
LED Stripe All-in-One Control
DMX Controller
User Manual

Thomann GmbH
Hans-Thomann-Straße 1
96138 Burgebrach
Germany
Telephone: +49 (0) 9546 9223-0
Internet: www.thomann.de
26.06.2023, ID: 554122

Table of contents
1 General information.............................................................................................................. 5
1.1 Further information........................................................................................................ 5
1.2 Notational conventions................................................................................................. 5
1.3 Symbols and signal words........................................................................................... 6
2 Safety instructions................................................................................................................. 7
3 Features....................................................................................................................................... 8
4 Installation................................................................................................................................. 9
5 Starting up............................................................................................................................... 10
6 Connections and operating elements........................................................................ 11
7 Operation................................................................................................................................. 13
7.1 Main menu...................................................................................................................... 13
7.2 Menu overview.............................................................................................................. 16
7.3 Functions in 4-channel DMX mode........................................................................ 16
7.4 Functions in 9-channel DMX mode........................................................................ 16
8 Technical specications.................................................................................................... 18
9 Plug and connection assignments............................................................................... 19
10 Troubleshooting................................................................................................................... 20
11 Protecting the environment........................................................................................... 21
Table of contents
LED Stripe All-in-One Control 3
DMX Controller

4LED Stripe All-in-One Control
DMX Controller

1 General information
This user manual contains important information on the safe operation of the device.
Read and follow all safety notes and all instructions. Save this manual for future refer‐
ence. Make sure that it is available to all persons using this device. If you sell the
device to another user, be sure that they also receive this manual.
Our products and user manuals are subject to a process of continuous development.
We therefore reserve the right to make changes without notice. Please refer to the
latest version of the user manual which is ready for download under
www.thomann.de.
1.1 Further information
On our website (www.thomann.de) you will nd lots of further information and
details on the following points:
Download This manual is also available as PDF le for you to download.
Keyword search Use the search function in the electronic version to nd the
topics of interest for you quickly.
Online guides Our online guides provide detailed information on technical
basics and terms.
Personal
consultation
For personal consultation please contact our
technical hotline.
Service If you have any problems with the device the
customer service will gladly assist you.
1.2 Notational conventions
This manual uses the following notational conventions:
The letterings for connectors and controls are marked by square brackets and italics.
Examples: [VOLUME] control, [Mono] button.
Texts and values displayed on the device are marked by quotation marks and italics.
Examples: ‘24ch’ , ‘OFF’ .
The individual steps of an instruction are numbered consecutively. The result of a
step is indented and highlighted by an arrow.
Example:
1. Switch on the device.
2. Press [Auto].
ðAutomatic operation is started.
3. Switch o the device.
Letterings
Displays
Instructions
General information
LED Stripe All-in-One Control 5
DMX Controller

References to other locations in this manual are identied by an arrow and the speci‐
ed page number. In the electronic version of the manual, you can click the cross-
reference to jump to the specied location.
Example: See
Ä
‘Cross-references’ on page 6.
1.3 Symbols and signal words
In this section you will nd an overview of the meaning of symbols and signal words
that are used in this manual.
Signal word Meaning
DANGER! This combination of symbol and signal word indicates
an immediate dangerous situation that will result in
death or serious injury if it is not avoided.
NOTICE! This combination of symbol and signal word indicates
a possible dangerous situation that can result in mate‐
rial and environmental damage if it is not avoided.
Warning signs Type of danger
Warning – high-voltage.
Warning – danger zone.
Cross-references
General information
6LED Stripe All-in-One Control
DMX Controller

2 Safety instructions
Use the device only as described in this user manual. Any other use or use under
other operating conditions is considered to be improper and may result in personal
injury or property damage. No liability will be assumed for damages resulting from
improper use.
This device may be used only by persons with sucient physical, sensorial, and intel‐
lectual abilities and having corresponding knowledge and experience. Other persons
may use this device only if they are supervised or instructed by a person who is
responsible for their safety.
Safety
DANGER!
Danger for children
Ensure that plastic bags, packaging, etc. are disposed of properly and are not within reach of babies and young children. Choking
hazard! Ensure that children do not detach any small parts (e.g. knobs or the like) from the unit. They could swallow the pieces
and choke! Never let children unattended use electrical devices.
DANGER!
Electric shock caused by high voltages inside
Within the device there are areas where high voltages may be present. Never remove any covers. There are no user-serviceable
parts inside. Do not use the device if covers, protectors or optical components are missing or damaged.
DANGER!
Electric shock caused by short-circuit
Always use proper ready-made insulated mains cabling (power cord). Do not modify the mains cable. Failure to do so could result
in electric shock/death or re. If in doubt, seek advice from a registered electrician.
NOTICE!
Risk of re
Do not block areas of ventilation. Do not install the device near any direct heat source. Keep the device away from naked ames.
NOTICE!
Operating conditions
This device has been designed for indoor use only. To prevent damage, never expose the device to any liquid or moisture. Avoid
direct sunlight, heavy dirt, and strong vibrations.
NOTICE!
Power supply
Before connecting the device, ensure that the input voltage (AC outlet) matches the voltage rating of the device and that the AC
outlet is protected by a residual current circuit breaker. Failure to do so could result in damage to the device and possibly injure
the user. Unplug the device before electrical storms occur and when it is unused for long periods of time to reduce the risk of
electric shock or re.
NOTICE!
Possible damage due to installation of a wrong fuse
The use of dierent types of fuses can cause serious damage to the unit. Fire hazard! Only fuses of the same type may be used.
Intended use
Safety instructions
LED Stripe All-in-One Control 7
DMX Controller

3 Features
This device is an all-in-one ballast and control for LED stripes. The device is suitable
for 12–24V LED stripes. The device is perfect for permanent installation in bars and
clubs.
The device oers exible application options due to dierent control options.
Special features of the device:
nHoles for wall mounting
nActuation via DMX, rotary controls (dimmer and colour macros), remote control
(included) or display
nAuto mode, sound-to-light, master/slave
nThree connection blocks for connecting LED stripes, can only be controlled
together
nTwo USB ports for charging additional devices
nLCD
nRobust aluminium housing
Features
8LED Stripe All-in-One Control
DMX Controller

4 Installation
Unpack and carefully check that there is no transportation damage before using the
unit. Keep the equipment packaging. To fully protect the device against vibration,
dust and moisture during transportation or storage use the original packaging or
your own packaging material suitable for transport or storage, respectively.
Create all connections while the device is o. Use the shortest possible high-quality
cables for all connections. Take care when running the cables to prevent tripping
hazards.
Installation
LED Stripe All-in-One Control 9
DMX Controller

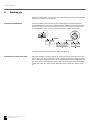
5 Starting up
Establish all connections as long as the unit is switched o. Use the shortest possible
high-quality cables for all connections.
Connect the DMX input of the device to the DMX output of a DMX controller or
another DMX device. Connect the output of the rst DMX device to the input of the
second one, and so on to form a daisy chain. Always ensure that the output of the
last DMX device in the daisy chain is terminated with a resistor (110 Ω, ¼ W).
If a DMX connection is established, the ‘DMX’ LED lights up.
When you congure a group of devices in master/slave mode, the rst unit will con‐
trol the other units for an automatic, sound-activated, synchronized show. This func‐
tion is ideal when you want to start a show immediately. Connect the DMX output of
the master device to the DMX input of the rst slave device. Then connect the DMX
output of the rst slave device to the DMX input of the second slave device and so
on.
Connections in DMX mode
Connections in master/slave mode
Starting up
10 LED Stripe All-in-One Control
DMX Controller

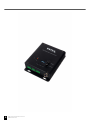
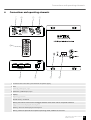
6 Connections and operating elements
ö#%
$
'
(
) &
*
1 Lockable Power Twist TR1 input socket for the power supply
2 Fuse
3[DMX IN] | DMX input, 3-pin
4[DMX OUT] | DMX output, 3-pin
5 Display
6 Operating elements
On/o switch | unlabelled
[Menu] | Activates the main menu and toggles between menu items. Closes an opened sub menu.
[Up] | increases the displayed value by one.
[Down] | decreases the displayed value by one.
[Enter] | Selects an option of the respective operating mode, conrms the set value.
Connections and operating elements
LED Stripe All-in-One Control 11
DMX Controller

[DIMMER] | Dimmer
[ColorMacro] | Colour macro
‘PWR’ | LED lights when the device is turned on.
‘DMX’ | LED lights up when DMX is active.
7 USB ports for charging devices
8 5-pin connection blocks for LED stripes
9 IR remote control
[Red] | Red colour value, set via + and -
[Green] | Green colour value, set via + and -
[Blue] | Blue colour value, set via + and -
[White] | White colour value, set via + and -
[+] | Increase value
[-] | Decrease value
[Blackout] | Switch o LED stripes
[Fullon] | Operate LED stripes at maximum intensity
[Auto] | Auto programme, set via + and -
[Fade] | Fade out LED stripes
[Strobe] | Strobe eect, set via + and -
[Amber] | Mixed colour
[Purple] | Mixed colour
[R+G] | Mixed colour
[R+B] | Mixed colour
[R+W] | Mixed colour
[R+A] | Mixed colour
[A+B] | Mixed colour
Connections and operating elements
12 LED Stripe All-in-One Control
DMX Controller

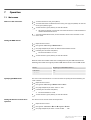
7 Operation
7.1 Main menu
1. To enter the main menu, press [Menu].
2. To scroll between the individual menu items, press [Up] and [Down]. To exit the
menu, press [Menu] again.
3. To exit the menu, press [Menu], or wait 30 seconds.
ðAll previous settings are retained even when the device is switched o and
disconnected from the mains.
4. To restart with default values, use the functions under ‘Reset Function’ in the
main menu.
1. Open the main menu.
2. Navigate to ‘DMX Settings è DMX Address’.
3. Use [Up] and [Down] to select an address between 001 and 512.
4. Conrm your selection with [Enter].
ðThe desired address is saved.
5. To exit the menu, press [Menu], or wait 30 seconds.
Make sure that this number matches the conguration of your DMX controller. The
following table shows the highest possible DMX address for the various DMX modes.
Mode Highest possible DMX address
4 channels 512
9 channels 512
The unit can be controlled in 4 or 9-channel mode. To specify the desired mode, pro‐
ceed as follows:
1. Open the main menu.
2. Navigate to ‘DMX Settings è DMX Channel Mode’.
3. Use [Up] and [Down] to select ‘4CH’ or ‘9CH’ .
4. Conrm your selection with [Enter].
ðThe desired mode is saved.
5. To exit the menu, press [Menu], or wait 30 seconds.
The device can be used in stand-alone operation.
1. Open the main menu.
2. Navigate to ‘Stand Alone è Auto è Program 1 è Dim’.
3. Use [Up] and [Down] to select a value of ‘000’ … ‘255’ .
How to use the main menu
Setting the DMX address
Specifying the DMX mode
Setting the dimmer in stand-alone
operation
Operation
LED Stripe All-in-One Control 13
DMX Controller

4. Conrm your selection with [Enter].
ðThe desired light intensity is saved.
5. Navigate to ‘Stand Alone è Auto è Program 1 è Speed’.
6. Use [Up] and [Down] to select a value of ‘000’ …‘255’ .
7. Conrm your selection with [Enter].
ðThe desired dimmer speed is saved.
8. To exit the menu, press [Menu], or wait 30 seconds.
1. Open the main menu.
2. Navigate to ‘Stand Alone è Sound è Mic Sens 00~99’.
3. Use [Up] and [Down] to select a value of ‘00’ …‘99’ .
4. Conrm your selection with [Enter].
ðThe desired sound control intensity is saved.
1. Open the main menu.
2. Navigate to ‘Stand Alone è Color Macro’.
3. Use [Up] and [Down] to select a value of ‘Color O’…‘Color 46’ .
4. Conrm your selection with [Enter].
5. Use [Up] and [Down] to select a value of ‘000’ …‘255’ for RBG and W respec‐
tively.
6. Conrm your selection with [Enter].
ðThe desired colour is saved under the desired colour macro number.
1. Open the main menu.
2. Navigate to ‘Setting è DisplayLight’.
3. Use [Up] and [Down] to select ‘On’ or ‘O’.
4. Conrm your selection with [Enter].
ðThe display remains on (On) or switches o after 1 minute (O).
1. Open the main menu.
2. Navigate to ‘Setting è DMX Fail’.
3. Use [Up] and [Down] to select ‘Hold’ or ‘Blackout’ .
4. Conrm your selection with [Enter].
ðThe last behaviour is maintained (Hold) or the light is switched o
(Blackout).
Setting the sound control in stand-
alone operation
Setting the colour macro in stand-
alone operation
Setting the display light
Selecting behaviour in case of DMX
failure
Operation
14 LED Stripe All-in-One Control
DMX Controller

1. Open the main menu.
2. Navigate to ‘Setting è IR Remote’.
3. Use [Up] and [Down] to select ‘On’ or ‘O’.
4. Conrm your selection with [Enter].
ðThe remote control is activated (On) or deactivated (O).
1. Open the main menu.
2. Navigate to ‘Setting è Factory Reset’.
3. Press [Enter].
4. ‘Reset Now’ appears on the display
5. Conrm with [Enter].
ðThe device is reset to the factory default settings.
1. Open the main menu.
2. Navigate to ‘System Info è Firmware’.
3. Press [Enter].
ðThe current rmware version is displayed.
1. Open the main menu.
2. Navigate to ‘System Info è Operation Hours’.
3. Press [Enter].
ðThe operation hours are displayed.
Setting the IR remote control
Resetting the device to factory
defaults
Displaying the rmware version
Displaying the operating hours
Operation
LED Stripe All-in-One Control 15
DMX Controller

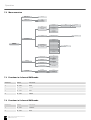
7.2 Menu overview
DMX Address
DMX mode
Stand Alone
System Info
4CH
9CH
Color Macro
(no dimmer, dimmer
via knob)
Auto
(no dimmer, dimmer
via knob)
DMX Fail
IR Remote
Factory Reset
Firmware
Operation Hours
001-512
MENU
Program 5
Program 6
Program 4
Program 3
Program 2
Program 1
Speed
Dim
000-255
000-255
Display Light
V1.0
xxxHrs
Setting
Color 1
...
Color Off
...
...
...
...
...
...
...
Color 46
On
Off
On
Off
Hold
Blackout
Reset Now
001 - 255
00 - 99
Mic Sens 00~99Sound
7.3 Functions in 4-channel DMX mode
Channel Value Function
1 0…255 Red
2 0…255 Green
3 0…255 Blue
4 0…255 White
7.4 Functions in 9-channel DMX mode
Channel Value Function
1 0…255 Dimmer
2 0…255 Red
Operation
16 LED Stripe All-in-One Control
DMX Controller

Channel Value Function
3 0…255 Green
4 0…255 Blue
5 0…255 White
6 Strobe
000…005 Strobe open
006…010 Strobe closed
011…033 Random pulse, slow…fast
034…056 Random ramp-up, slow…fast
057…079 Random ramp-down, slow…fast
080…102 Random strobe eect, slow…fast
103…127 Strobe pause eect, 5 s…1 s (short burst with break)
128…250 Strobe from slow…fast (<1 Hz…20 Hz)
251…255 Strobe open
7 Auto programme
000…015 O
016…055 Auto programme 1
056…095 Auto programme 2
096…135 Auto programme 3
136…175 Auto programme 4
176…214 Auto programme 5
215…255 Auto programme 6
8 000…255 Programme speed, slow…fast
9 Sound control
000…010 O
011…255 Slow…fast
Operation
LED Stripe All-in-One Control 17
DMX Controller

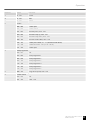
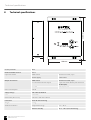
8 Technical specications
220 mm
160 mm
50 mm
Control protocols NCP
Number of DMX channels 4 or 9
Input connections DMX control XLR chassis socket, 3-pin
Power supply Power Twist
Output connections DMX control XLR chassis socket, 3-pin
3 × Connection for LED stripes 5-pin connection blocks (each with max.
50 W output)
2 × USB USB 2.0, 5 V/2 A
Power consumption 150 W
Supply voltage 100–240 V 50/60 Hz
Fuse F1AL250V
Dimensions (W × H × D) 160 mm × 220 mm × 50 mm
Installation Holes for wall mounting
Weight 1.2 kg
Ambient conditions Temperature range 0 °C…40 °C
Relative humidity 20 %…80 % (non-condensing)
Technical specications
18 LED Stripe All-in-One Control
DMX Controller

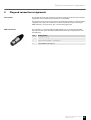
9 Plug and connection assignments
This chapter will help you select the right cables and plugs to connect your valuable
equipment so that a perfect light experience is guaranteed.
Please take our tips, because especially in ‘Sound & Light’ caution is indicated: Even if
a plug ts into a socket, the result of an incorrect connection may be a destroyed
DMX controller, a short circuit or ‘just’ a not working light show!
The unit oers a 3-pin XLR socket for DMX output and a 3-pin XLR plug for DMX
input. Please refer to the drawing and table below for the pin assignment of a suit‐
able XLR plug.
Pin Conguration
1 Ground, shielding
2 Signal inverted (DMX–, ‘cold signal’)
3 Signal (DMX+, ‘hot signal’)
Introduction
DMX connections
Plug and connection assignments
LED Stripe All-in-One Control 19
DMX Controller

10 Troubleshooting
NOTICE!
Possible data transmission errors
For error-free operation make use of dedicated DMX cables and do not
use ordinary microphone cables.
Never connect the DMX input or output to audio devices such as mixers
or ampliers.
In the following we list a few common problems that may occur during operation.
We give you some suggestions for easy troubleshooting:
Symptom Remedy
The unit does not work, no
light, the fan does not run
Check the mains power connection and the main
fuse.
No response to the DMX con‐
troller
1. The DMX indicator should light up. If it doesn't,
check DMX connectors and cables for proper con‐
nection.
2. If the DMX indicator lights up but with no
response, check the address settings and DMX
polarity.
3. Try using another DMX controller.
4. Check whether the DMX cables lie near or adja‐
cent to high voltage cables, which could cause
damage or interference with a DMX interface cir‐
cuit.
If the procedures recommended above do not succeed, please contact our Service
Center. You can nd the contact information at www.thomann.de.
Troubleshooting
20 LED Stripe All-in-One Control
DMX Controller
La pagina si sta caricando...
La pagina si sta caricando...
La pagina si sta caricando...
La pagina si sta caricando...
-
 1
1
-
 2
2
-
 3
3
-
 4
4
-
 5
5
-
 6
6
-
 7
7
-
 8
8
-
 9
9
-
 10
10
-
 11
11
-
 12
12
-
 13
13
-
 14
14
-
 15
15
-
 16
16
-
 17
17
-
 18
18
-
 19
19
-
 20
20
-
 21
21
-
 22
22
-
 23
23
-
 24
24


in altre lingue
- English: Botex 554122 User manual
Altri documenti
-
ProLights LED Fresnel Manuale utente
-
Cameo Auro Spot 200 Manuale utente
-
ProLights LED Fresnel pole operated Manuale utente
-
Cameo HydraBeam 4000 RGBW Manuale utente
-
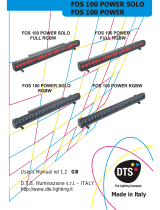 DTS FOS 100 FULL RGBW Manuale utente
-
Cameo Movo Beam Z 100 Manuale utente
-
-
Cameo CLROOTPAR4WH ROOT PAR 6 Manuale utente
-
