soundsation HYPER-PRO 12 PLUS Manuale utente
- Categoria
- Attrezzatura musicale
- Tipo
- Manuale utente

Hyper-Pro PLUS series
Bi-Amp Active Speakers
With Digital Sound Processing
Please read this manual carefully and properly take care of it
User Manual
Leggete questo manuale e conservatelo per future consultazioni
Manuale Utente

Dear customer,
First of all thanks far purchasing a Soundsation® product. Our mission is to satisfy
all possible needs of musical instrument and professional audio users oering a wide
range of products using the latest technologies.
We hope you will be satised with this item and, if you want to collaborate, we are
looking for a feedback from you about the operation of the product and possible
improvements to introduce in the next future. Go to our website www.soundsation-
music.com and send an e-mail with your opinion, this will help us to build instruments
ever closer to customer’s real requirements.
One last thing: read this manual before using the instrument, an incorrect operation
can cause damages to you and to the unit. Take care!
The Soundsation Team
Gentile Cliente,
Grazie per aver scelto un prodotto Soundsation®. La nostra missione è quella di orire
ai nostri utenti una vasta gamma di strumenti musicali ed apparecchiature audio e
lighting con tecnologie di ultima generazione.
Speriamo di aver soddisfatto le vostre aspettative e, se voleste collaborare, saremmo
lieti di ricevere un vostro feedback sulla qualità del prodotto al ne di migliorare co-
stantemente la nostra produzione. Visitate il nostro sito www.soundsationmusic.com ed
inviateci una mail con la vostra opinione, questo ci aiuterà a sviluppare nuovi prodotti
quanto più vicini alle vostre esigenze.
Un’ultima cosa, leggete il presente manuale al ne di evitare danni alla persona ed al
prodotto, derivanti da un utilizzo non corretto.
Il Team Soundsation

3
ENGLISH
TABLE OF CONTENTS
1. UNBOXING .................................................................................................................5
2. ACCESSORIES .............................................................................................................6
3. OVERVIEW ..................................................................................................................6
3.1. Main Features .......................................................................................................................................................... 6
4. REAR PANEL DESCRIPTION ...................................................................................... 7
5. AUDIO CONNECTIONS ..............................................................................................9
6. FIXED INSTALLATION .............................................................................................. 10
7. HOOKUP DIAGRAMS ..............................................................................................11
7.1. Examples of Input Connections ......................................................................................................................11
7.2. Stereo Operation with Mixer ...........................................................................................................................11
7.3. Bi-Amping with Hyper-Bass Active Subs ....................................................................................................12
8. SPECIFICATIONS ......................................................................................................13
9. WARRANTY AND SERVICE .....................................................................................14
10. WARNING ................................................................................................................14

4
ENGLISH
Hyper-Pro Plus Series User manual
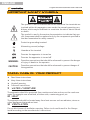
IMPORTANT SAFETY SYMBOLSIMPORTANT SAFETY SYMBOLS
The symbol is used to indicate that some hazardous live terminals are
involved within this apparatus, even under the normal operating con-
ditions, which may be sucient to constitute the risk of electric shock
or death.
The symbol is used in the service documentation to indicate that spe-
cic component shall be replaced only by the component specied in
that documentation for safety reasons.
Protective grounding terminal
Alternating current/voltage
Hazardous live terminal
Denotes the apparatus is turned on
Denotes the apparatus is turned o
WARNING: Describes precautions that should be observed to prevent the danger
of injury or death to the operator.
CAUTION: Describes precautions that should be observed to prevent danger of
the apparatus.
TAKING CARE OF YOUR PRODUCT
fRead these instructions
fKeep these instructions
fHeed all warning
fFollow all instructions
1) Water / Moisture
The apparatus should be protected from moisture and rain and can not be used near
water; for example near a bathtub, a kitchen sink, a swimming pool, etc.
2) Heat
The apparatus should be located away from heat sources such as radiators, stoves or
other appliances that produce heat.
3) Ventilation
Do not block areas of ventilation opening. Failure to do could result in re. Always
install according to the manufacturer’s instructions.

5
ENGLISH
Hyper-Pro Plus Series User manual
4) Object and Liquid Entry
Objects do not fall into and liquids are not spilled into the inside of the apparatus for
safety.
5) Power Cord and Plug
Protect the power cord from being walked on or pinched particularly at plugs, conve-
nience receptacles, and the point where they exit from the apparatus. Do not defeat
the safety purpose of the polarized or grounding-type plug. A polarized plug has two
poles; a grounding-type plug has two poles and a third grounding terminal. The third
prong is provided for your safety. If the provided plug does not t into your outlet,
refer to an electrician for replacement.
6) Fuse
To prevent the risk of re and damaging the unit, please use only of the recommend-
ed fuse type as described in the manual. Before replacing the fuse, make sure the unit
turned o and disconnected from the AC outlet.
7) Electrical Connection
Improper electrical wiring may invalidate the product warranty.
8) Cleaning
Clean only with a dry cloth. Do not use any solvents such as benzene or alcohol.
9) Servicing
Do not implement any servicing other than those means described in the manual. Refer
all servicing to qualied service personnel only. Only use accessories/attachments or
parts recommended by the manufacturer.
10) Warning
Please remember the high sound pressure do not only temporarily damage your sense
of hearing, but can also cause permanent damage. Be careful to select a suitable vol-
ume.
1. UNBOXING
Thank you for purchasing Hyper-Pro Plus Series active loudspeakers. Each unit has
been well tested and shipped in perfect operating conditions. Carefully unpack the car-
ton and check the contents to ensure that all parts are present and in good conditions:
f1 Loudspeaker
f1 Power cable
f1 User manual
If anything damaged during transport, notify the shipper immediately and keep pack-
ing material for inspection. Again, please save the carton and all the packing mate-
rials. If the unit must be returned to the manufacturer, it is important that the unit is
returned in the original manufacturer’s packing. Please do not take any action without
rst contacting us.

6
ENGLISH
Hyper-Pro Plus Series User manual
WARNING: Packaging box is not a toy! Keep out of reach of children!!! Keep
in a safe place the original packaging material for future use.
2. ACCESSORIES
Soundsation can supply a wide range of quality accessories that you can use with Hy-
per-Pro Plus speaker, like mixers, Cables, Microphones, stands, etc.
All products in our catalogue have been long tested with this device so we recommend
to use Genuine Soundsation Accessories and Spare Parts.
Ask your Soundsation dealer for any accessories you could need to ensure best perfor-
mance of the product.
3. OVERVIEW
The new Hyper-Pro Plus speakers represent a new important stage in the evolution of
the famous Hyper series of Soundsation. The power, audio quality and convenience of
the previous models are now integrated with the functions which are essential for those
who professionally use a speaker as a work tool.
700W (Hyper-Pro 12 / 15 Plus) and 600W (Hyper-Pro 10 Plus) continuous D-Class
speakers, selected woofers and compression drivers, DSP for Crossover control, EQ,
2-Band Limiter, phase alignment and delay optimization of woofers and compression
drivers. All this technology can ensure high performance and maximum audio quality in
any use conditions.
The control panel includes two XLR-Combo Mic/Line inputs, the Mix output and 4
Audio Programs (Music, Live, Monitor, Vocal) to quickly adapt the speaker to the main
uses.
The stylish and sturdy cabinet is designed to be installed vertically on the oor or on
a 35mm pole/tripod, and also suspended horizontally or vertically thanks to the 4 M8
xing points.
3.1. Main Features
f2-way Loudspeaker, Bass-Reex Design
f700W Continuous / 1400W Peak Class-D amplier (Hyper-Pro 12 / 15 Plus)
f600W Continuous / 1200W Peak Class-D amplier (Hyper-Pro 10 Plus)
f90°H x 60°V Coverage
fDSP for Crossover, EQ and 2-Band Limiter Control, Phase and Time Optimization
f4 EQ Presets (Music, Live, Monitor, Speech)

7
ENGLISH
Hyper-Pro Plus Series User manual
f2 Mic-Line Combo Inputs and Balanced Mix Output
fOn-o key for the Front LED
f35mm Adapter for Pole or Tripod Stand
f4 Fixing Points for M8 Eyebolts
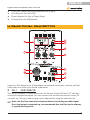
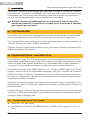
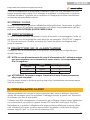
4. REAR PANEL DESCRIPTION
Imported and distributed in the EU by:
FRENEXPORT SPA
Via E. Ferrari, 10 - Porto Recanati (Italy)
www.frenexport.com
230V
1
11
10
23
4
5
6
7
8
9
Hyper-Pro Plus Series active loudspeakers have several connectors, controls, and indi-
cators the use of which you should understand.
1) CH 1 & CH2 Inputs
This section includes 2 Combo connectors for the use of both XLR and 1/4” Jack bal-
anced and unbalanced signals. You can connect here musical instruments, mixers, DJ
consoles, etc. The input audio signal can be adjusted by using the relative knob.
Note: Set the Gain control to minimum before connecting an audio signal.
Once the system is powered up, we recommend that the Gain set to midway
is a good starting point.

8
ENGLISH
Hyper-Pro Plus Series User manual
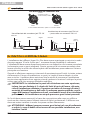
2) Speaker Mode
Four presets are included to optimize the response of the cabinet to suit your needs.
Cycle through them using the Mode button.
fMUSIC: A bass lift with a at mid to high response.
fLIVE: Similar to the MUSIC preset with the LF lift frequency shifted.
fMON: A LF and HF roll-o with a slight mid band cut for clarity.
fVOCAL: A bass roll-o with at mid and upper frequencies.
Note: The EQ setting is stored and recalled following a power cycle.
3) Limiter
This LED indicates that the limiter is on when the output voltage of the amplier ex-
ceeds the maximum level, or when power overload is detected. Some ashing of this
LED may be normal, but if it stays on for a long time, lower the input level.
4) Front LED Switch
This switch allows to turn ON/OFF the Blue front LED.
5) Master Volume
Controls the overall level of the speaker. Set this control to minimum when switching
the unit ON or O.
6) Mix Out
A signal feed which can be used to connect a second Hyper-Pro Plus speaker or other
PA or recording console. The MIX OUT signal level is not aected by the MASTER VOL-
UME knob.
7) Power Switch
Use this switch to turn the speaker on and o. Ensure the Master Volume controls is set
to minimum when switching on and o.
8) Voltage Select Switch
Please check the voltage setting is correct before powering up for the rst time your
Hyper-Pro Plus speaker. Damage could occur if the voltage is incorrectly set. It is pro-
tected by a Plexiglas cover to prevent an accidental and incorrect voltage selection.
9) Air Vents
These are critical for the reliability of the amplier. They let the internal power amplier
cooling to correctly operate, and preserve the amp from overheating. PLEASE DO NOT
BLOCK.

9
ENGLISH
Hyper-Pro Plus Series User manual
10) Fuse Holder
In case of fuse burn, to prevent the risk of re and damaging the unit, please use only
of the recommended fuse type as described in “8. SPECIFICATIONS” on page 13.
Before replacing the fuse, make sure the unit turned o and disconnected from the AC
outlet.
11) IEC Socket
Plug the power cord into an AC socket properly congured for your particular model.
Note: If you happen to lose the AC line-cord, always use a three-pin plug
with a ground pin. The wire correspondence is as follow:
Cable Pin International
Brown Live L
Blue Neutral N
Yellow/Green Earth
Always connect the earth! Pay attention to your safety!
Before taking into operation for the rst time, the installation has to be approved by an
expert.
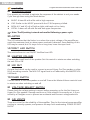
5. AUDIO CONNECTIONS
You will need several cables for the various connections to and from the speaker. See
the pictures below that show the internal wiring of these cables. Be sure to use only
high quality cables.
You can, of course, also connect unbalanced equipment to balanced inputs. Use either
mono and stereo jack, making sure ring and collar are connected together (or pins 1 &
3 in the case of XLR connectors).
Balanced use of XLR connectors
1= Ground/Shield
2= Hot (+)
3= Cold (-)
INPUT OUTPUT
In case of unbalanced use Pins 1 and 3 will be jumped

10
ENGLISH
Hyper-Pro Plus Series User manual
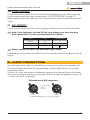
Unbalanced use of 1/4” jack TS connector
Strain relief
clamp
Sleeve
Tip
Sleeve
Ground shield
Tip
Signal
Balanced use of 1/4” jack TRS connector
Headphones connection with 1/4” TRS connector
Strain relief
clamp
Sleeve
Tip
Sleeve
Ground shield
Ring Ring
Cold (- Ve)
Tip
Hot (+ Ve)
6. FIXED INSTALLATION
The installation of Hyper-Pro Plus speakers has to be built and constructed in a way
that it can hold 10 times the weight for 1 hour without any harming demolition. The
installation must always be secured with a secondary safety attachment (e.g. an appro-
priate catch net). This secondary safety attachment must be constructed in a way that
no part of the installation can fall down if the main attachment fails.
When rigging, de-rigging or servicing the unit, staying in the area below the installation
place, on bridges, under high working places and other endangered areas is forbidden.
The operator has to make sure that the safety measure and the unit’s technical instal-
lation is approved by an expert before taking into operation for the rst time and after
changes before taking into operation another time.
IMPORTANT: Overhead rigging requires extensive experience, including
(but not limited to) calculating working load limits, installation material
being used, and periodic safety inspection of all installation material and the
loudspeaker. If you lack these qualications, do not attempt the installation
yourself, but instead use a professional structural rigger. Improper installa-
tion can result in bodily injury or property loss.
If the unit is to be placed lower from a high position such as a ceiling or high structures,
professional truss systems must be used. The loudspeaker must never be installed in
such a way that it can oscillate freely
CAUTION: Speakers may cause severe injuries when crashing down. If you
have doubts concerning the safety of a possible installation, do not install
the unit!

11
ENGLISH
Hyper-Pro Plus Series User manual
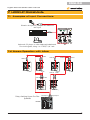
7. HOOKUP DIAGRAMS
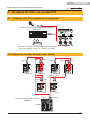
7.1. Examples of Input Connections
Dinamic microphone, using an XLR balanced
MIC input
Keyboard, CD player, or other balanced/unbalanced
Line Level signals, using 1 or 2 TRS/TS 1/4” Jack
7.2. Stereo Operation with Mixer
Imported and distributed in the EU by:
FRENEXPORT SPA
Via E. Ferrari, 10 - Porto Recanati (Italy)
www.frenexport.com
230V
Imported and distributed in the EU by:
FRENEXPORT SPA
Via E. Ferrari, 10 - Porto Recanati (Italy)
www.frenexport.com
230V
Imported and distributed in the EU by:
FRENEXPORT SPA
Via E. Ferrari, 10 - Porto Recanati (Italy)
www.frenexport.com
230V
Imported and distributed in the EU by:
FRENEXPORT SPA
Via E. Ferrari, 10 - Porto Recanati (Italy)
www.frenexport.com
230V
Imported and distributed in the EU by:
FRENEXPORT SPA
Via E. Ferrari, 10 - Porto Recanati (Italy)
www.frenexport.com
230V
Imported and distributed in the EU by:
FRENEXPORT SPA
Via E. Ferrari, 10 - Porto Recanati (Italy)
www.frenexport.com
230V
Right OutputLeft Output
MIXER
LINE IN
Daisy-chaining Hyper-Pro Plus
Speakers
THRU
LINE IN
THRU
LINE IN
LINE IN THRU
LINE IN THRU
LINE IN

12
ENGLISH
Hyper-Pro Plus Series User manual
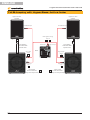
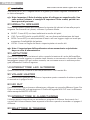
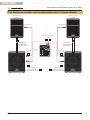
7.3. Bi-Amping with Hyper-Bass Active Subs
Right OutputLeft Output
Mixer
Hyper-Pro Plus
Speaker
Hyper- Bass
Active Subwoofer
(plays low-frequencies)
Hyper-Pro Plus
Speaker
Hyper-Bass
Active Subwoofer
(plays low-frequencies)
Left & Right full-range
outputs
Left full-range
input
Left hi-pass
output
Right full-range
input
Right hi-pass
output
Line balanced input
Line balanced input
Soundsation
SUB ST100-M20
Speaker Pole
Soundsation
SUB ST100-M20
Speaker Pole

13
ENGLISH
Hyper-Pro Plus Series User manual
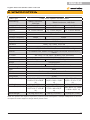
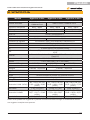
8. SPECIFICATIONS
Model Hyper Pro Plus 10 Hyper Pro Plus 12 Hyper Pro Plus 15
System Type 2-Way Active Speaker with Bass-Reex
Power Rating 600W Continuous,
1200 Peak 700W Continuous, 1400 Peak
Frequency Response 60Hz - 20kHz 45Hz - 20kHz 41Hz - 20kHz
Max SPL 128dB 130dB 131dB
LF Driver 10” Custom Woofer 12” Custom Woofer 15” Custom Woofer
HF Driver 1” Compression Driver
Coverage 90°H x 60°V
Crossover Frequency 2.8kHz 2.5kHz
Input Connectors 2x Balanced Combo XLR / 1/4” Jack Connectors
Output Connectors 1x Balanced XLR Mix Output
Indicators Power, Clip, Preset, Front Led
EQ 4 Preset (Music, Live, Monitor, Vocal)
DSP Crossover, EQ, Dual Band Limiters, Phase and LF/HF Time Alignment
Controls 2x Channel Gain, Master Volume, Front Led On/O, Ground Lift, EQ
Preset
AC Power 100-120V~ or 220-240V~ 50/60Hz (User Selectable)
Fuse T4A L (100-120V), T2A L (220-240V)
Power Consumption 315W Typical 360W Typical
Cabinet Polypropylene
Handles 1 on side, 1 on top 2 on sides, 1 on top
Monitor Angle 45°
Finish Black
Grille Powder-coated Steel with Acoustic Foam
Pole-Mount 36mm Pole Socket
Flying Points 4x M8
Unit Size (WxDxH) 302 x 310 x 529 mm
(11,89 x 12,20 x 20,83”
in)
357 x 356 x 610 mm
(14,05 x 14,01 x 24,01”
in)
420 x 385 x 694 mm
(16,53 x 15,16 x 27,32”
in)
Net Weight 11 kg (24,25 lbs.) 14,4 kg (31,7 lbs.) 18 kg (39,68 lbs.)
Carton Size (WxDxH) 370 x 360 x 571 mm
(14,57 x 14,17 x 22,48”
in)
440 x 440 x 685 mm
(17,32 x 440 x 26,97”
in)
500 x 465 x 775 (19,68
x 18,30 x 30,51” in)
Packed Weight 12,8 kg (28,22 lbs.) 16,8 kg (37,04 lbs.) 21,4 kg (47,17 lbs.)
NOTE: Our products are subject to a process of continual further development. Therefore modications to the tech-
nical features remain subject to change without further notice.

14
ENGLISH
Hyper-Pro Plus Series User manual
9. WARRANTY AND SERVICE
All Soundsation products feature a limited two-year warranty. This two-year warranty is specic to
the date of purchase as shown on your purchase receipt.
The following cases/components are not covered from the above warranty:
• Any accessories supplied with the product
• Improper use
• Fault due to wear and tear
• Any modication of the product eected by the user or a third party
Soundsation shall satisfy the warranty obligations by remedying any material or manufacturing
faults free of charge at Soundsation’s discretion either by repair or by exchanging individual parts
or the entire appliance. Any defective parts removed from a product during the course of a war-
ranty claim shall become the property of Soundsation.
While under warranty period, defective products may be returned to your local Soundsation dealer
together with original proof of purchase. To avoid any damages in transit, please use the original
packaging if available. Alternatively you can send the product to Soundsation SERVICE CENTER
– Via Enzo Ferrari , 10 – 62017 Porto Recanati - Italy . In order to send a product to service center
you need an RMA number. Shipping charges have to be covered by the owner of the product.
For further information please visit www.soundsationmusic.com
10. WARNING
PLEASE READ CAREFULLY – EU and EEA (Norway, Iceland and Liechtenstein) only
This symbol indicates that this product is not to be disposed of with your household waste, ac-
cording to the WEEE Directive (2202/96/EC) and your national law.
This product should be handed over to a designated collection point, e.g., on an authorized one-
for-one basis when you buy a new similar product or to an authorized collection site for recycling
waste electrical and electronic equipment (WEEE).
Improper handling of this type of waste could have a possible negative impact on the environ-
ment and human health due to potentially hazardous substances that are generally associated
with EEE. At the same time, your cooperation in the correct disposal of this product will contribute
to the eective usage of natural resources.
For more information about where you can drop o your waste equipment for recycling, please
contact your local city oce, waste authority, approved WEEE scheme or your household waste
disposal service.

15
SOMMARIO
1. DISIMBALLAGGIO ...................................................................................................17
2. ACCESSORI ...............................................................................................................18
3. DESCRIZIONE GENERALE ........................................................................................ 18
3.1. Caratteristiche Principali ....................................................................................................................................18
4. DESCRIZIONE DEL PANNELLO POSTERIORE ........................................................19
5. CONNESSIONI AUDIO ............................................................................................. 21
6. INSTALLAZIONE FISSA ............................................................................................ 22
7. SCHEMI DI COLLEGAMENTO .................................................................................. 23
7.1. Esempi per Connessioni di Ingresso.............................................................................................................23
7.2. Sistema Audio Stereo con Mixer ....................................................................................................................23
7.3. Sistema Audio con Subwoofer attivi Hyper-Bass ....................................................................................24
8. SPECIFICHE ............................................................................................................... 25
9. GARANZIA E ASSISTENZA ...................................................................................... 26
10. AVVISO .....................................................................................................................26

16
ITALIANO
Manuale Utente Serie Hyper-Pro Plus
IMPORTANTI SIMBOLI DI SICUREZZAIMPORTANTI SIMBOLI DI SICUREZZA
Il simbolo è usato per indicare che in questa apparecchiatura sono
presenti alcuni terminali sotto tensione pericolosi, anche in condizioni
di normale funzionamento, che possono costituire rischio di scosse
elettriche o di morte
Il simbolo viene utilizzato nella documentazione di servizio per indi-
care che uno specico componente può essere sostituito esclusiva-
mente dal componente specicato nella documentazione per motivi di
sicurezza.
Terminale di Terra
Corrente/Tensione alternata
Terminale in tensione pericoloso
Indica che l’apparato è acceso
Indica che l’apparato è spento
WARNING: Precauzioni da osservare per evitare il pericolo di ferimento o di morte
per l’utilizzatore.
CAUTION: Precauzioni da osservare per evitare danni all’apparecchio.
CURA DEL PRODOTTO
fLeggete queste istruzioni
fConservate queste istruzioni
fRispettate tutte le avvertenze
fSeguite tutte le istruzioni
1) Acqua / Umidita
L’apparecchio deve essere protetto dall’umidità e dalla pioggia, non può essere usato
in prossimità di acqua; ad esempio nei pressi di una vasca da bagno, di un lavandino, di
una piscina, etc.
2) Calore
L’apparecchio deve essere posto lontano da fonti di calore come radiatori, stufe o altri
apparecchi che producono calore.

17
ITALIANO
Manuale Utente Serie Hyper-Pro Plus
3) Ventilazione
Non ostruite le prese d’aria per la ventilazione: ciò potrebbe provocare incendi. Instal-
late sempre l’unità secondo le istruzioni del produttore.
4) Introduzione di oggetti e liquidi
Non introdurre oggetti o versare liquidi all’interno dell’apparato per ragioni di sicurezza
5) Cavo di alimentazione e spina
Evitate che il cavo di alimentazione venga calpestato o schiacciato, in particolare in
prossimità delle spine, delle prese e del punto in cui fuoriesce dall’apparecchio. Non
vanicate la nalità di sicurezza della spina con messa a terra. Una spina normale o
“polarizzata” ha due soli terminali; una spina con messa a terra ha un terzo polo di
terra. Questo ulteriore terminale serve per la vostra sicurezza. Se la spina fornita non si
inserisce nella presa, consultate un elettricista per l’eventuale sostituzione.
6) Fusibile
Per evitare il rischio di incendi e di danni all’unità, utilizzate solo il tipo di fusibile
descritto nel manuale. Prima di sostituire il fusibile, assicuratevi che l’apparecchio sia
spento e scollegato dalla presa di corrente.
7) Collegamento alla rete elettrica
Il collegamento elettrico improprio può invalidare la garanzia del prodotto.
8) Pulizia
Pulite solo con un panno asciutto. Non utilizzate solventi come benzolo o alcol.
9) Manutenzione
Non eettuate qualsiasi altro intervento al di fuori di quelli descritti nel manuale. Per
eventuale assistenza rivolgetevi solo a personale qualicato. Utilizzate solo accessori /
componenti suggeriti dal produttore.
10) Avviso
Vogliamo ricordare che un’alta pressione sonora non solo può danneggiare tempora-
neamente il senso dell’udito, ma può anche causare danni permanenti. Prestate atten-
zione anché il volume sia sempre adeguato.
1. DISIMBALLAGGIO
Grazie per aver acquistato il diusore della serie Hyper-Pro Plus. Ogni unità è stata
testata e spedita in perfette condizioni operative. Disimballare con cura il cartone e
controllare il contenuto per assicurarsi che tutte le parti siano presenti e in buone
condizioni
f1 Diusore
f1 Cavo di alimentazione
f1 Manuale utente
In caso di danni durante il trasporto, informare immediatamente lo spedizioniere e

18
ITALIANO
Manuale Utente Serie Hyper-Pro Plus
conservare il materiale di imballaggio per l’ispezione. Si prega di conservare il cartone
originale e tutti i materiali di imballaggio. Se l’unità deve essere restituita al produttore,
è importante che l’unità venga restituita nella confezione originale del produttore. Si
prega di non intraprendere alcuna azione senza prima contattarci.
AVVISO: La scatola di imballaggio non è un giocattolo! Tenere fuori dalla
portata dei bambini!!! Conservare in un luogo sicuro il materiale di imballag-
gio originale per uso futuro
2. ACCESSORI
Soundsation può fornire una vasta gamma di accessori di qualità che è possibile utiliz-
zare con gli altoparlanti Hyper-Pro Plus, come mixer, cavi, microfoni, supporti ecc.
Tutti i prodotti nel nostro catalogo sono stati lungamente testati, quindi consigliamo di
utilizzare accessori e ricambi originali Soundsation.
Chiedete al vostro rivenditore Soundsation tutti gli accessori necessari per garantire le
migliori prestazioni del prodotto.
3. DESCRIZIONE GENERALE
I nuovi diusori Hyper-Pro Plus rappresentano una nuova tappa importante nella evo-
luzione della ormai famosa serie Hyper di Soundsation. Integrano la potenza, la qualità
audio e la praticità dei modelli precedenti con l’essenzialità delle funzioni realmente
necessarie a chi usa professionalmente un diusore come strumento di lavoro.
Amplicatori in Classe-D da 700W (Hyper-Pro 12 / 15 Plus) e 600W (Hyper-Pro 10 Plus)
continui, woofer e driver a compressione selezionati, DSP per il controllo del Crossover,
dell’EQ, del Limiter a 2-Bande, l’allineamento di fase e l’ottimizzazione del ritardo woo-
fer e driver a compressione, garantiscono prestazioni elevate e massima qualità audio
in qualsiasi condizione di utilizzo.
Il pannello di controllo prevede due ingressi Mic/Line XLR-Combo, l’uscita Mix e 4 Pro-
grammi audio (Music, Live, Monitor, Speech) per adattare in modo rapido il diusore ai
principali utilizzi.
Il cabinet elegante e robusto e progettato in modo da consentire l’uso in verticale a pa-
vimento o su palo/tripode da 35mm, e l’installazione sospesa in orizzontale o verticale
grazie ai 4 punti di ssaggio M8.
3.1. Caratteristiche Principali
fDiusore 2-vie, Bass-reex
fAmplicatore in Classe-D da 700W Continui / 1400W di Picco (Hyper-Pro 12 / 15
Plus)

19
ITALIANO
Manuale Utente Serie Hyper-Pro Plus
fAmplicatore in Classe-D da 600W Continui / 1200W di Picco (Hyper-Pro 10 Plus)
fCopertura Angolare 90°H x 60°V
fDSP per il controllo di Crossover, EQ e Limiter a 2-Bande, Ottimizzazione di Fase e
Tempo
f4 Preset EQ (Music, Live, Monitor, Speech)
f2 Ingressi Mic-Line Combo e Uscita Mix Bilanciata
fTasto On-O per il Led Frontale
fAdattatore per Palo o Tripode da 35mm
f4 Punti di Fissaggio per Golfari M8
4. DESCRIZIONE DEL PANNELLO POSTERIORE
Imported and distributed in the EU by:
FRENEXPORT SPA
Via E. Ferrari, 10 - Porto Recanati (Italy)
www.frenexport.com
230V
1
11
10
23
4
5
6
7
8
9
I diusori attivi della serie Hyper-Pro Plus sono dotati di diversi connettori, comandi e
indicatori il cui utilizzo è di fondamentale importanza.
1) Ingressi CH1 e CH2
Questa sezione comprende 2 connettori Combo per l’utilizzo di segnali bilanciati e sbi-
lanciati sia XLR che Jack da 6,3mm. Qui è possibile collegare strumenti musicali, mixer,

20
ITALIANO
Manuale Utente Serie Hyper-Pro Plus
colonnine per DJ, ecc. Il segnale audio in ingresso può essere regolato utilizzando la
re-lativa manopola.
Nota: Impostare il Gain al minimo prima di collegare un segnale audio. Una
volta acceso il sistema, si consiglia di impostare il Gain a metà, poiché è un
buon punto di partenza.
2) Modalita Speaker
Sono inclusi quattro preset per ottimizzare la risposta del cabinet in base alle proprie
esigenze. Per scorrere tra i preset, utilizzare il pulsante Mode.
fMUSIC: Curva di EQ con bassi enfatizzati e medio-alti piatti
fLIVE: Curva di EQ simile a quella MUSIC, ma con diversa enfatizzazione dei bassi
fMON: Curva di EQ con attenuazione di bassi e alti con leggero taglio sui medi per
aumentare l’intelligibilità del parlato.
fVOCAL: Curva con taglio dei bassi e risposta piatta sui medi e alti.
Nota: L’impostazione dell’equalizzatore viene memorizzata e ripristinata
dopo un ciclo di alimentazione.
3) Limitatore
Questo LED indica che il limitatore è attivo quando la tensione di uscita dell’amplica-
tore supera il livello massimo o quando viene rilevato un sovraccarico di potenza. Veder
lampeggiare questo LED può essere normale, ma se rimane acceso in maniera prolun-
gata, abbassare il livello di ingresso.
4) Interruttore LED Anteriore
Questo interruttore consente di attivare/disattivare il LED frontale Blu.
5) Volume Master
Controlla il livello generale del diusore. Impostare questo comando al minimo quando
si accende o si spegne l’unità.
6) Mix Out
Uscita bilanciata che può essere utilizzata per collegare un secondo diusore Hyper-Pro
Plus o un sistema PA o di registrazione. Il livello del segnale MIX OUT non è inuenzato
dalla manopola MASTER VOLUME.
7) Interruttore di Alimentazione
Utilizzare questo interruttore per accendere e spegnere il diusore. Assicurarsi che i
controlli del Volume Master siano impostati al minimo quando si accende e si spegne il
diusore.
8) Selettore di Tensione
La pagina si sta caricando...
La pagina si sta caricando...
La pagina si sta caricando...
La pagina si sta caricando...
La pagina si sta caricando...
La pagina si sta caricando...
La pagina si sta caricando...
La pagina si sta caricando...
-
 1
1
-
 2
2
-
 3
3
-
 4
4
-
 5
5
-
 6
6
-
 7
7
-
 8
8
-
 9
9
-
 10
10
-
 11
11
-
 12
12
-
 13
13
-
 14
14
-
 15
15
-
 16
16
-
 17
17
-
 18
18
-
 19
19
-
 20
20
-
 21
21
-
 22
22
-
 23
23
-
 24
24
-
 25
25
-
 26
26
-
 27
27
-
 28
28


soundsation HYPER-PRO 12 PLUS Manuale utente
- Categoria
- Attrezzatura musicale
- Tipo
- Manuale utente
in altre lingue
Documenti correlati
-
soundsation GO-SOUND AMW series Manuale utente
-
-
-
-
-
-
-