soundsation GO-SOUND AMW series Manuale utente
- Tipo
- Manuale utente

GO-SOUND AMW series
Portable Pa Systems with MP3/Bluetooth,
Trolley and Battery
Please read this manual carefully and proper take care of this manual
USER MANUAL

2
ENGLISH
Dear customer,
First of all thanks far purchasing a SOUNDSATION® product. Our mission is to satisfy
all possible needs of musical instrument and professional audio users offering a wide
range of products using the latest technologies.
We hope you will be satised with this item and, if you want to collaborate, we are look-
ing for a feedback from you about the operation of the product and possible improve-
ments to introduce in the next future. Go to our website www.soundsationmusic.com
and send an e-mail with your opinion, this will help us to build instruments ever closer
to customer’s real requirements.
One last thing: read this manual before using the instrument, an incorrect operation
can cause damages to you and to the unit. Take care!
The SOUNDSATION Team

3
ENGLISH
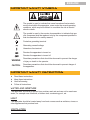
IMPORTANT SAFETY SYMBOLS
The symbol is used to indicate that some hazardous live terminals
are involved within this apparatus, even under the normal operating
conditions, which may be sufcient to constitute the risk of electric
shock or death.
The symbol is used in the service documentation to indicate that spe-
cic component shall be replaced only by the component specied in
that documentation for safety reasons.
Protective grounding terminal
Alternating current/voltage
Hazardous live terminal
Denotes the apparatus is turned on
Denotes the apparatus is turned off
WARNING:
Describes precautions that should be observed to prevent the danger
of injury or death to the operator.
CAUTION:
Describes precautions that should be observed to prevent danger of
the apparatus.
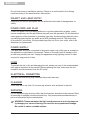
IMPORTANT SAFETY INSTRUCTIONS
f Read these instructions
f Keep these instructions
f Heed all warning
f Follow all instructions
Water and Moisture
The apparatus should be protected from moisture and rain and can not be used near
water; for example near a bathtub, a kitchen sink, a swimming pool, etc.
Heat
The apparatus should be located away from heat sources such as radiators, stoves or
other appliances that produce heat.
Ventilation

4
ENGLISH
Do not block areas of ventilation opening. Failure to do could result in re. Always
install according to the manufacturer's instructions.
Object and Liquid Entry
Objects do not fall into and liquids are not spilled into the inside of the apparatus for
safety.
Power Cord and Plug
Protect the power cord from being walked on or pinched particularly at plugs, conve-
nience receptacles, and the point where they exit from the apparatus. Do not defeat the
safety purpose of the polarized or grounding-type plug. A polarized plug has two poles;
a grounding-type plug has two poles and a third grounding terminal. The third prong
is provided for your safety. If the provided plug does not t into your outlet, refer to an
electrician for replacement.
Power Supply
The apparatus should be connected to the power supply only of the type as marked on
the apparatus or described in the manual. Failure to do could result in damage to the
product and possibly the user. Unplug this apparatus during lightning storms or when
unused for long periods of time.
Fuse
To prevent the risk of re and damaging the unit, please use only of the recommended
fuse type as described in the manual. Before replacing the fuse, make sure the unit
turned off and disconnected from the AC outlet.
Electrical Connection
Improper electrical wiring may invalidate the product warranty.
Cleaning
Clean only with a dry cloth. Do not use any solvents such as benzol or alcohol.
Servicing
Do not implement any servicing other than those means described in the manual. Refer
all servicing to qualied service personnel only. Only use accessories/attachments or
parts recommended by the manufacturer.
WARNING: Please remember the high sound pressure do not only temporar-
ily damage your sense of hearing, but can also cause permanent damage.
Be careful to select a suitable volume.

5
ENGLISH
TABLE OF CONTENTS
1. BEFORE YOU START .............................................................................................6
1.1. Unpacking .............................................................................................................................6
1.2. Getting Started ......................................................................................................................6
2. SOUNDSATION GO-SOUND AMW SERIES ...........................................................6
3. CONNECTIONS .......................................................................................................7
3.1. Mains Connections ................................................................................................................ 7
3.2. 12Vcc Power Input ................................................................................................................7
3.3. Audio Connections ................................................................................................................7
4. REAR PANEL FUNCTIONS .....................................................................................9
4.1. Mixer Controls .......................................................................................................................9
4.2. Digital Media Player Control Panel......................................................................................12
4.3. Using USB drives and SD-Cards ........................................................................................13
4.4. Remote Control ...................................................................................................................14
4.5. Using the Bluetooth™ Connection ......................................................................................14
5. DUAL VHF WIRELESS MICROPHONE ................................................................15
6. RECHARGEABLE BATTERY ................................................................................16
6.1. Battery Replacement ........................................................................................................... 17
6.2. Charging the Battery ...........................................................................................................17
6.3. Battery safety and disposal instructions ..............................................................................18
7. SPECIFICATIONS ..................................................................................................20
8. WARRANTY AND SERVICE ..................................................................................22
9. WARNING ..............................................................................................................22

6
ENGLISH
GO-SOUND AMW series User manual
1. BEFORE YOU START
1.1. Unpacking
Thank you for purchasing GO-SOUND AMW Series portable PA systems. Each unit
has been well tested and shipped in perfect operating conditions. Carefully unpack the
carton and check the contents to ensure that all parts are present and in good condi-
tions:
f 1 Loudspeaker
f 2 Handheld Wireless Microphones
f 1 Remote Control
f 1 Power Cable
f This User manual
If anything damaged during transport, notify the shipper immediately and keep packing
material for inspection. Again, please save its carton and all packing materials. If the
unit must be returned to the manufacturer, it is important that the unit is returned in the
original manufacturer’s packing. Please do not take any action without rst contacting
us.
1.2. Getting Started
GO-SOUND AMW Series portable PA systems are part of a wider range of SOUND-
SATION Pro Audio product line. These active speakers are compact, light weight and
very easy to use. They are ideal for any live music purpose. Make sure there is enough
space around the unit for proper ventilation and prevent overheating; do not place
the unit on top of hot devices such as radiators or power ampliers. The speaker is
connected to mains through the supplied cable. The product meets the required safety
standards. Blown fuses must be replaced with fuses of the same type and specica-
tion.
Make sure that all units must be properly grounded. For your safety, you
should never remove any ground connector from electrical devices or pow-
er cables, or make them inoperative.
Our products are subject to a continuous process of further development. Therefore
modications to the technical features remain subject to change without further notice.
2. SOUNDSATION GO-SOUND AMW SERIES
GO-SOUND AMW series is the result of years of experience gathered by SOUNDSA-
TION in Portable Sound systems, a segment where quality, versatility and value for
money are absolutely essential.

7
ENGLISH
GO-SOUND AMW series User manual
The series is composed by two portable PA systems with, respectively, 12” and 15”
woofers (GO-SOUND 12AMW and 15AMW). In addition to the MP3 player with USB,
SD-card and Bluetooth ™ of the GO-SOUND MULTIMEDIA version, these new line in-
tegrates two VHF wireless microphones with handheld transmitters, an Echo effect for
the two microphone inputs and the two wireless microphones, a useful 5-band graphic
EQ and a handy trolley with wheels and telescopic handle on top. The mains is on AC
or battery operated, the latter with a duration of about 2.5 hours at maximum volume
and full charge.
The amplication, as well as for the previous GO-SOUND 12A and AM versions, is
equipped with a Class-AB 800W (mains powered) peak-power module. The polypropyl-
ene enclosure is strong and lightweight, with metallic grille, 36mm standard pole mount
hole, and acoustic foam to protect the woofer and give a pleasant look.
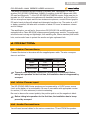
3. CONNECTIONS
3.1. Mains Connections
Connect the device to the mains with the supplied power cable. The wire correspon-
dence is as follow:
Cable Pin International
Brown Live L
Blue Neutral N
Yellow/Green Earth
The earth must always be connected! Pay attention to the safety! Before
taking into operation for the rst time, the installation has to be approved by
an expert.
3.2. 12Vcc Power Input
The GO-SOUND AMW Series speakers can be powered by a 12VDC power source
(such as the battery of an automobile). Be sure to use cables with appropriate conduc-
tor section (1.50 mm
2
minimum) to avoid overheating.
Be sure to observe the correct polarity: the positive pole is red; the negative is black.
Before taking into operation for the rst time, the installation has to be ap-
proved by an expert.
3.3. Audio Connections
You will need several cables for the various connections TO and FROM the speaker.

8
ENGLISH
GO-SOUND AMW series User manual
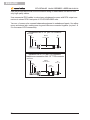
See the pictures below that show the internal wiring of these cables. Be sure to use
only high quality cables.
Use commercial RCA cables to wire stereo unbalanced sources with RCA output con-
nectors to stereo RCA Line inputs of GO-SOUND AMW units.
You can, of course, also connect balanced equipment to unbalanced inputs. Use either
mono and stereo jack, making sure ring and collar are connected together (or pins 1 &
3 in the case of XLR connectors).
Unbalanced use of 1/4” jack TS connector
Strain relief
clamp
Sleeve
Tip
Sleeve
Ground shield
Tip
Signal
Balanced use of 1/4” jack TRS connector
Headphones connection with 1/4” TRS connector
Strain relief
clamp
Sleeve
Tip
Sleeve
Ground shield
Ring
Ring
Cold (- Ve)
Tip
Hot (+ Ve)

9
ENGLISH
GO-SOUND AMW series User manual
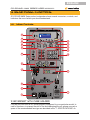
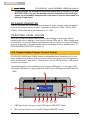
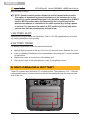
4. REAR PANEL FUNCTIONS
GO-SOUND AMW Series active loudspeakers have several connectors, controls, and
indicators the use of which you should understand.
4.1. Mixer Controls
0001:Song_Title_
ALL 00:01
U
8
1
2
6
3
4
4
5
7
9
10
11
12
13
14
15
16
17
1) IEC Socket with Fuse holder
Plug the line-cord into an AC socket properly congured for your particular model. In
case of fuse burn, to prevent the risk of re and damaging the unit, please use only a
spare of the recommended fuse type as described in the “7. SPECIFICATIONS” on

10
ENGLISH
GO-SOUND AMW series User manual
page 20. Before replacing the fuse, make sure the unit turned off and disconnected
from the AC outlet.
NOTE: If you happen to lose the AC line-cord, always use a three-pin plug
with a ground pin.
2) POWER Switch
Switch left to turn the speaker on, and switch right to turn it off. Make sure MASTER
LEVEL control is down before you turn it on.
3) ANTENNA A AND B
They receive the RF signals from the two transmitters. To increase the capacity of
reception, extend the two telescopic antennas as much as possible.
4) 12v power input and Fuse
As already anticipated in paragraph “3.2. 12Vcc Power Input” on page 7, GO-
SOUND AMW Series speakers can be powered by a 12VDC power source (such as
the battery of an automobile). This terminal is used to connect the unit to the external
source. Be sure to use cables with appropriate conductor section (1.50 mm
2
minimum)
to avoid overheating. Be even sure to observe the correct polarity: the positive pole is
red; the negative is black.
In case of fuse burn, to prevent the risk of re and damaging the unit, please use only
a spare of the recommended fuse type as described in the “7. SPECIFICATIONS” on
page 20.
WARNING: Before replacing the fuse, make sure the unit turned off and
disconnected from the AC outlet or any 12VDC external source.
5) Dual VHF Wireless Receiver
These portable PA systems feature two handheld wireless microphones for maximum
mobility during your performances. The dual receiver has a VHF ON/OFF switch with
POWER LED, to activate the unit and indicate it is on.
TIP: When you don’t use the two wireless microphones, it is always advis-
able to turn the receiver off, so as to lengthen the battery life.
The section is also composed of two level controls, one for each of the two micro-
phones, and two RF LED indicators, which light up when there is the radio signal from
the handheld transmitter. For further details on the handheld microphone, see “5. DUAL
VHF WIRELESS MICROPHONE” on page 15.
6) MIC IN1/Mic IN2
There are two 1/4” (6.3 mm) Jack plugs that accept unbalanced Mic-level signals.
There is no phantom power, so you should use a dynamic microphone, or use a con-

11
ENGLISH
GO-SOUND AMW series User manual
denser type if it has its own battery power.
7) LINE In
There is a stereo RCA that accept unbalanced line-level signals.
8) MIC LEVEL
This controls the overall signal level at MIC IN1 and MIC IN2 inputs.
9) Line Level
This controls the Line overall signal level at the RCA inputs.
10) ECHO
It adjust the Echo level on MIC IN 1 and 2 and to VHF MIC1 e 2. It has no effect on
LINE input and MP3 player.
11) Digital MEDIA player
This panel controls all functions related to the multi-player and hosts the Bluetooth™
receiver as well as USB and SD-Card slots. For further information about how to use it,
see “4.2. Digital Media Player Control Panel” on page 12.
12) Bluetooth/MP3 LEVEL
This controls the overall signal level of the MP3/Bluetooth™ player.
13) Master LEVEL
This controls the overall level of the speaker.
NOTE: It doesn’t affect the MIX OUT level.
14) MIX Out
It is a stereo RCA output with unbalanced line-level signals. It contains the mix of all
inputs and all controls. It can be used for recording purposes or simply to connect the
GO-SOUND AMW PA system to a mixer o any other audio system. This output is not
controlled by MASTER LEVEL.
15) POWER and CLIP LED
When line-cord is connected to the AC Mains connector and POWER switch is turned
on, the POWER indicator is lit.
CLIP LED lights up only when the input signals are too high and limiter operates in
order to prevent unwanted damage to amplier or transducers.
NOTE: To better adjust levels and avoid limiter to intervene and cut signals,

12
ENGLISH
GO-SOUND AMW series User manual
once connected the desired sound source slowly turn up levels 8, 9, 12 and
MASTER LEVEL (13) until the desired volume is reached and the CLIP light
comes on occasionally. Always protect your hears if you are close when it is
playing at high levels.
16) 5-Band Graphic EQ
This EQ optimizes the overall frequency response in order to better adapt the speaker
to the environment in which it is used. It operates on 5-bands (100Hz, 330Hz, 1KHz,
3,3KHz, 10KHz) and with a gain/reduction of +/- 12dB.
17) Battery Level Status
When you connect the power cable, you can check battery charge (even without
switching the unit on) basing on how many of the four LEDs are on. When charge level
is below 25%, the red LED ashes and indicates that you need to re-charge the battery
as soon as possible. For further details battery and charge function, please refer to “6.
RECHARGEABLE BATTERY” on page 16.
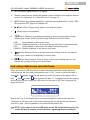
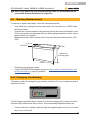
4.2. Digital Media Player Control Panel
GO-SOUND 12AMW and 15AMW feature a multimedia player that allows you to use
these speakers even without audio sources or cables: just connect your smartphone or
tablet via Bluetooth™ and that’s it. There is also a slot for SD-Cards and a USB plug to
connect your devices.
The reader accepts audio streaming in any format via Bluetooth™. In the case of SD-
Cards and USB devices, it plays audio les in MP3 (up to 320kbps) and WAV (44.1kHz
- 16bit).
0001:Song_Title_
ALL 00:01
U
1
2
3
4
5 6 7 8 9 10
1. USB Type-A plug: lets you to read USB drives in MS-DOS
®
format
2. SD-Card slot: allows you to read SD-Cards in MS-DOS
®
format

13
ENGLISH
GO-SOUND AMW series User manual
3. 2x16 character alphanumeric LCD display
4. Remote control sensor: allows the speaker to be controlled by the supplied remote
control. Fur details see “4.4. Remote Control” on page 14.
5. MODE button: by pressing repeatedly, it switches among Bluetooth™ mode, USB/
SD mode and OFF (player and display off).
6. Button (Play / Pause): plays audio of the selected device
7. (Stop): puts in stop playback
8. Button (Repeat): by pressing repeatedly, it allows you to browse through
different play modes (valid only when using USB drives and SD-Cards):
• ONE: Loop playback of the current song
• FOLDER: Repeated playback of all songs in the current folder in ascending order;
• ALL: Loop playback of all songs in all folders in ascending order
• RANDOM: Random playback of any song in any folder
9. Button (Rewind): Press to go back one track; holding down for one second
allows you to rewind to the beginning of current track
10. Button (Fast Forward): Press to move to next track; holding down for one
second lets you skip to the end of current track
4.3. Using USB drives and SD-Cards
When you insert a USB drive into the outlet, the player reads the content automati-
cally and plays the rst track in ascending order, in “ALL” mode (or last mode used, if
changed). The display shows on the upper-left corner the status of the player, that is
play , stop or pause ; than it shows the letter “U”, indicating that you are playing
an audio le from the connected USB device. In the case of SD-Card, the player dis-
plays the letter S.
Next to the U or S, the display shows the current playback mode (in this case ALL).
Then there is the time code of the current playing track. At the second line there are -
from left to right - the song number in the current folder and its title.
NOTE: In the case of use of a USB drive and an SD-Card simultaneously, the
reader will play the tracks on both devices, organizing them according to

14
ENGLISH
GO-SOUND AMW series User manual
the executing mode chosen (normal, cyclical, random, etc.).
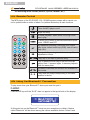
4.4. Remote Control
The MP3 player of the GO-SOUND 12 & 15 AMW systems comes with a remote con-
trol to operate within a radius of about 5 m (without obstacles) all main functions.
Turns the MP3 player on/off.
Stops the song.
It mutes playback. When active, the song contin-
ues to play.
It allows you to enter in the individual menus (blue-
tooth, USB/SD and OFF.
By repeatedly pressing, it switches from normal
play mode, current track loop (ONE), and all tracks
loop (ALL).
By repeatedly pressing, it switches among different
equalization curves.
They skip to the next or previous song.
Play or pause the rst song in the list or the last
played track. If pressed again, it resumes playback
from the same point.
Increase or decrease the volume. Not available on
this model.
0 - 9
They recall the song corresponding to the same
position in the list.
4.5. Using the Bluetooth™ Connection
To play music from your Bluetooth™ device you must rst pair it.
Pairing
Press MODE key until the “BLUE” does not appear in the top-left side of the display:
At this point turn on the Bluetooth™ mode on your smartphone or tablet. A device
called “Bluetooth” will be shown among the various available devices. Select it and

15
ENGLISH
GO-SOUND AMW series User manual
start the pairing process. Once nished, your play list will be directly played on your
Go-Sound 12AM or 15AM.
NOTE: GO-SOUND player control panel also acts on your Bluetooth™
device; so that, for example, by pressing the button , you play / pause
the song; pressing , you skip to the next track, and so on. The buttons
(Stop) and (Repeat), however, are deliberately disabled and can be
managed only by the Bluetooth™ device.
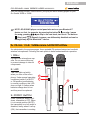
5. DUAL VHF WIRELESS MICROPHONE
As anticipated in the previous pages, these portable PA systems feature two handheld
wireless microphones. Following the main points to better understand their operation.
1. GRILL:
It protects the microphone cap-
sule. Do not remove this cap
to prevent damage to internal
components.
2. LED:
This LED lights up briey
when you turn on the micro-
phone. Under normal operating
conditions (switch 2 in MUTE
or ON position) and batteries
in normal conditions, this LED
does not light. It ashes when
batteries charge level is low
and they must be replaced.
3. ON/OFF SWITCH:
It has 3 positions: when it’s all
down, transmitter is OFF. When
it is in central position (MUTE),
the transmitter is on but audio is
disabled; nally, when it’s all up
(ON), the transmitter is working
ON
OFF
BATT
2X1.5V-AA TYPE
1
2
3
4
5

16
ENGLISH
GO-SOUND AMW series User manual
and the audio is active.
NOTE: Standby central position allows the unit to transmit without audio.
This option is important to prevent interference in the receiver due to the
absence of a radio transmitting signal. It is, therefore, suggested to ALWAYS
use this MUTE position when you temporarily don’t sing or play but the
wireless microphone is connected to an audio system (e.g. during a pause
in a show). You can move the switch to OFF position (all down) only when
you are sure that the sound system volume is low.
4 BATTERY SLOT:
Batteries are housed inside the transmitter. Use 2x 1.5V AA type batteries (not includ-
ed), paying attention to their polarity.
5 BATTERY COVER:
For battery replacement follow the instructions below:
f Apply a slight pressure at the top of the door (5) and pull down. Remove the cover.
f Insert or replace the batteries in the compartment, observing the +/- polarity marked
on the bottom.
f Replace the cover on the bottom of the battery slot.
f Push up the cover of the microphone in order to completely close it.
6. RECHARGEABLE BATTERY
These PA systems work with both AC or battery power. They feature a 12V - 7AH lead
rechargeable battery, housed inside the unit and accessible through the door on back
side of the unit.
Remove these four
screws

17
ENGLISH
GO-SOUND AMW series User manual
Note: If you power the unit with the external cable for an extended period,
you should remove the battery for longer life.
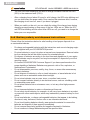
6.1. Battery Replacement
To remove or replace the battery, follow the instructions below:
• Turn off the unit, unplug the mains cable and/or the connection to a 12VDC exter-
nal power source.
• Unscrew the 4 screws shown in the previous picture and remove the plastic cover.
• Pull out the battery and disconnect the two wires paying attention to colors (red for
positive, black for negative).
• Replace the battery with a similar both in size and electrical characteristics (12V -
7AH).
NEGATIVE
POSITIVE
150mm
100mm max.
(including poles)
65mm
• Close the cover with the screws.
• Contact SOUNDSATION support service on https://www.soundsationmusic.com/
en/services/support in case of problems.
6.2. Charging the Battery
The battery, when fully charged has a duration of about 2.5 hours of continuous use at
maximum volume.
The full charge cycle lasts about 3 hours. For the rst charge cycle, however, it would
be better that it lasted more than 6 hours. This considerably lengthens battery life.
• Connect the unit to a power outlet through the supplied power cord. It is not neces-
sary to turn on the unit.

18
ENGLISH
GO-SOUND AMW series User manual
• The four LEDs start blinking as the level of charge increases from the rst LED
(25%) to the maximum level (100%).
• After a charging time of about 3 hours for a full charge, the LEDs stop blinking and
you can disconnect the power cable. Once reached the maximum level, however,
the charging circuit turns off, even if you leave it plugged.
• When you switch on the unit, you can check the state of the charge (even during
charging process) basing on how many of the four LEDs are on. When the 20%
red LED start blinking and the other three LEDs are off, you need to re-charge the
battery as soon as possible.
6.3. Battery safety and disposal instructions
Please follow the instructions below for safe handling of and proper disposal of us-
er-serviceable batteries.
• Do charge rechargeable batteries with the instructions and correct charging equip-
ment supplied with your SOUNDSATION product.
• Do store batteries in a cool, dry place at normal room temperature. Remove batter-
ies from devices that will be stored unused for extended periods.
• Do dispose of batteries according to the local laws and regulations of your region.
Some batteries may be recycled, and may be accepted for disposal at your local
recycling center.
• Do contact SOUNDSATION Customer Support if you have questions about the
proper handling of batteries. Batteries may present a risk of re, explosion, or
chemical burn if mistreated.
• Do not disassemble, puncture, modify, drop, throw, or cause other unnecessary
shocks to batteries.
• Do not dispose of batteries in a re or trash incinerator, or leave batteries in hot
places such as an automobile under direct sunlight.
• Do not store batteries near an oven, stove, or another heat source.
• Do not connect batteries directly to an electrical source, such as a building outlet
or automobile power-point.
• Do not place batteries into a microwave oven, or into any other high-pressure
container.
• Do not immerse batteries in water or otherwise get them wet.
• Do not short circuit batteries; for example, do not carry loose batteries in a pocket
or purse with other metal objects, which may inadvertently cause a battery to short
circuit.
• Do not use batteries, or charge rechargeable batteries, that appear to be leaking,
discolored, rusty, deformed, emit an odor or are otherwise abnormal.
• Do not touch leaking batteries directly; wear protective material to remove the
batteries and dispose of them properly immediately.
• Do not reverse the polarity (positive and negative terminals) of batteries.
• Do not continue to charge batteries beyond the specied time.

19
ENGLISH
GO-SOUND AMW series User manual
• Do not give batteries to young children, or store batteries where children may
access them.
• Do not put batteries in the mouth. If swallowed, contact a physician or local poison
control center immediately.

20
ENGLISH
GO-SOUND AMW series User manual
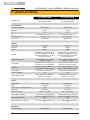
7. SPECIFICATIONS
GO-SOUND 12AMW GO-SOUND 15AMW
Speaker Type
Portable 2-way active speaker with
rechargeable battery
Portable 2-way active speaker with
rechargeable battery
Acoustical data
Frequency response 68Hz-19KHz 60Hz-19KHz
Max.SPL 112dB* 114dB*
LF 12” 15”
HF 1” Compression Driver (1” v.c.) 1” Compression Driver (1” v.c.)
Directivity (HxV) 90° x 40° - 60° 90° x 40° - 60°
Horn Type Asymmetric Asymmetric
Amplifer
Amp Class Class AB Class AB
Program 400W* 400W*
Peak 800W* 800W*
Controls
Mic1&2 level, Line level, Echo
level, Bluetooth/MP3 level, Master
level, Wireless Mics On, W. Mic1
level, W. Mic2 level
Mic1&2 level, Line level, Echo
level, Bluetooth/MP3 level, Master
level, Wireless Mics On, W. Mic1
level, W. Mic2 level
5-Band Graphoc EQ
100Hz, 330Hz, 1KHz, 3,3KHz,
10KHz (+/- 12dB)
100Hz, 330Hz, 1KHz, 3,3KHz,
10KHz (+/- 12dB)
Connections
Mic 1&2 6.3mm TS Jack, Line In
L&R RCA, Line Out L&R RCA
Mic 1&2 6.3mm TS Jack, Line In
L&R RCA, Line Out L&R RCA
Indicators
Power, Clip, Wireless Mic On, RF
Mic1, RF Mic2, Battery Charge
Power, Clip, Wireless Mic On, RF
Mic1, RF Mic2, Battery Charge
Media player USB, SD-Card, Bluetooth™ USB, SD-Card, Bluetooth™
2x16 LCD Display” Yes Yes
Media player controls
Stop, Play/Pause, Next track,
Previous track, Mode
Stop, Play/Pause, Next track,
Previous track, Mode
Power
Mains Power: 230VAC-50Hz 230VAC-50Hz
Fuse: T1A-250V T1A-250V
Add. Power (no charge function): 12Vcc 12Vcc
Add. Fuse: T10A-250V T10A-250V
Mains Connector VDE + Fuse holder VDE + Fuse holder
Add. Power Connector 12Vcc Push-in Spring Terminal 12Vcc Push-in Spring Terminal
Rechargeable Battery:
12V-7AH Lead Battery (TC12-7.0
type)
12V-7AH Lead Battery (TC12-7.0
type)
Battery Dimension (WxHxD):
151 x 100 (poles Included) x 65
mm
151 x 100 (poles Included) x 65
mm
Mechanics
Housing material Polypropylene Polypropylene
La pagina si sta caricando...
La pagina si sta caricando...
La pagina si sta caricando...
La pagina si sta caricando...
-
 1
1
-
 2
2
-
 3
3
-
 4
4
-
 5
5
-
 6
6
-
 7
7
-
 8
8
-
 9
9
-
 10
10
-
 11
11
-
 12
12
-
 13
13
-
 14
14
-
 15
15
-
 16
16
-
 17
17
-
 18
18
-
 19
19
-
 20
20
-
 21
21
-
 22
22
-
 23
23
-
 24
24


soundsation GO-SOUND AMW series Manuale utente
- Tipo
- Manuale utente
in altre lingue
Documenti correlati
Altri documenti
-
Ibiza Sound PORT10VHF-BT Manuale del proprietario
-
Yamaha HTR-6250 Manuale del proprietario
-
Yamaha RX-V465 Manuale del proprietario
-
Yamaha HTR-6280 Manuale del proprietario
-
LD Systems LDRBUD10 Manuale utente
-
-
-
-
-
Ibiza Sound PORT10VHF-BT Manuale del proprietario