
46910.H22.01
Monitor LED 21,5” Full-HD HDMI VGA BNC
21,5” BNC VGA HDMI LED Full-HD Monitor
Manuale per il collegamento e l’uso
Installation and operation manual

2
I
Indice
1. Informazioni generali ...................................................................................................................................................................................................... 1
1.1 Caratteristiche generali ...............................................................................................................................................................................................1
1.2 Apertura della confezione ..........................................................................................................................................................................................1
1.2.1 Contenuto della confezione .............................................................................................................................................................................. 1
1.3 Avvertenze .................................................................................................................................................................................................................1
1.3.1 Alimentazione ....................................................................................................................................................................................................1
1.3.2 Precauzioni di sicurezza ................................................................................................................................................................................... 1
1.3.3 Precauzioni di installazione ............................................................................................................................................................................... 1
1.3.4 Pulizia del dispositivo ........................................................................................................................................................................................1
1.3.5 Privacy and copyright ........................................................................................................................................................................................2
2 Comandi e impostazioni ................................................................................................................................................................................................ 2
2.1 Tasti di comando ........................................................................................................................................................................................................ 2
2.2 Comandi del menu a schermo ................................................................................................................................................................................... 3
2.2.1 Sorgente di ingresso ......................................................................................................................................................................................... 3
2.2.2 Picture Menu (Immagini) ...................................................................................................................................................................................3
2.2.3 Sound Menu (Audio) ......................................................................................................................................................................................... 4
2.2.4 Function Menu (Menu funzionamento) ............................................................................................................................................................. 4
2.2.5 Option Menu (Opzioni) ......................................................................................................................................................................................5
2.3 Media .........................................................................................................................................................................................................................5
3 Risoluzione dei problemi ............................................................................................................................................................................................... 6
4 Specichetecniche ........................................................................................................................................................................................................ 6

1
I
1. INFORMAZIONI GENERALI
Il monitor LCD a colori presenta una struttura molto robusta. È progettato per un uso continuo e può essere utilizzato in sistemi CCTV o come display multi-
mediale senza rischio di affaticamento eccessivo. Il display a schermo piatto è del tipo a cristalli liquidi (LCD) a matrice attiva TFT (Thin-Film Transistor).
1.1 CARATTERISTICHE GENERALI
• Area del display
• Montaggio a parete (staffa non inclusa)
• Presa di ingresso/uscita audio
• Ingresso video HDMI n°2
• Un canale ingresso VGA
L’ampia inclinazione consente la visione da seduti, quando si è in piedi o durante lo spostamento da una posizione a un’altra. Il menu a schermo multilin-
gue offre un metodo semplice per congurare e ottimizzare il display.
1.2 APERTURA DELLA CONFEZIONE
Controllare che l’imballaggio e il contenuto non siano visibilmente danneggiati. Se si osservano parti mancanti o danneggiate, contattare subito il rivendito-
re. In questo caso, non provare a utilizzare il dispositivo.
I prodotti danneggiati vanno restituiti nell’imballaggio originale.
1.2.1 Contenuto della confezione
• Monitor LCD
• Telecomando (opzionale)
• Alimentatore 12 VDC 3A
• Cavo di alimentazione
• Cavo HDMI
• Manuale di istruzioni
Nota importante: Gli accessori possono essere modicati senza preavviso.
1.3 AVVERTENZE
1.3.1 Alimentazione
• Usare solo l’alimentatore in dotazione con il dispositivo. Controllare le caratteristiche della rete elettrica prima di collegare l’alimentatore.
• Non tirare il cavo per staccare il dispositivo dalla rete elettrica.
1.3.2 Precauzioni di sicurezza
• Tenere il dispositivo al riparo dalla pioggia e dall’umidità per evitare il rischio di incendio ed elettrocuzione. Non introdurre materiali (solidi o liquidi) all’in-
terno del dispositivo. Se ciò dovesse accadere, staccare il dispositivo dalla rete elettrica e farlo ispezionare da persone qualicate.
• Non aprire mai il dispositivo. Per qualsiasi riparazione, rivolgersi a persone qualicate o a un centro di assistenza autorizzato.
• Tenere i bambini lontani dal dispositivo per evitare possibili danni accidentali.
• Non toccare il dispositivo con le mani bagnate per evitare scosse elettriche o danni meccanici.
• In caso di caduta del dispositivo o di danneggiamento dell’involucro esterno, non utilizzare l’apparecchio. L’uso in queste condizioni potrebbe creare rischi
di elettrocuzione. Contattare il rivenditore o l’installatore autorizzato.
• Se il monitor deve restare inutilizzato per un periodo prolungato, è consigliabile scollegare il cavo di alimentazione.
1.3.3 Precauzioni di installazione
• Per impedire il surriscaldamento del dispositivo, posizionarlo in modo da consentire un’adeguata circolazione dell’aria attraverso le fessure dell’involucro.
Nelle installazioni in rack, lasciare almeno 5 cm di spazio libero. Non installare il dispositivo vicino a fonti di calore, ad esempio a radiatori o tubazioni d’aria
calda. Tenere il dispositivo al riparo dalla luce solare diretta. Non installare il dispositivo in aree soggette a polvere, vibrazioni meccaniche o urti.
• Non appoggiare il dispositivo su superci instabili, ad esempio su un tavolo inclinato o traballante. Il dispositivo potrebbe cadere e causare lesioni o guasti
meccanici.
• Non installare il dispositivo in luoghi esposti all’umidità o all’acqua. Non dirigere getti d’acqua sul dispositivo: si potrebbero creare rischi di incendio, elet-
trocuzione o guasti meccanici.
• In caso di penetrazione di acqua o altri materiali nel dispositivo, interromperne l’uso: si potrebbero creare rischi di incendio o di elettrocuzione. Contattare
il rivenditore o l’installatore autorizzato.
• Nell’involucro sono predisposte fessure ed aperture per la circolazione dell’aria. Non bloccare o coprire tali aperture.
• Non appoggiare sul dispositivo oggetti pesanti o che producano calore: questo potrebbe danneggiare l’involucro e/o aumentare la temperatura interna,
causando problemi di funzionamento.
• Non coprire il dispositivo con teli o materiali simili mentre è in funzione: questo potrebbe causare la deformazione dell’involucro esterno o il surriscalda-
mento delle parti interne, con conseguenti rischi di incendio, elettrocuzione e guasti meccanici.
• Tenere il dispositivo lontano da magneti e oggetti magnetizzati per evitare problemi di funzionamento.
• Non usare il dispositivo in presenza di fumo, vapore, umidità, polvere o vibrazioni intense.
• Dopo avere trasportato il dispositivo da un luogo freddo a uno caldo o viceversa, attendere qualche tempo prima di utilizzarlo. Si consiglia di aspettare
mediamente tre ore: questo consentirà al dispositivo di adattarsi alle nuove condizioni ambientali (temperatura, umidità, ecc.).
• Il monitor è provvisto di una base in plastica con piedini di gomma. Può essere posizionato su una supercie orizzontale, ad esempio un tavolo o una
scrivania. Vericare che il dispositivo sia stabile e non sia in appoggio su supporti o superci instabili. La caduta del dispositivo potrebbe danneggiarlo e
causare lesioni.
• Ricordare di regolare la luminosità e il contrasto per ottenere un’immagine ottimale.
• Il monitor può anche essere installato a parete mediante una staffa (non in dotazione).
1.3.4 Pulizia del dispositivo
• Pulire delicatamente con un panno asciutto per rimuovere la polvere e lo sporco.
• Se non si riesce a eliminare lo sporco con un panno asciutto, inumidire il panno con un detergente neutro.
• Non usare liquidi volatili (come benzina, alcool, solventi, ecc.) o panni trattati chimicamente per pulire il dispositivo: questi materiali potrebbero causare
la deformazione, il deterioramento o la scalttura dello strato di vernice.

2
I
1.3.5 Privacyecopyright
• Il monitor LCD è un dispositivo destinato all’uso in impianti CCTV. La registrazione delle immagini è soggetta alle leggi vigenti nel paese di utilizzo. È
vietata la registrazione di immagini protette da copyright.
Sarà responsabilità degli utilizzatori del prodotto controllare e rispettare le norme e le leggi locali in materia di sorveglianza e registrazione dei segnali
video. Il produttore NON SARÀ RESPONSABILE per l’uso di questo prodotto in modalità non conformi alle leggi in vigore.
2. COMANDI E IMPOSTAZIONI
2.1: TASTI DI COMANDO
INPUT MENU “V+ “ “V-“ “CH+” “CH-” “POWER”
1. “INPUT” Permette di selezionare una sorgente o un’unità di ingresso.
2. “MENU” Permette di selezionare un menu o un’opzione di menu.
3. “V+” Permette di aumentare il volume dell’unità selezionata.
4. “V-” Permette di abbassare il volume dell’unità selezionata.
5. “CH+” Permette di spostarsi in alto nel menu a schermo.
6. “CH-” Permette di spostarsi in basso nel menu a schermo.
7. “Power” Questo è l’interruttore di accensione del monitor. Premendo nuovamente questo tasto, il monitor si spegne.
Gli indicatori mostrano lo stato di accensione o spegnimento.
Indicatore Stato
Acceso (rosso) Unità spenta
NO SIGNAL
NO SIGNAL (NESSUN SEGNALE) indica che come sorgente di ingresso è stato selezionato un segnale video non collegato
Acceso (verde) Unità accesa
Lampeggiante (rosso) Modalità risparmio energetico
CONNETTORE DI ALIMENTAZIONE (DC)
Inserire il cavo di alimentazione dell’adattatore nell’apposito connettore DC.
TASTO Power
Questo tasto viene usato per accendere e spegnere il monitor. Il colore verde del LED indica che il monitor è acceso, mentre il colore rosso indica che il
monitor è in standby.
TASTI DI VOLUME [3-4] E CONFERMA [1]
Permettono di cambiare il volume (il tasto 3 aumenta il volume, il tasto 4 lo abbassa).
TASTO DEL MENU [2] E CONFERMA
Questo tasto permette di visualizzare e chiudere il menu a schermo (OSD - On-Screen Display) e di confermare le impostazioni selezionate
TASTO DI SELEZIONE DELL’INGRESSO VIDEO [1]
Per selezionare il segnale desiderato (“HDMI”, “USB”, “VGA” o “CVBS”), premere il tasto (2) per selezionare l’opzione corrispondente. Premere il tasto (3-4)
“V+” e “V-” per confermare.
INGRESSO HDMI 1-HDMI 2
Permette di collegare segnali HDMI e segnali audio provenienti da una sorgente esterna provvista di uscita HDMI
INGRESSO SEGNALE USB
Ingresso USB.
INGRESSO SEGNALE PC (VGA)
Ingresso PC.
INGRESSO/USCITA AUDIO (VGA-CVBS)
Connettore per jack RCA di ingresso/uscita audio.
CVBS-IN
Segnale video d’ingresso analogico
CVBS-OUT
Segnale video d’uscita analogico

3
I
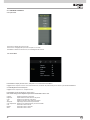
2.2 COMANDI DEL MENU A SCHERMO
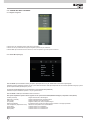
2.2.1 Sorgente di ingresso:
Premere INPUT per visualizzare l’elenco delle sorgenti di ingresso.
Premere CH+/CH- per evidenziare la sorgente di ingresso e premere V+ per confermare.
Premere MENU per nascondere il menu a schermo; il menu scomparirà in ogni caso dopo alcuni secondi.
2.2.2 Picture Menu (Immagini)
Premere MENU per visualizzare il menu principale, quindi premere V+/V- per selezionare il menu Picture (Immagine).
Evidenziare l’opzione desiderata e premere CH+/CH- per accedere al sottomenu delle opzioni disponibili sotto Picture Mode (Modalità immagine): Dynamic
(Dinamica)/Standard/Mild (Morbida)/User (Utente)
Contrast (Contrasto)/Brightness (Luminosità)/Color (Colore)/Sharpness (Nitidezza)
Evidenziare l’opzione desiderata e premere V+/V- per regolare il valore.
Premere MENU o EXIT per nascondere il menu a schermo.
Nota: queste impostazioni possono essere regolate solo se l’opzione Picture Mode (Modalità immagine) è impostata su User (Utente).
Contrast (Contrasto) Regola il livello di bianco dell’immagine
Brightness (Luminosità) Regola l’intensità delle parti nere dell’immagine.
Color (Colore) Regola l’intensità dei colori dell’immagine.
Tint (Tonalità) Regola la tonalità (rosso, verde, blu) dell’immagine.
Sharpness (Nitidezza) È possibile rendere più nitidi i bordi degli oggetti per ottenere un’immagine più denita.
Color Temperature (Temperatura colore) Selezionare la temperatura del colore desiderata.
Cool (Freddo) Conferisce al bianco una tonalità blu.
Medium (Medio) Conferisce al bianco una tonalità neutra.
Warm (Caldo) Conferisce al bianco una tonalità rossa.

4
I
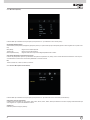
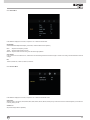
2.2.3 Menu Sound (Audio)
Premere MENU per visualizzare il menu principale, quindi premere V+/V- per selezionare il menu Sound (Audio).
Sound Mode (Modalità audio)
Standard/Music (Musica)/Movie (Film)/Sports (Sport)/User (Utente). Le opzioni Treble (Acuti) e Bass (Bassi) possono essere regolate solo in questa moda-
lità.)
Bass (Bassi) Regola i suoni a bassa frequenza.
Treble (Acuti) Regola i suoni ad alta frequenza.
Balance (Bilanciamento) Regola il livello dei suoni provenienti dagli altoparlanti sinistro e destro.
Auto Volume (Regolazione automatica del volume)
Premere L/R per impostare l’opzione o per disattivarla. Se l’opzione è impostata su On (Attiva), il suono emesso dall’unità viene livellato in caso di improv-
visi cambiamenti di volume dovuti a interruzioni pubblicitarie o al cambio di canale.
EQ:
120Hz 50, 500Hz 50, 1.5KHz 50, 5KHz 50, 10KHz 50.
2.2.4 Function Menu (Menu Funzionamento)
Premere MENU per visualizzare il menu principale, quindi premere V+/V- per selezionare il menu FUNCTION (Funzionamento).
Sleep Timer (Timer di spegnimento)
Impostare dopo quanti minuti (off, 10min, 20min, 30min, 60min, 90min, 120min, 180min, 240min) si desidera che il monitor si spenga automaticamente dopo
avere regolato l’ora. L’opzione Off disabilita la funzione.
Anti Burn-in:
Ritenzione periodica immagine (ON/OFF)

5
I
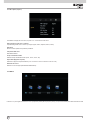
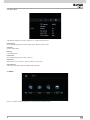
2.2.5 Menu Option (Opzioni)
Press MENU to display the main menu, and press V+/V- to select the OPTION menu
OSDLanguage(Linguamenuaschermo)
Impostare la lingua del menu a schermo. (Français, English, Italiano, Español, Deutsch, Polski)
OSD Reset:
Questo comando ripristina le impostazioni predenite.
Trasparenza OSD menu:
Basso/Medio/Alto/Off
Tempo visualizzazione OSD:
Selezione tempo visualizzazione OSD (5 Sec, 10 Sec, 15 Sec, Off)
Aspect Ratio (Rapporto d’aspetto)
Selezionare il rapporto d’aspetto desiderato (4:3 / 16:9 / Zoom1 / Zoom2 / Panorama / Point To Point)
Riduzione del rumore:
Riduzione rumore immagine (Basso/Medio/Alto/Default/Off)
2.3 MEDIA
Premere V+/V- per scegliere una delle icone Photo (Foto)/Music (Musica)/Movie (Film)/Text (Testo), quindi premere ENTER per accedere alla memoria USB

6
I
Prima di rivolgersi al servizio assistenza, eseguire i semplici controlli qui descritti. Se le istruzioni qui fornite non permettono di risolvere il problema, annotare
il modello e il numero di serie dell’apparecchio e contattare il rivenditore di zona.
3. RISOLUZIONE DEI PROBLEMI
Problema Possibile soluzione
L’apparecchio non produce suoni o immagini.
• Controllare che il cavo di alimentazione sia collegato a una presa elettrica.
• Controllare di avere premuto il tasto POWER
.
• Controllare le impostazioni di contrasto e luminosità dell’immagine.
• Verificare il volume audio.
Le immagini vengono riprodotte normalmente ma senza suoni.
• Verificare il volume audio.
• Controllare di non avere premuto il tasto MUTE
sul telecomando
Le immagini non si vedono o appaiono in bianco e nero.
• Regolare le impostazioni di colore.
• Controllare di avere selezionato il sistema di trasmissione corretto.
Interferenze nell’audio e nelle immagini.
• Provare a identificare l’apparecchio elettrico che sta interessando il monitor e allontanarlo.
• Collegare l’apparecchio a una presa elettrica differente.
Immagini sfocate o disturbate, audio distorto.
• Controllare la direzione, la posizione ei collegamenti dell’antenna.
Queste interferenze sono spesso dovute all’uso di un’antenna interna.
Il telecomando non funziona correttamente.
• Sostituire le batterie del telecomando
• Pulire l’estremità superiore del telecomando (finestra di trasmissione)
• Controllare i terminali delle batterie.
Compare il messaggio ‘no signal' (nessun segnale). • Controllare che il dispositivo sia acceso.
4. SPECIFICHE TECNICHE
Specifichedeldisplay
Tipo di pannello Monitor a LED 21,5” (16:9) retroilluminato
Tipo di involucro Plastica
Risoluzione massima 1920 (H) x 1080 (V)
Area attiva display 476.64 (H) x 268.11 (V) mm
Passo pixel 0.248 (H) x 0.248 (V) mm
Rapporto di contrasto 1000:1
Luminosità 250 cd/m²
Tempo di risposta 5 ms
Angolo di visione U/D: 80° / 80°, L /R: 75° / 75°
Colori 16,7 milioni
Frequenza di compatibilità PC 30-80 KHz (H) / 50-75Hz (V)
Temperatura del colore regolabile 9300K / 6500K / 5800K / User
Compatibilità video Multi-standard per NTSC/PAL
Rapporto d’aspetto 16: 9
Altoparlanti multimediali 1 destro, 1 sinistro, 2.5W
Demodulazione suoni Audio stereo
Silenziamento Sì
Umidità di esercizio 20 % - 70 %
Temperatura di esercizio da - 10 a 50 °C
Interfacce di ingresso/uscita
Interfaccia video HDMI x 2, USB x 1 , VGA x 1, BNC x 2
Interfaccia audio Ingresso audio x 1, Uscita audio x 1
Interfaccia di alimentazione Ingresso DC x 1
Terminazione 75 Ohm (terminazione automatica)
Sicurezza e EMC Energy Star / CE / FCC / ROHS /WEEE
Tipo di supporto Desktop
Colore Nero
Posizione dei tasti Lato destro
Peso netto/lordo 3.5/4.1 KG
Alimentazione
Alimentazione 12 Vdc, 3 A
Tensione AC100 - 240 V 50/60 Hz
Potenza assorbita <25 W

7
Table of contents
1. General Information ........................................................................................................................................................................................................ 8
1.1 General features ......................................................................................................................................................................................................... 8
1.2 Opening the box .........................................................................................................................................................................................................8
1.2.1 Contents of the box ...........................................................................................................................................................................................8
1.3 Warnings .................................................................................................................................................................................................................... 8
1.3.1 Power ................................................................................................................................................................................................................8
1.3.2 Safety precaution .............................................................................................................................................................................................. 8
1.3.3 Installation precautions .....................................................................................................................................................................................8
1.3.4 Clearing the device ...........................................................................................................................................................................................8
1.3.5 Privacy and copyright ........................................................................................................................................................................................9
2 Controls & settings ......................................................................................................................................................................................................... 9
2.1 Control keyboard ........................................................................................................................................................................................................9
2.2 OSD menu controls ....................................................................................................................................................................................................10
2.2.1 Imput source .....................................................................................................................................................................................................10
2.2.2 Picture Menu .....................................................................................................................................................................................................10
2.2.3 Sound Menu ......................................................................................................................................................................................................11
2.2.4 Function Menu ..................................................................................................................................................................................................11
2.2.5 Option Menu .....................................................................................................................................................................................................12
2.3 Media .........................................................................................................................................................................................................................12
3 Troubleshooting .............................................................................................................................................................................................................. 13
4 Productspecication ..................................................................................................................................................................................................... 13
EN

8
1. GENERAL INFORMATION
The LCD color monitor presents a very rugged structure. It is designed for continuous operation and can be used in CCTV systems or Multi-media display
without risks of excessive fatigue. The Flat Panel Display has an active matrix, thin-lm transistor (TFT), liquid crystal display (LCD).
1.1 GENERAL FEATURES
• Display area
• Wall mounting with not included bracket
• Socket audio input/output
• n°2 HDMI video input
• One input Channel VGA
Wide inclination to allow viewing either from a seated position or standing up and when moving from one position to the other Multilingual OSD menu for easy
setting and optimization of the display.
1.2 OPENING THE BOX
Check that the packing and the contents are not visibly damaged. Contact the retailer immediately if parts are either missing or damaged. Do not attempt to
use the device in this case. Send the product back in its original packing if it is damaged.
1.2.1 Contentsofthebox
• LCD monitor
• Remote Control (Optional) Power unit 12 Vdc 3A
• Power cable
• HDMI cable
• Instruction manual
Important Note: Accessories may be changed without prior notice.
1.3 WARNINGS
1.3.1 Power
• Only use the power unit provided to power the device. Check mains rating before plugging the power unit in.
• Do not pull the cable to unplug the device.
1.3.2 Safety precautions
• Keep the device away from rain and humidity to prevent risk of re and electrocution. Do not introduce material (solid or liquid) inside. If this should acci-
dentally occur, disconnect the device from the mains and have it inspected by qualied personnel.
• Never open the device. In all cases, contact the qualied personnel or authorized service center for repairs.
• Keep the device away from children to prevent accidental damage.
• Do not touch the device with wet hands to prevent electrical shock or mechanical damage.
• Do not use the device if it should fall or the external casing is damaged. Risk of electrocution if the device is used in such conditions.Contact the retailer
or authorized installer.
• It is advisable to disconnect the power wire if the monitor is not used for a certain time.
1.3.3 Installation precautions
• To prevent overheating the device, arrange it in a position allowing the ow of air through the slots in the casing. Ensure at least 5 cm of free space when
installing inside a rack. For the same reason, do not install sources of heat, such as radiators or hot air ducts. Keep away from direct sunlight. Do not
install in areas subject to excessive dust, mechanical vibrations or shocks.
• Do not arrange this device on an unstable surface, such as a tottering or slanted table. The device could fall causing injury or mechanical failures.
• Do not install the device in a place where it could be exposed to humidity or water. Do not direct a jet of water onto the device: risk of re electrocution or
mechanical failure
• Stop using the device if water or other material should penetrate inside: risk of re and electrocution. Contact the retailer or authorized installer.
• Slots and openings in the cabinet are provided for ventilation. These openings must not be blocked or covered.
• Do not place heavy or heat generating objects on top of the device: this could damage the casing and/or increase internal temperature causing faults.
• Do not cover the device with a cloth while it is running to prevent deforming the external casing and overheating the internal parts: risk of re electrocution
and mechanical failure.
• Keep magnets and magnetized objects away from the device to prevent faults.
• Do not use the device in presence of smoke, vapor, humidity, dust or intense vibrations.
• Wait for a while before operating a device immediately after transporting it from a cold place to a warm place and vice versa. Wait on average for three
hours: this will allow the device to adapt to the new ambient (temperature, humidity, etc.).
• The monitor is provided with a plastic base and rubber feet. It can be positioned on a horizontal surface, such as a desk or a table. Make sure that the
device is fastened rmly and that it is not resting on unstable supports or surfaces. Dropping could cause severe injury and damage the device.
• Remember to adjust the brightness and contrast to obtain a perfect image.
• The monitor can also be installed on the wall by means of a bracket (not provided).
1.3.4CleaningTheDevice
• Rub delicately with a dry cloth to remove dust and dirt.
• Dip the cloth in neutral detergent if dirt cannot be eliminated with a dry cloth alone.
• Do not use volatile liquids (such a petrol, alcohol, solvents, etc.) or chemically treated clothes to clean the device to prevent deformation, deterioration or
scratches to the paint nish.
EN

9
1.3.5 Privacyandcopyright
• The LCD monitor is a device for CCTV systems. Recording of images is subject to the laws in force in your country. Recording of images protected by
copyright is forbidden.
Product users shall be responsible for checking and respecting all local rules and regulations concerning monitoring and recording video signals. The
manufacturing SHALL NOT BE LIABLE for use of this product not in compliance with the laws inforce.
2. CONTROLS & SETTINGS
2. 1 CONTROL KEY BOARD
INPUT MENU “V+ “ “V-“ “CH+” “CH-” “POWER”
1. “INPUT” Use this to select an input source or an item.
2. “MENU” Use this to select an menu or an item.
3. “V+” Use increase the volume of the item you choose.
4. “V-” Use decrease the volume of the item you choose.
5. “CH+” Use this to move upthe item in on-screen menu.
6. “CH-” Use this to move down the item in on-screen menu.
7. “Power’’ Use this switch to turn on the monitor: Press this button againto turn off the monitor.
The indicators display the status of the power.
Indicator Status
Lit (Red) Power off
NO SIGNAL
NO SIGNAL It means that a not connected video signal has been selected as input
Lit (Green) Power on
Blinking (Red) Power saving mode
POWER CONNECTOR (DC)
Plug the power wire of the adapter provided into the respective DC.
Power BUTTON
This is used to switch the monitor on and off.The green LED lights up when the monitor is on while when it is in red stands for standby condition
VOLUME BUTTONS [3-4] AND CONFIRM [1]
They allow to change the volume (3 button increases the volume - 4 button decreases the volume).
MENU BUTTON [2] AND CONFIRM
This is used to access and quit the OSD (On-Screen Display) Menu and to conrm the selected settings
VIDEO INPUT SELECTION BUTTON [1]
To select the desired signal ( “HDM ‘ “USB” “VGA’ or “CVBS”) press the button (2) to select the desired item.
Press the button (3-4) “V+” and “V-” to conrm.
HDMI1- HDMI2 INPUT
Itallows the connection of an HDMI signal and an audio signal, coming from an external source provided with an HDMI output
USB SIGNAL INPUT
USB input.
PC SIGNAL INPUT (VGA)
PC input.
AUDIO INPUT/OUTPUT (VGA-CVBS)
RCA plugs audio input / Jack plugs audio output
CVBS-IN
Analog video signal input
CVBS-OUT
Analog video signal output
EN

10
2.2 OSD MENU CONTROLS
2.2.1 Input Source
Press INPUT to display the input source list.
Press CH+/CH- to highlight the input source and press V+ to conrm.
Press MENU to hide the On-Screen menu, or it will disappear after seconds.
2.2.2 Picture Menu
Press MENU to display the main menu, and press V+/V- to select the Picture Menu.
Highlight the item and press CH+/CH- or to enter the sub-menu, that shows the picture mode you can choose: Dynamic/Standard/Mild/User
Contrast/Brightness/Color/Sharpness
Highlight the item and press V+/V- to adjust the value.
Press MENU or EXIT to hide the on-screen menu.
Note:ThosesettingscanbeadjustedonlywhenthePictureModeissettoUser.
Contrast: Adjust the white level of the picture
Brightness: Adjust darkness of black sections in the picture
Color: Adjust the color intensity of the picture
Tint: Adjust the hue (Red, Green, Blue) of the picture
Sharpness: Object edges are enhanced for picture detail.
Color Temperature: Select the color temperature that you feel comfortable.
Cool: Gives white colors a blue tint.
Medium: Gives white colors a neutral tint.
Warm: Gives white colors a red tint.
EN

11
2.2.3 Sound Menu
Press MENU to display the main menu, and press V+/V- to select the Sound Menu.
Sound Mode
Standard/Music/Movie/Sports/User(Only in this mode, Treble and Bass can be adjusted.)
Bass Adjust the low frequency sounds.
Treble Adjust the high frequency sounds.
Balance Adjust the level of sound coming from the left and right speakers.
Auto Volume
Press L/R to set or cancel. When set on, it will level out the sound being heard when sudden changes in volume occur during commercial breaks or channel
changes.
EQ:
120Hz 50, 500Hz 50, 1.5KHz 50, 5KHz 50, 10KHz 50.
2.2.4 Function Menu
Press MENU to display the main menu, and press V+/V- to select the FUNCTION menu.
Sleep Timer
Select the time in minutes (off,10min,20min,30min,60min,90min,120min,180min, 240min) that you want the monintor to automatically after you set the time.
Cancel by setting it to Off.
Anti Burn-in:
Set periodic image retention (ON/OFF)
EN

12
2.2.5 Option Menu
Press MENU to display the main menu, and press V+/V- to select the OPTION menu
OSD Language
Set the OSD display language. (Français, English, Italiano, Español, Deutsch, Polski)
OSD Reset:
Recall the default setting.
Blending:
Low/ Middle/ High/ Off.
OSD DueTime:
Set the OSD display time (5Sec, 10Sec, 15Sec, off )
Aspect Ratio:
Select opinions (4:3 / 16:9 / Zoom1 / Zoom2 / Panorama / Point To Point)
Noise Reduction:
Reduce noise of the display image (Low/ Middle/ High/ Default/Off)
2.3 MEDIA
Press V+/V- to select Photo/Music/Movie/Text icon and ENTER to enter the USB memory
EN

13
If you cannot solve the problem use the instructions below, note the model and serial number of your set and contact your local dealer.
3. TROUBLE SHOOTING
Problem Possible Solution
No sound or picture.
- Check that the mains lead has been connected to a wall socket.
- Check that you have pressed the POWER
button.
- Check the picture contrast and brightness settings.
- Check the volume.
Normal picture but no sound.
- Check the volume.
- Check whether the MUTE
button has been pressed on the remote control.
No picture or black and white picture.
- Adjust the colour settings.
- Check that the broadcast system selected is correct.
Sound and picture interference.
- Try to identify the electrical appliance that is affecting the set and move it further away.
- Plug your set into a different mains socket.
Blurred or snowy picture,
distorted sound.
- Check the direction, location and connections of your aerial.
- This interference is often due to the use of an indoor aerial.
Remote control malfunctions.
- Replace the remote control batteries.
- Clean the upper edge of the remote control (transmission window).
- Check the battery terminals.
“no signal.” Message is displayed.
- Check that the signal cable is firmly connected to the device.
- Check that the device is turned on.
4. PRODUCT SPECIFICATIONS
Display Specification
Panel Type 21.5’’ (16:9) LED Backlit Monitor
Case Type Plastic
Best Resolution 1920 (H) x 1080 (V)
Active Display Area 476.64 (H) x 268.11 (V) mm
Pixel Pitch 0.248 (H) x 0.248 (V) mm
Contrast Ratio 1000:1
Brightness 250 cd/m²
Response Time 5 ms
Viewing Angle U/D: 80° / 80°, L /R: 75° / 75°
Display Colours 16.7 Million
PC Compatible Frequency 30-80 KHz (H) / 50-75Hz (V)
Adjustable Colour Temperature 9300K / 6500K / 5800K / User
Video Compatiblity Multi-Standard for NTSC / PAL
Aspect Ratio 16: 9
Speaker Multimedia Speakers Right x 1 Left x 1, 2.5W
Sound Demodulation Stereo. Audio
Mute Yes
Work Humidity 20 % - 70 %
Work Temperature - 10 to 50 °C
In/out interface
Video Interface HDMI x 2, USB x 1 , VGA x 1, BNC x 2
Audio Interface Audio in x 1, Audio Out x 1,
Power Interface DC In x 1
Termination 75 Ohms (Automatic termination)
Safety & EMC Certification Energy Star / CE / FCC / ROHS /WEEE
Stand Type Desktop
Colour Black
Button Position Right Hand Side
NET/Gross Weight 3.5/4.1 KG
Power
Power Supply 12 Vdc, 3 A
Voltage AC100 - 240V 50/60 Hz
Power Consumption < 25 W
EN

Vimar SpA: Viale Vicenza, 14
36063 Marostica VI - Italy
Tel. +39 0424 488 600 - Fax (Italia) 0424 488 188
Fax (Export) 0424 488 709
www.vimar.com
49400984A0 00 16 03
VIMAR - Marostica - Italy
-
 1
1
-
 2
2
-
 3
3
-
 4
4
-
 5
5
-
 6
6
-
 7
7
-
 8
8
-
 9
9
-
 10
10
-
 11
11
-
 12
12
-
 13
13
-
 14
14
-
 15
15
-
 16
16


in altre lingue
Altri documenti
-
Comelit HMON043A Manuale utente
-
DGM LTV-1914WHTC Manuale utente
-
Hannspree HANNS VAAS Manuale utente
-
DGM ETV-2272WH Manuale utente
-
Philips BDL3230QL/00 Manuale utente
-
Approx DTT Player/Recorder Manuale utente
-
Rosslare AY-B9250BT Manuale utente
-
Samsung U28E590DSL Manuale utente
-
-
Philips 40PFL9904H/12 Manuale utente