
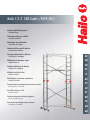
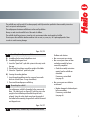
Hailo 1-2-3 500 Combi (9459-501)
DE
GB
FR
ES
IT
NL
PT
CZ
PL
RU
TR
GR
UA
Aluminium-Multifunktionsgerüst
Aufbauanleitung
Aluminium multipurpose scaffold
Assembly instructions
Échafaudage alu multifonctions
Instructions de montage
Andamio multifuncional de aluminio
Instrucciones de montaje
Ponteggio polifunzionale in alluminio
Istruzioni per il montaggio
Multifunctionele aluminium steiger
Opbouwinstructies
Andaime multifunções de alumínio
Instruções de montagem
)MJOÈLPWÄWÈDFÕÃFMPWÄMFuFOÈ
/¼WPELNPOU¼yJ
8JFMPGVOLDZKOFSVT[UPXBOJF[BMVNJOJVN
*OTUSVLDKBNPOUBV
Алюминиевая мультифункциональная станина
Инструкция по монтажу
Alu-Multi Fonksiyon-İskele
Kurulum Klavuzu
Σκαλωσιά αλουινίου πολλαπλών χρήσεων
Οδηγίες συναρμολόγησης
Алюмінієва мультифункційна станина
Інструкція з монтажу

2

3
DE Aufbauanleitung (Beschreibung) . . . . . . . . . . . . . . . . .
Aufbauanleitung (Illustrationen) . . . . . . . . . . . . . . . . .
GB Instructions for assembly (description) . . . . . . . . . . . . .
Instructions for assembly (illustrations) . . . . . . . . . . . . .
FR Instructions de montage (description) . . . . . . . . . . . . .
Instructions de montage (illustrations) . . . . . . . . . . . .
ES Instrucciones de montaje (Descripción) . . . . . . . . . . . .
Instrucciones de montaje (Ilustraciones) . . . . . . . . . . .
IT Istruzioni per il montaggio (descrizione) . . . . . . . . . . .
Istruzioni per il montaggio (gure) . . . . . . . . . . . . . .
NL Opbouwinstructies (beschrijving) . . . . . . . . . . . . . . . . .
Opbouwinstructies (illustraties) . . . . . . . . . . . . . . . . . .
PT Instruções de montagem (descrição) . . . . . . . . . . . . . .
Instruções de montagem (ilustrações) . . . . . . . . . . . . .
CZ Návod k montáži (Popis) . . . . . . . . . . . . . . . . . . . . . .
Návod k montáži (obrázky) . . . . . . . . . . . . . . . . . . .
PL Instrukcja montażu (opis) . . . . . . . . . . . . . . . . . . . . .
Instrukcja montażu (ilustracje) . . . . . . . . . . . . . . . . .
RU Руководство по сборке (описание) . . . . . . . . . . . . . .
Руководство по сборке (изображения) . . . . . . . . . .
TR Montaj talimatı (Açıklama) . . . . . . . . . . . . . . . . . . . . .
Montaj talimatı (Çizimler) . . . . . . . . . . . . . . . . . . . . . .
GR Οδηγίες συναρμολόγησης (Περιγραφή) . . . . . . . . . . . . .
Οδηγίες συναρμολόγησης (Εικόνες) . . . . . . . . . . . . . . . .
UA Інструкція зі збірки (Опис) . . . . . . . . . . . . . . . . . . . .
Інструкція зі збірки (зображення) . . . . . . . . . . . . .
Seite 4 - 5
Seite 30 - 37
Page 6 - 7
Page 30 - 37
Pages 8 - 9
Pages 30 - 37
Páginas 10 - 11
Páginas 30 - 37
Pagina 12 - 13
Pagina 30 - 37
pagina 14 - 15
pagina 30 - 37
Página 16 - 17
Página 30 - 37
Stránka 18 - 19
Stránka 30 - 37
Strona 20 - 21
Strona 30 - 37
Страница 22 - 23
Страница 30 - 37
Sayfa 24 - 25
Sayfa 30 - 37
Σελίδα 26 - 27
Σελίδα 30 - 37
Сторінка 28 - 29
Сторінка 30 - 37

4
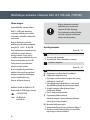
Dieses Aluminium-Multifunktionsgerüst
ist ausschließlich für den Hausgebrauch
bestimmt.
Die Aufbauanleitung vor der Benutzung
aufmerksam durchlesen und aufbewahren.
Sehr geehrte Kundin, sehr geehrter Kunde,
mit dem Hailo 1-2-3 500 Combi Aluminium-
Multifunktionsgerüst haben Sie ein viel-
seitiges und stabiles Gerüst erworben.
Dieses Aluminium-Multifunktionsgerüst
entspricht den Forderungen der Norm
EN 131 1-2-3-4 und NF E85-200.
Lesen Sie sich vor der Benutzung des
Gerüstes diese Aufbauanleitung genau durch.
Beachten Sie besonders die Sicherheits-
hinweise auf Seite 30.
Diese Aufbauanleitung bitte aufbewahren.
Falls Sie noch Fragen oder auch Anregungen
zu unserem Aluminium-Multifunktionsgerüst
haben, rufen Sie uns an.
Wir stehen Ihnen gerne zur Verfügung.
Hailo-Werk, Rudolf Loh GmbH & Co. KG
Daimlerstraße 8, 35708 Haiger, Germany
+49 (0) 2773 82-0
E-Mail: info@hailo.de
www.hailo.de
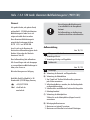
Vorwort
Hailo 1-2-3 500 Combi Aluminium-Multifunktionsgerüst (9459-501)
Seite 30 / 31
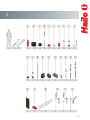
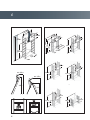
1 Piktogramme Sicherheitshinweise
1. Verwendung als Gerüst
2. Verwendung als Anlege- und Doppelleiter
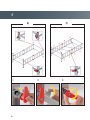
2 Teileübersicht
Seite 32 / 33
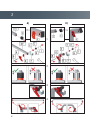
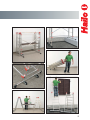
3 Vormontage
A) Vorbereitung der Horizontal- und Diagonalstreben
B) Vorbereitung der Geländerholme
1. Zwei ”Speed Lock“ Ein-Hand-Schnellverschlusssysteme an
jeder Strebe vormontieren.
2. Selbstsichernde Mutter so anziehen, dass die Unterlegscheibe
am Gewindebolzen anliegt.
3. Schnellverschluss anschließend auf Funktionalität überprüfen.
4. Einbaulage beachten!
C) Vorbereitung der Arbeitsplattform
2 Haken-Sets an der Arbeitsplattform (diagonal versetzt)
vormontieren.
D) Befestigung der Quertraversen
1. Quertraverse an Leiterteil 1 montieren.
2. Quertraverse mit Fahrrollen-Set an Leiterteil 2 befestigen.
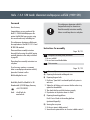
Aufbauanleitung

5
Das Gerüst darf nur verwendet werden, wenn es nach den Vorgaben dieser Aufbauanleitung ordnungsgemäß
und vollständig errichtet worden ist und sich in senkrechter Position befindet.
Das Aluminium-Multifunktionsgerüst darf nicht von Kindern benutzt werden.
Das Gerüst deshalb außer Reichweite von Kindern benutzen und aufbewahren.
Die Lagerung/Aufbewahrung des Gerüstes sollte in trockener Umgebung senkrecht stehend oder flach
liegend erfolgen. Das Gerüst keinen Witterungseinflüssen wie Regen, Eis, Schnee usw. auf Dauer aussetzen,
um Beschädigungen zu vermeiden.
Probleme und Lösungen:
s Ein oder mehrere Teil(e) fehlen.
s %INODERMEHRERE4EILESINDNACH
erfolgter Montage noch nicht verwendet
worden.
= Aufbau nochmals anhand der Aufbau-
anleitung überprüfen.
Gegebenenfalls Kontakt aufnehmen
(siehe Seite 4).
s %INODERMEHRERE4EILESIND
defekt oder verformt.
= Beschädigte oder verformte Teile
müssen vor der Montage ausgetauscht
werden.
Gegebenenfalls Kontakt aufnehmen
(siehe Seite 4).
DE
Seite 34 / 35
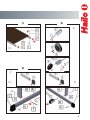
4 Montage des Multifunktionsgerüstes
E) Montage der Horizontal- und Geländerstreben
F) Montage der Diagonalstreben
1. Schnellverschlusssystem ”Speed Lock“ in den Hohlraum der
Leitersprosse einschieben.
2. Sicherungshaken nach unten um den Leiterholm klappen.
3. Schnellverschlusssystem ”Speed Lock“ verriegeln.
G) Befestigung der Arbeitsplattform
1. Arbeitsplattform an die Leitersprossen einsetzen und mit
beiden Haken-Sets befestigen (max. 9. Sprosse von unten).
2. Multifunktionsgerüst anschließend aufstellen.
5 Demontage
Die Demontage des Multifunktionsgerüstes erfolgt in
umgekehrter Reihenfolge.
Hinweis: Der Sicherungshaken, siehe Bild [X], hält die Strebe
oder den Holm in Einbauposition wenn der Schnellverschluss
gelöst wird. Vor dem Entfernen der Geländerholme, der
Horizontal- und Diagonalstreben Sicherungshaken vom Leiter-
holm wegschwenken!
Seite 36 / 37
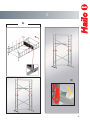
6 Technische Daten / Aufbauvarianten

6
Hailo 1-2-3 500 Combi Aluminium multipurpose scaffold (9459-501)
This multipurpose aluminium scaffold is
designed exclusively for domestic use.
Read the assembly instructions carefully
before use and keep them in a safe place.
Dear Customer,
Congratulations on your purchase of the
Hailo 1-2-3 500 Combi Multipurpose Alu-
minium Scaffold. We hope you enjoy using
this versatile and sturdy scaffolding unit.
This multipurpose aluminium scaffold meets
the requirements of the EN 131 1-2-3-4 and
NF E85-200 standards.
Please read these assembly instructions
thoroughly before using the scaffold, paying
particular attention to the safety instructions
on page 30.
Please keep these assembly instructions in a
safe place.
If you have any questions or comments
about our multipurpose aluminium scaffold,
please don’t hesitate to call us.
We’d be delighted to assist.
Hailo-Werk, Rudolf Loh GmbH & Co. KG
Daimlerstraße 8, 35708 Haiger, Germany
+44 1792 701999
Email: info@hailo.de
www.hailo.de
Foreword
Pages 30 / 31
1 Pictograms illustrating safety instructions
1. Use as a scaffold
2. Use as a lean-to and double ladder
2 Parts overview
Pages 32 / 33
3 Pre-assembly
A) Preparing the horizontal and diagonal struts
B) Preparing the guard rails
1. Pre-fit two “Speed Lock” one-handed quick lock systems to
each strut.
2. Tighten the self-locking nuts to ensure that the washer is up
against the threaded bolt.
3. Then check that the quick lock functions properly.
4. Pay attention to the position where it is fitted.
C) Preparing the working platform
Pre-fit 2 sets of hooks to the working platform
(positioned diagonally).
D) Securing the cross pieces
1. Fit the cross piece to ladder section 1.
2. Secure the cross piece with the set of castors to ladder section 2.
)NSTRUCTIONSFORASSEMBLY

7
GB
The scaffold may only be used if it has been properly and fully erected as specified in these assembly instructions
and is set up in a vertical position.
The multipurpose aluminium scaffold must not be used by children.
Always use and store the scaffold out of the reach of children.
The scaffold should be put away or stored in a dry environment either stood upright or laid flat.
Do not expose the scaffold to weather conditions such as rain, ice, snow, etc., for a prolonged period of time
in order to avoid incurring damage.
Problems and solutions:
s /NEORMOREPARTSAREMISSING
s /NEORMOREPARTSHAVENOTBEEN
used when assembly has been
successfully completed.
= Check the assembly instructions
against how the scaffold was
assembled.
If necessary, contact Hailo
(see page 6).
s /NEORMOREPARTSAREDEFECTIVE
or deformed.
= Replace damaged or deformed parts
before assembling.
If necessary, contact Hailo
(see page 6).
Pages 34 / 35
4 Assembling the multipurpose scaffold
E) Assembling the horizontal and platform struts
& Assembling the diagonal struts
1. Insert the “Speed Lock” quick lock system in the cavity inside
the rung.
2. Flip the safety hook down around the upright of the ladder.
3. Secure the “Speed Lock” quick lock system.
G) Securing the working platform
1. Insert the working platform into the rungs and secure with
both sets of hooks (max. 9 rungs from below).
2. Then stand the multipurpose scaffold up.
5 Dismantling the scaffold
The multipurpose scaffold is dismantled in the reverse order.
Note: The safety hook, see Figure [X], holds the strut or the
upright in the installation position when the quick lock is
released. Swing the safety hooks away from the upright of
the ladder before removing the guard rails and the horizontal
and diagonal struts.
Pages 36 / 37
6 Technical data / Different ways to assemble the scaffold

8
Cet échafaudage alu multifonctions est
destiné exclusivement à un usage
domestique.
Avant l’utilisation de l’échafaudage, lisez
attentivement et intégralement les présentes
instructions de montage et conservez-les.
Chère cliente, cher client,
Avec l’échafaudage alu multifonctions
Hailo 1-2-3 500 Combi, vous avez fait
l’acquisition d’un système solide aux
possibilités variées.
Cet échafaudage alu multifonctions
correspond aux exigences des normes
EN 131 1-2-3-4 et NF E85-200.
Avant l’utilisation de l’échafaudage, lisez
attentivement et intégralement les présentes
instructions de montage. Tenez compte tout
particulièrement des instructions de sécurité
de la page 30.
Veuillez conserver les présentes instructions
de montage.
Si vous avez encore des questions ou des
suggestions relatives à notre échafaudage
alu multifonctions, n’hésitez pas à nous
appeler.
Nous sommes à votre entière disposition.
Hailo-Werk, Rudolf Loh GmbH & Co. KG
Daimlerstraße 8, 35708 Haiger, Germany
+33 549 84 55 62
Courriel : info@hailo.de
www.hailo.de
Avant-propos
Échafaudage alu multifonctions Hailo 1-2-3 500 Combi (9459-501)
Pages 30 / 31
1 Pictogrammes des instructions de sécurité
1. Utilisation comme échafaudage
2. Utilisation comme échelle simple et échelle double accès
2 Vue d’ensemble des pièces
Pages 32 / 33
3 Prémontage
A) Préparation des entretoises horizontales et diagonales
B) Préparation des barres garde-corps
1. Sur chaque entretoise, prémonter deux systèmes de
verrouillage rapide d’une seule main « Speed Lock ».
2. Serrer l’écrou indesserrable de telle sorte que la rondelle soit
en appui contre le boulon fileté.
3. S’assurer ensuite du bon fonctionnement du dispositif de
verrouillage.
4. Veiller à ce que la position de montage soit correcte !
C) Préparation de la plate-forme de travail
Prémonter 2 jeux de crochets sur la plate-forme de travail
(mise en place en diagonale).
D) Fixation des traverses
1. Monter la traverse sur le plan 1.
2. Fixer la traverse avec le jeu de roulettes sur le plan 2.
)NSTRUCTIONSDEMONTAGE

9
FR
L’échafaudage ne peut être utilisé que s’il a été monté correctement et intégralement selon les prescriptions des
présentes instructions de montage et se trouve en position verticale.
L’échafaudage alu multifonctions ne doit pas être utilisé par des enfants.
L’échafaudage doit donc être utilisé et entreposé hors de portée des enfants.
L’échafaudage doit être entreposé dans un environnement sec, verticalement ou à plat. Ne pas exposer l’échafaudage
de façon prolongée aux influences atmosphériques, comme la pluie, la glace, la neige, etc., pour éviter tout dommage.
Problèmes et solutions :
s 5NEOUPLUSIEURSPIÒCESMANQUENT
s 5NEOUPLUSIEURSPIÒCESNANONTPAS
encore été utilisée(s) après le montage.
= Contrôler le montage encore une fois à
l’aide des instructions de montage.
Le cas échéant, se mettre en contact
(voir page 8).
s 5NEOUPLUSIEURSPIÒCESESTSONT
défectueuse(s) ou déformée(s).
= Les pièces endommagées ou
déformées doivent être remplacées
avant le montage.
Le cas échéant, se mettre en contact
(voir page 8).
Pages 34 / 35
4 Montage de l’échafaudage multifonctions
E) Montage des entretoises horizontales et des entretoises de garde-corps
& Montage des entretoises diagonales
1. Insérer le système de fermeture rapide « Speed Lock » dans
l’évidement du barreau.
2. Rabattre le crochet de sécurité vers le bas en le faisant
pivoter sur le montant d’échelle.
3. Verrouiller le système de fermeture rapide « Speed Lock ».
G) Fixation de la plate-forme de travail
1. Mettre la plate-forme de travail en place sur les barreaux et la fixer
avec les deux jeux de crochets (max. 9e barreau en partant du bas).
2. Mettre ensuite l’échafaudage multifonctions en place.
5 Démontage
Le démontage de l’échafaudage multifonctions s’effectue dans
l’ordre inverse.
Remarque : le crochet de sécurité, cf. figure [X], maintient
l’entretoise ou le montant dans la position de montage quand la
fermeture rapide est desserrée. Avant de retirer les barres garde-
corps ainsi que les entretoises horizontales et diagonales, faire
pivoter le crochet de sécurité hors du montant de l’échelle !
Pages 36 / 37
6 Caractéristiques techniques / variantes

10
Distinguida cliente, distinguido cliente:
Con el andamio multifuncional de aluminio
Hailo 1-2-3 500 Combi usted ha adqui-
rido un andamio estable y de múltiples
aplicaciones.
Este andamio multifuncional de aluminio
cumple los requisitos de las normas
EN 131 1-2-3-4 y NF E85-200.
Antes de utilizar el andamio, lea exactamente
estas instrucciones de montaje. Tenga espe-
cialmente en consideración las instrucciones
de seguridad de la página 30.
Guarde estas instrucciones de montaje.
Si todavía tiene preguntas o desea hacer
alguna propuesta en relación con el andamio
multifuncional de aluminio, llámenos.
Estamos a su disposición.
Hailo-Werk, Rudolf Loh GmbH & Co. KG
Daimlerstraße 8, 35708 Haiger, Germany
+34 91 633 44 50
E-Mail: info@hailo.de
www.hailo.de
0REÈMBULO
Andamio multifuncional de aluminio Hailo 1-2-3 500 Combi (9459-501)
Este andamio multifuncional de aluminio
está concebido exclusivamente para el uso
doméstico.
Lea atentamente las instrucciones de
montaje antes de usar el andamio y
guárdelas en lugar seguro.
Páginas 30 / 31
1 Pictogramas de las instrucciones de seguridad
1. Utilización como andamio
2. Utilización como escalera convencional y doble
2 Vista de las piezas
Páginas 32 / 33
3 Montaje previo
A) Preparación de los travesaños horizontales y diagonales
B) Preparación de los largueros de la barandilla
1. Montar previamente dos sistemas de cierre rápido
monomanual ”Speed Lock“ en cada travesaño.
2. Apretar la tuerca autofijadora de tal forma que la arandela
repose en el perno roscado.
3. Seguidamente, controlar la funcionalidad del cierre rápido.
4. ¡Cerciorarse de la correcta posición de montaje!
C) Preparación de la plataforma de trabajo
Premontar 2 juegos de ganchos en la plataforma de trabajo
(desplazados diagonalmente).
D) Fijación de los travesaños
1. Montar el travesaño en la parte de la escalera 1.
2. Fijar el travesaño con los rodillos de desplazamiento en la
parte de la escalera 2.
)NSTRUCCIONESDEMONTAJE

11
ES
El andamio solamente puede utilizarse cuando se haya montado correctamente de conformidad con estas instrucciones
de montaje y se encuentre en posición vertical.
El andamio multifuncional de aluminio no puede ser utilizado por niños.
Por ello, utilizar y guardar el andamio fuera del alcance de los niños.
El almacenamiento/depósito del andamio se ha de realizar en un entorno seco, de forma vertical u horizontal. Para
evitar daños, el andamio no puede exponerse continuamente a las inclemencias del tiempo como lluvia, hielo, nieve, etc.
Problemas y soluciones
s &ALTANUNAOMÈSPIEZAS
s 3EHAREALIZADOELMONTAJEYHASOBRADO
una o más piezas.
= ¡Controlar nuevamente el montaje
siguiendo las instrucciones de montaje.
Si es necesario, ponerse en contacto
con Hailo (ver página 10).
s 5NAOMÈSPIEZASESTÈNDEFECTUOSASO
deformadas.
= Las piezas defectuosas o deformadas
han de cambiarse antes de realizar el
montaje.
Si es necesario, ponerse en contacto
con Hailo (ver página 10).
Páginas 34 / 35
4 Montaje del andamio multifuncional
E) Montaje de los travesaños horizontales y de la barandilla
F) Montaje de los travesaños diagonales
1. Introducir el sistema de cierre rápido ”Speed Lock“ en el
hueco del peldaño de la escalera.
2. Doblar hacia abajo el gancho de seguridad en torno al
larguero de la escalera.
3. Bloquear el sistema de cierre rápido ”Speed Lock“.
G) Fijación de la plataforma de trabajo
1. Colocar la plataforma de trabajo sobre los peldaños
de la escalera y fijarla con ambos juegos de ganchos
(máx. 9° peldaño empezando a contar desde abajo).
2. Seguidamente poner de pie el andamio multifuncional.
5 Desmontaje
El desmontaje del andamio multifuncional se realiza en
secuencia inversa.
Advertencia: El gancho de seguridad, ver ilustración [X],
mantiene el travesaño o el larguero en la posición montada
cuando se suelta el cierre rápido. Antes de retirar el larguero de
la barandilla así como los travesaños horizontales y verticales,
girar hacia fuera de la escalera los ganchos de seguridad.
Páginas 36 / 37
6 Datos técnicos / Variantes de montaje

12
Questo trabattello multifunzione in
alluminio è destinato esclusivamente
all‘uso domestico.
Si prega di leggere attentamente, prima
dell‘utilizzo, le presenti istruzioni per l‘uso
e di conservarle con cura.
Gentile Cliente,
con Hailo 1-2-3 500 Combi avete acquistato
un trabattello multifunzione versatile
e robusto.
Questo trabattello multifunzione in alluminio
è conforme ai requisiti della norma
EN 131 1-2-3-4 e NF E85-200.
Prima di utilizzare il trabattello siete pregati
di leggere con attenzione le presenti istru-
zioni per l‘uso. Raccomandiamo di tenere
presente soprattutto le norme relative alla
sicurezza riportate a pagina 30.
Conservare con cura le presenti istruzioni
per l‘uso.
Se avete qualche dubbio o volete darci un
suggerimento in merito al nostro trabattello
multifunzione in alluminio potrete contattarci
telefonicamente.
Restiamo a vostra completa disposizione.
Hailo-Werk, Rudolf Loh GmbH & Co. KG
Daimlerstraße 8, 35708 Haiger, Germania
+39 0471 051851
E-mail: info@hailo.de
www.hailo.de
Introduzione
Ponteggio polifunzionale in alluminio Hailo 1-2-3 500 Combi (9459-501)
Pagina 30 / 31
1 Pittogrammi Norme di sicurezza
1. Utilizzo come trabattello
2. Utilizzo come scala d‘appoggio o scala doppia a libro
2 Elenco dei componenti
Pagina 32 / 33
3 /PERAZIONIPRELIMINARIDIMONTAGGIO
A) Preparazione dei correnti orizzontali e delle saette diagonali
B) Preparazione dei parapetti
1. Premontare due dispositivi di attacco rapido ad una mano
„Speed Lock“ su ciascun corrente.
2. Serrare i dadi autoaggancianti in modo tale che la rondella
poggi sul tirante filettato.
3. Verificare quindi la funzionalità dell‘attacco rapido.
4. Attenersi alla posizione di montaggio!
C) Preparazione della piattaforma di lavoro
2 Premontare i kit di ganci sulla piattaforma di lavoro
(sfasati diagonalmente).
D) Fissaggio dei correnti di collegamento orizzontali
1. Montare il corrente di collegamento orizzontale sulla
parte della scala n. 1.
2. Fissare il corrente di collegamento orizzontale con il kit di
ruote alla parte della scala n. 2.
)STRUZIONIPERILMONTAGGIO

13
IT
Utilizzare il trabattello solo è stato realizzato regolarmente e interamente in conformità alle presenti istruzioni,
e se è posizionato in senso perpendicolare.
È vietato l‘uso del trabattello multifunzione in alluminio da parte di bambini.
Utilizzare e conservare quindi il trabattello fuori dalla portata di bambini.
Depositare/conservare il trabattello in un ambiente asciutto, in piedi in posizione perpendicolare o coricato
a terra in posizione piana. Non sottoporre il trabattello per un lungo periodo a condizioni climatiche quali pioggia,
ghiaccio, neve, ecc, per evitare che venga danneggiato.
Problemi e soluzioni:
s -ANCAUNCOMPONENTEMANCANODIVERSI
componenti.
s 5NCOMPONENTEDIVERSICOMPONENTINON
sono stati utilizzati nel montaggio.
= Verificare nuovamente il montaggio
sulla base delle istruzioni per l‘uso.
Se necessario, contattare un addetto
(vedi pagina 12).
s 5NCOMPONENTEDIVERSICOMPONENTI
sono difettosi o deformati.
= Sostituire i componenti danneggiati
o deformati prima di effettuare il
montaggio.
Se necessario, contattare un addetto
(vedi pagina 12).
Pagina 34 / 35
4 Montaggio del trabattello multifunzione
E) Montaggio dei correnti orizzontali e del parapetto
F) Montaggio delle saette diagonali
1. Inserire il dispositivo di attacco rapido „Speed Lock“ nella
cavità presente nei pioli della scala.
2. Ruotare il gancio di sicurezza verso il basso, intorno al montante.
3. Bloccare lo „Speed Lock“.
G) Fissaggio della piattaforma di lavoro
1. Inserire la piattaforma di lavoro sui pioli della scala e
fissarli utilizzando il kit di ganci (max. 9° piolo dal basso).
2. Sollevare quindi il trabattello multifunzione.
5 Smontaggio
Lo smontaggio del trabattello multifunzione si effettua
procedendo in ordine inverso.
Attenzione: Il gancio di fissaggio, vedi figura [X], mantiene il
corrente o il montante nella posizione di montaggio quando si
allenta il dispositivo di attacco rapido. Prima di rimuovere i
montanti del parapetto, i correnti orizzontali o le saette
diagonali aprire il gancio di fissaggio ruotandolo in direzione
opposta al montante della scala!
Pagina 36 / 37
6 Dati tecnici / Varianti di montaggio

14
Deze multifunctionele aluminium steiger
is uitsluitend bestemd voor thuisgebruik.
Lees de opbouwinstructies vóór het gebruik
aandachtig door en bewaar deze.
Geachte klant,
Met de Hailo 1-2-3 500 Combi
multifunctionele aluminium steiger bent
u in het bezit gekomen van een veelzijdige
en stabiele steiger.
Deze multifunctionele aluminium steiger
voldoet aan de eisen van de norm
EN 131 1-2-3-4 en NF E85-200.
Lees vóór het gebruik van de steiger
deze opbouwinstructies grondig door.
Neem daarbij vooral goed nota van de
veiligheidsaanwijzingen op pagina 30.
Bewaar deze opbouwinstructies.
Als u nog vragen of suggesties hebt
over onze multifunctionele aluminium
steiger, neem dan contact met ons op.
Wij zijn u graag van dienst.
Hailo-Werk, Rudolf Loh GmbH & Co. KG
Daimlerstraße 8, 35708 Haiger, Germany
+31 (0) 6 54332 767
E-mail: info@hailo.de
www.hailo.de
Voorwoord
Multifunctionele aluminium steiger Hailo 1-2-3 500 Combi (9459-501)
Pagina 30 / 31
1 Pictogrammen veiligheidsaanwijzingen
1. Gebruik als steiger
2. Gebruik als aanleg- en dubbele ladder
2 /NDERDELENOVERZICHT
Pagina 32 / 33
3 Voormontage
A) Voorbereiding van de horizontale- en diagonale balken
B) Voorbereiding van de leuningstijlen
1. Monteer eerst twee ”Speed Lock“ éénhand-snelsluitsystemen
op elke balk.
2. Draai de zelfborgende moer zodanig vast dat de onderlegring
tegen de schroefdraadbout ligt.
3. Controleer vervolgens of de snelsluiting functioneert.
4. Let op inbouwpositie!
C) Voorbereiding van het werkplatform
Monteer eerst 2 hakensets aan het werkplatform
(diagonaal verplaatst).
D) Bevestiging van de dwarstraversen
1. Monteer dwarstraverse aan ladderdeel 1.
2. Bevestig dwarstraverse met wielenset aan ladderdeel 2.
Opbouwinstructies

15
NL
De steiger mag alleen worden gebruikt, wanneer deze volgens de informatie in deze opbouwinstructies correct
en compleet opgebouwd is en zich in verticale positie bevindt.
De multifunctionele aluminium steiger mag niet worden gebruikt door kinderen.
Gebruik en bewaar de steiger daarom buiten bereik van kinderen.
De steiger moet in een droge omgeving verticaal staand of plat liggend worden opgeslagen/bewaard. Stel de steiger
niet permanent bloot aan weersomstandigheden als regen, ijs, sneeuw enz., om beschadigingen te vermijden.
Problemen en oplossingen:
s %ENOFMEERONDERDELENONTBREKEN
s %ENOFMEERONDERDELENZIJNNA
voltooide montage nog niet gebruikt.
= Controleer de opbouw nogmaals aan
de hand van de opbouwinstructies.
Neem eventueel contact op
(zie pagina 14).
s %ENOFMEERONDERDELENZIJN
defect of vervormd.
= Beschadigde of vervormde onderdelen
moeten vóór de montage worden
vervangen.
Neem eventueel contact op
(zie pagina 14).
Pagina 34 / 35
4 Montage van de multifunctionele steiger
E) Montage van de horizontale- en leuningbalken
& Montage van de diagonale balken
1. Schuif het snelsluitsysteem ”Speed Lock“ in de holle ruimte
van de laddersport.
2. Klap de borghaak omlaag om de ladderstijl heen.
3. Vergrendel het snelsluitsysteem ”Speed Lock“.
G) Bevestiging van het werkplatform
1. Plaats het werkplatform op de laddersporten en bevestig
de beide hakensets (max. 9. sporten van onderaf).
2. Zet de multifunctionele steiger vervolgens op.
5 Demontage
De demontage van de multifunctionele steiger geschiedt in
omgekeerde volgorde.
Aanwijzing: De borghaak, zie afbeelding [X], houdt de balk
of de stijl in inbouwpositie wanneer de snelsluiting wordt
losgemaakt. Draai vóór het verwijderen van de leuningstijlen,
de horizontale- en diagonale balken de borghaken van de
ladder- stijl weg!
Pagina 36 / 37
6 Technische gegevens / opbouwvarianten

16
Esta escada de andaime multifunções de
alumínio destina-se exclusivamente para
utilização em ambiente doméstico.
Leia estas instruções de montagem com
atenção e guarde-as para futuras
referências.
Prezado cliente,
Com a escada de andaime multifunções de
alumínio Hailo 1-2-3.500 500 acabou de
adquirir uma escada versátil e estável.
Esta escada de andaime multifunções de
alumínio corresponde às exigências da
norma EN 131 1-2-3-4 e NF E85-200.
Antes de utilizar a escada de andaime,
queira ler com atenção estas instruções de
montagem. Respeite sobretudo as instruções
de segurança na página 30.
Guarde estas instruções de montagem para
futuras referências.
Em caso de dúvidas ou sugestões quanto ao
andaime multifunções de alumínio, por favor
contacte-nos através do número indicado.
Teremos todo o prazer em o atender.
Hailo-Werk, Rudolf Loh GmbH & Co. KG
Daimlerstraße 8, 35708 Haiger, Alemanha
+49 (0) 2773 82-0
E-mail: info@hailo.de
www.hailo.de
Prefácio
Andaime multifunções de alumínio Hailo 1-2-3 500 Combi (9459-501)
Página 30 / 31
1 Pictogramas Instruções de segurança
1. Utilização como escada de andaime
2. Utilização como escada de encostar e escada dupla
2 Vista geral dos componentes
Página 32 / 33
3 Pré-montagem
A) Preparação das travessas horizontais e diagonais
B) Preparação dos varões
1. Monte previamente os dois sistemas de fecho rápido com uma
única mão „Speed Lock“ em cada travessa.
2. Aperte a porca autofrenante de forma a que a anilha
fique rente ao pino roscado.
3. Verifique depois se o fecho de engate rápido está a funcionar
correctamente.
4. Respeite a posição correcta de montagem!
C) Preparação da plataforma de trabalho
2 Monte previamente o conjunto de ganchos na plataforma
de trabalho (desalinhados na diagonal).
D) Fixação das travessas
1. Monte a travessa horizontal no componente de escada.
2. Fixe a travessa horizontal no conjunto de rodas no
componente de escada 2.
)NSTRUÎÜESDEMONTAGEM

17
PT
Página 34 / 35
4 Montagem da escada de andaime multifunções
E) Montagem das travessas horizontais e dos varões
F) Montagem das travessas diagonais
1. Insira o sistema de fecho rápido „Speed Lock“ na cavidade
prevista para tal no degrau da escada.
2. Feche o gancho de trava virando-o para baixo,
em volta da longarina.
3. Tranque o sistema de fecho rápido „Speed Lock“.
G) Fixação da plataforma de trabalho
1. Encoste a plataforma de trabalho nos degraus e fixe com
os dois conjuntos de ganchos
(máx. 9º degrau contado a partir de baixo).
2. Levante depois a escada de andaime multifunções.
5 Desmontagem
A desmontagem da escada de andaime faz-se
pela ordem inversa.
.OTA/GANCHODESEGURANÎAVERlGURA;8=MANTÏMA
travessa ou a longarina na posição de montagem, quando
se solta o fecho de engate rápido. Antes de remover os varões,
abra os ganchos de segurança nas travessas horizontais e
diagonais nas longarinas das escadas!
Página 36 / 37
6 Dados técnicos / Variantes de montagem
A escada de andaime só deve ser utilizada depois de montada de forma completa e correcta de acordo com as
especificações constantes destas instruções de montagem e depois de colocada na posição vertical.
A escada de andaime multifunções de alumínio não deve ser utilizada por crianças.
Por isso, utilize e guarde a escada de andaime fora do alcance das crianças.
Guarde a escada de andaime num lugar seco, em posição vertical ou deitada. Não exponha a escada de andaime
por períodos mais prolongados a influências atmosféricas como chuva, gelo, neve, etc., a fim de evitar danos.
Problemas e resolução:
s &ALTAMUMOUVÈRIOSCOMPONENTES
s 5MOUVÈRIOSCOMPONENTESNÍOFOI
(foram) ainda utilizados depois da
montagem.
= Verifique novamente a montagem
consultando as instruções
de montagem.
Caso necessário, entre em contacto
com o fabricante (ver página 16).
s 5MOUVÈRIOSCOMPONENTESESTÍO
defeituosos ou deformados.
= Substituir os componentes danificados
ou deformados antes da montagem.
Caso necessário, entre em contacto
com o fabricante (ver página 16).

18
5PUPIMJOÈLPWÄWÈDFÕÃFMPWÄMFuFOÈKFVSÃFOP
WØMVÃOÇQSPQPUÓFCVWEPN¼DOPTUJ
1ÓFEQPVyJUÈNTJQP[PSOÇQÓFÃUÇUFO¼WPE
LNPOU¼yJBVTDIPWFKUFIP
7¼yFO¼[¼LB[OJDFW¼yFOØ[¼LB[OÈLV
T)BJMP$PNCJIMJOÈLPWØN
WÈDFÕÃFMPWØNMFuFOÈNKTUFLPVQJMJ
NOPIPTUSBOOÄBTUBCJMOÈMFuFOÈ
5PUPIMJOÈLPWÄWÈDFÕÃFMPWÄMFuFOÈWZIPWVKF
QPyBEBWLÔNOPSNZ
&//'&
1ÓFEQPVyJUÈNMFuFOÈTJQÓFTOÇQÓFÃUÇUF
O¼WPELNPOU¼yJ%PESyVKUFPC[WM¼ux
CF[QFÃOPTUOÈQPLZOZOBTUSBOÇ
5FOUPO¼WPELNPOU¼yJQSPTÈNVTDIPWFKUF
.¼UFMJKFuUÇPU¼[LZOFCPQPEOÇUZ
LOBuFNVIMJOÈLPWÄNVWÈDFÕÃFMPWÄNV
MFuFOÈUBLO¼N[BUFMFGPOVKUF
+TNF7¼NS¼EJLEJTQP[JDJ
)BJMP8FSL3VEPMG-PI(NC)$P,(
%BJNMFSTUSBºF)BJHFS/ÇNFDLP
&.BJM JOGP!IBJMPEF
XXXIBJMPEF
µWPE
)MJOÈLPWÄWÈDFÕÃFMPWÄMFuFOÈ)BJMP$PNCJ
4USBOB
1JLUPHSBNZ#F[QFÃOPTUOÈVQP[PSOÇOÈ
1PVyJUÈKBLPMFuFOÈ
1PVyJUÈKBLPQÓÈMPyOØBPCPVTUSBOOÇTDIÔEOØyFCÓÈL
£¼TUFÃOØQÓFIMFE
4USBOB
1ÓÈQSBWO¼NPOU¼y
" 1ÓÈQSBWBIPSJ[POU¼MOÈDIBEJBHPO¼MOÈDIW[QÇS
# 1ÓÈQSBWB[¼CSBEFMOÈDINBEFM
1ÓFENPOUVKUFEWBKFEOPSVÃOÈp4QFFE-PDLoSZDIMPV[¼WÇSZ
OBLByEPVW[QÇSV
%PU¼IOÇUFTBNPTWPSOPVNBUJDJOBUPMJLBCZQPEMPyLB
QÓJMFIMBLFTWPSOÈLVTF[¼WJUFN
)OFEQPUPN[LPOUSPMVKUF[EBSZDIMPV[¼WÇSGVOHVKF
%PESyVKUFNPOU¼yOÈQPMPIV
$ 1ÓÈQSBWBQSBDPWOÈQMPuJOZ
1ÓFENPOUVKUFTBEVI¼LÔOBQSBDPWOÈQMPuJOV
EJBHPO¼MOÇQÓFTB[FOÄ
% 1ÓJQFWOÇOÈQÓÈÃOØDIUSBWFS[
1ÓJNPOUVKUFQÓÈÃOPVUSBWFS[VOByFCÓÈLPWØEÈM
1ÓJQFWOÇUFQÓÈÃOPVUSBWFS[VTFTBEPVLPMFÃFLOB
yFCÓÈLPWØEÈM
.ÈVODKMONTÈäI

19
CZ
-FuFOÈTNÈCØUQPVyJUPKFOUFIEZLEZyCZMPEMFQÓFEFNTUBOPWFOØDIÕEBKÔUPIPUPO¼WPEVLNPOU¼yJÓ¼EOÇ
BQMOÇTNPOUPW¼OPBOBDI¼[ÈTFWFTWJTMÄQPMP[F
)MJOÈLPWÄWÈDFÕÃFMPWÄMFuFOÈOFTNÈQPVyÈWBUEÇUJ
1SPUPQPVyÈWFKUFBTLMBEVKUFMFuFOÈNJNPEPTBIEÇUÈ
-FuFOÈTLMBEVKUFTWJTMFOFCPOBMFyBUPWTVDIÄNQSPTUÓFEÈ"CZTUF[BCS¼OJMJQPuLP[FOÈ
OFWZTUBWVKUFMFuFOÈEMPVIPEPCÇQPWÇUSOPTUOÈNWMJWÔNKBLPKFEÄuxMFETOÈIBUE
1SPCMÄNZBÓFuFOÈ
q+FEFOOFCPWÈDFEÈMÔDIZCÈ
q+FEFOOFCPWÈDFEÈMÔOFCZMPQP
ÕTQÇuOÄNPOU¼yJKFuUÇQPVyJUP
;LPOUSPMVKUFNPOU¼yQPEMF
NPOU¼yOÈIPO¼WPEV
1PQÓÈQBEÇLPOUBLUVKUFWJ[TUSBOB
q+FEFOOFCPWÈDFEÈMÔKFWBEOØDIOFCP
EFGPSNPWBOØDI
1PuLP[FOÄOFCPEFGPSNPWBOÄEÈMZ
NVTÈCØUQÓFENPOU¼yÈWZNÇOÇOZ
1PQÓÈQBEÇLPOUBLUVKUFWJ[TUSBOB
4USBOB
.POU¼yWÈDFÕÃFMPWÄIPMFuFOÈ
& .POU¼yIPSJ[POU¼MOÈDIB[¼CSBEMPWØDIW[QÇS
' .POU¼yEJBHPO¼MOÈDIW[QÇS
;BTVÍUFTZTUÄNSZDIMPV[¼WÇSVp4QFFE-PDLoEP
EVUÄIPQSPTUPSVyFCÓÈLPWÄQÓÈÃLZ
1PKJTUOØI¼LTLMPQUFEPMÔLQPTUSBOJDJyFCÓÈLV
4ZTUÄNSZDIMPV[¼WÇSVp4QFFE-PDLo[BCMPLVKUF
( 1ÓJQFWOÇOÈQSBDPWOÈQMPuJOZ
1SBDPWOÈQMPuJOVOBTBÊUFOBQÓÈÃLZyFCÓÈLVB
QÓJQFWOÇUFKJPCÇNBTBEBNJI¼LÔNBYQÓÈÃFLPETQPEV
1PUPNWÈDFÕÃFMPWÄMFuFOÈQPTUBWUF
%FNPOU¼y
%FNPOU¼yWÈDFÕÃFMPWÄIPMFuFOÈQSPCÈI¼WPQBÃOÄNQPÓBEÈ
6QP[PSOÇOÈ1PKJTUOØI¼LWJ[PCS¼[FL<9>ESyÈQÓÈÃLVOFCP
QPTUSBOJDJWNPOU¼yOÈQP[JDJLEZyTFVWPMOÈSZDIMPV[¼WÇS
1ÓFEPETUSBOÇOÈN[¼CSBEFMOÈDINBEFMIPSJ[POU¼MOÈDIB
EJBHPO¼MOÈDIQÓÈÃFLPELMPÍUFQPKJTUOØI¼LPE
yFCÓÈLPWÄQPTUSBOJDF
4USBOB
5FDIOJDLÄÕEBKFNPOU¼yOÈWBSJBOUZ

20
/JOJFKT[FBMVNJOJPXFSVT[UPXBOJF
XJFMPGVOLDZKOFKFTUQS[F[OBD[POF
XZD[OJFEPVZULVEPNPXFHP
1S[FEVZULPXBOJFNOBMFZEPLBEOJF
QS[FD[ZUBÁJOBTUÅQOJFQS[FDIPXZXBÁ
OJOJFKT[JOTUSVLDKÅNPOUBV
4[BOPXOBLMJFOULPT[BOPXOZLMJFODJF
)BJMP$PNCJBMVNJOJPXF
SVT[UPXBOJFXJFMPGVOLDZKOFUPTUBCJMOF
SVT[UPXBOJFPXJFMPSBLJDINPMJXPwDJBDI
[BTUPTPXBOJB
/JOJFKT[FBMVNJOJPXFSVT[UPXBOJF
XJFMPGVOLDZKOFPEQPXJBEBXZNBHBOJPN
OPSNZ&/J/'&
1S[FEVZULPXBOJFNSVT[UPXBOJBQSPTJNZ
PEPLBEOFQS[FD[ZUBOJFOJOJFKT[FK
JOTUSVLDKJNPOUBV1SPTJNZ[XSÎDJÁ
T[D[FHÎMOVXBHÅOBXTLB[ÎXLJEPUZD[DF
CF[QJFD[FÌTUXBQPEBOFOBTUSPOJF
1SPTJNZSÎXOJFPQS[FDIPXZXBOJF
OJOJFKT[FKJOTUSVLDKJNPOUBV
8SB[JFFXFOUVBMOZDIQZUBÌMVCUBLF
XUQMJXPwDJEPUZD[DZDIOBT[FHPBMVNJ
OJPXFHPSVT[UPXBOJBXJFMPGVOLDZKOFHP
QSPTJNZPLPOUBLUUFMFGPOJD[OZ
+FTUFwNZEP1BÌTUXBEZTQP[ZDKJ
)BJMP8FSL3VEPMG-PI(NC)$P,(
%BJNMFSTUSBºF)BJHFS(FSNBOZ
&NBJM JOGP!IBJMPEF
XXXIBJMPEF
4PXPXTUÅQOF
8JFMPGVOLDZKOFSVT[UPXBOJF[BMVNJOJVN)BJMP$PNCJ
4USPOB
1JLUPHSBNZEPUZD[DFXTLB[ÎXFLX[BLSFTJFCF[QJFD[FÌTUXB
4UPTPXBOJFKBLPSVT[UPXBOJB
4UPTPXBOJFKBLPESBCJOZEPTUBXJBOFKJSP[TUBXOFK
;FTUBXJFOJFFMFNFOUÎX
4USPOB
8TUÅQOZNPOUB
" 1S[ZHPUPXBOJFT[D[FCMJQP[JPNZDIJQS[FLUOZDI
# 1S[ZHPUPXBOJFESLÎXCPD[OZDI
1S[ZLBEZNT[D[FCMV[NPOUPXBÁXTUÅQOJFEXBTZTUFNZ
T[ZCLP[D[FLb4QFFE-PDLp
4BNP[BCF[QJFD[BKDFOBLSÅULJEPLSÅDJÁXUBLJTQPTÎC
BCZQPELBELBQS[ZMFHBBEPHXJOUPXBOFHPUS[QJFOJB
4QSBXE[JÁOBTUÅQOJFT[ZCLP[D[LÅQPELUFN
QSBXJEPXFHPE[JBBOJB
;XSÎDJÁVXBHÅOBVNJFKTDPXJFOJF
$ 1S[ZHPUPXBOJFQMBUGPSNZSPCPD[FK
;NPOUPXBÁXTUÅQOJF[FTUBXZIBLÎXQS[ZQMBUGPSNJF
SPCPD[FKQS[FTVOJÅUFQS[FLUOJF
% .PDPXBOJFCFMFLQPQS[FD[OZDI
;BNPOUPXBÁCFMLÅQPQS[FD[OQS[ZFMFNFODJFESBCJOZ
;BQPNPD[FTUBXVLSLÎXKF[EOZDIVNPDPXBÁCFMLÅ
QPQS[FD[OQS[ZFMFNFODJFESBCJOZ
*OTUSVLDKBNPOUBV
La pagina si sta caricando...
La pagina si sta caricando...
La pagina si sta caricando...
La pagina si sta caricando...
La pagina si sta caricando...
La pagina si sta caricando...
La pagina si sta caricando...
La pagina si sta caricando...
La pagina si sta caricando...
La pagina si sta caricando...
La pagina si sta caricando...
La pagina si sta caricando...
La pagina si sta caricando...
La pagina si sta caricando...
La pagina si sta caricando...
La pagina si sta caricando...
La pagina si sta caricando...
La pagina si sta caricando...
La pagina si sta caricando...
La pagina si sta caricando...
-
 1
1
-
 2
2
-
 3
3
-
 4
4
-
 5
5
-
 6
6
-
 7
7
-
 8
8
-
 9
9
-
 10
10
-
 11
11
-
 12
12
-
 13
13
-
 14
14
-
 15
15
-
 16
16
-
 17
17
-
 18
18
-
 19
19
-
 20
20
-
 21
21
-
 22
22
-
 23
23
-
 24
24
-
 25
25
-
 26
26
-
 27
27
-
 28
28
-
 29
29
-
 30
30
-
 31
31
-
 32
32
-
 33
33
-
 34
34
-
 35
35
-
 36
36
-
 37
37
-
 38
38
-
 39
39
-
 40
40


Hailo 9459-501 Assembly Instructions
- Tipo
- Assembly Instructions
- Questo manuale è adatto anche per
in altre lingue
- English: Hailo 9459-501
- français: Hailo 9459-501
- español: Hailo 9459-501
- Deutsch: Hailo 9459-501
- русский: Hailo 9459-501
- Nederlands: Hailo 9459-501
- português: Hailo 9459-501
- Türkçe: Hailo 9459-501
Documenti correlati

Altri documenti
-
 Powerfix Profi HG01975 Operation and Safety Notes
-
Festool MFT/3 Conturo-AP Istruzioni per l'uso
-
Brennenstuhl 1420350 specificazione
-
 Centaure Speed up XL Manuale utente
-
Hilti XBT 4000-A Istruzioni per l'uso
-
-
Bosch PTA 1000 Manuale del proprietario
-
Dremel 2600 PROJECT TABLE Manuale del proprietario
-
Bosch PWB 600 Original Instructions Manual
-
Metabo SE 4000 Istruzioni per l'uso

