Inventor FS405B Floor Standing Fan 50W Manuale utente
- Tipo
- Manuale utente

• USER’S MANUAL
• ΕΓΧΕΙΡΙΔΙΟ ΧΡΗΣΗΣ
• MANUAL UTILIZATORULUI
• BEDIENUNGSANLEITUNG
• MANUEL D’UTILISATEUR
• MANUALE DELL’ UTENTE
• MANUAL DEL PROPIETARIO
FLOOR FAN
MODEL:
FS405B
ENGLISH | ΕΛΛΗΝΙΚΑ | ROMANA | DEUTSCH | FRANÇAIS | ITALIANO | ESPAÑOL


LANGUAGES
ENGLISH .................................................................................................................4
ΕΛΛΗΝΙΚΑ .............................................................................................................11
ROMANA ..............................................................................................................18
DEUTSCH ..............................................................................................................25
FRANÇAIS .............................................................................................................32
ITALIANO .............................................................................................................. 39
ESPAÑOL ..............................................................................................................46

4ΕΝ
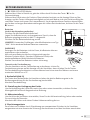
For safe operation please read and follow the below Instructions carefully.
1. If the supply cord is damaged, it must be replaced by the manufacturer or its service agent or a
similarly qualied person in order to avoid a hazard.
2. To avoid the risk of electrical shock, do not immerse the unit, cord or plug in water or any other
liquids.
3. This appliance can be used by children aged from 8 years and above and persons with reduced
physical, sensory or mental capabilities or lack of experience and knowledge if they have been
given supervision or instruction concerning use of the appliance in a safe way and understand
the hazards involved.
Children shall not play with the appliance. Cleaning and user maintenance shall not be made by
children without supervision.
4. When the appliance is not operating, and, prior to cleaning, please unplug from the power
socket.
5. When assembling the fan, make sure that the protective fan grill covers are properly installed.
6. After the fan assembly, do not remove the rotor blade guard.
7. Do not disassemble the rotor blade guard to clean the rotor blades.
8. Use a slightly damp cloth to clean the fan enclosure and rotor blade.
9. Do not allow any water or other liquid to enter the motor housing.
10. Do not dispose this product as unsorted municipal waste. This appliance requires
special treatment for disposal. It is prohibited to dispose of this appliance in domestic
household waste. To prevent possible harm to the environment or human health from
uncontrolled waste disposal, recycle it responsibly to promote the sustainable reuse of material
resources.
To return your used device, contact the retailer, it is possible they may dispose of it at a
recycling facility.
RULES FOR SAFE OPERATION
1. While the fan is operating, no sharp objects, such as pencils, should be inserted through the
protective grill. Be extra cautious when handling and be certain no ngers penetrate beyond
the protective grill area, this should be strictly avoided at all times.
2. Be certain that the fan is disconnected when repositioning from one location to another.
3. Be certain that the fan is on a stable surface while operating, to avoid accidental tipping.
4.Be extra cautious when operating near a window as rain may cause electric shock.
5. This device is intended for domestic use only.
CAUTION
WARNING

5
ΕΝ
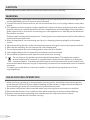
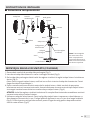
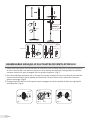
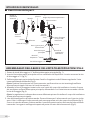
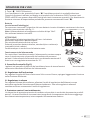
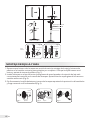
INSTALLATION INSTRUCTIONS
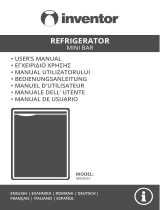
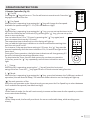
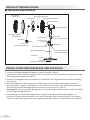
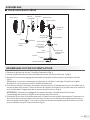
■ Name of components
Note: All the pictures in this manual are for
explanation purpose only. Any discrepancy
between the real object and the illustration
in the drawing shall be subject to the real
subject.
Front grill Fan blade
Plastic nut
Tighten
Spinner
Loosen
Rear grill
Internal Pole
Extension Pole
Motor shaft
Motor housing
Circlip
Thumb
screw
Fasten
Chassis
Height
adjustment ring
7-shape Bolt
Push button
Remote Control Hook
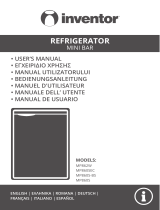
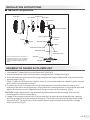
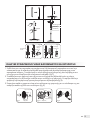
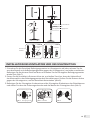
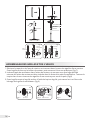
ASSEMBLY OF CHASSIS & COLUMN UNIT
1. Unscrew the 7-shape Bolt from the Extension Pole (Fig.1).
2. Insert the extension pole into the chassis and tighten the 7-shape Bolt (Fig.2).
3. From the extension pole loosen the height adjustment ring and adjust the internal pole to the
desired height. (Fig.3)
(Note: If you can’t nd the internal pole, check if it is housed inside the extension pole. You can
pull it out from the extension pole.)
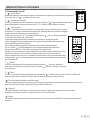
4. To attach the motor housing section to the internal pole, loosen the thumb screw on the
bottom of the motor housing section. Place the motor housing section on the internal pole and
tighten the thumb screw in alignment with the groove on the internal pole. (Fig.4)
CAUTION: Height adjustment ring must be fully fastened before the assembly of the motor
housing section to the internal pole.
5. Usage of the remote control hook: Clip the hook to the internal pole along with the opening,
with the straight face of the accessory facing up. The hook can be moved up and down along
the pole (Fig.5). The hook hole of the remote control may be linked to the hook for storage
when not in use. (Fig.6)

6ΕΝ
Internal
Pole
Annulargroove
Mountinghole
Thumb screw
F
Fig.5 Fig.6
ig.3
Looseen
Fig.4
Fig.1Fig.2
Straight face
Hook
Opening
Hook hole
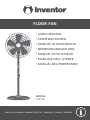
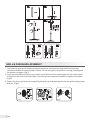
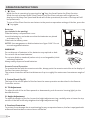
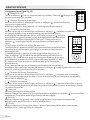
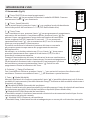
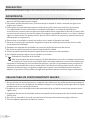
GRILL & FAN BLADE ASSEMBLY
1. Unscrew the spinner clockwise (or take the spinner out from the bag) and the plastic nut
counterclockwise to remove both of them. Fix the rear grill to the motor housing, then tighten
the plastic nut again. (Fig.7)
2. Insert the fan blade into the motor shaft, and make sure the retaining pin on the motor shaft
is tted into the slot of the fan blade. Turn the spinner counterclockwise to tighten the blade.
(Fig.8)
3. Fasten the front grill and the rear grill by the grill clip and then tighten the fan grill locking screw
and nut. (Fig.9)
Fig.7 Fig.8 Fig.9

7
ΕΝ
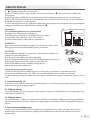
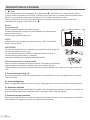
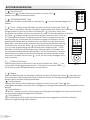
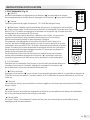
OPERATION INSTRUCTIONS
I. Remote Controller (Fig.10)
1. “ ” On/O
Pressing the “ ” key will turn on. The fan will start at normal mode. Press the “ ”
key again to turn o the fan.
2. “ ” Fan Speed
While the fan is operating, by pressing the “ ” key will change the fan speed.
Available fan speed settings: 0-1-2-3 (O-Low-Medium-High).
3. “ ” Timer
While the fan is operating, by pressing the “ ” key, you can set up the timer to turn
o the fan. While the fan is turned o, by pressing the “ ” key, you can set up the
timer to turn on the fan.
You can select from 0.5 to 7.5 hours by pressing the “ ” key again (each
press increases the timer by 0.5 hours).
The respective timer indication(s) on the display will light up.
You can add the light timer indications to read the selected/remaining time
until the unit turns on/o.
For instance, if the required timer setting is 6.5 hours, the “ ” key must be
pressed repeatedly until the timer indication 0.5h, 2h and 4h are light at the
same time.
During the Timer operation, the light timer indications will change every 0.5
hours to indicate the remaining operation time.
To deactivate the Timer function and restore the continuous operation
of the fan, press the “ ” key repeatedly until all timer indications are not
light.
4. “ ” Swing
While the fan is operating, pressing the “ ” key will start the horizontal
swing of the fan. Press the “ ” key again to turn o the horizontal swing function.
5. “ ” Mode
While the fan is operating, by pressing the “ ” key, you select between the 3 dierent modes of
operation (Normal-Natural-Sleep). The selected mode indication on the display will light up.
“ ” Normal operation of fan.
While the unit operates under Normal mode you can press the Fan Speed key to select between
the 3 available fan speeds (Low-Medium-High).
“ ” Natural
Under Natural mode, the fan will continuously increase and decrease the fan speed to provide a
more natural wind feeling.
“ ” Sleep
Under Sleep mode, the fan will provide air for more comfortable sleep, while working more
silently.
Fig.10
Fig.12
Fig. 12

8ΕΝ
6. “ ” Silent
While the fan is operating, by pressing the “ ” key, the fan will enter the Silent function.
While the unit operates under Silent function only the Silent indicator will be light on the
display, and the keys Fan Speed and Mode will not be operational (the rest of the keys will still
be operational).
To turn o the Silent function and return to the previous operation settings of the fan, press the
“ ” key again.
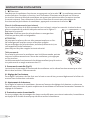
Batteries
(not included in the packing)
Slide the battery compartment cover.
Insert the batteries, and make sure that the batteries are placed
as shown in Fig.11.
Slide back the battery cover.
NOTES: Use manganese or alkaline batteries of type "AAA". Do not
use rechargeable batteries.
WARNING!
Do not dispose of batteries in re, batteries may explode or leak.
Do not mix old and new batteries.
Do not mix alkaline, standard (carbon-zinc) or rechargeable (nickel-
cadmium) batteries.
Always safely dispose of used batteries.
Remote Control Operation
To operate the fan with the remote controller, always point the remote controller at the display of
the fan, then press the keys.
The remote controller will work at distances of up to roughly ve meters and a maximum angle of
±15º.
II. Control Panel (Fig.12)
The keys of the control panel of the fan have the same operation as described in the Remote
Controller section.
III. Tilt Adjustment
To adjust the tilt of the air ow upwards or downwards, push the motor housing lightly to the
desireddirection.
IV. Height Adjustment
To adjust the height of the fan, loosen the height adjustment ring, carefully raise or lower the top
section of the fan and rmly retighten the height adjustment ring.
V. Overheat Protection
To protect from damage due to overheating for any unexpected reason, the fan is equipped with
a thermal fuse that burns out and turns o the fan.
OPERATION INSTRUCTIONS
Fig.11
AAA Battery, 1.5v

9
ΕΝ
This fan requires limited maintenance. Do not attempt to x on your own. Always refer to
qualied personnel if any service is required.
1. Prior to cleaning and assembling, the fan must be unplugged.
2. To ensure adequate air circulation to the fan's motor, vents at the rear of the fan motor should
be free of dust at all times. Do not disassemble the fan in order to remove the dust.
3. The exterior parts of the device may be wiped with a soft and damp (with a mild detergent)
cloth.
4. The use of any abrasive detergent or solvents, gasoline, or paint thinner for cleaning purposes
should be avoided as this may result in damaging the surface of the fan.
5. Water or any other liquids in the motor housing or interior parts of the fan must be avoided at
all times.
CLEANING
1. Prior to performing any cleaning the device must be unplugged.
2. All plastic parts of the device should be cleaned with a soft moist cloth and with mild soap.
Thoroughly clean any soap excess with a dry cloth.
MAINTENANCE INSTRUCTION
All the pictures in the manual are for explanatory purposes only. The actual shape of the unit you
purchased may be slightly dierent, but the operations and functions are the same.
The company may not be held responsible for any misprinted information. The design and the
specications of the product for reasons, such as product improvement, are subject to change
without any prior notice.
Please consult with the manufacturer at +30 211 300 3300 or with the Sales agency for further
details. Any future updates to the manual will be uploaded to the service website, and it is advised
to always check for the latest version.
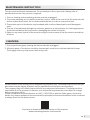
Scan here to download the latest version of this manual.
www.inventorappliances.com/manuals

10 ΕΝ
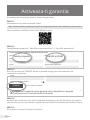
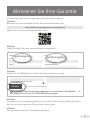
Activate your Warranty
l Visit our web site and activate your warranty via the below link or by
scanning the QR code
https://www.inventorairconditioner.com/warranty-inventor
l Fill all the elds as shown below
þ
once the warranty submission has been completed a conrmation message will be
sent to your email
Full Name*
Address*
Postal Code*
Phone Number*
E-mail*
Unit Type*
Serial Number of the unit*
Date of Purchase*
Invoice Number*
Additional Details
Subscribe to Inventor's Newsletter
Owner details Unit details
To activate the warranty card, please ll in the following elds
* Required eld
With the current warranty card you accept the terms and conditions.
SEND
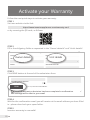
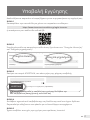
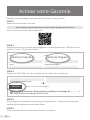
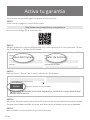
Follow the next quick steps to activate your warranty:
STEP 1
Visit our website via the link:
https://www.inventorappliances.com/warranty-card
or by scanning the QR code, as follows:
STEP 2
Fill in the obligatory fields as requested in the “Owner’s details” and “Unit’s details”:
STEP 4
Wait for the confirmation email you will receive at the email address you have filled
in - please also check your spam folder.
STEP 5
Inventor warranty is now valid!
STEP 3
Click SEND button at the end of the submission form:
þ
once the warranty submission has been completed a conrmation
message will be sent to your email
Activate your Warranty
l Visit our web site and activate your warranty via the below link or by
scanning the QR code
https://www.inventorairconditioner.com/warranty-inventor
l Fill all the elds as shown below
þ
once the warranty submission has been completed a conrmation message will be
sent to your email
Full Name*
Address*
Postal Code*
Phone Number*
E-mail*
Unit Type*
Serial Number of the unit*
Date of Purchase*
Invoice Number*
Additional Details
Subscribe to Inventor's Newsletter
Owner details Unit details
To activate the warranty card, please ll in the following elds
* Required eld
With the current warranty card you accept
the terms and conditions.
SEND
Activate your Warranty
l Visit our web site and activate your warranty via the below link or by
scanning the QR code
https://www.inventorairconditioner.com/warranty-inventor
l
þ
essage will be
sent to your email
Full Name*
Address*
Postal Code*
Phone Number*
E-mail*
Unit Type*
Serial Number of the indoor unit*
Serial Number of the outdoor unit*
Date of Purchase*
Invoice Number*
Additional Details
Subscribe to Inventor's Newsletter
Owner details Unit details
s
With the current warranty card you accept the terms and conditions.
SEND
Activate your Warranty

11
GR
Activate your Warranty
l Visit our web site and activate your warranty via the below link or by
scanning the QR code
https://www.inventorairconditioner.com/warranty-inventor
l Fill all the elds as shown below
þ
once the warranty submission has been completed a conrmation message will be
sent to your email
Full Name*
Address*
Postal Code*
Phone Number*
E-mail*
Unit Type*
Serial Number of the unit*
Date of Purchase*
Invoice Number*
Additional Details
Subscribe to Inventor's Newsletter
Owner details Unit details
To activate the warranty card, please ll in the following elds
* Required eld
With the current warranty card you accept the terms and conditions.
SEND
Follow the next quick steps to activate your warranty:
STEP 1
Visit our website via the link:
https://www.inventorappliances.com/warranty-card
or by scanning the QR code, as follows:
STEP 2
Fill in the obligatory fields as requested in the “Owner’s details” and “Unit’s details”:
STEP 4
Wait for the confirmation email you will receive at the email address you have filled
in - please also check your spam folder.
STEP 5
Inventor warranty is now valid!
STEP 3
Click SEND button at the end of the submission form:
þ
once the warranty submission has been completed a conrmation
message will be sent to your email
Activate your Warranty
l Visit our web site and activate your warranty via the below link or by
scanning the QR code
https://www.inventorairconditioner.com/warranty-inventor
l Fill all the elds as shown below
þ
once the warranty submission has been completed a conrmation message will be
sent to your email
Full Name*
Address*
Postal Code*
Phone Number*
E-mail*
Unit Type*
Serial Number of the unit*
Date of Purchase*
Invoice Number*
Additional Details
Subscribe to Inventor's Newsletter
Owner details Unit details
To activate the warranty card, please ll in the following elds
* Required eld
With the current warranty card you accept
the terms and conditions.
SEND
Activate your Warranty
l Visit our web site and activate your warranty via the below link or by
scanning the QR code
https://www.inventorairconditioner.com/warranty-inventor
l
þ
essage will be
sent to your email
Full Name*
Address*
Postal Code*
Phone Number*
E-mail*
Unit Type*
Serial Number of the indoor unit*
Serial Number of the outdoor unit*
Date of Purchase*
Invoice Number*
Additional Details
Subscribe to Inventor's Newsletter
Owner details Unit details
s
With the current warranty card you accept the terms and conditions.
SEND
Activate your Warranty
l Visit our web site and activate your warranty via the below link or by
scanning the QR code
https://www.inventorairconditioner.com/warranty-inventor
l
þ
essage will be
sent to your email
Full Name*
Address*
Postal Code*
Phone Number*
E-mail*
Unit Type*
Serial Number of the indoor unit*
Serial Number of the outdoor unit*
Date of Purchase*
Invoice Number*
Additional Details
Subscribe to Inventor's Newsletter
Owner details Unit details
s
With the current warranty card you accept the terms and conditions.
SEND
Activate your Warranty
l Visit our web site and activate your warranty via the below link or by
scanning the QR code
https://www.inventorairconditioner.com/warranty-inventor
l
þ
essage will be
sent to your email
Full Name*
Address*
Postal Code*
Phone Number*
E-mail*
Unit Type*
Serial Number of the indoor unit*
Serial Number of the outdoor unit*
Date of Purchase*
Invoice Number*
Additional Details
Subscribe to Inventor's Newsletter
Owner details Unit details
s
With the current warranty card you accept the terms and conditions.
SEND
Activate your Warranty
Για ασφαλή λειτουργία, ακολουθήστε προσεκτικά τις παρακάτω οδηγίες.
1. Εάν το καλώδιο τροφοδοσίας είναι κατεστραμμένο, πρέπει να αντικατασταθεί από τον
κατασκευαστή, τον αντιπρόσωπο σέρβις ή από εξειδικευμένο τεχνικό για να αποφύγετε τον
κίνδυνο.
2. Για να αποφύγετε πιθανό κίνδυνο ηλεκτροπληξίας μην βυθίζετε τη μονάδα, το καλώδιο ή το
βύσμα στο νερό ή σε άλλου είδους υγρά.
3. Η συσκευή μπορεί να χρησιμοποιηθεί από παιδιά ηλικίας από 8 ετών και πάνω και από άτομα
με αναπηρία (ΑμεΑ) ή έλλειψη γνώσης και εμπειρίας, μόνο όταν έχουν επίβλεψη ή οδηγίες
σχετικά με την χρήση της συσκευής με ασφάλεια και κατανοούν τους σχετικούς κινδύνους.
Τα παιδιά δεν επιτρέπεται να παίζουν με την συσκευή. Ο καθαρισμός και η συντήρηση της
συσκευής δεν πρέπει να γίνεται από παιδιά χωρίς επίβλεψη.
4. Πριν από οποιαδήποτε εργασία καθαρισμού της συσκευής, αποσυνδέετε την συσκευή από
την πρίζα.
5. Όταν συναρμολογείτε τον ανεμιστήρα, φροντίστε για την σωστή εγκατάσταση των
προστατευτικών καλυμμάτων της φτερωτής.
6. Μετά την συναρμολόγηση του ανεμιστήρα, μην αφαιρείτε το προστατευτικό κάλυμμα της
φτερωτής.
7. Μην αφαιρείτε το προστατευτικό κάλυμμα της φτερωτής για τον καθαρισμό της φτερωτής.
8. Χρησιμοποιήστε ένα ελαφρά νωπό πανί για τον καθαρισμό της φτερωτής και του καλύμματος
του κινητήρα.
9. Μην αφήνετε νερό ή άλλου είδους υγρά να εισέλθουν στον κινητήρα.
10. Οδηγίες Απόρριψης του προϊόντος
Αυτή η ένδειξη ορίζει ότι το προϊόν αυτό δεν πρέπει να απορρίπτεται όπως τα αστικά
απορρίμματα εντός της Ευρωπαϊκής Ζώνης. Αυτή η συσκευή απαιτεί ειδική επεξεργασία
για τη διάθεση. Προκειμένου να αποφευχθεί πιθανή μόλυνση του περιβάλλοντος ή του
ανθρώπινου οργανισμού από την ανεξέλεγκτη διάθεση των αποβλήτων, ανακυκλώστε με
υπευθυνότητα ώστε να ενισχύσετε την βιώσιμη επαναχρησιμοποίηση των υλικών πόρων.
Για να επιστρέψετε τη χρησιμοποιημένη συσκευή σας, επικοινωνήστε με τον κατάστημα από
όπου αγοράσατε το προϊόν, ώστε να αναλάβει αυτό την ανακύκλωσή του.
ΟΔΗΓΙΕΣ ΓΙΑ ΑΣΦΑΛΗ ΛΕΙΤΟΥΡΓΙΑ
1. Μην τοποθετείτε τα δάχτυλά σας ή άλλα αιχμηρά αντικείμενα εντός των προστατευτικών
καλυμμάτων και ενώ ο ανεμιστήρας βρίσκεται σε λειτουργία. Βεβαιωθείτε ότι η χρήση
του γίνεται πάντα με προσοχή και ότι κάποιο δάχτυλο ή αντικείμενο δεν θα διαπεράσει τα
προστατευτικά καλύμματα.
2. Βεβαιωθείτε ότι ο ανεμιστήρας έχει αποσυνδεθεί από την πρίζα προτού τον μετατοπίσετε
από τη μια θέση στην άλλη.
3. Βεβαιωθείτε ότι ο ανεμιστήρας είναι τοποθετημένος & λειτουργεί σε σταθερό έδαφος,
προκειμένου να αποφύγετε πιθανή ανατροπή του.
4. Μην λειτουργείτε τον ανεμιστήρα κοντά σε παράθυρο, καθώς η βροχή μπορεί να προκαλέσει
ηλεκτροπληξία.
5. Προορίζεται μόνο για οικιακή χρήση.
ΠΡΟΣΟΧΗ
ΠΡΟΕΙΔΟΠΟΙΗΣΗ

12 GR
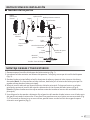
ΟΔΗΓΙΕΣ ΕΓΚΑΤΑΣΤΑΣΗΣ
ΟΔΗΓΙΕΣ ΣΥΝΑΡΜΟΛΟΓΗΣΗΣ ΒΑΣΗΣ ΚΑΙ ΣΤΥΛΟΥ
1. Ξεβιδώστε την γωνιακή βίδα από τον κύριο στύλο (Σχ.1).
2. Εισαγάγετε τον κύριο στύλο στην βάση στήριξης. Τοποθετήστε και συσφίξτε την γωνιακή βίδα
(Σχ.2).
3. Ξεσφίξτε το δαχτυλίδι ρύθμισης ύψους στον κύριο στύλο. Τοποθετήστε και ρυθμίστε στο
επιθυμητό ύψος τον εσωτερικό στύλο (Σχ.3).
(Σημείωση: Εάν δεν βρίσκετε τον εσωτερικό στύλο ελέγξτε εάν είναι τοποθετημένο στον κύριο
στύλο εσωτερικό και αφαιρέστε τον.)
4. Ξεσφίξτε την βίδα σύσφιξης που βρίσκεται στην πίσω πλευρά του κύριου στύλου.
Τοποθετήστε το περίβλημα του κινητήρα στον κύριο στύλο, ευθυγραμμίστε την αυλάκωση
του εσωτερικού στύλου και σφίξτε καλά την βίδα σύσφιξης (Σχ.4).
ΠΡΟΣΟΧΗ: Το δαχτυλίδι ρύθμισης ύψους θα πρέπει να έχει συσφιχθεί καλά πριν την
τοποθέτηση του κελύφους του κινητήρα στον εσωτερικό στύλο.
5. Χρήση του άγκιστρου χειριστηρίου: Συνδέστε το άγκιστρο χειριστηρίου στον εσωτερικό
στύλο με το οριζόντιο τμήμα του αγκίστρου να κοιτάει προς τα πάνω. Το εξάρτημα μπορεί
να μετακινηθεί επάνω στον στύλο ενώ είναι ήδη τοποθετημένο (Σχ.5). Μπορείτε να
χρησιμοποιήσετε το άγκιστρο με την υποδοχή του ασύρματου χειριστηρίου για φύλαξη όσο
δεν χρησιμοποιείται (Σχ.6).
Μπροστινό
κάλυμμα
φτερωτής Φτερωτή
Πλαστικό
Παξιμάδι Πίσω κάλυμμα φτερωτής
Άξονας κινητήρα
Περίβλημα
κινητήρα
Βίδα σύσφιξης
Δαχτυλίδι
ρύθμισης
ύψους
Στερεώστε
Ξέσφιγμα
Περιστροφέας
Δαχτυλίδι
καλύμματος
Σφίξιμο
Πλήκτρα
Εσωτερικός
στύλος
Άγκιστρο
χειριστηρίου
Κύριος
στύλος
Βάση
στήριξης
Γωνιακή βίδα
■ Περιγραφή εξαρτημάτων
Σημείωση:
Οι εικόνες στο παρόν
εγχειρίδιο έχουν
επεξηγηματικό
σκοπό. Σε περίπτωση
που εντοπίσετε
διαφορές ανάμεσα στο
εικονιζόμενο προιόν
και στο πραγματικό,
αναφερθείτε στο
προιόν που αγοράσατε.

13
GR
ΟΔΗΓΙΕΣ ΣΥΝΑΡΜΟΛΟΓΗΣΗΣ ΚΑΛΥΜΜΑΤΟΣ ΚΑΙ ΦΤΕΡΩΤΗΣ
1. Ξεβιδώστε τον περιστροφέα περιστρέφοντας δεξιόστροφα (ή αφαιρέστε τον από την
συσκευασία) και το πλαστικό παξιμάδι περιστρέφοντας αριστερόστροφα για να τα
αφαιρέσετε πλήρως. Τοποθετήστε το πίσω κάλυμμα της φτερωτής στο περίβλημα του
κινητήρα, και συσφίξτε καλά το πλαστικό παξιμάδι (Σχ.7).
2. Τοποθετήστε την φτερωτή στον άξονα του κινητήρα και βεβαιωθείτε ότι ο πείρος
συγκράτησης του άξονα έχει εισέλθει στην υποδοχή της φτερωτής. Συσφίξτε καλά την
φτερωτή περιστρέφοντας αριστερόστροφα τον περιστροφέα (Σχ.8).
3. Στερεώστε καλά το μπροστινό και πίσω κάλυμμα της φτερωτής με τον σύνδεσμο της και
συσφίξτε καλά την βίδα του συνδέσμου (Σχ.9).
Mounting Hole
Ξεσφίξτε
Βίδα σύσφιξης
Αυλάκωση
Υποδοχή
αγκίστρου
Οριζόντιο
τμήμα
Εσωτερικός
στύλο Άγκιστρο
Άνοιγμα
Περιστροφέας Περιστροφέας
Σφίξτε
Υποδοχή
Πείρος
συγκράτησης
Σφίξτε
Ξεσφίξτε
Πλαστικό
παξιμάδι Φτερωτή
Σχ. 1
Σχ. 3
Σχ. 5
Σχ. 2
Σχ. 4
Σχ. 6
Σχ. 7 Σχ. 8 Σχ. 9

14 GR
ΟΔΗΓΙΕΣ ΧΡΗΣΗΣ
I. Ασύρματο χειριστήριο (Σχ.10)
1. “ ”Πλήκτρο On-O
Πιέστε το πλήκτρο “ ” για την ενεργοποίηση της μονάδας. Πιέστε το “ ”πλήκτρο ξανά
για απενεργοποίηση της μονάδας
2. “ ” Πλήκτρο Ταχύτητας Ανεμιστήρα
Κατά την λειτουργία του ανεμιστήρα, πιέστε το πλήκτρο “ ” για να επιλέξετε την
ταχύτητα του ανεμιστήρα.
Διαθέσιμες ταχύτητες ανεμιστήρα: 0-1-2-3 (O-Χαμηλή-Μεσαία-Υψηλή).
3. “ ” Πλήκτρο Χρονοδιακόπτη
Κατά την λειτουργία του ανεμιστήρα, πιέζοντας το πλήκτρο “ ” μπορείτε να ρυθμίσετε
τον χρονοδιακόπτη για την απενεργοποίηση του ανεμιστήρα. Όταν ο
ανεμιστήρας είναι απενεργοποιημένος, πιέζοντας το πλήκτρο “ ” μπορείτε
να ρυθμίσετε τον χρονοδιακόπτη για την απενεργοποίηση του ανεμιστήρα.
Μπορείτε να επιλέξετε ρύθμιση από 0.5 έως και 7.5 ώρες πιέζοντας το
πλήκτρο “ ” επανειλημμένα (κάθε φορά αυξάνεται η ρύθμιση κατά 0.5
ώρες).
Οι αντίστοιχες ενδείξεις της οθόνης θα φωτίσουν.
Προσθέτοντας τις φωτεινές ενδείξεις του χρονοδιακόπτη μπορείτε να δείτε
τον επιλεγμένο/υπολειπόμενο χρόνο μέχρι η μονάδα να ενεργοποιηθεί/
απενεργοποιηθεί.
Για παράδειγμα, εάν η επιθυμητή ρύθμιση χρονοδιακόπτη είναι 6.5
ώρες, το πλήκτρο “ ” θα πρέπει να πατηθεί επανειλημμένα έως ότου οι
ενδείξεις 0.5h, 2h και 4h είναι φωτεινές ταυτόχρονα. Κατά την λειτουργία
χρονοδιακόπτη οι φωτεινές ενδείξεις χρονοδιακόπτη θα αλλάζουν ανά
0.5 ώρες για να υποδεικνύουν τον υπολειπόμενο χρόνο λειτουργίας
χρονοδιακόπτη.
Για την απενεργοποίηση της ρύθμισης χρονοδιακόπτη και επιστροφή σε
συνεχόμενη λειτουργία του ανεμιστήρα, πιέστε το πλήκτρο “ ” επανειλημμένα έως ότου όλες οι
φωτεινές ενδείξεις χρονοδιακόπτη είναι σβηστές.
4. “ ” Πλήκτρο Αυτόματης Περιστροφής
Κατά την λειτουργία του ανεμιστήρα, πιέζοντας το πλήκτρο “ ” ενεργοποιείται η αυτόματη
οριζόντια περιστροφή του ανεμιστήρα. Για την απενεργοποίηση της αυτόματης περιστροφής,
πιέστε ξανά το πλήκτρο “ ”.
5. “ ” Πλήκτρο Λειτουργίας
Κατά την λειτουργία του ανεμιστήρα, πιέζοντας το πλήκτρο “ ” μπορείτε να επιλέξετε ανάμεσα
στις 3 διαφορετικές λειτουργίες του ανεμιστήρα (κανονική, φυσική, ύπνου). Η αντίστοιχη ένδειξη
της οθόνης θα φωτίσει.
“ ” Κανονική
Κανονική λειτουργία του ανεμιστήρα.
Κατά την διάρκεια της κανονικής λειτουργίας μπορείτε να πιέσετε το πλήκτρο “ ” για να επιλέξετε
ανάμεσα στις 3 ταχύτητες ανεμιστήρα (Χαμηλή-Μεσαία-Υψηλή).
“ ” Φυσική
Κατά την διάρκεια της φυσικής λειτουργίας η ταχύτητα του ανεμιστήρα συνεχόμενα θα
αυξομειώνεται, προσδίδοντας πιο φυσική αίσθηση αέρα.
“ ” Ύπνου
Κατά την διάρκεια της λειτουργίας ύπνου ο ανεμιστήρας θα προσδίδει αέρα για πιο άνετες
συνθήκες ύπνου, λειτουργώντας πιο αθόρυβα.
Fig.10
Fig.12
Σχ. 10
Σχ. 12

15
GR
6. “ ” Πλήκτρο Αθόρυβης Λειτουργίας
Κατά την λειτουργία του ανεμιστήρα, πιέζοντας το πλήκτρο “ ” ενεργοποιείται η αθόρυβη
λειτουργία.
Κατά την χρήση σε αθόρυβη λειτουργία, στην οθόνη παραμένει φωτεινή μόνο η αντίστοιχη
ένδειξη, και τα πλήκτρα Ταχύτητας Ανεμιστήρα και Λειτουργίας δεν λειτουργούν (τα υπόλοιπα
πλήκτρα συνεχίζουν να λειτουργούν).
Για την απενεργοποίηση της ρύθμισης αθόρυβης λειτουργίας και επιστροφή στις προηγούμενες
επιλεγμένες ρυθμίσεις, πιέστε ξανά το πλήκτρο “ ”
Μπαταρίες
(δεν συμπεριλαμβάνονται στην συσκευασία)
Αφαιρέστε το κάλυμμα των μπαταριών.
Τοποθετήστε τις μπαταρίες και βεβαιωθείτε ότι έχουν
τοποθετηθεί όπως φαίνεται στην εικόνα Σχ.11.
Επανατοποθετήστε το κάλυμμα των μπαταριών.
ΣΗΜΕΙΩΣΗ:
Χρησιμοποιείστε μπαταρίες μαγγανίου ή αλκαλικές τύπου "AAA".
Μην χρησιμοποιείτε επαναφορτιζόμενες μπαταρίες.
ΠΡΟΣΟΧΗ!
Μην πετάτε τις μπαταρίες στη φωτιά, οι μπαταρίες ενδέχεται να
εκραγούν ή να διαρρεύσουν.
Μην αναμιγνύετε παλιές και νέες μπαταρίες.
Μην αναμιγνύετε αλκαλικές, κανονικές (άνθρακα-ψευδαργύρου) ή
επαναφορτιζόμενες (νικελίου-καδμίου) μπαταρίες.
Φροντίζετε πάντα για την ασφαλή απόρριψη των
χρησιμοποιημένων μπαταριών.
Χρήση ασύρματου χειριστηρίου
Για να λειτουργήσετε τον ανεμιστήρα με το ασύρματο χειριστήριο, στρέφετε πάντα το
ασύρματο χειριστήριο προς την οθόνη του ανεμιστήρα και έπειτα πιέστε το πλήκτρο.
Το ασύρματο χειριστήριο μπορεί να λειτουργήσει σε απόσταση μέχρι 5 μέτρα και μέγιστη γωνία
±15º.
II. Control Panel (Σχ.12)
Τα πλήκτρα του control panel του ανεμιστήρα έχουν την ίδια λειτουργία όπως περιγράφεται στο
τμήμα του ασύρματου χειριστηρίου.
III. Ρύθμιση κλίσης
Για να ρυθμίσετε την κλίση προς τα πάνω ή κάτω, σπρώξτε το περίβλημα του κινητήρα προς την
επιθυμητή κατεύθυνση.
IV. Ρύθμιση ύψους
Για να ρυθμίσετε το ύψος του ανεμιστήρα, ξεσφίξτε το δαχτυλίδι ρύθμισης ύψους, χαμηλώστε ή
υψώστε προσεκτικά το επάνω τμήμα του ανεμιστήρα και συσφίξτε καλά το δαχτυλίδι ρύθμισης
ύψους.
V. Προστασία υπερθέρμανσης
Για την προστασία από πρόκληση ζημιάς λόγω υπερθέρμανσης από μη αναμενόμενο λόγο, ο
ανεμιστήρας είναι εφοδιασμένος με θερμική ασφάλεια που καίγεται και απενεργοποιεί τον
ανεμιστήρα
ΟΔΗΓΙΕΣ ΧΡΗΣΗΣ
Ασύρματο χειριστήριο
Κάλυμμα
μπαταριών
Μπαταρία
1.5V AAA
Σχ. 11

16 GR
Ο ανεμιστήρας απαιτεί περιορισμένη συντήρηση. Μην επιχειρήσετε να τον επιδιορθώσετε
μόνοι σας. Πάντα να απευθύνεστε σε εξειδικευμένο τεχνικό εάν απαιτείται κάποια υπηρεσία.
1. Φροντίστε να αποσυνδέσετε τον ανεμιστήρα από το ρεύμα προτού προχωρήσετε σε
καθαρισμό και συναρμολόγηση του ανεμιστήρα.
2. Για να εξασφαλίσετε επαρκή ανακυκλοφορία του αέρα, φροντίστε οι αεραγωγοί του
ανεμιστήρα να είναι απαλλαγμένοι από σκόνη. Μην αποσυναρμολογείτε τον ανεμιστήρα για
να απομακρύνετε την σκόνη.
3. Τα εξωτερικά μέρη της συσκευής μπορούν να καθαριστούν με ένα μαλακό υγρό πανί,
εμποτισμένο με ήπιο απορρυπαντικό.
4. Αποφύγετε τη χρήση λειαντικών απορρυπαντικών, βενζίνης ή διαλυτικών. Υπάρχει κίνδυνος
να προκληθεί φθορά της επιφάνειας του ανεμιστήρα.
5. Μην ρίχνετε νερό ή άλλου είδους υγρά στο περίβλημα του κινητήρα ή στα εσωτερικά μέρη
της συσκευής.
ΚΑΘΑΡΙΣΜΟΣ
1. Πριν από κάθε καθαρισμό, φροντίστε να αποσυνδέετε την συσκευή.
2. Όλα τα πλαστικά μέρη της συσκευής πρέπει να καθαρίζονται με ένα μαλακό υγρό πανί,
εμποτισμένο με ήπιο απορρυπαντικό. Απομακρύνετε κάθε περίσσεια σαπουνιού με ένα
στεγνό πανί.
ΟΔΗΓΙΕΣ ΣΥΝΤΗΡΗΣΗΣ
Όλες οι εικόνες στο παρόν εγχειρίδιο εξυπηρετούν επεξηγηματικούς σκοπούς.
Το προϊόν που προμηθευτήκατε μπορεί να εμφανίζει ορισμένες διαφορές ως προς το σχήμα,
ωστόσο οι λειτουργίες και τα χαρακτηριστικά παραμένουν ίδια.
Η εταιρεία δεν φέρει ευθύνη για τυχόν τυπογραφικά λάθη. Ο σχεδιασμός και οι προδιαγραφές
του προϊόντος μπορεί να τροποποιηθούν χωρίς προηγούμενη ειδοποίηση με σκοπό τη
βελτίωση των προϊόντων.
Για λεπτομέρειες, απευθυνθείτε στον κατασκευαστή στο 211 300 3300 ή στον αντιπρόσωπο.
Τυχόν ενημερώσεις του εγχειρίδιου θα αναρτηθούν στην ιστοσελίδα του κατασκευαστή,
παρακαλούμε να ελέγξετε για την πιο πρόσφατη έκδοση.
Σαρώστε εδώ για να κατεβάσετε την τελευταία έκδοση του εγχειριδίου.
www.inventoraircondition.gr/media-library

17
GR
Ονοματεπώνυμο*
Διεύθυνση*
Τ.Κ.*
Τηλέφωνο*
Διεύθυνση email*
Τύπος μηχανήματος*
Σειριακός αριθμός μηχανήματος*
Ημερομηνία αγοράς μηχανήματος*
Αριθμός παραστατικού*
Επιπλέον στοιχεία
Να εγγραφώ στο newsletter της Inventor
Στοιχεία ιδιοκτήτη Στοιχεία μηχανήματος
Για να ενεργοποιήσετε την εγγύηση, παρακαλούμε συμπληρώστε τα παρακάτω πεδία
Υποβολή Εγγύησης
l Επισκεφθείτε τη σελίδα μας και ενεργοποιήστε την εγγύησή σας μέσω
του παρακάτω link ή σκανάροντας το QR code
https://www.inventoraircondition.gr/egiisi-inventor
l Συμπληρώστε όλα τα πεδία όπως φαίνονται παρακάτω
þ
Μόλις ολοκληρωθεί η υποβολή της εγγύησης θα λάβετε την επιβεβαίωση
κατοχύρωσης στο email σας
* Απαραίτητο πεδίο
Αποστέλοντας τη φόρμα εγγύησης αποδέχεστε τους όρους και τις προϋποθέσεις.
AΠΟΣΤΟΛΗ
Ακολουθήστε τα παρακάτω σύντομα βήματα για να ενεργοποιήσετε την εγγύησή σας:
ΒΗΜΑ 1
Επισκεφθείτε την ιστοσελίδα μας μέσω του παρακάτω συνδέσμου:
https://www.inventoraircondition.gr/egiisi-inventor
ή σκανάροντας τον ακόλουθο κωδικό QR:
ΒΗΜΑ 2
Συμπληρώστε όλα τα απαραίτητα πεδία όπως ζητούνται στα "Στοιχεία ιδιοκτήτη"
και "Στοιχεία μηχανήματος":
ΒΗΜΑ 4
Θα λάβετε σχετικό mail επιβεβαίωσης στη διεύθυνση email που έχετε δηλώσει.
Παρακαλούμε ελέγξτε και τον φάκελο με τα Ανεπιθύμητα εισερχόμενα.
ΒΗΜΑ 5
Έχετε υποβάλει επιτυχώς την εγγύηση του προϊόντος Inventor!
ΒΗΜΑ 3
Πατήστε το κουμπί ΑΠΟΣΤΟΛΗ, στο κάτω μέρος της φόρμας υποβολής:
þ
Μόλις ολοκληρωθεί η υποβολή της εγγύησης θα λάβετε την
επιβεβαίωση κατοχύρωσης στο email σας
Ονοματεπώνυμο*
Διεύθυνση*
Τ.Κ.*
Τηλέφωνο*
Διεύθυνση email*
Τύπος μηχανήματος*
Σειριακός αριθμός μηχανήματος*
Ημερομηνία αγοράς μηχανήματος*
Αριθμός παραστατικού*
Επιπλέον στοιχεία
Να εγγραφώ στο newsletter της Inventor
Στοιχεία ιδιοκτήτη Στοιχεία μηχανήματος
Για να ενεργοποιήσετε την εγγύηση, παρακαλούμε συμπληρώστε τα παρακάτω πεδία
Υποβολή Εγγύησης
l Επισκεφθείτε τη σελίδα μας και ενεργοποιήστε την εγγύησή σας μέσω
του παρακάτω link ή σκανάροντας το QR code
https://www.inventoraircondition.gr/egiisi-inventor
l Συμπληρώστε όλα τα πεδία όπως φαίνονται παρακάτω
þ
Μόλις ολοκληρωθεί η υποβολή της εγγύησης θα λάβετε την επιβεβαίωση
κατοχύρωσης στο email σας
*
Απαραίτητο πεδίο
Απ
οστέλοντας τη φόρμα εγγύησης αποδέχεστε τους όρους και τις προϋποθέσεις.
AΠΟΣΤΟΛΗ
Ονοματεπώνυμο*
Διεύθυνση*
Τ.Κ.*
Τηλέφωνο*
Διεύθυνση email*
Τύπος μηχανήματος*
Σειριακός αριθμός μηχανήματος*
Ημερομηνία αγοράς μηχανήματος*
Αριθμός παραστατικού*
Επιπλέον στοιχεία
Να εγγραφώ στο newsletter της Inventor
Στοιχεία ιδιοκτήτη Στοιχεία μηχανήματος
Για να ενεργοποιήσετε την εγγύηση, παρακαλούμε συμπληρώστε τα παρακάτω πεδία
Υποβολή Εγγύησης
l Επισκεφθείτε τη σελίδα μας και ενεργοποιήστε την εγγύησή σας μέσω
του παρακάτω link ή σκανάροντας το QR code
https://www.inventoraircondition.gr/egiisi-inventor
l Συμπληρώστε όλα τα πεδία όπως φαίνονται παρακάτω
þ
Μόλις ολοκληρωθεί η υποβολή της εγγύησης θα λάβετε την επιβεβαίωση
κατοχύρωσης στο email σας
* Απαραίτητο πεδίο
Αποστέλοντας τη φόρμα εγγύησης αποδέχεστε τους όρους και τις προϋποθέσεις.
AΠΟΣΤΟΛΗ
Υποβολή Εγγύησης

18 RO
Pentru o functionare sigura, cititi si urmati cu atentie instructiunile de mai jos.
1. Daca cablul de alimentare este deteriorat, acesta trebuie inlocuit de catre producator sau
agentul de service sau de catre o alta persoana calicata pentru a evita orice pericol.
2. Pentru a evita riscul de electrocutare, nu scufundati unitatea, cablul sau stecherul in apa sau in
alte lichide.
3. Acest aparat poate utilizat de copii cu varsta de minim 8 ani, de persoane cu capacitati
zice, senzoriale sau mentale reduse sau cu lipsa de experienta si cunostinte, daca au fost
supravegheate sau instruite cu privire la utilizarea aparatului intr-un mod sigur si care inteleg
pericolele implicate.
Copiii nu se vor juca cu aparatul. Curatarea si intretinerea nu trebuie efectuata de catre copii fara
supravegherea adultilor.
4. Cand aparatul nu functioneaza si, inainte de curatare, va rugam sa il deconectati de la priza.
5. Cand asamblati ventilatorul, asigurati-va ca dispozitivul de protectie a capacelor gratarului
ventilatorului sunt instalate corect.
6. Dupa asamblarea ventilatorului, nu indepartati protectia palelor rotorului.
7. Nu dezasamblati aparatoarea palelor rotorului pentru a curata palele rotorului.
8. Folositi un o carpa umeda pentru a curata carcasa ventilatorului si paleta rotorului.
9. Nu permiteti apei sau altui lichid sa patrunda in carcasa motorului.
10. Nu reciclati acest produs ca deseu municipal nesortat. Acest aparat necesita un
tratament special pentru reciclare. Este interzisa aruncarea acestui aparat la gunoiul
menajer. Pentru a preveni posibilele daune aduse mediului sau sanatatii umane de la
reciclarea necontrolata, reciclati-l in mod responsabil pentru a promova reutilizarea durabila a
resurselor materiale.Pentru a returna dispozitivul folosit, contactati comerciantul cand este
posibil sa-l duca la o unitate de reciclare.
REGULI PENTRU FOLOSIREA IN SIGURANTA
1. In timp ce ventilatorul functioneaza, nu trebuie introduse obiecte ascutite, cum ar creioane
in gratarul de protectie. Fiti precauti atunci cand il manipulati si asigurati-va ca niciun deget nu
patrunde dincolo de zona de protectie a gratarului, acest lucru trebuie evitat cu strictete in orice
moment.
2. Asigurati-va ca ventilatorul este deconectat atunci cand il repozitionati dintr-un loc in altul.
3. Asigurati-va ca ventilatorul se aa pe o suprafata stabila in timpul functionarii,pentru a evita
rasturnarea accidentala.
4. Fiti foarte precauti atunci cand lucrati langa o fereastra, deoarece ploaia poate provoca socuri
electrice.
5. Acest dispozitiv este destinat strict uzului casnic.
ATENTIE
AVERTIZARI

19
RO
INSTRUCTIUNI DE INSTALARE
MONTAJUL SASIULUI SI UNITATII (COLOANA)
1. Desurubati surubul de pe stalpul de prelungire (Fig.1).
2. Introduceti stalpul de extensie in sasiu si strangeti surubul (Fig.2).
3. De la stalpul de prelungire slabiti inelul de reglare a inaltimii si reglati stalpul intern la inaltimea
dorita. (Fig.3)
(Nota: Daca nu gasiti stalpul intern, vericati sa nu e in interiorul stalpului de extensie. Puteti
trage din stalpul de prelungire.)
4. Pentru a atasa sectiunea carcasei motorului la stalpul intern, slabiti surubul de pe partea
inferioara a sectiunii carcasei motorului. Asezati sectiunea carcasei motorului pe stalpul intern
si strangeti surubul mare aliniat cu canelura de pe stalpul intern. (Fig.4)
ATENTIE: Inelul de reglare a inaltimii trebuie sa e complet xat inainte de asamblarea sectiunii
carcasei motorului pe stalpul interior.
5. Utilizarea carligului telecomenzii: Fixati carligul de stalpul intern impreuna cu deschiderea, cu
fata dreapta a accesoriului in sus. Carligul poate deplasat in sus si in jos de-a lungul stalpului
(Fig.5). Oriciul pentru carlig al telecomenzii poate legat de carlig pentru depozitare atunci
cand nu este utilizat. (Fig.6)
Grilaj fata Lamela
ventilatorului
Piulita din
plastic Grilaj spate
Arbore
Carcasa
Surub
Inel de reglare
a inaltimii
Fixati
Slabiti
Rotor
Clip
Strangeti
Buton
Stalp intern
Carlig pentru
telecomanda
Stalp de
prelungire
Sasiu
Surub forma 7
■ Denumirea componentelor
Nota: Toate imaginile
din acest manual au
doar scop explicativ.
Orice discrepanta intre
obiectul real si ilustratia
din desen va preleva.

20 RO
1. Desurubati spinnerul in sensul acelor de ceasornic (sau scoateti spinnerul) si piulita de plastic
in sens invers acelor de ceasornic pentru a le scoate pe amandoua. Fixati grilajul din spatele
carcasei motorului, apoi strangeti din nou piulita de plastic. (Fig.7)
2. Introduceti paleta ventilatorului in locasul motorului si asigurati-va ca surubul de pe arborele
motorului este xat in fanta paletei ventilatorului. Rotiti in sens invers acelor de ceasornic
pentru a strange. (Fig.8)
3. Fixati grilajul din fata si cel din spate si apoi strangeti surubul si piulita de blocare a grilajului
ventilatorului. (Fig.9)
Mounting Hole
Loosen
Thumb srew
Annular groove
Oriciu
pentru carlig
Stalp Intern Carlig
Deschis
Fig. 1
Fig. 3
Fig. 5
Fig. 2
Fig. 4
Fig. 6
Spinner Spinner Tight
Slot
Retaining Pin
Tight
Loose
Plastic nut Blade
Fig. 7 Fig. 8 Fig. 9
ASAMBLAREA GRILAJULUI SI A PALETELOR VENTILATORULUI
La pagina si sta caricando...
La pagina si sta caricando...
La pagina si sta caricando...
La pagina si sta caricando...
La pagina si sta caricando...
La pagina si sta caricando...
La pagina si sta caricando...
La pagina si sta caricando...
La pagina si sta caricando...
La pagina si sta caricando...
La pagina si sta caricando...
La pagina si sta caricando...
La pagina si sta caricando...
La pagina si sta caricando...
La pagina si sta caricando...
La pagina si sta caricando...
La pagina si sta caricando...
La pagina si sta caricando...
La pagina si sta caricando...
La pagina si sta caricando...
La pagina si sta caricando...
La pagina si sta caricando...
La pagina si sta caricando...
La pagina si sta caricando...
La pagina si sta caricando...
La pagina si sta caricando...
La pagina si sta caricando...
La pagina si sta caricando...
La pagina si sta caricando...
La pagina si sta caricando...
La pagina si sta caricando...
La pagina si sta caricando...
La pagina si sta caricando...
La pagina si sta caricando...
La pagina si sta caricando...
La pagina si sta caricando...
-
 1
1
-
 2
2
-
 3
3
-
 4
4
-
 5
5
-
 6
6
-
 7
7
-
 8
8
-
 9
9
-
 10
10
-
 11
11
-
 12
12
-
 13
13
-
 14
14
-
 15
15
-
 16
16
-
 17
17
-
 18
18
-
 19
19
-
 20
20
-
 21
21
-
 22
22
-
 23
23
-
 24
24
-
 25
25
-
 26
26
-
 27
27
-
 28
28
-
 29
29
-
 30
30
-
 31
31
-
 32
32
-
 33
33
-
 34
34
-
 35
35
-
 36
36
-
 37
37
-
 38
38
-
 39
39
-
 40
40
-
 41
41
-
 42
42
-
 43
43
-
 44
44
-
 45
45
-
 46
46
-
 47
47
-
 48
48
-
 49
49
-
 50
50
-
 51
51
-
 52
52
-
 53
53
-
 54
54
-
 55
55
-
 56
56