Belkin 8820ED00388_F7D1401_V1 Manuale utente
- Categoria
- Router
- Tipo
- Manuale utente
Questo manuale è adatto anche per

Surf WIRELESS ROUTER WITH BUILT-IN MODEM
User Manual
8820ed00388_F7D1 401_v1
English
Français
DEutsch
nEDErlanDs

TABLE OF CONTENTS
Getting Started ........................................... 3
What’s in the Box ............................................. 3
Initial Setup .................................................. 3
Advanced Tools & Settings..................................... 8
The Belkin Router Manager .................................... 9
Manual Setup Using Your Browser ............................. 10
Adding Computers to Your Network ............................ 11
Getting to Know Your Router .............................. 13
Front Panel ................................................. 13
Back Panel ................................................. 14
Technical Features .......................................... 15
Technical Details ........................................ 16
System Requirements........................................ 16
Troubleshooting, Support, and Warranty ................... 17
Troubleshooting ............................................. 17
Belkin International, Inc., Limited 2-Year Product Warranty.........25
Regulatory Information ................................... 28
FCC Statement.............................................. 28

3
What’s in the Box
Surf Wireless Modem-Router
ADSL cable (attached to router)
In some regions, a phone-jack adapter (microfilter) will be included.
Power supply (attached to router)
Ethernet cable
Network information card (attached to router)
Belkin Setup CD with User Manual
Initial Setup
Where to Place Your Router
For the best results, place the Router in an open location
away from large metal objects and magnets such as those
found in speakers. Raising the Router above floor level
can improve the strength of your wireless signal.
GETTING STARTED

4
GETTING STARTED
3
1
2
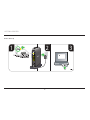
How to Set It Up

5
GETTING STARTED
1. Connect your Router’s ADSL cable to your phone jack or phone-
jack adapter (microfilter). If you are replacing an existing Router
or gateway, this may require unplugging the existing gateway.
Note: If required by your Internet Service Provider (ISP),
plug the included phone-jack adapter (microfilter) into your
wall-mounted phone jack. Please check with your provider
before connecting your Router if you are unsure whether or
not you need to use the included phone-jack adapter.
2. Plug the Router’s power supply into a wall outlet.
3. Put the CD into your computer. If the CD doesn’t
open automatically, please browse to your CD drive
and double-click on the Belkin Setup CD icon.
4. Click the Setup icon on the CD menu.
Setup

6
GETTING STARTED
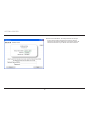
5. After a brief installation, the setup software will ask you
for the network name and password from the network
information card that is attached to your Router. Store the
card under the base of your Router for future reference.

7
GETTING STARTED
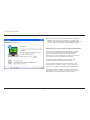
6. A progress screen will appear while additional software is
installed. This may take a few minutes to complete. Once
finished, a “Success” message will appear indicating that you
are connected to the Internet via your new Belkin Router.
During setup you may be asked for additional information.
You may need to enter a username and password provided
by your ISP. This username and password is likely to be
found on materials that came from your ISP when you
signed up for service. If necessary, you may need to contact
your ISP to retrieve your username and password.
If you have a static IP address, you may need to enter
additional information also provided by your ISP.
If your computer doesn’t have a wireless adapter, or the
setup software is unable to control it, you may be asked to
connect your computer to the Router with a network cable.
If the setup software is unable to detect your VCI and VPI
settings based on your country, you may also need to enter
this information. Your ISP is likely to have provided it.

8
GETTING STARTED
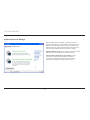
Advanced Tools & Settings
After the initial setup is complete, you have the option to
change settings like your network name, security type, and
password. To make these changes and others, click on the
Advanced Tools icon at the CD Setup menu and select one
of the following settings that you would like to change:
Network Name & Security – Personalize your network name
(SSID), password, and strength of wireless security.
Internet Service Provider & Login Settings – Have
you moved or changed Internet Service Providers?
If you’d like to change these settings without running
through the setup process again, this is the place.

9
GETTING STARTED
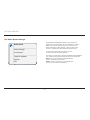
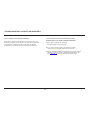
The Belkin Router Manager
Belkin.2234
Router Settings
User Manual
Check for Updates
Options
Exit
The Belkin Router Manager appears in your system tray
(Windows) or menu bar (Mac). Its icon indicates the current
status of your Router and also allows you to access your
Router’s settings to make changes. It also provides quick
access to software that came bundled with your Router.
To access the Router settings, click on the icon
and select from the menu that appears.
The status of your Router is shown by the Belkin Router Manager
icon, which closely mimics the light on the front of the Router.
Green: You are connected to your Belkin Router
and it is connected to the Internet.
Amber: You are connected to your Belkin Router,
but it is not connected to the Internet.

10
GETTING STARTED
In your browser, type “http://router” (you do not need to type
in anything else such as “www”). Then press the Enter key. If
you’re still having trouble running the manual setup option, type
“192.168.2.1” in your browser (you do not need to type in anything
else such as “http://” or “www”). Then press the Enter key.
Manual Setup Using Your Browser

11
GETTING STARTED
Adding Computers to Your Network
Wireless devices such as computers, network printers, and gaming
systems can connect to your Router with a few simple steps.
Using the CD
1. Put the Setup CD into your computer. If the CD
doesn’t open automatically, browse to your CD
drive and open the Belkin Setup CD icon.
2. Click the Setup icon on the CD menu.
3. After a brief installation, the setup software will ask you for the
network name and password from the network information card
that came with your Router. This card is most likely now located
underneath the foot of your Router in the provided card slot.
4. A progress screen will appear while additional software is
installed. This may take a few minutes to complete. Once
finished, a “Success” message will appear indicating that you
are connected to the Internet via your new Belkin Router.
Note: The setup software runs only on
Windows and Mac OS X systems.

12
GETTING STARTED
Manually
If you choose not to use the included Setup CD for
adding additional computers or wireless devices, you
can manually add these items to your network.
1. Locate the wireless-network-connections option
on your computer or wireless device.
2. Select your Belkin Router from the list of available networks. You
can identify your Belkin Router by locating the network name
(SSID) from the card located underneath the foot of your Router.
3. Enter your network password (located on
your network information card).
Your wireless device will take a few moments to connect to your
network. If the connection is not made the first time, try this
process again. If you still have difficulty connecting to your network
after trying this process a few times, see the “Troubleshooting”
section in this manual for help with connecting to your network.
Note: In some cases you may be prompted to select the
security type. It is printed on the card for your convenience.
Using the WPS Button
1. Start WPS Push Button Connection (WPS PBC) on your
computer or other Wi-Fi device that you would like to connect
wirelessly to your Router. Often there will be a button for this
purpose in software that came with the device, or a physical
“WPS,” “PBC,” or “Security” button on the device itself.
2. Within two minutes, press the WPS button on your Router.
The WPS light (small light above WPS button) will blink green while
it listens for your Wi-Fi device. Once a connection is established, the
light will turn green and then go out. If a connection is not established,
the light will blink amber. You may repeat the process to try again.
You can repeat this process for each WPS-enabled
device you’d like to add to your network.

13
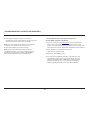
GETTING TO KNOW YOUR ROUTER
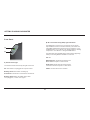
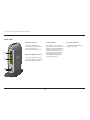
A) Router Status Light
Your Router’s status is shown by the light on the front.
Off: The Router is not plugged into a power source.
Blinking Green: The Router is starting up.
Solid Green: The Router is connected to the Internet.
Blinking Amber: Either the ADSL (RJ11) cable
is not plugged in, or there is no signal.
B) Wi-Fi Protected Setup (WPS) Light and Button
The WPS button on the front of your Router can be used to
help establish a secure connection between your Router and
other WPS-enabled Wi-Fi devices such as computers. To use
the WPS feature on your Router, see “Getting Started > Adding
Computers to Your Network > Using the WPS Button”.
The small light near the WPS button shows what is happening
while you are using WPS to establish a connection.
Off: Idle
Blinking Green: The Router is listening for a
WPS-enabled computer or other device.
Solid Green: The Router has made a secure
connection with the computer or other device.
Amber: A connection was not created.
Front Panel
(a)
(b)

14
GETTING TO KNOW YOUR ROUTER
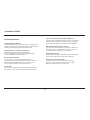
A) ADSL Connector
Connect your Router to a
phone jack using a telephone
cord. In some areas, a
microfilter might be required.
B) Wired (LAN) Connectors
Connect computers and other
wired network devices to these
ports using Ethernet cables.
C) Reset Button
This button is used to restart
your Router in rare cases when it
functions incorrectly. Resetting
the Router will preserve your
settings. This button may also
be used to restore the factory
default settings. Please see
the Troubleshooting section
for more information.
D) Power Connector
Connect the included power
supply to this jack.
Back Panel
(a)
(b)
(c)
(d)

15
TECHNICAL DETAILS
Technical Features
Integrated ADSL2+ Modem
The integrated ADSL2+ modem allows you to connect to the
Internet via your local Internet Service Provider (ISP) without
installing and maintaining a separate DSL modem.
Integrated 802.11n Wireless Access Point
The N150 technology enhances your Router’s
wireless capabilities, allowing for data transfer speeds
of up to 150Mbps across your network.
NAT IP Address Sharing
To save you the cost of adding IP addresses per
computer in your house, your Belkin Router uses Network
Address Translation (NAT) technology, allowing you to
share a single IP address across your network.
SPI Firewall
Your Router is equipped with a firewall that will protect your
network from a wide array of common attacks and viruses.
Universal Plug-and-Play (UPnP) Compatibility
The UPnP (Universal Plug-and-Play) feature in your Router
offers seamless operation of voice and video messaging,
games, and other applications that are UPnP-compliant.
Web-Based Advanced User Interface
You can easily make changes to your Router’s advanced
settings through your web browser. These changes can
be made from any computer on your network.
Belkin Router Monitor
The Belkin Router Monitor application helps you to monitor
your Router’s status and change network settings.
Integrated 4-Port 10/100 Switch
Your Router has a built-in, 4-port network switch to
allow your wired computers to share: printers, data,
MP3 files, digital photos, and much more.

16
TECHNICAL DETAILS
System Requirements
Modem Router
Broadband ADSL Internet connection with
RJ11 (telephone) connection
At least one computer with an installed network interface adapter
TCP/IP networking protocol installed on each computer
RJ11 ADSL telephone cable
Internet browser
Setup Software
A computer running Windows
®
XP SP2 and higher,
Windows Vista
®
32 and 64 bit, or
Windows 7 32 and 64 bit;
or Mac OS
®
X, 10.5 and 10.6
Minimum 1GHz processor and 256MB RAM
600MB of free hard-drive space for installation

17
TROUBLESHOOTING, SUPPORT, AND WARRANTY
Troubleshooting
The Setup CD does not automatically start.
If Belkin Setup does not run when you insert the CD-ROM, your
computer may not be configured to open CDs automatically.
If Belkin Setup does not appear within 15 seconds, browse
to your CD-ROM drive and open the “Belkin Setup” icon.
Alternatively, you may visit http://router/ and perform the
setup manually. Please see “Manual Setup Using Your
Browser” earlier in this manual for more information.
Belkin Setup cannot find my Router.
If Belkin Setup is not able to communicate with your Router during
the installation process, please check the following items.
1. Make sure that the wireless hardware on your
computer is turned on, if available.
2. Try connecting your computer to one of the four “wired”
ports on the Router with an Ethernet cable.
3. Ensure that the Router is on. The front-panel light should be on.
4. Unplug the Router’s power supply for 10
seconds, then plug it back in.
5. There may be firewall software on your computer preventing
an outgoing connection. You may choose to temporarily
disable this software before attempting setup.
If Belkin Setup still cannot find the Router, you might choose
to do a manual setup. Refer to “Manually Configuring
Network Settings” in this manual for details.

18
TROUBLESHOOTING, SUPPORT, AND WARRANTY
Belkin Setup cannot connect my Router to the Internet.
If Belkin Setup is not able to connect the Router to
the Internet, please check the following items:
1. Use the troubleshooting suggestions within Belkin Setup.
2. If your ISP requires a user name and password, make sure that
you have typed in your user name and password correctly. Some
user names require that the ISP’s domain may be at the end of the
name. Example: “myname@myisp.com”. The “@myisp.com” part of
the user name may need to be typed as well as your user name.
3. If you continue to have no Internet connection, refer
to “Manually Configuring Network Settings” in this
manual for an alternative setup method.
Belkin Setup completed installation, but I cannot browse the
Web. The light on the front of my Router is blinking amber.
1. Make sure the Router is connected to your ADSL line with an
RJ11 (telephone) cable via the Router’s one gray ADSL port.
2. Check that the modem (ADSL) connection is
connected to your broadband (ADSL) socket on the
wall (via an ADSL filter if one is required).
3. Unplug your Router’s power supply, wait 10 seconds,
and plug it back in. This will cause the Router to try to
reestablish communication with the ADSL line.

19
TROUBLESHOOTING, SUPPORT, AND WARRANTY
I can’t connect to the Internet wirelessly.
If the light on the front of the Router is solid green, then your
Router is connected to the Internet. You may not be connected
to the Router’s wireless network. Please refer to “Adding
Computers to Your Network” in this manual for instructions.
I can’t connect to the Internet wirelessly and my
network name is not listed in Available Networks.
1. Verify that your Router is on and the
front-panel light shows solid green.
2. If you are far from the Router, you might try moving
closer to see if you might have been out of range.
3. Using a computer attached to the Router via a network cable,
visit http://router/ and ensure that “Broadcast SSID” is ON.
This setting is found on the “Channel and SSID” page.

20
TROUBLESHOOTING, SUPPORT, AND WARRANTY
My wireless network per formance is slow, inconsistent,
suffers from weak signal, or I’m having difficulty maintaining a
VPN connection.
Wireless technology is radio-based, which means connectivity
and the throughput performance between devices
decreases when the distance between devices increases.
Other factors that will cause signal degradation (metal is
generally the worst culprit) are obstructions such as walls
and metal appliances. Note also that connection speed may
decrease as you move farther away from the Router.
In order to determine if wireless issues are related to
range, we suggest temporarily moving the computer
within 10 feet from the Router if possible.
Changing the wireless channel—Depending on local
wireless traffic and interference, switching the wireless
channel of your network can improve performance and
reliability. See the section titled “Changing the Wireless
Channel” for instructions on how to choose other channels.
Limiting the wireless transmit rate—Limiting the wireless transmit
rate can help improve range and connection stability. Most wireless
cards have the ability to limit the transmission rate. To change this
property in Windows, go to the Windows Control Panel, open “Network
Connections”, and double-click on your wireless card’s connection. In
the properties dialog, select the “Configure” button on the “General”
tab, then choose the “Advanced” tab and select the rate property.
Wireless client cards are usually set to automatically adjust
the wireless transmit rate for you, but doing so can cause
periodic disconnects when the wireless signal is too weak; as
a rule, slower transmission rates are more stable. Experiment
with different connection rates until you find the best one
for your environment. Note that all available transmission
rates should be acceptable for browsing the Internet. For
more assistance, see your wireless card’s user manual.
La pagina si sta caricando...
La pagina si sta caricando...
La pagina si sta caricando...
La pagina si sta caricando...
La pagina si sta caricando...
La pagina si sta caricando...
La pagina si sta caricando...
La pagina si sta caricando...
La pagina si sta caricando...
La pagina si sta caricando...
La pagina si sta caricando...
-
 1
1
-
 2
2
-
 3
3
-
 4
4
-
 5
5
-
 6
6
-
 7
7
-
 8
8
-
 9
9
-
 10
10
-
 11
11
-
 12
12
-
 13
13
-
 14
14
-
 15
15
-
 16
16
-
 17
17
-
 18
18
-
 19
19
-
 20
20
-
 21
21
-
 22
22
-
 23
23
-
 24
24
-
 25
25
-
 26
26
-
 27
27
-
 28
28
-
 29
29
-
 30
30
-
 31
31


Belkin 8820ED00388_F7D1401_V1 Manuale utente
- Categoria
- Router
- Tipo
- Manuale utente
- Questo manuale è adatto anche per
in altre lingue
Documenti correlati
-
Belkin Modem 8820nt00398_F7D4402_v1 Manuale utente
-
-
-
Belkin F5D8232-4 Manuale del proprietario
-
-
-
-
-
-