
Ed. 1.1
User Guide - EN
Guida Utente - IT
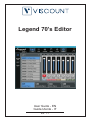
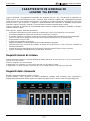
Legend 70’s Editor

User Guide
Legend 70's Editor
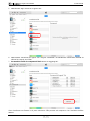
INDEX
NOTES ABOUT THIS GUIDE................................................................................................................................................ 1
GENERAL CHARACTERISTICS OF LEGEND '70s EDITOR ............................................................................................ 2
LEGEND '70s EDITOR ........................................................................................................................................................... 2
Minimum system requirements ......................................................................................................................................... 2
Instrument Requirements .................................................................................................................................................. 2
STARTING THE APPLICATION............................................................................................................................................ 3
Installing the application .................................................................................................................................................... 3
Connecting the Legend '70s ............................................................................................................................................. 3
Error messages displayed during connection ................................................................................................................. 5
Sections of the Legend '70s Editor ................................................................................................................................... 6
LIVE SECTION ........................................................................................................................................................................ 7
Song Mode ......................................................................................................................................................................... 8
Program Mode ................................................................................................................................................................... 9
Live Set 1 and Live Set 2 ................................................................................................................................................ 10
SONG SECTION ................................................................................................................................................................... 11
PROGRAM SECTION .......................................................................................................................................................... 13
File transfer between computer and iPad ...................................................................................................................... 14
TIMBRE SECTION ............................................................................................................................................................... 17
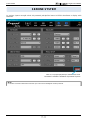
SYSTEM SECTION .............................................................................................................................................................. 20
NOTES ABOUT THIS GUIDE
Please keep this user guide safe
This user guide is an integral part of the product. The descriptions and illustrations contained in this
publication are subject to change.
Without prejudice to the essential characteristics of the product, the manufacturer reserves the right to make
any changes to parts, details and accessories that it deems appropriate for the improvement of the product
or for construction or commercial needs, at any time and without undertaking to update this publication
promptly.
All rights reserved, no part of this manual may be reproduced in any form without the express written
permission of the manufacturer.
All trademarks mentioned in this manual are the property of their respective manufacturers.
Please read the enclosed information carefully. You will avoid wasting time and get the best performance
from the product.
The initials or numbers in square brackets [ ] indicate the names of the commands and connectors of the
instrument. For example, [VOLUME] indicates VOLUME potentiometer.
The illustrations and screens are for information purposes only and may differ from your application.
The information described in this guide refers to the application version when the document was written and
may not reflect the functionality of the version you are using. Therefore, please check the website
www.viscountinstruments.com periodically for the latest version and the availability of a more up-to-date
guide.
For a description of the adjustable functions and parameters in the Legend '70s Editor but also present in
the Legend '70s instrument and not described in this user guide, please refer to the user manual of that
instrument.
This user guide is updated to version 1.02 of the application.

User Guide
Legend 70's Editor
GENERAL CHARACTERISTICS OF
THE LEGEND '70s EDITOR
The Legend '70s Editor is an application available for Windows, MacOS and iOS, which allows real-time
adjustment and storage of all parameters available in the Legend '70s instrument. The application also allows
the selection of various instrument models and the adjustment of additional sound parameters of the E.Piano,
Clavi and A.Piano modules. You can also save any Program in your computer and reload it quickly and easily.
The Legend '70s Editor has a clear and simple user interface, which works with any screen resolution.
Specifically, the Legend '70s Editor allows you to:
select the instruments’ Song mode and select the Songs and Programs they contain.
select the instruments’ Program mode and select Programs.
turn on/off and adjust the volumes of each installed module in a single screen.
create Live Sets, i.e. groups of up to 24 Programs that can be quickly recalled with a simple click.
program Songs and Lists.
adjust all Program parameters.
save the Programs to a computer and reload them back to the instrument when needed.
select the desired instrument model for each position of the E.Piano, Clavi and A.Piano timbre selector.
adjust additional sound generation parameters of the E.Piano, Clavi and A.Piano modules.
adjust the main parameters of the instrument's System menu.
Minimum system requirements
Operating System: Windows 7 (64 bit), Windows 8 (64 bit), Windows 10, Mac OS X ver. Lion 10.7 or later, iOS
ver. 9.2 or later.
Ports on computer: a standard USB
Computer connection: A USB type A-B cable no longer than 3 meters.
Connection with iPad: Camera Connection Kit. One USB cable type A-B not longer than 3 meters.
Instrument Requirements
Model: Legend '70s Artist-W, Artist or Compact
Firmware Release: 1.03 or higher (the release currently installed in the instrument is shown on the display when
the instrument is turned on or by the Legend '70s Editor at the top right as shown below).

User Guide
Legend 70's Editor
STARTING THE APPLICATION
Installing the application
The application installation varies depending on your operating system.
Windows
1. Download the file Legend ‘70s Editor Setup vX.yy.exe from www.viscountinstruments.com
2. Click on the downloaded file to start the installation and follow the prompts on the screen.
3. Once the installation is complete, click on the file icon or on the desktop icon to launch the application.
MacOS
1. Download the Viscount Legend '70s Editor (Mac OS X) vX.YY. app from www.viscountinstruments.com.
2. Open the .zip file and copy the contents to your "Applications" folder.
3. Once the installation is complete, launch the application from the "Applications" folder.
iOS
1. Download the Legend '70s Editor app from the App Store.
2. Once the installation is complete, click on the icon to launch the application.
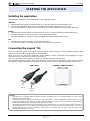
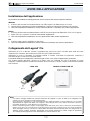
Connecting the Legend '70s
Using PC or MacOS, plug a USB Type A connector into one of the USB ports of your computer and the Type B
connector into the [USB TO HOST] port on the instrument.
When using an iPad, connect the instrument via the optional Camera Connection Kit by plugging the Type A
connector into the USB port on the iPad Connection Kit.
You can connect while the instrument is already on and the application already open.
With Windows operating systems, if this is the first time you connect the instrument to your computer via USB,
the operating system will ask you to install the necessary drivers. To do so, follow the prompts on the screen.
USB CABLE CAMERA CONNECTION KIT
NOTES
- With iPad we recommend using the original Camera Connection Kit. If a non-Apple adapter is used, correct
operation is not guaranteed.
- If the instrument Local Off function (UTILITY / MIDI SETTINGS / LOCAL CONTROL screen) is active, for the
Legend '70s Editor to work correctly, on the connected computer or iPad the Thru function has to be activated
between the MIDI input and output ports used with the instrument.
- If the operating system denies saving the file due to lack of permissions, or if you are no longer able to overwrite a
file already present on your computer (without displaying an error message), right-click on the file icon (also on the
desktop shortcut), then choose "Properties". Now select the "Security" tab and check "Run this program as
administrator". Finally click on "Ok".
Connector
type A
Connector
type B

User Guide
Legend 70's Editor
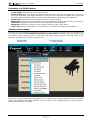
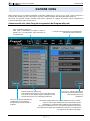
When started, the application will show this page:
First, connect to the instrument, to do so click the
CONNECT button.
If the connection time is longer than expected, this
message is displayed:
The name of the connected Legend 70’s model will appear a
few seconds later (as in the picture) and Legend 70’s Editor
will show the current parameters of the instrument.
This means that all the adjustments performed through the
Legend 70’s Editor interface before connecting the instrument
will be lost.
NOTE
Subsequent restarts of the application will open the LIVE screen section last selected prior to closing the app.
NOTE
On older computers, you can be disconnected if many other
applications, in addition to the Legend 70’s Editor, are open and
there’s a high computer workload. In this case we recommended
you close unneeded applications.

User Guide
Legend 70's Editor
Error messages displayed during connection
Device not found
(Device not found! Please, check USB connection and retry...)
The Legend '70s Editor cannot connect to the instrument because it is not being detected between USB devices
connected to your computer or iPad.
If the instrument is properly connected to your computer or iPad, close the application, then turn the instrument
off and on again and restart the application.
MIDI port already in use
(The midi port may be in use by another application. Please, close it and retry)
The Legend '70s Editor cannot connect to the instrument if there are other applications open in the computer
that use the port connected to the Legend '70s and identified as "MIDI2 (Viscount Legend)" or "Viscount Legend
Port 2". If you want to use the Legend '70s Editor, close the other applications connected to this port.
Connection lost
(The connection to the device has been lost. Please, reconnect to the device)
The Legend '70s Editor has lost communication with the connected instrument. Make sure it is turned on and
that the USB cable or Camera Connection Kit (when used with an iPad) is connected and undamaged.
Data reception problems
(Failed to receive data. Please reconnect to the device)
The Legend '70s Editor cannot receive all the necessary data from the instrument.
If the instrument is properly connected to your computer or iPad, close the application, then turn the instrument
off and on again and restart the application.
Instrument firmware not updated
(Legend '70s firmware is out of date! Please, update the firmware to rel 1.03 or later)
In order to use the Legend '70s Editor, firmware version 1.03 or later must be installed on the instrument.
Download the latest available version from www.viscountinstruments.com
Legend '70s Editor version not updated
(Legend '70s Editor is too old. Please, download the latest editor)
You are running and older version of Legend ‘70s Editor which is not compatible with the firmware currently
installed on your instrument. Download the latest version of the editor at www.viscountinsntruments.com.

User Guide
Legend 70's Editor
Sections of the Legend '70s Editor
The top menu bar of the screen is where you’ll find the buttons for the Legend '70s Editor sections and for
connecting the editor to the instrument.
These buttons recall the following areas:
LIVE: to a live use of the instrument.
SONG: to create Songs and Lists.
PROGRAM: to edit Programs.
TIMBRE: to advanced adjustments of the timbres in the E.Piano, Clavi and A.Piano modules.
SYSTEM: to set the instrument system parameters.
CONNECT: to connect/disconnect the Legend '70s Editor to the instrument.
METHODS OF PARAMETER ADJUSTMENT
The adjustment of the parameters is simple and intuitive and can be done in two modes:
Click on the + and - buttons to increase or decrease the value or ON/OFF buttons to activate or deactivate a
control.
In continuous controls (slider) by moving the cursor or using the mouse wheel.
Click once on the displayed value and enter the value with the keyboard.

User Guide
Legend 70's Editor
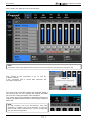
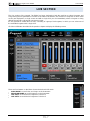
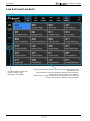
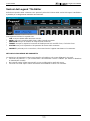
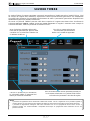
LIVE SECTION
The Live section of the Legend '70s Editor has been designed to help the musician to select Programs and
Songs during the live performance. Thanks to the editor user interface, the selection of Programs is much faster
as they are displayed in a single screen and with a single click you can immediately select a Program or Song
without the need to scroll through unnecessary ones.
It’s also possible to create two Live Sets, consisting of a group of 24 Programs, in which you can select one of
the available Programs with a single click.
Click the LIVE button described in the previous chapter to display the following screen:
There are four buttons on the left to choose the desired LIVE mode:
SONG MODE: to recall Lists and Songs on the instrument.
PROGRAM MODE: to recall Programs on the instrument.
LIVE SET 1: to recall the 24 Programs of Live Set 1.
LIVE SET 2: to recall the 24 Programs of Live Set 2.

User Guide
Legend 70's Editor
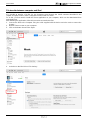
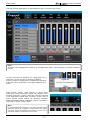
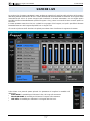
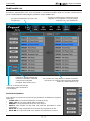
Song Mode
Below is a description of the areas on this screen:
List and Song Selection
Control of the modules
List selection area.
Click in this area to open the drop-down menu to select
the desired List.
Song selection area.
The boxes show the location and the name of the Song.
Click in the Song boxes to select the desired Song.
Volume slider control
of the modules.
Module names.
Shows the modules
Output Routing.
Module on/off buttons.
Timbre selected in each module.
Double click in these boxes to bring up the
timbre selection screen.
For the External module the selected Program
Change is indicated.

User Guide
Legend 70's Editor
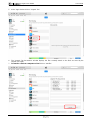
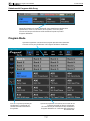
Song Program Selection
Program Mode
These boxes show the four parts of the currently selected Song and
display the name and location of the Program in each block.
Click on the boxes to select the part and then the desired Program on the
instrument.
These boxes show the 16 Program banks.
Click on the boxes to view the 16 Programs of the desired bank.
These boxes show the location and name of the 16
Programs in the selected bank.
Click on the boxes to select the desired Program.
The box turns blue to confirm your selection.
Click this button to display the
module controls screen
described in Song Mode.

User Guide
Legend 70's Editor
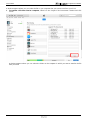
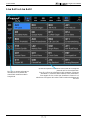
Live Set 1 and Live Set 2
These boxes show the location and name of the 24 Programs in the
selected Live Set.
Click the boxes to select the desired Program on the instrument.
The box turns blue to confirm your selection.
Double-click on a box to display the menu where you can select the
Program to insert in the desired Live Set location.
Click this button to display the
module controls screen
described in Song Mode.

User Guide
Legend 70's Editor
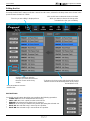
SONG SECTION
In the Song section of the Legend '70s Editor you can edit both Lists and Songs, i.e. assign the Programs to the
four parts of the Song and define the order of the Songs within the Lists.
Click on the SONG button in the top menu of the Legend 70's Editor to display the Song section main screen.
Selecting Lists, Songs and assigning Programs to parts
List selection area.
Click in this area to open the drop-down menu
to select the desired List.
Song selection area. The boxes show the location
and the name of the Song.
Click in the Song boxes to select the Song you
have to modify.
Location and name of the currently
selected Song in the instrument.
Click this button to permanently
store the modified Song.
Click this button to display the
Edit List screen (described
below).
These boxes represent the four parts of the current Song.
Click on the boxes to select the desired part. The box turns
blue to confirm your selection.
Click on the black rectangle showing the location and name
of the Program to display the menu in which to select the
Program to assign to the part.

User Guide
Legend 70's Editor
Editing the List
Pressing the EDIT LIST button recalls the current List edit screen, selected in the drop-down menu shown in the
previous image (SONG LIST field).
EDIT BUTTONS
On the left are six buttons that allow you to perform the following operations:
CLEAR LIST: the List is initialized with all Init Song.
COPY LIST: the List is copied from the SOURCE List.
REMOVE: the selected Song (blue box) is removed.
INSERT: an Init Song is inserted in the position preceding the selected one.
MOVE UP: the selected Song is moved up one position.
MOVE DN: the selected Song is moved down one position.
The List you are editing is displayed here.
Click on this box to select the Source List from
which you want to choose the Songs to be
included in the List you are editing.
To insert a List Song on the right (SOURCE), drag it
with the mouse to the desired position in the List on
the left (EDIT LIST).
Click this button to undo the
changes you made and return to
the main screen of the Song
section.
Click this button to store the
modified List

User Guide
Legend 70's Editor
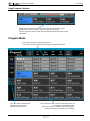
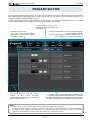
PROGRAM SECTION
In the Program section of the Legend '70s Editor you can edit the Programs. In this section you can find all the
parameters showed in the display menus of the Legend '70s, you can also save the individual Program to your
computer or iPad and reload it when desired.
Click the PROGRAM button on the top menu of the Legend 70's Editor to display the screen for a specific
section of the Program. The COMMON screen is shown below as an example:
NOTE
- Refer to the user's manual of the instrument for detailed description of all parameters.
- In order to load the Programs, saved on a computer or iPad, directly on the instrument, the .L7P files generated by
the Editor must be copied (or saved directly) in a "Legend'70s \ Program" folder (to be created if not already
present) on the USB stick for a later use with the instrument's Load Program function.
Click the SAVE button to save the current Program
to your computer or iPad.
Click the LOAD button to load a Program saved on
your computer or iPad into the instrument.
Program selection area.
Click in this area to open the drop-
down menu to select the Program
you have to modify.
Click this button to store on the
instrument the Program with the
changes made.
Click these boxes to view the relevant
sections of the current Program,
corresponding to the sections in the EDIT
menu of the instrument.
Display area of all the parameters available in the
Program section selected with the buttons on the left.
The names and function of the parameters are the same
as those in the EDIT menu sections of the instrument.

User Guide
Legend 70's Editor
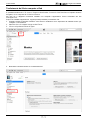
File transfer between computer and iPad
It is possible to transfer .L7P files (i.e. the Programs saved through the SAVE command described in the
chapter "Program Section") from a computer to an iPad and vice versa.
To do this, you first need to install the iTunes application on your computer, which can be downloaded from
www.apple.com.
After installing the application, follow this procedure to transfer the files:
1. Connect the iPad to the computer using the cable supplied with the device and also used to connect the
charger.
2. Wait for iTunes to start on your computer.
3. Click on the button shown in the figure:
4. In the bar on the left click on "File sharing".

User Guide
Legend 70's Editor
5. In the "App" window click on "Legend '70s".
6. The "Legend '70s Documents" window displays the files currently stored on the iPad and used by the
Legend 70's Editor.
7. To transfer a file from computer to iPad click on "Add file".

User Guide
Legend 70's Editor
A window appears where you can select the file on your computer that you want to transfer to your iPad.
8. To transfer a file from iPad to computer, select it in the "Legend '70s Documents" window and click
"Save".
A window appears where you can select the folder on the computer in which you want to transfer the file
from your iPad.

User Guide
Legend 70's Editor
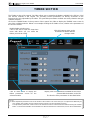
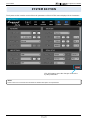
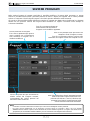
TIMBRE SECTION
The Timbre section of the Legend '70s Editor allows you to customize the timbres available in the E.Piano, Clavi
and A.Piano modules of the Legend '70s, providing several parameters not directly accessible on the
instrument, but only adjustable by the editor. The generation parameters available are strictly related to the type
of timbre selected.
Click on the TIMBRE button in the top menu of the Legend 70's Editor to display the TIMBRE area screen for
one of the available modules. Below is an example showing the E.PIANO screen, relative to the parameters of
the E.Piano module:
The adjustment parameters refer to the timbre of the module. This means that you can adjust them differently for
each position of the timbre selector switch, but they remain so for all instrument programs.
The adjustment parameters remain active in the instrument until it is switched off even without clicking the STORE
button. To make them definitive and available even after the instrument is switched off, click on the STORE button.
Module timbre selection area.
Click in this area to open the drop-down
menu with which you can select the
timbre you want to modify.
Click this button to store on the
instrument the timbre with the
changes made.
Click on these boxes to display the
timbre parameters screen for the
selected module.
Display area of all parameters available for the screen
selected with the buttons on the left.
The function of the parameters is described below.

User Guide
Legend 70's Editor
Parameters of the E.PIANO Timbre
E.Piano Model: selection of electric piano model. The available models depend on the selected electric
piano timbre (Rhod, Wurli, E.Grand).
Stretch Tuning: pitch curve along the keyboard extension. With a value of 0 the keyboard is in tune as in
the original instrument, then slightly lowered in the low end of the keyboard and slightly raised in the high
end. With positive values this effect is increased, while with negative values the pitch is attenuated.
Hammer: modifies the characteristics and dimensions of the hammer which, during impact with the tine,
determines the intensity and timbre of the sound. With positive values you increase the size of the hammer
that transfers larger energy to the tine and a richer sound produced, especially when playing at high
dynamics. Negative values decrease the size of the hammer, making the sound lighter.
Tine Position (Rhod): adjusts the position of the tine with respect to the pickup to control the harmonic
content of the sound. At negative values, the tine is closer to the pickup and the sound has more harmonic
content. At positive values, the tine is moved away from the pickup and the sound is more muted.
Tone Bar Decay (Rhod): adjusts the size of the tone bar and consequently the decay time of the sound.
Tone Bar Res. (Rhod): determines the body of the tone bar that affects the initial "bell" character of the
sound. With positive values the sound becomes very bright with exaltation of the "bell" component, while
with negative values it is more muted.
Reed Position (Wurli): adjusts the position of the reed allowing you to change the harmonic content of the
sound. At negative values the reed is closer to the pickup and the sound has a higher harmonic content. At
positive values, the reed is moved away from the pickup and the sound is more muted.
Reed Decay (Wurli): adjusts the reed size and consequently the decay time of the sound.
Reed Decay (E.Grand): adjusts the decay time of the sound.
Release Noise: adjusts the audio level of the noise generated by the dampers when the keyboard keys are
released.
Pedal Noise: adjusts the audio level of the noise generated by the Sustain pedal when pressed.
Natural Ribattuto (Rhod and Wurli): when playing in ribattuto the hammer does not always hit the tine or
the reed in the same position, as this still vibrates because of the previous percussions and this determines
that the notes rebated always have a differing timbre. With this parameter you can enhance or attenuate
this behavior.
Damper Res. (E.Grand): adjusts the amount of resonance of the strings while the Sustain pedal is pressed
and some strings are resonating in sympathy.
CLAVI timbre parameters
Clavi Model: Clavinet model selection.
Stretch Tuning: pitch curve along the keyboard extension. With a value of 0 the keyboard is in tune as in
the original instrument, then slightly lowered in the low end of the keyboard and slightly raised in the high
end. With positive values this effect is increased, while with negative values the pitch is attenuated.
Hammer: defines the characteristics of the hammer (tangent), thus modifying the intensity and timbre of the
sound. With positive values you increase the size of the Tangent that the larger it is, the more energy is
transferred to the pickup and the richer the sound produced. Negative values decrease the size of the
tangent, making the sound more muted.
Release Noise: adjusts the audio level of the noise generated by the wool damper when the keyboard keys
are released.
Pickup Position: sets the position of the pickup on which the sound character depends. With positive
values the pickup approaches the bridge, to the end of the string where the timbre is brighter, while with
negative values it is positioned toward the center of the string, and the sound becomes softer and more
muted.
Dynamic: adjusts the sensitivity to the force on the keys. With positive values the instrument is more
sensitive and you can reach the level and timbre of the signal normally generated by playing at high
dynamics even if you exert little force on the keys of the keyboard.

User Guide
Legend 70's Editor
Parameters of A.PIANO timbres
A.Piano Model: selection of the acoustic piano model.
Stretch Tuning: pitch curve along the keyboard extension. With a value of 0 the keyboard is in tune as in
the original instrument, then slightly lowered in the low end of the keyboard and slightly raised in the high
end. With positive values this effect is increased, while with negative values the pitch is attenuated.
Release Time: adjusts the decay time of the sound once a key is released.
Release Noise: adjusts the audio level of the noise generated by the dampers when the keys are released.
Pedal Noise: adjusts the audio level of the noise generated by the Sustain pedal.
Damper Res. adjusts the amount of strings resonance while using the Sustain pedal.
Layer Level (only dual-sound timbre, e.g. Piano&Choir): volume balance between the two timbres.
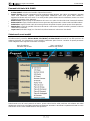
Selection of new models
Whenever Viscount releases new models for the E.Piano, Clavi or A.Piano modules, these can be listened to
and evaluated using the E.Piano Model, Clavi Model or A.Piano Model parameter and associated with one of
the positions of the Timbre selector. To select the new model, simply open the drop-down menu of this
parameter as shown in the following example screen:
By selecting one of the model in the drop-down menu, it is placed in the currently selected position of the timbre
selector as indicated in the timbre selection area. By clicking on the STORE button, the selected model is
permanently inserted in this position
Module timbre
selection area.
Drop-down menu for
model selection
La pagina si sta caricando...
La pagina si sta caricando...
La pagina si sta caricando...
La pagina si sta caricando...
La pagina si sta caricando...
La pagina si sta caricando...
La pagina si sta caricando...
La pagina si sta caricando...
La pagina si sta caricando...
La pagina si sta caricando...
La pagina si sta caricando...
La pagina si sta caricando...
La pagina si sta caricando...
La pagina si sta caricando...
La pagina si sta caricando...
La pagina si sta caricando...
La pagina si sta caricando...
La pagina si sta caricando...
La pagina si sta caricando...
La pagina si sta caricando...
La pagina si sta caricando...
La pagina si sta caricando...
-
 1
1
-
 2
2
-
 3
3
-
 4
4
-
 5
5
-
 6
6
-
 7
7
-
 8
8
-
 9
9
-
 10
10
-
 11
11
-
 12
12
-
 13
13
-
 14
14
-
 15
15
-
 16
16
-
 17
17
-
 18
18
-
 19
19
-
 20
20
-
 21
21
-
 22
22
-
 23
23
-
 24
24
-
 25
25
-
 26
26
-
 27
27
-
 28
28
-
 29
29
-
 30
30
-
 31
31
-
 32
32
-
 33
33
-
 34
34
-
 35
35
-
 36
36
-
 37
37
-
 38
38
-
 39
39
-
 40
40
-
 41
41
-
 42
42


Viscount Legend ’70s Manuale del proprietario
- Tipo
- Manuale del proprietario
- Questo manuale è adatto anche per
in altre lingue
- English: Viscount Legend ’70s Owner's manual
Documenti correlati
-
Viscount Physis Piano V100 Manuale del proprietario
-
Viscount LEGEND LIVE Manuale del proprietario
-
-
Viscount Legend Editor Manuale del proprietario
-
-
-
-