Abus DF 88 Installation and Operation Instructions
- Tipo
- Installation and Operation Instructions

D Montage- und Bedienungsanleitung für ABUS Dachflächenfenster-Schloss DF 88
G Installation and operation instructions for ABUS skylight lock DF 88
D Diese Anleitung ist wie folgt untergliedert:
I. Allgemeine Hinweise IV. Werkzeug
II. Einsatzmöglichkeit V. Montageanleitung
III. Packungsinhalt VI. Bedienung
I. Allgemeine Hinweise
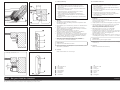
DF 88 bietet zusätzlich Schutz gegen unberechtigtes Eindringen in
Ihre Räume. Das Schloss eignet sich für Dachflächenfenster aus Holz und
Kunststoff, bei denen Schlosskörper und Schließkasten im Winkel von 90°
zueinander montiert werden müssen (Abb. 1). Einige Dachflächenfenster
sind wie ein normales Fenster gebaut. Hierfür kann FTS 88 eingesetzt
werden.
Achtung! Einige Dachflächenfenster – Typen haben eine arretierbare
Putzstellung bei 180°. Diese Arretierstellung ist nach der Montage
von DF 88 u. U. nicht mehr erreichbar.
Empfehlung: Um einen maximalen Drehwinkel zu erreichen,
montieren Sie DF 88 möglichst weit unten.
Die optimale Schutzwirkung erreichen Sie, wenn Sie entsprechend dieser
Montage- und Bedienungsanleitung vorgehen.
Die Befestigungsschrauben sollten zur Vermeidung von Überdrehung
mit einem geeigneten Werkzeug eingeschraubt und von Hand angezogen
werden. Ausschließlich ABUS-Befestigungsmaterial einsetzen.
Für eventuell auftretende Verletzungen bzw. Schäden, die bei der
Montage und/oder durch unsachgemäße Handhabung entstehen,
übernimmt der Hersteller keine Haftung!
Ein Zugang des gesamten Objektes muss von außen mittels Schlüssel
zu öffnen sein.
II. Einsatzmöglichkeit der DF 88
• DF 88 eignet sich für nach außen öffnende Dachflächenfenster,
die oben oder in der Mitte drehend gelagert sind.
• DF 88 wird grundsätzlich auf der Innenseite montiert, der Schließkasten
auf dem Fensterflügel und der Schlosskasten auf dem Rahmen.
• Ab einer lichten Rahmenbreite von ca. 50 cm sollten 2 Stück DF 88
montiert wenden. Montageposition rechts oder links, seitlich oder unten.
Bei der Montage von nur einem Schloss sollte dieses auf der rechten
Fensterseite montiert werden.
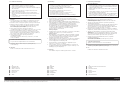
III. Packungsinhalt (Abb. 2)
1. 1 Schlosskasten
2. 1 Schließblech
3. 2 Abdeckkappen Schlosskasten
4. 1 Abdeckhaube Schließblech
5. 1 Satz Unterlagen für Schlosskasten je 1x1 mm, 2 mm, 4 mm, 8 mm
6. Schrauben:
2 Stück 6,3 x 100 mm
2 Stück 6,3 x 160 mm
4 Stück 5,5 x 150 mm
IV. Montagewerkzeug
Kreuzschlitzschraubendreher
Bohrmaschine
Feile, Säge zum Kürzen der Schrauben, ggf. Schraubstock
G These instructions are organised in the following sections:
I. General instructions IV. Tools
II. Possible uses V. Installation instructions
III. Pack contents VI. Operation
I. General instructions
DF 88 offers additional protection from unauthorised intruders
in your rooms. The lock is suitable for dormer windows made of wood,
metal and PVC where lock body and locking case have to be fitted at
an angle of 90° to each other (fig. 1). Some dormer windows are built
like a normal window. In this case, FTS 88 can be used.
Caution! Some dormer window types have a locked cleaning setting
at 180°. After fitting DF 88, it may happen that this locked setting is
no longer possible.
Recommendation: Fit DF 88 as low as possible to achieve a maximum
turning angle.
Optimum protection can be achieved by proceeding according to these
installation and operation instructions. To prevent the risk of over-
tightening, the fastening screws should by screwed in using a suitable
tool and tightened by hand. Only use ABUS fastening material.
The manufacturer does not assume any liability for possible injuries
or damages caused during installation and/or by incorrect handling!
One entrance possibility of the whole object must be accessible
with a key from the outside.
II. Possible use for DF 88
• DF 88 is suitable for dormer windows which open to the outside
and which are hinged at the top or in the middle.
• DF 88 is always mounted to the inside, with the locking case
on the window casement and the lock case on the frame.
• From an inner frame width of approx. 50 cm, two DF 88 should be fitted,
on the right or left, on the side or bottom.
When only one lock is fitted, it should be positioned on the right side
of the window.
III. Pack contents (fig. 2)
1. 1 lock case
2. 1 locking plate
3. 2 cover caps lock case
4. 1 cover locking plate
5. 1 set shims for lock case 1 each 1, 2, 4, 8 mm
6. Screws:
2 each 6.3 x 100 mm
2 each 6.3 x 60 mm
4 each 5.5 x 50 mm
IV. Installation tools
Phillips screwdriver
Drill
Saw, file for shortening the screws, possibly vice
32
8
17
30
25 17
49
133
Abb./fig.
schéma
afb./ill. 1
für
Schrauben
Ø
In Holz und Kunststoff
ohne Metalleinlage
Bohrer Ø
In Alu und Kunststoff
mit Metalleinlage
Bohrer Ø
4,5 mm
4,0 mm
5,0 mm
4,5 mm
6,3 mm
5,5 mm
Bohrtabelle
for
screws
Ø
in wood and PVC
without metal inlay
drill bit Ø
in aluminium and PVC
with metal inlay
drill bit Ø
4.5 mm
4.0 mm
5.0 mm
4.5 mm
6.3 mm
5.5 mm
Drilling table
Abb./fig./schéma/afb./ill. 2
6
1
3
24
5

F Ce manuel comporte les chapitres suivants:
I. Conseils d’ordre général IV. Outillage
II. Application V. Instructions de montage
III. Liste de colisage VI. Utilisation
I. Conseils d’ordre général
DF 88 offre en plus une protection contre les intrusions par effraction
dans votre logement. La serrure convient pour des lucarnes en bois et
en PVC, pour lesquelles le boîtier de serrure et le boîtier de gâche doivent
être montés dans un angle de 90° par rapport l’un à l’autre (schéma 1).
Certaines lucarnes sont construites comme une fenêtre normale.
Dans ce cas, FTS 88 convient parfaitement.
Attention! Certains types de lucarne ont une position de nettoyage
verrouillable à 180°. Cette position de verrouillage n'est plus accessible
après l’installation de DF 88.
Recommandation: Pour obtenir un angle de pivotement maximal,
montez DF 88 aussi loin que possible vers le bas.
Pour un effet de protection optimal, suivez les instructions de ce manuel
d’installation et d’utilisation. Afin d’éviter un serrage abusif, vissez
et serrez les vis de fixation à la main et avec un outillage adéquat.
Utilisez exclusivement des produits ABUS.
Le fabricant n’assume aucune responsabilité pour d’éventuels blessures
ou dégâts causés pendant l’installation et/ou par suite de manipulations
inappropriées!
II. Application
• DF 88 convient pour les lucarnes ouvrant vers l’extérieur,
et pivotant dans la partie supérieure ou au centre.
• DF 88 est monté en principe du côté intérieur,
la gâche sur le vantail et le boîtier sur le châssis.
• A partir d’une largeur de châssis d’environ 50 cm,
2 éléments DF 88 doivent être montés.
Position de montage à droite ou à gauche, latéralement ou dans le bas.
Lors du montage d’une seule serrure, celle-ci doit être montée
sur le montant latéral droit.
III. Liste de colisage (schéma 2)
1. 1 boîtier
2. 1 gâche
3. 2 caches pour boîtier
4. 1 cache pour gâche
5. 1 ensemble d’entretoises pour le boîtier chacun 1 x 1, 2, 4, 8 mm
6. Vis:
2 pièces de 6,3 x 100 mm
2 pièces de 6,3 x 60 mm
4 pièces de 5,5 x 50 mm
IV. Outillage
Tournevis cruciforme
Perceuse
Lime, scie pour raccourcir les vis, le cas échéant taraudeuse
pour
vis
Ø
dans châssis bois et
PVC sans âme métallique
foret Ø
dans châssis aluminium et
PVC avec âme métallique
foret Ø
4,5 mm
4,0 mm
5,0 mm
4,5 mm
6,3 mm
5,5 mm
Tableau de perçage
n Index: gebruik montage- en bedieningsinstructie:
I. Algemeen IV. Gereedschap
II. Toepassing V. Montage
III. Verpakkingsinhoud VI. Bediening
I. Algemeen
Bijzetgrendel voor dakramen en naar buiten draaiende ramen.
Stompe ramen en schuiframen. Geschikt voor hout, aluminium en
kunststof. DF 88 is volgens keuringseisen NEN 5096 SKG gecertificeerd.
De DF 88 biedt daarnaast bescherming tegen onbevoegd binnendringen
van uw woning. Advies: monteer aan de sluitzijde voor maximale veilig-
heid 2 stuks per 1 meter raamhoogte. Op kunststof zonder metalen kern
dient u dit slot in combinatie met ABUS BA bevestigingsanker te monteren.
Optioneel verkrijgbaar, zie voor montage in de handleiding van BA.
Geschikt voor dakramen waarbij slotkast en sluitkast in een hoek van
90° wordt gemonteerd. (afb. 1).
Let op! Sommige dakraamtypen hebben een vergrendelbare
poetsstand bij 180°. Deze vastzetstand is na de montage van
DF 88 evt. niet meer te gebruiken.
Advies: monteer DF 88 zo laag mogelijk onderaan het dakraam
om de maximale draaihoek te verkrijgen.
Optimale veiligheid wordt bereikt door nauwkeurig opvolgen van deze
montage- en gebruiksaanwijzing, Om overexpansie of doldraaien van de
bevestigingsschroeven te vermijden, draait u handmatig en met passend
gereedschap de schroeven vast.
Voor eventuele verwondingen en/of schade tijdens montage en/of door
gebruik aanvaardt de fabrikant geen enkele aansprakelijkheid!
II. Toepassing
• DF 88 is geschikt voor naar buiten draaiende ramen.
Bij stompe ramen is montage van 1 slot aan de sluitzijde voldoende.
• Dakramen en ramen met boven- of middenscharnier.
• DF 88 wordt uitsluitend aan de binnenzijde gemonteerd;
de slotkast op het kozijn en de sluitplaat op de raamvleugel.
• DF 88 kan op dakramen zowel rechts, links, aan de zijkant of aan de
onderzijde worden gemonteerd. Bij de montage van één slot op een
dakraam dient DF 88 aan de rechterkant van het dakraam te worden
gemonteerd.
Bij slechte bevestigingsmogelijkheden (zacht hout, aluminium of kunststof
zonder metalen kern) sloten monteren met extra bevestigingsmiddelen.
Gebruik hiervoor ABUS bevestigingsanker BA, of chemische ankers.
In de handel verkrijgbaar.
III. Verpakkingsinhoud (afb. 2)
1. 1 slotkast
2. 1 sluitplaat
3. 2 afdekkappen slotkast
4. 2 afdekkap sluitplaat
5. 1 set opvulplaatjes voor slotkast 1, 2, 4, 8 mm
6. Schroeven:
2 6,3 x 100 mm
2 6,3 x 60 mm
4 5,5 x 50 mm
IV. Gereedschap
Kruiskopschroevendraaier
Boormachine, boren zie tabel
Vijl, zaag en eventueel bankschroef voor inkorten van de schroeven
voor
schroef
Ø
in hout en kunststof
zonder metalen kern
boor Ø
in aluminium en kunststof
met metalen kern
boor Ø
4,5 mm
4,0 mm
5,0 mm
4,5 mm
6,3 mm
5,5 mm
Boortabel
I Queste istruzioni si suddividono in modo seguente:
I. Istruzioni generali IV. Attrezzi
II. Possibilità d’impiego V. Istruzioni di montaggio
III. Contenuto della confezione VI. Uso
I. Istruzioni generali
La DF 88 offre una protezione in più per la Vostra casa.
La serratura è adatta per finestre del tetto in legno, metallo e plastica,
in cui scatola e cassa della serratura devono essere montate ad angolo
di 90° una rispetto all’altra (ill. 1). Alcune finestre del tetto sono costruite
come finestre normali. Per esse si può impiegare la FTS 88.
Attenzione! Alcuni tipi di finestre del tetto possono essere girate di
180° e bloccate per pulirle. Potrebbe essere che questa funzione non
esista più dopo aver montato la DF 88.
Consiglio: per ottenere il massimo angolo di rotazione,
montare la DF 88 il piú in basso possibile.
Si può ottenere una protezione ottimale, procedendo secondo queste
istruzioni di montaggio ed uso. Le viti di fissaggio, per evitarne un
serraggio eccessivo, devono essere avvitate con un utensile adatto e poi
serrate a mano. Impiegare esclusivamente materiale di fissaggio ABUS.
Per eventuali ferimenti e/o danni, che si verificano durante il montaggio
e/o per maneggio indebito, il produttore non si assume alcuna
responsabilità!
Un ingresso della casa deve sempre essere raggiungibile a chiave.
II. Possibilità d’impiego della DF 88
• La DF 88 è adatta per tutte le finestre del tetto che si aprono verso
l’esterno con supporto girevole in alto o al centro
• La DF 88 viene montata di solito all´interno, la cassa della serratura (1)
sul telaio e la lamiera di chiusura (2) sul battente della finestra.
• A partire da una larghezza interna di circa 50 cm si devono montare
2 DF 88. Posizione di montaggio a destra o a sinistra, lateralmente o in
basso.
Se si monta una sola serratura, essa dovrebbe essere montata
sul lato destro della finestra.
III. Contenuto della confezione (ill. 2)
1. 1 scatola della serratura
2. 1 lamiera di chiusura
3. 2 coperchietti della scatola della serratura
4. 1 coperchietto lamiera di chiusura
5. 1 kit di spessori per scatola della serratura 1 x 1, 2, 4, 8 mm cadauno
6. Viti:
2 viti da 6,3 x 100 mm
2 viti da 6,3 x 60 mm
4 viti da 5,5 x 50 mm
IV. Attrezzi per il montaggio
Cacciavite a stella
Trapano
Lima, sega per accorciare le viti, in caso morsa
per
viti
Ø
in legno e plastica
senza inserto metallico
punta da trapano Ø
in alluminio e plastica
con inserto metallico
punta da trapano Ø
4,5 mm
4,0 mm
5,0 mm
4,5 mm
6,3 mm
5,5 mm
Tabella per trapanazioni
classificatie manuele test
zelfstandig
inbraakwerendheidsklasse
NEN5096/ENV1630
RC 2
3 min. / A
contacttijd /
gereedschapsset
zonder
ABUS bevestigingsanker
houten kozijnen kunststof kozijnen
gebruik BA-anker
in combinatie met
ABUS bevestigingsanker
F Instructions de montage et d’utilisation
pour serrure de lucarne ABUS DF 88
n Montage- en bedieningsinstructie voor ABUS bijzetgrendel DF 88
I Istruzioni di montaggio ed uso della serratura
per finestre del tetto DF 88

D Technische Änderungen vorbehalten. Für Irrtümer und Druckfehler keine Haftung. ABUS © 2010
G Subject to technical alterations. No liability for mistakes and printing errors. ABUS © 2010
Abb./fig./schéma/afb./ill. 4
Abb./fig./schéma/afb./ill. 5 Abb./fig./schéma/afb./ill. 6
Abb./fig./schéma/afb./ill. 7
Abb./fig./schéma/afb./ill. 8
A
A
A
A
Abb./fig./schéma/afb./ill. 3
8 mm
쐃
쐇
쐋
쐄 쐂
쐏
min. 29 mm
min. 49 mm
쐆
B
B
쐄
D V. Montageanleitung:
Wichtige Hinweise:
• Vor der Montage prüfen Sie bitte die Einstellung des Fensters.
Stellen Sie sicher, dass sich das Fenster einwandfrei öffnen und
schließen lässt.
• Messen Sie auch nach, ob die in Abb. 1 angegebenen Mindestmaße
an Ihrem Fenster vorhanden sind.
• Die Bohrlochtiefen bzw. die Schraubenlängen müssen auf die
örtlichen Gegebenheiten abgestimmt werden.
• Austreten des Bohrers bzw. der Schrauben auf der Rückseiten
vermeiden! Ggf. mit Bohranschlag arbeiten oder die vorhandenen
Schrauben kürzen.
• Beim Bohren keine beweglichen Teile, Dichtungen oder Glasscheiben
verletzen.
Montage:
1. Schlosskasten (1) mit Unterlagen (5) unterlegen.
Der Abstand des Flügels zur Laibung / zum Rahmen entspricht der Höhe
der Unterlagen (Abb. 4).
2. Kunststoffhaube (4) von Schließblech (2) mit Hilfe eines Schraubendrehers
ausrasten.
3. Schließblech (2) so nahe wie möglich zur Öffnungsseite des Fensters
(auf Bewegungsfreiheit von Fenstergriffe achten) mit langer Schenkelseite
auf den Fensterflügel bündig anhalten.
Hilfsmittel: Vorher ermittelte Unterlage(n) (5) (Abb. 5).
4. Bohrposition A (Abb. 6) anzeichnen und vorbohren (s. Bohrtabelle).
Schließblech (2) mit Schrauben 5,5 x 50 mm anschrauben.
5. Abdeckplatten (3) des Schlosskastens (1) vorsichtig von unten ausstoßen.
Schlosskasten (1) mit Unterlagen (5) unterfüttern und mittig auf gleiche
Höhe im parallelen Abstand von 8 mm zum Schließblech (2) anhalten.
Hilfsmittel: 8 mm dicke Unterlage (5) (Abb. 7).
6. Bohrposition B (Abb. 8) anzeichnen und vorbohren (s. Bohrtabelle).
Schlosskasten (1) einschließlich Unterlagen (5) mit Schrauben
6,3 x 60 mm oder 6,3 x 100 mm anschrauben.
Funktion prüfen:
Riegel müssen beim Einschließen frei laufen.
7. Abschließend Haube (4) und Abdeckplatten (3) auf Schließblech (2) bzw.
Schlosskasten (1) aufdrücken.
VI. Bedienung
DF 88 wird mit Schlüssel ver- und entriegelt.
D
쐃 = lichte Rahmenbreite
쐇 = Fensterflügel
쐋 = Schließkasten
쐏 = Fensterlaibung
쐄 = Schlosskasten
쐂 = Unterlagen
쐆 = Schließblech
G V. Installation instructions:
• Before installation, please check the setting of the window.
If necessary, readjust the fittings so that the window opens
and closes perfectly.
• Also check whether your window complies with the minimum
dimensions shown in fig. 1.
• The depths of the drilled holes and screw lengths must be adjusted
to the local conditions.
• Avoid the drill or screws from coming out at the back!
Possibly work with drill stopper or shorten the existing screws.
• When drilling, do not damage any moving parts,
seals or glass panes.
Installation:
1. Fit the shims (5) under the lock case (1).
The space from the casement to the soffit/frame corresponds
to the shim height (see fig. 4).
2. Unclip the plastic cover (4) from the locking plate (2) using a screwdriver.
3. Hold the locking plate (2) as close as possible to the opening side
of the window (make sure the handle has room to move)
with the long leg side flush on the window casement.
Aid: previously defined shim package (5) (see fig. 5).
4. Mark and pre-drill hole A (see fig. 6) (see drilling table).
Screw closing plate (2) on using screws 5.5 x 50 mm.
5. Carefully push the cover plates (3) of the lock case (1) out from below.
Fit shims (5) under the lock case (1) and hold centrally at the same height
in parallel spacing of 8 mm to the locking plate (2).
Aid: 8 mm shim (5) (see fig. 7).
6. Mark and pre-drill hole B (see drilling table). Screw the lock case (1)
on including shims (5) using screws 6.3 x 60 mm or 6.3 x 100 mm.
Check function:
Bolt must run freely when closing the window.
7. Then press on the cover (4) and cover plates (3) onto the locking plate (2)
or lock case (1).
VI. Operation
DF 88 is locked and unlocked with the key.
G
쐃 = inside frame width
쐇 = window
쐋 = locking case
쐏 = window soffit
쐄 = lock case
쐂 = spacers
쐆 = locking plate
ABUS - Das gute Gefühl der Sicherheit
www.abus.com

F Nous nous réservons le droit de toutes modifications techniques. Nous n’assumons aucune responsabilité pour des erreurs ou défauts d’impression éventuels. ABUS © 2010
n Technische wijzigingen voorbehouden. Geen aansprakelijkheid voor vergissingen en drukfouten. ABUS © 2010
I Ci si riservano modifiche tecniche. Per errori e refusi di stampa non ci si assume alcuna responsabilità. ABUS © 2010
F V. Instructions de montage:
Indications importantes:
• Avant le montage, examinez l’ouverture de la lucarne.
Assurez-vous que la lucarne ouvre et ferme parfaitement.
• Vérifiez si votre lucarne comporte les dimensions minimales indiquées
dans la schéma 1.
• Les profondeurs de perçage ou les longueurs de vis doivent être
adaptées aux conditions locales.
• Evitez le dépassement de perçage ou de vis sur la face arrière!
Utilisez le cas échéant une butée de perçage ou raccourcissez les vis
de fixation.
• Lors du perçage, évitez d’endommager les éléments mobiles,
les joints ou les vitres.
Montage:
1. Posez des entretoises (5) sous la gâche (1). La hauteur des entretoises
correspond à la distance entre l’ouvrant et le dormant (schéma 4).
2. Décrochez le cache en PVC (4) de la gâche (2) au moyen d’un tournevis.
3. Maintenez fermement la gâche (2) le plus près possible de l’ouverture
de la lucarne (observez le rayon de rotation de la poignée de fenêtre)
avec le côté le plus long sur l’ouvrant.
Aide: entretoise(s) (5) comme indiqué auparavant (schéma 5).
4. Tracez et préforez la position de perçage A (schéma 6)
(voir tableau de perçage). Fixez la gâche (2) avec des vis de 5,5 x 50 mm.
5. Décrochez avec précaution les caches (3) du boîtier (1) par le bas.
Insérez des entretoises (5) sous le boîtier (1) et maintenez-les centrées
à la même hauteur et à une distance parallèle de 8 mm de la gâche (2).
Aide: entretoise d’une épaisseur de 8 mm (5) (schéma 7).
6. Tracez et préforez la position de perçage B (schéma 8)
(voir tableau de perçage).
Fixez la gâche (1) avec les entretoises (5) et des vis de 6,3 x 60 mm
ou de 6,3 x 100 mm.
Contrôlez le bon fonctionnement:
Les pênes doivent se déplacer librement lors de la fermeture.
7. Finalement, clipsez les caches PVC (3) et (4) sur la gâche (2)
et sur le boîtier (1).
VI. Utilisation
DF 88 est verrouillé/déverrouillé á l’aide d’uneavec une clé.
F
쐃 = Largeur de cadre
쐇 = Ouvrant de fenêtre
쐋 = Gâche + Cache PVC
쐏 = Battant de fenêtre
쐄 = Boîtier serrure
쐂 = Entre toises
쐆 = Gâche
n V. Montage:
Belangrijke aanwijzingen:
• Controleer voor montage de afstelling van het raam.
Let op dat het raam probleemloos sluit en opent.
• Meet na, of de in afb. 1 aangegeven minimumafmetingen
daadwerkelijk beschikbaar zijn.
• De boordieptes en schroeflengtes moeten aan het
gevelelement aangepast worden.
• Voorkom doorboren en -schroeven. Eventueel met een
booraanslag werken of de schroeven inkorten.
Bij het boren geen beslag, afdichtingen of ruiten beschadigen.
Montage:
1. Bevestig slotkast (1) op het kozijn. Eventueel uitvullen met opvul-
plaatjes (5). Met behulp van opvulplaatjes wordt hoogteverschil tussen
kozijn en raamvleugel opgevangen.
2. Klik met een schroevendraaier de kunststof kap (4) van sluitplaat (2) los.
3. Plaats bij dakramen de sluitplaat (2) zo dicht mogelijk bij de openingszijde
van het dakraam. Let op dat de raamgrepen vrij kunnen bewegen.
Houdt de sluitplaat met de lange zijde gelijk tegen de raamvleugel.
De opvulplaatjes (5) zijn een uitstekend hulpmiddel om de juiste positie
te bepalen. (zie afb. 4) Bij schuifpuien en dubbele ramen DF 88 boven
en onder de raamgreep plaatsen voor optimale beveiliging.
Bij stompe ramen is 1 slot voldoende.
Montage sluitplaat
1. Bepaal boorpositie A (zie afb. 5) aantekenen en voorboren (zie boortabel).
Sluitplaat (2) met schroeven 5,5 x 50 mm vastschroeven.
Montage slotkast
1. Druk afdekkapjes (3) van de slotkast (1) vanuit de onderkant voorzichtig
eruit. Houdt slotkast (1) parallel en op dezelfde hoogte van de sluitplaat
(2) met een tussenruimte van 8mm. Gebruik voor bepalen van deze
afstand het opvulplaatje van 8mm (5) die afb. 6.
2. Bepaal boorpositie B (zie afb. 7) aantekenen en voorboren (zie boortabel).
Gebruik bij kunststof zonder metalen kern ABUS BA bevestigingsanker.
Voor bevestiging anker zie aanwijzingen BA.
3. Bevestig slotkast (1) eventueel uitvullen met opvulplaatjes (5) met
schroeven 6,3 x 60 mm of 6,3 x 100 mm.
4. Controleer functie, van het slot. Vooral bij dakramen is de vrijloop van
het dakraam belangrijk. Plaats afdekkappen (4) op de slotkast (1) en de
afdekkappen (3) op de sluitplaat (2).
VI. Bediening
Zowel afsluiten als openen van DF 88 geschiedt d.m.v. de sleutel.
n
쐃 = Dagmaat
쐇 = Raam
쐋 = Sluitkast
쐏 = Kozijnuitsparing
쐄 = Slotkast
쐂 = Opvulplaatjes
쐆 = Sluitplaat
I V. Istruzioni per il montaggio:
Avvertenze importanti:
• Prima del montaggio verificare per favore la regolazione della finestra.
Se necessario registrare nuovamente i ferramenti affinché la finestra
si chiuda e si apra perfettamente.
• Verificare anche che le misure minime indicate nell’ill. 1 esistano nelle
vostre finestre.
• Le profondità per trapanare i fori, risp. le lunghezze delle viti devono
essere adattate alle condizioni particolari.
• Evitare che la punta del trapano risp. la vite fuoriesca dall’altra parte!
Se necessario lavorare con arresto del trapano o accorciare le viti.
Quando si trapana, non danneggiare parti mobili, guarnizioni o vetri.
Montaggio:
1. Mettere gli spessori (5) sotto alla scatola della serratura (1).
La distanza del battente rispetto all’intradosso/al telaio corrisponde
all’altezza degli spessori (ill. 4).
2. Staccare con l’aiuto di un cacciavite il coperchietto in plastica (4)
della lamiera di chiusura (2).
3. Tenere la lamiera di chiusura (2) il piú vicino possibile al lato di apertura
della finestra (fare attenzione che la maniglia della finestra possa
muoversi liberamente), con il lato lungo a filo sul battente della finestra.
Mezzi d’ausilio: spessori già scelti prima (5) (vedi ill. 5).
4. Disegnare il punto da trapanare A (vedi il. 6) e trapanare (vedi tabella
trapanazioni). Avvitare la lamiera di chiusura (2) con le viti 5,5 x 50 mm.
5. Staccare con cautela da basso i coperchietti (3) della scatola della
serratura (1).
Mettere spessori (5) sotto la scatola della serratura (1) e tenere centrati
alla stessa altezza a distanza parallela di 8 mm rispetto alla lamiera di
chiusura (2). Mezzi d’ausilio: spessori da 8 mm (5) (vedi ill. 7).
6. Disegnare la posizione di trapanatura B (vedi ill. 7) e trapanare
(vedi tabella trapanazioni).
Avvitare scatola della serratura (1) inclusi spessori (5) con viti
6,3 x 60 mm o 6,3 x 100 mm.
Controllare il funzionamento:
Quando si chiude il chiavistello deve scorrere liberamente.
7. Poi mettere premendoli il coperchietto (4) e i coperchietti (3) sulla lamiera
di chiusura (2) risp. sulla scatola della serratura (1).
VI. Uso
La DF 88 viene bloccata e sbloccata con la chiave.
I
쐃 = larghezza interna del telaio della finestra
쐇 = batente
쐋 = scattola di chiusura
쐏 = incasso
쐄 = cassa di chiusura
쐂 = spessori
쐆 = lamiera di chiusura
390118 12/10
www.abus.com
-
 1
1
-
 2
2
-
 3
3
-
 4
4


Abus DF 88 Installation and Operation Instructions
- Tipo
- Installation and Operation Instructions
in altre lingue
- English: Abus DF 88
- français: Abus DF 88
- Deutsch: Abus DF 88
- Nederlands: Abus DF 88
Documenti correlati
-
Abus DF 88 Manuale utente
-
-
-
-
-
-
-
-
-