Liebherr GP 1486 (WHITE) Manuale del proprietario
- Tipo
- Manuale del proprietario

Downloaded from www.vandenborre.be
Gebrauchsanweisung
Tischgefrierschrank
Operating instructions
Table-height freezer
Mode d'emploi
Congélateur table-top
Gebruiksaanwijzing
Tafelmodel diepvrieskast
Istruzioni per l’uso
Congelatore da tavolo
Instrucciones de uso
Congelador "Table-Top"
Instruções de utilização
Arca congeladora de bancada
Kullanım kılavuzu
Masa derin dondurucusu
221111
7081994 - 00
GP(esf)14../GP13.. ... 6

Downloaded from www.vandenborre.be
Inhalt
1 Gerät auf einen Blick............................................. 2
1.1 Geräte- und Ausstattungsübersicht.......................... 2
1.2 Einsatzbereich des Geräts....................................... 2
1.3 Konformität............................................................... 2
1.4 Aufstellmaße............................................................ 3
1.5 Energie sparen......................................................... 3
2 Allgemeine Sicherheitshinweise.......................... 3
3 Bedienungs- und Anzeigeelemente..................... 4
3.1 Bedien- und Kontrollelemente.................................. 4
3.2 Temperaturanzeige.................................................. 4
4 Inbetriebnahme...................................................... 4
4.1 Gerät transportieren................................................. 4
4.2 Gerät aufstellen........................................................ 4
4.3 Tueranschlagwechsel.............................................. 5
4.4 Einschub in die Küchenzeile..................................... 5
4.5 Verpackung entsorgen............................................. 6
4.6 Gerät anschließen.................................................... 6
4.7 Gerät einschalten..................................................... 6
5 Bedienung.............................................................. 6
5.1 Helligkeit der Temperaturanzeige............................. 6
5.2 Kindersicherung....................................................... 6
5.3 Temperaturalarm...................................................... 6
5.4 Lebensmittel einfrieren............................................. 7
5.5 Lebensmittel auftauen.............................................. 7
5.6 Temperatur einstellen............................................... 7
5.7 SuperFrost............................................................... 7
5.8 Schubfächer............................................................. 7
5.9 Abstellflächen........................................................... 7
5.10 VarioSpace............................................................... 8
5.11 Info-System.............................................................. 8
5.12 Kälte Akkus.............................................................. 8
6 Wartung.................................................................. 8
6.1 manuell Abtauen...................................................... 8
6.2 Gerät reinigen........................................................... 8
6.3 Kundendienst........................................................... 9
7 Störungen............................................................... 9
8 Außer Betrieb setzen............................................. 10
8.1 Gerät ausschalten.................................................... 10
8.2 Außer Betrieb setzen................................................ 10
9 Gerät entsorgen..................................................... 10
Der Hersteller arbeitet ständig an der Weiterentwicklung aller
Typen und Modelle. Bitte haben Sie deshalb Verständnis
dafür, dass wir uns Änderungen in Form, Ausstattung und
Technik vorbehalten müssen.
Um alle Vorteile Ihres neuen Gerätes kennenzulernen, lesen
Sie bitte die Hinweise in dieser Anweisung aufmerksam durch.
Die Anleitung ist für mehrere Modelle gültig, Abweichungen
sind möglich. Abschnitte, die nur auf bestimmte Geräte
zutreffen, sind mit einem Sternchen (*) gekennzeichnet.
Handlungsanweisungen sind mit einem
gekenn-
zeichnet, Handlungsergebnisse mit einem .
1 Gerät auf einen Blick
1.1 Geräte- und Ausstattungsübersicht
Hinweis
u
Ablagen, Schubladen oder Körbe sind im Auslieferungszu-
stand für eine optimale Energieeffizienz angeordnet.
Fig. 1
(1) Bedien- und Kontrollele-
mente
(4) Typenschild
(2) VarioSpace (5) Stellfüße
(3) Schubfach
1.2 Einsatzbereich des Geräts
Das Gerät eignet sich ausschließlich zum Kühlen von Lebens-
mitteln im häuslichen oder haushaltsähnlichen Umfeld. Hierzu
zählt z.B. die Nutzung
-
in Personalküchen, Frühstückspensionen,
-
durch Gäste in Landhäuser, Hotels, Motels, und anderen
Unterkünften,
-
beim Catering und ähnlichem Service im Großhandel
Benutzen Sie das Gerät ausschließlich im haushaltsüblichen
Rahmen. Alle anderen Anwendungsarten sind unzulässig. Das
Gerät ist nicht geeignet für die Lagerung und Kühlung von
Medikamenten, Blutplasma, Laborpräparaten oder ähnlichen
der Medizinprodukterichtlinie 2007/47/EG zu Grunde liegenden
Stoffe und Produkte. Eine missbräuchliche Verwendung des
Gerätes kann zu Schädigungen an der eingelagerten Ware
oder deren Verderb führen. Im Weiteren ist das Gerät nicht
geeignet für den Betrieb in explosionsgefährdeten Bereichen.
Das Gerät ist je nach Klimaklasse für den Betrieb bei
begrenzten Umgebungstemperaturen ausgelegt. Die für Ihr
Gerät zutreffende Klimaklasse ist auf dem Typenschild aufge-
druckt.
Hinweis
u
Die angegebenen Umgebungstemperaturen einhalten,
sonst verringert sich die Kühlleistung.
Klimaklasse für Umgebungstemperaturen
SN, N bis 32 °C
ST bis 38 °C
T bis 43 °C
Eine einwandfreie Funktion des Gerätes ist bis zu einer unteren
Umgebungstemperatur von 5 °C gewährleistet.
1.3 Konformität
Der Kältemittelkreislauf ist auf Dichtheit geprüft. Das Gerät
entspricht den einschlägigen Sicherheitsbestimmungen sowie
den EG-Richtlinien 2006/95/EG, 2004/108/EG, 2009/125/EG
und 2010/30/EU.
Gerät auf einen Blick
2

Downloaded from www.vandenborre.be
1.4 Aufstellmaße
Fig. 2
Modell h a g e e' d c c'
GP1376 851 553 611 624 653 1129 563 592
GP1476 851 602 611 628 657 1174 613 640
GPesf1476 851 602 611 610 657 1174 597 644
GP1486 851 602
646
x
663
x
692
x
1209
x
613 640
x
Bei Geräten ohne beiliegende Wandabstandshalter oder
wenn die beiliegenden Abstandshalter nicht verwendet
werden, verringert sich das Maß um 35 mm (siehe 4.2) .
1.5 Energie sparen
-
Immer auf gute Be- und Entlüftung achten. Lüftungsöff-
nungen bzw. -gitter nicht abdecken.
-
Gerät nicht im Bereich direkter Sonnenbestrahlung, neben
Herd, Heizung und dergleichen aufstellen.
-
Der Energieverbrauch ist abhängig von den Aufstellbedin-
gungen z.B. der Umgebungstemperatur (siehe 1.2) .
-
Gerät möglichst kurz öffnen.
-
Je niedriger die Temperatur eingestellt wird, desto höher ist
der Energieverbrauch.
-
Alle Lebensmittel gut verpackt und abgedeckt aufbewahren.
Reifbildung wird vermieden.
-
Lebensmittel nur solange wie nötig herausnehmen, damit
sie sich nicht zu sehr erwärmen.
-
Warme Speisen einlegen: erst auf Zimmertemperatur
abkühlen lassen.
-
Wenn im Gerät eine dicke Reifschicht ist: Gerät abtauen.
Staubablagerungen erhöhen den Energie-
verbrauch:
-
Die Kältemaschine mit dem Wärmetau-
scher - Metallgitter an der Rückseite des
Gerätes - einmal jährlich abstauben.
2 Allgemeine Sicherheitshinweise
Gefahren für den Benutzer:
-
Dieses Gerät ist nicht bestimmt für Personen (auch Kinder)
mit physischen, sensorischen oder mentalen Beeinträchti-
gungen oder Personen, die nicht über ausreichende Erfah-
rung und Kenntnisse verfügen. Es sei denn, sie wurden
durch eine Person, die für ihre Sicherheit verantwortlich ist,
in die Benutzung des Gerätes unterwiesen und anfänglich
beaufsichtigt. Kinder beaufsichtigen, damit sie nicht mit dem
Gerät spielen.
-
Im Fehlerfall Netzstecker ziehen (dabei nicht am Anschluss-
kabel ziehen) oder Sicherung ausschalten.
-
Reparaturen, Eingriffe am Gerät und den Wechsel der Netz-
anschlussleitung nur vom Kundendienst oder anderem
dafür ausgebildeteten Fachpersonal ausführen lassen.
-
Wenn das Gerät vom Netz getrennt wird, immer am Stecker
anfassen. Nicht am Kabel ziehen.
-
Gerät nur nach den Angaben der Anweisung montieren und
anschließen.
-
Bewahren Sie diese Anleitung sorgfältig auf und reichen Sie
diese gegebenenfalls an den Nachbesitzer weiter.
Brandgefahr:
-
Das enthaltene Kältemittel R 600a ist umweltfreundlich, aber
brennbar. Entweichendes Kältemittel kann sich entzünden.
•
Rohrleitungen des Kältekreislaufs nicht beschädigen.
•
Im Geräteinnenraum nicht mit offenem Feuer oder Zünd-
quellen hantieren.
•
Im Geräteinnenraum keine elektrischen Geräte benutzen
(z. B. Dampfreinigungsgeräte, Heizgeräte, Eiscremebe-
reiter usw.).
•
Wenn Kältemittel entweicht: Offenes Feuer oder Zünd-
quellen in der Nähe der Austrittstelle beseitigen. Netzste-
cker ziehen. Raum gut lüften. Kundendienst benachrich-
tigen.
-
Keine explosiven Stoffe oder Sprühdosen mit brennbaren
Treibmitteln, wie z. B. Butan, Propan, Pentan usw. im Gerät
lagern. Entsprechende Sprühdosen sind erkennbar an der
aufgedruckten Inhaltsangabe oder einem Flammensymbol.
Eventuell austretende Gase können sich durch elektrische
Bauteile entzünden.
-
Brennende Kerzen, Lampen und andere Gegenstände mit
offenen Flammen vom Gerät fernhalten, damit diese das
Gerät nicht in Brand setzen.
-
Hochprozentigen Alkohol nur dicht verschlossen und
stehend lagern. Eventuell austretender Alkohol kann sich
durch elektrische Bauteile entzünden.
Absturz- und Umkippgefahr:
-
Sockel, Schubfächer, Türen usw. nicht als Trittbrett oder
zum Aufstützen missbrauchen. Dies gilt insbesondere für
Kinder.
Gefahr einer Lebensmittelvergiftung:
-
Überlagerte Lebensmittel nicht verzehren.
Gefahr von Erfrierungen, Taubheitsgefühlen und
Schmerzen:
-
Dauernden Hautkontakt mit kalten Oberflächen oder Kühl-/
Gefriergut vermeiden oder Schutzmaßnahmen ergreifen, z.
B. Handschuhe verwenden. Speiseeis, besonders Wasse-
reis oder Eiswürfel nicht sofort und nicht zu kalt verzehren.
Beachten Sie die spezifischen Hinweise in den anderen
Kapiteln:
GEFAHR kennzeichnet eine unmittelbar
gefährliche Situation, die Tod oder
schwere Körperverletzungen zur
Folge haben wird, wenn sie nicht
vermieden wird.
WARNUNG kennzeichnet eine gefährliche Situa-
tion, die Tod oder schwere Körper-
verletzung zur Folge haben könnte,
wenn sie nicht vermieden wird.
VORSICHT kennzeichnet eine gefährliche Situa-
tion, die leichte oder mittlere Körper-
verletzungen zur Folge haben
könnte, wenn sie nicht vermieden
wird.
Allgemeine Sicherheitshinweise
3

Downloaded from www.vandenborre.be
ACHTUNG kennzeichnet eine gefährliche Situa-
tion, die Sachschäden zur Folge
haben könnte, wenn sie nicht
vermieden wird.
Hinweis kennzeichnet nützliche Hinweise
und Tipps.
3 Bedienungs- und Anzeigeele-
mente
3.1 Bedien- und Kontrollelemente
Fig. 3
(1) Taste On/Off (6) Symbol Alarm
(2) Einstelltaste (7) Symbol Menu
(3) Temperaturanzeige (8) Symbol Kindersicherung
(4) Taste SuperFrost (9) Taste Alarm
(5) Symbol SuperFrost (10) Symbol Netzausfall
3.2 Temperaturanzeige
Im Normalbetrieb wird angezeigt:
-
die wärmste Gefriertemperatur
Die Temperaturanzeige blinkt:
-
die Temperatureinstellung wird verändert
-
nach dem Einschalten ist die Temperatur noch nicht kalt
genug
-
die Temperatur ist um mehrere Grad angestiegen
In der Anzeige blinken Striche:
-
die Gefriertemperatur liegt über 0 °C.
Die folgenden Anzeigen weisen auf eine Störung hin. Mögliche
Ursachen und Maßnahmen zur Behebung: (siehe Störungen).
-
F0 bis F5
-
Das Symbol Netzausfall
leuchtet.
4 Inbetriebnahme
4.1 Gerät transportieren
VORSICHT
Verletzungs- und Beschädigungsgefahr durch falschen Trans-
port!
u
Das Gerät verpackt transportieren.
u
Das Gerät stehend transportieren.
u
Das Gerät nicht alleine transportieren.
4.2 Gerät aufstellen
WARNUNG
Brandgefahr durch Feuchtigkeit!
Wenn stromführende Teile oder die Netzanschlussleitung
feucht werden, kann es zu einem Kurzschluss kommen.
u
Das Gerät ist für den Gebrauch in geschlossenen Räumen
konzipiert. Das Gerät nicht im Freien oder im Feuchte- und
Spritzwasserbereich betreiben.
WARNUNG
Brandgefahr durch Kurzschluss!
Wenn Netzkabel/Stecker des Gerätes oder eines anderen
Gerätes und Geräterückseite sich berühren, können Netzkabel/
Stecker durch die Vibrationen des Gerätes beschädigt werden,
so dass es zu einem Kurzschluss kommen kann.
u
Gerät so aufstellen, dass es keine Stecker oder Netzkabel
berührt.
u
An Steckdosen im Geräterückseitenbereich weder das
Gerät noch andere Geräte anschließen.
WARNUNG
Brandgefahr durch Kältemittel!
Das enthaltene Kältemittel R 600a ist umweltfreundlich, aber
brennbar. Entweichendes Kältemittel kann sich entzünden.
u
Die Rohrleitungen des Kältekreislaufs nicht beschädigen.
WARNUNG
Brand- und Beschädigungsgefahr!
u
Wärmeabgebende Geräte, z. B. Mikrowellengerät, Toaster
usw. nicht auf das Gerät stellen!
WARNUNG
Brand- und Beschädigungsgefahr durch blockierte Belüftungs-
öffnungen!
u
Die Belüftungsöffnungen immer freihalten. Immer auf gute
Be- und Entlüftung achten!
Hinweis*
Die Beutel an der Rückseite des Gerätes sind wichtig für die
Funktionstüchtigkeit. Ihr Inhalt ist ungiftig und ungefährlich.
u
Beutel nicht entfernen!
q
Bei Schäden am Gerät umgehend - vor dem Anschließen -
beim Lieferanten rückfragen.
q
Der Boden am Standort muss waagerecht und eben sein.
q
Gerät nicht im Bereich direkter Sonnenbestrahlung, neben
Herd, Heizung und dergleichen aufstellen.
q
Optimaler Aufstellort ist ein trockener und gut belüfteter
Raum.
q
Das Gerät mit der Rückseite und bei Verwendung beilieg-
ender Wandabstandshalter (siehe unten) mit diesen stets
direkt an der Wand aufstellen.
q
Das Gerät nicht ohne Hilfe aufstellen.
q
Der Aufstellungsraum Ihres Gerätes muss laut der Norm
EN 378 pro 8 g Kältemittel R 600a ein Volumen von 1 m
3
aufweisen. Ist der Aufstellraum zu klein, kann im Falle einer
Leckage des Kältekreislaufes ein entzündliches Gas-Luft-
Gemisch entstehen. Die Angabe der Kältemittelmenge
finden Sie auf dem Typenschild im Geräteinnenraum.
u
Das Anschlusskabel von der Geräterückseite abnehmen.
Dabei den Kabelhalter entfernen, sonst entstehen Vibrati-
onsgeräusche!
u
Schutzfolien von der Gehäuseaußenseite abziehen.*
Bedienungs- und Anzeigeelemente
4

Downloaded from www.vandenborre.be
u
Alle Transportsicherungsteile entfernen.
Liegen dem Gerät Wandabstandshalter bei, wird durch
Montage und Verwendung dieser Wandabstandshalter die
ausgewiesene Energieaufnahme erreicht. Ohne Wand-
abstandshalter verringert sich die angegebene Gerätetiefe um
3,50 cm. Werden beiliegende Wandabstandshalter nicht
verwendet, hat dies keinen Einfluss auf die Funktionsfähigkeit
des Gerätes. Allerdings erhöht sich bei solchen Geräten bei
geringerem Wandabstand der Energieverbrauch geringfügig.*
u
Bei einem Gerät mit beilie-
genden Wandabstandshaltern
diese Wandabstandshalter auf
der Rückseite des Geräts links
und rechts oben montieren.*
*
u
Verpackung entsorgen. (siehe 4.5)
u
Gerät mit dem beiliegenden
Gabelschlüssel über die Stell-
füße (A) und mit Hilfe einer
Wasserwaage fest, ebenste-
hend ausrichten.
Hinweis
u
Gerät reinigen (siehe 6.2) .
Wenn das Gerät in sehr feuchter Umgebung aufgestellt wird,
kann sich auf der Außenseite des Geräts Kondenswasser
bilden.
u
Immer auf gute Be- und Entlüftung am Aufstellort achten.
4.3 Tueranschlagwechsel
Bei Bedarf können Sie den Anschlag wechseln.
Stellen Sie sicher, dass folgendes Werkzeug bereitliegt:
q
Torx® 25
q
Torx® 15
q
beiliegenden Gabelschlüssel
q
ggf. zweite Person für Montagearbeit
VORSICHT
Verletzungsgefahr wenn die Tür herauskippt!
u
Tür gut festhalten.
u
Tür vorsichtig abstellen.
Fig. 4 bei Geräten mit Türgriff
u
Gehen Sie in der Reihenfolge der Positionsnummern in der
Grafik vor.
4.4 Einschub in die Küchenzeile
Fig. 5
(1) Aufsatzschrank (3) Küchenschrank
(2) Gerät (4) Wand
x
Bei Geräten ohne beiliegende Wandabstandshalter oder
wenn die beiliegenden Abstandshalter nicht verwendet
werden, verringert sich das Maß um 35 mm (siehe 4.2) .
Das Gerät kann mit der Kücheneinrichtung umbaut werden.
Um das Gerät
Fig. 5 (2)
der Küchenzeilenhöhe anzugleichen,
kann über dem Gerät ein entsprechender Aufsatzschrank
Fig. 5 (1)
angebracht werden.
Beim Umbau mit Küchenschränken (Tiefe max. 580 mm) kann
das Gerät direkt neben dem Küchenschrank
Fig. 5 (3)
aufge-
stellt werden. Das Gerät steht seitlich 70 mm
x
und in der Gerä-
temitte 85 mm
x
gegenüber der Küchenschrankfront vor.
Wichtig für die Belüftung:
-
An der Rückseite des Aufsatzschrankes muss ein Abluft-
schacht von mindestens 50 mm Tiefe über die gesamte
Aufsatzschrankbreite vorhanden sein.
-
Der Entlüftungsquerschnitt unter der Raumdecke muss
mindestens 300 cm
2
betragen.
-
Je größer der Lüftungsquerschnitt, um so energiesparender
arbeitet das Gerät.
Inbetriebnahme
5

Downloaded from www.vandenborre.be
Wenn das Gerät mit den Scharnieren neben einer Wand
Fig. 5 (4)
aufgestellt wird, muss der Abstand zwischen Gerät
und Wand mindestens 40 mm betragen. Dies entspricht dem
Griffüberstand bei geöffneter Tür.
4.5 Verpackung entsorgen
WARNUNG
Erstickungsgefahr durch Verpackungsmaterial und Folien!
u
Kinder nicht mit Verpackungsmaterial spielen lassen.
Die Verpackung ist aus wiederverwertbaren Materia-
lien hergestellt:
-
Wellpappe/Pappe
-
Teile aus geschäumtem Polystyrol
-
Folien und Beutel aus Polyethylen
-
Umreifungsbänder aus Polypropylen
-
genagelter Holzrahmen mit Scheibe aus Poly-
ethylen*
u
Das Verpackungsmaterial zu einer offiziellen Sammelstelle
bringen.
4.6 Gerät anschließen
ACHTUNG
Beschädigungsgefahr für die Elektronik!
u
Keine Inselwechselrichter (Umwandeln von Gleichstrom in
Wechsel- bzw. Drehstrom) oder Energiesparstecker
verwenden.
WARNUNG
Brand- und Überhitzungsgefahr!
u
Keine Verlängerungskabel oder Verteilerleisten verwenden.
Stromart (Wechselstrom) und Spannung am Aufstellort
müssen mit den Angaben auf dem Typenschild überein-
stimmen (siehe Gerät auf einen Blick).
Das Gerät nur über eine vorschriftsmäßig installierte
Schutzkontakt-Steckdose anschließen. Die Steck-
dose muss mit 10 A oder höher abgesichert sein.
Sie muss leicht zugänglich sein, damit das Gerät im
Notfall schnell vom Strom getrennt werden kann. Sie
muss außerhalb des Geräterückseitenbereichs
liegen.
u
Elektrischen Anschluss prüfen.
u
Den Netzstecker einstecken.
4.7 Gerät einschalten
u
Taste On/Off
Fig. 3 (1)
drücken.
w
Das Gerät ist eingeschaltet. Die Temperaturanzeige und
das Symbol Alarm
Fig. 3 (6)
blinken bis die Temperatur kalt
genug ist.
5 Bedienung
5.1 Helligkeit der Temperaturanzeige
Sie können die Helligkeit der Temperaturanzeige an die Licht-
verhältnisse im Aufstellraum anpassen.
5.1.1 Helligkeit einstellen
Die Helligkeit ist einstellbar zwischen h 0 (minimale Beleuch-
tung) und h 5 (maximale Leuchtkraft).
u
Einstellmodus aktivieren: Taste SuperFrost
Fig. 3 (4)
ca. 5 s
drücken.
w
In der Anzeige wird das Symbol Menu
Fig. 3 (7)
angezeigt.
w
In der Anzeige blinkt c .
u
Mit der Einstelltaste
Fig. 3 (2)
h auswählen.
u
Mit der Taste SuperFrost
Fig. 3 (4)
kurz bestätigen.
w
In der Anzeige erscheint der zuletzt eingestellte
Helligkeitswert.
u
Mit der Einstelltaste
Fig. 3 (2)
den gewünschten Wert von h
0 bis h 5 auswählen.
w
Die Helligkeit ist eingestellt.
u
Einstellmodus deaktivieren: Taste On/Off
Fig. 3 (1)
zwei mal
drücken.
w
In der Temperaturanzeige wird wieder die Temperatur ange-
zeigt.
5.2 Kindersicherung
Mit der Kindersicherung können Sie sicherstellen, dass Kinder
beim Spielen das Gerät nicht versehentlich ausschalten.
5.2.1 Kindersicherung einstellen
Wenn die Funktion eingeschaltet werden soll:
u
Einstellmodus aktivieren: Taste SuperFrost
Fig. 3 (4)
ca. 5 s
drücken.
w
In der Anzeige wird das Symbol Menu
Fig. 3 (7)
angezeigt.
w
In der Anzeige blinkt c .
u
Mit der Taste SuperFrost
Fig. 3 (4)
kurz bestätigen.
w
In der Anzeige erscheint c1.
u
Mit der Taste SuperFrost
Fig. 3 (4)
kurz bestätigen.
w
Das Symbol Kindersicherung
Fig. 3 (8)
leuchtet in
der Anzeige.
w
In der Anzeige blinkt c .
w
Die Funktion Kindersicherung ist eingeschaltet.
Wenn der Einstellmodus beendet werden soll:
u
Die Taste On/Off
Fig. 3 (1)
kurz drücken.
w
In der Temperaturanzeige wird wieder die Temperatur ange-
zeigt.
Wenn die Funktion ausgeschaltet werden soll:
u
Einstellmodus aktivieren: Taste SuperFrost
Fig. 3 (4)
ca. 5 s
drücken.
w
In der Anzeige wird das Symbol Menu
Fig. 3 (7)
angezeigt.
w
In der Anzeige blinkt c .
u
Mit der Taste SuperFrost
Fig. 3 (4)
kurz bestätigen.
w
In der Anzeige erscheint c0 .
u
Mit der Taste SuperFrost
Fig. 3 (4)
kurz bestätigen.
w
Das Symbol Kindersicherung
Fig. 3 (8)
erlischt.
w
In der Anzeige blinkt c .
w
Die Funktion Kindersicherung ist ausgeschaltet.
Wenn der Einstellmodus beendet werden soll:
u
Die Taste On/Off
Fig. 3 (1)
kurz drücken.
w
In der Temperaturanzeige wird wieder die Temperatur ange-
zeigt.
5.3 Temperaturalarm
Wenn die Gefriertemperatur nicht kalt genug ist, ertönt der
Tonwarner.
Gleichzeitig blinkt die Temperaturanzeige und das Symbol
Alarm
Fig. 3 (6)
.
Der Tonwarner verstummt automatisch, das Symbol Alarm
Fig. 3 (6)
geht aus und die Temperaturanzeige hört auf zu
blinken, wenn die Temperatur wieder ausreichend kalt ist.
Wenn der Alarmzustand bestehen bleibt: (siehe Störungen).
5.3.1 Temperaturalarm stumm schalten
Der Tonwarner kann stumm geschaltet werden. Wenn die
Temperatur wieder ausreichend kalt ist, ist die Alarm-Funktion
wieder aktiv.
Bedienung
6

Downloaded from www.vandenborre.be
u
Taste Alarm
Fig. 3 (9)
drücken.
w
Der Tonwarner verstummt.
5.4 Lebensmittel einfrieren
Sie können maximal so viel kg frische Lebensmittel innerhalb
von 24 h einfrieren, wie auf dem Typenschild (siehe Gerät auf
einen Blick) unter "Gefriervermögen ... kg/24h" angegeben ist.
Die Schubfächer können jeweils mit max. 25 kg Gefriergut, die
Platten je mit max. 35 kg belastet werden.
VORSICHT
Verletzungsgefahr durch Glasscherben!
Flaschen und Dosen mit Getränken können beim Gefrieren
platzen. Dies gilt insbesondere für kohlensäurehaltige
Getränke.
u
Flaschen und Dosen mit Getränken nicht einfrieren!
Damit die Lebensmittel schnell bis zum Kern durchfrieren,
folgende Mengen pro Packung nicht überschreiten:
- Obst, Gemüse bis zu 1 kg
- Fleisch bis zu 2,5 kg
u
Lebensmittel in Gefrierbeuteln, wiederverwendbaren Kunst-
stoff-, Metall- oder Aluminiumbehältern portionsweise verpa-
cken.
5.5 Lebensmittel auftauen
- bei Raumtemperatur
- im Mikrowellengerät
- im Backofen/Heißluftherd
u
Aufgetaute Lebensmittel nur in Ausnahmefällen wieder
einfrieren.
5.6 Temperatur einstellen
Die Temperatur ist abhängig von folgenden Faktoren:
-
der Häufigkeit des Türöffnens
-
der Raumtemperatur des Aufstellortes
-
der Art, Temperatur und Menge der Lebensmittel
Empfehlenswerte Temperatureinstellung: -18 °C
Die Temperatur kann fortlaufend geändert werden. Ist die
Einstellung -28 °C erreicht, wird wieder mit -14 °C begonnen.
u
Temperaturfunktion aufrufen: Einmal Einstelltaste
Fig. 3 (2)
drücken.
w
In der Temperaturanzeige blinkt die aktuelle Temperatur.
u
Temperatur in 1 °C -Schritten ändern: Einstelltaste
Fig. 3 (2)
so oft drücken bis die gewünschte Temperatur in der
Temperaturanzeige leuchtet.
u
Temperatur fortlaufend ändern: Taste gedrückt halten.
w
Während des Einstellens wird der Wert blinkend angezeigt.
w
Ca. 5 s nach dem letzten Tastendruck wird die tatsächliche
Temperatur angezeigt. Die Temperatur stellt sich langsam
auf den neuen Wert ein.
5.7 SuperFrost
Mit dieser Funktion können Sie frische Lebensmittel schnell bis
auf den Kern durchfrieren. Das Gerät arbeitet mit maximaler
Kälteleistung, dadurch können die Geräusche des Kälteaggre-
gats vorübergehend lauter sein.
Sie können maximal so viel kg frische Lebensmittel innerhalb
von 24 h einfrieren, wie auf dem Typenschild unter "Gefrierver-
mögen ... kg/24h" angegeben ist. Diese maximale Gefriergut-
menge ist je nach Modell und Klimaklasse verschieden.
Je nachdem wieviel frische Lebensmittel eingefroren werden
sollen, müssen Sie SuperFrost frühzeitig einschalten: bei einer
kleinen Gefriergutmenge ca. 6h, bei der maximalen Gefriergut-
menge 24h vor dem Einlegen der Lebensmittel.
Verpacken Sie die Lebensmittel und legen Sie sie möglichst
breitflächig ein. Einzufrierende Lebensmittel nicht mit bereits
gefrorener Ware in Berührung bringen, damit diese nicht
antaut.
SuperFrost müssen Sie in folgenden Fällen nicht einschalten:
-
beim Einlegen von bereits gefrorener Ware
-
beim Einfrieren von bis zu ca. 1 kg frischen Lebensmitteln
täglich
5.7.1 Mit SuperFrost einfrieren
u
Taste SuperFrost
Fig. 3 (4)
einmal kurz drücken.
w
Das Symbol SuperFrost
Fig. 3 (5)
leuchtet.
w
Die Gefriertemperatur sinkt, das Gerät arbeitet mit maxi-
malen Kälteleistung.
Hinweis
u
Beim Betätigen der Taste SuperFrost kann es durch die
eingebaute Einschaltverzögerung zu einem bis zu 8 Minuten
verspäteten Einschalten des Kompressors kommen. Diese
Verzögerung erhöht die Lebensdauer des Kompressors.
Bei einer kleinen Gefriergutmenge:
u
Ca. 6 h warten.
u
Verpackte Lebensmittel in die unteren Schubfächer legen.
Bei der maximalen Gefriergutmenge:
u
Ca. 24 h warten.
u
Unterstes Schubfach herausnehmen und die Lebensmittel
direkt in das Gerät legen, so dass sie Kontakt zum Boden
oder den Seitenwänden haben.
w
SuperFrost schaltet sich automatisch ab. Je nach einge-
legter Menge frühestens nach 30 h spätestens nach 65 h.
w
Das Symbol SuperFrost
Fig. 3 (5)
erlischt, wenn das
Einfrieren abgeschlossen ist.
u
Lebensmittel in das Schubfach legen und dieses wieder
einschieben.
w
Das Gerät arbeitet im energiesparenden Normalbetrieb
weiter.
5.8 Schubfächer
u
Um Gefriergut direkt auf den Abstellflächen zu lagern:
Schubfach nach vorne ziehen und herausheben.
5.9 Abstellflächen
u
Abstellfläche herausnehmen: vorne
anheben und herausziehen.
u
Abstellfläche wieder einsetzen: bis zum
Anschlag einfach einschieben.
Bedienung
7

Downloaded from www.vandenborre.be
5.10 VarioSpace
Sie können zusätzlich zu den
Schubfächern auch die Abstellflä-
chen herausnehmen. So erhalten
Sie Platz für großes Gefriergut.
Geflügel, Fleisch, große Wildteile
sowie hohe Backwaren können als
Ganzes eingefroren und weiter
zubereitet werden.
u
Die Schubfächer können jeweils
mit max. 25 kg Gefriergut, die
Platten je mit max. 35 kg belastet
werden.
5.11 Info-System
Fig. 6
(1) Fertiggerichte,
Eiscreme
(4) Wurst, Brot
(2) Schweinefleisch, Fisch (5) Wild, Pilze
(3) Obst, Gemüse (6) Geflügel, Rind/ Kalb
Die Zahlen geben jeweils für mehrere Gefriergutarten die
Lagerzeit in Monaten an. Die angegebenen Lagerzeiten sind
Richtwerte.
5.12 Kälte Akkus
Die Kälte-Akkus verhindern bei Stromausfall, dass die Tempe-
ratur zu schnell ansteigt.
5.12.1 Kälte Akkus verwenden
u
Die durchgefrorenen Kälte-Akkus
im oberen, vorderen Bereich des
Gefrierraums auf das Gefriergut
legen.
6 Wartung
6.1 manuell Abtauen
Im Gerät bildet sich nach längerem Betrieb eine Reif- bzw.
Eisschicht.
Die Reif- bzw. Eisschicht bildet sich schneller, wenn das Gerät
häufig geöffnet wird oder die eingelegten Lebensmittel warm
sind. Eine dickere Eisschicht erhöht jedoch den Energiever-
brauch. Deshalb das Gerät regelmäßig abtauen.
VORSICHT
Verletzungs- und Beschädigungsgefahr durch heißen Dampf!
u
Zum Abtauen keine elektrischen Heiz- oder Dampfreini-
gungsgeräte, offenen Flammen oder Abtausprays
verwenden.
u
Eis nicht mit scharfen Gegenständen entfernen.
u
Einen Tag vor dem Abtauen SuperFrost einschalten.
w
Das Gefriergut erhält eine "Kältereserve".
u
Gerät ausschalten.
w
Die Temperaturanzeige erlischt.
w
Wenn die Temperaturanzeige nicht erlischt, ist die Kindersi-
cherung aktiv. (siehe 5.2) .
u
Netzstecker ziehen oder Sicherung ausschalten.
u
Kälte-Akkus oben auf das Gefriergut legen.
u
Gefriergut evtl. im Schubfach in Zeitungspapier oder
Decken einschlagen und an einem kühlen Ort aufbewahren.
u
Einen Topf mit heißem, nicht koch-
endem Wasser auf eine mittlere
Platte stellen.
-oder-
u
Die unteren beiden Schubfächer
halbvoll mit handwarmem Wasser
füllen und in das Gerät einsetzen.
w
Das Abtauen wird beschleunigt.
u
Gerätetür während des Abtauens offen lassen.
u
Losgelöste Eisstücke herausnehmen.
u
Tauwasser evtl. mehrmals mit einem Schwamm oder Tuch
aufnehmen.
u
Das Gerät reinigen und trockenreiben. (siehe 6.2) .
6.2 Gerät reinigen
VORSICHT
Verletzungs- und Beschädigungsgefahr durch heißen Dampf!
Heißer Dampf kann die Oberflächen beschädigen und zu
Verbrennungen führen.
u
Keine Dampfreinigungsgeräte verwenden!
ACHTUNG
Falsche Reinigung beschädigt das Gerät!
u
Reinigungsmittel nicht konzentriert verwenden.
u
Keine scheuernden oder kratzenden Schwämme oder
Stahlwolle verwenden.
u
Keine scharfen, scheuernden, sand-, chlorid-, chemiekalien-
oder säurehaltigen Putzmittel verwenden.
u
Keine chemischen Lösungsmittel verwenden.
u
Das Typenschild an der Geräteinnenseite nicht beschä-
digen oder entfernen. Es ist wichtig für den Kundendienst.
u
Keine Kabel oder anderen Bauteile abreißen, knicken oder
beschädigen.
u
Kein Reinigungswasser in die Ablaufrinne, die Lüftungsgitter
und elektrischen Teile dringen lassen.
u
Weiche Putztücher und einen Allzweckreiniger mit neut-
ralem pH-Wert verwenden.
u
Im Geräteinnenraum nur lebensmittelunbedenkliche
Reiniger und Pflegemittel verwenden.
u
Gerät leeren.
u
Netzstecker ziehen.
u
Be- und Entlüftungsgitter regelmäßig reinigen.
w
Staubablagerungen erhöhen den Energieverbrauch.
u
Außen- und Innenflächen aus Kunststoff mit lauwarmem
Wasser und etwas Spülmittel von Hand reinigen.
u
Lackierte Seitenwände ausschließlich mit einem weichen,
sauberen Tuch abwischen. Bei starker Verschmutzung
lauwarmes Wasser mit Neutralreiniger verwenden.*
Edelstahlreiniger nicht auf Glas- oder Kunststoffflächen
auftragen, damit sie nicht zerkratzen. Anfängliche dunklere
Stellen und eine intensivere Farbe der Edelstahloberfläche
sind normal.*
u
Außenflächen aus Edelstahl bei Verschmutzung mit
einem handelsüblichen Edelstahlreiniger reinigen. Anschlie-
ßend beiliegendes Edelstahlpflegemittel gleichmäßig in
Schliffrichtung auftragen.*
Nach dem Reinigen:
u
Gerät und Ausstattungsteile trockenreiben.
u
Gerät wieder anschließen und einschalten.
u
SuperFrost einschalten (siehe 5.7) .
Wenn die Temperatur ausreichend kalt ist:
u
Die Lebensmittel wieder einlegen.
Wartung
8

Downloaded from www.vandenborre.be
6.3 Kundendienst
Prüfen Sie zunächst, ob Sie den Fehler selber beheben
können. (siehe Störungen). Falls dies nicht der Fall ist, wenden
sie sich an den Kundendienst. Die Adresse entnehmen Sie
bitte dem beiliegenden Kundendienstverzeichnis.
WARNUNG
Verletzungsgefahr durch unfachmännische Reparatur!
u
Reparaturen und Eingriffe am Gerät und der Netzanschluss-
leitung, die nicht ausdrücklich genannt sind (siehe
Wartung), nur vom Kundendienst ausführen lassen.
u
Gerätebezeichnung
Fig. 7 (1)
, Service-
Nr.
Fig. 7 (2)
und
Serial-Nr.
Fig. 7 (3)
vom Typenschild
ablesen. Das Typen-
schild befindet sich
an der linken Geräte-
innenseite.
Fig. 7
u
Den Kundendienst benachrichtigen und den Fehler, Geräte-
bezeichnung
Fig. 7 (1)
, Service-Nr.
Fig. 7 (2)
und Serial-Nr.
Fig. 7 (3)
mitteilen.
w
Dies ermöglicht einen schnellen und zielgerichteten Service.
u
Das Gerät geschlossen lassen, bis der Kundendienst
eintrifft.
w
Die Lebensmittel bleiben länger kühl.
u
Netzstecker ziehen (dabei nicht am Anschlusskabel ziehen)
oder Sicherung ausschalten.
7 Störungen
Ihr Gerät ist so konstruiert und hergestellt, dass Funktionssi-
cherheit und lange Lebensdauer gegeben sind. Sollte dennoch
während des Betriebes eine Störung auftreten, so prüfen Sie
bitte, ob die Störung auf einen Bedienungsfehler zurückzu-
führen ist. In diesem Fall müssen Ihnen auch während der
Garantiezeit die anfallenden Kosten berechnet werden.
Folgende Störungen können Sie selbst beheben:
Das Gerät arbeitet nicht.
→
Das Gerät ist nicht eingeschaltet.
u
Gerät einschalten.
→
Der Netzstecker steckt nicht richtig in der Steckdose.
u
Netzstecker kontrollieren.
→
Die Sicherung der Steckdose ist nicht in Ordnung.
u
Sicherung kontrollieren.
Der Kompressor läuft lang.
→
Der Kompressor schaltet bei geringem Kältebedarf auf eine
niedrige Drehzahl. Obwohl sich dadurch die Laufzeit
erhöht, wird Energie gespart.
u
Das ist bei energiesparenden Modellen normal.
→
SuperFrost ist eingeschaltet.
u
Um die Lebensmittel schnell abzukühlen läuft der
Kompressor länger. Dies ist normal.
Eine LED hinten unten am Gerät (beim Kompressor)
blinkt regelmässig alle 15 Sekunden*.
→
Der Inverter ist mit einer Fehler-Diagnose LED ausge-
stattet.
u
Das Blinken ist normal.
Geräusche sind zu laut.
→
Drehzahlgeregelte* Kompressoren können aufgrund der
verschiedenen Drehzahlstufen unterschiedliche Laufgeräu-
sche verursachen..
u
Das Geräusch ist normal.
Ein Blubbern und Plätschern
→
Dieses Geräusch kommt vom Kältemittel, das im Kälte-
kreislauf fließt.
u
Das Geräusch ist normal.
Ein leises Klicken
→
Das Geräusch entsteht immer, wenn sich das Kühlaggregat
(der Motor) automatisch ein- oder ausschaltet.
u
Das Geräusch ist normal.
Ein Brummen. Es ist kurzfristig etwas lauter, wenn sich
das Kühlaggregat (der Motor) einschaltet.
→
Bei eingeschaltetem SuperFrost, frisch eingelegten
Lebensmitteln oder nach lang geöffneter Tür erhöht sich
automatisch die Kälteleistung.
u
Das Geräusch ist normal.
→
Die Umgebungstemperatur ist zu hoch.
u
Problemlösung: (siehe 1.2)
Vibrationsgeräusche
u
Gerät etwas wegrücken, über die Stellfüße ausrichten.
In der Temperaturanzeige wird angezeigt: F0 bis F5.
→
Ein Fehler liegt vor.
u
An den Kundendienst wenden. (siehe Wartung).
In der Temperaturanzeige leuchtet Netzausfall . In der
Temperaturanzeige wird die wärmste Temperatur ange-
zeigt, die während des Netzausfalls erreicht wurde.
→
Die Gefriertemperatur war durch einen Netzausfall oder
eine Stromunterbrechung während der letzten Stunden
oder Tage zu hoch angestiegen. Wenn die Stromunterbre-
chung beendet ist, arbeitet das Gerät in der letzten Tempe-
ratureinstellung weiter.
u
Anzeige der wärmsten Temperatur löschen: Taste Alarm
Fig. 3 (9)
drücken.
u
Die Lebensmittel auf ihre Qualität prüfen. Verdorbene
Lebensmittel nicht mehr verzehren. Aufgetaute Lebensmittel
nicht wieder einfrieren.
In der Temperaturanzeige leuchtet DEMO.
→
Der Vorführmodus ist aktiviert.
u
An den Kundendienst wenden. (siehe Wartung).
Gerät ist an den Außenflächen warm.
→
Die Wärme des Kältekreislaufs wird zur Vermeidung von
Kondenswasser genutzt.
u
Dies ist normal.
Temperatur ist nicht ausreichend kalt.
→
Die Gerätetür ist nicht richtig geschlossen.
u
Gerätetür schließen.
→
Die Be- und Entlüftung ist nicht ausreichend.
u
Lüftungsgitter freimachen.
→
Die Umgebungstemperatur ist zu hoch.
u
Problemlösung: (siehe 1.2) .
→
Das Gerät wurde zu häufig oder zu lange geöffnet.
u
Abwarten, ob sich die erforderliche Temperatur von allein
wieder einstellt. Falls nicht, wenden Sie sich an den
Kundendienst. (siehe Wartung).
→
Es wurden zu große Mengen frischer Lebensmittel ohne
SuperFrost eingelegt.
u
Problemlösung: (siehe 5.7)
→
Die Temperatur ist falsch eingestellt.
u
Die Temperatur kälter einstellen und nach 24 h kontrol-
lieren.
→
Das Gerät steht zu nahe an einer Wärmequelle.
u
Problemlösung: (siehe Inbetriebnahme).
In der Anzeige werden Striche ("- -") angezeigt.
→
Die Gefriertemperatur ist durch einen Netzausfall oder eine
Stromunterbrechung über Null Grad angestiegen.
u
Siehe auch “Stomausfall” und “
”
Störungen
9

Downloaded from www.vandenborre.be
8 Außer Betrieb setzen
8.1 Gerät ausschalten
u
Taste On/Off
Fig. 3 (1)
ca 2 s drücken.
w
Die Temperaturanzeige ist dunkel.
8.2 Außer Betrieb setzen
u
Gerät leeren.
u
Netzstecker ziehen.
u
Gerät reinigen (siehe 6.2) .
u
Tür offen lassen, damit keine schlechten Gerüche
entstehen.
9 Gerät entsorgen
Das Gerät enthält noch wertvolle Materialien und
ist einer vom unsortierten Siedlungsabfall
getrennten Erfassung zuzuführen. Die Entsorgung
von ausgedienten Geräten muss fach- und sachge-
recht nach den örtlich geltenden Vorschriften und
Gesetzen erfolgen.
Das ausgediente Gerät beim Abtransport am Kältekreislauf
nicht beschädigen, damit das enthaltene Kältemittel (Angaben
auf dem Typenschild) und das Öl nicht unkontrolliert entwei-
chen können.
u
Gerät unbrauchbar machen.
u
Netzstecker ziehen.
u
Anschlusskabel durchtrennen.
Außer Betrieb setzen
10

Downloaded from www.vandenborre.be
Contents
1 Appliance at a glance............................................ 11
1.1 Overview of the appliance and equipment................ 11
1.2 Range of appliance use............................................ 11
1.3 Conformity................................................................ 11
1.4 Installation dimensions............................................. 12
1.5 Saving energy.......................................................... 12
2 General safety information................................... 12
3 Controls and displays........................................... 13
3.1 Operating controls.................................................... 13
3.2 Temperature display................................................. 13
4 Putting into operation............................................ 13
4.1 Transporting the appliance....................................... 13
4.2 Installing the appliance............................................. 13
4.3 Changing over the door hinge.................................. 14
4.4 Insertion into a row of kitchen units........................... 14
4.5 Disposing of packaging............................................ 15
4.6 Connecting the appliance......................................... 15
4.7 Switching on the appliance....................................... 15
5 Control.................................................................... 15
5.1 Brightness of the temperature display...................... 15
5.2 Child proofing........................................................... 15
5.3 Temperature alarm................................................... 15
5.4 Freezing food........................................................... 16
5.5 Thawing food............................................................ 16
5.6 Setting the temperature............................................ 16
5.7 SuperFrost............................................................... 16
5.8 Drawers.................................................................... 16
5.9 Shelves.................................................................... 16
5.10 VarioSpace............................................................... 17
5.11 Information system................................................... 17
5.12 Cold storage accumulators....................................... 17
6 Maintenance........................................................... 17
6.1 Manual defrosting..................................................... 17
6.2 Cleaning the appliance............................................. 17
6.3 Customer service..................................................... 18
7 Malfunction............................................................. 18
8 Decommissioning.................................................. 19
8.1 Switching off the appliance....................................... 19
8.2 Taking the appliance out of service.......................... 19
9 Disposing of the appliance................................... 19
The manufacturer works constantly on the further development
of all the types and models. Therefore please understand that
we have to reserve the right to make design, equipment and
technical modifications.
To get to know all the benefits of your new appliance, please
read the information contained in these instructions carefully.
The instructions apply to several models. Differences may
occur. Text relating only to specific appliances is marked with
an asterisk (*).
Instructions for action are marked with a
, the results of
action are marked with a .
1 Appliance at a glance
1.1 Overview of the appliance and
equipment
Note
u
Shelves, drawers and baskets are arranged for optimum
energy efficiency on delivery.
Fig. 1
(1) Operating controls (4) Type plate
(2) VarioSpace (5) Adjustable feet
(3) Drawer
1.2 Range of appliance use
The appliance is suitable solely for cooling food in a domestic
environment or similar. This includes use in, for example
-
in staff kitchenettes, bed and breakfast establishments,
-
by guests in country homes, hotels, motels and other forms
of accommodation,
-
in catering and similar services in the wholesale trade
Use the appliance solely as is customary within a domestic
environment. All other types of use are inadmissible. The appli-
ance is not suitable for storing and cooling medicines, blood
plasma, laboratory preparations or similar substances and
products covered by the 2007/47/EC Medical Devices Direc-
tive. Misuse of the appliance can result in the stored products
suffering harm or perishing. Furthermore, the appliance is not
suitable for operation in potentially explosive atmospheres.
The appliance is set to operate within specific ambient temper-
ature limits according to its climate rating. The correct climate
rating for your appliance is indicated on the type plate.
Note
u
Compliance with the ambient temperatures indicated is
required, otherwise the cooling performance is reduced.
Climate
rating
for ambient temperatures
SN, N up to 32 °C
ST up to 38 °C
T up to 43 °C
The appliance will function properly in ambient temperatures of
down to 5 °C.
1.3 Conformity
The refrigerant circuit is tested for leakage. The appliance
complies with the relevant safety regulations and EC Directives
2006/95/EC, 2004/108/EC, 2009/125/EC and 2010/30/EU.
Appliance at a glance
11

Downloaded from www.vandenborre.be
1.4 Installation dimensions
Fig. 2
Model h a g e e' d c c'
GP1376 851 553 611 624 653 1129 563 592
GP1476 851 602 611 628 657 1174 613 640
GPesf1476 851 602 611 610 657 1174 597 644
GP1486 851 602
646
x
663
x
692
x
1209
x
613 640
x
On appliances not supplied with wall spacer brackets or if the
supplied spacer brackets are not used, the dimension is
reduced by 35 mm (see 4.2) .
1.5 Saving energy
-
Always ensure good ventilation. Do not cover ventilation
openings or grille.
-
Do not place appliance in areas of direct sunlight or next to a
stove, heater or similar object.
-
The energy consumption depends on the installation condi-
tions, e.g. the ambient temperature (see 1.2) .
-
Keep the time the appliance is open to a minimum.
-
The lower the temperature setting, the higher the power
consumption.
-
Ensure that all food is well packed and covered for storage.
This will prevent frost from forming.
-
Remove food as needed in order that it does not warm too
much.
-
First cool warm food to room temperature before storing it .
-
If there is a thick layer of frost in the appliance: defrost the
appliance.
Accumulated dust increases the energy
consumption:
-
Once a year, dust the refrigerating unit
together with the metal grille of the heat
exchanger at the back of the appliance.
2 General safety information
Danger for the user:
-
This appliance is not designed for persons (including chil-
dren) with physical, sensory or mental impairment or
persons not having sufficient experience and knowledge,
unless they are instructed in the use of the appliance and
are initially supervised by a person responsible for their
safety. Keep children under supervision to ensure they do
not play with the appliance.
-
In case of a fault, pull out the mains plug (not by pulling the
connecting cable) or switch off the fuse.
-
Have any repairs to or intervention in the appliance, and any
change of the mains power cable, carried out by the
customer service only or by other specialised personnel
trained for the purpose.
-
When disconnecting the appliance from the supply, always
take hold of the plug. Do not pull the cable.
-
Install and connect the appliance only as instructed.
-
Please keep these instructions in a safe place and pass
them on to any subsequent owners.
Fire hazard:
-
The refrigerant R 600a is environmentally friendly but flam-
mable. Escaping refrigerant may ignite.
•
Do not damage the refrigerant circuit pipes.
•
Do not allow naked flames or ignition sources to enter the
appliance.
•
Do not use any electrical appliances in the interior (e.g.
steam cleaners, heaters, ice cream maker etc.).
•
If refrigerant escapes: eliminate naked flames or sources
of ignition from the vicinity. Pull out the power plug. Venti-
late the area well. Notify customer service.
-
Do not store explosives or sprays using combustible propel-
lants such as butane, propane, pentane, etc. in the appli-
ance. To identify these spray cans, look for the list of
contents printed on the can, or a flame symbol. Gases
possibly escaping may ignite due to electrical components.
-
Keep burning candles, lamps and other items with naked
flames away from the appliance so that they do not set the
appliance on fire.
-
Always store high-percentage alcohol in tightly sealed,
upright containers. Alcohol possibly escaping may ignite
due to electrical components.
Danger of tipping and falling:
-
Do not misuse the plinth, drawers, doors etc. as a step or for
support. This applies particularly to children.
Danger of food poisoning:
-
Do not consume food which has been stored too long.
Danger of frostbite, numbness and pain:
-
Avoid lasting skin contact with cold surfaces or refrigerated/
frozen food or take protective steps, e.g. wear gloves. Do
not consume ice cream, water ice or ice cubes immediately
and do not consume them too cold.
Please observe the specific information in the other
sections:
DANGER identifies a situation involving direct
danger which, if not obviated, may
result in death or severe bodily
injury.
WARNING identifies a dangerous situation
which, if not obviated, may result in
death or severe bodily injury.
CAUTION identifies a dangerous situation
which, if not obviated, may result in
minor or medium bodily injury.
NOTICE identifies a dangerous situation
which, if not obviated, may result in
damage to property.
Note identifies useful information and tips.
General safety information
12

Downloaded from www.vandenborre.be
3 Controls and displays
3.1 Operating controls
Fig. 3
(1) On/Off button (6) Alarm symbol
(2) Adjustment button (7) Menu symbol
(3) Temperature display (8) Child lock symbol
(4) SuperFrost button (9) Alarm button
(5) SuperFrost symbol (10) Power failure symbol
3.2 Temperature display
The following are displayed in normal operation:
-
the warmest freezing temperature
The temperature display flashes:
-
the temperature setting is being changed
-
after switch-on the temperature is not yet cold enough
-
the temperature has risen several degrees
Dashes flash in the display:
-
the freezer temperature is above 0 °C.
The following displays indicate malfunction. Possible causes
and corrective action (see Malfunction).
-
F0 to F5
-
The power failure symbol shines.
4 Putting into operation
4.1 Transporting the appliance
CAUTION
Risk of injury and danger of damage as a result of incorrect
transport!
u
Transport the appliance in a packed condition.
u
Transport the appliance upright.
u
Do not transport the appliance without assistance.
4.2 Installing the appliance
WARNING
Fire hazard due to dampness!
If live parts or the mains lead become damp this may cause
short circuits.
u
The appliance is designed for use in enclosed areas. Do not
operate the appliance outdoors or in areas where it is
exposed to splash water or damp conditions.
WARNING
Risk of fire due to short circuit!
If the mains cable/connector of the appliance or of another
appliance touch the rear of the appliance, the mains cable/
connector may be damaged by the appliance vibrations,
leading to a short circuit.
u
Stand the appliance so that it is not touched by connectors
or main cables.
u
Do not plug the appliance or any others into sockets located
near the rear of the appliance.
WARNING
Fire hazard due to refrigerant!
The refrigerant R 600a is environmentally friendly but flam-
mable. Escaping refrigerant may ignite.
u
Do not damage the piping of the refrigeration circuit.
WARNING
Fire hazard and danger of damage!
u
Do not place appliances emitting heat e.g. microwaves,
toasters etc. on the appliance!
WARNING
Blocked ventilation openings pose a risk of fire and damage!
u
Always keep the ventilation openings clear. Always ensure
that the appliance is properly ventilated!
Note*
The bags at the rear of the appliance are important for proper
operation. Their contents are nontoxic and nonhazardous.
u
Do not remove the bags!
q
In the event that the appliance is damaged, contact the
supplier immediately before connecting to the mains.
q
The floor at the site must be flat and level.
q
Do not install the appliance in a location where it is exposed
to direct radiation of the sun, next to a cooker, heater and
similar.
q
The ideal installation site is a dry, well ventilated room.
q
Always stand the appliance backed directly to the wall using
the enclosed wall spacers (see below).
q
Do not install the appliance without assistance.
q
Standard EN 378 specifies that the room in which you install
your appliance must have a volume of 1 m
2
per 8 g of R
600a refrigerant used in the appliance. If the room in which
the appliance is installed is too small, a flammable gas-air
mixture may form in the event of a leakage in the refrigera-
tion circuit. The quantity of refrigerant used in your appliance
is indicated on the type plate on the inside of the appliance.
u
Detach the connecting cable from the rear of the appliance,
removing the cable holder at the same time because other-
wise there will be vibratory noise!
u
Remove the protective film from the outside of the appli-
ance.*
u
Remove all transit supports.
If wall spacers are included with the appliance, the specified
energy consumption is achieved if these wall spacers are
mounted and used. Without wall spacers, the specified appli-
ance depth is reduced by 3.50 cm. If the enclosed wall spacers
are not used, the function of the appliance is not affected in any
way. However, on such appliances with less wall clearance,
energy consumption will be slightly higher.*
Controls and displays
13

Downloaded from www.vandenborre.be
u
In the case of an appliance with
enclosed wall spacers, mount
the wall spacers on the back of
the appliance at the top left and
right.*
*
u
Dispose of packaging material (see 4.5) .
u
Align the appliance so that it
stands firmly and on a level by
applying the accompanying
spanner to the adjustable-
height feet (A) and using a
spirit level.
Note
u
Clean the appliance (see 6.2) .
If the appliance is installed in a very damp environment,
condensate may form on the outside of the appliance.
u
Always see to good ventilation at the installation site.
4.3 Changing over the door hinge
You can change over the door hinges if necessary.
Make sure that the following tools are at hand:
q
Torx® 25
q
Torx® 15
q
Supplied open-ended wrench
q
If necessary, a second person to assist with installation
CAUTION
Risk of injury if the door tips!
u
Take good hold of the door.
u
Set down the door carefully.
Fig. 4 On appliances with a door handle
u
Follow the sequence of the item numbers in the diagram.
4.4 Insertion into a row of kitchen units
Fig. 5
(1) Stack cabinet (3) Kitchen cabinet
(2) Appliance (4) Wall
x
In the case of appliances without enclosed wall spacers, or if
the enclosed spacers are not used, the dimension is reduced
by 35 mm (see 4.2) .
The appliance can be inserted into a row of kitchen units. To
match the appliance
Fig. 5 (2)
to the height of the row of units,
a suitable stack cabinet
Fig. 5 (1)
can be fitted above the appli-
ance.
When building in with kitchen units (max. depth 580 mm) the
appliance can be positioned directly next to the refrigerator
Fig. 5 (3)
. The appliance projects out from the kitchen unit front
by 70 mm
x
at the side and by 85 mm
x
at the centre.
Important for the ventilation:
-
At the back of the stack cabinet there has to be a ventilation
duct of at least 50 mm depth throughout the width of the
stack cabinet.
-
The ventilation space under the ceiling has to be at least
300 cm
2
.
-
the larger the ventilation space, the more energy-saving the
appliance is in operation.
Putting into operation
14

Downloaded from www.vandenborre.be
If the appliance is installed with the hinges next to a wall
Fig. 5 (4)
, the distance between appliance and wall has to be at
least 40 mm. This corresponds to the projection of the handle
when the door is open.
4.5 Disposing of packaging
WARNING
Danger of suffocation due to packing material and plastic film!
u
Do not allow children to play with packing material.
The packaging is made of recyclable materials:
-
corrugated board/cardboard
-
expanded polystyrene parts
-
polythene bags and sheets
-
polypropylene straps
-
nailed wooden frame with polyethylene panel*
u
Take the packaging material to an official collecting point.
4.6 Connecting the appliance
NOTICE
Risk of damage to the electronic control system!
u
Do not use stand-alone inverters (conversion of d.c. to a.c./
three-phase) or energy saving plugs.
WARNING
Fire and overheating hazard!
u
Do not use extension cables or multiple socket outlets.
The type of current (alternating current) and voltage at the
installation site have to conform with the data on the type plate
(see Appliance at a glance).
Connect the appliance only with a properly installed
socket outlet with earthing contact. The socket outlet
must be fused with 10 A or higher.
It must be easily accessible so that the appliance can
be quickly disconnected from the supply in an emer-
gency. It must be outside the area of the rear of the
appliance.
u
Check the electrical connection.
u
Plug in the power plug.
4.7 Switching on the appliance
u
Press the On/Off button
Fig. 3 (1)
.
w
The appliance is switched on. The temperature display and
Alarm symbol
Fig. 3 (6)
flash until the temperature is cold
enough.
5 Control
5.1 Brightness of the temperature
display
You can adjust the brightness of the temperature display to the
light conditions of the room in which the appliance is installed.
5.1.1 Setting the brightness
The brightness is adjustable between h 0 (minimum bright-
ness) and h 5 (maximum brightness).
u
Activate setting mode by pressing the SuperFrost button,
Fig. 3 (4)
, for approx. 5 sec.
w
The Menu symbol is shown on the display,
Fig. 3 (7)
.
w
c flashes on the display.
u
Use the adjustment button,
Fig. 3 (2)
, to select h.
u
Briefly confirm with the SuperFrost button,
Fig. 3 (4)
.
w
The display shows the last set brightness value.
u
Use the adjustment button,
Fig. 3 (2)
, to set the desired
value from h 0 to h 5.
w
The brightness is set.
u
Deactivate the setting mode by pressing the On/Off button,
Fig. 3 (1)
, twice.
w
The temperature display shows the temperature again.
5.2 Child proofing
The child-proofing function enables you to make sure that the
appliance is not inadvertently switched off by playing children.
5.2.1 Setting the child lock
To switch on the function:
u
Activate setting mode by pressing the SuperFrost button,
Fig. 3 (4)
, for approx. 5 sec.
w
The Menu symbol is shown on the display,
Fig. 3 (7)
.
w
c flashes on the display.
u
Briefly confirm with the SuperFrost button,
Fig. 3 (4)
.
w
c1 appears on the display.
u
Briefly confirm with the SuperFrost button,
Fig. 3 (4)
.
w
The child lock symbol,
Fig. 3 (8)
, lights up on the
display.
w
c flashes on the display.
w
The child lock function is switched on.
To cancel setting mode:
u
Briefly press the On/Off button,
Fig. 3 (1)
.
w
The temperature display shows the temperature again.
To switch off the function:
u
Activate setting mode by pressing the SuperFrost button,
Fig. 3 (4)
, for approx. 5 sec.
w
The Menu symbol is shown on the display,
Fig. 3 (7)
.
w
c flashes on the display.
u
Briefly confirm with the SuperFrost button,
Fig. 3 (4)
.
w
c0 appears on the display.
u
Briefly confirm with the SuperFrost button,
Fig. 3 (4)
.
w
The child lock symbol,
Fig. 3 (8)
, goes out.
w
c flashes on the display.
w
The child lock function is switched off.
To cancel setting mode:
u
Briefly press the On/Off button,
Fig. 3 (1)
.
w
The temperature display shows the temperature again.
5.3 Temperature alarm
The audible alarm sounds if the freezer temperature is not cold
enough.
The temperature display and the alarm symbol
Fig. 3 (6)
flash
at the same time.
The audible alarm is automatically silenced, the alarm symbol
Fig. 3 (6)
goes out and the temperature display stops flashing
when the temperature is sufficiently cold again.
If the alarm status persists: (see Malfunction).
5.3.1 Muting the temperature alarm
The audible alarm can be muted. When the temperature is
sufficiently cold again, the alarm function is active again.
u
Press alarm button
Fig. 3 (9)
.
w
The audible alarm is silenced.
Control
15

Downloaded from www.vandenborre.be
5.4 Freezing food
The rating plate indicates the maximum quantity of fresh food
you can freeze within 24 hours (see Appliance at a glance)
under "Freezing capacity ... kg/24h".
The maximum load of frozen food for the drawers is 25 kg each
and for the shelves 35 kg each.
CAUTION
Risk of injury due to broken glass!
Bottles and cans containing drinks may burst when being
frozen. This applies particularly to sparkling drinks.
u
Do not freeze bottles and cans containing drinks!
In order that the food is rapidly frozen through to the core, do
not exceed the following quantities per pack:
- Fruit, vegetables up to 1 kg
- Meat up to 2.5 kg
u
Pack the food in portions in freezer bags, reusable plastic,
metal or aluminium containers.
5.5 Thawing food
- at room temperature
- in a microwave oven
- in a conventional or fan oven
u
Food once thawed should be re-frozen only in exceptional
cases.
5.6 Setting the temperature
The temperature depends on the following factors:
-
the frequency of opening the door
-
the room temperature of the installation location
-
the type, temperature and quantity of the food
Recommended temperature setting: -18 °C
The temperature is changed sequentially. Once the -28 °C
setting is reached, the sequence starts again at -14 °C.
u
Call up the temperature function by pressing the adjustment
button
Fig. 3 (2)
once.
w
The current temperature flashes on the temperature display.
u
To change the temperature in 1 °C increments, press the
adjustment button,
Fig. 3 (2)
, repeatedly until the desired
temperature is shown on the temperature display.
u
To change the temperature continuously, press and hold the
button.
w
During adjustment the value flashes on the display.
w
Approx. 5 sec. after the last button press, the actual temper-
ature is displayed. The temperature gradually adjusts to the
new value.
5.7 SuperFrost
With this function you can freeze fresh food quickly through to
the core. The appliance operates with maximum refrigeration.
The noise of the refrigeration unit may be temporarily louder as
a result.
The maximum amount of fresh food which can be frozen in 24
h is indicated on the type plate under "freezing capacity ... kg/
24h". This amount varies according to the model and climate
rating.
You have to activate SuperFrost in good time, depending on
how much fresh food is to be frozen: about 6 hours before
placing the food inside in case of small amounts and about 24
hours in advance in case of the maximum amount of food to be
frozen.
Wrap produce and spread it out as far as possible. Do not
allow produce to be frozen to touch produce that is already
frozen to prevent the latter thawing.
You do not have to activate SuperFrost in the following cases:
-
when placing frozen food in the freezer
-
when freezing up to approx. 1 kg fresh food daily
5.7.1 Freezing with SuperFrost
u
Briefly press the SuperFrost button
Fig. 3 (4)
once.
w
The SuperFrost symbol
Fig. 3 (5)
shines.
w
The freezer temperature drops, the appliance operates with
maximum refrigerating performance.
Note
u
When the SuperFrost button is pressed, the built-in switch-
on delay may defer compressor activation by up to 8
minutes. This delay extends the service life of the
compressor.
For a smaller quantity of produce to be frozen:
u
wait approx. 6 h.
u
Place wrapped produce in the bottom drawers.
For the maximum quantity of produce to be frozen:
u
wait approx. 24 h.
u
Remove bottom drawer and place produce directly in the
appliance so that it touches the base or sides.
w
SuperFrost is automatically deactivated. Depending on the
quantity placed inside, after 30 h at the earliest, 65 h at the
latest.
w
The SuperFrost symbol
Fig. 3 (5)
extinguishes once freezing
is completed.
u
Place produce in the drawer and then push the drawer back
in again.
w
The appliance continues to operate in the energy-saving,
normal mode.
5.8 Drawers
u
To store frozen food directly on the shelves: pull the drawer
forwards and lift it out.
5.9 Shelves
u
To remove the shelf: lift up at the front
and pull out.
u
To put the shelf back: simply push in as
far as it will go.
Control
16

Downloaded from www.vandenborre.be
5.10 VarioSpace
Apart from being able to remove the
drawers, you can also remove the
shelves, creating space for large
items of frozen food. Poultry, meat,
large pieces of game and high
bakery products can be frozen in
one piece and prepared.
u
The maximum load of frozen food
for the drawers is 25 kg each and
for the shelves 35 kg each.
5.11 Information system
Fig. 6
(1) Ready-made meals, ice
cream
(4) Sausages, bread
(2) Pork, fish (5) Game, mushrooms
(3) Fruit, vegetables (6) Poultry, beef/veal
The figures indicate the storage time in months for several
types of frozen food in each case. Storage times given are
guide times.
5.12 Cold storage accumulators
The cold storage accumulators prevent the temperature from
rising too fast in the event of power failure.
5.12.1 Using cold storage accumulators
u
Place the frozen cold storage
accumulators on the frozen food
in the upper front area of the
freezer compartment.
6 Maintenance
6.1 Manual defrosting
After a long period of operation, a layer of frost or ice can build
up inside the appliance.
The layer of frost or ice builds up faster if the appliance is
opened often or if the food is warm when placed inside.
However, a thick layer of ice will increase the appliance‘s
energy consumption. You should therefore defrost the appli-
ance regularly.
CAUTION
Risk of injury and damage as a result of hot steam!
u
Do not use electric heaters or steam cleaners, naked flames
or defrosting sprays for defrosting.
u
Do not remove ice using sharp instruments.
u
Switch on SuperFrost one day before defrosting.
w
The frozen goods are provided with a "cold reserve".
u
Switch off the appliance.
w
The temperature display goes out.
w
If the temperature display does not go out, the child lock
function (see 5.2) is active.
u
Pull out the power plug or switch off the fuse.
u
Place cold storage accumulators on top of the frozen food.
u
If possible, put the frozen goods in the freezer drawer,
wrapped in newspaper or a blanket, and store in a cool
place.
u
Place a pan with hot, not boiling
water on a middle shelf.
-or-
u
Half-fill the two lower drawers with
lukewarm water and put them in the
appliance.
w
Defrosting is speeded up.
u
Leave the door of the appliance open while defrosting.
u
Remove detached pieces of ice.
u
If necessary, pick up defrost water several times, using a
sponge or cloth.
u
Clean the appliance (see 6.2) and rub dry.
6.2 Cleaning the appliance
CAUTION
Risk of injury and damage as a result of hot steam!
Hot steam may damage the surfaces and cause burns.
u
Do not use any steam cleaners!
NOTICE
Incorrect cleaning damages the appliance!
u
Do not use cleaning agents in concentrated form.
u
Do not use any scouring or abrasive sponges or steel wool.
u
Please do not use any aggressive, scouring, sand-,
chloride-, chemical- or acid-based cleaning agents.
u
Do not use chemical solvents.
u
Do not damage or remove the type plate on the inside of the
appliance. It is important for the customer service.
u
Do not pull off, bend or damage cables or other compo-
nents.
u
Do not allow any cleaning water to enter the drain channel,
ventilation grille or electrical parts.
u
Please use soft cleaning cloths and a universal pH-neutral
cleaning agent.
u
Please use cleaning and care products suitable for contact
with foodstuffs in the appliance interior.
u
Empty appliance.
u
Pull out the power plug.
u
Clean the vent grille regularly.
w
Dust deposits increase energy consumption.
u
Clean plastic outer and inner surfaces with lukewarm
water and a little washing-up liquid.
u
Only use a soft clean cloth to wipe side walls with a paint
finish. In the case of heavy soiling, use lukewarm water with
neutral cleaning agent.*
Do not apply stainless steel cleaning agent to glass or plastic
surfaces to prevent them from being scratched. Darker areas at
the beginning and quite an intensive colour of the stainless
steel surface are normal.*
u
When soiled, clean stainless steel outer surfaces with a
commercially available stainless steel cleaning agent. Then
apply the enclosed stainless steel care product evenly in the
direction of polishing.*
After cleaning:
u
Wipe dry the appliance and items of equipment.
u
Connect the appliance and switch it on again.
u
Switch on SuperFrost (see 5.7) .
When the temperature is sufficiently cold:
u
Put the food back inside.
Maintenance
17

Downloaded from www.vandenborre.be
6.3 Customer service
First check whether you can correct the fault yourself by refer-
ence to the list (see Malfunction). If this is not the case, please
contact the customer service whose address is given in the
enclosed customer service list.
WARNING
Risk of injury if repair work is not carried out professionally!
u
Have any repairs and action - not expressly specified - on
the appliance and mains cable carried out by service
personnel only. (see Maintenance)
u
Read the appliance
designation
Fig. 7 (1)
, service
No.
Fig. 7 (2)
and
serial No.
Fig. 7 (3)
off the type plate
located inside the
appliance on the left-
hand side.
Fig. 7
u
Notify the customer service, specifying the fault, appliance
designation
Fig. 7 (1)
, service No.
Fig. 7 (2)
and serial No.
Fig. 7 (3)
.
w
This will help us to provide you with a faster and more accu-
rate service.
u
Keep the appliance closed until the customer service
arrives.
w
The food will stay cool longer.
u
Pull out the mains plug (not by pulling the connecting cable)
or switch off the fuse.
7 Malfunction
Your appliance is designed and manufactured for a long life
span and reliable operation. If a malfunction nonetheless
occurs during operation, check whether it is due to a handling
error. In this case you will have to be charged for the costs
incurred, even during the warranty period. You may be able to
rectify the following faults yourself:
Appliance does not work.
→
The appliance is not switched on.
u
Switch on the appliance.
→
The power plug is not properly inserted in the wall socket.
u
Check power plug.
→
The fuse of the wall socket is not in order.
u
Check fuse.
The compressor runs for a long time.
→
The compressor switches to a low speed when little cold is
needed. Although the running time is increased as a result,
energy is saved.
u
This is normal in energy-saving models.
→
SuperFrost is activated.
u
The compressor runs for longer in order to rapidly cool the
food. This is normal.
A LED on the bottom rear of the appliance (at the
compressor) flashes regularly every 15 seconds*.
→
The inverter is equipped with a diagnostic LED.
u
The flashing is normal.
Excessive noise.
→
Speed-controlled* compressors may produce varying
running noise due to different speed steps.
u
The sound is normal.
A bubbling and gurgling noise.
→
This noise comes from the refrigerant flowing in the refriger-
ation circuit.
u
The sound is normal.
A quiet clicking noise.
→
The noise is produced whenever the refrigeration unit
(motor) automatically switches on or off.
u
The sound is normal.
A hum. It is briefly a little louder when the refrigeration
unit (the motor) switches on.
→
The refrigeration increases automatically when the Super-
Frost, function is activated, fresh food has just been placed
in the appliance or the door has been left open for a while.
u
The sound is normal.
→
The ambient temperature is too high.
u
Solution: (see 1.2)
Vibratory noise.
u
Move the appliance away a little and align it using the
adjustable feet.
The temperature display indicates: F0 to F5.
→
There is a fault.
u
Contact the customer service (see Maintenance).
The temperature display indicates power failure . The
warmest temperature reached during the power failure
appears in the temperature display.
→
The freezer temperature rose too high over the last hours or
days due to a power failure or power interruption. When the
power interruption is over, the appliance will continue to
operate in the last temperature setting.
u
To cancel the display of the warmest temperature: press
alarm button
Fig. 3 (9)
.
u
Check the quality of the food. Do not consume spoiled food.
Do not re-freeze thawed food.
DEMO shines in the temperature display.
→
The demo mode is activated.
u
Contact the customer service. (see Maintenance).
The outside surfaces of the appliance are warm.
→
The heat of the refrigeration circuit is used to prevent
condensate from forming.
u
This is normal.
The temperature is not cold enough.
→
The door of the appliance is not properly closed.
u
Close the door of the appliance.
→
Insufficient ventilation.
u
Clear ventilation grilles.
→
The ambient temperature is too high.
u
Solution: (see 1.2) .
→
The appliance was opened too frequently or for too long.
u
Wait until the appliance reaches the required temperature
itself. If not, contact the customer service. (see Mainte-
nance).
→
Too much fresh food was placed inside without SuperFrost.
u
Solution: (see 5.7)
→
The temperature is incorrectly set.
u
Set to a colder temperature and check after 24 h.
→
The appliance is too close to a heat source.
u
Solution: (see Putting into operation).
Dashes ("- -") are indicated in the display.
→
The freezer temperature has risen above zero degrees due
to power failure or interruption.
u
See also "Power failure" and "
"
Malfunction
18

Downloaded from www.vandenborre.be
8 Decommissioning
8.1 Switching off the appliance
u
Press On/Off button
Fig. 3 (1)
for about 2 seconds.
w
The temperature display is dark.
8.2 Taking the appliance out of service
u
Empty the appliance.
u
Pull out the power plug.
u
Clean the appliance (see 6.2) .
u
Leave the door open to prevent odour.
9 Disposing of the appliance
The appliance contains some reusable materials
and should be disposed of properly - not simply
with unsorted household refuse. Appliances which
are no longer needed must be disposed of in a
professional and appropriate way, in accordance
with the current local regulations and laws.
When disposing of the appliance, ensure that the refrigeration
circuit is not damaged to prevent uncontrolled escape of the
refrigerant it contains (data on type plate) and oil.
u
Disable the appliance.
u
Pull out the plug.
u
Cut through the connecting cable.
Decommissioning
19

Downloaded from www.vandenborre.be
Sommaire
1 Vue d'ensemble de l'appareil............................... 20
1.1 Vue d'ensemble de l'appareil et de ses
équipements............................................................. 20
1.2 Domaine d'utilisation de l'appareil............................ 20
1.3 Conformité................................................................ 21
1.4 Dimensions.............................................................. 21
1.5 Economiser l'énergie................................................ 21
2 Consignes de sécurité générales........................ 21
3 Eléments de commande et d'affichage............... 22
3.1 Éléments de commande et de contrôle.................... 22
3.2 Affichage de la température..................................... 22
4 Mise en service...................................................... 22
4.1 Transport de l'appareil.............................................. 22
4.2 Mise en place de l'appareil....................................... 22
4.3 Remplacement de la butée de porte......................... 23
4.4 Insertion entre deux éléments de cuisine................. 23
4.5 Eliminer l'emballage................................................. 24
4.6 Brancher l'appareil................................................... 24
4.7 Enclencher l'appareil................................................ 24
5 Commande............................................................. 24
5.1 Luminosité de l'affichage de température................. 24
5.2 Verrouillage enfants................................................. 24
5.3 Alarme de température............................................. 25
5.4 Congeler des aliments.............................................. 25
5.5 Dégivrer les aliments................................................ 25
5.6 Réglage de la température....................................... 25
5.7 SuperFrost............................................................... 25
5.8 Tiroirs....................................................................... 26
5.9 Tablettes de rangement........................................... 26
5.10 VarioSpace............................................................... 26
5.11 Système info............................................................. 26
5.12 Accumulateurs de froid............................................. 26
6 Entretien................................................................. 26
6.1 Dégivrer manuellement............................................ 26
6.2 Nettoyage de l'appareil............................................. 26
6.3 S.A.V. ...................................................................... 27
7 Dysfonctionnements............................................. 27
8 Mise hors service................................................... 28
8.1 Couper l'appareil...................................................... 28
8.2 Mise hors service..................................................... 28
9 Eliminer l'appareil.................................................. 28
Le fabricant travaille constamment au développement de tous
les types et modèles d'appareils.C'est pourquoi nous nous
réservons le droit de modifier la forme, l'équipement et la tech-
nique de nos appareils. Nous vous remercions de votre
compréhension.
Afin de découvrir tous les avantages de votre nouvel appareil,
nous vous prions de lire attentivement ces instructions de
montage.
Ces instructions de montage sont valables pour plusieurs
modèles, des différences sont donc possibles.Les paragra-
phes ne concernant que certains appareils sont indiqués par
un astérisque (*).
Les instructions de manipulation sont indiqués par un
,
les résultats de manipulation par un .
1 Vue d'ensemble de l'appareil
1.1 Vue d'ensemble de l'appareil et de
ses équipements
Remarque
u
A la livraison, les tablettes de rangement, les bacs et les
balconnets sont disposés de sorte à assurer une efficacité
énergétique maximale.
Fig. 1
(1) Éléments de commande
et de contrôle
(4) Plaque signalétique
(2) VarioSpace (5) Pieds réglables
(3) Tiroir
1.2 Domaine d'utilisation de l'appareil
L'appareil est exclusivement adapté à la réfrigération d'ali-
ments dans un environnement domestique ou un environne-
ment semblable. Est prise en compte, par exemple, l'utilisation
-
les cuisines du personnel, les pensions de famille,
-
les clients de maisons de campagne, hôtels, motels et
autres hébergements,
-
les traiteurs et services semblables dans le commerce de
gros
N'utilisez l'appareil que dans un cadre domestique. Toute autre
sorte d'utilisation est interdite. L'appareil n'est pas conçu pour
le stockage et la réfrigération de médicaments, de plasma
sanguin, de préparations de laboratoire ou autres produits ou
substances semblables concernés par la directive des produits
médicaux 2007/47/EG. Une utilisation abusive de l'appareil
peut entraîner l'endommagement des produits stockés ou leur
altération. De plus, l'appareil n'est pas adapté pour le fonction-
nement dans les domaines à risque d'explosions.
En fonction de la classe climatique, l'appareil a été conçu pour
l'exploitation à des températures environnantes limites. La
classe climatique de votre appareil est indiquée sur la
plaquette signalétique.
Remarque
u
Respectez les températures environnantes indiquées, sinon
la puissance réfrigérante diminue.
Classe clima-
tique
pour températures ambiantes
SN, N à 32 °C
Vue d'ensemble de l'appareil
20
La pagina si sta caricando...
La pagina si sta caricando...
La pagina si sta caricando...
La pagina si sta caricando...
La pagina si sta caricando...
La pagina si sta caricando...
La pagina si sta caricando...
La pagina si sta caricando...
La pagina si sta caricando...
La pagina si sta caricando...
La pagina si sta caricando...
La pagina si sta caricando...
La pagina si sta caricando...
La pagina si sta caricando...
La pagina si sta caricando...
La pagina si sta caricando...
La pagina si sta caricando...
La pagina si sta caricando...
La pagina si sta caricando...
La pagina si sta caricando...
La pagina si sta caricando...
La pagina si sta caricando...
La pagina si sta caricando...
La pagina si sta caricando...
La pagina si sta caricando...
La pagina si sta caricando...
La pagina si sta caricando...
La pagina si sta caricando...
La pagina si sta caricando...
La pagina si sta caricando...
La pagina si sta caricando...
La pagina si sta caricando...
La pagina si sta caricando...
La pagina si sta caricando...
La pagina si sta caricando...
La pagina si sta caricando...
La pagina si sta caricando...
La pagina si sta caricando...
La pagina si sta caricando...
La pagina si sta caricando...
La pagina si sta caricando...
La pagina si sta caricando...
La pagina si sta caricando...
La pagina si sta caricando...
La pagina si sta caricando...
La pagina si sta caricando...
La pagina si sta caricando...
La pagina si sta caricando...
La pagina si sta caricando...
La pagina si sta caricando...
La pagina si sta caricando...
La pagina si sta caricando...
La pagina si sta caricando...
La pagina si sta caricando...
La pagina si sta caricando...
La pagina si sta caricando...
-
 1
1
-
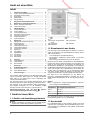 2
2
-
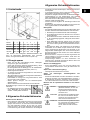 3
3
-
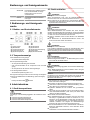 4
4
-
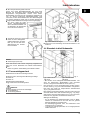 5
5
-
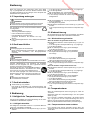 6
6
-
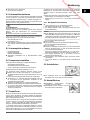 7
7
-
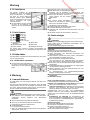 8
8
-
 9
9
-
 10
10
-
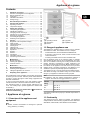 11
11
-
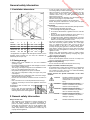 12
12
-
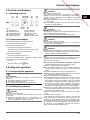 13
13
-
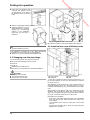 14
14
-
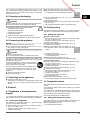 15
15
-
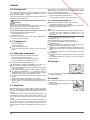 16
16
-
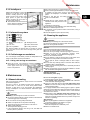 17
17
-
 18
18
-
 19
19
-
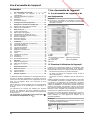 20
20
-
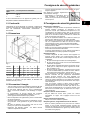 21
21
-
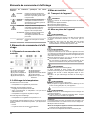 22
22
-
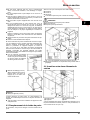 23
23
-
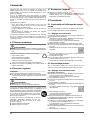 24
24
-
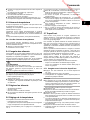 25
25
-
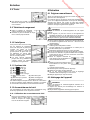 26
26
-
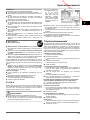 27
27
-
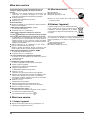 28
28
-
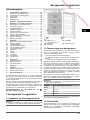 29
29
-
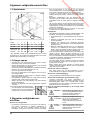 30
30
-
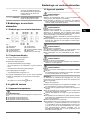 31
31
-
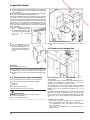 32
32
-
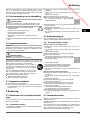 33
33
-
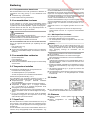 34
34
-
 35
35
-
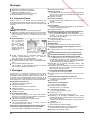 36
36
-
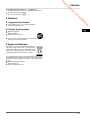 37
37
-
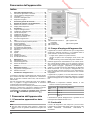 38
38
-
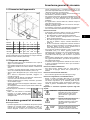 39
39
-
 40
40
-
 41
41
-
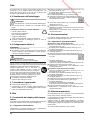 42
42
-
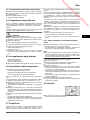 43
43
-
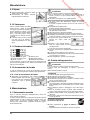 44
44
-
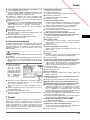 45
45
-
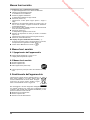 46
46
-
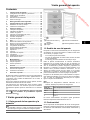 47
47
-
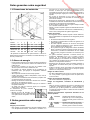 48
48
-
 49
49
-
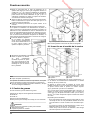 50
50
-
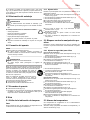 51
51
-
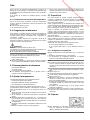 52
52
-
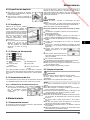 53
53
-
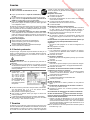 54
54
-
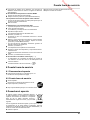 55
55
-
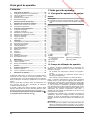 56
56
-
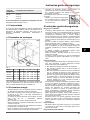 57
57
-
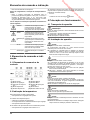 58
58
-
 59
59
-
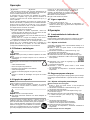 60
60
-
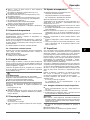 61
61
-
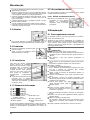 62
62
-
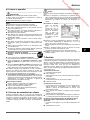 63
63
-
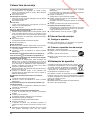 64
64
-
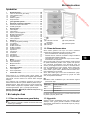 65
65
-
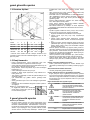 66
66
-
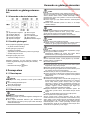 67
67
-
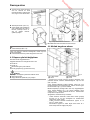 68
68
-
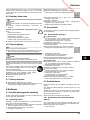 69
69
-
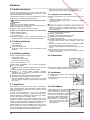 70
70
-
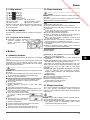 71
71
-
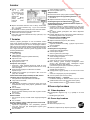 72
72
-
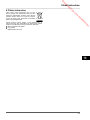 73
73
-
 74
74
-
 75
75
-
 76
76


Liebherr GP 1486 (WHITE) Manuale del proprietario
- Tipo
- Manuale del proprietario
in altre lingue
- français: Liebherr GP 1486 (WHITE) Le manuel du propriétaire
- español: Liebherr GP 1486 (WHITE) El manual del propietario
- Deutsch: Liebherr GP 1486 (WHITE) Bedienungsanleitung
- Nederlands: Liebherr GP 1486 (WHITE) de handleiding
- português: Liebherr GP 1486 (WHITE) Manual do proprietário
- Türkçe: Liebherr GP 1486 (WHITE) El kitabı