DREAME M12 Wet and Dry Vacuum Manuale utente
- Categoria
- Aspirapolvere
- Tipo
- Manuale utente

The illustrations in this manual are for reference only. Please
refer to the actual product.
Wet and Dry Vacuum
User Manual
M12

THANK YOU
FOR PURCHASING THIS DREAME
WET AND DRY VACUUM.
Registration Quick Start
Welcome to register a Dreame account by
scaning the QR code. You are available
for the User Manual and Special Oers.
With it you are obtaining a high quality product that is
engineered for optimal performance.
If you have any questions on the product,
please contact us: aftersales@dreame.tech.
Contents
EN User Manual 001
IT Manuale utente 022

1 21 2
EN EN
• Please read this manual carefully before use and retain it for future reference.
• When using an electrical appliance, basic precautions should always be followed,
including the following:
• READ ALL INSTRUCTIONS BEFORE USING (THIS APPLIANCE). Failure to follow the
warnings and instructions may result in electric shock, re and/or serious injury.
Safety Information
To reduce the risk of re, electric shock, or injury:
WARNING-
Important Safety Instructions
For Household Use Only
• Use only as described in this user guide. Use only manufacturer's recommended
attachments.
• Use indoors only, on non-carpeted oor surfaces such as vinyl, tile, sealed wood, etc.
Be careful not to run over loose objects or the edges of area rugs. Stalling the brush
may result in premature belt failure.
• This appliance should not be used by children younger than 8 years old nor persons
with physical, sensory, intellectual deciencies, or limited experience or knowledge
without the supervision of a parent or guardian to ensure safe operation and to avoid
any risks. Cleaning and maintenance shall not be performed by children without
supervision.
• Do not use a ammable or combustible liquid to clean oors.
• Do not use to pick up ammable or combustible liquids, such as gasoline. Do not use
in areas where ammable or combustible liquids may be present.
• For the purposes of recharging the battery, only use the detachable adapter provided
with this appliance. Use only with <YLS0251B-E260090> adapter.
• An adapter that is suitable for one type of battery pack may create a risk of re when
used with another battery pack.
• Do not immerse the appliance in liquid.
• Plastic lm can be dangerous. To avoid the danger of suocation, keep it away from
children.
• Keep hair, loose clothing, ngers, and all parts of the body away from openings and
moving parts of the appliance and its accessories.
• Use only ocially-approved oor cleaner as described in the user guide.
• Do not put any object into openings. Do not use the appliance when any opening is
blocked; keep free of dust, lint, hair, and anything that may inhibit air ow.
• Do not use it without lters in place.
• Do not use the appliance with a damaged adapter. If the adapter is damaged, it must
be replaced by the manufacturer, its service agent or similarity qualied persons in
order to avoid hazards.
• Keep ground cables away from the appliance when using it, because a hazard may
occur if the appliance runs over a supply cord.
Safety Information
• Do not pick up toxic material (chlorine bleach, ammonia, drain cleaner, etc.). Do not
pick up hard or sharp objects such as glass, nails, screws, coins, etc.
• Do not use the appliance in an enclosed space lled with vapour given o by oil-
based paint, paint thinner, some moth-proong substances, ammable dust, or other
explosive or toxic vapour.Do not pick up anything that is burning or smoking, such as
cigarettes, matches or hot ashes.
• Follow all charging instructions and do not charge the appliance outside of the
temperature range specied in the battery as doing so increases the risk of re.
• Charger base output terminals should not be short-circuited. Do not use it with
damaged charger base. If the appliance has been dropped, damaged, left outdoors,
dropped into water, or is not working as it should, return it to a service center.
• Keep the adapter cable away from heated surfaces. Do not handle the adapter plug or
appliance with wet hands. To unplug, grasp the adapter plug, rather than the cable.
• Do not pull or carry adapter by cable, use cable as a handle, close door on cable, or
pull cable around sharp edges or corners.
• Switch o when not in use, before cleaning, maintainingor servicing the appliance,
and before connecting or disconnecting the tool with a moving brush.
• Do not use an appliance that is damaged or modied. Damaged or modied
appliance may exhibit unpredictable behavior resulting in re, explosion, or risk of
injury.
• Do not expose the appliance to re or excessive temperature. Exposure to re or
excessive temperature may cause an explosion.
• Ensure that the appliance is placed on a horizontal surface. Do not use the appliance
at the same position if the appliance is equipped with a brush roller and the handle is
not completely upright. Do not store the appliance in a place where it may freeze.
• Use extra care when cleaning on stairs.
• Prevent unintentional starting. Ensure the switch is in the OFF-position before picking
up or carrying the appliance. Carrying the appliance with your nger on the switch or
energizing appliance that have the switch on invites accidents.
• This product contains batteries that can only be replaced by qualied technicians or
after-sales service.

3 43 4
EN EN
Safety Information
SAVE THESE INSTRUCTIONS
IMPORTANT SAFEGUARDS
• Have servicing performed by a qualied repair person using only identical
replacement parts. This will ensure that the safety of the product is maintained.
• Do not modify or attempt to repair the appliance excepts as indicated in the
instructions for use and care.
• Do not use in extremely hot or cold environments (below 5° C/41° F or above
40° C/104° F). Please charge the appliance in temperature above 5° C/41° F and below
40° C/104° F).
• If appliance has been dropped, damaged, left outdoors, dropped into water, or is
not working as it should, never attempt to operate it. Please have it repaired at an
authorized service center.
We, Dreame Trading (Tianjin) Co., Ltd., hereby declares that this equipment is in
compliance with the applicable Directives, European Norms, and amendments. The full
text of the EU declaration of conformity is available at the following internet address:
https://global.dreametech.com
For detailed e-manual, please go to
https://global.dreametech.com/pages/user-manuals-and-faqs
detachable supply unit
read operator's manual
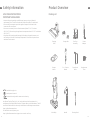
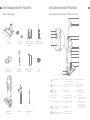
Product Overview
Spare Brush
Roller
Main Body
Storage BoxCharging
Base
Dust Cup
Assembly
2-in-1 Crevice
Nozzle
Power
Adapter
Replacement
Filter
Storage
Mount
Cleaning BrushHandle
Packing List
Motorized cleaning head for water suction cleaning

5 65 6
EN EN
14
13
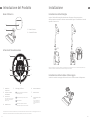
Product Overview
Wet and Dry Vacuum Floor Washer
Handvac Mode Switch
Handvac Power Switch
Used Water Tank
Brush Roller Cover
Brush Roller Cover
Release Buttons
Self-Cleaning Button
Power Switch
Handvac Release Button
Used Water Tank
Handle
Display Screen
Used Water Tank
Release Button Clean Water Tank
Brush Roller Handle
Brush Roller Release
Button
Clean Water Tank Handle
Clean Water Tank Release
Button
Mode Switch
1
2
3
4
5
6
7
8
9
10
11
12
18
17
16
15
1
2
3
4
5
6
7
8
9
10
11
12
13
14
15
16
17
18 Voice Prompt Button
• Press briey to activate the voice
prompt or adjust the volume
• Press and hold for 3 seconds to
access the language settings.Press
to switch between languages. Press
andhold to conrm the selection
Charging Port
Charging Base
Display Screen
If the appliance is not working properly, the screen display will show an error message. Please refer to the
troubleshooting table to nd your solution.
1
21
2Charging Contacts
8
1
5
3
2
4
7
6
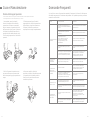
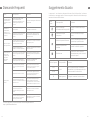
Error Message
Insucient water in the
Clean Water Tank
Used Water Tank full
Blocked tube
Brush roller stuck /
Brush roller not installed
Suction Mode Standard Mode
Self-Cleaning
Turbo Mode
Dirt Level Indicator
Battery Status
Indicator Auto Mode
1
2
3
4
6
7
8
5
Press briey to enable this
function (battery level ≥ 15%) The color of the indicator
changesin real time
according to theamount of
dirt.
Product Overview

7 87 8
EN EN
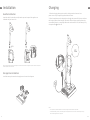
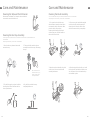
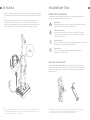
Installation Charging
Handle Installation 1. Place the charging baseagainst a wallon level ground and connect it to a
powersource. Fully charge the appliance before rst use.
2. Place the appliance on the charging base, the on the screenwilllight up to indicate
the charging status.When charging, the number on the display screen represents the
current battery levelasa percentage. When the numberreaches100, the battery is fully
charged and the will turn o.
Insert the end of the handle vertically into the port on the top of the appliance as
indicated until you hear a click.
Note: To disassemble, extend a hard object into the hole on the back of the appliance to press contacts and pull the
handle upwards at the same time.
Storage Box Installation
Install the storage box onto the charging base as shown in the diagram.
2
咔哒 1
Note:
• If no operation is performed within 10 minutes, the appliance will enter the sleep mode.
• To extend the battery life time, the battery keeps cooling down for about one hour automatically after you
have used the appliance for a long time.
Click

9 109 10
EN EN
The appliance is powered on in Auto modeby default, you can switch to Suction
modeas needed.
Auto Mode
While washing the oor, the appliance can adjust its suction
poweraccording todierent situations.
Suction Mode
If Suction mode is selected, the appliance will vacuum water only and the
brush roller will not be dampened. No water is coming out of the Clean
Water Tank.
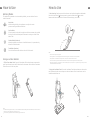
Standard Mode (Handvac)
When the appliance converts to a handheld vacuum, it is powered on by
default in Standard mode.
Turbo Mode (Handvac)
Press the handvac mode switch to select the Turbo mode.
1. Fill the Clean Water Tank: Press the Clean Water Tank release button to remove the
tank. Open the tank cover and ll the tank with clean water. Re-install the Clean Water
Tank and ensure it clicks into place.
Note:
• For better cleaning performance, it is recommended to add 10ml detergent with the bottle cap into the full Clean
Water Tank, then shake gently and evenly for use.
• Do not add any liquids other than the ocially-approved cleaner.
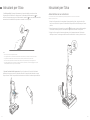
Using asaFloor Washer
1
2
2. Start cleaning: Gently step on the brush cover and recline the appliance backwards.
Press the Power Switch to start operating, press the Mode Switch tto switch
between the Auto mode and the Suction mode according to your needs.
3. Empty the Used Water Tank: Press the Used Water Tank release button to take out the
tank. Remove the tank cover and pour out the used water. Close the tank cover and re-
install the tank before use.
Note:
• Do not vacuum any foamy liquids.
• If the appliance is in the upright position while working, the current task will be suspended.
• The appliance is suitable for cleaning oors, marble, tiles and other hard surfaces.
• Do not recline the appliance backwards more than 140° to prevent the appliance from leaking water.
• When the appliance isin operation,do not liftit o the ground, move it, tilt itorlay it at.Doing so may cause the
usedwatertoow into the motor.
<140°
1
2
How to Use How to Use
Working Modes

11 1211 12
EN EN
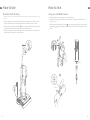
1. Press the handvac release button to remove the handvac.
2. Install the dust cup assembly and other attachments as shown in the diagram until
you hear a click.
3. Brieypressthe handvac Power Switch to start operating.Brieypressthe handvac
mode switch to switch between Standard mode and Turbo mode according to your
needs.
How to Use
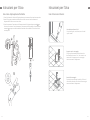
One-Touch Self-Cleaning
* The self-cleaning function can be enabled only when the appliance is being charged and the battery level is more
than 15%.
1. After the appliance completes the cleaning task, place it back onto the base and
make sure that the water in the Clean Water Tank is sucient for self-cleaning.
2. Briey press the self-cleaning button on the top of the handle. The self-cleaning
indicatorwilllight up and the appliancewillstart self-cleaning.
3. After self-cleaning is complete, promptly clean the Used Water Tank. If some stains
are left on the charging base, clean the base.
How to Use
Using asaHandheld Vacuum
1
2
咔哒
Click
咔哒
Click

13 1413 14
EN EN
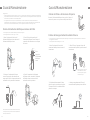
2-in-1 crevice nozzle:
For cleaning corners, stairs, sofas, coee
tables and other narrow spaces.
Storage box:
Store the cleaning brush, the lter, and the
brush rolleronthe storage box as shown in
the diagram.
Storage mount:
If the dust cup assembly and the 2-in-1 crevice
nozzle are not in use, store themonthe
storage mount as shown in the diagram.
Using Dierent Attachments
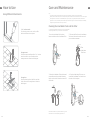
Care and Maintenance
Used Water
Tank Cover
Filter
Tips:
• Turn o the appliance before performing care and/or maintenance. Do not touch the Power Switch.
• Replace parts if needed. The parts must be replaced by those available from the manufacturer or its service agent.
• If the appliance is not used for an extended period, fully charge it, unplugthepower adapter, and store the
appliance in a cool, low-humidity environment away from direct sunlight. To avoid over-discharge of the battery,
charge the appliance at least once every 3 months.
Cleaning the Used Water Tank and the Filter
* Cleaning the Used Water Tank after each use is recommended.
* Replacing the lter every 3 to 6 months is recommended.
1. Press the Used Water Tank release
button and take out the Used Water Tank.
2. Take out the lter from the Used Water
Tank cover. Remove the tank cover and
pour out the wastewater.
3. Rinse the Used Water Tank and the tank
cover with water, the provided cleaning
brush can be used to clean the inner wall
of the tank.
4. Close the Used Water Tank cover, re-
install the Used Water Tank and ensure
the tank clicks into place.
1
2
Note: When the lter is dirty and needs washing, rinse it
with water. It must be completely dry before use.
How to Use
1
2
咔哒
Click

1
2
15 1615 16
EN EN
Care and Maintenance
1.First, press the brush roller cover
release buttonsinwardson both sides
to remove the brush roller cover.Next,
press the brush roller release
buttonandthe handle of the brush
roller will pop out. Pull the handle to
take out the brush roller.
2. Clean out any hair and debris tangled
on the brush roller with the provided
cleaning brush. Rinse the brush roller
with clean water and dry it completely.
3. Tap the lter gently or clean it with the
cleaning brush. Rinse the lter and the
dust cup with water.
4. Dry the lter and the dust cup
completely before use.
* Clean as needed.Alternatinguse of the two provided brush rollers is recommended.
* Replacing the brush roller every 3 to 6 months is recommended.
1
2
3. Wipe the suction inlet with a dry cloth
or wet tissue. Do not rinse the brush
assembly with water.
4. After cleaning the brush roller, re-install
the brush roller and the brush roller cover.
You will hear a click to indicate that they
are installed in place.
CareandMaintenance
Cleaning the Dust Cup Assembly
1. Press the dust cup release button and
remove the cup.
2. Take out the lter and the cyclone
assembly from the dust cup, then empty
the cup.
* Cleaning the dust cup after each use or after the amount of dust in the cup reaches the MAX line is
recommended.
* Replacing the lter every 3 to 6 months is recommended.
Note: To reduce the risk
of electric shock or injury,
do not rinse the cyclone
assembly with water.
Remove the Used Water Tank, wipe the tube and the dirt
sensor with a wet cloth before use.
Cleaning the Tube and the Dirt Sensor Cleaning the Brush Assembly

17 1817 18
EN EN
Error Possible Cause Solution
The appliance
does not work.
The appliance is out of battery or
its battery level is low. Fully charge its battery before use.
The appliance is in the upright
position. Recline the appliance backwards.
The appliance is overheatingdue
to blockageand the high-
temperature cut-ohas activated.
Clear the blockage and wait until
the temperature returns normal.
The Used Water Tank is full. Empty the Used Water Tank.
The handle, brush roller, or Used
Water Tank is not installed in
place.
Ensure the handle, brush roller, or
Used Water Tank are all properly in
place.
The appliance
charges slowly. The temperature of the battery is
too low or too high. Wait until the battery's temperature
returns normal.
The suction
power of the
appliance is
weak.
The lter is clogged. Clean the Used Water Tank and
thelter that is in the dust cup.
There are some foreign objects
in the tube and the suction inlet
orthe tube and the suction
inletare blocked.
Clean the tube and the suction inlet.
The motor
is making a
strange noise.
There is too much dirty water in
the Used Water Tank. Empty the Used Water Tank.
The suction inlet is blocked. Clear any blockage in the suction
inlet.
The dirt level
indicator is solid
red.
The dirt sensor needs cleaning.
The dirt sensor is in the
tube. Please refer to the
troubleshootingsectionfor
guidance on howto clean the tube.
The concentration of the cleaner is
too high. Dilute the cleaner with water at the
recommended ratio.
Someliquidother than the
ocially-approved cleanerhas
beenadded andlarge amounts
offoamareproduced.
Use only the ocially-approved
cleaner.
The display
screen does not
light up while
charging.
The power adapter is not plugged
into the electrical outlet.
Make sure the power adapter is
plugged in.
The appliance is not placed onto
the charging base properly.
Make sure the appliance is placed
onto the charging base properly.
If an error occurs, the appliancewill stop working. Please refer to the following table for
troubleshooting. If the problem persists, please contact the customer service.
For additional services, please contact us via aftersales@dreame.tech
Website: https://global.dreametech.com
Error Possible Cause Solution
No wateris
comingout
oftheappliance.
The Clean Water Tank is not
properly installed in place, or the
water in the Clean Water Tank is
insucient.
Re-install or ll the Clean Water
Tank.
It takes 30 second to dampen the
brush roller.
Turn on the appliance and check
again in 30 seconds.
The vent leaks
water.
A collision or a sharp pull causes
water to enter the motor.
Movethe appliancegently back and
forthwhile itis turned on.
Thelteris not completely dry
after being cleaned. Dry the lter completely before use.
Self-cleaning
fails.
The brush roller may be jammed
by largedebris.
Open the brush roller cover to check
and clean the brush roller.
The appliance is not being
charged.
Make sure the appliance is being
charged before enabling the self-
cleaning function.
Self-cleaning cannot be enabled
if the battery level is lower than
15%.
The self-cleaning function
canonlybe enabledwhen the
appliance is being charged and the
battery level is more than 15%.
TheUsed Water Tankis not
installed in place, or theUsed
Water Tankis full.
Re-install or empty theUsed Water
Tank.
The Clean Water Tank is not
installed in place, or the water
in the Clean Water Tank is
insucient.
Fill or re-install theClean Water
Tank.
FAQ FAQ

19 2019 20
EN EN
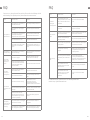
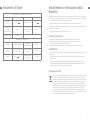
Troubleshooting
If the appliance is not working properly, the screen display will show an error message.
Please refer to the troubleshooting table to nd your solution.
Troubleshooting
Code Possible Cause Solution
E1-E7 Error
Restart the appliance for troubleshooting.
If the problem persists, please contact
customer service.
H1-H6
H7 Battery
overheating
Wait until the battery's temperature returns
normal.
Error Icon Possible Cause Solution
Insucient water in Clean
Water Tank Fill the Clean Water Tank.
Used Water Tank full Empty the Used Water Tank.
Brush roller stuck Clean the brush roller with the
provided cleaning brush.
Brush roller not installed Install the brush roller.
Blocked tube
Check whetherthelteris clogged.
Alternatively,clean the tube and
the dirt sensor.
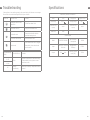
Specications
Wet and Dry Vacuum Floor Washer
Model HHV3 Charging Time Approx. 5 hours
Rated Voltage 21.6 V Charging Voltage 26 V
Used Water Tank
Capacity 700 mL Clean Water Tank
Capacity 900 mL
Rated Power 300 W
Power Adapter
Model YLS0251B-E260090 No-load Power
Consumption 0.08 W
Input 100-240 V~ 50/60 Hz
0.8 A Max
Average Active
Eciency 87.28%
Output 26 V 0.9 A Eciency at Low
Load (10%) 79.74%

22
IT
2121
EN
The built-in lithium-ion battery contains substances that are hazardous to the
environment. Before disposing of the battery, make sure the battery is removed by
qualied technicians and discarded at an appropriate recycling facility.
–thebatterymustberemovedfromtheappliancebeforeitisscrapped;
–theappliancemustbedisconnectedfromthesupplymainswhenremovingthe
battery;
–thebatteryistobedisposedofsafely.
Removal Guide
1. Re movethedisplayscreenbyrotatingitwithatool.
2. Removethescrewsonthebatterycoverinturnandthenpryopenthecoverwith
propertools.
3. UnplugtheterminalsbetweenthebatteryandPCBboardtoremovethebattery.
CAUTION:
• Before removing the battery, disconnect the power and run out the battery as much
as possible.
• Unneeded batteries should be discarded at an appropriate recycling facility.
• Do not expose to high temperature environment to avoid risks of explosion.
• Under abusive conditions, liquid may be ejected from the battery. If contact occurs,
ush with water and seek medical help.
WEEE Information
All products bearing this symbol are waste electrical and electronic equipment
(WEEE as in directive 2012/19/EU) which should not be mixed with unsorted
household waste. Instead, you should protect human health and the
environment by handing over your waste equipment to a designated collection
point for the recycling of waste electrical and electronic equipment, appointed
by the government or local authorities. Correct disposal and recycling will
help prevent potential negative consequences to the environment and human
health. Please contact the installer or local authorities for more information
about the location as well as terms and conditions of such collection points.
Battery Disposal and Removal
• Leggere attentamente questo manuale prima dell'uso e conservarlo per riferimento
futuro.
• Quando si utilizza un apparecchio elettrico, è necessario seguire sempre le precauzioni
di base, comprese le seguenti :
• LEGGERE TUTTE LE ISTRUZIONI PRIMA DI UTILIZZO (QUESTO APPARECCHIO). La mancata
osservanza delle avvertenze e delle istruzioni può provocare scosse elettriche, incendi
e/o lesioni gravi.
Informazioni sulla Sicurezza
Per ridurre il rischio di incendi, scosse elettriche o lesioni:
AVVERTENZA-
Istruzioni Importanti per la Sicurezza
Solo Per Uso Domestico
• Utilizzare solo come descritto in questa guida per l'utente. Utilizzare solo gli accessori
consigliati dal produttore.
• Utilizzare solo in interni, su superci non rivestite di tappetto come vinile, piastrelle,
legno sigillato, ecc. Fare attenzione a non calpestare oggetti sciolti o bordi di tappeti.
Lo stallo della spazzola può provocare un guasto prematuro della cinghia.
• Questo prodotto non deve essere utilizzato da bambini di età inferiore a 8 anni, né
da persone con decit sici, sensoriali, cognitivi, esperienza o conoscenza limitata,
senza la supervisione di un genitore o tutore, al ne di garantire la sicurezza del
funzionamento ed evitare eventuali rischi. La pulizia e la manutenzione non devono
essere eseguite da bambini senza supervisione.
• Non usare liquidi inammabili o combustibili per pulire i pavimenti.
• Non usare per raccogliere liquidi inammabili o combustibili, come benzina. Non
usare in aree dove possono essere presenti liquidi inammabili o combustibili.
• Per ricaricare la batteria, usa solo l'adattatore rimovibile fornito con questo
apparecchio.Usa solo con adattatore <YLS0251B-E260090>.
• Un adattatore che sia adatto a un tipo di pacco batteria può creare un rischio di
incendio quando è usato con un altro pacco batteria.
• Non immergere l'apparecchio in liquidi.
• La pellicola di plastica può essere pericolosa. Per evitare il pericolo di soocamento,
tenerlo lontano dalla portata dei bambini.
• Tenere i capelli, i vestiti larghi, le dita e tutte le parti del corpo lontani dalle aperture e
dalle parti in movimento dell'apparecchio e dei suoi accessori.
• Utilizzare solo il tipo e la quantità di liquidi specicati nella sezione operativa di questa
guida. Il liquido non deve essere diretto verso apparecchiature contenenti componenti
elettrici.
• Usa solo un detergente per pavimenti ucialmente approvato come descritto nella
guida per l'utente.
• Non utilizzarlo senza ltri in posizione.
• Non usare l'apparecchio con un adattatore danneggiato. Se l'adattatore è
danneggiato, deve essere sostituito dal produttore, dal suo agente di servizio o da
personale con qualica similare al ne di evitare rischi.
• Tieni i cavi di messa a terra lontani dall'apparecchio durante l'uso, poiché un pericolo
potrebbe vericarsi se l'apparecchio passa su un cavo di alimentazione.

23 24
IT IT
Testa pulente motorizzata per la pulizia ad aspirazione dell'acqua
Informazioni sulla Sicurezza
• Non raccogliere materiale tossico (candeggina a base di cloro, ammoniaca, detergente
per scarichi, ecc.). Non raccogliere oggetti duri o appuntiti come vetro, chiodi, viti,
monete, ecc.
• Non utilizzare l'apparecchio in uno spazio chiuso pieno di vapori emessi da vernici a
base di olio, diluenti per vernici, alcune sostanze antitarme, polvere inammabile o altri
vapori esplosivi o tossici. Non raccogliere nulla che stia bruciando o fumando, come
sigarette, ammiferi o cenere calda.
• Segui tutte le istruzioni per la ricarica e non ricaricare l'apparecchio al di fuori
dell'intervallo di temperatura specicato nella batteria, poiché ciò aumenta il rischio di
incendio.
• I terminali di uscita della base di ricarica non devono essere cortocircuitati. Non
utilizzarlo con cavo o caricatore danneggiato. Se l'apparecchio è caduto, danneggiato,
lasciato all'aperto, caduto in acqua o non funziona come dovrebbe, restituirlo a un
centro di assistenza.
• Tenere il cavo del caricatore lontano da superci riscaldate. Non maneggiare la spina
del caricabatterie o l'apparecchio con le mani bagnate. Per scollegare, aerrare la spina
del caricabatterie anziché il cavo.
• Non tirare o trasportare il caricabatterie tramite il cavo, non utilizzare il cavo come
maniglia, chiudere lo sportello del cavo o tirare il cavo attorno a spigoli vivi o angoli.
• Spegnerlo quando non in uso, prima di pulire, sottoporre a manutenzione o riparare
l'apparecchio e prima di collegare o scollegare l'utensile con una spazzola mobile.
• Non esporre l'apparecchio a amme o temperature eccessive. L'esposizione al fuoco o
ad una temperatura eccessiva può provocare un'esplosione.
• Non esporre l'apparecchio a amme o temperature eccessive. L'esposizione al fuoco o
ad una temperatura eccessiva può provocare un'esplosione.
• Assicurarsi che l'apparecchio sia posizionato su una supercie orizzontale. Non
utilizzare l'apparecchio nella stessa posizione se è dotato di spazzola rotante e il
manico non è completamente in posizione verticale. Non riporre l'elettrodomestico in
un luogo in cui potrebbe gelare.
• Prestare particolare attenzione durante la pulizia delle scale.
• Impedire l'avviamento accidentale. Assicurarsi che l'interruttore sia in posizione OFF
prima di sollevare o trasportare l'apparecchio. Trasportare l'apparecchio con il dito
sull'interruttore o mettere sotto tensione l'apparecchio con l'interruttore acceso può
provocare incidenti.
• Questo prodotto contiene batterie che possono essere sostituite solo da tecnici
qualicati o dal servizio post-vendita.
Informazioni sulla Sicurezza
SALVARE QUESTE ISTRUZIONI
PRECAUZIONI IMPORTANTI
• Far eseguire la manutenzione da un tecnico qualicato utilizzando solo parti di
ricambio identiche. Ciò garantirà il mantenimento della sicurezza del prodotto.
• Non modicare o tentare di riparare l'apparecchio salvo quanto indicato nelle
istruzioni per l'uso e la cura.
• Non usare in ambienti estremamente caldi o freddi (sotto 5° C/41° F o sopra
40° C/104° F). Per favore ricarica l'apparecchio a temperature superiori a 5° C/41° F e
inferiori a 40° C/104° F).
• Se l'apparecchio è caduto, danneggiato, lasciato all'aperto, caduto in acqua o non
funziona come dovrebbe, non tentare mai di metterlo in funzione. Si prega di farlo
riparare presso un centro di assistenza autorizzato.
Unità di alimentazione staccabile
Leggi il manuale dell'operatore
Con la presente, Dreame Trading (Tianjin) Co., Ltd., dichiara che questo apparecchio
è conforme alle direttive applicabili e alle norme europee, nonché ai relativi
emendamenti. Il testo completo della dichiarazione di conformità UE è disponibile al
seguente indirizzo Internet : https://global.dreametech.com
Il manuale elettronico dettagliato è disponibile all'indirizzo
https://global.dreametech.com/pages/user-manuals-and-faqs

25 26
IT IT
Introduzione del Prodotto
Spazzola a Rullodi
Ricambio
Dispositivo
Principale
Scatola di
Stoccaggio
Base di
Ricarica
Assemblaggio del
Contenitore della
Polvere
Ugello per
fessure 2-in-1
Adattatore di
Alimentazione
Filtrodi
Ricambio
Supporto di
Archiviazione
Spazzola per la
Pulizia
Maniglia
Lista Imballaggio
Introduzione del Prodotto
Aspirapolvere a Pavimento Umido e Asciutto
Interruttore della Modalità
di Aspirapolvere Manuale
Interruttore di Alimentazione
dell'Aspirapolvere Manuale
Serbatoio
dell'AcquaUsato
Coperchio del Rullo della
Spazzola
Pulsanti di Rilascio del
Coperchio del Rullo della
Spazzola
Pulsante di Autopulizia
Interruttore di
Alimentazione
Pulsante di Rilascio
dell'Aspirapolvere
Maniglia del Serbatoio
dell'AcquaUsata
Schermo di Visualizzazione
Pulsante di Rilascio del
Serbatoio dell'AcquaUsato
Serbatoio dell'Acqua
Pulita
Maniglia del Rullo della
Spazzola
Pulsante di Rilascio del
Rullo della Spazzola
Maniglia del Serbatoio
dell'Acqua Pulita
Pulsante di Rilascio del
Serbatoio dell'Acqua Pulita
Interruttore di Modalità
1
2
3
4
5
6
7
8
9
10
11
12
13
14
15
16
17
18 Pulsante Vocale
• Premere brevemente per attivare
il messaggio vocale o regolare il
volume
• Premi e tieni premuto per 3
secondi per accedere alle
impostazioni della lingua. Premi
per passare da una lingua
all'altra. Premi e tieni premuto
per confermare la selezione
14
13
1
2
3
4
5
6
7
8
9
10
11
12
18
17
16
15

27 28
IT IT
Porta di ricarica
Base di Ricarica
Schermo di Visualizzazione
Se l'apparecchio non funziona correttamente, la visualizzazione dello schermo mostrerà un messaggio di errore. Per
favore fai riferimento alla tabella di risoluzione dei problemi per trovare la tua soluzione.
1
2Contatti di Ricarica
Messaggi di Errore
Acqua insuciente nelserbatoio
dell'acqua pulita
Serbatoio dell'acqua usato pieno
Tubo Bloccato
Rullo della spazzola bloccato/
Rullo della spazzola non installato
Modalità di
Aspirazione
Modalità Standard
Auto-Pulizia
Modalità turbo
Indicatore di livello
sporco
Indicatore di Stato
della Batteria Modalità Auto
1
2
3
4
6
7
8
5
Premi brevemente per abilitare
questa funzione (livello della
batteria≥15%) Il colore dell'indicatore
cambia in tempo reale
secondo la quantità di
sporco.
Introduzione del Prodotto Installazione
Installazione della Maniglia
Inserire il fondo della maniglia verticalmente nella porta sulla parte superiore
dell'aspirapolvere secondo la direzione mostrata nella gura e l'installazione è riuscita
quando si sente un clic.
Nota: Per smontare la maniglia, utilizzare un oggetto duro per raggiungere il foro sul retro dell'aspirapolvere per
premere il contatto e allo stesso tempo estrarre la maniglia verso l'alto.
Installazione della Scatola di Stoccaggio
Installa la scatola di stoccaggio sulla base di ricarica come mostrato nel diagramma.
2
咔哒 1
Clic
1
2
8
1
5
3
2
4
7
6

29 30
IT IT
In ricarica
1. Posiziona la base di ricaricacontro una paretesu un terreno pianeggiante e collegala
a una fonte di alimentazione. Ricarica completamente l'apparecchio prima del primo
uso.
2. Posiziona l'apparecchio sulla base di ricarica, il sullo schermosiilluminerà
per indicare lo stato di ricarica. Durante la ricarica, il numero sullo schermo di
visualizzazione rappresenta il livello attuale della batteriainpercentuale. Quando il
numeroraggiunge100, la batteria è completamente carica e il si spegnerà.
Nota:
• Se non viene eseguita alcuna operazione entro 10 minuti, l'apparecchio entrerà in modalità di sospensione.
• Per prolungare la durata della batteria, la batteria continua a rareddarsi automaticamente per circa un'ora
dopo che hai usato l'apparecchio per un lungo periodo.
L'apparecchio è acceso in modalità Automaticaper impostazione predenita, puoi
passare alla modalità di aspirazionese necessario.
Modalità Auto
Durante il lavaggio del pavimento, l'apparecchio può regolare la propria
potenza di aspirazione secondo le diverse situazioni.
Modalità di Aspirazione
Se è selezionata la modalità di Aspirazione, l'apparecchio aspira solo
acqua e il rullo della spazzola non sarà inumidito. Non esce acqua dal
Serbatoio dell'Acqua Pulita.
Modalità Standard
Quando l'apparecchio si converte in un aspirapolvere portatile, viene acceso
per impostazione predenita in modalità Standard.
Modalità turbo
Premi l'interruttore della modalità di aspirapolvere manuale per
selezionare la modalità di Turbo.
1. Riempi il Serbatoio dell'Acqua Pulita : Premi il pulsante di rilascio del Serbatoio
dell'Acqua Pulita per rimuovere il serbatoio. Apri il coperchio del serbatoio e riempi il
serbatoio con acqua pulita. Reinstalla il Serbatoio dell'Acqua Pulita e assicurati che
scatti in posizione.
Nota:
• Per prestazioni di pulizia migliori, si consiglia di aggiungere 10 ml di detersivo con il tappo del acone nel
Serbatoio dell'Acqua Pulita pieno, quindi agitare delicatamente e uniformemente per l'uso.
• Non aggiungere eventuali liquidi diversi dal detergente ucialmente approvato.
Uso come Lavapavimenti
1
2
Istruzioni per l'Uso
Modalità di Funzionamento

31 32
IT IT
2. Inizia la pulizia: Calpesta delicatamente il coperchio della spazzola e reclina
l'apparecchio all'indietro. Per favore premi l'interruttore di Alimentazione per
avviare il funzionamento, premi l'interruttore di modalità per passare dalla modalità
automatica alla modalità di aspirazione secondo le tue esigenze.
3. Svuota il serbatoio dell'acqua usata: Premi il pulsante di rilascio del Serbatoio
dell'Acqua Usata per estrarre il serbatoio. Rimuovi il coperchio del serbatoio e versa
l'acqua usata. Chiudi il coperchio del serbatoio e reinstallar il serbatoio prima dell'uso.
Nota:
• Non usare per aspirare liquidi schiumosi.
• Se l'apparecchio è in posizione verticale durante il funzionamento, il compito corrente sarà sospesa.
• L'apparecchio è adatto per la pulizia di pavimenti, marmo, piastrelle e altre superci dure.
• Non reclinare l'apparecchio all'indietro di oltre 140° per evitare perdite d'acqua dall'apparecchio.
• Quando l'apparecchio è in funzione, non sollevarlo da terra, spostarlo, inclinarlo o appoggiarlo in piano.
Farlo potrebbe far uire l'acqua usata nel motore.
<140°
1
2
Istruzioni per l'Uso Istruzioni per l'Uso
Auto-Puliziacon un solo tocco
* La funzione di auto-pulizia è attivabile solo quando l'apparecchio è in ricarica e il livello della
batteria è superiore al 15%.
1. Dopo che l'apparecchio ha completato l'operazione di pulizia, riposizionalo sulla
base e assicurati che l'acqua nel Serbatoio dell'Acqua Pulita sia suciente per l'auto-
pulizia.
2. Premi brevemente il pulsante di auto-pulizia sulla parte superiore della maniglia.
L'indicatore di auto-pulizia siaccenderà e l'apparecchio inizierà l'auto-pulizia.
3. Dopo che l'auto-pulizia è stata completata, pulisci tempestivamente il Serbatoio
dell'Acqua Usata. Se rimangono delle macchie sulla base di ricarica, pulisci la base.

33 34
IT IT
1. Premi il pulsante di rilascio dell'aspirapolvere per rimuovere l'aspirapolvere manuale.
2. Installa il gruppo contenitore della polvere e altri accessori come mostrato nel
diagramma nché non senti uno scatto.
3. Premi brevemente l'interruttore di Alimentazione dell'aspirapolvere manuale per
iniziare a funzionare. Premi brevemente l'interruttore della modalità di aspirapolvere
manuale per passare dalla modalità Standard alla modalità di Turbo secondo le
tue esigenze.
Istruzioni per l'Uso
Uso come Aspirapolvere Portatile
1
2
咔哒
Clic
咔哒
Clic
Bocchetta per fessure 2 in 1:
Per pulire angoli, scale, divani, tavoli e altri
spazi ristretti.
Scatola di stoccaggio:
Conserva la spazzola per la pulizia, il ltro e il
rullo della spazzolasullascatola di stoccaggio
come mostrato nel diagramma.
Supporto per lo stoccaggio:
Se il gruppo contenitore della polvere e la
bocchetta per fessura 2-in-1 non sono in uso,
conservalisulsupporto per lo stoccaggio
come mostrato nel diagramma.
Uso di Accessori Diversi
Istruzioni per l'Uso

35 36
IT IT
Cura & Manutenzione
Coperchio
del Serbatoio
dell'Acqua
Usato
Filtro
Suggerimenti:
• Spegni l'apparecchio prima di eseguire la cura e / o la manutenzione. Non toccare l'interruttore di Alimentazione.
• Le parti devono essere sostituite se necessario, si prega di utilizzare le parti designate dalla fabbrica originale per
evitare danni al prodotto a causa di inadeguatezza.
• Se l'apparecchio non è usato per un periodo esteso, ricaricalo completamente, scollegal'adattatore di
alimentazionee riponi l'apparecchio in un ambiente fresco e poco umido, lontano dalla luce solare diretta. Per
evitare una scarica eccessiva della batteria, ricarica l'apparecchio almeno una volta ogni 3 mesi.
Pulizia del Serbatoio dell'Acqua Usata e del Filtro
* Si consiglia di pulire il Serbatoio dell'Acqua Usata dopo ogni uso.
* Si consiglia di sostituire il ltro ogni 3 - 6 mesi.
1. Premi il pulsante di rilascio del
Serbatoio dell'Acqua Usata ed estrai il
Serbatoio dell'Acqua Usata.
2. Estrai il ltro dal coperchio del
Serbatoio dell'Acqua Usata. Rimuovi il
coperchio del serbatoio e versa l'acqua
di scarico.
3. Sciacqua ilserbatoio dell'acqua
usatae il coperchio del serbatoio con
acqua pulita. Pulisci la parete interna del
serbatoio con la spazzola in dotazione.
4. Chiudi il coperchio del Serbatoio
dell'Acqua Usata, reinstalla il Serbatoio
dell'Acqua Usata e assicurati che il
serbatoio scatti in posizione.
1
2
Nota: Quando il ltro è sporco e deve essere lavato,
sciacqualo con acqua. Deve essere completamente
asciutto prima dell'uso.
1
2
咔哒
Clic
Cura & Manutenzione
3. Picchietta delicatamente il ltro o
puliscilo con la spazzola per la pulizia.
Sciacqua il ltro e il contenitore della
polvere con acqua.
4. Asciuga completamente il ltro e il
contenitore della polvere prima dell'uso.
Pulizia del Gruppo Contenitore della Polvere
1. Premi il pulsante di rilascio del
contenitore della polvere e rimuovi il
contenitore.
2. Estrai il ltro e il gruppo ciclone dal
contenitore della polvere, quindi svuota il
contenitore.
* Si consiglia di pulire il contenitore della polvere dopo ogni uso o dopo che la quantità di polvere nel contenitore
ha raggiunto la linea MAX.
* Si consiglia di sostituire il ltro ogni 3 - 6 mesi.
Nota: Per ridurre il rischio di
scosse elettriche o lesioni,
non risciacquare il gruppo
ciclone con acqua.
Rimuovi il Serbatoio dell'Acqua Usata, pulisci il tubo e il
sensore di sporco con un panno umido prima dell'uso.
Pulizia del Tubo e del Sensore di Sporco
La pagina si sta caricando...
La pagina si sta caricando...
La pagina si sta caricando...
La pagina si sta caricando...
-
 1
1
-
 2
2
-
 3
3
-
 4
4
-
 5
5
-
 6
6
-
 7
7
-
 8
8
-
 9
9
-
 10
10
-
 11
11
-
 12
12
-
 13
13
-
 14
14
-
 15
15
-
 16
16
-
 17
17
-
 18
18
-
 19
19
-
 20
20
-
 21
21
-
 22
22
-
 23
23
-
 24
24


DREAME M12 Wet and Dry Vacuum Manuale utente
- Categoria
- Aspirapolvere
- Tipo
- Manuale utente
in altre lingue
Documenti correlati
Altri documenti
-
Klarstein 10041383 Manuale del proprietario
-
LG V-KC701HER Manuale utente
-
Polti Forzaspira Slim SR90B Manuale utente
-
-
-
LG V-CC182HTQV Manuale utente
-
-
-
-
Domo DO236SW Manuale utente