
3A HEALTH CARE S.r.l.
Via Marziale Cerutti, 90F/G - 25017 Lonato del Garda (BS) - Italy
tel. +39 030 9133177 - fax +39 030 9919114
e-mail: [email protected] - www.3-a.it
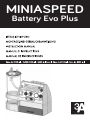
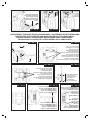
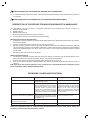
1. Vaso da 2000 ml
2. Tappo per vaso
3. Dispositivo di protezione
4. Pulsante ON-OFF
5. Regolatore di vuoto
6. Vuotometro
7. Presa per alimentatore multitensione
e ricarica batteria
8. Tubo in silicone 20 cm
8a. Tubo in silicone 10 cm
9. Filtro antibatterico
10. Lampada di servizio
11. Pulsante ON-OFF lampada
12. Vano accessori
13. Staffa di aggancio in ambulanza
11. Gefäß 2000 ml
2. Gefäßdeckel
3. Schutzvorrichtung
4. Hauptschalter ON-OFF
5. Vakuumregler
6. Unterdruckmesser
7. Buchse für Mehrspannungsnetzteil
und Akkuaufladung
8. Silikonschlauch 20 cm
8a. Silikonschlauch 10 cm
9. Bakterienfilter
10. Arbeitsleuchte
11. Betriebsschalter ON-OFF Arbeitsleuchte
12. Zubehörfach
13. Haltebügel für Rettungswagen
I
1. Vaso de 2000 ml
2. Tapón para el vaso
3. Aparato de protección
4. Botón ON-OFF
5. Regulador de vacío
6. Vacuómetro
7. Toma para alimentador
multitensión y recarga
de batería
8. Tubo de silicona 20 cm
8a. Tubo de silicona 10 cm
9. Filtro antibacteriano
10. Lámpara de servicio
11. Botón ON-OFF lámpara
12. Compartimento de
accesorios
13. Abrazadera de enganche
en la ambulancia
1. 2000 ml Vessel
2. Vessel plug
3. Protection device
4. ON-OFF button
5. Vacuum regulator
6. Vacuum gauge
7. Multi-voltage power supply unit
and battery charger socket
8. 20 cm silicon tube
8a. 10 cm silicon tube
9. Antibacterial filter
10. Working light
11. Light ON-OFF button
12. Accessory compartment
13. Ambulance mounting bracket
3
8
2
8a
4 5 6 7
12
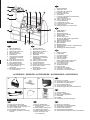
ACCESSORI / ZUBEHÖR / ACCESSORIES / ACCESSOIRES / ACCESORIOS
14 15 16
17 18 19
D
GB
E
1. Vase de 2000 ml
2. Bouchon pour vase
3. Dispositif de protection
4. Bouton ON-OFF
5. Régulateur de vide
6. Videmètre
7. Prise pour alimentation
multitension et recharge
de la batterie
8. Tube en silicone 20 cm
8a. Tube en silicone 10 cm
9. Filtre antibactérien
10. Lampe de service
11. Bouton ON-OFF de la lampe
12. Compartiment des
accessoires
13. Étrier de fixation dans
l’ambulance
F
14. Borsa con tracolla
15. Regolatore manuale monouso
16. Alimentatore multitensione
17. Cavo di alimentazione
18. Cannula sterile monouso
19. Staffa di aggancio fissa sull’ambulanza
14. Schultertasche
15. Einweg - Handregler
16. Mehrspannungsnetzteil
17. Netzkabel
18. Kanüle
19. Haltebügel im Rettungswagen
I
D
14. Bolsa con bandolera
15. Regulador manual desechable
16. Alimentador multitención
17. Cable de alimentación
18. Cánula estéril desechable
19. Abrazadera de enganche fija de ambulancia
E
14. Sac en bandoulière
15. Régulateur manuel pour
un seul usage
16. Alimentateur multitension
17. Câble d’alimentation
18. Canule stérile uniservice
19. Étrier de fixation fixe
sur l’ambulance
14. Bag with shoulder strap
15. Disposable manual regulator
16. Multi-voltage power suppply unit
17. Power supply cord
18. Disposable sterile cannula
19. Permanent ambulance mounting
bracket
GB F
Fig. - Abb. 1
Fig. - Abb. 2
1
PROCEDURA DI SMALTIMENTO (Dir.2012/19/Ue-RAEE) Il simbolo posto sul fondo dell’apparecchio indica la raccolta separata delle apparecchiature
elettriche ed elettroniche. Al termine della vita utile dell’apparecchio, non smaltirlo come rifiuto municipale solido misto ma smaltirlo presso un centro
di raccolta specifico situato nella vostra zona oppure riconsegnarlo al distributore all’atto dell’acquisto di un nuovo apparecchio dello stesso tipo ed
adibito alle stesse funzioni. Questa procedura di raccolta separata delle apparecchiature elettriche ed elettroniche viene effettuata in visione di una
politica ambientale comunitaria con obiettivi di salvaguadia, tutela e miglioramento della qualità dell’ambiente e per evitare effetti potenziali sulla salute
umana dovuti alla presenza di sostanze pericolose in queste apparecchiature o ad un uso improprio delle stesse o di parti di esse. Attenzione! Uno
smaltimento non corretto di apparecchiature elettriche ed elettroniche potrebbe comportare sanzioni.
ENTSORGUNGSVERFAHREN (RICHTLINIE 2012/19/Ue-Weee) Das Symbol auf dem Boden des Geräts gibt die getrennte Müllsammlung der elektrischen
und elektronischen Ausrüstungen an. Am Ende der Lebensdauer vom Gerät es nicht als gemischter fester Gemeindenabfall, sondern es bei einem
spezifischen Müllsammlungszentrum in Ihrem Gebiet entsorgen oder es dem Händler zurückgeben, wenn Sie ein neues Gerät desselben Typ mit
denselben Funktionen kaufen. Diese Prozedur getrennter Müllsammlung der elektrischen und elektronischen Ausrüstungen wird im Hinblick auf eine
zukünftige gemeinsame europäische Umweltschutzpolitik vorgenommen, welche darauf zielen wird, die Umwelt zu schützen und sichern, als auch die
Umweltqualität zu verbessern und potentielle Wirkungen auf die menschliche Gesundheit wegen der Anwesenheit von gefährlichen Stoffen in diesen
Vorrichtungen oder Missbrauch derselben oder von Teilen derselben zu vermeiden. Vorsicht! Die fehlerhafte Entsorgung von elektrischen und elektronischen
Vorrichtungen könnte Sanktionen mit sich bringen.
DISPOSAL PROCEDURE (Dir. 2012/19/Ue-WEEE) The symbol on the bottom of the device indicates the separated collection of electric and electronic
equipment. At the end of life of the device, do not dispose it as mixed solid municipal waste, but dispose it referring to a specific collection centre
located in your area or returning it to the distributor, when buying a new device of the same type to be used with the same functions. This procedure
of separated collection of electric and electronic devices is carried out forecasting a European environmental policy aiming at safeguarding, protecting
and improving environment quality, as well as avoiding potential effects on human health due to the presence of hazardous substances in such equipment
or to an improper use of the same or of parts of the same. Caution! The wrong disposal of electric and electronic equipment may involve sanctions.
PROCÉDURE D’ÉLIMINATION (Dir. 2012/19/Ue-WEEE) Le symbole placé sur le fond de l’appareil indique la récolte séparée des appareils électriques
et électroniques. A la fin de la vie utile de l’appareil, il ne faut pas l’éliminer comme déchet municipal solide mixte; il faut l’éliminer chez un centre de
récolte spécifique situé dans votre zone ou bien le rendre au distributeur au moment de l’achat d’un nouveau appareil du même type et prévu pour les
mêmes fonctions. Cette procédure de récolte séparée des appareils électriques et électroniques se réalise dans une vision d’une politique de sauvegarde,
protection et amélioration de la qualité de l’environnement et pour éviter des effets potentiels sur la santé humaine dus à la présence de substances
dangereuses dans ces appareils ou bien à un emploi non autorisé d’elles ou de leurs parties. Attention! Une élimination incorrecte des appareils
électriques pourrait impliquer des pénalités.
PROCEDIMIENTO DE ELIMINACIÓN (Dir.2012/19/Ue-RAEE) El símbolo colocado en el fondo del aparato indica la recogida separada de los equipos
eléctricos y electrónicos. Al término de la vida útil del aparato, no eliminar como residuo municipal sólido mixto sino eliminarlo en un centro de recogida
específico colocado en vuestra zona o entregarlo al distribuidor a la hora de comprar un nuevo aparato del mismo tipo y destinado a las mismas
funciones. Este procedimiento de recogida separada de los equipos eléctricos y electrónicos se realiza con el propósito de una política del medioambiente
comunitaria con objetivos de salvaguardia, defensa y mejoramiento de la calidad del medioambiente y para evitar efectos potenciales en la salud de
los seres humanos debido a la presencia de sustancias peligrosas dentro de estos equipos o a un uso inapropiado de los mismos o de algunas de
sus partes. Cuidado! Una eliminación no correcta de equipos eléctricos y electrónicos podría conllevar sanciones.
10
11
13
9
3A3918 rev. 01 - 04/2019
MINIASPEED
Battery Evo Plus

3A HEALTH CARE S.r.l.
Via Marziale Cerutti, 90F/G - 25017 Lonato del Garda (BS) - Italy
tel. +39 030 9133177 - fax +39 030 9919114
e-mail: [email protected] - www.3-a.it
1. Vaso da 2000 ml
2. Tappo per vaso
3. Dispositivo di protezione
4. Pulsante ON-OFF
5. Regolatore di vuoto
6. Vuotometro
7. Presa per alimentatore multitensione
e ricarica batteria
8. Tubo in silicone 20 cm
8a. Tubo in silicone 10 cm
9. Filtro antibatterico
10. Lampada di servizio
11. Pulsante ON-OFF lampada
12. Vano accessori
13. Staffa di aggancio in ambulanza
11. Gefäß 2000 ml
2. Gefäßdeckel
3. Schutzvorrichtung
4. Hauptschalter ON-OFF
5. Vakuumregler
6. Unterdruckmesser
7. Buchse für Mehrspannungsnetzteil
und Akkuaufladung
8. Silikonschlauch 20 cm
8a. Silikonschlauch 10 cm
9. Bakterienfilter
10. Arbeitsleuchte
11. Betriebsschalter ON-OFF Arbeitsleuchte
12. Zubehörfach
13. Haltebügel für Rettungswagen
I
1. Vaso de 2000 ml
2. Tapón para el vaso
3. Aparato de protección
4. Botón ON-OFF
5. Regulador de vacío
6. Vacuómetro
7. Toma para alimentador
multitensión y recarga
de batería
8. Tubo de silicona 20 cm
8a. Tubo de silicona 10 cm
9. Filtro antibacteriano
10. Lámpara de servicio
11. Botón ON-OFF lámpara
12. Compartimento de
accesorios
13. Abrazadera de enganche
en la ambulancia
1. 2000 ml Vessel
2. Vessel plug
3. Protection device
4. ON-OFF button
5. Vacuum regulator
6. Vacuum gauge
7. Multi-voltage power supply unit
and battery charger socket
8. 20 cm silicon tube
8a. 10 cm silicon tube
9. Antibacterial filter
10. Working light
11. Light ON-OFF button
12. Accessory compartment
13. Ambulance mounting bracket
3
8
2
8a
4 5 6 7
12
ACCESSORI / ZUBEHÖR / ACCESSORIES / ACCESSOIRES / ACCESORIOS
14 15 16
17 18 19
D
GB
E
1. Vase de 2000 ml
2. Bouchon pour vase
3. Dispositif de protection
4. Bouton ON-OFF
5. Régulateur de vide
6. Videmètre
7. Prise pour alimentation
multitension et recharge
de la batterie
8. Tube en silicone 20 cm
8a. Tube en silicone 10 cm
9. Filtre antibactérien
10. Lampe de service
11. Bouton ON-OFF de la lampe
12. Compartiment des
accessoires
13. Étrier de fixation dans
l’ambulance
F
14. Borsa con tracolla
15. Regolatore manuale monouso
16. Alimentatore multitensione
17. Cavo di alimentazione
18. Cannula sterile monouso
19. Staffa di aggancio fissa sull’ambulanza
14. Schultertasche
15. Einweg - Handregler
16. Mehrspannungsnetzteil
17. Netzkabel
18. Kanüle
19. Haltebügel im Rettungswagen
I
D
14. Bolsa con bandolera
15. Regulador manual desechable
16. Alimentador multitención
17. Cable de alimentación
18. Cánula estéril desechable
19. Abrazadera de enganche fija de ambulancia
E
14. Sac en bandoulière
15. Régulateur manuel pour
un seul usage
16. Alimentateur multitension
17. Câble d’alimentation
18. Canule stérile uniservice
19. Étrier de fixation fixe
sur l’ambulance
14. Bag with shoulder strap
15. Disposable manual regulator
16. Multi-voltage power suppply unit
17. Power supply cord
18. Disposable sterile cannula
19. Permanent ambulance mounting
bracket
GB F
Fig. - Abb. 1
Fig. - Abb. 2
1
PROCEDURA DI SMALTIMENTO (Dir.2012/19/Ue-RAEE) Il simbolo posto sul fondo dell’apparecchio indica la raccolta separata delle apparecchiature
elettriche ed elettroniche. Al termine della vita utile dell’apparecchio, non smaltirlo come rifiuto municipale solido misto ma smaltirlo presso un centro
di raccolta specifico situato nella vostra zona oppure riconsegnarlo al distributore all’atto dell’acquisto di un nuovo apparecchio dello stesso tipo ed
adibito alle stesse funzioni. Questa procedura di raccolta separata delle apparecchiature elettriche ed elettroniche viene effettuata in visione di una
politica ambientale comunitaria con obiettivi di salvaguadia, tutela e miglioramento della qualità dell’ambiente e per evitare effetti potenziali sulla salute
umana dovuti alla presenza di sostanze pericolose in queste apparecchiature o ad un uso improprio delle stesse o di parti di esse. Attenzione! Uno
smaltimento non corretto di apparecchiature elettriche ed elettroniche potrebbe comportare sanzioni.
ENTSORGUNGSVERFAHREN (RICHTLINIE 2012/19/Ue-Weee) Das Symbol auf dem Boden des Geräts gibt die getrennte Müllsammlung der elektrischen
und elektronischen Ausrüstungen an. Am Ende der Lebensdauer vom Gerät es nicht als gemischter fester Gemeindenabfall, sondern es bei einem
spezifischen Müllsammlungszentrum in Ihrem Gebiet entsorgen oder es dem Händler zurückgeben, wenn Sie ein neues Gerät desselben Typ mit
denselben Funktionen kaufen. Diese Prozedur getrennter Müllsammlung der elektrischen und elektronischen Ausrüstungen wird im Hinblick auf eine
zukünftige gemeinsame europäische Umweltschutzpolitik vorgenommen, welche darauf zielen wird, die Umwelt zu schützen und sichern, als auch die
Umweltqualität zu verbessern und potentielle Wirkungen auf die menschliche Gesundheit wegen der Anwesenheit von gefährlichen Stoffen in diesen
Vorrichtungen oder Missbrauch derselben oder von Teilen derselben zu vermeiden. Vorsicht! Die fehlerhafte Entsorgung von elektrischen und elektronischen
Vorrichtungen könnte Sanktionen mit sich bringen.
DISPOSAL PROCEDURE (Dir. 2012/19/Ue-WEEE) The symbol on the bottom of the device indicates the separated collection of electric and electronic
equipment. At the end of life of the device, do not dispose it as mixed solid municipal waste, but dispose it referring to a specific collection centre
located in your area or returning it to the distributor, when buying a new device of the same type to be used with the same functions. This procedure
of separated collection of electric and electronic devices is carried out forecasting a European environmental policy aiming at safeguarding, protecting
and improving environment quality, as well as avoiding potential effects on human health due to the presence of hazardous substances in such equipment
or to an improper use of the same or of parts of the same. Caution! The wrong disposal of electric and electronic equipment may involve sanctions.
PROCÉDURE D’ÉLIMINATION (Dir. 2012/19/Ue-WEEE) Le symbole placé sur le fond de l’appareil indique la récolte séparée des appareils électriques
et électroniques. A la fin de la vie utile de l’appareil, il ne faut pas l’éliminer comme déchet municipal solide mixte; il faut l’éliminer chez un centre de
récolte spécifique situé dans votre zone ou bien le rendre au distributeur au moment de l’achat d’un nouveau appareil du même type et prévu pour les
mêmes fonctions. Cette procédure de récolte séparée des appareils électriques et électroniques se réalise dans une vision d’une politique de sauvegarde,
protection et amélioration de la qualité de l’environnement et pour éviter des effets potentiels sur la santé humaine dus à la présence de substances
dangereuses dans ces appareils ou bien à un emploi non autorisé d’elles ou de leurs parties. Attention! Une élimination incorrecte des appareils
électriques pourrait impliquer des pénalités.
PROCEDIMIENTO DE ELIMINACIÓN (Dir.2012/19/Ue-RAEE) El símbolo colocado en el fondo del aparato indica la recogida separada de los equipos
eléctricos y electrónicos. Al término de la vida útil del aparato, no eliminar como residuo municipal sólido mixto sino eliminarlo en un centro de recogida
específico colocado en vuestra zona o entregarlo al distribuidor a la hora de comprar un nuevo aparato del mismo tipo y destinado a las mismas
funciones. Este procedimiento de recogida separada de los equipos eléctricos y electrónicos se realiza con el propósito de una política del medioambiente
comunitaria con objetivos de salvaguardia, defensa y mejoramiento de la calidad del medioambiente y para evitar efectos potenciales en la salud de
los seres humanos debido a la presencia de sustancias peligrosas dentro de estos equipos o a un uso inapropiado de los mismos o de algunas de
sus partes. Cuidado! Una eliminación no correcta de equipos eléctricos y electrónicos podría conllevar sanciones.
10
11
13
9
3A3918 rev. 01 - 04/2019
MINIASPEED
Battery Evo Plus

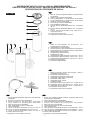
DESCRIZIONE VASO DA 2000 ml / 2000 ml SEKRETBEHÄLTER /
DESCRIPTION OF 2000 ml vessel / DESCRIPTION RÉCIPIENT DE 2000 ml /
DESCRIPCIÓN DEL RECIPIENTE DE 2000 ml
10 11
1. Vaso di raccolta serigrafato 2000ml in policarbonato
sterilizzabile
2. Tappo in polipropilene sterilizzabile
3. Guida galleggiante in polipropilene sterilizzabile
4. Corpo galleggiante in polipropilene sterilizzabile
5. Valvola in gomma sterilizzabile
6. Guarnizione in silicone sterilizzabile
7. Filtro antibatterico Monouso
8. Tubo in silicone sterilizzabile Ø6x12 mm - Lunghezza
20 cm
8a. Tubo in silicone sterilizzabile Ø6x12 mm – Lunghezza
10 cm
9 . Tubo in silicone sterilizzabile lungo Ø6x12 mm -
Lunghezza 130 cm
10. Cannula sterile monouso
11. Regolatore manuale sterile monouso
I
1. 2000 ml Sekretgefäß, mit Siebdruck, aus
sterilisierbarem Polykarbonat
2. Sterilisierbarer Propylenstopfen
3. Schwimmführung aus sterilisierbarem Polypropylen
4. Schwimmkörper aus sterilisierbarem Polypropylen
5. Sterilisierbares Gummiventil
6. Sterilisierbarer Silikondichtung
7. Antibakterieller Filter
8. Sterilisierbarer Silikonschlauch, Ø 6x12 mm - 20 cm
8a. Sterilisierbarer Silikonschlauch, Ø6x12 mm – 10 cm
9. Sterilisierbarer Silikonschlauch, Ø 6x12 mm - 130 cm
10. Steriles Einwegkatheter
11. Steriler Einweghandregler
D
1. 2000 ml collection vessel with serigraph, made of
sterilisable polycarbonate
2. Sterilisable polypropylene top
3. Sterilisable polypropylene float guide
4. Sterilisable polypropylene float body
5. Sterilisable rubber valve
6. Sterilisable silicon gasket
7. Antibacterial filter
8. Sterilisable silicon tube Ø 6x12 mm - length 20 cm
8a. Sterilisable silicon tube Ø6x12 mm – length 10 cm
9. Sterilisable silicon tube Ø 6x12 mm - length 130 cm
10. Disposable sterile cannula
11. Disposable sterile manual regulator
GB
1. Frasco de recogida gradado mediane serigrafia 2000 ml de
policarbonato esterilizable
2. Tapón de polipropileno esterilizable
3. Guía del flotador de polipropileno esterilizable
4. Cuerpo del flotador de polipropileno esterilizable
5. Válvula de goma esterilizable
6. Guarnición hermética de silicona esterilizable
7. Filtro antibacteriano
8. Tubo de silicona esterilizable de 6x12 mm de diámetro - 20 cm
8a. Tubo de silicona esterilizable de 6x12 mm de diámetro – 10 cm
9. Tubo de silicona esterilizable de 6x12 mm de diámetro - 130 cm
10. Cánula estéril desechable
11. Regulador manual estéril desechable
E
1. Pot de collecte sérigraphié 2000 ml en polycarbonate
stérilisable
2. Bouchon en polypropylène stérilisable
3. Guide flottant en polypropylène stérilisable
4. Corps flottant en polypropylène stérilisable
5. Valve en caoutchouc stérilisable
6. Joint d’étanchéité en silicone stérilisable
7. Filtre antibactérien
8. Tuyau en silicone stérilisable Ø 6x12 mm 20 cm
8a. Tuyau en silicone stérilisable Ø 6x12 mm 10 cm
9. Tuyau en silicone stérilisable Ø 6x12 mm 130 cm
10. Canule stérile uniservice
11. Régulateur manuel stérile uniservice
F
DESCRIZIONE AGGANCIO - SGANCIO IN AMBULANZA / ABSAUGGERÄT IM
RETTUNGSWAGEN MONTIEREN / DESCRIPTION OF AMBULANCE MOUNTING - RELEASE
SYSTEM / DEMONTIEREN - DESCRIPTION DE L’ACCROCHAGE - DÉCROCHAGE DANS
L’AMBULANCE / DESCRIPCIÓN DEL ENGANCHE - DESENGANCHE EN LA AMBULANCIA
Staffa fissa sull’aspiratore
Haltebügel auf dem Absauggerät
Bracket fixed to aspirator
Étrier fixe sur l’aspirateur
Abrazadera fija en el aspirador
Staffa fissa in ambulanza
Haltebügel im Rettungswagen
Bracket fixed to ambulance
Étrier fixe dans l’ambulance
Abrazadera fija de ambulancia
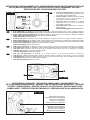
DESCRIZIONE FUNZIONAMENTO LED / BESCHREIBUNG DER FUNKTIONSWEISE DER LED
LED OPERATION DESCRIPTION / DESCRIPTION DU FONCTIONNEMENT DES LED /
DESCRIPCIÓN DEL FUNCIONAMIENTO DE LEDS
1. Rote LED blinkt: Die Batterie ist nicht mehr in der Lage, maximale Autonomie zu liefern. Batterie ersetzen.
2. Rote LED leuchet kontinuierlich: Batterie entladen. Das Gerät maximal für 3 Minuten benutzen und die Batterie aufladen.
3. Gelbe LED leuchet kontinuierlich: Batterie in Reserve (Autonomie ca. 10 Minuten), Batterie aufladen.
4. Grüne LED leuchet kontinuierlich: Gerät in Betrieb, Batterie geladen.
Grüne LED blinkt: Batterieaufladung.
D
1. Led rosso lampeggiante: la batteria non è
più in grado di fornire la massima autonomia,
provvedere alla sua sostituzione.
2. Led rosso fisso: la batteria è scarica, utilizzare
l’apparecchio per 3 minuti massimo e
provvedere a ricaricare la batteria
3. Led giallo fisso: la batteria è in riserva
(autonomia 10 minuti circa), se possibile
provvedere a ricaricarla.
4. Led verde fisso: apparecchio in funzione,
batteria carica.
Led verde lampeggiante: batteria sotto carica.
I
2
Fig. - Abb. 3
2
3
Fig. - Abb. 4
1. Flashing red Led: the battery is no longer capable of supplying maximum charge duration; replace it.
2. Red Led permanently on: the battery is flat, use the appliance for a maximum of 3 minutes and re-charge the battery
3. Yellow Led permanently on: the battery is in reserve (about 10 minutes’ operating time left); recharge it if possible.
4. Green Led permanently on: appliance operating, battery charged.
Green Led flashing: battery under charge.
GB
1. Led rouge clignotante: la batterie n’est plus en mesure d’assurer l’autonomie maximale, la remplacer.
2. Led rouge fixe: la batterie est déchargée, utiliser l’appareil pendant 3 minutes au maximum puis recharger la batterie.
3. Led jaune fixe: la batterie est sur la réserve (10 minutes d’autonomie environ); la recharger si possible.
4. Led verte fixe: appareil en marche, batterie chargée.
Led verte clignotante: batterie sous charge.
F
1. Led rojo parpadeante: la batería ya no logra ofrecer la autonomía máxima; sustituirla.
2. Led rojo fijo: la batería está agotada, utilizar el aparato durante 3 minutos como máximo y volver a cargarla
3. Led amarillo fijo: la batería se halla en reserva (unos 10 minutos de autonomía); de ser posible volver a cargarla.
4. Led verde fijo: aparato funcionando, batería cargada.
Led verde parpadeante: batería en carga.
E
11
10
Fig. - Abb. 5
Fig. - Abb. 6
6
5
4
3
1
98a8 7
2

DESCRIZIONE VASO DA 2000 ml / 2000 ml SEKRETBEHÄLTER /
DESCRIPTION OF 2000 ml vessel / DESCRIPTION RÉCIPIENT DE 2000 ml /
DESCRIPCIÓN DEL RECIPIENTE DE 2000 ml
10 11
1. Vaso di raccolta serigrafato 2000ml in policarbonato
sterilizzabile
2. Tappo in polipropilene sterilizzabile
3. Guida galleggiante in polipropilene sterilizzabile
4. Corpo galleggiante in polipropilene sterilizzabile
5. Valvola in gomma sterilizzabile
6. Guarnizione in silicone sterilizzabile
7. Filtro antibatterico Monouso
8. Tubo in silicone sterilizzabile Ø6x12 mm - Lunghezza
20 cm
8a. Tubo in silicone sterilizzabile Ø6x12 mm – Lunghezza
10 cm
9 . Tubo in silicone sterilizzabile lungo Ø6x12 mm -
Lunghezza 130 cm
10. Cannula sterile monouso
11. Regolatore manuale sterile monouso
I
1. 2000 ml Sekretgefäß, mit Siebdruck, aus
sterilisierbarem Polykarbonat
2. Sterilisierbarer Propylenstopfen
3. Schwimmführung aus sterilisierbarem Polypropylen
4. Schwimmkörper aus sterilisierbarem Polypropylen
5. Sterilisierbares Gummiventil
6. Sterilisierbarer Silikondichtung
7. Antibakterieller Filter
8. Sterilisierbarer Silikonschlauch, Ø 6x12 mm - 20 cm
8a. Sterilisierbarer Silikonschlauch, Ø6x12 mm – 10 cm
9. Sterilisierbarer Silikonschlauch, Ø 6x12 mm - 130 cm
10. Steriles Einwegkatheter
11. Steriler Einweghandregler
D
1. 2000 ml collection vessel with serigraph, made of
sterilisable polycarbonate
2. Sterilisable polypropylene top
3. Sterilisable polypropylene float guide
4. Sterilisable polypropylene float body
5. Sterilisable rubber valve
6. Sterilisable silicon gasket
7. Antibacterial filter
8. Sterilisable silicon tube Ø 6x12 mm - length 20 cm
8a. Sterilisable silicon tube Ø6x12 mm – length 10 cm
9. Sterilisable silicon tube Ø 6x12 mm - length 130 cm
10. Disposable sterile cannula
11. Disposable sterile manual regulator
GB
1. Frasco de recogida gradado mediane serigrafia 2000 ml de
policarbonato esterilizable
2. Tapón de polipropileno esterilizable
3. Guía del flotador de polipropileno esterilizable
4. Cuerpo del flotador de polipropileno esterilizable
5. Válvula de goma esterilizable
6. Guarnición hermética de silicona esterilizable
7. Filtro antibacteriano
8. Tubo de silicona esterilizable de 6x12 mm de diámetro - 20 cm
8a. Tubo de silicona esterilizable de 6x12 mm de diámetro – 10 cm
9. Tubo de silicona esterilizable de 6x12 mm de diámetro - 130 cm
10. Cánula estéril desechable
11. Regulador manual estéril desechable
E
1. Pot de collecte sérigraphié 2000 ml en polycarbonate
stérilisable
2. Bouchon en polypropylène stérilisable
3. Guide flottant en polypropylène stérilisable
4. Corps flottant en polypropylène stérilisable
5. Valve en caoutchouc stérilisable
6. Joint d’étanchéité en silicone stérilisable
7. Filtre antibactérien
8. Tuyau en silicone stérilisable Ø 6x12 mm 20 cm
8a. Tuyau en silicone stérilisable Ø 6x12 mm 10 cm
9. Tuyau en silicone stérilisable Ø 6x12 mm 130 cm
10. Canule stérile uniservice
11. Régulateur manuel stérile uniservice
F
DESCRIZIONE AGGANCIO - SGANCIO IN AMBULANZA / ABSAUGGERÄT IM
RETTUNGSWAGEN MONTIEREN / DESCRIPTION OF AMBULANCE MOUNTING - RELEASE
SYSTEM / DEMONTIEREN - DESCRIPTION DE L’ACCROCHAGE - DÉCROCHAGE DANS
L’AMBULANCE / DESCRIPCIÓN DEL ENGANCHE - DESENGANCHE EN LA AMBULANCIA
Staffa fissa sull’aspiratore
Haltebügel auf dem Absauggerät
Bracket fixed to aspirator
Étrier fixe sur l’aspirateur
Abrazadera fija en el aspirador
Staffa fissa in ambulanza
Haltebügel im Rettungswagen
Bracket fixed to ambulance
Étrier fixe dans l’ambulance
Abrazadera fija de ambulancia
DESCRIZIONE FUNZIONAMENTO LED / BESCHREIBUNG DER FUNKTIONSWEISE DER LED
LED OPERATION DESCRIPTION / DESCRIPTION DU FONCTIONNEMENT DES LED /
DESCRIPCIÓN DEL FUNCIONAMIENTO DE LEDS
1. Rote LED blinkt: Die Batterie ist nicht mehr in der Lage, maximale Autonomie zu liefern. Batterie ersetzen.
2. Rote LED leuchet kontinuierlich: Batterie entladen. Das Gerät maximal für 3 Minuten benutzen und die Batterie aufladen.
3. Gelbe LED leuchet kontinuierlich: Batterie in Reserve (Autonomie ca. 10 Minuten), Batterie aufladen.
4. Grüne LED leuchet kontinuierlich: Gerät in Betrieb, Batterie geladen.
Grüne LED blinkt: Batterieaufladung.
D
1. Led rosso lampeggiante: la batteria non è
più in grado di fornire la massima autonomia,
provvedere alla sua sostituzione.
2. Led rosso fisso: la batteria è scarica, utilizzare
l’apparecchio per 3 minuti massimo e
provvedere a ricaricare la batteria
3. Led giallo fisso: la batteria è in riserva
(autonomia 10 minuti circa), se possibile
provvedere a ricaricarla.
4. Led verde fisso: apparecchio in funzione,
batteria carica.
Led verde lampeggiante: batteria sotto carica.
I
2
Fig. - Abb. 3
2
3
Fig. - Abb. 4
1. Flashing red Led: the battery is no longer capable of supplying maximum charge duration; replace it.
2. Red Led permanently on: the battery is flat, use the appliance for a maximum of 3 minutes and re-charge the battery
3. Yellow Led permanently on: the battery is in reserve (about 10 minutes’ operating time left); recharge it if possible.
4. Green Led permanently on: appliance operating, battery charged.
Green Led flashing: battery under charge.
GB
1. Led rouge clignotante: la batterie n’est plus en mesure d’assurer l’autonomie maximale, la remplacer.
2. Led rouge fixe: la batterie est déchargée, utiliser l’appareil pendant 3 minutes au maximum puis recharger la batterie.
3. Led jaune fixe: la batterie est sur la réserve (10 minutes d’autonomie environ); la recharger si possible.
4. Led verte fixe: appareil en marche, batterie chargée.
Led verte clignotante: batterie sous charge.
F
1. Led rojo parpadeante: la batería ya no logra ofrecer la autonomía máxima; sustituirla.
2. Led rojo fijo: la batería está agotada, utilizar el aparato durante 3 minutos como máximo y volver a cargarla
3. Led amarillo fijo: la batería se halla en reserva (unos 10 minutos de autonomía); de ser posible volver a cargarla.
4. Led verde fijo: aparato funcionando, batería cargada.
Led verde parpadeante: batería en carga.
E
11
10
Fig. - Abb. 5
Fig. - Abb. 6
6
5
4
3
1
98a8 7
2

4
Staffa basculante gialla
Schwenkbarer gelbe bügel
Yellow mobile bracket
Étrier basculant jaune
Abrazadera basculante
amarilla
Fig. - Abb. 6c
DESCRIZIONE E FISSAGGIO STAFFA IN AMBULANZA / HALTEBÜGEL IM RETTUNGSWAGEN
DESCRIPTION OF PROCEDURE FOR MOUNTING BRACKET IN AMBULANCE /
DESCRIPTION DE L’ACCROCHAGE/DÉCROCHAGE DANS L’AMBULANCE /
DESCRIPCIÓN Y FIJACIÓN DE LA ABRAZADERA EN LA AMBULANCIA
1
2
4
53
Fig. - Abb. 7a
Fori in cui infilare le viti
di fissaggio (non fornite)
Bohrungen für die
Befestigungsschrauben
(kein Lieferumfang)
Holes into which the fixing screws
(not supplied) are fitted
Orifices dans lesquels introduire
les vis de fixation (non fournies)
Orificios en donde insertar
los tornillos de fijación (no suministrados)
Fig. - Abb. 7b
Piani di appoggio della staffa
al pannello ambulanza
Befestigungsplatte
Bracket surfaces which fit against
the ambulance panel
Plans d’appui de l’étrier au
panneau de l’ambulance
Planos de apoyo de la abrazadera
en el panel de la ambulancia
Fig. - Abb. 7c
Viti
Sch
Screws
Vis
Tor
Pannello ambulanza
Fahrzeugwand
Ambulance panel
Panneau de
l’ambulance
Panel ambulancia
Cavetto marrone Polo Positivo (+)
Braunes Kabel Positiver Pol (+)
Brown wire Positive pole (+)
Câble marron Pôle positif (+)
Cable marrón Polo positivo (+)
Cavetto blu Polo Negativo (–)
Blaues Kabel Negativer Pol (–)
Blue wire Negative pole (–)
Câble bleu Pôle négatif (–)
Cable azul Polo negativo (–)
Cavetto marrone Polo Positivo (+)
Braunes Kabel Positiver Pol (+)
Brown wire Positive pole (+)
Câble marron
Pôle positif (+)
Cable marrón
Polo positivo (+)
Fig. - Abb. 7f
Cavetto blu
Polo Negativo (–)
Blaues Kabel
Negativer Pol (–)
Blue wire
Negative pole (–)
Câble bleu Pôle négatif (–)
Cable azul Polo negativo (–)
Premere
Drücken
Press
Appuyer
Presiona
Fig. - Abb. 6a Fig. - Abb. 6b
Fig. - Abb. 7
Fig. - Abb. 7e
Fig. - Abb. 7d
71,50
85

5

The MINIASPEED BATTERY EVO PLUS aspirator, specific for secretion removal, is a portable professional
device suitable for use in ambulances, in homes and in clinics. It has a vacuum regulator, a vacuum gauge and
2000 ml container with a protection device to prevent liquid from entering the suction pump, which cuts off the
aspiration flow. It has lifetime lubrication and is easy to handle, simple to use, reliable, strong and silent. This
model has a 12 V rechargeable battery; when connected to the ambulance mounting bracket it not only operates
on the ambulance’s battery but also recharges. The MINIASPEED BATTERY EVO PLUS aspirator has the following
accessories: 2000 ml container with protection device, power supply cord with multi-voltage power supply unit,
10 cm long sterilisable silicone connection tube, 20 cm long sterilisable silicone connection tube, 130 cm long
sterilisable silicone connection tube, sterile, disposable cannula, sterile, disposable manual flow regulator
and disposable antibacterial filter.
N.B.: Only use genuine accessories supplied by 3A Health Care; the accessories supplied with the device
by the manufacturer have been tested and proven compliant with the latest current safety standards.
WARNING! Correct operation of the device is not guaranteed in the event of use of accessories other
than those supplied.
INTENDED USE
Battery-powered medical / surgical aspirator intended for use in the field and/or in vehicles. It may also be used
in home care and/or outpatient settings.
Medical purposes: This product is intended for use for the aspiration of body fluids.
Intended users of the product:
• Legally certified medical personnel (doctors, nurses and therapists).
• For home treatment or home care under the guidance of medical personnel.
• Users must also be able to understand the operation of the medical device, and the contents of the instruction
manual, in general terms.
Intended patients for the product: People who need to remove body fluids (saliva, blood, etc.).
Environment: This product is intended for use in an ambulance. However, it may also be used in home care
and/or outpatient settings.
Expected duration: Duration may vary based on the operating environment. The lifetime of the device is 5 years
and that of the collection vessel and the silicone tubes 1 year or 30 sterilisation cycles. The cannula, manual
flow regulator and antibacterial filter are disposable devices and must therefore be replaced after each application.
Frequent use of the product may shorten the duration.
Precautions for use: The warnings and cautions described in the instruction manual must be observed.
IMPORTANTS WARNINGS
This is a medical device and must be used by qualified staff. It must be operated as indicated in this user
instruction manual. It is important for the operator to read and understand the information on use and
maintenance of the unit. If you have any questions, contact your stockist. MICROBIAL CONTAMINATION:
in the case of illnesses with a risk of infection or microbial contamination, the accessories should be
thoroughly cleaned and sterilised after each use.
The manufacturer has made every effort to ensure that all its products are of the highest quality and are reliable.
Nevertheless, as for all electrical appliances, fundamental safety standards must be observed:
• Children and persons who are not self-sufficient may only use the unit under the strict supervision of a
responsible adult who has read this manual.
• The device must always be used by specifically trained staff who have read this manual.
• Never use adapters for supply voltages different to the voltage shown on the data plate on the back of the
unit. Keep the cord away from hot surfaces.
• The unit should not be used in the presence of inflammable anaesthetic mixtures with air, oxygen or
nitrous oxide.
• Never handle the supply cord plug with wet hands or use the unit when taking a bath or a shower. Never
leave the unit close to water, do not submerge it in any liquids. If by chance it falls into water, pull the plug
out of the socket immediately before recovering it. Do not use the unit if the plug or supply cord are worn or
wet (send it immediately to your stockist).
• Although the device is protected against sprays of water, do not use it in the rain.
GB
6

• Only authorised personnel may perform maintenance and/or repair work. Unauthorised repairs annul the
guarantee.
• Ensure that the connections and container closing are performed carefully to prevent suction losses.
• Do not tip the container over while connected to the unit when operating, as liquid may be sucked inside the
appliance causing pump damage. If this happens, switch the aspirator off immediately and empty and clean
the container. Send the appliance to your stockist.
• When the protection device intervenes aspiration is interrupted; empty the container and perform the cleaning
operations.
• The cannula and the manual control of the aspirated flow are sterile, disposable products: They must be
replaced after every application.
• Check the use-by-date on the original packaging of the cannula and check the integrity of the sterile packaging.
If expired and/or deteriorated, replace it.
• The disposable antibacterial filter must be replaced after every application.
• Never use the battery charger with other appliances or for uses other than that established by this manual.
Never use MINIASPEED BATTERY EVO PLUS with other power supply units.
• In view of their length, the power cord and connection hose could constitute a strangulation hazard.
• Use of the device in ambient conditions other than those specified in the manual may seriously impair its
safety and technical characteristics.
• In the event of aspiration without the container and/or antibacterial filter, or if it is suspected that substances
have entered the aspiration circuit, contact your stockist at once.
• Never modify the device’s mounting bracket or the bracket installed in the ambulance as this may impair the
safety of both the device and its installation environment.
• Always use the device in the vertical position on an unobstructed, stable, flat surface.
USE INSTRUCTIONS
Each time before use, ensure that all the accessories are perfectly clean according to the instructions indicated
in the “CLEANING AND DISINFECTION OPERATIONS”.
1. OPERATION WITH MULTI-VOLTAGE POWER SUPPLY UNIT
1.1 Check the charge level of the ambulance’s battery before using the device
1.2 For use outside the ambulance (i.e. not fixed to the bracket [19]) with the internal battery flat or not full
charged, connect the multi-voltage power supply (16) to the socket on the device (7) and connect the cord
(17) to a mains power socket.
1.3 Connect the appliance as indicated in Figure 1 (page 1).
1.4 Start the appliance by placing the switch to the “I” (ON) position (4) (green pilot light on).
1.5 The vacuum regulator (5) can be used to set the level of vacuum required (bar/KPa). Turn the knob clockwise,
in the “+” direction, to obtain a higher vacuum or anticlockwise, in the “-“ direction, for a lower vacuum;
these values are read on the vacuum gauge (6),
Important: the vacuum values on the control decal are purely for guidance; always refer to the vacuum
gauge reading.
1.6 After the application, switch off the device, remove the supply cord (17) from the mains socket and disconnect
the power supply unit (16) from the device. Perform the cleaning operations as described in the “CLEANING
AND DISINFECTION” paragraph.
2. OPERATION WITH BATTERY AND BATTERY CHARGER WITH MULTI-VOLTAGE POWER SUPPLY UNIT
2.1 The device is supplied with the battery partially charged. We therefore recommend charging it before use.
2.2 To charge the battery, with the device switched off connect the multi-voltage power supply unit (16) to the
device’s socket (7) and to the mains power supply by means of the cord (17). Charging time: about 4 hours.
Charge duration: about 40/45 minutes at maximum suction power.
2.3 Operation with internal battery only:
Switch the device on by pressing the “ON-OFF button (4) (green light comes on). If the green light goes out
during use, and the yellow light comes on, there is about 10/15 minutes of battery charge left (reserve level).
Therefore: terminate the application if possible. If the application cannot be terminated, it can be continued
until the red (battery flat) light comes on, but if this occurs do not use the appliance for more than 3 minutes
to avoid damaging the battery. To continue the application with the battery flat (red light on), connect the
multi-voltage power supply unit (16) (as described in point 2.2).
2.4 At the end of the application, switch the device off by pressing the button (4). Connect the power supply
unit (16) to charge the battery (as described in point 2.2). If the device is not in use and is not connected
to the bracket (19) in the ambulance, the power supply unit should be left connected (16) to ensure that
the battery is always charged to the optimal level.
2.5 For aspiration procedures see points 1.3; 1.4; 1.5.
7

N.B.: when the battery power drops below a set level the aspirator shuts down to avoid damage to
the battery. If absolutely necessary, the user can restart the aspirator for 1 minute by pressing the
ON/OFF button again.
3. OPERATION WITH THE DEVICE INSTALLED IN THE AMBULANCE
3.1 The device can also operate connected to the ambulance mounting bracket (19).
3.2 With the device connected to the bracket (19), there is no limit to patient treatment time because the device
is powered directly by the ambulance battery.
3.3 The device’s battery is charged by leaving it connected to the ambulance mounting bracket (19).
3.3.1 The device’s battery is also charged while treatment is in progress (with the device connected to the
ambulance mounting bracket).
3.4. For aspiration procedures see points 1.3; 1.4; 1.5.
4. SECRETION VESSEL - 2000 ml (Fig. 3)
The secretion vessel set consists of an overflow valve, a vessel (1) in clear material (polycarbonate) and a blue
plug (2).
Connection: connect one end of the 10 cm tube (8a) to “VACUUM” connector of the blue top (2) and the other
end connect it to the antibacterial filter connector (7). Then connect one end of the 20 cm tube (8) to the free
connector of the antibacterial filter (7) and the other end to the “INLET” connector of the aspirator.
The antibacterial filter also protects the aspiration circuit from any contaminating agents sucked in during use.
Do not use the aspirator without the antibacterial filter, because from a bacteriological point of view, it becomes
dangerous for the patient. Keep the device vertical to allow the overflow to function correctly.
Connect one end of the 130 cm tube (9) to the “PATIENT” connector of the blue cap (2), while at the other end
to connect the disposable, sterile manual regulator (11) and connect the disposable, sterile cannula (10) to this
latter.
All the components of the vessel can be sterilised using a conventional system in an autoclave at a temperature
of 121°C, or by boiling for 10 minutes. We recommend replacing the complete vessel at every 30 sterilisation
cycles. Do not overturn the vessel during use, in order to prevent the intervention of the non-return valve (3-4-
5); should this occur, switch the aspirator off and detach the tube connected to the antibacterial filter. Never
use the aspirator without the secretion collection vessel and/or without the antibacterial filter.
DESCRIPTION OF USE OF WORKING LIGHT
The MINIASPEED BATTERY EVO PLUS is fitted with a LED working light (10) which allows use of the device in
dark conditions and/or at night.
Press the button (11) to switch on the light, as shown in Figure 5 of page 3; press the button (11) again to switch
it off. The light switches off automatically after about 60 minutes.
The light is of LED type, so the amount of current it consumes is minimal and it can be used even during
treatment; however, it should be switched off whenever it is not required and/or at the end of the treatment.
CLEANING AND DISINFECTION OPERATIONS
N.B.: If using chemical disinfectants, follow the manufacturer’s instructions exactly.
• The cannula and the aspirated flow manual command are sterile, disposable products and must be replaced
after every application.
• The antibacterial disposable filter must be replaced after every application.
• Never leave the appliance in water or submerged; clean the external casing of the appliance using only a
damp cloth with detergent (non abrasive).
DESCRIPTION OF AMBULANCE MOUNTING / RELEASE SYSTEM
1. Fit the bottom of the bracket fixed to the aspirator into the recess provided in the bottom of the bracket
mounted in the ambulance (as shown in Figure 6 of page 3).
2. Keeping the device engaged with the bracket, push it until it engages with the hook in the top of the yellow
mobile bracket (as shown in Figure 6a):
N.B.: to ensure that the device engages correctly, press the mobile bracket, push the device fully down
and release the mobile bracket (as shown in Figure 6b).
8

ALWAYS CHECK THAT THE DEVICE HAS ENGAGED WITH THE BRACKET.
3. To release the device, press the yellow mobile bracket and lift the aspirator up and towards you (as shown
in Figure 6c).
KEEP A FIRM GRIP ON THE HANDLE OF THE ASPIRATOR WHILE RELEASING IT.
DESCRIPTION OF PROCEDURE FOR MOUNTING BRACKET IN AMBULANCE
The ambulance mounting bracket is supplied assembled and complete (as shown in Figure 7):
1. Wall mounting bracket.
2. Mobile bracket.
3. Mobile bracket spring.
4. Block complete with electrical contacts and cord.
5. 2 metre power cord for connecting the ambulance battery.
Mounting the bracket in the ambulance
• The bracket must be installed on the panel inside the ambulance by skilled staff authorised by the vehicle’s
constructor/outfitter.
• The fixing points are shown in Figure 7a, Figure 7b and Figure 7c.
• M5 Allen screws (UNI 5931-DIN 912-ISO 4762) should be used since they undergo deceleration testing at
10g as required by the EN 1789 standard. Otherwise, screws (with the same mechanical characteristics)
having (non-tapered) heads, max. Ø10, and no more than 7 mm in height (including the washer, if fitted)
can be used.
• See Figure 7d for the fixing centre distances.
Wiring connection/polarity
• The bracket is supplied complete with the ambulance battery connection cord (5) (already fitted), which
powers the device and charges its battery when it is connected to the bracket.
• Connect the wires to the ambulance following the polarity shown in Figure 7e.
• If the cord is disconnected from the bracket for any reason, reconnect it following the polarity shown in
Figure 7f.
N.B.: Take great care over the polarity (+ and –) because if it is reversed the device’s electronic circuit
board and battery will be damaged beyond repair.
Note: if you experience faults or malfunctioning problems different to those listed above, always and
exclusively contact authorised assistance centres.
PROBLEMS, CAUSES AND SOLUTIONS
PROBLEMS POSSIBLE CAUSES SOLUTIONS
Excessive noise. Damaged pump or blockages in the
internal aspiration circuit. Send to the assistance circuit.
The unit switches on but does not aspirate. - Damaged pump.
- Vacuum regulator fully open. Connection
tubes disconnected and/or badly
connected, broken connection tubes.
Container not in a vertical position, full, or
defective overflow valve. Possible
blockage of the hydraulic circuit inside the
unit.
- Send to the assistance circuit.
- Check the position of the vacuum
regulator. Check the connections and the
integrity of the tubes. Position the
container in a vertical position, check the
overflow valve (blocked) and/or replace
the silicon tubes.
The vacuum rate cannot be regulated. Damage to the internal hydraulic system
or blockage of the connection tubes to
the aspiration unit.
Send to the assistance circuit.
When the appliance is switched on, the
protection fuse always trips. Pump probably damaged or in shortcircuit. Send to the assistance circuit.
The vacuum gauge does not work. Liquid penetrating the pneumatic circuit. Send to the assistance circuit.
9

TECHNICAL CHARACTERISTICS
Professional portable medical device for secretion removal, suitable for fixed and transportable use.
Complete with flame retardant ABS V0 casing and piston-cylinder electrical compressor lubricated for life.
Risk class under Directive 93/42/EEC: IIb
Suction class: High vacuum / High flow
Protection level against entry of liquids and solids: IP44
Voltage: 12VDC
Absorption: 3A
Adjustable vacuum level: from 0 to –0.85 bar (-85KPa)
Vacuum gauge precision class: 2.5% under UNI EN 837
Air flow: 30 lt/min operating without restrictions +/– 10 %
Temporary use: max. 45 minutes
Dimensions: 38 (length) x 13.5 (width) x 35 (Height) cm
Weight: 4.85 kg approx
Noise level: 55dBA (1m)
Multi-voltage switching battery charger: PRI: 100 ÷ 240V~ 50 – 60Hz
SEC: 14VDC 4.28A
Internal battery: 12VDC 4Ah Lead, hermetic
Battery charge duration: 45 minutes at maximum suction power
Operating conditions:
Temperature: min. 0° C; max 40° C
Air humidity: min. 10 %; max 95 %
Storage conditions:
Temperature: min. –10° C; max 50° C
Air humidity: min. 10 %; max 95 % %
Operating-storage conditions: min. 690 hPa; max 1060 hPa
10
SYMBOLS USED
Type BF appliance
It is compulsory to carefully read the instructions
before using this device
Switch On
Switch off (or battery on charge)
Direct current
Alternate current
Conforms to Directive 93/42/EEC for
medical devices
The device contains a hermetic lead
battery. It must be disposed of in
accordance with current regulations
on the disposal of toxic-harmful
waste
Sterilisation by ethyl oxide
Disposable
Do not use the unit when takig a bath or a
shower
The device’s casing is protected against
solid particles having diameter of 1 mm
or above, spraying water and access to
hazardous parts with a wire

11
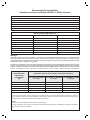
Electromagnetic Compatibility
Compliance levels according to EN 60601-1-2:2015 standard
- ESD immunity: 15 kV air, 8 kV contact (EN 61000-4-2)
- Burst immunity: 2 kV/100 kHz (EN 61000-4-4)
- Surge immunity (EN 61000-4-5): 1 kV common mode /2 kV differential mode
- Magnetic field (EN 61000-4-8): 30 A/m
- Immunity to rf currents in the 150 kHz-80 MHz range (EN 61000-4-6) 3 V modulation 80% 1 kHz
- RF emissions, CISPR 11: Class B
- Harmonics emissions, EN 61000-3-2: Class A
Rf field immunity (EN 61000-4-3):
Field (V/m) Frequency Modulation
3 80MHz 2700MHz 1kHz AM 80%
27 380MHz 390MHz 18Hz PM 50%
28 430MHz 470MHz 18Hz PM 50%
9 704MHz 787MHz 217Hz PM 50%
28 800MHz 960MHz 18Hz PM 50%
28 1700MHz 1990MHz 217Hz PM 50%
28 2400MHz 2570MHz 217Hz PM 50%
9 5100MHz 5800MHz 217Hz PM 50%
For transmitters with rated maximum output power not listed above, the recommended separation distance d in metres (m)
may be determined using the equation adopted for the transmitter frequency, where P is the maximum rated output power
of the transmitter in Watts (W) stated by the transmitter manufacturer.
Notes:
(1) At 80 MHz and 800 MHz the highest frequency range applies.
(2) These guidelines might not apply in all situations. Electromagnetic propagation is affected by absorption and reflection
from structures, objects and people.
0,01 0,12 0,12 0,23
0,1 0,38 0,38 0,73
1 1,2 1,2 2,3
10 3,8 3,8 7,3
100 12 12 23
Rated maximum
output power
of transmitter
(W) from 150 kHz to 80 MHz
d = 1,2 √P from 80 MHz to 800 MHz
d = 1,2 √P from 800 MHz to 2,5 GHz
d = 2,3 √P
Separation distance (m) in relation to transmitter frequency
Warnings:
Although compliant with the EN 60601-1-2 standard, the MINIASPEED BATTERY EVO PLUS medical device
may interfere with other devices in the vicinity. The device must not be used in proximity to or stacked on top
of other equipment. Install the device well away from other equipment that emits high frequencies (short waves,
microwaves, electric scalpels, cell phones).
The device is intended for use in an electromagnetic environment in which radiated RF disturbances are under
control. The customer or user can help prevent electromagnetic interference by maintaining a minimum distances
between mobile and portable RF communication equipment (transmitters) and the medical device as recommended
below, according to the maximum output power of the radio communication equipment.

3A HEALTH CARE S.r.l.
Via Marziale Cerutti, 90F/G - 25017 Lonato del Garda (BS) - Italy
tel. +39 030 9133177 - fax +39 030 9919114
e-mail: [email protected] - www.3-a.it
1. Vaso da 2000 ml
2. Tappo per vaso
3. Dispositivo di protezione
4. Pulsante ON-OFF
5. Regolatore di vuoto
6. Vuotometro
7. Presa per alimentatore multitensione
e ricarica batteria
8. Tubo in silicone 20 cm
8a. Tubo in silicone 10 cm
9. Filtro antibatterico
10. Lampada di servizio
11. Pulsante ON-OFF lampada
12. Vano accessori
13. Staffa di aggancio in ambulanza
11. Gefäß 2000 ml
2. Gefäßdeckel
3. Schutzvorrichtung
4. Hauptschalter ON-OFF
5. Vakuumregler
6. Unterdruckmesser
7. Buchse für Mehrspannungsnetzteil
und Akkuaufladung
8. Silikonschlauch 20 cm
8a. Silikonschlauch 10 cm
9. Bakterienfilter
10. Arbeitsleuchte
11. Betriebsschalter ON-OFF Arbeitsleuchte
12. Zubehörfach
13. Haltebügel für Rettungswagen
I
1. Vaso de 2000 ml
2. Tapón para el vaso
3. Aparato de protección
4. Botón ON-OFF
5. Regulador de vacío
6. Vacuómetro
7. Toma para alimentador
multitensión y recarga
de batería
8. Tubo de silicona 20 cm
8a. Tubo de silicona 10 cm
9. Filtro antibacteriano
10. Lámpara de servicio
11. Botón ON-OFF lámpara
12. Compartimento de
accesorios
13. Abrazadera de enganche
en la ambulancia
1. 2000 ml Vessel
2. Vessel plug
3. Protection device
4. ON-OFF button
5. Vacuum regulator
6. Vacuum gauge
7. Multi-voltage power supply unit
and battery charger socket
8. 20 cm silicon tube
8a. 10 cm silicon tube
9. Antibacterial filter
10. Working light
11. Light ON-OFF button
12. Accessory compartment
13. Ambulance mounting bracket
3
8
2
8a
4 5 6 7
12
ACCESSORI / ZUBEHÖR / ACCESSORIES / ACCESSOIRES / ACCESORIOS
14 15 16
17 18 19
D
GB
E
1. Vase de 2000 ml
2. Bouchon pour vase
3. Dispositif de protection
4. Bouton ON-OFF
5. Régulateur de vide
6. Videmètre
7. Prise pour alimentation
multitension et recharge
de la batterie
8. Tube en silicone 20 cm
8a. Tube en silicone 10 cm
9. Filtre antibactérien
10. Lampe de service
11. Bouton ON-OFF de la lampe
12. Compartiment des
accessoires
13. Étrier de fixation dans
l’ambulance
F
14. Borsa con tracolla
15. Regolatore manuale monouso
16. Alimentatore multitensione
17. Cavo di alimentazione
18. Cannula sterile monouso
19. Staffa di aggancio fissa sull’ambulanza
14. Schultertasche
15. Einweg - Handregler
16. Mehrspannungsnetzteil
17. Netzkabel
18. Kanüle
19. Haltebügel im Rettungswagen
I
D
14. Bolsa con bandolera
15. Regulador manual desechable
16. Alimentador multitención
17. Cable de alimentación
18. Cánula estéril desechable
19. Abrazadera de enganche fija de ambulancia
E
14. Sac en bandoulière
15. Régulateur manuel pour
un seul usage
16. Alimentateur multitension
17. Câble d’alimentation
18. Canule stérile uniservice
19. Étrier de fixation fixe
sur l’ambulance
14. Bag with shoulder strap
15. Disposable manual regulator
16. Multi-voltage power suppply unit
17. Power supply cord
18. Disposable sterile cannula
19. Permanent ambulance mounting
bracket
GB F
Fig. - Abb. 1
Fig. - Abb. 2
1
PROCEDURA DI SMALTIMENTO (Dir.2012/19/Ue-RAEE) Il simbolo posto sul fondo dell’apparecchio indica la raccolta separata delle apparecchiature
elettriche ed elettroniche. Al termine della vita utile dell’apparecchio, non smaltirlo come rifiuto municipale solido misto ma smaltirlo presso un centro
di raccolta specifico situato nella vostra zona oppure riconsegnarlo al distributore all’atto dell’acquisto di un nuovo apparecchio dello stesso tipo ed
adibito alle stesse funzioni. Questa procedura di raccolta separata delle apparecchiature elettriche ed elettroniche viene effettuata in visione di una
politica ambientale comunitaria con obiettivi di salvaguadia, tutela e miglioramento della qualità dell’ambiente e per evitare effetti potenziali sulla salute
umana dovuti alla presenza di sostanze pericolose in queste apparecchiature o ad un uso improprio delle stesse o di parti di esse. Attenzione! Uno
smaltimento non corretto di apparecchiature elettriche ed elettroniche potrebbe comportare sanzioni.
ENTSORGUNGSVERFAHREN (RICHTLINIE 2012/19/Ue-Weee) Das Symbol auf dem Boden des Geräts gibt die getrennte Müllsammlung der elektrischen
und elektronischen Ausrüstungen an. Am Ende der Lebensdauer vom Gerät es nicht als gemischter fester Gemeindenabfall, sondern es bei einem
spezifischen Müllsammlungszentrum in Ihrem Gebiet entsorgen oder es dem Händler zurückgeben, wenn Sie ein neues Gerät desselben Typ mit
denselben Funktionen kaufen. Diese Prozedur getrennter Müllsammlung der elektrischen und elektronischen Ausrüstungen wird im Hinblick auf eine
zukünftige gemeinsame europäische Umweltschutzpolitik vorgenommen, welche darauf zielen wird, die Umwelt zu schützen und sichern, als auch die
Umweltqualität zu verbessern und potentielle Wirkungen auf die menschliche Gesundheit wegen der Anwesenheit von gefährlichen Stoffen in diesen
Vorrichtungen oder Missbrauch derselben oder von Teilen derselben zu vermeiden. Vorsicht! Die fehlerhafte Entsorgung von elektrischen und elektronischen
Vorrichtungen könnte Sanktionen mit sich bringen.
DISPOSAL PROCEDURE (Dir. 2012/19/Ue-WEEE) The symbol on the bottom of the device indicates the separated collection of electric and electronic
equipment. At the end of life of the device, do not dispose it as mixed solid municipal waste, but dispose it referring to a specific collection centre
located in your area or returning it to the distributor, when buying a new device of the same type to be used with the same functions. This procedure
of separated collection of electric and electronic devices is carried out forecasting a European environmental policy aiming at safeguarding, protecting
and improving environment quality, as well as avoiding potential effects on human health due to the presence of hazardous substances in such equipment
or to an improper use of the same or of parts of the same. Caution! The wrong disposal of electric and electronic equipment may involve sanctions.
PROCÉDURE D’ÉLIMINATION (Dir. 2012/19/Ue-WEEE) Le symbole placé sur le fond de l’appareil indique la récolte séparée des appareils électriques
et électroniques. A la fin de la vie utile de l’appareil, il ne faut pas l’éliminer comme déchet municipal solide mixte; il faut l’éliminer chez un centre de
récolte spécifique situé dans votre zone ou bien le rendre au distributeur au moment de l’achat d’un nouveau appareil du même type et prévu pour les
mêmes fonctions. Cette procédure de récolte séparée des appareils électriques et électroniques se réalise dans une vision d’une politique de sauvegarde,
protection et amélioration de la qualité de l’environnement et pour éviter des effets potentiels sur la santé humaine dus à la présence de substances
dangereuses dans ces appareils ou bien à un emploi non autorisé d’elles ou de leurs parties. Attention! Une élimination incorrecte des appareils
électriques pourrait impliquer des pénalités.
PROCEDIMIENTO DE ELIMINACIÓN (Dir.2012/19/Ue-RAEE) El símbolo colocado en el fondo del aparato indica la recogida separada de los equipos
eléctricos y electrónicos. Al término de la vida útil del aparato, no eliminar como residuo municipal sólido mixto sino eliminarlo en un centro de recogida
específico colocado en vuestra zona o entregarlo al distribuidor a la hora de comprar un nuevo aparato del mismo tipo y destinado a las mismas
funciones. Este procedimiento de recogida separada de los equipos eléctricos y electrónicos se realiza con el propósito de una política del medioambiente
comunitaria con objetivos de salvaguardia, defensa y mejoramiento de la calidad del medioambiente y para evitar efectos potenciales en la salud de
los seres humanos debido a la presencia de sustancias peligrosas dentro de estos equipos o a un uso inapropiado de los mismos o de algunas de
sus partes. Cuidado! Una eliminación no correcta de equipos eléctricos y electrónicos podría conllevar sanciones.
10
11
13
9
3A3918 rev. 01 - 04/2019
MINIASPEED
Battery Evo Plus
-
 1
1
-
 2
2
-
 3
3
-
 4
4
-
 5
5
-
 6
6
-
 7
7
-
 8
8
-
 9
9
-
 10
10
-
 11
11
-
 12
12
-
 13
13


in altre lingue
- English: Gima 28278 Owner's manual
- français: Gima 28278 Le manuel du propriétaire
Documenti correlati
Altri documenti
-
Moretti LTA460 Manuale utente
-
 Anthogyr Implanteo Manuale utente
-
GCE AMBULANCE PANEL II Istruzioni per l'uso
-
DRIVEN WH1221Z Remote Control Ambulance Guida utente
-
laerdal suction unit Guida utente
-
Haba 2519 Het ziekenautospel Manuale del proprietario
-
 Carpower 14.2120 Istruzioni per l'uso
-
-
EMS PERIO-FLOW Operation Instructions Manual

