Motorola IMPRES Smart Energy System Manuale utente
- Tipo
- Manuale utente

User Guide
IMPRES
Adaptive
Single-Unit Charger
TM
en
de-DE fr-FR es-ES
it-IT pt-PT nl-NL ru
6866553D01.book Page 1 Monday, March 21, 2016 9:47 AM

6866553D01.book Page 2 Monday, March 21, 2016 9:47 AM

English
1
IMPORTANT SAFETY INSTRUCTIONS
This document contains important safety and operating instructions. Please read
these instructions carefully and save them for future reference.
OPERATIONAL WARNINGS
1. To reduce risk of injury, charge only the rechargeable Motorola
authorized batteries listed in Table 1 on page 3. Other batteries
may explode, causing personal injury and damage.
2. Use of accessories not recommended by Motorola may result in
risk of fire, electric shock, or injury.
3. To reduce risk of damage to the electric plug and cord, pull by the plug rather
than the cord when disconnecting the charger.
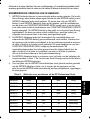
4. An extension cord should not be used unless absolutely necessary. Use of an
improper extension cord could result in risk of fire and electric shock. If an
extension cord must be used, make sure that the cord size is 18 AWG for
lengths of up to 100 feet (30.48 m), and 16 AWG for lengths up to 150 feet
(45.72 m).
5. To reduce risk of fire, electric shock, or injury, do not operate the charger if it
has been broken or damaged in any way. Take it to a qualified Motorola service
representative.
6. Do not disassemble the charger
– it is not repairable and replacement parts are
not available. Disassembly of the charger may result in risk of electric shock or
fire.
7. To reduce risk of electric shock, unplug the charger from the AC outlet before
attempting any maintenance or cleaning.
8. For fuse replacement, use only fuses of the same type and rating listed on the
charger label.
9. This is a class A product. In a domestic environment, this product may cause
radio interference in which case the user may be required to take adequate
measures.
OPERATIONAL SAFETY GUIDELINES
• Turn the radio off when charging the battery.
• This equipment is not suitable for outdoor use. Use only in dry
locations/conditions.
• Connect equipment only to an appropriately fused and wired supply of the correct
voltage (as specified on the product).
• Disconnect from line voltage by removing the mains plug from the outlet.
• The socket outlet to which this equipment is connected should be close and
easily accessible.
6866553D01.book Page 1 Monday, March 21, 2016 9:47 AM

2
English
• For equipment using fuses, replacements must comply with the type and rating
specified in the equipment instructions.
• Maximum ambient temperature around the charger must not exceed 40 °C
(104 °F).
• Make sure the cord is located where it will not be stepped on, tripped over, or
subjected to water, damage, or stress.
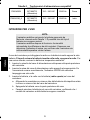
IMPRES FEATURE / BENEFIT DESCRIPTION
The IMPRES energy solution is an advanced Tri Chemistry energy system
developed by Motorola which encompasses (a) IMPRES batteries and (b) the
IMPRES Adaptive Charger.
The IMPRES Adaptive Charger, when used in conjunction with Motorola IMPRES
batteries will:
1. Maximize operation time between charge cycles by automatically eliminating
memory effect.
2. Maximize battery life by significantly reducing heat during the trickle and post
charge cycles.
3. Eliminate the need to purchase reconditioning equipment and train personnel to
“manage battery maintenance tasks”.
With this unique patented system approach, there is no need to track and record
battery use, conduct manual reconditioning cycles or remove batteries from
chargers following charging.
The IMPRES Adaptive Charger monitors the usage pattern of the IMPRES battery,
stores that information in the IMPRES battery, and performs a recondition cycle
only when needed.
The IMPRES Adaptive Charger will not overheat the battery regardless of how long
it is left in the pocket. The charger monitors the battery and automatically “tops off”
the battery, as required.
The IMPRES Adaptive Charger simplifies the charging and battery care process:
All a user needs to do is follow these simple steps:
1. Place the radio / battery in the charger
2. Remove the radio / battery when it is fully charged.
Motorola is the only manufacturer that offers a conditioning or reconditioning
charger that provides users with the choice of charging the radio with the battery
attached or the battery separately.
6866553D01.book Page 2 Monday, March 21, 2016 9:47 AM

English
3
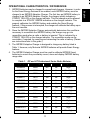
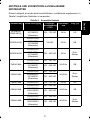
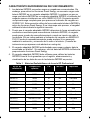
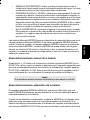
OPERATIONAL CHARACTERISTICS / DIFFERENCES:
1. IMPRES batteries may be charged in conventional chargers. However, in order
for the Smart Energy features to be enabled, each IMPRES battery must be
charged in an IMPRES Adaptive Charger. The first time an IMPRES battery is
charged in an IMPRES Adaptive Charger, the charger initially indicates a
STEADY YELLOW on the charger indicator. This first charge must be allowed
to complete to a STEADY GREEN indication on the charger indicator. This
properly calibrates the IMPRES battery and enables the Smart Energy
features. If this process is interrupted, the charger will calibrate the battery upon
the next insertion.
2. Since the IMPRES Adaptive Charger automatically determines the conditions
necessary to recondition the IMPRES battery, the charger may go into
recondition mode when a radio or battery is inserted. This is indicated by a
STEADY YELLOW on the charger indicator. The recondition mode can be
overridden, if required, by removing and reinserting the radio or battery. (Please
see instructions later in this guide.)
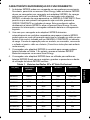
3. The IMPRES Adaptive Charger is designed to charge any battery listed in
Table 1. However, only Motorola IMPRES batteries will provide Smart Energy
features.
4. The IMPRES Adaptive Charger must be used to calibrate IMPRES Smart
batteries to ensure they accurately record, store and display IMPRES battery
usage data.
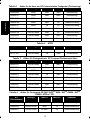
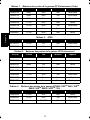
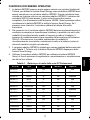
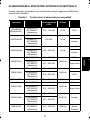
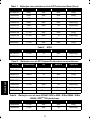
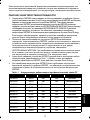
Table 1. GP and HT Professional Series Radio Batteries
Kit (PN) Chemistry FM IMPRES Capacity
HNN9008 NiMH No No High
HNN9009 NiMH No No Ultra-High
HNN9010 NiMH Yes No Ultra-High
HNN9011 NiCD Yes No High
HNN9012 NiCD No No High
HNN9013 Li-Ion No No High
HNN4001 NiMH No Yes Ultra-High
HNN4002 NiMH Yes Yes Ultra-High
HNN4003 Li-Ion No Yes Ultra-High
HNN9003 NiMH No No High
WPNN4045 NiMH No No High
PMNN4045 NiMH No No High
PMNN4151 NiMH No No High
PMNN4154 NiMH No No Ultra-High
6866553D01.book Page 3 Monday, March 21, 2016 9:47 AM

4
English
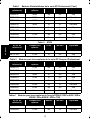
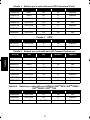
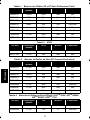
PMNN4156 NiMH No Yes Ultra-High
PMNN4157 NiMH Yes Yes Ultra-High
PMNN4158 Li-Ion No No High
PMNN4159 Li-Ion No Yes Ultra-High
PMNN4455 Li-Ion No No High
PMNN4457 Li-Ion No No High
Table 2. ATEX
Kit (PN) Chemistry ATEX IMPRES Capacity
NNTN5510 Li-Ion Yes No Ultra-High
NNTN7383 Li-Ion Yes No High
Table 3. GP Compact Professional Series Radio Batteries
Kit (PN) Chemistry FM IMPRES Capacity
JMNN4023 Li-Ion No No High
JMNN4024 Li-Ion No No High
JMNN4025 NiMH Yes No High
PMNN4073 Li-Ion Yes No High
PMNN4074 Li-Ion No No High
PMNN4094 Li-Ion No Yes Ultra-High
PMNN4201 Li-Ion No No High
PMNN4202 Li-Ion No No Ultra-High
Table 4. DP3441/ DGP
TM
8050 / XiR
TM
E8600 / XiR
TM
E8608 / XPR
TM
7150
Series Radio Battery
Kit (PN) Chemistry HazLoc IMPRES Capacity
PMNN4440 Li-Ion No No High
PMNN4502 Li-Ion No Yes Ultra High
PMNN4511 Li-Ion TIA 4950 Yes Ultra High
Table 1. GP and HT Professional Series Radio Batteries (Cont.)
Kit (PN) Chemistry FM IMPRES Capacity
6866553D01.book Page 4 Monday, March 21, 2016 9:47 AM

English
5
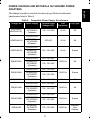
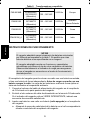
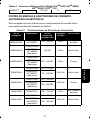
POWER SOURCES AND MOTOROLA AUTHORIZED POWER
ADAPTERS
This charger should be used with the direct plug-in Motorola authorised
transformers listed in Table 5:
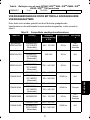
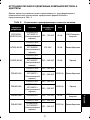
Table 5. Compatible Power Supply Transformers
Charger Kit Power Supply Nominal Input
Voltage ±10%
Line
Frequency
Plug Type
WPLN4206/
AZWPLN4182_
25009297001/
2571586S13
(Alternate)
108 – 132 VAC 60 Hz US
AZWPLN4183
PS000037A02
230 VAC 50 Hz UK
EPNN5753 /
2571586S06
(Alternate)
AZWPLN4184
PS000037A01
220 – 240 VAC 50 Hz Europe
EPNN5752 /
2571586S07
(Alternate)
PMLN5194A
PS000037A02 220 – 240 VAC
50/60 Hz UK
EPNN9287A /
2571886T01
(Alternate)
100 – 240 VAC
PMLN5188A
PS000037A01 220 – 240 VAC
50/60 Hz Europe
EPNN9286A /
2571886T01
(Alternate)
100 – 240 VAC
PMLN5198B 25009297001 108 – 132 VAC 60 Hz US
PMLN5194B
PS000037A02 220 – 240 VAC
50/60 Hz UK
EPNN9287B /
25012006001
(Alternate)
100 – 240 VAC
PMLN5188B
PS000037A01 220 – 240 VAC
50/60 Hz Europe
EPNN9286B /
25012006001
(Alternate)
100 – 240 VAC
PMLN5199
EPNN9294/
2571886T01
(Alternate)
100 – 240 VAC 50/60 Hz
Australia/
New
Zealand
6866553D01.book Page 5 Monday, March 21, 2016 9:47 AM

6
English
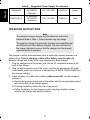
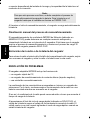
OPERATING INSTRUCTIONS
The charger’s pocket accommodates either a radio with a battery attached or a
battery alone. Prior to charging a radio with a battery, turn the radio off.
Batteries charge best if they are at room temperature when charged.
1. Plug the charger end of the power cord into the AC receptacle located at the
back of the charger.
2. Plug the wall receptacle end of the power cord into the appropriate AC outlet.
A successful power-up sequence is indicated by a SINGLE FLASH GREEN on
the charger indicator.
3. Insert a battery, or a radio with a battery (radio turned off), into the charger’s
pocket by:
a. Aligning the groove on each side of the battery with the corresponding raised
rail on each side of the charger pocket.
b. Pressing the battery toward the rear of the pocket.
c. Sliding the battery into the charger pocket, ensuring complete contact
between the charger and battery contacts.
PMLN5208
EPNN9291/
2571886T01
(Alternate)
100 – 240 VAC 50/60 Hz Korea
PMLN5196_A
EPNN9286A/
2571886T01
(Alternate)
100 – 240 VAC 50/60 Hz India
Note
The adaptive charger charges only the Motorola authorized
batteries listed in Table 1. Other batteries may not charge.
The adaptive charger has automatic features and capabilities that
are different from other battery chargers. Pay close attention to
the charge indicator to ensure that the charger is in the desired/
expected mode of operation.
Table 5. Compatible Power Supply Transformers
6866553D01.book Page 6 Monday, March 21, 2016 9:47 AM

English
7
Once the battery is properly seated into the pocket, the charger indicator
illuminates, indicating the charger has recognized the presence of the battery. Refer
to the charge indicators in Table 6.
In order for the features of Motorola IMPRES batteries and the Adaptive Charging
System to be fully available, the data contained in Motorola IMPRES batteries must
be initialized by the charger the first time it is charged. This process is indicated by
a STEADY YELLOW on the charger indicator (the same as though the battery were
reconditioning). The process is automatic, includes an initial reconditioning of the
battery, and begins charging upon completion of this process. This process requires
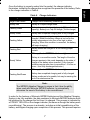
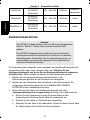
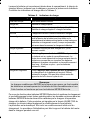
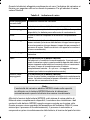
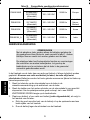
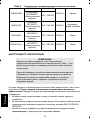
Table 6. Charge Indicators
Charge Indicator Description
Single Flash Green Charger has successfully powered up.
Steady Red Battery is in rapid charge mode.
Flashing Green
Battery has completed rapid charge (>90% available
capacity). Battery is in Top-Off charge (Trickle charge).
Steady Green Battery has completed charging and is fully charged.
Flashing Yellow
Battery is recognized by charger but is waiting to be
charged. (Either the battery voltage is too low or the
battery temperature is too low or too high to allow
charging. When this condition is corrected, the battery
will begin charging.)
Flashing Red
Battery cannot be charged or is not making proper
contact.
Steady Yellow
(This applies to IMPRES batteries only)
Battery is in recondition mode. The length of time the
charger remains in this mode depends on the state of
charge of the battery when inserted. (Fully charged
batteries require more time to recondition – 8 hours or
more – than fully discharged batteries.)
Flashing Red/Green
(This applies to IMPRES batteries only)
Battery has completed charging and is fully charged.
Battery continues to be usable, but may be nearing the
end of its rated service life.
Note:
The IMPRES Adaptive Charger is unique in that it has the ability,
when used with Motorola IMPRES batteries, to automatically
determine the need of the battery to be reconditioned.
6866553D01.book Page 7 Monday, March 21, 2016 9:47 AM

8
English
time to initialize the battery, so the battery should be left in the charger overnight on
the initial insertion.
The IMPRES Adaptive Charger operates both as:
•a Charger with all Motorola authorized batteries, and
•a Reconditioner with Motorola authorized IMPRES batteries.
Charging the Battery
To ensure optimum performance, Motorola recommends all new batteries be left in
the charger until the charger indicator displays a STEADY GREEN.
1. Once a battery or a radio with a battery is properly inserted into the charger, the
charger begins to rapid charge the battery and is indicated by a STEADY RED on
the charger indicator. The length of time the charger indicates STEADY RED
depends on the state of charge of the battery.
2. Completion of rapid charge (>90% available capacity) is indicated by a
FLASHING GREEN on the charger indicator. This indicates the Top-Off charge
(trickle charge) and requires approximately 1 hour.
3. Completion of Top-Off charge is indicated by a STEADY GREEN on the charger
indicator. This indicates the battery is fully charged.
4. Other indications that may appear on the charger indicator while charging are:
• FLASHING YELLOW – indicates that either the battery temperature or
battery voltage is out of range for charging. Charging resumes when these
conditions have been corrected.
• FLASHING RED AND GREEN – indicates that the battery may be
approaching the end of its rated service life. While this battery is fully
charged, its charging capacity has been reduced by usage and may not
adequately support heavier applications. This is available only when used
with Motorola IMPRES batteries. This is not a fault indication, but a
notification to the user that the battery may soon no longer be able to yield
expected service and may need to be replaced.
Note:
The charger pocket is designed for different battery shapes and
sizes. Ensure that a radio with a battery attached or battery alone
is inserted correctly.
If a radio with a battery attached or battery alone is inserted
incorrectly, the indicator will not illuminate, indicating that the
battery is not being charged.
In some cases, new batteries might indicate a STEADY GREEN
on the charger indicator.
6866553D01.book Page 8 Monday, March 21, 2016 9:47 AM

English
9
• FLASHING RED – indicates that the battery is unchargeable. This could be
the result of a loss of contact between the battery and the charger.
Charging resumes when the condition causing this indication is corrected.
Motorola IMPRES batteries have an internal memory device that is read by the
Motorola IMPRES Adaptive Charger. If an IMPRES battery is charged for more
than 2.5 minutes, the IMPRES Adaptive Charger retains the serial number of the
IMPRES battery. The IMPRES battery may be removed from the charger for up to
30 minutes. Once the battery is reinserted into the charger, it will resume the
charging process from the point from when the battery was first removed.
Manually Reconditioning the Battery
Within 2.5 minutes of the initial insertion of an IMPRES battery (STEADY RED
indication), remove and reinsert the battery within 5 seconds to manually force
reconditioning to occur. The charger indicator changes from a STEADY RED to a
STEADY YELLOW. This forces the charger to recondition and automatically
recharge the battery.
Automatically Reconditioning the Battery
The Motorola IMPRES Adaptive Charger, when used in conjunction with a Motorola
IMPRES battery, has the ability to determine when it is appropriate to recondition
the battery.
When an IMPRES battery is properly inserted into the charger, the charger
determines if it is appropriate to recondition the battery. If the battery needs
reconditioning, the charger automatically indicates a STEADY YELLOW. This
process may take up to 8 hours or more to complete, depending on the state of
charge and capacity rating of the battery when it is inserted.
At the completion of the recondition cycle, the charger automatically recharges the
battery.
Note:
Excessive reconditioning of the battery may reduce the overall life of
the battery.
Note:
For this process to be effective, the battery must be allowed to
complete the recondition/recharge process. Leave the battery in the
charger until the charger indicates a STEADY GREEN.
6866553D01.book Page 9 Monday, March 21, 2016 9:47 AM

10
English
Manually Terminating the Reconditioning Process
At any time during the reconditioning process of a Motorola IMPRES battery
(STEADY YELLOW indication), reconditioning may be terminated by removing and
reinserting the battery within 5 seconds. This causes the charger to terminate the
reconditioning process and begin the charging process. The charger indicator
changes to a STEADY RED.
Removing a Radio or Battery from the Charger
To remove a radio or a battery from the charger pocket, place one hand on the
charger for support and remove the radio or battery with the other hand.
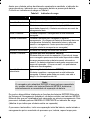
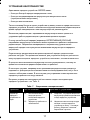
TROUBLESHOOTING
The IMPRES Adaptive Charger incorporates the features of:
• a constant current rapid charger,
• an interrupted current (negative pulse) conditioning charger,
• a reconditioning unit.
The combination of the features listed above are unique in a desktop charger.
Therefore, operation of the radio with a battery attached while in the charger is not
recommended.
While in the charger, radio operation may result in minimally reduced radio
performance and extended battery charge time.
Towards the end of the rapid charge cycle (STEADY RED indication), the battery
voltage exceeds the normal operating voltage of the radio. The voltage returns to a
normal level following the rapid charge mode or when the battery is removed from
the charger.
If the radio is turned on while the charger is in rapid charge mode, the radio
becomes temporarily inoperable. This condition can be cleared by removing the
radio from the charger and turning the radio off and on again.
During the reconditioning process, the battery becomes fully discharged. As a
result, the radio may not function during reconditioning mode.
In some cases, such as use near fluorescent lighting or electric motors, a slight
hum may be noticed in the receiving radio. If this occurs, moving the charger or
repositioning the power cord should eliminate the hum.
6866553D01.book Page 10 Monday, March 21, 2016 9:47 AM

English
11
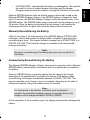
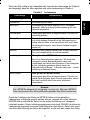
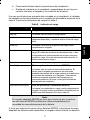
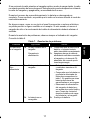
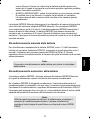
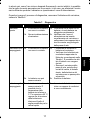
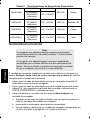
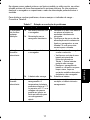
When troubleshooting, always observe the charge indicator – Refer to Table 6.
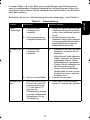
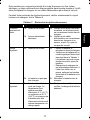
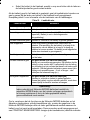
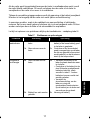
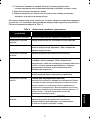
Table 7. Troubleshooting
Problem What it means... What to do...
No charger
indication
1a. Charger contact is not
being made.
1b. No power to the charger.
1a. Check that the radio with battery,
or the battery alone, is inserted
correctly.
1b. Make sure that the power cord is
securely plugged into the
charger and an appropriate AC
outlet, and that there is power to
the outlet.
Flashing Red
Indication
2a. Charger contact is not
being made.
2b. Battery cannot be
charged.
2a. • Remove the battery from the
charger and replace it back
into the charger.
• Verify that the battery is a
Motorola authorized battery
listed in Table 1. Other
batteries may not charge.
• Remove power from the
battery charger and, using a
clean dry cloth, clean the gold
metal charging contacts of
both the battery and the
charger.
2b. Replace battery.
Flashing Yellow
Indication
3. Battery is waiting to be
charged. The battery
temperature may be
below 5 °C (41 °F) or
above 40 °C (104 °F) or
the battery voltage may
be lower than the
predetermined threshold
level for rapid charging.
3. When this condition is corrected,
the battery will begin charging.
6866553D01.book Page 11 Monday, March 21, 2016 9:47 AM

12
English
SERVICE
Adaptive Single-unit Chargers are not repairable. Order replacement chargers as
necessary from your local Motorola Sale Representative.
© 2004, 2015, 2016 Motorola Solutions, Inc. All rights reserved.
MOTOROLA, MOTO, MOTOROLA SOLUTIONS and the Stylized M logo are
trademarks or registered trademarks of Motorola Trademark Holdings, LLC and are
used under license. All other trademarks are the property of their respective
owners.
6866553D01.book Page 12 Monday, March 21, 2016 9:47 AM

1
Deutsch
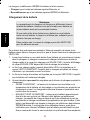
WICHTIGE SICHERHEITSHINWEISE
Dieses Dokument enthält wichtige Sicherheits- und Bedienungshinweise. Bitte
lesen Sie diese Hinweise sorgfältig durch und heben Sie das Handbuch auf, damit
Sie sie später jederzeit nachschlagen können.
WARNHINWEISE FÜR DEN BETRIEB
1. Um die Verletzungsgefahr zu verringern, dürfen nur die in Tabelle
1 auf Seite 3 aufgeführten, von der Firma Motorola zugelassenen
Akkus aufgeladen werden. Andere Akkus können beim Aufladen
explodieren und Verletzungen bzw. Sachschäden verursachen.
2. Bei Verwendung von Zubehörteilen, die nicht von der Firma Motorola
freigegeben sind, besteht Feuer-, Stromschlag- und Verletzungsgefahr.
3. Ziehen Sie den Stecker niemals am Kabel aus der Steckdose, wenn Sie die
Stromversorgung des Ladegeräts unterbrechen möchten, um Beschädigungen
des Netzkabels und des Steckers zu vermeiden.
4. Verwenden Sie nach Möglichkeit kein Verlängerungskabel. Bei Verwendung
eines ungeeigneten Verlängerungskabels besteht Brand- und
Stromschlaggefahr. Wenn der Einsatz eines Verlängerungskabels unbedingt
erforderlich ist, sollten Sie auf die richtigen Kabeldimensionen achten.
5. Bei Verwendung schadhafter Ladegeräte besteht Feuer-, Stromschlag- und
Verletzungsgefahr. Lassen Sie daher bitte beschädigte Ladegeräte vom
Motorola-Kundendienst reparieren.
6. Das Ladegerät kann nicht repariert werden, es enthält keine auswechselbaren
Teile und darf nicht auseinandergebaut werden, da hierbei Stromschlag- und
Feuergefahr besteht.
7. Bevor Sie das Ladegerät warten oder reinigen, sollten Sie den Netzstecker
abziehen, um einem Stromschlag vorzubeugen.
8. Defekte Sicherungen dürfen nur durch Sicherungen ersetzt werden, die den
Angaben auf dem Etikett am Ladegerät entsprechen.
9. Dies ist ein als Klasse A eingestuftes Produkt. In häuslicher Umgebung kann
dieses Produkt Funkstörungen verursachen. In diesem Fall obliegt es dem
Benutzer, entsprechende Maßnahmen zu ergreifen.
SICHERHEITSRICHTLINIEN FÜR DEN BETRIEB
• Schalten Sie das Handsprechfunkgerät zum Laden des Akkus ab.
• Das Ladegerät ist nicht für den Einsatz im Freien ausgelegt und darf nur in
trockenen Räumen betrieben werden.
• Schließen Sie das Ladegerät nur an eine ordnungsgemäß gesicherte und
verkabelte Steckdose an, die die richtige Spannung aufweist (siehe Etikett am
Ladegerät).
• Ziehen Sie den Netzstecker ab, wenn das Ladegerät von der Netzspannung
isoliert werden soll.
Vorsicht
6866553D01.book Page 1 Monday, March 21, 2016 9:47 AM

2
Deutsch
• Die Steckdose für das Ladegerät muss in der Nähe befindlich und leicht
erreichbar sein.
• In Geräten mit Überspannungsschutz dürfen nur solche Sicherungen verwendet
werden, die dem in der Bedienungsanleitung angegebenen Typ entsprechen.
• Das Ladegerät darf bei Umgebungstemperaturen über 40°C nicht eingesetzt werden.
• Achten Sie darauf, dass Sie das Kabel so verlegen, dass niemand darauf treten
oder darüber stolpern kann. Außerdem darf es nicht mit Wasser in Berührung
kommen, Zugkräften ausgesetzt werden oder beschädigt werden.
LEISTUNGSMERKMALE DES IMPRES-LADEGERÄTS
Das IMPRES-Akkuladesystem von Motorola ist ein modernes Energiesystem für
drei verschiedene Akkutypen. Zum System gehören: (a) IMPRES-Akkus und
(b) das IMPRES-Ladegerät.
Die Verwendung des IMPRES-Ladegeräts zusammen mit IMPRES-Akkus bietet
die folgenden Vorzüge:
1. Die Betriebszeit zwischen Ladezyklen wird maximiert, da der Memory-Effekt
automatisch eliminiert wird.
2. Die Akku-Lebensdauer wird maximiert, da wesentlich weniger Wärme während der
Erhaltungsladezyklen und der an das Laden anschließenden Zyklen entsteht.
3. Der Kauf von zusätzlichen Rekonditionierungsgeräten wird überflüssig, ebenso
die Schulung von Personal in „Akkuwartungsaufgaben“.
Mit diesem einzigartigen, patentierten Akkuladesystem gehören das Kontrollieren
und Protokollieren der Akkunutzung, die Durchführung manueller
Rekonditionierungszyklen und die Notwendigkeit, Akkus nach dem Aufladen aus
dem Ladegerät nehmen zu müssen, der Vergangenheit an.
Das IMPRES-Ladegerät überwacht die Nutzungsmuster der IMPRES-Akkus,
speichert diese Informationen im IMPRES-Akku und führt nur dann einen
Rekonditionierungszyklus durch, wenn es erforderlich ist.
Im IMPRES-Ladegerät wird der Akku nie zu heiß, ganz gleich, wie lange er in der
Ladeschale steckt. Das Ladegerät überwacht den Akku und lädt ihn bei Bedarf
automatisch nach.
Mit dem IMPRES-Ladegerät wird der Lade- und Akkuwartungsprozess vereinfacht:
Gehen Sie einfach wie folgt vor:
1. Setzen Sie das Handsprechfunkgerät/den Akku in das Ladegerät ein.
2. Nehmen Sie das Handsprechfunkgerät/den Akku aus dem Ladegerät,
wenn es/er vollständig geladen ist.
Motorola ist der einzige Hersteller, der ein Konditionierungs- oder
Rekonditionierungsladegerät anbietet, bei dem Benutzer die Wahl haben, das
Funkgerät mit eingesetztem Akku oder den Akku separat aufzuladen.
6866553D01.book Page 2 Monday, March 21, 2016 9:47 AM

3
Deutsch
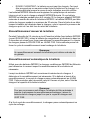
BETRIEBSCHARAKTERISTIK UND FUNKTIONELLE
UNTERSCHIEDE:
1. IMPRES-Akkus können in herkömmlichen Ladegeräten geladen werden. Die
Chip-Funktion dieser Akkus wird aber nur dann aktiviert, wenn der IMPRES-
Akku in einem IMPRES-Ladegerät geladen wird. Wenn ein IMPRES-Akku das
erste Mal in einem IMPRES-Ladegerät aufgeladen wird, leuchtet die
Ladeanzeige des Ladegeräts zunächst GELB. Die Erstladung darf nicht
unterbrochen werden, d.h. der Akku darf erst dann aus dem Ladegerät
genommen werden, wenn die Ladeanzeige GRÜN leuchtet. Der IMPRES-Akku
wird dadurch ordnungsgemäß kalibriert und die Chip-Funktion aktiviert. Wird
der Erstladungsprozess unterbrochen, kalibriert das Ladegerät den Akku, wenn
er das nächste Mal in die Ladeschale gesteckt wird.
2. Das IMPRES-Ladegerät bestimmt die zum Rekonditionieren des IMPRES-
Akkus erforderlichen Bedingungen jeweils automatisch und schaltet daher
eventuell auf Rekonditionierungsbetrieb, wenn ein Handsprechfunkgerät oder
ein Akku in die Ladeschale gesteckt wird. Die Ladeanzeige leuchtet in diesem
Fall GELB. Der Rekonditionierungsbetrieb kann erforderlichenfalls durch
Herausnehmen und erneutes Einsetzen des Handsprechfunkgeräts bzw. Akkus
umgangen werden (siehe Gebrauchsanleitung in diesem Handbuch).
3. Das IMPRES-Ladegerät eignet sich zum Laden aller in Tabelle 1 aufgelisteten
Akkus. Die Chip-Funktion steht allerdings nur bei Motorola-IMPRES-Akkus zur
Verfügung.
4. Zum Kalibrieren von IMPRES-Chip-Akkus muss das IMPRES-Ladegerät
verwendet werden. Dadurch wird sichergestellt, dass die Nutzungsdaten der
IMPRES-Akkus korrekt aufgezeichnet, gespeichert und angezeigt werden.
Tabelle 1.
Akkus für die Serie der GP Professionellen Funkgeräte
Kit (Teilenummer) Akkutyp FM IMPRES Kapazität
HNN9008 NiMH Nein Nein Hochleistung
HNN9009 NiMH Nein Nein Ultrahochleistung
HNN9010 NiMH Ja Nein Ultrahochleistung
HNN9011 NiCD Ja Nein Hochleistung
HNN9012 NiCD Nein Nein Hochleistung
HNN9013 Lithium-Ionen Nein Nein Hochleistung
HNN4001 IMPRES NiMH Nein Ja Ultrahochleistung
HNN4002 IMPRES NiMH Ja Ja Ultrahochleistung
HNN4003 IMPRES
Lithium-Ionen
Nein Ja Ultrahochleistung
HNN9003 NiMH Nein Nein Hochleistung
WPNN4045 NiMH Nein Nein Hochleistung
6866553D01.book Page 3 Monday, March 21, 2016 9:47 AM

4
Deutsch
PMNN4045 NiMH Nein Nein Hochleistung
PMNN4151 NiMH Nein Nein Hochleistung
PMNN4154 NiMH Nein Nein Ultrahochleistung
PMNN4156 NiMH Nein Ja Ultrahochleistung
PMNN4157 NiMH Ja Ja Ultrahochleistung
PMNN4158 Lithium-Ionen Nein Nein Hochleistung
PMNN4159 Lithium-Ionen Nein Ja Ultrahochleistung
PMNN4455 Lithium-Ionen Nein Nein Hochleistung
PMNN4457 Lithium-Ionen Nein Nein Hochleistung
Tabelle 2. ATEX
Kit (Teilenummer) Akkutyp ATEX IMPRES Kapazität
NNTN5510 Lithium-Ionen Ja Nein Ultrahochleistung
NNTN7383 Lithium-Ionen Ja Nein Hochleistung
Tabelle 3. Akkus für Funkgeräte der GP Compact Professional-Serie
Kit (Teilenummer) Akkutyp FM IMPRES Kapazität
JMNN4023 Lithium-Ionen Nein Nein Hochleistung
JMNN4024 Lithium-Ionen Nein Nein Hochleistung
JMNN4025 NiMH Ja Nein Hochleistung
PMNN4073 Lithium-Ionen Ja Nein Hochleistung
PMNN4074 Lithium-Ionen Nein Nein Hochleistung
PMNN4094 Lithium-Ionen Nein Ja Ultrahochleistung
PMNN4201 Lithium-Ionen Nein Nein Hochleistung
PMNN4202 Lithium-Ionen Nein Nein Ultrahochleistung
Tabelle 4. Akkus für Funkgeräte DP3441/ DGP
TM
8050 / XiR
TM
E8600 / XiR
TM
E8608 / XPR
TM
7150
Kit
(Teilenummer)
Akkutyp HazLoc IMPRES Kapazität
PMNN4440 Lithium-Ionen Nein Nein Hochleistung
PMNN4502 Lithium-Ionen Nein Ja Ultrahochleistung
PMNN4511 Lithium-Ionen TIA 4950 Ja Ultrahochleistung
Tabelle 1. Akkus für die Serie der GP Professionellen Funkgeräte (Fortsetzung)
Kit (Teilenummer) Akkutyp FM IMPRES Kapazität
6866553D01.book Page 4 Monday, March 21, 2016 9:47 AM

5
Deutsch
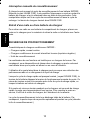
NETZTEILE UND VON MOTOROLA ZUGELASSENE
NETZADAPTER
Dieses Ladegerät ist mit den direkt anschließbaren, von Motorola zugelassenen, in
Tabelle 5 angeführten Netzteilen zu verwenden:
Tabelle 5.
Kompatible Netzteile
Ladehalterung Strom-versorgung Eingangs-
nennspannung
± 10%
Sendefrequ
enz
Plug-Typ
WPLN4206/
AZWPLN4182_
25009297001/
2571586S13
(Alternative)
108–132VAC 60Hz US
AZWPLN4183
PS000037A02
230 VAC 50 Hz GB
EPNN5753 /
2571586S06
(Alternative)
AZWPLN4184
PS000037A01
220–240VAC 50Hz
Euro-
Stecker
EPNN5752 /
2571586S07
(Alternative)
PMLN5194A
PS000037A02 220 – 240 VAC
50/60 Hz GB
EPNN9287A /
2571886T01
(Alternative)
100 – 240 VAC
PMLN5188A
PS000037A01 220 – 240 VAC
50/60 Hz
Euro-
Stecker
EPNN9286A /
2571886T01
(Alternative)
100 – 240 VAC
PMLN5198B 25009297001 108 – 132 VAC 60 Hz US
PMLN5194B
PS000037A02 220 – 240 VAC
50/60 Hz GB
EPNN9287B /
25012006001
(Alternative)
100 – 240 VAC
PMLN5188B
PS000037A01 220 – 240 VAC
50/60 Hz
Euro-
Stecker
EPNN9286B /
25012006001
(Alternative)
100 – 240 VAC
6866553D01.book Page 5 Monday, March 21, 2016 9:47 AM

6
Deutsch
BEDIENUNGSANLEITUNG
Die Ladeschale des Ladegeräts nimmt entweder ein Handsprechfunkgerät samt
eingesetztem Akku oder einen separaten Akku auf. Schalten Sie das
Handsprechfunkgerät aus, bevor Sie ein Handsprechfunkgerät zusammen
mit Akku laden. Akkus werden am besten bei Raumtemperatur geladen.
1. Stecken Sie den Ladegerätestecker des Netzkabels in die
Stromversorgungsbuchse an der Rückseite des Ladegeräts.
2. Stecken Sie den Netzstecker des Netzkabels in die Netzsteckdose. Ein
erfolgreicher Einschaltvorgang wird durch EINMALIGES GRÜNES
AUFBLINKEN der Ladeanzeige angezeigt.
3. Setzen Sie den Akku bzw. das Handsprechfunkgerät samt Akku
(Handsprechfunkgerät ist ausgeschaltet) wie folgt in die Ladeschale ein:
a. Richten Sie die Aussparung an jeder Seite des Akkus auf die
entsprechende Führung an jeder Seite der Ladeschale aus.
b. Drücken Sie den Akku zur Rückseite der Ladeschale.
c. Schieben Sie den Akku in die Ladeschale. Achten Sie dabei darauf, dass
die Ladekontakte die Kontakte des Akkus berühren.
PMLN5199
EPNN9294/
2571886T01
(Alternative)
100 – 240 VAC 50/60 Hz
Australien /
Neuseeland
PMLN5208
EPNN9291/
2571886T01
(Alternative)
100 – 240 VAC 50/60 Hz Korea
PMLN5196_A
EPNN9286A/
2571886T01
(Alternative)
100 – 240 VAC 50/60 Hz Indien
Hinweis:
Das IMPRES-Ladegerät lädt nur die von Motorola freigegebenen
Akkus in Tabelle 1. Andere Akkus werden eventuell nicht
geladen.
Das IMPRES-Ladegerät unterscheidet sich durch bestimmte
Leistungsmerkmale und automatische Funktionen von anderen
Akkuladegeräten. Beobachten Sie die Ladeanzeige genau, um
sicherzustellen, dass sich das Ladegerät in der gewünschten/
erwarteten Betriebsart befindet.
Tabelle 5.
Kompatible Netzteile
6866553D01.book Page 6 Monday, March 21, 2016 9:47 AM
La pagina si sta caricando...
La pagina si sta caricando...
La pagina si sta caricando...
La pagina si sta caricando...
La pagina si sta caricando...
La pagina si sta caricando...
La pagina si sta caricando...
La pagina si sta caricando...
La pagina si sta caricando...
La pagina si sta caricando...
La pagina si sta caricando...
La pagina si sta caricando...
La pagina si sta caricando...
La pagina si sta caricando...
La pagina si sta caricando...
La pagina si sta caricando...
La pagina si sta caricando...
La pagina si sta caricando...
La pagina si sta caricando...
La pagina si sta caricando...
La pagina si sta caricando...
La pagina si sta caricando...
La pagina si sta caricando...
La pagina si sta caricando...
La pagina si sta caricando...
La pagina si sta caricando...
La pagina si sta caricando...
La pagina si sta caricando...
La pagina si sta caricando...
La pagina si sta caricando...
La pagina si sta caricando...
La pagina si sta caricando...
La pagina si sta caricando...
La pagina si sta caricando...
La pagina si sta caricando...
La pagina si sta caricando...
La pagina si sta caricando...
La pagina si sta caricando...
La pagina si sta caricando...
La pagina si sta caricando...
La pagina si sta caricando...
La pagina si sta caricando...
La pagina si sta caricando...
La pagina si sta caricando...
La pagina si sta caricando...
La pagina si sta caricando...
La pagina si sta caricando...
La pagina si sta caricando...
La pagina si sta caricando...
La pagina si sta caricando...
La pagina si sta caricando...
La pagina si sta caricando...
La pagina si sta caricando...
La pagina si sta caricando...
La pagina si sta caricando...
La pagina si sta caricando...
La pagina si sta caricando...
La pagina si sta caricando...
La pagina si sta caricando...
La pagina si sta caricando...
La pagina si sta caricando...
La pagina si sta caricando...
La pagina si sta caricando...
La pagina si sta caricando...
La pagina si sta caricando...
La pagina si sta caricando...
La pagina si sta caricando...
La pagina si sta caricando...
La pagina si sta caricando...
La pagina si sta caricando...
La pagina si sta caricando...
La pagina si sta caricando...
La pagina si sta caricando...
La pagina si sta caricando...
La pagina si sta caricando...
La pagina si sta caricando...
La pagina si sta caricando...
La pagina si sta caricando...
La pagina si sta caricando...
La pagina si sta caricando...
-
 1
1
-
 2
2
-
 3
3
-
 4
4
-
 5
5
-
 6
6
-
 7
7
-
 8
8
-
 9
9
-
 10
10
-
 11
11
-
 12
12
-
 13
13
-
 14
14
-
 15
15
-
 16
16
-
 17
17
-
 18
18
-
 19
19
-
 20
20
-
 21
21
-
 22
22
-
 23
23
-
 24
24
-
 25
25
-
 26
26
-
 27
27
-
 28
28
-
 29
29
-
 30
30
-
 31
31
-
 32
32
-
 33
33
-
 34
34
-
 35
35
-
 36
36
-
 37
37
-
 38
38
-
 39
39
-
 40
40
-
 41
41
-
 42
42
-
 43
43
-
 44
44
-
 45
45
-
 46
46
-
 47
47
-
 48
48
-
 49
49
-
 50
50
-
 51
51
-
 52
52
-
 53
53
-
 54
54
-
 55
55
-
 56
56
-
 57
57
-
 58
58
-
 59
59
-
 60
60
-
 61
61
-
 62
62
-
 63
63
-
 64
64
-
 65
65
-
 66
66
-
 67
67
-
 68
68
-
 69
69
-
 70
70
-
 71
71
-
 72
72
-
 73
73
-
 74
74
-
 75
75
-
 76
76
-
 77
77
-
 78
78
-
 79
79
-
 80
80
-
 81
81
-
 82
82
-
 83
83
-
 84
84
-
 85
85
-
 86
86
-
 87
87
-
 88
88
-
 89
89
-
 90
90
-
 91
91
-
 92
92
-
 93
93
-
 94
94
-
 95
95
-
 96
96
-
 97
97
-
 98
98
-
 99
99
-
 100
100


Motorola IMPRES Smart Energy System Manuale utente
- Tipo
- Manuale utente
in altre lingue
- English: Motorola IMPRES Smart Energy System User manual
- français: Motorola IMPRES Smart Energy System Manuel utilisateur
- español: Motorola IMPRES Smart Energy System Manual de usuario
- Deutsch: Motorola IMPRES Smart Energy System Benutzerhandbuch
- русский: Motorola IMPRES Smart Energy System Руководство пользователя
- Nederlands: Motorola IMPRES Smart Energy System Handleiding
- português: Motorola IMPRES Smart Energy System Manual do usuário
Documenti correlati
-
Motorola IMPRES Smart Energy System Manuale utente
-
-
-
-
Motorola NNTN8845 Guida utente
-
Motorola IMPRES NNTN7595 Manuale utente
-
-
-
Motorola PS000029A07 Manuale utente
-