Siemens ET375FAB1E/01 Manuale utente
- Categoria
- Friggitrici
- Tipo
- Manuale utente


en
3
Table of contents
enI nst r uct i on manual
8 Intended use . . . . . . . . . . . . . . . . . . . . . . . . . . . . . 4
( Important safety information . . . . . . . . . . . . . . . 4
] Causes of damage . . . . . . . . . . . . . . . . . . . . . . . . 5
7 Environmental protection . . . . . . . . . . . . . . . . . . 5
Tips on energy saving . . . . . . . . . . . . . . . . . . . . . . . . . 5
Environmentally-friendly disposal . . . . . . . . . . . . . . . . . 5
* Getting to know your appliance . . . . . . . . . . . . . 6
Your new deep fryer. . . . . . . . . . . . . . . . . . . . . . . . . . . 6
Control panel . . . . . . . . . . . . . . . . . . . . . . . . . . . . . . . . 6
Controls . . . . . . . . . . . . . . . . . . . . . . . . . . . . . . . . . . . . 7
Heating element . . . . . . . . . . . . . . . . . . . . . . . . . . . . . . 7
Accessories . . . . . . . . . . . . . . . . . . . . . . . . . . . . . . . . . 7
K Before using for the first time. . . . . . . . . . . . . . . 7
Cleaning the appliance . . . . . . . . . . . . . . . . . . . . . . . . 7
1 Operating the appliance . . . . . . . . . . . . . . . . . . . 8
Deep-fat frying . . . . . . . . . . . . . . . . . . . . . . . . . . . . . . . 8
Deep fryer settings. . . . . . . . . . . . . . . . . . . . . . . . . . . . 8
Heating indicator . . . . . . . . . . . . . . . . . . . . . . . . . . . . . 8
Safety cut-out . . . . . . . . . . . . . . . . . . . . . . . . . . . . . . . . 8
Draining the frying oil/fat . . . . . . . . . . . . . . . . . . . . . . . 8
Table of cooking settings . . . . . . . . . . . . . . . . . . . . . . . 9
Tips and tricks . . . . . . . . . . . . . . . . . . . . . . . . . . . . . . . 9
A Childproof lock. . . . . . . . . . . . . . . . . . . . . . . . . . 10
Switching on. . . . . . . . . . . . . . . . . . . . . . . . . . . . . . . . 10
Switching off. . . . . . . . . . . . . . . . . . . . . . . . . . . . . . . . 10
Automatic childproof lock . . . . . . . . . . . . . . . . . . . . . 10
O Time-setting options . . . . . . . . . . . . . . . . . . . . . 11
Kitchen timer . . . . . . . . . . . . . . . . . . . . . . . . . . . . . . . 11
Stopwatch . . . . . . . . . . . . . . . . . . . . . . . . . . . . . . . . . 11
b Automatic safety cut-out . . . . . . . . . . . . . . . . . . 11
k Wipe protection . . . . . . . . . . . . . . . . . . . . . . . . . 11
Switching on. . . . . . . . . . . . . . . . . . . . . . . . . . . . . . . . 11
Switching off. . . . . . . . . . . . . . . . . . . . . . . . . . . . . . . . 11
[ Energy consumption indicator . . . . . . . . . . . . . 11
Q Basic settings. . . . . . . . . . . . . . . . . . . . . . . . . . . 12
Changing the basic settings. . . . . . . . . . . . . . . . . . . . 12
D Cleaning . . . . . . . . . . . . . . . . . . . . . . . . . . . . . . . 13
Do not use these cleaning agents . . . . . . . . . . . . . . . 13
Cleaning the appliance . . . . . . . . . . . . . . . . . . . . . . . 13
3 Trouble shooting . . . . . . . . . . . . . . . . . . . . . . . . 14
E-report in the displays. . . . . . . . . . . . . . . . . . . . . . . .14
4 Customer service . . . . . . . . . . . . . . . . . . . . . . . . 15
E number and FD number . . . . . . . . . . . . . . . . . . . . .15
Produktinfo
Additional information on products, accessories,
replacement parts and services can be found at
www.siemens-home.bsh-group.com and in the online
shop www.siemens-home.bsh-group.com/eshops

en Intended use
4
8Intended use
Intended use
Read these instructions carefully. Only then
will you be able to operate your appliance
safely and correctly. Retain the instruction
manual and installation instructions for future
use or for subsequent owners.
Check the appliance for damage after
unpacking it. Do not connect the appliance if it
has been damaged in transport.
Only a licensed professional may connect
appliances without plugs. Damage caused by
incorrect connection is not covered under
warranty.
This appliance is intended for private domestic
use and the household environment only. The
appliance must only be used for the
preparation of food and beverages. The
cooking process must be supervised. A short
cooking process must be supervised without
interruption. Only use the appliance in
enclosed spaces.
This appliance is intended for use up to a
maximum height of 2000 metres above sea
level.
Do not use any unsuitable safety devices or
child protection grilles. These can cause
accidents.
This appliance is not intended for operation
with an external clock timer or a remote
control.
The manufacturer accepts no responsibility for
damage which arises as a result of
disregarding the instruction manual.
This appliance may be used by children over
the age of 8 years old and by persons with
reduced physical, sensory or mental
capabilities or by persons with a lack of
experience or knowledge if they are
supervised or are instructed by a person
responsible for their safety how to use the
appliance safely and have understood the
associated hazards.
Children must not play with, on, or around the
appliance. Children must not clean the
appliance or carry out general maintenance
unless they are at least 15 years old and are
being supervised.
Keep children below the age of 8 years old at
a safe distance from the appliance and power
cable.
(Important safety
information
Impor t ant saf et y informat i on
This appliance must be installed according to
the installation instructions included.
:Warning – Risk of fire!
■ Hot oil and fat can ignite very quickly. Never
leave hot fat or oil unattended. Never use
water to put out burning oil or fat. Switch off
the hotplate. Extinguish flames carefully
using a lid, fire blanket or something similar.
Risk of fire!
■ Deep-fat frying oil or fat can catch fire. Only
use the deep-fat fryer with suitable deep-fat
frying oil or fat. Do not exceed or fall short
of the fill level. Liquefy deep frying fat before
use. Observe the product-related deep-fat
frying temperature.
Risk of fire!
■ Old deep-fat frying oil or fat tends to foam
and has a lower ignition temperature.
Replace deep-fat frying oil or fat when it
becomes brown, smells unpleasant and/or
smokes prematurely.
Risk of fire!
■ Water in hot oil generates a fat explosion.
Never try to put out burning deep-fat frying
oil or fat by pouring water on it.
In the event of fire:
– Unplug the appliance: Switch off the fuse
in the fuse box.
– Cover with a stainless steel cover or fire
blanket: The lack of oxygen will
extinguish the fire.
– Switch off the extractor fan: The air
draught strengthens the fire.
Risk of fire!
■ The appliance becomes very hot and
flammable materials could catch fire. Never
store or use flammable objects (e.g. spray
cans, cleaning agents) under the appliance
or in its immediate vicinity. Never place
flammable items on or in the appliance.
:Warning – Risk of burns!
■ The accessible parts become very hot when
in operation. Never touch hot parts. Keep
children at a safe distance.
Risk of burns!
■ Water in hot oil generates a fat explosion.
Take particular care when working with
water near the hot appliance. Also take care
when working with water near the cold
appliance. Do not allow any water to enter
the deep-fat frying oil or fat. Risk of a fat
explosion when next heating the appliance
up! Always close the cooled appliance with
the cover.
Risk of burns!

Causes of damage en
5
■ Water in hot oil generates a fat explosion.
Replace deep-fat frying oil or fat when it
contains a lot of water (e.g. due to frequent
deep-fat frying of frozen food).
Signs of water in the deep-fat frying oil or
fat:
– Rising bubbles
– Water droplets
– Steam
– Spitting during deep-fat frying
Risk of burns!
■ Filling with wet foodstuffs and large
quantities causes the deep-fat frying oil or
fat to foam over. Dry wet foodstuffs
thoroughly before deep-fat frying. Remove
ice from frozen food. Fill the basket next to
the deep-fat fryer, not in it or above it. Lower
the deep-fat frying basket into the oil or fat
slowly, several times.
Risk of burns!
■ Water in hot oil generates a fat explosion.
Dry the deep-fat frying basin carefully after
cleaning before filling it with deep-fat frying
oil or fat again.
Risk of burns!
■ When the appliance cover is closed, heat
will accumulate. Only close the appliance
cover when the appliance has cooled down.
Never switch the appliance on with the
appliance cover closed. Do not rest food on
the appliance cover or use it to keep food
warm.
:Warning – Risk of electric shock and
serious injury!
■ The cable insulation on electrical
appliances may melt when touching hot
parts of the appliance. Never bring
electrical appliance cables into contact with
hot parts of the appliance.
Risk of electric shock!
■ Do not use any high-pressure cleaners or
steam cleaners, which can result in an
electric shock.
Risk of electric shock!
■ A defective appliance may cause electric
shock. Never switch on a defective
appliance. Unplug the appliance from the
mains or switch off the circuit breaker in the
fuse box. Contact the after-sales service.
Risk of electric shock!
■ Incorrect repairs are dangerous. Repairs
may only be carried out by one of our
trained after-sales engineers. If the
appliance is faulty, unplug the mains plug or
switch off the fuse in the fuse box. Contact
the after-sales service.
]Causes of damage
Ca u s e s of damage
Caution!
■ If hard or sharp objects fall on the glass ceramic
panel or the glass ceramic cover, damage could
occur.
■ Damage from unsuitable accessories: only use
designated original accessories. Only use the
designated original deep frying baskets. Do not put
the glass cover of the steamer on the deep fryer.
7Environmental protection
En v i r o n ment al pr ot ect i on
In this section, you can find information about saving
energy and disposing of the appliance.
Tips on energy saving
■ Only heat the appliance until it has reached the
desired temperature.
■ Always set the recommended temperature.
■ Use oil or fat which is suitable for deep-fat frying.
Environmentally-friendly disposal
Dispose of packaging in an environmentally-friendly
manner.
This appliance is labelled in accordance with
European Directive 2012/19/EU concerning
used electrical and electronic appliances
(waste electrical and electronic equipment -
WEEE). The guideline determines the
framework for the return and recycling of used
appliances as applicable throughout the EU.

en Getting to know your appliance
6
*Getting to know your
appliance
Get t i ng to know your appl i ance
In this section, we will explain the indicators and
controls. You will also find out about the various
functions of your appliance.
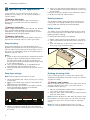
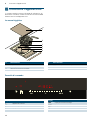
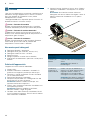
Your new deep fryer
Control panel
No. Name
1 Glass ceramic cover
2 Deep frying basket
3 Heating element retainer
4 Frying basket suspension
5 Heating element
6 Control panel
No. Name
f
S
³
«
Ñ
Indicators
û
Appliance is on
Ñ
Wipe protection
p
Heating indicator
‚
Childproof lock
÷
Energy consumption indicator
‹‹‹
Temperature/cooking time
Indicators

Before using for the first time en
7
Controls
Touching a symbol activates the associated function.
Notes
■ The settings will remain unchanged if you touch
multiple symbols at once. This allows you to wipe up
spills on the control panel.
■ Always keep the controls dry. Moisture reduces their
effectiveness.
Heating element
For easier cleaning of the deep-fat fryer basin, you can
swivel the element upwards.
:Warning – Risk of burns!
The element heats up even when swivelled up. Do not
switch the deep-fat fryer on while the element is
swivelled up.
Accessories
Only use the deep-fat frying baskets intended for this
deep-fat fryer.
Do not insert any plastic utensils into the fat.
KBefore using for the first
time
Be f o r e usi ng for the first time
In this section, you can find out what you must do
before using your appliance to prepare food for the first
time. Read the safety information before you
start.~ "Important safety information" on page 4
Cleaning the appliance
Clean the frying basin and the deep frying basket
thoroughly using a sponge and soapy water before
using them for the first time. Wipe dry with a clean dry
cloth.
V
Kitchen timer
ö
Cooking time
þ
Stopwatch
°C Temperature
Controls
#
Switches on the appliance
„
Activates the wipe protection/childproof lock
0||190° Sets the temperature/cooking time
0
Switches on the kitchen timer/stopwatch
Indicators

en Operating the appliance
8
1Operating the appliance
Oper at i ng the appl i ance
In this section, you can find out how to set your
appliance. In the table, you can find the settings for
various dishes.
:Warning – Risk of fire!
When using the deep-fat fryer with frozen fat, the
element can overheat. Defrost frozen fat before
liquefying.
:Warning – Risk of fire!
When using the deep-fat fryer with solid fat, the element
may overheat. Melt deep-fat frying fat first at a low
temperature. Only set a higher temperature once the
deep-fat frying fat is largely melted.
:Warning – Risk of fire!
If the minimum fill level is not met (bottom mark), the
element can overheat. Add oil or fat in good time.
Deep-fat frying
During deep-fat frying, the heat generated by the
appliance is transferred to the food being fried via the
fat. This rapid cooking process forms a tasty crust on
the food. The temperature range for deep-fat frying is
between 150 and 190 °C.
Notes
■ Break up the fresh frying fat into small pieces before
melting it. When reusing frying fat, make a hole in
the solid mass of fat (e.g. using the handle of a
wooden spoon) before melting it, pushing right down
to the heating element.
■ Only use pure vegetable oil or vegetable fat for
deep-fat frying. Avoid using blends of fat.
■ When frying fat may emit smoke as it melts. This is
normal.
Deep fryer settings
Note: Ensure that the drain valve is closed.
1. Fill the frying basin with 4 litres of frying oil or 3.5 kg
of frying fat.
2. Switch on the deep fryer using the main switch #.
‹‹‹ lights up in the display.
3. Slide your finger across the control panel until the
desired temperature appears in the display.
The heating indicator flashes.
4. When the heating indicator p goes out, place the
deep frying basket containing the food to be fried in
the oil/fat.
5. When you have finished deep-fat frying, remove the
deep frying basket and gently shake it to remove any
excess oil/fat.
Hang the deep frying basket in the suspension device
to allow the remaining oil/fat to drain.
Heating indicator
The heating indicator stays lit while the deep fryer is
heating up. The heating indicator goes out when the
frying oil/fat has reached the set temperature.
Safety cut-out
The safety cut-out automatically switches off the deep
fryer if the frying basin is not filled with oil/fat up to at
least the bottom marking.
” and ‡ flash alternately in the display.
1. Switch off the deep fryer and allow it to cool down.
2. Fill the frying basin with at least 3 litres of frying oil/
fat.
3. Push the safety pin on the front of the housing in
firmly (e.g. using a ball-point pen).
You can now use the deep fryer again.
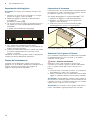
Draining the frying oil/fat
If the food being fried is no longer becoming crispy
despite the temperature being set correctly, you need to
change the oil/fat.
:Warning – Risk of burns!
Hot oil or fat may spray out from the drain valve during
draining. Allow the oil or fat to cool down until it is
lukewarm before draining.
1. Place a heat-resistant container with a capacity of
over 4 litres under the drain valve.
2. Open the drain valve underneath the deep fryer and
drain the used oil/fat.
Note: Drain the fat while it is still warm and liquid. If the
fat solidifies in the drain valve, you can push it through
using a thin object such as the handle of a wooden
spoon.
Note: Do not pour oil/fat down the sink or toilet;
dispose of it at designated collection points instead.
S

Operating the appliance en
9
Table of cooking settings
The values in the table are guide values and may vary
depending on the type and quantity of the food being
fried.
--------
Tips and tricks
Tips for using oil or fat to fry food
■ When frying food, use only pure plant oils or fats that
are suitable for high-temperature frying, such as
groundnut oil, palm oil and coconut oil. Oils that are
not suitable include virgin olive oil, soybean oil and
wheatgerm oil. Avoid using blends of fat.Follow the
manufacturer's instructions.
■ Each time you use the fryer, use a skimming ladle
afterwards to remove any large food remnants from
the frying oil or fat. Alternatively, you can open the oil
drain valve to drain off the food remnants. Wait until
the frying oil or fat has cooled down to 40 °C or
less.
■ If you wish to reuse the frying oil or fat, line a metal
sieve with a piece of paper towel and, once the oil or
fat is lukewarm, pour it through the sieve.
Food being fried Amount Temperature in °C Time in minutes Information
Melting the frying fat 3.5 kg 100
Fresh food
Filled puff pastry items x 5 190 6-8 Pre-cooked meat filling, raw
vegetable filling. Turn.
Battered prawns x 12 170-180 4-6 Pre-cooked and shelled. Turn.
Battered vegetables x 8 170-180 4-8 e.g. cauliflower florets*, cour-
gette slices, mushrooms,
onion rings. Turn.
Fish fillet, breaded 100 - 200 g
each
160-170 5-10
Chicken thighs, breaded 200 - 350 g
each
160 15-20
Croquettes 6-8 170 5-6
Chips 500 g 180 Initially 2-4, then 6-8 Wait at least 15 minutes
between pre-frying and frying
until cooked. Use floury pota-
toes.
Escalope, breaded x 2 170-180 5-8
Desserts
Jam-filled/plain doughnuts x 6 160-170 6-10 Fry without the basket. Turn.
Battered fruit x 8 170-180 5-7 e.g. slices of pineapple, apple
or kiwi. Turn.
Crullers/churros x 4 170-180 6-8 Turn.
Frozen food**
Camembert, breaded 75 - 100 g each 160 6-8
Fish fillet, breaded 150 g each 170 5-7
Fish fingers 500 g 170 3-5
Mini spring rolls/nems 500 g 180 3-5
Chicken nuggets 500 g 160 5-6
Croquettes 500 g 170 3-5
Chips 500 g 180 5-7
Squid rings 500 g 180 3-5
* Pre-cooked, al dente
** Observe the information on the packaging

en Childproof lock
10
■ Replace the frying oil or fat regularly, and at the very
latest when it starts to smell or taste unpleasant,
foams significantly, starts to smoke (at 160-170 °C)
or if the food no longer becomes crispy even at the
correct temperature setting. Early smoking must not
be confused with the steam that rises when moist
food is placed in the fryer.
■ Put the lid back on once the oil or fat has cooled
down. This prevents impurities or water from
contaminating the fat.
Tips regarding the food
■ The following are suitable for deep frying: small
pieces of meat and fish, vegetables, potatoes,
pastries, fruit and breaded food.
■ Moist foods such as fish, shellfish, pieces of meat,
vegetables or fruit slices must be thoroughly dried.
■ Foods with a high water content are not suitable for
deep frying.
Tips regarding the deep frying
■ Do not deep fry very large quantities at once so that
the oil can circulate and release the heat quickly to
the food. Shake the frying basket with the food to
avoid it sticking and to help the oil circulate.
■ The food should be completely covered by the deep
frying oil or fat. Turn large food items after the first
halve of the frying time or push them down with a
second frying basket.
■ Fill the food into the frying basket on the worktop
beside the deep fryer. Do not fill the frying basket
directly over the deep fryer. This will help keep the
deep frying oil or fat free from residues.
■ Do not salt or season the food above the deep fryer
to avoid soiling of the deep frying oil or fat.
■ Moist or frozen food leads to particularly hefty
foaming of the oil or fat when it is inserted. Slowly
lower the filled basket several times. This prevents
overflowing of the fat.
■ Remove ice from deep frozen foodstuffs before deep
frying.
■ Set the recommended temperature.
– Correct temperature: proteins form a protective
crust. Only a small amount of fat is absorbed.
– Temperature too high: the food is browned too
quickly and remains raw on the inside.
– Temperature too low: the food absorbs too much
oil or fat.
■ Dab freshly deep fried food with kitchen paper to
reduce the amount of fat even more.
AChildproof lock
Ch i l d p r o o f lock
Your appliance is equipped with a childproof lock so
that children cannot switch it on accidentally or change
any settings.
Switching on
1. Switch off the appliance.
2. Touch the „ symbol for at least 4 seconds.
The ‚ indicator lights up for 10 seconds. The
appliance is locked.
Switching off
Touch the „ symbol until the ‚ symbol lights up.
The childproof lock is deactivated.
Automatic childproof lock
This function automatically activates the childproof lock
every time you switch the appliance off.
Switching on
Switch on the automatic childproof lock.~ "Basic
settings" on page 12

Time-setting options en
11
OTime-setting options
Ti me- s et t i ng opt i ons
There are 2 different time-setting options:
■ Kitchen timer
■ Stopwatch
Kitchen timer
You can use the kitchen timer to set a time of up to
99 minutes. It runs independently of all the other
settings.
Setting the kitchen timer
1. If the appliance is switched off, touch the 0 symbol
once; if it is switched on, touch the 0 symbol twice.
The V indicator lights up. ‹‹ min lights up on the
display.
Note: When the appliance is switched on, pressing
the 0 symbol once switches on the stopwatch.
2. Set the desired time in the settings range.
The timer starts counting down after a few seconds.
When the time has elapsed
When the time has elapsed, an audible signal sounds
and ‹‹ flashes on the display for 10 seconds. The
V indicator flashes.
Touch any symbol.
The indicators go out and the audible signal ceases.
Setting the correct time
Use the 0 symbol to select the kitchen timer and reset
the time.
Stopwatch
The stopwatch displays the time that has passed since it
was activated.
The stopwatch only works when the appliance is
switched on. When the appliance is switched off, the
stopwatch is switched off as well.
Note: . If the kitchen timer is selected in addition to the
stopwatch, the setting will appear on the timer display for
10 seconds. The temperature will then be displayed
again.
Switching on
1. Touch the 0 symbol.
‹‹ is shown on the display.
2. Touch the control panel.
Timing starts. Seconds are displayed during the first
minute, then minutes. After 10 seconds the timer
display goes out and the temperature is shown.
3. Touch the 0 symbol to show the timer display
again.
Switching off
1. Touch the 0 symbol.
The timer display will be shown.
2. Touch the control panel.
The stopwatch will be switched off. The timer display
will go out.
bAutomatic safety cut-out
Au t o mat i c saf et y cut - out
If an appliance remains switched on for a long time
without any settings being changed, automatic switch-
off is activated.
Heating of the appliance is stopped. ” ‰ and •/œ flash
alternately in the display.
The indicator goes out when you touch any control. You
can implement new settings.
When the time limit is activated depends on the
temperature selected (2 to 4 hours).
kWipe protection
Wipe pr ot ect i on
If you wipe over the control panel while the appliance is
switched on, settings may be altered.
To prevent this from happening, your appliance has a
wipe protection function.
Switching on
Touch the „ symbol when the appliance is switched on.
An audible signal sounds. The Ñ indicator lights up.
The control panel is locked for 30 seconds. You can
now wipe over the control panel without altering any
settings.
Note: The main switch is excluded from the wipe
protection function. You can switch off the appliance at
any time.
Switching off
Touch the „ symbol.
The wipe protection function is switched off.
[Energy consumption
indicator
En e r g y cons umpt i on indicator
You can use this function to display the total energy
consumption between switching the appliance on and
off.
Once switched off, the energy consumption in kilowatt
hours (e.g. 1.87 kWh) is displayed for 10 seconds.
The accuracy of the display depends, amongst other
things, on the voltage quality of the power supply.
The energy consumption display may not be
activated.~ "Basic settings" on page 12
f
S
³
«
Ñ

en Basic settings
12
QBasic settings
Ba s i c set t i ngs
Your appliance has various basic settings. You can
adapt these settings to suit your own needs.
Changing the basic settings
The appliance must be switched off.
1. Switch on the appliance.
2. Within the next 10 seconds, touch the „ symbol for
approximately 4 seconds until an audible signal
sounds.
™ and ‚ flash alternately and ‹ lights up.
3. Touch the „ symbol as many times as necessary
until the required indicator appears.
4. Set the desired value on the control panel.
5. Repeat steps 3 and 4 until all the required settings
have been changed.
6. Touch the „ symbol for approximately 4 seconds
until an audible signal sounds.
The settings have been saved.
Discarding the changes
To exit the basic settings, switch off the appliance with
the main switch. Changes are not saved.
Display Function
™‹
Reset the basic settings
‹
Switched off.*
‚
Switched on.
™‚
Childproof lock
‹
Automatic childproof lock switched off.*
‚
Automatic childproof lock switched on.
ƒ
Manual and automatic childproof lock switched off.
™ƒ
Audible signal
‹
Confirmation signal and operation error signal switched
off (main switch signal always remains on).
‚
Only the operation error signal is switched on.
ƒ
Only the confirmation signal is switched on.
„
Confirmation signal and operation error signal switched
on.*
™„
Energy consumption display (Ask your electricity
supplier what the mains voltage is.)
‹
Consumption display switched off.*
‚
Consumption display with mains voltage at 230 V.
„
Consumption display with mains voltage at 220 V.
…
Consumption display with mains voltage at 240 V.
™†
Automatic switch-off (The higher the level selected,
the longer the period of time until the appliance
switches off.)
‹
Switch off after 2-4 hours.*
‚
Switch off after 1-2 hours.
ƒ
Switch off after 30-60 minutes.
™‡
Duration of the timer end signal
‚
10 seconds.*
ƒ
30 seconds.
„
1 minute.
™‰
Demo mode
‹
Switched off.*
‚
Switched on. Appliance can be operated but does not
heat up.
*Basic setting

Cleaning en
13
DCleaning
Cl eani ng
With good care and cleaning, your appliance will retain
its appearance and remain fully functioning for a long
time to come. We will explain here how you should
correctly care for and clean your appliance.
Suitable maintenance and cleaning products can be
purchased from the after-sales service or in our e-Shop.
:Warning – Risk of burns!
The appliance becomes hot during operation. Allow the
appliance to cool down before cleaning.
:Warning – Risk of electric shock!
Do not use any high-pressure cleaners or steam
cleaners, which can result in an electric shock.
:Warning – Risk of burns!
The accessible parts become very hot when in
operation. Never touch hot parts. Keep children at a
safe distance.
Do not use these cleaning agents
■ Scouring or chemically aggressive cleaners
■ Acidic cleaners (e.g. vinegar, citric acid, etc)
■ Cleaners containing chlorine or with a high content
of alcohol
■ Oven cleaner
■ Hard and scratchy sponges, brushes or scouring
pads
■ Thoroughly wash out new sponge cloths before
using them.
Cleaning the appliance
The appliance must be cold.
1. Drain the oil.
2. Lift the heating element up and ensure that it
engages in the retainer provided.
3. Use kitchen paper to remove any large remnants of
food in the frying basin.
4. Push the heating element down.
5. Fill the frying basin with hot soapy water up to the
bottom marking.
Note: Never fill with water above the top marking.
6. Clean the frying basin and the heating element with
a soft scrubbing brush.
Note: Avoid scraping or scouring as this could leave
permanent scratches.
7. Swing the heating element up until it engages in the
retainer. Clean the section of frying basin beneath
the heating element.
8. Drain the water. Swivel the heating element down
again and rinse with clean water.
Note: Do not leave any cleaning agent residues in
the frying basin. Dry the frying basin and the heating
element with a soft cloth.
Appliance part/
surface
Recommended cleaning
Deep frying
basket
Clean by hand using a mild
detergent.
Note: N.B.: Do not clean it in the
dishwasher.
Control panel
and glass
ceramic cover
Clean using a soft damp cloth and
a little detergent; the cloth must
not be too wet. Wash off any
remaining detergent with cold
water. Then dry with a soft cloth
Note: Do not clean the glass
ceramic cover in the dishwasher.

en Trouble shooting
14
3Trouble shooting
Tr oubl e s hoot i ng
:Warning – Risk of electric shock!
Incorrect repairs are dangerous. Repairs may only be
carried out by one of our trained after-sales engineers. If
the appliance is faulty, unplug the mains plug or switch
off the fuse in the fuse box. Contact the after-sales
service.
Faults often have simple explanations. Please read the
information in the table before calling the after-sales
service.
The electronics of your appliance are underneath the
control panel. For various reasons, the temperature in
this area may rise sharply.
The appliance can be set to switch off automatically in
order to prevent the electronics from overheating. ”…
and • or œ appear alternately in the display.
E-report in the displays
When an error message with "E" appears in the display,
e.g. E0111, switch the appliance off and on again.
If it was a one-off error, the display goes out. If the error
message appears again, call the after-sales service and
quote the exact error message.
Display Error Remedy
None The power supply has been disconnected. Check the household fuse for the appliance. Check whether there is a
power cut by trying other electronic appliances.
All displays flash The touch controls are wet or an object is rest-
ing on them.
Dry the controls or remove the object.
”‹
Appliance fault Switch off the appliance and switch it back on again. If the display appears
again, call the after-sales service.
”…
The electronics have overheated. The appli-
ance has therefore been switched off.
Wait until the electronics have cooled down sufficiently. Touch any control.
”… goes out.
”‡
Safety cut-out Switch off the appliance and allow it to cool down. Fill the frying basin with
frying oil/fat up to the top marking. Push the safety pin on the front of the
housing in firmly.
”ˆ
Appliance fault Switch off the appliance and switch it back on again. If the display appears
again, call the after-sales service.
”‰
The appliance was in operation for too long and
has switched itself off.
Switch the appliance on again.
š“ Appliance does not
heat up
Demo mode is switched on Switching off demo mode: Disconnect the appliance from the power sup-
ply for 30 seconds (switch off the household fuse or the circuit breaker in
the fuse box). Switch on the appliance. Touch any control in the next
3 minutes. Demo mode is switched off.

Customer service en
15
4Customer service
Cu s t o mer ser vi ce
Our after-sales service is there for you if your appliance
needs to be repaired. We will always find an
appropriate solution, also in order to avoid after-sales
personnel having to make unnecessary visits.
E number and FD number
When calling us, please quote the product number
(E no.) and the production number (FD no.) so that we
can provide you with the correct advice. The rating plate
containing these numbers is found on the underside of
the appliance.
To save time, you can make a note of the number of
your appliance and the telephone number of the after-
sales service in the space below, should it be required.
Please note that a visit from an after-sales service
engineer is not free of charge in the event of misuse of
the appliance, even during the warranty period.
Please find the contact data of all countries in the
enclosed customer service list.
To book an engineer visit and product advice
Rely on the professionalism of the manufacturer. You
can therefore be sure that the repair is carried out by
trained service technicians who carry original spare
parts for your appliances.
E-Nr Number FD Number
After-sales service O
GB 0344 892 8999
Calls charged at local or mobile rate.
IE 01450 2655
0.03 € per minute at peak. Off peak 0.0088 €
per minute.
=1U)'(1U
7\SH

it
16
Indice
itI s t r uz i oni per l’uso
8 Conformità d'uso . . . . . . . . . . . . . . . . . . . . . . . . 17
( Importanti avvertenze di sicurezza. . . . . . . . . . 17
] Cause dei danni . . . . . . . . . . . . . . . . . . . . . . . . . 19
7 Tutela dell'ambiente. . . . . . . . . . . . . . . . . . . . . . 19
Consigli per il risparmio energetico . . . . . . . . . . . . . .19
Smaltimento ecocompatibile . . . . . . . . . . . . . . . . . . . 19
* Conoscere l'apparecchio . . . . . . . . . . . . . . . . . 20
La nuova friggitrice. . . . . . . . . . . . . . . . . . . . . . . . . . .20
Pannello di comando . . . . . . . . . . . . . . . . . . . . . . . . .20
Superfici di comando . . . . . . . . . . . . . . . . . . . . . . . . .21
Resistenza . . . . . . . . . . . . . . . . . . . . . . . . . . . . . . . . .21
Accessori . . . . . . . . . . . . . . . . . . . . . . . . . . . . . . . . . .21
K Prima di utilizzare l'apparecchio per la prima
volta . . . . . . . . . . . . . . . . . . . . . . . . . . . . . . . . . . . 21
Pulizia dell’apparecchio . . . . . . . . . . . . . . . . . . . . . . .21
1 Uso dell'apparecchio . . . . . . . . . . . . . . . . . . . . . 21
Friggere . . . . . . . . . . . . . . . . . . . . . . . . . . . . . . . . . . .21
Impostazioni della friggitrice. . . . . . . . . . . . . . . . . . . .22
Display del riscaldamento . . . . . . . . . . . . . . . . . . . . .22
Interruzione di sicurezza. . . . . . . . . . . . . . . . . . . . . . .22
Scaricare l'olio/il grasso di frittura . . . . . . . . . . . . . . .22
Tabella delle impostazioni . . . . . . . . . . . . . . . . . . . . . 23
Consigli e suggerimenti . . . . . . . . . . . . . . . . . . . . . . .23
A Sicurezza bambino. . . . . . . . . . . . . . . . . . . . . . . 24
Attivazione . . . . . . . . . . . . . . . . . . . . . . . . . . . . . . . . .24
Disattivazione . . . . . . . . . . . . . . . . . . . . . . . . . . . . . . .24
Sicurezza bambini automatica . . . . . . . . . . . . . . . . . .24
O Funzioni durata . . . . . . . . . . . . . . . . . . . . . . . . . 25
Contaminuti . . . . . . . . . . . . . . . . . . . . . . . . . . . . . . . .25
Cronometro . . . . . . . . . . . . . . . . . . . . . . . . . . . . . . . .25
b Spegnimento di sicurezza automatico. . . . . . . 25
k Protezione per la pulizia . . . . . . . . . . . . . . . . . . 26
Attivazione . . . . . . . . . . . . . . . . . . . . . . . . . . . . . . . . .26
Disattivazione . . . . . . . . . . . . . . . . . . . . . . . . . . . . . . .26
[ Indicatore consumo di energia. . . . . . . . . . . . . 26
Q Impostazioni di base . . . . . . . . . . . . . . . . . . . . . 27
Modifica delle impostazioni di base . . . . . . . . . . . . . .27
D Pulizia . . . . . . . . . . . . . . . . . . . . . . . . . . . . . . . . . 28
Non usate questi detergenti . . . . . . . . . . . . . . . . . . . . 28
Pulizia dell’apparecchio . . . . . . . . . . . . . . . . . . . . . . .28
3 Malfunzionamento, che fare? . . . . . . . . . . . . . . 29
Messaggio di errore E negli indicatori . . . . . . . . . . . .29
4 Servizio assistenza clienti. . . . . . . . . . . . . . . . . 30
Codice prodotto (E) e codice di produzione (FD). . . .30
Produktinfo
Per ulteriori informazioni su prodotti, accessori, pezzi di
ricambio e servizi è possibile consultare il sito Internet
www.siemens-home.bsh-group.com e l'eShop
www.siemens-home.bsh-group.com/eshops

Conformità d'uso it
17
8Conformità d'uso
Conf or mità d' uso
Leggere attentamente le presenti istruzioni
per l'uso. Solo così è possibile utilizzare
l'apparecchio in modo sicuro e corretto.
Custodire con la massima cura le presenti
istruzioni per l'uso e il montaggio in caso di un
utilizzo futuro o cessione a terzi.
Controllare l'apparecchio dopo averlo
disimballato. Qualora si fossero verificati danni
da trasporto, non collegare l'apparecchio.
L'allacciamento senza spina dell'apparecchio
può essere effettuato solo da un tecnico
autorizzato. In caso di danni causati da un
allacciamento non corretto, decade il diritto di
garanzia.
Questo apparecchio è pensato esclusivamente
per l'utilizzo in abitazioni private e in ambito
domestico. Utilizzare l'apparecchio
esclusivamente per la preparazione di cibi e
bevande. Il processo di cottura deve essere
sorvegliato. Un processo di cottura breve va
sorvegliato continuamente. Utilizzare
l'apparecchio esclusivamente in luoghi chiusi.
Questo apparecchio è progettato solo per
l'utilizzo fino ad un'altezza di massimo
2000 metri sul livello del mare.
Non utilizzare dispositivi di protezione o griglie
di protezione per bambini non adatti.
Potrebbero causare incidenti.
Questo apparecchio non è da utilizzare con un
timer esterno o un telecomando separato.
Il Costruttore non può ritenersi responsabile in
caso di danni provocati dall'inosservanza delle
presenti Istruzioni d'uso.
Questo apparecchio può essere utilizzato da
bambini di età pari o superiore a 8 anni e da
persone con ridotte facoltà fisiche, sensoriali o
mentali nonché da persone prive di sufficiente
esperienza o conoscenza dello stesso se
sorvegliate da una persona responsabile della
loro sicurezza o se istruite in merito all'utilizzo
sicuro dell'apparecchio e consapevoli degli
eventuali rischi derivanti da un utilizzo
improprio.
I bambini non devono utilizzare l'apparecchio
come un giocattolo. I bambini non devono né
pulire né utilizzare l'apparecchio da soli a meno
che non abbiano un'età superiore agli 15 anni
e che siano assistiti da parte di un adulto.
Tenere lontano dall'apparecchio e dal cavo di
alimentazione i bambini di età inferiore agli
8 anni.
(Importanti avvertenze di
sicurezza
Impor t ant i avv er t enze di si cur ezza
Questo apparecchio deve essere installato
secondo le istruzioni per il montaggio fornite.
:Avviso – Pericolo di incendio!
■ L'olio o il burro caldi si incendiano
rapidamente. Non lasciare mai incustoditi
sul fuoco l'olio o il burro caldi. Non utilizzare
mai acqua per spegnere il fuoco.
Disattivare la zona di cottura. Soffocare le
fiamme con un coperchio, una coperta
ignifuga o qualcosa di simile.
Pericolo di incendio!
■ L'olio o il grasso di frittura possono
prendere fuoco. Utilizzare la friggitrice
esclusivamente con olio o grasso adatti.
Attenersi con precisione alle quantità
indicate. Far sciogliere il grasso o l'olio di
frittura prima dell'uso. Attenersi alla
temperatura di frittura prevista per ciascun
prodotto.
Pericolo di incendio!
■ L'olio o il grasso di frittura esausto tende a
traboccare e ha una temperatura di
accensione più bassa. Sostituire l'olio o il
grasso di frittura quando diventa scuro,
emana un odore sgradevole e/o si forma
troppo presto del fumo.
Pericolo di incendio!
■ L'acqua in contatto con l'olio bollente causa
un'esplosione. Non versare mai acqua sul
grasso o sull'olio bollenti.
In caso d'incendio:
– Scollegare l'apparecchio dalla rete
elettrica: disattivare il fusibile nella
scatola dei fusibili.
– Applicare la copertura in acciaio o la
coperta antifiamma: esaurendosi
l'ossigeno, il fuoco si spegne.
– Spegnere la cappa: lo spostamento
d'aria alimenta il fuoco.
Pericolo di incendio!
■ L'apparecchio diventa molto caldo, i
materiali infiammabili potrebbero prendere
fuoco. Non riporre o utilizzare mai oggetti
infiammabili (ad es. bombolette spray,
detergenti) sotto l'apparecchio o nelle sue
immediate vicinanze. Non mettere mai
oggetti infiammabili sopra o dentro
l'apparecchio.

it Importanti avvertenze di sicurezza
18
:Avviso – Pericolo di scottature!
■ Durante il funzionamento le parti scoperte
diventano molto calde. Non toccare mai le
parti ad alta temperatura. Tenere lontano i
bambini.
Pericolo di scottature!
■ L'acqua in contatto con l'olio bollente causa
un'esplosione. Prestare particolare
attenzione se si utilizza l'acqua vicino
all'apparecchio caldo. Prestare attenzione
anche se si utilizza l'acqua vicino
all'apparecchio freddo. Non aggiungere
acqua nell'olio e nel grasso di frittura. In
caso di un nuovo riscaldamento il grasso
può esplodere! Chiudere sempre con un
coperchio l'apparecchio raffreddato.
Pericolo di scottature!
■ L'acqua in contatto con l'olio bollente causa
un'esplosione. Sostituire l'olio o il grasso
usato per friggere quando contiene molta
acqua (ad es. se si friggono spesso
alimenti surgelati).
Se è presente acqua nell'olio/grasso di
frittura, si osservano:
– bollicine che risalgono verso la superficie
– gocce d'acqua
– vapore
– molti spruzzi durante la frittura
Pericolo di scottature!
■ Cucinare alimenti umidi o in grandi quantità
può causare la fuoriuscita dell'olio o del
grasso di frittura. Asciugare con cura gli
alimenti umidi prima della frittura.
Rimuovere il ghiaccio dagli alimenti
surgelati. Per riempirlo, posizionare il
cestello accanto alla friggitrice, non dentro
o sopra. Calare più volte e lentamente il
cestello della friggitrice nell'olio o nel
grasso.
Pericolo di scottature!
■ L'acqua in contatto con l'olio bollente causa
un'esplosione. Prima di riempire
nuovamente il vano della friggitrice con olio
o grasso di frittura, asciugarlo
accuratamente dopo averlo pulito.
Pericolo di scottature!
■ Quando la copertura dell'apparecchio è
chiusa si verifica un accumulo di calore.
Chiudere la copertura dell'apparecchio solo
quando quest'ultimo si è raffreddato. Non
attivare mai l'apparecchio con la copertura
chiusa. Non utilizzare la copertura
dell'apparecchio come scaldavivande o
piano d'appoggio.
:Avviso – Pericolo di scariche elettriche!
■ Se posto vicino ai componenti caldi
dell'apparecchio, l'isolamento del cavo
degli apparecchi elettronici può fondere.
Evitare il contatto tra il cavo di
allacciamento e i componenti caldi
dell'apparecchio.
Pericolo di scariche elettriche!
■ L'infiltrazione di liquido può provocare una
scarica elettrica. Non utilizzare detergenti
ad alta pressione o dispositivi a getto di
vapore.
Pericolo di scariche elettriche!
■ Un apparecchio difettoso può causare delle
scosse elettriche. Non mettere mai in
funzione un apparecchio difettoso. Togliere
la spina o disattivare il fusibile nella scatola
dei fusibili. Rivolgersi al servizio di
assistenza clienti.
Pericolo di scossa elettrica!
■ Gli interventi di riparazione effettuati in
modo non conforme rappresentano una
fonte di pericolo. Le riparazioni devono
essere effettuate esclusivamente da
personale tecnico del servizio di assistenza
adeguatamente istruito. Se l'apparecchio è
guasto, staccare la spina o disattivare il
fusibile nella rispettiva scatola. Rivolgersi al
servizio di assistenza clienti.

Cause dei danni it
19
]Cause dei danni
Cause dei danni
Attenzione!
■ Se oggetti duri o appuntiti cadono sul pannello o
sulla copertura in vetroceramica possono causare
danni.
■ Danni all'apparecchio causati da accessori
inadeguati: Usate solo gli accessori originali.
Utilizzate solo i cesti per la frittura previsti per questo
apparecchio. Non usare mai il coperchio di vetro del
piano cottura a vapore per la friggitrice.
7Tutela dell'ambiente
Tut el a del l ' ambi ent e
Questo capitolo contiene informazioni relative al
risparmio energetico e allo smaltimento
dell'apparecchio.
Consigli per il risparmio energetico
■ Preriscaldare l'apparecchio finché non ha raggiunto
la temperatura desiderata.
■ Impostare sempre la temperatura consigliata.
■ Friggere utilizzando olio o grassi adatti.
Smaltimento ecocompatibile
Si prega di smaltire le confezioni nel rispetto
dell'ambiente.
Questo apparecchio dispone di contrassegno
ai sensi della direttiva europea 2012/19/UE in
materia di apparecchi elettrici ed elettronici
(waste electrical and electronic equipment -
WEEE).
Questa direttiva definisce le norme per la
raccolta e il riciclaggio degli apparecchi
dismessi valide su tutto il territorio dell’Unione
Europea.

it Conoscere l'apparecchio
20
* Conoscere l'apparecchio
Conoscer e l ' appar ecc hi o
In questo capitolo vengono illustrati gli indicatori e gli
elementi di comando. Inoltre verrete a conoscenza delle
diverse funzioni dell'apparecchio.
La nuova friggitrice
Pannello di comando
N. Denominazione
1 Coperchio in vetroceramica
2 Cestello per frittura
3 Supporto per elemento riscaldante
4 Supporto di sospensione cestello per frittura
5 Elemento riscaldante
6 Pannello di comando
N. Denominazione
f
S
³
«
Ñ
Display
û
L’apparecchio è acceso
Ñ
Protezione per la pulizia
p
Display del riscaldamento
‚
Sicurezza bambini
÷
Display del consumo di energia
‹‹‹
Temperatura/durata
V
Contaminuti
ö
Durata
Display
La pagina sta caricando ...
La pagina sta caricando ...
La pagina sta caricando ...
La pagina sta caricando ...
La pagina sta caricando ...
La pagina sta caricando ...
La pagina sta caricando ...
La pagina sta caricando ...
La pagina sta caricando ...
La pagina sta caricando ...
La pagina sta caricando ...
La pagina sta caricando ...
-
 1
1
-
 2
2
-
 3
3
-
 4
4
-
 5
5
-
 6
6
-
 7
7
-
 8
8
-
 9
9
-
 10
10
-
 11
11
-
 12
12
-
 13
13
-
 14
14
-
 15
15
-
 16
16
-
 17
17
-
 18
18
-
 19
19
-
 20
20
-
 21
21
-
 22
22
-
 23
23
-
 24
24
-
 25
25
-
 26
26
-
 27
27
-
 28
28
-
 29
29
-
 30
30
-
 31
31
-
 32
32


Siemens ET375FAB1E/01 Manuale utente
- Categoria
- Friggitrici
- Tipo
- Manuale utente
in altre lingue
- English: Siemens ET375FAB1E/01 User manual
Documenti correlati
Altri documenti
-
Neff N33TK00N0 Manuale utente
-
Steba DF200 Manuale del proprietario
-
Silvercrest SKF 2300 B2 Istruzioni per l'uso
-
Bosch PXX895GA7(00) Istruzioni per l'uso
-
Bosch PXY828DX6E/01 Istruzioni per l'uso
-
Steba DF 180 Manuale utente
-
Silvercrest SKF 2300 A1 Manuale del proprietario
-
KitchenAid KHDF 3010 Program Chart
-
-
Whirlpool AKT 326/IX Guida utente