Siemens Cordless Telephone Gigaset 3000 Manuale utente
- Categoria
- Telefoni
- Tipo
- Manuale utente

Hicom cordless E
Gigaset 3000 Comfort
Operating instructions
Warning
Please read the safety
notes on page 2
before putting the
equipment into
service.
s

2
General
Safety notes
Notes on handset use
●
Do
not use the handset in environments where
there is danger of explosion
(for example, a paint
shop).
●
Research has shown that electronic devices such as
medical equipment can be affected by the handset.
Local
safety regulations must therefore be
observed.
●
The handset is not suitable for people with hearing aids
since radio signal interference produces a very
unpleasant humming sound if the volume is turned up
too high.
●
Do
not
use handsets in
damp environments
(bath-
room). The units are not splashproof.
●
If you lend your handset to someone else, please make
sure that you include the operating instructions with it.
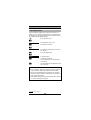
Notes on battery use
●
Only use approved nickel cadmium (NiCd) or nickel
metal hydrid batteries (NiMH), see page 12.
●
Never use other batteries or normal (non-recharge-
able) batteries.
These batteries can cause short-cir-
cuits and may be subject to damage (dangerous). Note
the symbols in the battery compartment:
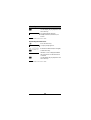
Use rechargeable batteries only and
observe polarity.
●
Avoid contact with
water
and
fire
.
●
Do not use non-Siemens charging devices. These
could damage the batteries.
●
Only use the supplied plug-in power supply unit as des-
ignated on the underside of the charging shell.
●
Please dispose of defective batter-
ies, the mobile handset and the
charging shell in accordance with the
environmental specifications.

3
General
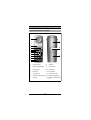
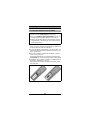
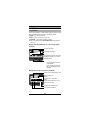
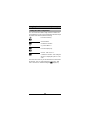
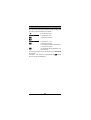
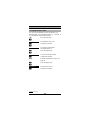
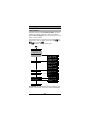
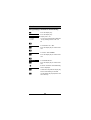
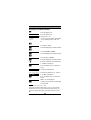
Operating elements, unit parts
1
2
4
5
6
7
8
9
3
10
11
13
14
12
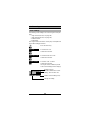
1 Receiver inset 8 Talk key
2 Display (illuminated) 9 Keypad lock
3 Display keys 10 Recall key
4 Menu key 11 Microphone
5 On-hook key 12 Attachment clip
6 Telephone directory key 13 Ringer loudspeaker
7 Talk key 14 Battery compartment/
lid
Fig 1 Operating elements, unit parts

4
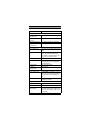
Contents
General . . . . . . . . . . . . . . . . . . . . . . . . . . . . . . . . . . . . . . 2
Safety notes . . . . . . . . . . . . . . . . . . . . . . . . . . . . . . . . . . . 2
Operating elements, unit parts . . . . . . . . . . . . . . . . . . . . . 3
Contents . . . . . . . . . . . . . . . . . . . . . . . . . . . . . . . . . . . . . 4
Introduction . . . . . . . . . . . . . . . . . . . . . . . . . . . . . . . . . . 7
Notes on these operating instructions. . . . . . . . . . . . . . . . 7
Features . . . . . . . . . . . . . . . . . . . . . . . . . . . . . . . . . . . . . . 7
Hicom cordless E . . . . . . . . . . . . . . . . . . . . . . . . . . . . . . . 8
Environmental conditions . . . . . . . . . . . . . . . . . . . . . . . . . 8
General operating instructions . . . . . . . . . . . . . . . . . . . . . 9
Radiorange . . . . . . . . . . . . . . . . . . . . . . . . . . . . . . . . . . . 10
Leaving the radio network. . . . . . . . . . . . . . . . . . . . . . . . 10
Cleaning the handset . . . . . . . . . . . . . . . . . . . . . . . . . . . 10
Preparing the handset. . . . . . . . . . . . . . . . . . . . . . . . . 11
Inserting the batteries into the handset. . . . . . . . . . . . . . 11
Charging and using the batteries . . . . . . . . . . . . . . . . . . 12
Fitting the attachment clip. . . . . . . . . . . . . . . . . . . . . . . . 14
Activating/deactivating handsets. . . . . . . . . . . . . . . . . . . 15
Activating/deactivating the keypad lock. . . . . . . . . . . . . . 16
Display . . . . . . . . . . . . . . . . . . . . . . . . . . . . . . . . . . . . . 17
Explanation . . . . . . . . . . . . . . . . . . . . . . . . . . . . . . . . . . . 17
Keys . . . . . . . . . . . . . . . . . . . . . . . . . . . . . . . . . . . . . . . . 18
User guidance, selecting functions . . . . . . . . . . . . . . . . . 18
Logging handsets onto a telephone system. . . . . . . 21
Opening the logon window . . . . . . . . . . . . . . . . . . . . . . . 21
Logging on for the first time. . . . . . . . . . . . . . . . . . . . . . . 23
Logging on at other systems. . . . . . . . . . . . . . . . . . . . . . 23
Setting the ISDN configuration . . . . . . . . . . . . . . . . . . . . 25
Conducting calls . . . . . . . . . . . . . . . . . . . . . . . . . . . . . 26
Internal dialling . . . . . . . . . . . . . . . . . . . . . . . . . . . . . . . . 26
External dialling. . . . . . . . . . . . . . . . . . . . . . . . . . . . . . . . 27
Block dialling for internal/external dialling. . . . . . . . . . . . 28
Answering calls . . . . . . . . . . . . . . . . . . . . . . . . . . . . . . . . 29
Speakerphone mode. . . . . . . . . . . . . . . . . . . . . . . . . . . . 30
Number redial. . . . . . . . . . . . . . . . . . . . . . . . . . . . . . . . 31
Number redial – last five numbers . . . . . . . . . . . . . . . . . 31
Manual number redial . . . . . . . . . . . . . . . . . . . . . . . . . . . 31
Automatic number redial . . . . . . . . . . . . . . . . . . . . . . . . . 31
Copying a number to the telephone directory. . . . . . . . . 32
Editing an entry. . . . . . . . . . . . . . . . . . . . . . . . . . . . . . . . 33
Deleting an entry. . . . . . . . . . . . . . . . . . . . . . . . . . . . . . . 33
Displaying an entry . . . . . . . . . . . . . . . . . . . . . . . . . . . . . 34

5
Contents
Disabling number redial . . . . . . . . . . . . . . . . . . . . . . . . . 34
Entering text. . . . . . . . . . . . . . . . . . . . . . . . . . . . . . . . . 35
Overview – key layout. . . . . . . . . . . . . . . . . . . . . . . . . . . 35
Entering letters/characters and digits . . . . . . . . . . . . . . . 35
Telephone directory . . . . . . . . . . . . . . . . . . . . . . . . . . 37
Overview – telephone directory menu. . . . . . . . . . . . . . . 37
Storing numbers (directory/network prefix menu). . . . . . 38
Dialling a number from the directory/network prefix menu39
Other telephone directory functions . . . . . . . . . . . . . . . . 39
Network prefix support . . . . . . . . . . . . . . . . . . . . . . . . 42
"Linking" the prefix and call number . . . . . . . . . . . . . . . . 42
Speed dialling from other locations. . . . . . . . . . . . . . . . . 42
Main menu – overview. . . . . . . . . . . . . . . . . . . . . . . . . 43
Settings – overview . . . . . . . . . . . . . . . . . . . . . . . . . . . 44
Audio settings . . . . . . . . . . . . . . . . . . . . . . . . . . . . . . . 45
Audio settings . . . . . . . . . . . . . . . . . . . . . . . . . . . . . . . . . 45
Activating/deactivating audio settings . . . . . . . . . . . . . . . 46
Activating/deactivating the ringer . . . . . . . . . . . . . . . . . . 47
Security. . . . . . . . . . . . . . . . . . . . . . . . . . . . . . . . . . . . . 48
Changing the handset PIN . . . . . . . . . . . . . . . . . . . . . . . 48
Activating/deactivating the handset lock . . . . . . . . . . . . . 49
Auto talk . . . . . . . . . . . . . . . . . . . . . . . . . . . . . . . . . . . . 51
Language . . . . . . . . . . . . . . . . . . . . . . . . . . . . . . . . . . . 52
Resetting the handset to the default state . . . . . . . . 53
Bases . . . . . . . . . . . . . . . . . . . . . . . . . . . . . . . . . . . . . . 54
Selecting the base. . . . . . . . . . . . . . . . . . . . . . . . . . . . . . 54
Changing the base name . . . . . . . . . . . . . . . . . . . . . . . . 55
SLC menu — overview . . . . . . . . . . . . . . . . . . . . . . . . 56
Service . . . . . . . . . . . . . . . . . . . . . . . . . . . . . . . . . . . . . 57
Basic Service . . . . . . . . . . . . . . . . . . . . . . . . . . . . . . . . . 57
Call forwarding . . . . . . . . . . . . . . . . . . . . . . . . . . . . . . . . 60
Mailbox . . . . . . . . . . . . . . . . . . . . . . . . . . . . . . . . . . . . . 67
Query number . . . . . . . . . . . . . . . . . . . . . . . . . . . . . . . 68
Display Test . . . . . . . . . . . . . . . . . . . . . . . . . . . . . . . . . 69
Message Waiting Indication . . . . . . . . . . . . . . . . . . . . 70
Code functions. . . . . . . . . . . . . . . . . . . . . . . . . . . . . . . 71
Switching functions. . . . . . . . . . . . . . . . . . . . . . . . . . . 72
Automatic callback . . . . . . . . . . . . . . . . . . . . . . . . . . . . . 72
Forwarding calls . . . . . . . . . . . . . . . . . . . . . . . . . . . . . . . 73

6
Contents
Consultation during a call . . . . . . . . . . . . . . . . . . . . . . . . 73
Toggle – Switching between two users. . . . . . . . . . . . . . 74
Conference . . . . . . . . . . . . . . . . . . . . . . . . . . . . . . . . . . . 75
Appendix . . . . . . . . . . . . . . . . . . . . . . . . . . . . . . . . . . . 77
Troubleshooting. . . . . . . . . . . . . . . . . . . . . . . . . . . . . . . . 77
Approval . . . . . . . . . . . . . . . . . . . . . . . . . . . . . . . . . . . . . 78
Technical data. . . . . . . . . . . . . . . . . . . . . . . . . . . . . . . . . 78
Accessories. . . . . . . . . . . . . . . . . . . . . . . . . . . . . . . . . . . 79
Index . . . . . . . . . . . . . . . . . . . . . . . . . . . . . . . . . . . . . . . 80

7
Introduction
These operating instructions describe the Gigaset 3000
Comfort handset in connection with Hicom cordless E at
Hicom 300/300 E/300 H.
All functions that can be performed via your handset are
described. You may discover that certain handset functions
are not available as required. The reasons for this may be
as follows:
●
The function is not configured for you and your handset.
In this case, please consult your system administrator.
●
Your Hicom 300/300 E/300 H does not support this func-
tion. Please contact your Siemens sales partner for a sys-
tem upgrade.
DECT features
*
handset
●
Illuminated graphical display with battery charge display
●
Speakerphone mode
●
Status-dependent functions
●
Number redial for the last 5 numbers
●
Telephone directory for 100 entries in the handset
●
Enhanced user guidance with displays in different lan-
guages according to the setting
●
For information on setting the language, see page 52.
●
Block dialling with correction option
●
Auto talk
**
on removal from the charging unit
●
Protection against inadvertent key activation
●
Simplified operation via short cuts
●
Long usage times without recharging with an NiCd bat-
tery:
–up to
10 hours talk time
.
–up to
100 hours in standby mode
.
●
Use of an NiMH battery to considerably increase operat-
ing times
*DECT =
D
igital
E
nhanced
C
ordless
T
elecommunications
** Activated by default.
Notes on these operating instructions
Features

8
Introduction
●
Each handset can log onto and be used by
up to
4DECT
systems
.
Features of the Hicom cordless E
●
Internal and external calls in the entire Hicom cordless E
radio network
●
The user can roam throughout the entire radio network
and still receive all internal and external calls at one call
number (roaming).
●
Automatic call transfer from base station to base station
when moving in the radio network (handover).
●
Automatic callback
for internal calls
●
Call forwarding
to internal users
●
Consultation
during a call
●
Use of all important Hicom functions
The Hicom cordless E DECT telephone system comprises:
●
The radio exchange for the Hicom 300/300 E/300 H,
●
Base stations (transmitter/receiver)
●
Gigaset handsets (cordless telephones)
●
Charging shells
●
Please read the safety notes
, see page 2.
●
The handset and charging shell should not be placed near
electronic devices, such as other telephones, hi-fi, office
or microwave devices, as this may adversely affect the
operation of your telephone and/or the electronic equip-
ment.
●
Do not expose the handset or charging shell to direct sun-
light or other sources of heat.
●
Use the handset at temperatures between +5 °C and
+45 °C.
●
Do not expose the handset or charging shell to damp
environments.
●
Avoid using the handset and charging shell in rooms
where there is a lot of dust.
Hicom cordless E
Environmental conditions

9
Introduction
●
The devices offer
a high level of privacy
.
No protection
can be guaranteed against illegal bugging using other
radio receivers.
●
When operating the handset, a basic distinction is made
between:
–
telephone/switching functions,
e.g. when a call is in
progress
–
local functions,
e.g. the display when the handset is
on.
●
Local functions can also be performed in the charging
shell.
●
Local functions can be cancelled with the on-hook key
Á
before they are stored or saved.
●
The local function is cancelled and the caller reaches you
if you receive a call while you are performing local func-
tions.
●
Even if you remove the battery, your telephone directory
entries, all settings and your PIN are not lost.
●
The call charge display at the handset depends on the
Hicom 300/300 E/300 H setting.
●
Displays from the system do not contain muted vowels or
special characters.
●
The handset can be implemented as a second executive
telephone with limited functions.
●
The
emergency number function
is not supported by
Hicom cordless E.
●
Any dial pauses entered – display P – are not recognised by
Hicom cordless E and are ineffective.
●
The
?0$@*@*)!
function cannot be used with
Hicom cordless E. The DTMF Suffix Dialling Hicom func-
tion can be used as an alternative, (see page 59).
●
Operation at a Gigaset base station is possible in accord-
ance with the Gigaset operating instructions.
General operating instructions

10
Introduction
●
Depending on the environment, the range in the open is
up to 300 m
per base station.
●
In buildings, the range extends
up to 50 m
per base sta-
tion (depending on the room and building layout and con-
struction).
●
If you leave the radio range of the system’s base stations
during a call, the quality of the voice connection drops,
particularly if you move. For a better voice connection,
move back into the base station range.
●
The radio connection is lost if you exceed the range. This
is identified by the flashing of
-!
, for example.
●
The field strength is displayed in the first display line by
the symbol when the phone is idle.
●
Please consult your system administrator in the case of
range problems
.
●
Integrated power saving function: If you leave the base
station radio range when the handset is switched on, the
interval between synchronisation attempts gradually
increases – this increases the battery life in standby
mode.
To ensure that the handset can be used as soon as you
return to the radio network, you should immediately
regis-
ter it again
:
Press the on-hook key until the display is blank, press the
on-hook key again until the handset is on.
●
If you intend to leave the radio network and take your
handset with you, we recommend that you turn the hand-
set off in order to save the battery.
To clean the handset and the charging shell, simply wipe
them with a damp or antistatic cloth. Never use a dry cloth
(this produces static charge). Do not use
abrasive cleaning
agents
.
Radiorange
Leaving the radio network
Cleaning the handset

11
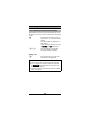
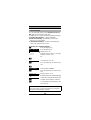
Preparing the handset
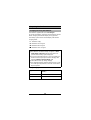
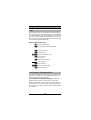
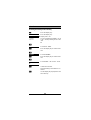
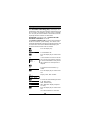
●
Hold the handset with the dialling keypad facing down-
wards, see Fig 2. A battery compartment for 2 batteries is
located in the lower part of the handset.
●
To open the battery compartment, press the grooves and
slide the lid downwards in the direction of the arrow, see
Fig 2. Lift off the lid.
●
Insert the 2 batteries supplied into the battery compart-
ment, as shown in Fig 2.
Ensure that the batteries are inserted according to
cor-
rect polarity
.This is indicated in the battery compartment.
●
Position the lid at a distance of approx. 3 millimetres from
the battery compartment, see Fig 2.
Slide the lid of the battery compartment upwards until it
slots into place.
Inserting the batteries into the handset
Note:
●
Please read the
safety notes
first, see page 2.
●
Only use
supplied or approved batteries
. Do not use
normal (non-rechargeable) batteries, see page 13.
●
Always change the batteries at the same time and only
insert batteries of the same type and produced by the
same manufacturer.
Fig 2 Inserting the batteries

12
Preparing the handset
The batteries supplied (NiCd) are
not charged
.
To charge the batteries, insert the handset into the Gigaset
3000L charging shell with the display facing upwards.
The battery symbol on the handset display indicates the
charging status:
Battery charging times:
Charging and using the batteries
Batteries empty.
E Batteries 33% charged.
8 Batteries 66% charged.
7 Batteries 100% charged.
Note:
●
New batteries should be initially charged for a
mini-
mum period of 16 hours
without interruption, irre-
spective of the battery symbol displayed.
●
To increase the battery life for as long as possible, the
handset should only be placed in the charging shell
when the
battery is almost empty
E.
●
The batteries warm up during charging.
●
Old, defective batteries must be disposed of in accord-
ance with legal requirements, not in the normal waste
disposal system.
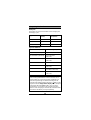
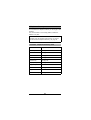
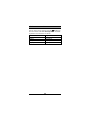
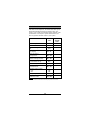
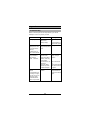
Type Charging time in the handset
(hours)
NiCd, 700 mAh 5 to 6
NiMH, 1100 mAh 8 to 9

13
Preparing the handset
Battery life:
These times are only achieved after several charging and
discharging cycles.
Approved batteries:
Type Standby mode
(hours)
When phone in
use (hours)
NiCd, 700 mAh up to 100 up to 10
NiMH, 1100 mAh up to 160 up to 15
NiMH, 1500 mAh up to 220 up to 20
Nickel cadmium (NiCd) Nickel metal hydrid (NiMH)
Sanyo N-3U (700 mAh) Sanyo H-3 U (1500 mAh)
GP GP60AAKC (600 mAh) GP GP130 AA HC
(1300 mAh)
Varta 751RS (700 mAh) GP GP150 AA HC
(1500 mAh)
Varta VH 1101 (1100 mAh)
Panasonic HHR-110 AA
(1100 mAh)
Friwo NiMH (1400 mAh)
Toshiba TH-1200 AARE
(1200 mAh)
Note on the use of NiMH batteries:
After inserting NiMH batteries into the handset, we rec-
ommend that you charge the handset completely and
then discharge through use without returning it to the
charging shell until the battery low beep is audible. In this
way, the handset
charge status display
7
is adapted
to the longer life of the NiMH battery. You can subse-
quently place your handset in the charging shell each
time it is used. Charging is electronically controlled which
ensures that the battery is charged optimally.

14
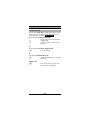
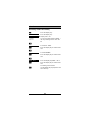
Preparing the handset
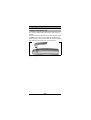
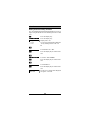
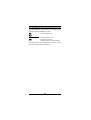
You can fit the supplied attachment clip to your handset if
required.
Place the attachment clip on the back of the handset. There
are
holes
on the sides of the handset approximately level
with the display. Press the clip towards the handset until the
clip’s side tabs click into place in the handset holes.
Fitting the attachment clip
Fig 3 Fitting the attachment clip

15
Preparing the handset
●
Off status:
Display blank – calls cannot be received.
●
On status
e.g. -! is displayed. Prerequisite for all
telephone functions: normal operating status.
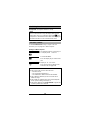
Activating the handset:
Deactivating the handset:
* Activated by default.
Activating/deactivating handsets
Note:
The language set at the
factory
is
English
. For informa-
tion on changing the language to German or another lan-
guage, refer to page 52.
Á Press the on-hook key and hold it
down for one second.
You will hear the
confirmation beep.
*
Display when the handset is on or in
message status, see page 17.
Á Press the on-hook key
and hold it
down
until the display is blank.
You will
hear the confirmation beep.
Note:
The handset can only be fully switched off when it is
removed from the charging shell!
The handset is automatically set to on or message status
if it is placed in the charging shell, see page 17.

16
Preparing the handset
This allows you to protect your handset against
inadvertent
key activation
, e.g. when carrying it in your bag. Calls are
signalled even if the keypad is locked and can be answered
in the same way as when the telephone is on.
Prerequisite:
handset is activated.
Activating the keypad lock:
Deactivating the keypad lock:
Activating/deactivating the keypad lock
j Press the keypad lock and hold it
down for
one second
.
Display in
keypad lock status
.
j Press Keypad lock and
hold it down
for one second
.
Display when the handset is on or in
message status, see page 17.
9!2 '*&!

17
Display
The handset features a 4-line display with 16 characters per
line. Depending on the situation, the display shows:
●
digits
, e.g. dialled numbers
●
text
, e.g. the current base (system)
●
symbols,
e.g. ringing or battery symbol
●
and in the last line the
current functions
of the two dis-
play keys.
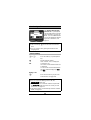
Display when the handset is on or in message status
(example)
Display when a call is in progress (example)
Explanation
-!
M
,[
+
7
Display keys:
– varying functions specific
to the display
– press left or right side of
the key, depending on the
function
Current functions of the display
keys: Network prefix, Message
Waiting Indication, SLC menu,
number redial
Current base display
Charge status (100%)
Receive intensity
G4>
Internal call number of the user
Name of the user
Call up other functions
Status:
microphone is activated
Offer:
Switch off microphone or acti-
vate mute function
+=
;
<
4A@;
Confirm selected function

18
Display
The two display keys are located directly under the display.
The current functions of the display keys are status-depend-
ent and are displayed in the lower display line. Each display
key can be used to display one or two functions. In the case
of two functions, you must press either on the left or the right
side of the corresponding display key.
Meaning of the displays keys:
The use of all telephone system features is accelerated and
simplified by a system of user-friendly prompts based on
menus and messages on the display.
For information on setting the language,
see page 52.
Depending on the status of the handset, e.g. if the tele-
phone is switched on or in call status, various functions are
available and can be selected. With status-dependent func-
tions, only functions that are relevant to the current situation
are available.
Keys
MCall up network prefix
,Call up Message Waiting Indication
+Call up SLC menu
[Number redial
;<Select menu item or entry
\Cancel process /
up one level
=Confirm function/entry
Cancel function
NOpen submenu
Move to the left or right
:Delete character
User guidance, selecting functions
RETURN

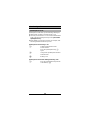
19
Display
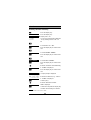
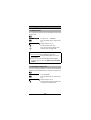
Function selection using menus (handset functions)
The currently selected (highlighted) function is displayed on
a
dark background
.
A
dotted line
indicates the end of the menu. If you scroll fur-
ther, the first function in the menu is selected again. When
the
"line" is selected
, press the display key to
return to the higher-level menu or to on status.
Menu key
to open the main menu
(handset function).
\
Display key
to:
– jump back to the next menu level up
– cancel a function
;<
Display keys
for scrolling forward/
backward within the individual menus.
=
Display key
for confirming the cur-
rently selected function.
N
Display key
for opening submenus.
Á
On-hook key
for ending calls or for
cancelling functions and returning im-
mediately to on status.
- - - - - - - -
On status
\
9
;
<
<
;
\
Main menu
Submenu
6-!A-!,*)
>**(4*)*,?!
?!,/!
?!)#-
-!-
?!.,2
.*@'&
:)#.#!
!".'>!-!
?*.) ?!)#-
RRRRRRRR
RRRRRRRR
RETURN

20
Display
Function selection using display keys
(when a call is in progress, service menu)
When a call is in progress, the display keys ; and <
can be used to call up different functions, e.g.:
For example, youcan use the display keys ; and < to
scroll to the next function when a call is in progress. If the
required function is displayed, simply press the display key
= and follow the instructions.
The other user is unaware that you are scrolling with ;
and <. The selected function is only initiated or called up
after confirming with =.
Functions are selected in the same way in the
Hicom serv-
ice menu
, see page 57.
;?A:@
?@>@;N
?@>@@>;?>
4A@;
La pagina si sta caricando...
La pagina si sta caricando...
La pagina si sta caricando...
La pagina si sta caricando...
La pagina si sta caricando...
La pagina si sta caricando...
La pagina si sta caricando...
La pagina si sta caricando...
La pagina si sta caricando...
La pagina si sta caricando...
La pagina si sta caricando...
La pagina si sta caricando...
La pagina si sta caricando...
La pagina si sta caricando...
La pagina si sta caricando...
La pagina si sta caricando...
La pagina si sta caricando...
La pagina si sta caricando...
La pagina si sta caricando...
La pagina si sta caricando...
La pagina si sta caricando...
La pagina si sta caricando...
La pagina si sta caricando...
La pagina si sta caricando...
La pagina si sta caricando...
La pagina si sta caricando...
La pagina si sta caricando...
La pagina si sta caricando...
La pagina si sta caricando...
La pagina si sta caricando...
La pagina si sta caricando...
La pagina si sta caricando...
La pagina si sta caricando...
La pagina si sta caricando...
La pagina si sta caricando...
La pagina si sta caricando...
La pagina si sta caricando...
La pagina si sta caricando...
La pagina si sta caricando...
La pagina si sta caricando...
La pagina si sta caricando...
La pagina si sta caricando...
La pagina si sta caricando...
La pagina si sta caricando...
La pagina si sta caricando...
La pagina si sta caricando...
La pagina si sta caricando...
La pagina si sta caricando...
La pagina si sta caricando...
La pagina si sta caricando...
La pagina si sta caricando...
La pagina si sta caricando...
La pagina si sta caricando...
La pagina si sta caricando...
La pagina si sta caricando...
La pagina si sta caricando...
La pagina si sta caricando...
La pagina si sta caricando...
La pagina si sta caricando...
La pagina si sta caricando...
La pagina si sta caricando...
La pagina si sta caricando...
La pagina si sta caricando...
-
 1
1
-
 2
2
-
 3
3
-
 4
4
-
 5
5
-
 6
6
-
 7
7
-
 8
8
-
 9
9
-
 10
10
-
 11
11
-
 12
12
-
 13
13
-
 14
14
-
 15
15
-
 16
16
-
 17
17
-
 18
18
-
 19
19
-
 20
20
-
 21
21
-
 22
22
-
 23
23
-
 24
24
-
 25
25
-
 26
26
-
 27
27
-
 28
28
-
 29
29
-
 30
30
-
 31
31
-
 32
32
-
 33
33
-
 34
34
-
 35
35
-
 36
36
-
 37
37
-
 38
38
-
 39
39
-
 40
40
-
 41
41
-
 42
42
-
 43
43
-
 44
44
-
 45
45
-
 46
46
-
 47
47
-
 48
48
-
 49
49
-
 50
50
-
 51
51
-
 52
52
-
 53
53
-
 54
54
-
 55
55
-
 56
56
-
 57
57
-
 58
58
-
 59
59
-
 60
60
-
 61
61
-
 62
62
-
 63
63
-
 64
64
-
 65
65
-
 66
66
-
 67
67
-
 68
68
-
 69
69
-
 70
70
-
 71
71
-
 72
72
-
 73
73
-
 74
74
-
 75
75
-
 76
76
-
 77
77
-
 78
78
-
 79
79
-
 80
80
-
 81
81
-
 82
82
-
 83
83


Siemens Cordless Telephone Gigaset 3000 Manuale utente
- Categoria
- Telefoni
- Tipo
- Manuale utente