
00011412_13/09.14
All listed brands are trademarks of the corresponding companies. Errors and omissions excepted,
and subject to technical changes. Our general terms of delivery and payment are applied.
Hama GmbH & Co KG
D-86652 Monheim
www.hama.com
E
CZ
F
D
GB
I
P
NL
TR
GR
RO
H
FIN
PL
S
RUS
SK
Operating Instructions
Bedienungsanleitung
Mode d‘emploi
Instrucciones de uso
Руководство по эксплуатации
Istruzioni per l‘uso
Gebruiksaanwijzing
Οδηγίες χρήσης
Instrukcja obsługi
Használati útmutató
Návod k použití
Návod na použitie
Manual de instruções
Kullanma kılavuzu
Manual de utilizare
Bruksanvisning
Pistokelaturi
4in1 / 8in1Universal Remote Control
Universal Fernbedienung
00011412
00011413

Universal Remote Control
Thank you for your decision for a Hama product.
Take your time and read the following instructions
and information completely. Please keep these
instructions in a safe place for future reference.
Function buttons (Models 4 in 1, 8 in 1)
1. LED indicator
2. Mode key for selection of secondary device
group (only 8 in 1 model: AUX,DVBT,CBL,AMP)
3. Device selection keys
4. Setup: Remote control settings
5. Vol+/Vol-: Volume control
6. Text ON: Switch on Teletext
Menu: Open device menu
7. Hold: Hold the current Teletext page
8. Number Keys 0-9
9. AV: selects external A/V sources
10. ◄◄ Rewind/red
► Play/yellow
►► Fast forward/blue
● Start recording
■ Stop/green
ll Pause/magenta
11. -/- -: Switch to two-digit channel numbers
12. Info: On-Screen information (if supported by
A/V device)
EPG: Electronic Programme Guide (if supported
by selected A/V device)
13. Text OFF: exits Teletext
EXIT: exits device menu
14. PROG+/PROG-:Programme selection up/down
15. Mute Switch
OK: Confirms a selection
16. Shift key
17. Power: ON/OFF
1. Explanation of the Note symbol
Note
► This symbol is used to indicate additional in-
formation or important notes.
2. Package Contents
- Universal Remote Control (URC)
- Code List
- This operating instructions
3. Safety notes
• Do not use the Universal Remote Control in mo-
ist or wet environments and avoid spray-water
contact.
• Do not expose the Universal Remote Control to
heat sources or direct sunlight.
• Do not drop the Universal Remote Control..
• Never open the Universal Remote Control. It
contains no user-serviceable parts.
• As with all electrical devices, keep the Universal
Remote Control away from children.
4. Getting started – installing the Batteries
Note
► Alkaline batteries are recommended. Use 2
„AAA“ (LR 03/Micro) type batteries.
► Remove the battery compartment lid on the
back of your URC.
► Check the required battery polarity and in-
sert batteries according to the “+/–” marks
inside the compartment.
► Close battery compartment lid.
Note: Code saver
► Any codes you have programmed remain
stored for up to 10 minutes while you re-
place the battery .Make sure you do not
press any buttons before you have placed
new batteries inside the remote control.
All the codes will be erased if a button is
pressed while there are no batteries in the
remote control.
Note: Battery saving function
► The remote control switches off automatical-
ly when a button is pressed down for more
than 15 seconds. This conserves battery
power if the remote control gets stuck in a
position where the buttons are continually
pressed down,such as between sofa cushi-
ons.
5. Setup
Notes
► To obtain a proper infrared (IR) transmission,
allways point your Remote control in the ap-
proximate direction of the device you want
to control.
► Press the “MODE” key to select the seconda-
ry device group :AUX, AMP, DVB-T, CBL (only
8 in1 Model).
► Press the Shift key to operate the blue func-
tion keys. The Shift function deactivates by
pressing the Shift key again, or automatically
after approx. 30 sec. without use.
► No entry for approx. 30 seconds will time out
the Setup mode. The LED indicator shows six
ashes and turns off.
► Each device type can be programmed under
any device key, i.e a TV can be programmed
under DVD, AUX, etc.
► If you want to control a device , it´s not pos-
sible while the Universal Remote Control is
in the Setup Mode. Exit the Setup mode and
select the device you want to control using
the device selection keys.
5.1 Direct Code Entry
Your Universal Remote Control Package contains a
code list. The code list shows 4-digit codes for most
A/V device manufacturers in alphabetical order and
grouped by device type (e.g. TV, DVD, etc.). If the
device you want to control is covered by the code
list, the Direct Code Entry is the most convenient
entry method.
5.1.1 Turn on the device you want to control
5.1.2 Press the SETUP key until the LED indicator is
permanently lit.
5.1.3 Select the device you want to control using
the device key (e.g. TV). A successful selection
is indicated by the LED with one ash follo-
wed by permanent light.
5.1.4 Check code list for brand and type of the
device you want to control.
5.1.5 Enter the corresponding 4-digit code using
the 0 – 9 keys. The LED indicator conrms
each entered digit via a short ash and turns
off after the fourth digit.
Note
► If the code is valid, it is saved automatically
► If code is invalid, the LED indicator ashes
six times and then turns off. Repeat steps
5.1.1 to 5.1.5 or use a different code entry
method.
5.2 Manual code search
Your Universal Remote Control is equipped with
an internal memory, which is preloaded with up to
350 codes per device type for the most common
A/V devices. You can zap through these codes until
the device you want to control shows a reaction.
This might be that the device you want to control
switches off (POWER key) or changes the channel
(PROG+/PROG- keys).
5.2.1 Turn on the device you want to control
5.2.2 Press the SETUP key until the LED indicator is
permanently lit.
POWER
SETUP SHIFT
OK
MENU EPG EXIT
TV
VOL-
PROG+
PROG-
123
456
789
AV -/--
0
VOL+
DVDSAT
VCR
1
3
4
5
6
7
8
9
10
17
14
16
15
13
12
11
4in1
Art.Nr.: 00011412
MODE
POWER
AUX
SETUP SHIFT
OK
MENU EPG EXIT
DVBT CBL
AMP
TV
VOL-
PROG+
PROG-
123
456
789
AV -/--
0
VOL+
DVD
M
SAT
VCR
1
2
3
4
5
6
7
8
9
10
17
14
16
15
13
12
11
8in1
Art.Nr.: 00011413
2
3
g
Operating Instruction

5.2.3 Select the device you want to control using
the device key (e.g. TV). A successful selection
is indicated by the LED with one ash follo-
wed by permanent light.
5.2.4 Press the “POWER” or the PROG+/PROG- key
to zap through the preloaded codes until the
device you want to control reacts.
5.2.5 Press MUTE(OK) to save the code and exit the
code search. The LED indicator turns off.
Note
►
Internal
memory
limitations
al
low
only
up
to
350
most
common
device
codes
to
be
pr
e-
loaded.
D
ue
to
the
extensive
n
umber
of
differ
ent available A/V devices on the mar-
ket, it may be possible that only the most
common main functions are available. If so,
repeat steps 5.2.1 to 5.2.5 to nd a more
compatible code. No code may be available
for some special device models.
5.3 Auto Code Search
Auto Code Search uses the same preloaded codes
as the Manual Code Search (5.2) but your Universal
Remote Control scanns through the codes automa-
tically until the device you want to control shows
a reaction. This might be that the device you want
to control switches off (POWER key) or changes the
channel (P+/P- keys).
5.3.1 Turn on the device you want to control
5.3.2 Press the SETUP key until the LED indicator is
permanently lit.
5.3.3 Select the device you want to control using
the device key (e.g. TV). A successful selection
is indicated by the LED with one ash follo-
wed by permanent light.
5.3.4 Press the PROG+/PROG- keys or POWER to
start the Auto Code Search. The LED indicator
ashes once followed by permanent light.
The Universal Remote Control has a latency of
6 seconds before the rst scan starts.
Note: Scan Speed Settings
► Scan Speed Settings can be set at either 1 or
3 seconds. The default setting for the scan
time per single code is 1 sec. If this feels un-
comfortable , you can switch to 3 sec. scan
time per single code. To switch between the
scan times, press PROG+ or PROG- during
the 6 sec. latency before Auto Code Search
starts scanning.
5.3.5 The LED indicator conrms each single code
scan with a single ash.
5.3.6 Press MUTE(OK) to save the code and exit the
code search. The LED indicator turns off.
5.3.7 To stop the Auto Code Search during the scan
process, press the EXIT key.
Note
► When all codes are searched without suc-
cess, the Universal Remoote Control exits
Auto Code Search and returns to operational
mode automatically. Currently stored code
is not changed.
5.4 Code Identification
The Code identication offers you the possibility, to
determine an already entered code.
5.4.1 Press the SETUP key until the LED indicator is
permanently lit.
5.4.2 Select the device you want to control using
the device key (e.g. TV). A successful selection
is indicated by the LED with one ash follo-
wed by permanent light.
5.4.3 Press SETUP key. The LED indicator ashes
once followed by permanent light.
5.4.4 To nd the rst digit, press the numeric keys
from 0 to 9. The LED indicator ashes once
to indicate the rst digit of the 4-digit code
number.
5.4.5 Repeat step 5.4.4 for the second, third and
fourth digit.
CODES
TV VCR SATDVD
AUX AMP CBL DVBT
6. Special Functions
6.1 Punch Through Channel
The Punch Through Channel allows the PROG+ or
PROG- commands to bypass the currently controlled
device and switch the channels on a second device.
All other commands remain uninuenced.
To activate the punch through channel setting:
•Press desired device mode key (e.g. TV).
•Press and hold “PROG+” key.
•Press desired device mode key (e.g. SAT).
•Release “PROG+” (the indicator ashes once if
the setting is activated).
To deactivate the punch through channel setting:
•Press desired device mode key (e.g. TV).
•Press and hold “PROG-” key.
•Press desired device mode key (e.g. SAT).
•Release “PROG-” (the indicator is ashing twice
if the setting is deactivated).
6.2 Punch Through Volume
The Punch Through Volume allows the VOL+ or
VOL- commands to bypass the currently controlled
device and adjust the volume on a second device.
All other commands remain uninuenced.
To activate the punch through volume setting:
•Press desired device mode key (e.g. TV).
•Press and hold “VOL+” key.
•Press desired device mode key (e.g. SAT).
•Release “VOL+” (the indicator ashes once if
the setting is activated).
To deactivate the punch through volume setting:
•Press desired device mode key (e.g. TV).
•Press and hold “VOL-” key.
•Press desired device mode key (e.g. SAT).
•Release “VOL-” (the indicator is ashing twice if
the setting is deactivated).
6.3 Macro Power
Macro Power enables you to turn two A/V devices
on/off simultaneously.
To activate the macro power setting:
•Press desired device mode key (e.g. TV).
•Press and hold “POWER” key.
•Press desired device mode key (e.g. SAT).
•Release “POWER” (the indicator ashes once if
the setting is activated).
To deactivate the macro power setting:
•Press desired device mode key (e.g. TV).
•Press and hold “POWER” key.
•Press desired device mode key (e.g. SAT).
•Release “POWER” (the indicator is ashing
twice if the setting is deactivated).
7. Maintenance
• Do not mix new and used batteries for
powering the Universal Remote Control, as old
batteries tend to leak and may cause power
drain.
• Do not use corrosive or abrasive cleansers on
your Universal Remote Control.
• Keep the Universal Remote Control dust free by
wiping it with a soft, dry cloth.
4
5

Universal-Fernbedienung
Danke, dass Sie sich für den Kauf eines Hama-
Produkts entschieden haben.
Nehmen Sie sich die Zeit, und lesen Sie die
folgenden Anweisungen und Informationen
vollständig durch. Bitte bewahren Sie diese
Anleitung zum späteren Nachschlagen an einem
sicheren Platz auf.
Funktionstasten (Modelle 4 in 1, 8 in 1)
1. LED
2. Modustaste zur Auswahl der sekundären
Gerätegruppe (nur Modell 8 in 1:
AUX,DVBT,CBL,AMP)
3. Tasten zur Geräteauswahl
4. Setup: Einstellungen der Fernbedienung
5. Vol+/Vol-: Lautstärkeregulierung
6. Text EIN: Teletext einschalten
Menu: Gerätemenü öffnen
7. Halten: Aktuelle Teletextseite halten
8. Zifferntasten 0-9
9. AV: Externe AV-Quellen wählen
10. ◄◄ Rücklauf/rot
► Wiedergabe/gelb
►► Schneller Vorlauf/blau
● Aufnahme starten
■ Stopp/grün
ll Pause/magenta
11. -/- -: Zu zweistelligen Sendernummern wechseln
12. Info: On-Screen-Informationen (wenn vom AV-
Gerät unterstützt)
EPG: Elektronischer Programmführer (wenn
vom ausgewählten AV-Gerät unterstützt)
13. Text AUS: Teletext verlassen
EXIT: Gerätemenü verlassen
14. PROG+/PROG-: Programmauswahl, nach oben/
nach unten
15. Stummschalter
OK: Auswahl bestätigen
16. Shift-Taste
17. Power: EIN/AUS
1. Erläuterung des Hinweissymbols
Hinweis
► Dieses Symbol deutet auf zusätzliche Informa-
tionen oder wichtige Hinweise hin.
2. Lieferumfang
- Universal-Fernbedienung
- Codeliste
- Diese Bedienungsanleitung
3. Sicherheitshinweise
• Verwenden Sie die Universal-Fernbedienung
nicht in feuchten Umgebungen, und vermeiden
Sie Kontakt mit Spritzwasser.
• Halten Sie die Universal-Fernbedienung von
Wärmequellen fern, und setzen Sie sie keinem
direkten Sonnenlicht aus.
• Lassen Sie die Universal-Fernbedienung nicht
fallen.
• Öffnen Sie die Universal-Fernbedienung nicht.
Sie enthält keine vom Benutzer zu wartenden
Teile.
• Die Universal-Fernbedienung gehört wie alle
elektrischen Geräte nicht in Kinderhände.
4. Erste Schritte – Einsetzen der Batterien
Hinweis
► Es werden Alkalibatterien empfohlen. Ver-
wenden Sie zwei Batterien vom Typ „AAA”
(LR 03/Micro).
► Entfernen Sie die Batteriefachabdeckung auf
der Rückseite der Universal-Fernbedienung.
► Setzen Sie die Batterien unter Berücksichti-
gung der „+/-”-Markierungen für die Pola-
rität ein.
► Schließen Sie das Batteriefach.
8. Troubleshooting
Q. My Universal Remote Control does not work at
all!
A. Check your A/V device. If the device’s main
switch is turned off, your URC cannot operate
your device.
A. Check whether your batteries are inserted
properly and are in the correct +/- position.
A. Check whether you have pressed the correspon-
ding device mode key for your device.
A. If the batteries are low, replace the batteries.
Q. If several Device Codes are listed under the
brand of my A/V device, how
can I select the correct Device Code?
A. To determine the correct Device Code for your
A/V device, test the codes one by one until most
keys work properly.
Q. My A/V equipment responds only to some of the
commands.
A. Try other codes until most keys work properly.
9. Service and Support
If you have questions on the product, you are
welcome to contact Hama Product Consulting.
Hotline: +49 9091 502-115
For further support information please visit:
www.hama.com
6
7
d
Bedienungsanleitung

Hinweis: Codespeicher
► Beim Ersetzen der Batterien bleiben alle von
Ihnen programmierten Codes bis zu 10 Mi-
nuten gespeichert. Achten Sie darauf, dass
Sie keine Tasten drücken, bis die neuen Bat-
terien in der Fernbedienung eingesetzt sind.
Wenn Sie eine Taste drücken und sich keine
Batterien in der Fernbedienung benden,
werden alle Codes gelöscht.
Hinweis: Energiesparfunktion
► Die Fernbedienung schaltet sich automa-
tisch aus, wenn eine Taste länger als 15
Sekunden gedrückt wird. Dies verlängert die
Lebensdauer der Batterien, sollte die Fernbe-
dienung an einer Stelle feststecken, an der
die Tasten dauerhaft gedrückt werden, z. B.
zwischen Sofakissen.
5. Setup
Hinweis
► Halten Sie die Fernbedienung für eine ord-
nungsgemäße Infrarotübertragung immer in
die ungefähre Richtung des zu bedienenden
Geräts.
► Jeder Gerätetyp kann unter einer beliebigen
Gerätetaste programmiert werden, z. B.
kann ein Fernseher unter DVD, AUX usw.
programmiert werden.
► Sie können mit der Universal-Fernbedienung
kein Gerät bedienen, solange sich diese im
Setup-Modus bendet. Verlassen Sie den
Setup-Modus, und wählen Sie das zu bedie-
nende Gerät über die Tasten zur Geräteaus-
wahl aus.
5.1 Direkte Codeeingabe
Im Lieferumfang der Universal-Fernbedienung
ist eine Codeliste enthalten. Die Codeliste zeigt
vierstellige Codes der meisten AV-Gerätehersteller
in alphabetischer Reihenfolge an, gruppiert
nach Gerätetyp (z. B. TV, DVD usw.). Wenn das
zu bedienende Gerät in der Codeliste enthalten
ist, ist die direkte Codeeingabe die einfachste
Eingabemethode.
5.1.1 Schalten Sie das zu bedienende Gerät ein.
5.1.2 Drücken Sie die Taste „SETUP”, bis die LED
dauerhaft leuchtet.
5.1.3 Wählen Sie über die Gerätetaste das zu
bedienende Gerät aus (z. B. TV). Bei erfolg-
reicher Auswahl blinkt die LED einmal und
leuchtet danach dauerhaft.
5.1.4 Suchen Sie in der Codeliste nach Marke und
Typ des zu bedienenden Geräts.
5.1.5 Geben Sie den entsprechenden vierstelligen
Code über die Zifferntasten 0-9 ein. Die LED
bestätigt die Eingabe der einzelnen Ziffern
jeweils mit einem kurzen Blinken und erlischt
nach der vierten Ziffer.
Hinweis
► Ein gültiger Code wird automatisch
gespeichert.
► Bei einem ungültigem Code blinkt die LED
sechsmal und erlischt anschließend. Wieder-
holen Sie die Schritte 5.1.1 bis 5.1.5, oder
verwenden Sie eine andere Methode zur
Codeeingabe.
5.2 Manuelle Codesuche
Die Universal-Fernbedienung verfügt über einen
internen Speicher, in dem bereits bis zu 350 Codes
pro Gerätetyp für die gängigsten AV-Geräte ent-
halten sind. Sie können diese Codes durchgehen,
bis das zu bedienende Gerät eine Reaktion zeigt.
Beispielsweise schaltet sich das zu bedienende Ge-
rät aus (Taste „POWER”) oder wechselt den Sender
(Taste „PROG+/PROG-”).
5.2.1 Schalten Sie das zu bedienende Gerät ein.
5.2.2 Drücken Sie die SETUP-Taste, bis die LED
dauerhaft leuchtet.
5.2.3 Wählen Sie über die Gerätetaste das zu
bedienende Gerät aus (z. B. TV). Bei erfolg-
reicher Auswahl blinkt die LED einmal und
leuchtet danach dauerhaft.
5.2.4 Drücken Sie die Taste „POWER” oder
„PROG+/PROG-”, um durch die voreingestell-
ten Codes zu blättern, bis das zu bedienende
Gerät eine Reaktion zeigt.
5.2.5 Drücken Sie „MUTE(OK)”, um den Code zu
speichern und die Codesuche zu verlassen.
Die LED erlischt.
Hinweis
► Im internen Speicher können maximal
350 Codes der gängigsten Geräte gespei-
chert werden. Aufgrund der zahlreichen auf
dem Markt erhältlichen AV-Geräte kann es
passieren, dass nur die gängigsten Haupt-
funktionen verfügbar sind. Ist dies der Fall,
wiederholen Sie die Schritte 5.2.1 bis 5.2.5,
um einen kompatibleren Code zu nden. Für
einige spezielle Gerätemodelle ist möglicher-
weise kein Code verfügbar.
5.3 Automatische Codesuche
Die automatische Codesuche verwendet dieselben
voreingestellten Codes wie die manuelle Codesuche
(5.2). Die Universal-Fernbedienung durchsucht die
Codes jedoch automatisch, bis das zu bedienende
Gerät eine Reaktion zeigt. Beispielsweise schaltet
sich das zu bedienende Gerät aus (Taste „POWER”)
oder wechselt den Sender (Tasten „PROG+/PROG-”).
5.3.1 Schalten Sie das zu bedienende Gerät ein.
5.3.2 Drücken Sie die Taste „SETUP”, bis die LED
dauerhaft leuchtet.
5.3.3 Wählen Sie über die Gerätetaste das zu
bedienende Gerät aus (z. B. TV). Bei erfolg-
reicher Auswahl blinkt die LED einmal und
leuchtet danach dauerhaft.
5.3.4 Drücken Sie die Taste „PROG+/PROG-” oder
„POWER”, um die automatische Codesuche
zu starten. Die LED blinkt einmal und leuchtet
danach dauerhaft. Es dauert 6 Sekunden, bis
die Universal-Fernbedienung mit der ersten
Suche beginnt.
8
9

Hinweis: Einstellen der
Suchgeschwindigkeit
► Die Standardeinstellung für die Suchzeit pro
Code ist 1 Sekunde. Wenn Ihnen dies nicht
zusagt, können Sie zu einer Suchzeit von
3 Sekunden pro Code wechseln. Um zwi-
schen den Suchzeiten zu wechseln, drücken
Sie „PROG+” oder „PROG-” innerhalb der
6 Sekunden vor dem Beginn der automa-
tischen Codesuche.
5.3.5 Die LED bestätigt die jeweiligen Codesuchen
mit einem einzelnen Blinken.
5.3.6 Drücken Sie „MUTE(OK)”, um den Code zu
speichern und die Codesuche zu verlassen.
Die LED erlischt.
5.3.7 Um die automatische Suche während des
Suchvorgangs abzubrechen, drücken Sie die
Taste „EXIT”.
Hinweis
► Wenn alle Codes ohne Erfolg durchsucht
wurden, verlässt die Universal-Fernbedie-
nung die automatische Codesuche und kehrt
automatisch in den Betriebsmodus zurück.
Der aktuell gespeicherte Code bleibt unver-
ändert.
5.4 Codeerkennung
Die Codeerkennung bietet Ihnen die Möglichkeit,
einen bereits eingegebenen Code zu ermitteln.
5.4.1 Drücken Sie die Taste „SETUP”, bis die LED
dauerhaft leuchtet.
5.4.2 Wählen Sie über die Gerätetaste das zu
bedienende Gerät aus (z. B. TV). Bei erfolg-
reicher Auswahl blinkt die LED einmal und
leuchtet danach dauerhaft.
5.4.3 Drücken Sie die Taste „SETUP”. Die LED blinkt
einmal und leuchtet danach dauerhaft.
5.4.4 Drücken Sie zur Suche der ersten Ziffer eine
der Nummerntasten von 0 bis 9. Die LED
blinkt einmal für die erste Ziffer der vierstelli-
gen Codenummer.
5.4.5 Wiederholen Sie den Schritt 5.4.4 für die
zweite, dritte und vierte Ziffer.
CODES
TV VCR SATDVD
AUX AMP CBL DVBT
6. Sonderfunktionen
6.1 Sender-Punch-Through
Mit der Sender-Punch-Through-Funktion können die
Befehle PROG+ oder PROG- das aktuell gesteuerte
Gerät umgehen, und die Sender eines zweiten
Gerätes wechseln. Alle anderen Befehle sind davon
nicht betroffen.
So aktivieren Sie die Sender-Punch-Through-
Funktion:
•Drücken Sie die gewünschte Gerätetaste (z.B. TV).
•Halten Sie die Taste „PROG+” gedrückt.
•Drücken Sie die gewünschte Gerätetaste (z.B.
SAT).
•Lassen Sie die Taste „PROG+” wieder los (die LED
blinkt einmal bei aktivierter Einstellung).
So deaktivieren Sie die Sender-Punch-Through-
Funktion:
•Drücken Sie die gewünschte Gerätetaste (z.B. TV).
•Halten Sie die Taste „PROG-” gedrückt.
•Drücken Sie die gewünschte Gerätetaste (z.B.
SAT).
•Lassen Sie die Taste „PROG-” wieder los (die LED
blinkt zweimal wenn die Einstellung deaktiviert
wird).
6.2 Lautstärke-Punch-Through
Mit der Lautstärke-Punch-Through-Funktion können
die Befehle VOL + oder VOL- das aktuell gesteuerte
Gerät umgehen, und die Lautstärke eines zweiten
Gerätes einstellen. Alle anderen Befehle sind davon
nicht betroffen.
So aktivieren Sie die Lautstärke-Punch-Through-
Funktion:
•Drücken Sie die gewünschte Gerätetaste (z.B. TV).
•Halten Sie die Taste „VOL+” gedrückt.
•Drücken Sie die gewünschte Gerätetaste (z.B.
SAT).
•Lassen Sie die Taste „VOL+” wieder los (die LED
blinkt einmal bei aktivierter Einstellung).
So deaktivieren Sie die Sender-Punch-Through-
Funktion:
•Drücken Sie die gewünschte Gerätetaste (z.B. TV).
•Halten Sie die Taste „VOL-” gedrückt.
•Drücken Sie die gewünschte Gerätetaste (z.B.
SAT).
•Lassen Sie die Taste „VOL-” wieder los (die LED
blinkt zweimal wenn die Einstellung deaktiviert
wird).
6.3 Macro Power
Mit Macro Power können Sie zwei AV-Geräte
gleichzeitig ein-/ausschalten.
So aktivieren Sie die Macro Power-Funktion:
•Drücken Sie die gewünschte Gerätetaste (z.B. TV).
•Halten Sie die Taste „POWER” gedrückt.
•Drücken Sie die gewünschte Gerätetaste (z.B.
SAT).
•Lassen Sie die Taste „POWER” wieder los (die LED
blinkt einmal bei aktivierter Einstellung).
So deaktivieren Sie die Macro Power-Funktion:
•Drücken Sie die gewünschte Gerätetaste (z.B. TV).
•Halten Sie die Taste „POWER” gedrückt.
•Drücken Sie die gewünschte Gerätetaste (z.B.
SAT).
•Lassen Sie die Taste „POWER” wieder los (die LED
blinkt zweimal wenn die Einstellung deaktiviert
wird)
7. Wartung
• Verwenden Sie nie gleichzeitig alte und neue
Batterien in der Universal-Fernbedienung, da
alte Batterien zum Auslaufen neigen und zu
einem Leistungsverlust führen können.
• Reinigen Sie die Universal-Fernbedienung
keinesfalls mit Scheuermitteln oder scharfen
Reinigungsmitteln.
• Halten Sie die Universal-Fernbedienung frei
von Staub, indem Sie sie mit einem trockenen
weichen Tuch reinigen.
8. Fehlerbehebung
F. Meine Universal-Fernbedienung funktioniert
nicht!
A. Überprüfen Sie das AV-Gerät. Wenn der Haupt-
schalter des Geräts ausgeschaltet ist, kann
die Universal-Fernbedienung das Gerät nicht
bedienen.
A. Überprüfen Sie, dass die Batterien korrekt ein-
gesetzt sind und die Polarität beachtet wurde.
A. Überprüfen Sie, ob Sie die entsprechende
Gerätetaste für das Gerät gedrückt haben.
A. Tauschen Sie die Batterien bei niedrigem Batte-
riestand aus.
F. Wenn für die Marke meines AV-Geräts mehrere
Gerätecodes aufgelistet sind, wie wähle ich den
korrekten Gerätecode aus?
A. Um den korrekten Gerätecode für das AV-Gerät
zu bestimmen, testen Sie die Codes nacheinan-
der, bis die meisten Tasten ordnungsgemäß
funktionieren.
F. Mein AV-Gerät reagiert nur auf einige Tastenbe-
fehle.
A. Probieren Sie andere Codes, bis die meisten
Tasten ordnungsgemäß funktionieren.
9. Service und Support
Bitte wenden Sie sich bei Fragen zum Produkt
gerne an die Hama-Produktberatung.
Hotline: +49 9091 502-115 (Deu/Eng)
Weitere Supportinformationen nden sie hier:
www.hama.com
10
11

Télécommande universelle
Nous vous remercions d’avoir choisi un produit
Hama.
Veuillez prendre le temps de lire l'ensemble des
consignes et informations suivantes. Veuillez
conserver ces instructions dans un endroit sûr afin
de pouvoir les consulter en cas de besoin.
Touches de fonction (modèles 4 en 1, 8 en 1)
1. LED
2. Touche de mode pour la sélection du deuxième
groupe d'appareils (uniquement modèle 8 in 1:
AUX, DVBT, CBL, AMP)
3. Touches de sélection de l’appareil
4. Configuration : paramètres de la télécommande
5. Vol+ / Vol- : réglage du volume
6. Texte ON : activation du télétexte
Menu: ouverture du menu de l’appareil
7. Pause : pause sur la page télétexte actuelle
8. Bloc numérique 0-9
9. AV : sélection de la source AV
10. ◄◄ retour rapide / voyant rouge
► lecture / voyant jaune
►► avance rapide / voyant bleu
● démarrage de l'enregistrement
■ stop / voyant vert
ll pause / voyant magenta
11. -/- -: sélection de numéros de stations à deux
chiffres
12. Info : informations à l'écran (si pris en charge
par l'appareil AV)
EPG : guide électronique de programmes (si
pris en charge par l'appareil AV)
13. Texte OFF : désactivation du télétexte
EXIT : quitter le menu de l’appareil
14. PROG+ / PROG- : sélection du programme vers
le haut / vers le bas
15. Commutateur sourdine
OK : confirmer la sélection
16. Touche Shift
17. Alimentation : MARCHE / ARRÊT
1. Explication des symboles
Remarque
► Ce symbole est utilisé pour indiquer des infor-
mations supplémentaires ou des remarques
importantes.
2. Matériel livré
- Télécommande universelle
- Liste de codes
- Mode d‘emploi
3. Consignes de sécurité
• N‘utilisez pas la télécommande universelle
dans un environnement humide et évitez toute
projection d‘eau.
• Protégez votre télécommande universelle de
toute source de chaleur et ne l‘exposez pas aux
rayons directs du soleil.
• Ne laissez pas votre télécommande tomber par
terre.
• N‘ouvrez pas votre télécommande ; elle ne com-
prend aucune pièce nécessitant un entretien.
• Cette télécommande universelle, comme tout
autre appareil électrique, ne doit pas se trouver
à portée des enfants.
4. Premiers pas - insertion des piles
Remarque
► Nous vous recommandons d‘utiliser des
piles alcalines. Utilisez 2 piles LR03 (AAA /
Micro).
► Ouvrez le couvercle du compartiment à piles
sur la face arrière de la télécommande.
► Insérez deux piles dans le logement en re-
spectant les indications de polarité (+/-).
► Refermez le compartiment à piles.
Remarque: mémoire des codes
► Tous les codes programmés restent enregis-
trés pendant 10 minutes lorsque vous rem-
placez les piles. Assurez-vous de n‘appuyer
sur aucune touche avant d‘insérer de nou-
velles piles dans la télécommande. Tous les
codes seront effacés si vous appuyez sur une
touche alors que la télécommande ne conti-
ent aucune pile.
Remarque: Fonction d‘économie
des piles
► La télécommande se met automatiquement
hors service lorsque vous appuyez sur une
touche pendant plus de 15 secondes. Cet-
te fonction permet de ne pas vider les piles
de votre télécommande si cette dernière est
coincée (entre les coussins d‘un divan, par
exemple) et qu‘une touche reste enfoncée.
5. Configuration
Remarque
► Pointez la télécommande en direction de
l‘appareil que vous désirez piloter an de
garantir une excellente transmission infra-
rouge.
► Appuyez sur la touche « MODE » an de sé-
lectionner le deuxième groupe d‘appareils :
AUX, AMP, DVB-T, CBL (uniquement modèle
8 en 1).
► Appuyez sur la touche Shift an d‘utiliser
les touches de fonction bleues. Vous pouvez
désactiver la fonction Shift en appuyant à
nouveau sur la touche Shift ; elle se désac-
tive automatiquement si vous n‘appuyez sur
aucune touche pendant 30 secondes.
► Le mode de conguration s‘interrompt auto-
matiquement lorsque vous n‘appuyez sur au
cune touche pendant plus de 30 secondes.
► La LED clignote six fois, puis s’éteint.
► Vous pouvez programmer chaque type
d‘appareil à l‘aide de n‘importe quelle
touche ; vous pouvez, par exemple, pro-
grammer un téléviseur sous DVD, AUX etc.
► Vous ne pouvez pas piloter un appareil à
l‘aide de la télécommande lorsqu‘il se trouve
en mode de conguration. Vous pouvez quit-
ter le mode de conguration et sélectionner
l‘appareil que vous désirez piloter à l‘aide
des touches de sélection de l’appareil.
5.1 Saisie directe du code
Une liste de codes fait partie des éléments fournis
avec la télécommande. La liste de codes comprend
des codes de quatre chiffres provenant de la
plupart des constructeurs d‘appareils AV classés par
ordre alphabétique, groupés par type d‘appareils
(TV, DVD, etc.). La saisie directe du code est la
méthode la plus simple dans le cas où le code de
votre appareil est compris dans la liste.
5.1.1 Mettez l’appareil que vous désirez utiliser
sous tension.
5.1.2 Appuyez sur la touche « SETUP » jusqu‘à ce
que la LED s‘allume en vert en permanence.
5.1.3 Sélectionnez l’appareil que vous désirez
piloter (TV, etc.) à l‘aide de la touche de
l‘appareil. La LED clignote une fois, puis
s‘allume en permanence en cas de sélection
correcte.
5.1.4 Recherchez le code de l’appareil que vous
désirez utiliser à l’aide de la liste des codes
par marque et par type.
5.1.5 Saisissez ensuite le code à quatre chiffres cor-
respondant à l‘aide du bloc numérique 0-9.
La LED conrme la saisie de chaque chiffre en
clignotant brièvement, puis s‘éteint après le
quatrième chiffre.
12
13
f
Mode d’emploi

Remarque
► Un code valide est sauvegardé automatique-
ment.
► En cas de code erroné, la LED clignote six
fois, puis s‘éteint. Répétez les étapes 5.1.1
à 5.1.5 ou utilisez une autre méthode pour
la saisie du code.
5.2 Recherche manuelle du code
La télécommande dispose d‘une mémoire interne
contenant jusqu‘à 350 codes par type d‘appareil
adaptés à tous les appareils AV courants. Vous
pouvez passer tous ces codes en revue jusqu‘à ce
que l‘appareil que vous désirez utiliser réagisse ;
l‘appareil se met, par exemple, hors tension (touche
« POWER ») ou change de station (touche « PROG+
/ PROG- »).
5.2.1 Mettez l’appareil que vous désirez utiliser sous
tension.
5.2.2
Appuyez sur la touche « SETUP » jusqu‘à ce
que la LED s‘allume en permanence.
5.2.3
Sélectionnez l’appareil que vous désirez pilo-
ter (TV, etc.) à l‘aide de la touche de l‘appareil.
La LED clignote une fois, puis s‘allume en
permanence en cas de sélection correcte.
5.2.4
Appuyez sur la touche « POWER » ou « PROG+
/ PROG- » an de faire déler les codes
présélectionnés jusqu‘à ce que l‘appareil que
vous désirez utiliser réagisse.
5.2.5
Appuyez sur la touche « MUTE (OK) » an de
sauvegarder le code et quitter la recherche du
code ; la LED s’éteint.
Remarque
► La télécommande dispose d‘une mémoire
interne contenant 350 codes adaptés aux
appareils AV courants. En raison de la quan-
tité d‘appareils AV disponibles sur le mar-
ché, il est possible que seules les fonctions
principales soient disponibles. Si tel est le
cas, répétez les étapes 5.2.1 à 5.2.5 an de
trouver un code compatible. Il est possible
qu‘aucun code ne fonctionne pour certains
modèles spéciaux.
5.3 Recherche automatique du code
La recherche automatique du code utilise les
mêmes codes présélectionnés que ceux de la
recherche manuelle (5.2). La télécommande univer-
selle recherche automatiquement le code jusqu‘à
ce que l‘appareil que vous désirez utiliser réagisse ;
l‘appareil se met, par exemple, hors tension
(touche « POWER ») ou change de station (touches
« PROG+ / PROG- »).
5.3.1 Mettez l’appareil que vous désirez utiliser
sous tension.
5.3.2 Appuyez sur la touche « SETUP » jusqu‘à ce
que la LED s‘allume en vert en permanence.
5.3.3 Sélectionnez l’appareil que vous désirez
piloter (TV, etc.) à l‘aide de la touche de
l‘appareil. La LED clignote une fois, puis
s‘allume en permanence en cas de sélection
correcte.
5.3.4 Appuyez sur la touche « PROG+ / PROG- »
ou « POWER » an de lancer une recherche
automatique de code. La LED clignote
une fois, puis s‘allume en permanence. La
télécommande universelle commence la
première recherche après 6 secondes.
Remarque : réglage de la vitesse
de recherche
► Le réglage par défaut de la vitesse de re-
cherche par code est de 1 seconde. Vous
pouvez modier ce réglage et congurer une
vitesse de 3 secondes par code. Appuyez sur
la touche « PROG+ / PROG- » pendant les 6
secondes précédent le début de la recherche
automatique.
5.3.5 La LED conrme la recherche du code à l‘aide
d‘un clignotement unique.
5.3.6 Appuyez sur la touche « MUTE (OK) » an de
sauvegarder le code et quitter la recherche du
code ; la LED s’éteint.
5.3.7 Appuyez sur la touche « EXIT » an
d‘interrompre la recherche automatique.
Remarque
► La télécommande universelle quitte le mode
de recherche automatique et retourne en
mode de fonctionnement normal si elle ne
détecte aucun code adapté. Le code sauve-
gardé actuellement ne change pas.
5.4 Reconnaissance de code
La reconnaissance de code vous permet de recher-
cher un code déjà attribué.
5.4.1 Appuyez sur la touche « SETUP » jusqu‘à ce
que la LED s‘allume en vert en permanence.
5.4.2 Sélectionnez l’appareil que vous désirez
piloter (TV, etc.) à l‘aide de la touche de
l‘appareil. La LED clignote une fois, puis
s‘allume en permanence en cas de sélection
correcte.
5.4.3 Appuyez sur la touche « SETUP ». La LED clig-
note une fois, puis s‘allume en permanence.
5.4.4 Appuyez sur une des touches numériques de
0 à 9 an de lancer la recherche du premier
chiffre. La LED clignote une fois pour le
premier chiffre du code à quatre chiffres.
5.4.5 Répétez les étapes 5.4.4 pour le deuxième, le
troisième et le quatrième chiffre.
CODES
TV VCR SATDVD
AUX AMP CBL DVBT
6. Fonctions spéciales
6.1 Recherche de stations en maintenant la
touche enfoncée (« punch through »)
La fonction de recherche de Chaînes en maintenant
la touche enfoncée (« punch through ») vous
permet de contourner les commandes PROG+ ou
PROG- de l‘appareil utilisé actuellement et piloter
un deuxième appareil. Les autres commandes ne
sont pas affectées.
Activadon de la fonction de recherche de chaînes
(« punch through »):
•Appuyez sur la touche de l‘appareil désiré (TV,
etc.).
•Maintenez la touche « PROG+ » enfoncée.
•Appuyez sur la touche de l‘appareil désiré (SAT,
etc.).
•Relâchez la touche « PROG+ » (la LED clignote
une fois en cas d‘activation du paramètre).
Désactivadon de la fonction de recherche de chaînes
(« punch through »):
•Appuyez sur la touche de l‘appareil désiré (TV,
etc.).
•Maintenez la touche « PROG- » enfoncée.
•Appuyez sur la touche de l‘appareil désiré (SAT,
etc.).
•Relâchez la touche « PROG- » (la LED clignote
deux fois en cas de désactivation du paramètre).
14
15

6.2 Réglage du volurne en maintenant la
touche enfoncée (« punch through »)
La fonction de réglage du volume en maintenant la
touche enfoncée (« punch through ») vous permet
de contourner les commandes VOL+ ou VOL- de
l‘appareil utilisé actuellement et régler Ie volume
d‘un deuxième appareil. Les autres commandes ne
sont pas affectées.
Activation de la fonction de réglage du volume par
touche enfoncée « punch through »:
•Appuyez sur la touche de l‘appareil désiré (TV, etc.).
•Maintenez la touche « VOL+ » enfoncée.
•Appuyez sur la touche de l‘appareil désiré (SAT, etc.).
•Relâchez la touche « VOL+ » (la LED clignote une
fois en cas d‘activation du paramètre).
Désactivation de la fonction de réglage du volume
par touche enfoncée « punch through »:
•Appuyez sur la touche de l‘appareil désiré (TV, etc.).
•Maintenez la touche « VOL- » enfoncée.
•Appuyez sur la touche de l‘appareil désiré (SAT, etc.).
•Relâchez la touche « VOL- » (la LED clignote deux
fois en cas de désactivation du paramètre).
6.3 Macro Power
La fonction MACRO POWER vous permet de
mettre deux appareils AV simultanément sous/hors
tension.
Activation de la fonction MACRO POWER:
•Appuyez sur la touche de l‘appareil désiré (TV, etc.).
•Maintenez la touche « POWER » enfoncée.
•Appuyez sur la touche de l‘appareil désiré (SAT, etc.).
•Relâchez la touche « POWER » (la LED clignote une
fois en cas d‘activation du paramètre).
Désactivation de la fonction MACRO POWER:
•Appuyez sur la touche de l‘appareil désiré (TV, etc.).
•Maintenez la touche « POWER » enfoncée.
•Appuyez sur la touche de l‘appareil désiré (SAT, etc.).
•Relâchez la touche « POWER » (la LED clignote
deux fois en cas de désactivation du paramètre).
7. Entretien
•
N‘utilisez pas de piles neuves avec des piles
usagées dans la télécommande universelle; les
piles usagées sont susceptibles de couler et
provoquer une détérioration de l‘appareil.
• N‘utilisez en aucun cas des produits abrasifs
ou des produits nettoyants agressifs pour le
nettoyage de votre télécommande universelle.
• Vous pouvez éliminer la poussière de votre té-
lécommande en l‘essuyant à l‘aide d‘un chiffon
sec et doux.
8. Élimination des pannes
Q. Ma télécommande universelle ne fonctionne
pas.
R. Contrôlez l’appareil AV. Vous ne pourrez pas uti-
liser la télécommande sur un appareil mis hors
tension à l’aide de la touche d’alimentation
principale.
R. Vériez que les piles sont correctement insérées
dans la télécommande (polarité +/–).
R. Vériez que vous avez bien appuyé sur la touche
de l‘appareil correspondant au système désiré.
R. Remplacez les piles en cas de niveau faible.
Q. Plusieurs codes d’appareils sont mentionnés
pour la marque de mon appareil ; lequel choisir
?
R. Pour déterminer le bon code de votre appareil
AV, testez successivement les codes, l’un après
l’autre, jusqu’à ce que la plupart des fonctions
de votre appareil fonctionnent correctement.
Q. Mon appareil AV réagit uniquement à certaines
commandes de la télécommande.
R. Testez d‘autres codes jusqu’à ce que la plupart
des fonctions de votre appareil fonctionnent
correctement.
9. Service et assistance
En cas de question concernant le produit, veuillez
vous adresser au service de conseil produits de
Hama.
Ligne téléphonique directe : +49 9091 502-115
(allemand/anglais)
Vous trouverez ici de plus amples informations
concernant l‘assistance :
www.hama.com
Mando a distancia universal
Le agradecemos que se haya decidido por la
compra de un producto de Hama.
Tómese tiempo y léase primero las siguientes
instrucciones e informaciones. Por favor, guarde
estas instrucciones en un lugar seguro para poder
consultarlas cuando sea necesario.
Teclas de función (modelos 4 en 1, 8 en 1)
1. LED
2. Tecla de modo para seleccionar el grupo de
aparatos secundario (sólo modelo 8 en 1: AUX,
DVBT, CBL, AMP)
3. Teclas de selección de aparatos
4. Setup: Ajustes del mando a distancia
5. Vol+/Vol-: Regulación de volumen
6. Text EIN: Encender el teletexto
Menu: Abrir el menú del aparato
7. Halten: Parar la página actual del teletexto
8. Cifras numéricas 0-9
9. AV: Seleccionar fuentes de AV externas
10. ◄◄ Retroceso/rojo
► Reproducción /amarillo
►► Avance rápido/azul
● Iniciar grabación
■ Stop/verde
ll Pausa/fucsia
11. -/- -: Cambiar a números de emisoras de dos
cifras
12. Info: Informaciones en pantalla (si el aparato
AV las soporta)
EPG: Guía electrónica de programas (si el
aparato AV seleccionado la soporta)
13.Text AUS: Salir del teletexto
EXIT: Salir del menú del aparato
14. PROG+/PROG-: Selección de programa, hacia
arriba/hacia abajo
15. Conmutador de reproducción sin sonido
OK: Confirmar selección
16. Tecla Shift
17. Power: ON/OFF
1. Explicación del símbolo de nota
Nota
► Este símbolo hace referencia a informaciones
adicionales o indicaciones importantes.
2. Volumen de suministro
- Mando a distancia universal
- Lista de códigos
- Estas instrucciones de manejo
3. Instrucciones de seguridad
• No utilice el mando a distancia universal en
entornos húmedos y evite el contacto con las
salpicaduras de agua.
• Mantenga alejado el mando a distancia de las
fuentes de calor y no lo exponga a la radiación
directa del sol.
• No deje caer el mando a distancia universal.
• No abra el mando a distancia universal. No
contiene piezas que pueda reparar el usuario.
• El mando a distancia universal, como todos los
aparatos eléctricos, no debe estar en manos de
los niños.
4. Primeros pasos – Colocar las pilas
Nota
► Se recomienda utilizar pilas alcalinas. Utilice
dos pilas del tipo „AAA” (LR 03/Micro).
► Retire la cubierta del compartimento de pilas
en el lado posterior del mando a distancia
universal.
► Teniendo en cuenta las marcas de polaridad
“+/ -”, coloque las pilas.
► Cierre el compartimento de las pilas.
16
17
e
Instrucciones de uso

Nota: Memoria de códigos
► Todos los códigos que haya programado se
conservan guardados durante 10 minutos
mientras usted cambia la pila. Asegúrese de
no pulsar ninguna tecla antes de haber colo-
cado nuevas pilas en el mando a distancia.
Si se pulsa una tecla cuando no hay pilas en
el mando a distancia, todos los códigos se
borran.
Nota: Función de ahorro de la pila
► El mando a distancia se apaga automáti-
camente si se mantiene pulsada una tecla
durante más de 15 segundos. Esto conserva
la carga de la pila si el mando a distancia se
queda atrapado en un lugar donde las teclas
se vean continuamente pulsadas, como en-
tre los cojines de un sofá.
5. Configuración
Nota
► Para que la transmisión de infrarrojos sea
correcta, sujete el mando a distancia siem-
pre orientado hacia el aparato a manejar.
► Pulse la tecla „MODE” de selección del gru-
po de aparatos secundario: AUX, AMP, DVB-
T, CBL (sólo modelo 8 en 1).
► Pulse la tecla Shift para utilizar las teclas de
función azules. La función Shift se desactiva
pulsando de nuevo la tecla Shift, o automá-
ticamente si no se pulsa ninguna otra tecla
durante aprox. 30 segundos.
► Si no se realiza ninguna entrada en 30 se-
gundos, el modo de conguración naliza. El
LED parpadea seis veces y se apaga.
► Cada tipo de aparato se puede programar
en cualquier tecla del aparato, es decir, un
televisor se puede programar en la tecla
DVD, AUX, etc.
► Con el mando a distancia universal no se
puede manejar ningún aparato que se en-
cuentre en el modo de conguración. Salga
del modo de conguración y seleccione el
aparato a manejar con ayuda de las teclas
de selección de aparatos.
5.1 Entrada directa de códigos
El volumen de suministro del mando a distancia
universal incluye una lista de códigos. La lista de
códigos muestra códigos de cuatro cifras de la
mayoría de fabricantes de aparatos de AV en orden
alfabético, agrupados por tipo de aparato (p. ej.,
TV, DVD, etc.). Si el aparato a manejar se encuentra
en la lista de códigos, la entrada directa del código
es el método más sencillo para introducir el código.
5.1.1 Encienda el aparato a manejar.
5.1.2 Pulse y mantenga pulsada la tecla „SETUP”
hasta que el LED luzca de forma permanente.
5.1.3 Seleccione el aparato a manejar (p. ej., TV)
mediante la tecla de selección de aparatos. Si
la selección se ha realizado con éxito, el LED
parpadea una vez y después luce de forma
permanente.
5.1.4 En la lista de códigos, busque la marca y el
modelo del aparato a manejar.
5.1.5 Introduzca el código de cuatro cifras corre-
spondiente con ayuda de las teclas numéricas
0-9. El LED conrma la entrada de cada una
de las cifras con un breve parpadeo y se
apaga tras la cuarta cifra.
Remarques
► Si el código es correcto, éste se guarda au-
tomáticamente.
► Si el código no es correcto, el LED parpadea
seis veces y se apaga a continuación. Repita
los pasos 5.1.1 a 5.1.5 o utilice otro método
de entrada de códigos.
5.2 Búsqueda manual de códigos
El mando a distancia universal dispone de una
memoria interna que incluye hasta 350 códigos
por tipo de aparato para los aparatos de AV más
corrientes. Puede ir probando estos códigos hasta
que el aparato a manejar muestre una reacción.
Por ejemplo, el aparato a manejar se apaga (tecla
„POWER”) o cambia de emisora (tecla „PROG+/
PROG-”).
5.2.1
Encienda el aparato a manejar.
5.2.2
Pulse y mantenga pulsada la tecla SETUP
hasta que el LED luzca de forma permanente.
5.2.3
Seleccione el aparato a manejar (p. ej., TV)
mediante la tecla de selección de aparatos. Si
la selección se ha realizado con éxito, el LED
parpadea una vez y después luce de forma
permanente.
5.2.4
Pulse la tecla „POWER” o la tecla „PROG+/
PROG-” para desplazarse por los códigos
preajustados hasta que el aparato a manejar
muestre una reacción.
5.2.5
Pulse „MUTE(OK)” para guardar el código y
salir de la búsqueda de códigos. El LED se
apaga.
Nota
► En la memoria interna se pueden guardar
como máximo 350 códigos de los aparatos
más corrientes. Debido al gran número de
aparatos de AV existentes en el mercado,
puede ocurrir que sólo se disponga de las
funciones principales más corrientes. De ser
éste el caso, repita los pasos 5.2.1 a 5.2.5
para encontrar un código más compatible.
Es posible que para algunos modelos espe-
ciales de aparatos no se disponga de ningún
código.
5.3 Búsqueda automática de códigos
La búsqueda automática de códigos utiliza los mis-
mos códigos preajustados que la búsqueda manual
de códigos (5.2). El mando a distancia universal
comprueba estos códigos automáticamente hasta
que el aparato a manejar muestra una reacción.
Por ejemplo, el aparato a manejar se apaga (tecla
„POWER”) o cambia de emisora (teclas „PROG+/
PROG-”).
5.3.1 Encienda el aparato a manejar.
5.3.2 Pulse y mantenga pulsada la tecla „SETUP”
hasta que el LED luzca de forma permanente.
5.3.3 Seleccione el aparato a manejar (p. ej., TV)
mediante la tecla de selección de aparatos. Si
la selección se ha realizado con éxito, el LED
parpadea una vez y después luce de forma
permanente.
5.3.4 Pulse la tecla „PROG+/PROG-” o „POWER”
para iniciar la búsqueda automática de
códigos. El LED parpadea una vez y luego
luce de forma permanente. Deben transcurrir
6 segundos hasta que el mando a distancia
universal inicie la primera búsqueda.
18
19

Nota: Ajuste de la velocidad de
búsqueda
► El ajuste standard para el tiempo de bús-
queda por código es de 1 segundo. Si este
ajuste no es de su agrado, puede cambiar a
un tiempo de búsqueda de 3 segundos por
código. Para cambiar entre los tiempos de
búsqueda, pulse „PROG+” o „PROG-” en los
6 segundos previos al inicio de la búsqueda
automática de códigos.
5.3.5 El LED conrma cada búsqueda de código
con un solo parpadeo.
5.3.6 Pulse „MUTE(OK)” para guardar el código y
salir de la búsqueda de códigos. El LED se
apaga.
5.3.7 Para cancelar la búsqueda automática en
marcha, pulse la tecla “EXIT”.
Notas
► Si se han comprobado todos los códigos sin
éxito, el mando a distancia universal sale de
la búsqueda automática de códigos y vuelve
automáticamente al modo de funcionamien-
to. El código actualmente ajustado perma-
nece invariable.
5.4 Detección de códigos
La detección de códigos le ofrece la posibilidad de
detectar un código ya introducido.
5.4.1 Pulse y mantenga pulsada la tecla „SETUP”
hasta que el LED luzca de forma permanente.
5.4.2 Seleccione el aparato a manejar (p. ej., TV)
mediante la tecla de selección de aparatos. Si
la selección se ha realizado con éxito, el LED
parpadea una vez y después luce de forma
permanente.
5.4.3 Pulse la tecla „SETUP”. El LED parpadea una
vez y luego luce de forma permanente.
5.4.4 Para buscar la primera cifra, pulse una de las
teclas numéricas de 0 a 9. El LED parpadea
una vez para la primera cifra del número de
código de cuatro cifras.
5.4.5 Repita el paso 5.4.4 para la segunda, tercera
y cuarta cifra.
CODES
TV VCR SATDVD
AUX AMP CBL DVBT
6. Funciones especiales
6.1 Punch-Through de emisora
Con la función Punch-Through de emisora, los co-
mandos PROG+ o PROG- pueden evitar el aparato
actualmente controlado para cambiar la emisora de
un segundo aparato. Los dermás comandos no se
ven afectados por ello.
Para activar la función Punch-Through de emisora:
•Pulse la tecla del aparato que desee (p. ej., TV).
•Mantenga pulsada la tecla „PROG+”.
•Pulse la tecla del aparato que desee (p. ej., SAT).
•Suelte la tecla „PROG+” de nuevo (el LED
parpadea una vez con el ajuste activado).
Para desactivar la función Punch-Through de
emisora:
•Pulse la tecla del aparato que desee (p. ej., TV).
•Mantenga pulsada la tecla „PROG-”.
•Pulse la tecla del aparato que desee (p. ej., SAT).
•Suelte la tecla „PROG-” de nuevo (el LED
parpadea dos veces cuando se desactiva el
ajuste).
6.2 Punch-Through de volumen
Con la función Punch-Through de volumen, los
comandos VOL+ o VOL- pueden evitar el aparato
actualmente contralado para ajustar el volumen de
un segundo aparato. Los demás comandos no se
ven afectados por ello.
Para activar la función Punch-Through de volumen:
•Pulse la tecla del aparato que desee (p. ej., TV).
•Mantenga pulsada la tecla „VOL+”.
•Pulse la tecla del aparato que desee (p. ej., SAT).
•Suelte la tecla „VOL+” de nuevo (el LED parpadea
una vez con el ajuste activado).
Para desactivar la función Punch-Through de
volumen:
•Pulse la tecla del aparato que desee (p. ej., TV).
•Mantenga pulsada la tecla „VOL-”.
•Pulse la tecla del aparato que desee (p. ej., SAT).
•Suelte la tecla „VOL-” de nuevo (
el LED parpadea
dos veces cuando se desactiva el ajuste
).
6.3 Macro Power
Con Macro Power puede encender/apagar dos
aparatos de AV al mismo tiempo.
Para activar la función Macro Power:
•Pulse la tecla del aparato que desee (p. ej., TV).
•Mantenga pulsada la tecla „POWER”.
•Pulse la tecla del aparato que desee (p. ej., SAT).
•Suelte la tecla „POWER” de nuevo (el LED
parpadea una vez con el ajuste activado).
Para desactivar la función Macro Power:
•Pulse la tecla del aparato que desee (p. ej., TV).
•Mantenga pulsada la tecla „POWER”.
•Pulse la tecla del aparato que desee (p. ej., SAT).
•Suelte la tecla „POWER” de nuevo (el LED parpadea
dos veces cuando se desactiva el ajuste).
7. Mantenimiento
•
No utilice pilas viejas y nuevas al mismo tiempo
en el mando a distancia universal ya que las
pilas viejas tienden a derramarse y pueden
provocar una pérdida de rendimiento.
• No limpie nunca el mando a distancia universal
con sustancias abrasivas ni con detergentes
agresivos.
• Mantenga el mando a distancia universal libre
de polvo limpiándolo con un paño suave y seco.
8. Solución de fallos
C. Mi mando a distancia universal no funciona.
R. Compruebe el aparato de AV. Si el interruptor
principal del aparato está apagado, el mando
a distancia universal no puede manejar el
aparato.
R. Compruebe si las pilas están correctamente
colocadas y si la polaridad es correcta.
R. Compruebe si ha pulsado la tecla de aparato
correspondiente para el aparato.
R. Cambie las pilas si están próximas a gastarse.
C. Si para la marca de mi aparato de AV se
encuentran varios códigos de aparato en la
lista, ¿cómo selecciono el código de aparato
correcto?
R. Para encontrar el código de aparato correcto
para el aparato de AV, pruebe los códigos su-
cesivamente hasta que la mayoría de las teclas
funcionen correctamente.
C. Mi aparato de AV sólo reacciona a algunos
comandos de teclas.
R. Pruebe otros códigos hasta que funcione la
mayoría de las teclas.
9. Servicio y soporte
Si tiene que hacer alguna consulta sobre el produc-
to, diríjase al asesoramiento de productos Hama.
Línea directa: +49 9091 502-115 (Alemán/Inglés)
Encontrar más información de soporte aquí:
www.hama.com
20
21

Универсальный пульт
дистанционного управления
Благодарим за покупку!
Перед началом эксплуатации внимательно
ознакомьтесь с настоящей инструкцией. Храните
инструкцию в надежном месте для справок в
будущем.
Органы управления (модели "4 в 1", "8 в 1")
1. Лампа
2. Кнопка выбора дополнительной группы
устройств (только в модели "8 в 1":
AUX,DVBT,CBL,AMP)
3. Кнопки выбора устройств
4. Setup: настройка ПДУ
5. Vol+/Vol-: регулировка громкости
6. Text EIN: включение телетекста
Menu: открыть меню устройства
7. Halten: замораживание текущей страницы
телетекста
8. Кнопки с цифрами 0 - 9
9. AV: выбор внешнего источника AV
10. ◄◄ быстрая перемотка назад (красная)
► воспроизведение (желтая)
►► быстрая перемотка вперед (синяя)
● включение записи
■ стоп (зеленая)
ll пауза (пурпурная)
11. -/- -: включение двухразрядного номера
программы
12. Info: экранная информация (при наличии
функции в AV-устройстве)
EPG: электронная программа передач (при
наличии функции в AV-устройстве)
13.Text AUS: выключить телетекст
EXIT: выйти из меню устройства
14. PROG+/PROG-: переключение программ
вперед/назад
15. Выключатель звука
OK: ввод команды
16. Кнопка Shift
17. Power: включение/выключение питания
1. Описание значков
Примечание
► Дополнительная иливажная информация.
2. Комплект поставки
- Универсальный пульт дистанционного
управления
- Список кодов
- Настоящая инструкция
3. Техника безопасности
• Берегите изделие от влаги и брызг воды.
• Не подвергайте изделие воздействию
прямых солнечных лучей. Не размещайте
изделие рядом с источниками тепла.
• Берегите изделие от ударов и падений.
• Запрещается разбирать изделие.
В устройстве нет узлов, которые
предназначены для техобслуживания
эксплуатационником.
• Не давать детям!
4. Загрузка батарей
Примечание
► Рекомендуется применять щелочные
батареи. Для питания применяются две
батареи ААА (LR 03/Micro).
► На задней панели устройства откройте
крышку отсека батарей.
► Загрузите батареи, соблюдая полярность.
► Закройте крышку отсека батарей.
Примечание! Блок хранения
кодов
► Во время замены батареи записывающее
устройство пульта сохраняет все коды
до 10 минут, однако при этом нельзя
нажимать кнопки до загрузки батареи
в отсек. Если это произойдет, все коды
будут удалены.
Примечание! Экономичный режим
► ПДУ автоматически отключается через
15 секунд после последнего нажатия
на любую кнопку. Это предотвращает
нежелательный разряд батареи в
случае постоянного нажатия на кнопку,
например при попадании пульта между
подушками дивана.
5. Настройка
Примечание!
► Направьте ИК-излучатель ПДУ в сторону
управляемого устройства.
► Нажмите кнопку MODE, чтобы выбрать
дополнительную группу устройств: AUX,
AMP, DVB-T, CBL (только в модели „8
в 1”).
► Чтобы воспользоваться синими
кнопками, нажмите кнопку SHIFT.
Работа кнопки SHIFT отменяется при ее
повторном нажатии или автоматически
через 30 секунд после последнего
нажатия на любую кнопку.
► Режим настройки выключается
автоматически, если нажатий на кнопки
не производилось в течение 30 секунд.
Лампа индикации загорится шесть раз, а
затем погаснет.
► Все типы устройств можно назначить
на любую кнопку, например, кнопки
DVD, AUX и т.д. можно настроить на
управление телевизором.
► В режиме настройки управление
устройствами невозможно. Выйдите из
режима настройки, после чего выберите
кнопкой тип устройства, которым
требуется управлять.
5.1 Ввод кода из списка кнопками
В комплекте имеет список кодов устройств. В
списке приводятся четырехразрядные коды
большинства производителей визуальной
и звуковой техники. Список сортирован
по алфавиту и по типам устройств. Если
управляемое устройство находится в списке
кодов, то прямой ввод кода является самым
простым способом настройки ПДУ.
5.1.1 Включите управляемое устройство.
5.1.2 Нажмите и удерживайте кнопку SETUP,
пока не загорится лампа индикации.
5.1.3 Выберите управляемое устройство, нажав
кнопку типа устройства, например TV. Если
выбор правильный, лампа мигнет один
раз, а затем начнет гореть непрерывно
5.1.4 В списке кодов найдите тип и марку
управляемого устройства.
5.1.5 Введите четырехзначный код из списка.
При вводе каждой цифры загорается
лампа индикации. После ввода 4-й цифры
лампа гаснет.
22
23
u
Руководство по эксплуатации

Примечание
► Действительный код сохраняется
автоматически.
► Если код введен неправильно, лампа
загорается 6 раз, а затем гаснет. В этом
случае повторите пункты 5.1.1 - 5.1.5,
либо воспользуйтесь другим методом
настройки.
5.2 Поиск кода вручную
ПДУ снабжен внутренним блоком памяти на
350 кодов. Поиск кода вручную заключается
в последовательном переборе сохраненных
кодов, пока не сработает управляемое
устройство. Например, управляемое устройство
может отключиться (кнопка POWER) или
переключить программу (PROG+/PROG-).
5.2.1 Включите управляемое устройство.
5.2.2 Нажмите и удерживайте кнопку SETUP,
пока не загорится лампа индикации.
5.2.3 Выберите управляемое устройство, нажав
кнопку типа устройства, например TV. Если
выбор правильный, лампа мигнет один
раз, а затем начнет гореть непрерывно
5.2.4 Нажимайте кнопку POWER или PROG+/
PROG-, переключая, таким образом, коды,
пока не сработает управляемое устройство.
5.2.5
Чтобы сохранить код и выйти из режима
поиска, нажмите MUTE(OK). Лампа
погаснет.
Примечание
► Встроенные блок памяти вмещает до 350
кодов. Так как количество AV-приборов
чрезвычайно велико, возможно будут
работать только основные функции ПДУ. В
этом случае повторите пункты 5.2.1 - 5.2.5,
чтобы найти более подходящий код. Для
некоторых специфичных моделей устройств,
возможно, коды не предусмотрены.
5.3 Автоматический поиск кодов
При автоматическом поиске применяются
те же коды, что и при поиске вручную (5.2).
ПДУ автоматически перебирает коды до
реагирования управляемого устройства.
Например, управляемое устройство может
отключиться (кнопка POWER) или переключить
программу (PROG+/PROG-).
5.3.1
Включите управляемое устройство.
5.3.2 Нажмите и удерживайте кнопку SETUP,
пока не загорится лампа индикации.
5.3.3 Выберите управляемое устройство, нажав
кнопку типа устройства, например TV. Если
выбор правильный, лампа мигнет один
раз, а затем начнет гореть непрерывно
5.3.4 Чтобы включить автопоиск кодов,
нажмите PROG+/PROG- или POWER. Лампа
мигнет один раз, а затем начнет гореть
непрерывно Поиск начнется через 6
секунд.
Примечание! Настройка
скорости поиска
► На каждый код выделена 1 секунда. При
необходимости коды можно переключат
каждые 3 секунды. Чтобы настроить
время переключения кода, нажмите
PROG+ или PROG- в период ожидания
начала автоматического кода (в первые 6
секунд после включения режима поиска).
5.3.5 При переключении кода мигает лампа
индикации.
5.3.6 Чтобы сохранить код и выйти из режима
поиска, нажмите MUTE(OK). Лампа
погаснет.
5.3.7 Чтобы прервать поиск, нажмите кнопку
EXIT.
Примечание
► Если автоматический поиск не дал
результата, ПДУ автоматически переходит
в рабочий режим. Текущий сохраненный
код не изменяется.
5.4 Считывание кодов
Функция предназначена для определения
кодов, которые уже занесены в память пульта
дистанционного управления.
5.4.1 Нажмите и удерживайте кнопку SETUP,
пока не загорится лампа индикации.
5.4.2 Выберите управляемое устройство, нажав
кнопку типа устройства, например TV. Если
выбор правильный, лампа мигнет один
раз, а затем начнет гореть непрерывно.
5.4.3 Нажмите кнопку SETUP. Лампа мигнет один
раз, а затем начнет гореть непрерывно.
5.4.4 Чтобы найти первую цифру кода,
нажимайте кнопки от 0 до 9. При нажатии
правильной цифры лампа индикации
загорится один раз.
5.4.5 Повторите пункт 5.4.4 для поиска второй,
третьей и четвертой цифры.
CODES
TV VCR SATDVD
AUX AMP CBL DVBT
6. 6. Дополнительные функции
6.1 Функция Punch Through для
переклочения программ
Данная функция „сквозных кoманд” (Punch
Тhrough) предназначена для переключения
программ другого устройства, не меняя тип
устройства. Функция не влияет на другие
команды.
Включение функции:
•Нажмите кнопку устройства, например, ТV.
•Нажмите и удерживайте кнопку PROG+.
•Нажмите
кнопку
другого
устройства, например,
SAТ.
•Отпустите кнопку PROG+. Лампа мигнет один
раз, показывая, что настройка включена.
Выключение функции:
•Нажмите кнопку устройства, например, ТV.
•Нажмите и удерживайте кнопку PROG–.
•Нажмите
кнопку
другого
устройства, например,
SAТ.
•Отпустите кнопку PROG–. При отключении
режима настройки лампа мигает два раза.
6.2 Функция Punch Тhrough для реrулировки
rpoмкости
Данная функция „сквозных команд” (Puпch
Through) предназначена для реrулировкм
громкости другого устройства, не меняя тип
устpoйcтвa. Функция не впияет на другие
команды.
Включение функции:
•Нажмите кнопку устройства, например, ТV.
•Нажмите и удерживайте кнопку VOL+.
•Нажмите
кнопку
другого
устройства, например,
SAТ.
•Отпустите кнопку VOL+. Лампа мигнет один
раз, показывая, что настройка включена.
Выключение функции:
•Нажмите кнопку устройства, например, ТV.
•Нажмите и удерживайте кнопку VOL–.
•Нажмите
кнопку
другого
устройства, например,
SAТ.
•Отпустите кнопку VOL–. При отключении
режима настройки лампа мигает два раза.
24
25

6.3 Макрокоманда включения/выключения
питания
Функция предназначена для одновременного
включения/выключения питания двух устройств.
Включение функции:
•Нажмите кнопку устройства, например, ТV.
•Нажмите и удерживайте кнопку POWER.
•Нажмите
кнопку
другого
устройства, например,
SAТ.
•Отпустите кнопку POWER. Лампа мигнет один
раз, показывая, что настройка включена.
Выключение функции:
•Нажмите кнопку устройства, например, ТV.
•Нажмите и удерживайте кнопку POWER.
•Нажмите
кнопку
другого
устройства, например,
SAТ.
•Отпустите кнопку POWER. При отключении
режима настройки лампа мигает два раза.
7. ТЕХОБСЛУЖИВАНИЕ
• Запрещается одновременно загружать новые
и старые батареи.
• Запрещается чистить прибор абразивными
средствами.
• Берегите прибор от пыли. Протирать прибор
следует сухой мягкой тканью.
8. Fehlerbehebung
B. ПДУ не работает.
O. Проверьте управляемое устройство. Главный
выключатель управляемого устройства
должен находиться в положении ВКЛ.
O. Проверьте состояние батарей и соблюдение
полярности.
O. Убедитесь, что нажимаемые кнопки
соответствуют управляемому устройству.
O. Замените разряженные батареи.
B. Как выбрать правильный код при наличии
нескольких кодов для управляемого
устройства.
O. Чтобы найти правильный код для устройства,
попробуйте все коды поочередно, пока
не найдете тот, который поддерживает
наибольшее количество требуемых команд.
B. Устройство реагирует только на некоторые
команды пульта дистанционного управления.
O. Попробуйте применить другой код.
9. Отдел техобслуживания
По вопросам ремонта или замены неисправных
изделий обращайтесь к продавцу или в
сервисную службу компании Hama.
Горячая линия отдела техобслуживания:
+49 9091 502-115 (немецкий, английский)
Подробнее смотрите здесь:
www.hama.com
Telecomando universale
Grazie per avere acquistato un prodotto Hama.
Prima della messa in esercizio, leggete
attentamente le seguenti istruzioni e avvertenze.
Conservate le istruzioni in un luogo sicuro per una
eventuale consultazione.
Tasti funzione (modelli 4 in 1, 8 in 1)
1. LED
2. Tasto modalità per la selezione del gruppo
apparecchi secondario (solo modello 8 in 1:
AUX,DVBT,CBL,AMP)
3. Tasti per la selezione apparecchio
4. Setup: impostazioni del telecomando
5. Vol+/Vol-: regolazione del volume
6. Testo ON: attivare televideo
Menu: menu apparecchi
7. Hold: bloccare pagina televideo attuale
8. Tasti numerici 0-9
9. AV: selezionare sorgenti esterne AV
10. ◄◄ Ritorno/rosso
► Riproduzione/giallo
►► Avanti veloce / blu
● Avvio registrazione
■ Stop / verde
ll Pausa / magenta
11. -/- -: Passare ai numeri trasmettitore a due cifre
12. Info: informazioni on screen (se supportate
dall'apparecchio AV)
EPG: servizio di guida elettronica ai programmi
(se supportato dall'apparecchio AV)
13. Testo OFF: uscire da televideo
EXIT: uscire dal menu apparecchio
14. PROG+/PROG-: scelta programma, verso l'alto/
verso il basso
15. Pulsante Mute
OK: confermare la selezione
16. Tasto Shift
17. Power: ON/OFF
1. Spiegazione del simbolo di avvertenza
Avvertenza
► Questo simbolo rimanda a informazioni sup-
plementari o indicazioni importanti.
2. Volume di fornitura
- Telecomando universale
- Elenco codici
- Queste istruzioni per l’uso
3. Indicazioni di sicurezza
• Non usare il telecomando universale in ambienti
umidi ed evitare il contatto con gli spruzzi.
• Tenere il telecomando universale lontano da
fonti di calore e non esporlo alla luce diretta del
sole.
• Non fare cadere il telecomando universale.
• Non aprire il telecomando universale. Non
contiene parti soggette a manutenzione da
parte dell‘utente.
• Tenere il telecomando universale, come tutte le
apparecchiature elettriche, fuori dalla portata
dei bambini.
4. Primi passi - inserimento delle batterie
Avvertenza
► Si consiglia di utilizzare batterie alcaline.
Utilizzare due batterie del tipo „AAA” (LR
03/Micro).
► Aprire il coperchio del vano batterie sul retro
del telecomando universale.
► Introdurre due batterie con la corretta pola-
rità (+ / -).
► Richiudere il vano batterie.
26
27
i
Istruzioni per l‘uso

Nota: salvacodice
► Tutti i codici programmati restano memo-
rizzati per 10 minuti mentre si sostituisce la
batteria. Non premere alcun pulsante prima
di inserire la batteria nuova nel telecoman-
do. Tutti i codici vengono cancellati se si
preme un pulsante mentre non ci sono bat-
terie nel telecomando.
Nota: Funzione di risparmio batteria
► Il telecomando si spegne automaticamente
se si tiene premuto un pulsante per più di
15 secondi. Questo consente di preservare
la batteria se il telecomando resta bloccato
in una posizione in cui i pulsanti vengono
continuamente premuti, come tra i cuscini
del divano.
5. Setup
Avvertenze
► Per una corretta trasmissione a infrarossi, te-
nere sempre il telecomando nella direzione
dell‘apparecchio da comandare.
► Premere il tasto „MODE” per scegliere il
gruppo apparecchi secondario: AUX, AMP,
DVB-T, CBL (solo modello 8 in 1).
► Premere il tasto Shift per utilizzare i tasti fun-
zione blu. La funzione Shift viene disattivata
premendo nuovamente il tasto Shift, oppure
automaticamente, se non si preme alcun ta-
sto per ca. 30 secondi.
► Se per 30 secondi non si preme nulla, si esce
dal modo Setup. Il LED lampeggia 6 volte,
quindi si spegne.
► Tutti i tipi di apparecchi possono essere pro-
grammati premendo un tasto qualsiasi, ad
es. un televisore può essere programmato
con DVD, AUX ecc.
► Con il telecomando universale non si posso-
no comandare apparecchi che si trovano nel
modo Setup. Per uscire dal modo Setup, sce-
gliere l‘apparecchio da comandare mediante
i tasti per la scelta apparecchio.
5.1 Immissione diretta del codice
Nella confezione del telecomando universale è
contenuto un elenco dei codici. L‘elenco riporta
i codici a quattro cifre della maggior parte dei
costruttori di apparecchi AV in ordine alfabetico,
raggruppati in base al tipo di apparecchio (ad es.
TV, DVD ecc.). Se l‘apparecchio da comandare è
riportato nell‘elenco, l‘immissione diretta del codice
è il metodo più immediato.
5.1.1 Accendere l’apparecchio da comandare.
5.1.2 Premere il tasto „SETUP”, nché il LED non si
accende a luce ssa.
5.1.3 Mediante il tasto apparecchio, scegliere
l‘apparecchio da comandare (ad es. TV). A
scelta avvenuta, il LED lampeggia una volta,
quindi resta acceso.
5.1.4 Nell‘elenco codici, cercare la marca e il tipo di
apparecchio da comandare.
5.1.5 Immettere il codice a quattro cifre corrispon-
dente mediante i tasti numerici 0-9. Il LED
conferma l’immissione delle singole cifre
lampeggiando brevemente e si spegne dopo
la quarta cifra.
Note
► Un codice valido viene salvato automatica-
mente.
► In caso di codice non valido, il LED lampeg-
gia sei volte, quindi si spegne. Ripetere i
passi da 5.1.1 a 5.1.5 o utilizzare un altro
metodo per l‘immissione dei codici.
5.2 Ricerca codice manuale
Il telecomando universale dispone di una memoria
interna che contiene già 350 codici per appa-
recchio, per ciascuno dei più comuni apparecchi
AV. È possibile fare scorrere i vari codici, nché
l‘apparecchio da comandare non mostra una
reazione, ad esempio l’apparecchio da comandare
si spegne (tasto „POWER”) oppure cambia il
programma (tasto „PROG+/PROG-”).
5.2.1 Accendere l’apparecchio da comandare.
5.2.2 Premere il tasto „SETUP”, nché il LED non si
accende a luce ssa.
5.2.3 Mediante il tasto apparecchio, scegliere
l‘apparecchio da comandare (ad es. TV). A
scelta avvenuta, il LED lampeggia una volta,
quindi resta acceso.
5.2.4 Premere il tasto „POWER” o „PROG+/PROG-”
per scorrere i codici preimpostati, nché
l‘apparecchio da comandare non mostra una
reazione.
5.2.5 Premere „MUTE(OK)” per memorizzare il
codice e uscire dalla ricerca codice. Il LED si
spegne.
Note
► Nella memoria interna si possono memoriz-
zare massimo 350 codici degli apparecchi
più comuni. Per via dei numerosi apparecchi
AV presenti sul mercato, può accadere che
siano disponibili solo le funzioni principali
più comuni. In questo caso, ripetere i pas-
saggi da 5.2.1 a 5.2.5 per trovare un codice
compatibile. Per alcuni modelli speciali di
apparecchi, potrebbero non esserci codici
disponibili.
5.3 Ricerca codice automatica
La ricerca automatica del codice utilizza gli stessi
codici preimpostati della ricerca manuale del codice
(5.2). Il telecomando universale ricerca i codici
manualmente, nché l‘apparecchio da comandare
non mostra una reazione, ad esempio l’apparecchio
da comandare si spegne (tasto „POWER”) oppure
cambia il programma (tasto „PROG+/PROG-”).
5.3.1 Accendere l’apparecchio da comandare.
5.3.2 Premere il tasto „SETUP”, nché il LED non si
accende a luce ssa.
5.3.3 Mediante il tasto apparecchio, scegliere
l‘apparecchio da comandare (ad es. TV). A
scelta avvenuta, il LED lampeggia una volta,
quindi resta acceso.
5.3.4 Premere il tasto „PROG+/PROG-” o „POWER”
per avviare la ricerca automatica del codice.
Il LED lampeggia una volta, quindi resta
acceso. Occorrono 6 secondi anché il
telecomando universale inizi a effettuare la
prima ricerca.
Nota: impostazione della velocità
di ricerca
► L‘impostazione standard del tempo di ricerca
per ciascun codice è 1 secondo. Se si pre-
ferisce, si può passare a un tempo di ricer-
ca di 3 secondi. Per passare tra i tempi di
ricerca, premere „PROG+” o „PROG-” entro
6 secondi dall‘avvio della ricerca automatica
del codice.
5.3.5 Il LED conferma le ricerche dei codici con un
singolo lampeggio.
5.3.6 Premere „MUTE(OK)” per memorizzare il
codice e uscire dalla ricerca codice. Il LED si
spegne.
5.3.7 Per interrompere la ricerca automatica,
premere il tasto „EXIT”.
Note
► Se si provano tutti i codici senza successo,
il telecomando universale esce dalla ricerca
automatica e torna automaticamente nel
modo di esercizio. Il codice attualmente me-
morizzato resta invariato.
28
29

5.4 Riconoscimento del codice
Il riconoscimento del codice consente di rilevare i
codici già immessi.
5.4.1 Premere il tasto „SETUP”, nché il LED non si
accende a luce ssa.
5.4.2 Mediante il tasto apparecchio, scegliere
l‘apparecchio da comandare (ad es. TV). A
scelta avvenuta, il LED lampeggia una volta,
quindi resta acceso.
5.4.3 Premere il tasto SETUP. Il LED lampeggia una
volta, quindi resta acceso.
5.4.4 Per la ricerca della prima cifra, premere uno
dei tasti numerici da 0 a 9. Il LED lampeggia
una volta per la prima cifra del codice nume-
rico a quattro cifre.
5.4.5 Ripetere il passaggio 5.4.4 per la seconda,
terza e quarta cifra.
CODES
TV VCR SATDVD
AUX AMP CBL DVBT
6. Funzioni speciali
6.1 Punch through canale
Con la funzione Punch through canale, i comandi
PROG+ o PROG- possono eludere l‘apparecchio
attualmente comandato e cambiare i programmi di
un secondo apparecchio. Tutti gli altri comandi non
sono interessati.
Ecco come attivare la funzione Punch through canale:
•Premere il tasto dell‘apparecchio desiderato
(ad es. TV)
•Tenere premuto il tasto „PROG+”.
•Premere il tasto dell‘apparecchio desiderato
(ad es. SAT)
•Rilasciare il tasto „PROG+” (il LED lampeggia una
volta quando l‘impostazione è attivata).
Ecco come disattivare la funzione Punch through
canale:
•Premere il tasto dell‘apparecchio desiderato
(ad es. TV)
•Tenere premuto il tasto „PROG-”.
•Premere il tasto dell‘apparecchio desiderato
(ad es. SAT)
•Rilasciare il tasto „PROG-” (il LED lampeggia due
volte se viene disattivata l‘impostazione).
6.2 Punch through volume
Con la funzione Punch through volume, i comandi
VOL+ o VOL- possono eludere l‘apparecchio
attualmente comandato e variare il volume di un
secondo apparecchio. Tutti gli altri comandi non
sono interessati.
Ecco come attivare la funzione Punch through
volume:
•Premere il tasto dell‘apparecchio desiderato
(ad es. TV)
•Tenere premuto il tasto „VOL+”.
•Premere il tasto dell‘apparecchio desiderato
(ad es. SAT)
•Rilasciare il tasto „VOL+” (il LED lampeggia una
volta quando l‘impostazione è attivata).
Ecco come disattivare la funzione Punch through
volume:
•Premere il tasto dell‘apparecchio desiderato
(ad es. TV)
•Tenere premuto il tasto „VOL-”.
•Premere il tasto dell‘apparecchio desiderato
(ad es. SAT)
•Rilasciare il tasto „VOL-” (il LED lampeggia due
volte se viene disattivata l‘impostazione).
6.3 Macro Power
Con il tasto Macro Power è possibile accendere e
spegnere contemporaneamente due apparecchi AV.
Ecco come attivare la funzione Macro Power:
•Premere il tasto dell‘apparecchio desiderato
(ad es. TV)
•Tenere premuto il tasto „POWER”.
•Premere il tasto dell‘apparecchio desiderato
(ad es. SAT)
•Rilasciare il tasto „POWER” (il LED lampeggia
una volta quando l‘impostazio ne è attivata).
Ecco come disattivare la funzione Macro Power:
•Premere il tasto dell‘apparecchio desiderato
(ad es. TV)
•Tenere premuto il tasto „POWER”.
•Premere il tasto dell‘apparecchio desiderato
(ad es. SAT)
•Rilasciare il tasto „POWER” (il LED lampeggia
due volte se viene disattivata l‘impostazione).
7. Manutenzione
• Non inserire mai contemporaneamente batterie
vecchie e nuove nel telecomando universale,
poiché le batterie vecchie tendono a scaricarsi
causando una perdita di potenza.
• Non pulire mai il telecomando universale con
sostanze abrasive o detergenti aggressivi.
• Togliere la polvere con un panno morbido e
asciutto.
8. Ricerca Guasti
Q. Il mio telecomando universale non funziona!
R. Vericare l‘apparecchio AV. Se l‘interruttore
principale dell‘apparecchio è spento, non utiliz-
zare il telecomando universale dell‘apparecchio.
R. Vericare che le batterie del telecomando siano
inserite correttamente e che la polarità +/–
corrisponda.
R. Vericare di avere premuto il corrispondente
tasto dell‘apparecchio.
R. Sostituire le batterie se sono scariche.
Q. Se per la marca del mio apparecchio AV sono
elencati numerosi codici, come scelgo quello
corretto?
R. Per determinare il codice corretto per
l‘apparecchio AV, provare i codici uno dopo
l‘altro nché la maggior parte dei tasti
dell‘apparecchio non funzionano correttamente.
Q. Il mio apparecchio AV reagisce solo ad alcuni
comandi dei tasti.
R. Provare un altro codice nché la maggior parte
dei tasti non funzionano correttamente.
9.
Assistenza e supporto
In caso di domande sul prodotto, rivolgersi alla Consu-
lenza prodotto Hama.
Hotline: +49 9091 502-115 (ted./ing.)
Ulteriori informazioni sul supporto sono disponibili qui:
www.hama.com
30
31

Universele afstandsbediening
Hartelijk dank dat u voor een Hama-product heeft
gekozen.
Neemt u zich de tijd en lees de onderstaande
aanwijzingen en informatie allereerst geheel door.
Bewaar deze instructies op een veilige plek als
naslagwerk voor op een later tijdstip.
Functietoetsen (modellen 4 in 1, 8 in 1)
1. LED
2. Moduletoets voor de selectie van de secundaire
apparatuurgroep (alleen model 8 in 1:
AUX,DVBT,CBL,AMP)
3. Toetsen voor de apparatuurselectie
4. Setup: instellingen van de afstandsbediening
5. Vol+/Vol-: volumeregeling
6. Text IN: teletext inschakelen
Menu: apparatuurmenu openen
7. Vasthouden: op actuele teletextpagina blijven
8. Cijfertoetsen 0-9
9. AV: externe AV-bronnen selecteren
10. ◄◄ terug/rood
► weergave/geel
►► snel vooruit/blauw
● opname starten
■ stop/groen
ll pause/roze
11. -/- -: naar tweecijferig zendernummer
omschakelen
12. Info: On-Screen-informatie (mits deze functie
door het AV-toestel wordt ondersteund)
EPG: elektronische programmagids (mits deze
functie door het geselecteerde AV-toestel wordt
ondersteund)
13.Tekst UIT: teletext verlaten
EXIT: apparatuurmenu verlaten
14. PROG+/PROG-: programmaselectie, naar boven/
naar beneden
15. Mute-schakelaar
OK: selectie bevestigen
16. Shift-toets
17. Power: IN/UITä
1. Verklaring van het aanwijzing-symbool
Aanwijzing
► Dit symbool duidt op extra informatie of bel-
angrijke aanwijzingen.
2. Bij de verpakking inbegrepen
- Universele afstandsbediening
- Codelijst
- Deze bedieningsinstructies
3. Veiligheidsinstructies
• Gebruik de universele afstandsbediening niet in
vochtige omgevingen en voorkom contact met
spatwater.
• Houd de universele afstandsbediening uit de
buurt van warmtebronnen en stel de afstands-
bediening niet bloot aan direct zonlicht.
• Laat de universele afstandsbediening niet
vallen.
• De universele afstandsbediening niet openen.
De afstandsbediening bevat geen onderdelen
die door de gebruiker dienen te worden onder-
houden.
• De universele afstandsbediening dient, net als
alle elektrische apparatuur, buiten het bereik
van kinderen gehouden te worden.
4. Eerste stappen – plaatsen van de batterijen
Aanwijzing
► Wij adviseren alkaline batterijen. Gebruik
twee batterijen van het type „AAA” (LR 03/
Micro).
► Verwijder het batterijdeksel aan de achter-
zijde van de universele afstandsbediening.
► Plaats vervolgens de batterijen met inacht-
neming van de polariteit (+/-), zoals in het
batterijvak is aangegeven.
► Sluit het batterijvak.
Aanwijzing: Code-opslag
► Eventuele geprogrammeerde codes blijven
gedurende 10 minuten bewaard terwijl u
de batterijen vevangt. Druk a.u.b. geen en-
kele toets in voordat u nieuwe batterijen in
de afstandsbediening heeft geplaatst. Alle
geprogrammeerde codes zullen worden
verwijderd indien een toets wordt ingedrukt
terwijl er zich geen batterijen in de afstands-
bediening bevinden.
Aanwijzing: Batterijspaarfunctie
► Indien er een toets langer dan 15 seconden
wordt ingedrukt, dan zal de afstandsbedie-
ning automatisch uitschakelen. Dit is een
energiebesparende functie voor de batte-
rijen indien de afstandsbediening wordt
ingeklemd en dientengevolge toets(en) con-
tinu worden ingedrukt, zoals bijv. tussen de
kussens van het bankstel.
5. Setup
Aanwijzing
► Houd de afstandsbediening voor een cor-
recte infrarood-overdracht altijd in de rich-
ting van het te bedienen toestel.
► Druk op de toets „MODE” voor de selectie
van de secundaire apparatuurgroep: AUX,
AMP, DVB-T, CBL (alleen model 8 in 1).
► Druk de Shift-toets in teneinde de blauwe
functietoetsen te gebruiken. De Shift-functie
wordt door opnieuw op de Shift-toets te
drukken gedeactiveerd, of automatisch, in-
dien ca. gedurende 30 seconden geen toets
wordt ingedrukt.
► Indien gedurende ca. 30 seconden niets
wordt ingevoerd, wordt de Setup-modus
beëindigd. De LED knippert zesmaal en gaat
vervolgens uit.
► Ieder type toestel kan onder een willekeurige
toets worden geprogrammeerd, bijv. kan een
televisietoestel onder DVD, AUX worden ge-
programmeerd.
► U kunt met de universele afstandsbediening
geen toestel bedienen, zolang zich dit in
de Setup-modus bevindt. Verlaat de Setup-
modus, en selecteer het te bedienen toestel
met behulp van de toetsen voor de appara-
tuurselectie.
5.1 Directe code-invoer
Bij de levering van de universele afstandsbediening
is een codelijst inbegrepen. De codelijst toont
viercijferige codes van de meeste AV-apparatuur-
fabrikanten in alfabetische volgorde, gegroepeerd
naar het soort toestel (bijv. tv, dvd-speler enz.).
Indien het te bedienen toestel in de codelijst is
vermeld, is de directe code-invoer de eenvoudigste
invoermethode.
5.1.1 Schakel het toestel dat bediend moet worden
in.
5.1.2 Druk op de toets „SETUP” totdat de LED
continu brandt.
5.1.3 Selecteer met behulp van de apparatuurtoets
het toestel dat bediend moet worden, (bijv.
tv). Bij succesvolle selectie knippert de LED
eenmaal en brandt daarna continu.
5.1.4 Zoek in de codelijst naar het merk en type van
het te bedienen toestel.
5.1.5 Voer vervolgens de desbetreffende viercijfe-
rige code met behulp van de cijfertoetsen 0-9
in. De LED bevestigt de invoer van de afzon-
derlijke cijfers steeds met een kort knipperen
en gaat na het vierde cijfer uit.
32
33
o
Gebruiksaanwijzing

Opmerkingen
► Een geldige code wordt automatisch opges-
lagen.
► Bij een ongeldige code knippert de LED
zesmaal en gaat vervolgens uit. Herhaal de
stappen 5.1.1 tot 5.1.5, of maak gebruik
van een andere methode om de codes in te
voeren.
5.2 Handmatig codes zoeken
De universele afstandsbediening beschikt over een
intern geheugen, waarin reeds max. 350 codes per
soort toestel voor de meest gangbare AV-appara-
tuur zijn opgeslagen. U kunt deze codes doorlopen
totdat het te bedienen toestel een reactie toont.
Het te bedienen toestel schakelt zich bijvoorbeeld
uit (toets „POWER”) of schakelt om naar een
andere zender (toets „PROG+/PROG-”).
5.2.1 Schakel het toestel dat bediend moet worden
in.
5.2.2 Druk op de toets „SETUP” totdat de LED
continu brandt.
5.2.3 Selecteer met behulp van de apparatuurtoets
het toestel dat bediend moet worden, (bijv.
tv). Bij succesvolle selectie knippert de LED
eenmaal en brandt daarna continu.
5.2.4 Druk op de toets „POWER” of „PROG+/PROG-
”, teneinde door de vooraf reeds ingevoerde
codes te bladeren totdat het te bedienen
toestel een reactie toont.
5.2.5 Druk op „MUTE(OK)” teneinde de code op te
slaan en de code-zoekfunctie te verlaten. De
LED gaat uit.
Opmerkingen
► In het interne geheugen kunnen maximaal
350 codes van de meest gangbare apparatu-
ur worden opgeslagen. Vanwege de talrijke
op de markt te verkrijgen AV-apparatuur kan
het voorkomen dat alleen de meest gebru-
ikelijke hoofdfuncties te beschikking zijn.
Is dit het geval dan herhaalt u de stappen
5.2.1 tot 5.2.5 teneinde een meer compa-
tibele code te vinden. Voor enige speciale
apparatuurmodellen is mogelijk geen code
ter beschikking.
5.3 Automatische code-zoekfunctie
De automatische code-zoekfunctie maakt gebruik
van dezelfde vooraf ingevoerde codes zoals de
handmatige code-zoekfunctie (5.2). De universele
afstandsbediening doorzoekt de codes echter
automatisch totdat het te bedienen toestel een
reactie toont. Het te bedienen toestel schakelt zich
bijvoorbeeld uit (toets „POWER”) of schakelt om
naar een andere zender (toets „PROG+/PROG-”).
5.3.1 Schakel het toestel dat bediend moet
worden in.
5.3.2 Druk op de toets „SETUP” totdat de LED
continu brandt.
5.3.3 Selecteer met behulp van de apparatuurtoets
het toestel dat bediend moet worden, (bijv.
tv). Bij succesvolle selectie knippert de LED
eenmaal en brandt daarna continu.
5.3.4 Druk op de toets „PROG+/PROG-” of
„POWER” teneinde de automatische code-
zoekfunctie te starten. De LED knippert
eenmaal en brandt daarna continu. Het duurt
6 seconden totdat de universele afstandsbe-
diening met de eerste zoektocht begint.
Aanwijzing: instellen van de
zoeksnelheid
► De standaardinstelling voor de zoektijd per
code is 1 seconde. Indien deze instelling u
niet bevalt kunt u naar een zoektijd van 3
seconden per code omschakelen. Om tussen
de zoektijden om te schakelen drukt u op
„PROG+” of „PROG-” binnen de 6 seconden
voor het begin van de automatische code-
zoekfunctie.
5.3.5 De LED bevestigt de desbetreffende code-
zoekfuncties door eenmaal te knipperen.
5.3.6 Druk op „MUTE(OK)” teneinde de code op te
slaan en de code-zoekfunctie te verlaten. De
LED gaat uit.
5.3.7 Teneinde de automatische zoekfunctie tijdens het
zoeken af te breken drukt u op de toets „EXIT”.
Opmerkingen
► Indien alle codes zonder succes werden
doorzocht, verlaat de universele afstandsbe-
diening de automatische code-zoekfunctie
en keert automatisch naar de bedrijfsmodus
terug. De actueel opgeslagen code blijft on-
gewijzigd.
5.4 Codeherkenning
De codeherkenning biedt aan u de mogelijkheid
een reeds ingevoerde code te achterhalen.
5.4.1 Druk op de toets „SETUP” totdat de LED
continu brandt.
5.4.2 Selecteer met behulp van de apparatuurtoets
het toestel dat bediend moet worden, (bijv.
tv). Bij succesvolle selectie knippert de LED
eenmaal en brandt daarna continu.
5.4.3 Druk op de toets „SETUP”. De LED knippert
eenmaal en brandt daarna continu.
5.4.4 Druk, om het eerste getal te zoeken, op één
van de cijfertoetsen 0 tot 9. De LED knippert
eenmaal voor het eerste getal van het viercij-
ferige codenummer
.
5.4.5 Herhaal de stap 5.4.4 voor het tweede, derde
en vierde getal.
CODES
TV VCR SATDVD
AUX AMP CBL DVBT
6. Speciale functies
6.1 Sender-Punch-Through
Met de Sender-Punch-Through-functie kunnen de
commando‘s PROG+ of PROG- hel actueel bediende
toestel omzeilen, en de zenders va n een tweede
toestel omschakelen. Alle andere commando‘s zijn
daarvan uitgesloten.
Zo activeert u de Sender-Punch-Through-functie:
•Druk op de gewenste apparatuurtoets (bijv. tv).
•Houd de toets „PROG+” ingedrukt.
•Druk op de gewenste apparatuurtoets (bijv. SAl).
•Laat de toets „PROG+” weer los (de LED knippert
eenmaal bij geactiveerde instelling).
Zo deactiveert u de Sender-Punch-Through-functie:
•Druk op de gewenste apparatuurtoets (bijv. tv).
•Houd de toets „PROG-” ingedrukt.
•Druk op de gewenste apparatuurtoets (bijv. SAl).
•Laat de toets „PROG-” weer los (de LED
knippert tweemaal indien de instelling wordt
gedeactiveerd).
34
35

6.2 Geluidssterkte-Punch-Through
Met de Geluidssterkte-Punch-Through-functie
kunnen de commando‘s VOL+ of VOL- het actueel
bediende toestel omzeilen, en de geluidssterkte
van een tweede toestel instellen. Alle andere
commando‘s zijn daarvan uitgesloten.
Zo activeert u de Geluidssterkte-Punch-Through-
functie:
•Druk op de gewenste apparatuurtoets (bijv. tv).
•Houd de toets „VOL+” ingedrukt.
•Druk op de gewenste apparatuurtoets (bijv. SAl).
•Laat de toets „VOL+” weer los (de LED knippert
eenmaal bij geactiveerde instelling).
Zo deactiveert u de Geluidssterkte-Punch-Through-
functie:
•Druk op de gewenste apparatuurtoets (bijv. tv).
•Houd de toets „VOL-” ingedrukt.
•Druk op de gewenste apparatuurtoets (bijv. SAl).
•Laat de toets „VOL-” weer los (de LED
knippert tweemaal indien de instelling wordt
gedeactiveerd).
6.3 Macro Power
Met Macro Power kunt u twee AV-toestellen
tegelijkertijd in-/uitschakelen.
Zo activeert u de Macro Power-functie:
•Druk op de gewenste apparatuurtoets (bijv. tv).
•Houd de toets „POWER” ingedrukt.
•Druk op de gewenste apparatuurtoets (bijv. SAl).
•Laat de toets „POWER” weer los (de LED knippert
eenmaal bij geactiveerde instelling).
Zo deactiveert u de Macro Power-functie:
•Druk op de gewenste apparatuurtoets (bijv. tv).
•Houd de toets „POWER” ingedrukt.
•Druk op de gewenste apparatuurtoets (bijv. SAl).
•Laat de toets „POWER” weer los (de LED
knippert tweemaal indien de instelling wordt
gedeactiveerd)
7. Onderhoud
• Gebruik nimmer tegelijkertijd oude en nieuwe
batterijen in de universele afstandsbediening
omdat oude batterijen kunnen lekken en tot
vermogensverlies kunnen leiden.
• Reinig de universele afstandsbediening nimmer
met een schuurmiddel of scherpe reinigingsmid-
delen.
• Houd de universele afstandsbediening vrij van
stof door haar regelmatig met een droge zachte
doek te reinigen.
8. Het Oplossen van Storingen
V. Mijn universele afstandsbediening doet het niet!
A. Controleer het AV-toestel. Indien de hoofdscha-
kelaar van het toestel is uitgeschakeld kan de
universele afstandsbediening het toestel niet
bedienen.
A. Controleer of de batterijen van de afstandsbe-
diening juist zijn geplaatst en of de polariteit in
orde is.
A. Controleer of de desbetreffende toets voor het
toestel is ingedrukt.
A. Vervang de batterijen bij een laag laadniveau.
V. Indien voor het merk van mijn AV-toestel meer-
dere toestelcodes zijn opgesomd, hoe selecteer
dan de juiste toestelcode?
A. Om de correcte toestelcode voor het AV-toestel
te achterhalen, test u de codes één voor één uit
tot de meeste toetsen/functies van uw toestel
naar behoren functioneren.
V. Mijn AV-toestel reageert alleen op een paar
toetsen.
A. Probeer andere codes totdat de meeste toetsen
correct functioneren.
9. Service en support
Neem bij vragen over het product contact op met
de afdeling Productadvies van HAMA.
Hotline: +49 9091 502-115 (Duits/Engels)
Meer support-informatie vindt u hier:
www.hama.com
Τηλεχειριστήριο γενικής χρήσης
Σας ευχαριστούμε για την αγορά αυτού του προϊόντος
της Hama.
Διαβάστε προσεκτικά όλες τις παρακάτω οδηγίες και
πληροφορίες. Φυλάξτε αυτό το εγχειρίδιο σε ασφαλές
μέρος για μετέπειτα χρήση.
Πλήκτρα λειτουργίας (μοντέλα 4 σε 1, 8 σε 1)
1. Λυχνία LED
2. Πλήκτρο λειτουργίας για επιλογή της
δευτερεύουσας ομάδας συσκευών (μόνο στο
μοντέλο 8 σε 1: AUX,DVBT,CBL,AMP)
3.
Πλήκτρα επιλογής συσκευής
4.
Setup: Ρυθμίσεις του τηλεχειριστηρίου
5.
Vol+/Vol-: Ρύθμιση της έντασης
6.
Text ΟΝ: Ενεργοποίηση teletext
Menu: Άνοιγμα μενού συσκευής
7.
Hold: Παραμονή στην τρέχουσα σελίδα teletext
8.
Αριθμητικά πλήκτρα 0-9
9.
AV: Επιλογή εξωτερικών πηγών ήχου/εικόνας
10. ◄◄ Μετακίνηση προς τα εμπρός/κόκκινο
► Αναπαραγωγή/κίτρινο
►► Μετακίνηση προς τα πίσω/μπλε
● Έναρξη εγγραφής
■ Διακοπή/πράσινο
ll Προσωρινή διακοπή/ματζέντα
11. -/- -: Μετάβαση σε διψήφιους αριθμούς
12. Info: Πληροφορίες στην οθόνη (εάν
υποστηρίζονται από την συσκευή ήχου/εικόνας)
EPG: Ηλεκτρονικός οδηγός προγράμματος (εάν
υποστηρίζεται από την επιλεγμένη συσκευή ήχου/
εικόνας)
13.Text OFF: Έξοδος από το teletext
EXIT: Έξοδος από το μενού συσκευών
14. PROG+/PROG-: Επιλογή προγράμματος, προς τα
πάνω/κάτω
15. Διακόπτης σίγασης
OK: Επιβεβαίωση επιλογής
16. Πλήκτρο Shift
17. Power: Ενεργοποίηση/Απενεργοποίηση
1.
Επεξήγηση του συμβόλου υπόδειξης
Υπόδειξη
► Αυτό το σύμβολο υποδεικνύει επιπλέον
πληροφορίες ή σημαντικές υποδείξεις.
2.
Περιεχόμενα συσκευασίας
- Τηλεχειριστήριο γενικής χρήσης
- Λίστα κωδικών
- Αυτό το εγχειρίδιο χρήσης
3.
Υποδείξεις ασφαλείας
•
Μην χρησιμοποιείτε το τηλεχειριστήριο γενικής
χρήσης σε υγρό περιβάλλον, και αποφεύγετε
επαφή με σταγόνες νερού.
•
Κρατήστε το τηλεχειριστήριο μακριά από πηγές
θερμότητας και μην το εκθέτετε σε άμεση ηλιακή
ακτινοβολία.
•
Μην αφήνετε το τηλεχειριστήριο να πέσει.
•
Μην ανοίγετε το τηλεχειριστήριο. Δεν περιέχει
εξαρτήματα που μπορεί να επισκευάσει ο χρήστης.
•
Το τηλεχειριστήριο, όπως και άλλες ηλεκτρικές
συσκευές, δεν είναι παιχνίδι για τα παιδιά.
4.
Πρώτα βήματα – Τοποθέτηση των μπαταριών
Υπόδειξη
► Συνίσταται η χρήση αλκαλικών μπαταριών.
Χρησιμοποιήστε δύο μπαταρίες „ΑΑΑ” (LR
03/Micro).
► Αφαιρέστε το κάλυμμα των μπαταριών στην
πίσω πλευρά του τηλεχειριστηρίου.
► Τοποθετήστε τις μπαταρίες λαμβάνοντας
υπόψη τα σύμβολα πολικότητας „+/-”.
► Κλείστε τη θήκη μπαταριών.
36
37
k
Οδηγίες χρήσης

Υπόδειξη: Μνήμη κωδικών
► Κατά την αντικατάσταση των μπαταριών
αποθηκεύονται για 10 λεπτά όλοι οι
κωδικοί που προγραμματίσατε. Δεν πρέπει
να πατήσετε κάποιο πλήκτρο μέχρι να
τοποθετηθούν οι νέες μπαταρίες στο
τηλεχειριστήριο. Αν πατηθεί κάποιο πλήκτρο
χωρίς να έχουν τοποθετηθεί οι μπαταρίες στο
τηλεχειριστήριο, χάνονται όλοι οι κωδικοί.
Υπόδειξη: Λειτουργία
εξοικονόμησης ενεργείας:
► Αν δεν πατηθεί κανένα πλήκτρο για
15 δευτερόλεπτα το τηλεχειριστήριο
απενεργοποιείται αυτόματα. Κατ‘ αυτόν τον
τρόπο γίνεται εξοικονόμηση μπαταριών,
σε περίπτωση που το τηλεχειριστήριο
σφηνώσει σε κάποιο μέρος όπου πατιούνται
συνεχώς τα πλήκτρα π. χ. ανάμεσα στα
μαξιλάρια του καναπέ.
5. Setup
Υποδείξεις
► Για σωστή μεταφορά υπέρυθρων κρατάτε
το τηλεχειριστήριο πάντα προς το μέρος της
συσκευής.
► Πατήστε το πλήκτρο „MODE” για επιλογή της
δευτερεύουσας ομάδας συσκευών: AUX, AMP,
DVB-T, CBL (μόνο στο μοντέλο 8 σε 1).
► Πατήστε το πλήκτρο Shift για να
χρησιμοποιήσετε τα μπλε πλήκτρα
λειτουργίας. Η λειτουργία Shift
απενεργοποιείται πατώντας ξανά το πλήκτρο
Shift, ή αυτόματα, εάν για 30 περίπου
δευτερόλεπτα δεν πατηθεί κανένα πλήκτρο
► Εάν δεν γίνει κάποια εισαγωγή δεδομένων για
περίπου 30 δευτερόλεπτα, ολοκληρώνεται
η λειτουργία εγκατάστασης. Η λυχνία LED
αναβοσβήνει έξι φορές και μετά σβήνει..
► Κάθε τύπος συσκευής μπορεί να
προγραμματιστεί μέσω του πλήκτρου
συσκευής που εσείς θέλετε π.χ. η τηλεόραση
μπορεί να προγραμματιστεί μέσω του DVD,
AUX κλπ.
► Ο χειρισμός της συσκευής μέσω του
τηλεχειριστηρίου δεν μπορεί να γίνει όσο αυτή
βρίσκεται στη λειτουργία εγκατάστασης. Βγείτε
από το μενού εγκατάστασης και επιλέξτε τη
συσκευή που θέλετε να χειριστείτε μέσω
πλήκτρων επιλογής συσκευής.
5.1 Άμεση εισαγωγή κωδικού
Στη συσκευασία του τηλεχειριστηρίου υπάρχει μια
λίστα κωδικών. Στη λίστα κωδικών αναγράφονται
τετραψήφιοι κωδικοί των περισσότερων
κατασκευαστών συσκευών ήχου/εικόνας σε
αλφαβητική σειρά, κατηγοριοποιημένοι κατά τύπο
συσκευής (π.χ. τηλεόραση, συσκευή DVD κλπ.). Εάν
η συσκευή που θέλετε να χειριστείτε δεν περιέχεται
στη λίστα κωδικών, η πιο εύκολη μέθοδος εισαγωγής
κωδικού είναι η άμεση εισαγωγή.
5.1.1
Ενεργοποιήστε τη συσκευή που θέλετε να
χειριστείτε.
5.1.2
Πατήστε το πλήκτρο „SETUP”, μέχρι η λυχνία
LED να μείνει αναμμένη.
5.1.3
Μέσω του πλήκτρου επιλογής συσκευής
επιλέξτε τη συσκευή που θέλετε να χειριστείτε
(π.χ. τηλεόραση). Εάν η επιλογή είναι επιτυχής,
η λυχνία LED αναβοσβήνει μία φορά και στη
συνέχεια μένει αναμμένη.
5.1.4
Αναζητήστε στη λίστα κωδικών τη μάρκα και τον
τύπο της συσκευής που θέλετε να χειριστείτε.
5.1.5.
Στη συνέχεια εισάγετε τον αντίστοιχο
τετραψήφιο κωδικό μέσω των αριθμητικών
πλήκτρων 0-9. Η λυχνία LED επιβεβαιώνει την
εισαγωγή κάθε αριθμού αναβοσβήνοντας μία
φορά σύντομα, ενώ μετά τον τέταρτο αριθμό
σβήνει.
Υπόδειξη
► Αποθηκεύεται αυτόματα ένας έγκυρος κωδικός.
► Σε περίπτωση που ο κωδικός δεν είναι έγκυρος,
η λυχνία LED αναβοσβήνει έξι φορές και στη
συνέχεια σβήνει. Επαναλάβετε τα βήματα 5.1.1
έως 5.1.5, ή χρησιμοποιήστε μια άλλη μέθοδο
για εισαγωγή κωδικών.
5.2
Χειροκίνητη αναζήτηση κωδικού
Το τηλεχειριστήριο διαθέτει εσωτερική μνήμη στην
οποία υπάρχουν ήδη έως και 350 κωδικοί ανά τύπο
συσκευής για τις πιο κοινές συσκευές ήχου/εικόνας.
Μπορείτε να πλοηγηθείτε σε αυτούς τους κωδικούς
μέχρι να αντιδράσει η συσκευή. Η συσκευή που θέλετε
να χειριστείτε π.χ. απενεργοποιείται (πλήκτρο „PO-
WER”) ή αλλάζει το κανάλι (πλήκτρο „PROG+/PROG-”).
5.2.1
Ενεργοποιήστε τη συσκευή που θέλετε να
χειριστείτε.
5.2.2
Πατήστε το πλήκτρο SETUP , μέχρι η λυχνία LED
να μείνει αναμμένη.
5.2.3
Μέσω του πλήκτρου επιλογής συσκευής
επιλέξτε τη συσκευή που θέλετε να χειριστείτε
(π.χ. τηλεόραση). Εάν η επιλογή είναι επιτυχής,
η λυχνία LED αναβοσβήνει μία φορά και στη
συνέχεια μένει αναμμένη.
5.2.4
Πατήστε το πλήκτρο „POWER” ή „PROG+/
PROG-”, για να πλοηγηθείτε στους
προρυθμισμένους κωδικούς, μέχρι η συσκευή να
αντιδράσει.
5.2.5
Πατήστε „MUTE(OK)”, για να αποθηκεύσετε
τον κωδικό και να βγείτε από την αναζήτηση
κωδικού. Η λυχνία LED σβήνει.
Υπόδειξη
► Στην εσωτερική μνήμη μπορούν να
αποθηκευτούν το πολύ 350 κωδικοί των πιο
κοινών συσκευών. Λόγω του μεγάλου αριθμού
συσκευών ήχου/εικόνας που υπάρχουν στην
αγορά, ενδέχεται να διατίθενται μόνο οι πιο
συνήθεις βασικές λειτουργίες. Εάν συμβεί
κάτι τέτοιο επαναλάβετε τα βήματα 5.2.1 έως
5.2.5 για να βρείτε έναν συμβατό κωδικό. Για
κάποια ειδικά μοντέλα συσκευών μπορεί να μην
υπάρχει κωδικός.
5.3
Αυτόματη αναζήτηση κωδικού
Η αυτόματη αναζήτηση κωδικού χρησιμοποιεί τους
ίδιους προρυθμισμένους κωδικούς με την χειροκίνητη
αναζήτηση κωδικών (5.2). Το τηλεχειριστήριο όμως
ψάχνει τους κωδικούς αυτόματα, μέχρι να αντιδράσει
η συσκευή. Η συσκευή που θέλετε να χειριστείτε π.χ.
απενεργοποιείται (πλήκτρο „POWER”) ή αλλάζει κανάλι
(πλήκτρα „PROG+/PROG-”).
5.3.1
Ενεργοποιήστε τη συσκευή που θέλετε να
χειριστείτε.
5.3.2
Πατήστε το πλήκτρο „SETUP” , μέχρι η λυχνία
LED να μείνει αναμμένη.
5.3.3
Μέσω του πλήκτρου επιλογής συσκευής
επιλέξτε τη συσκευή που θέλετε να χειριστείτε
(π.χ. τηλεόραση). Εάν η επιλογή είναι επιτυχής,
η λυχνία LED αναβοσβήνει μία φορά και στη
συνέχεια μένει αναμμένη.
5.3.4
Πατήστε το πλήκτρο „PROG+/PROG-” ή „PO
-
WER”, για να ξεκινήσετε αυτόματη αναζήτηση
κωδικού. Η λυχνία LED αναβοσβήνει μία φορά
και στη συνέχεια μένει αναμμένη. Η έναρξη
της πρώτης αναζήτησης του τηλεχειριστηρίου
διαρκεί 6 λεπτά.
38
39
La pagina si sta caricando...
La pagina si sta caricando...
La pagina si sta caricando...
La pagina si sta caricando...
La pagina si sta caricando...
La pagina si sta caricando...
La pagina si sta caricando...
La pagina si sta caricando...
La pagina si sta caricando...
La pagina si sta caricando...
La pagina si sta caricando...
La pagina si sta caricando...
La pagina si sta caricando...
La pagina si sta caricando...
La pagina si sta caricando...
La pagina si sta caricando...
La pagina si sta caricando...
La pagina si sta caricando...
La pagina si sta caricando...
La pagina si sta caricando...
La pagina si sta caricando...
La pagina si sta caricando...
La pagina si sta caricando...
La pagina si sta caricando...
-
 1
1
-
 2
2
-
 3
3
-
 4
4
-
 5
5
-
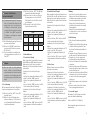 6
6
-
 7
7
-
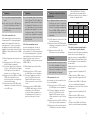 8
8
-
 9
9
-
 10
10
-
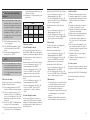 11
11
-
 12
12
-
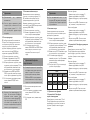 13
13
-
 14
14
-
 15
15
-
 16
16
-
 17
17
-
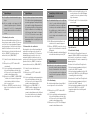 18
18
-
 19
19
-
 20
20
-
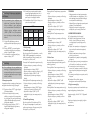 21
21
-
 22
22
-
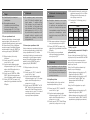 23
23
-
 24
24
-
 25
25
-
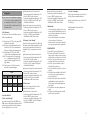 26
26
-
 27
27
-
 28
28
-
 29
29
-
 30
30
-
 31
31
-
 32
32
-
 33
33
-
 34
34
-
 35
35
-
 36
36
-
 37
37
-
 38
38
-
 39
39
-
 40
40
-
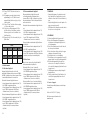 41
41
-
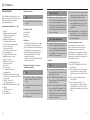 42
42
-
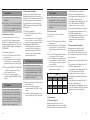 43
43
-
 44
44


Hama 00011412 Manuale del proprietario
- Tipo
- Manuale del proprietario
- Questo manuale è adatto anche per
in altre lingue
- português: Hama 00011412 Manual do proprietário
- slovenčina: Hama 00011412 Návod na obsluhu
- polski: Hama 00011412 Instrukcja obsługi
- Türkçe: Hama 00011412 El kitabı
- română: Hama 00011412 Manualul proprietarului
Documenti correlati
-
Hama 00012307 Manuale del proprietario
-
-
-
-
Hama 00221054 Manuale utente
-
Hama 4in1, 8in1 Universal TV Remote Control Manuale utente
-
-
-
-
Altri documenti
-
Thomson ROCZ107 Manuale del proprietario
-
Emtec EKCOH180 Manuale del proprietario
-
Konig Electronic IR-URC32 Manuale utente
-
König IR-URC31 specificazione
-
-
Schwaiger UFB 801 Instructions Manual
-
-
Schwaiger UFB 3802 Manuale utente
-
-
HQ RC UNIVERS30 specificazione