
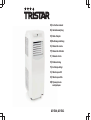
AC-5560, AC-5562
EN | Instruction manual
NL | Gebruiksaanwijzing
FR | Mode d’emploi
DE | Bedienungsanleitung
ES | Manual de usuario
PT | Manual de utilizador
IT | Manuele utente
SV | Bruksanvisning
PL | Instrukcja obsługi
CS | Návod na použití
SK | Návod na použitie
RU | Руководство по
эксплуатации

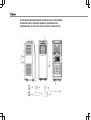
PARTS DESCRIPTION / ONDERDELENBESCHRIJVING / DESCRIPTION DES PIÈCES / TEILEBESCHREIBUNG /
DESCRIPCIÓN DE LAS PIEZAS / DESCRIÇÃO DOS COMPONENTES / DESCRIZIONE DELLE PARTI /
BESKRIVNING AV DELAR / OPIS CZĘŚCI / POPIS SOUČÁSTÍ / POPIS SÚČASTÍ / ПИСАНИЕ ЗАПЧАСТИ

Instruction manual
3
SAFETY
• Please read this user’s manual carefully to
ensure proper use, maintenance and
installation.
• By ignoring the safety instructions the
manufacturer cannot be held responsible for
the damage.
• The appliance is for indoor use only.
• Do not use the unit on a socket that is
damaged or that has not been installed
correctly.
• Do not use the unit:
– near a source of fire.
– in an area where oil is likely to splash.
– in an area exposed to direct sunlight.
– in an area where water is likely to
splash.
– near a bath, a shower or a swimming
pool.
• Never insert your fingers or objects into the
air outlet. Take special care to warn children
of these dangers.
• Keep the unit upright during transport and
storage.
• Before cleaning the unit, always turn off or
disconnect the power supply.
• Always turn off and disconnect the power
supply before moving the unit.
•WARNING: To avoid the risk of fire, do
not cover the unit.
• All the unit sockets must comply with the
local electric safety requirements. If
necessary please check.
• If the supply cord is damaged, it must be
replaced by the manufacturer, its service
agent or similarly qualified persons in order
to avoid a hazard.
• If the supply cord is damaged, it must be
replaced by the manufacturer, service agent
or qualified person(s) in order to avoid a
hazard.
• This appliance can be used by children aged
8 years and above, persons with reduced
physical, sensory, and mental capabilities or
persons with a lack of experience and
knowledge if they have been given correct
supervision or instruction concerning the use
of the appliance in a safe way and
understand the hazards involved. Children
EN

Instruction manual
4
should not play with the appliance. Cleaning
and user maintenance should not be carried
out by children without supervision.
• This appliance is only to be used for
household purposes and only for the
purpose it is made for.
• Notes:
– In the case of any damage, please
disconnect the power supply and contact
the dealer or a designated repair shop.
– In any case, the power cord shall be
firmly grounded.
– To avoid the possibility of danger, if the
power cord is damaged, please
disconnect the power supply. It must be
replaced by the dealer or a designated
repair shop.
Warning
• Please use the recommended defrosting and
cleaning process from the manufacturer
only. Do not accelerate the defrosting or
cleaning process in any other way.
• The appliance shall be stored in a room
without continuously operating ignition
sources (for example: open flames , an
operating gas appliance or an operating
electric heater).
• Do not pierce or burn.
• Be aware that refrigerants may not contain
an odor.
• The appliance should be installed, operated
and stored in a room with a floor area larger
than X m2. (X=10.3 for 10000Btu/h; X=11.3
for 12000Btu/h,14000Btu/h)
• Only contact an authorized service technician
for repair or maintenance of this unit.
•Do not pull , deform or modify the power
supply cord or immerse in water . Pulling or
misuse of the power supply cord could result
in damage to the unit and cause an electrical
shock.
•Compliance with national gas regulations
should be observed.
•Keep ventilation openings clear of
obstructions.
•Any person who is involved with working on
or opening a refrigerant circuit should hold a
current valid certificate from an industry
accredited assessment authority which
authorizes their competence to handle

Instruction manual
5
refrigerants safely in accordance with an
industry recognized assessment
specification.
• Servicing should only be performed as
recommended by the equipment
manufacturer. Maintenance and repair
requiring the assistance of other skilled
personnel should be carried out under the
supervision of a person(s) competent in the
use of flammable refrigerants.
• Do not stop the unit by pulling out the power
plug whilst in operation as this may cause
an electric shock or fire due to heat
generation unless strange sounds are heard
or if strange smells or smoke appear from
the unit.
Specific information regarding appliances with R 290 refrigerant gas.
• Thoroughly read all of the warnings.
• When defrosting and cleaning the
appliance , do not use any tools other than
those recommended by the manufacturing
company.
• The appliance should not be stored in a
room with continuously operating ignition
sources (for example: open flames , an
operating gas appliance or an operating
electric heater).
• Do not puncture and do not burn.
• Appliance shall be installed, operated and
stored in a room with a floor area larger than
X m2. (X=10.3 for 10000Btu/h; X=11.3 for
12000Btu/h,14000Btu/h)
• This appliance contains Y g (see rating label
back of unit ) of R290 refrigerant gas.
• R290 is a refrigerant gas that complies with
the European directives on the environment.
Do not puncture any part of the refrigerant
circuit.
• If the appliance is installed, operated or
stored in a non-ventilated area, the room
must be designed to prevent to the
accumulation of refrigerant leaks that could
result in a fire risk or explosion due to
ignition of the refrigerant caused by electric
heaters, stoves, or other sources of ignition.
• The appliance must be stored in such a way
as to prevent mechanical failure.
EN

Instruction manual
6
• Individuals who operate or work on the
refrigerant circuit must have the appropriate
certification issued by an accredited
organization that ensures competence in
handling refrigerants according to a specific
evaluation recognized by associations in the
industry.
• Repairs must be performed based on the
recommendation from the manufacturing
company. Maintenance and repairs that
require the assistance of other qualified
personnel must be performed under the
supervision of an individual specified in the
use of flammable refrigerants.
Batteries
• Do not expose the battery to high
temperatures or direct sunlight. Never throw
batteries into the fire. There is a danger of
explosion!
• Keep batteries away from children. Batteries
are not a toy!
• Do not open the batteries by force.
• Avoid contact with metallic objects.(Rings,
nails, screws et cetera) there is a danger of
short-circuiting!
• As a result of a short-circuit batteries may
heat up consider-ably or even catch fire. this
may result in burns.
• For your safety the battery poles should be
covered with adhesive strips during
transport.
• Do not touch a ruptured and/or leaking
battery. If the liquid from the battery gets into
your eyes, rinse your eyes as soon as
possible with clean water, without rubbing
your eyes. Immediately go to the hospital. If
it is not treated properly, it can cause eye
problems.
Refrigerant
(CE) N 842/2006: This unit contains the refrigerant R290. The amount
of refrigerant is less than 1kg, and is in a closed cooling circuit. The
coolant does have zero ozone depletion potential, but is a so-called
greenhouse gases under the Kyoto Protocol and may thus contribute
to global warming, if it is released to the atmosphere. Therefore only
trained technicians with refrigerant certificate make a filling or
emptying. Your appliance does not have be refilled with refrigerant if
used properly and has an undamaged coolant circuit. GWP: R290: 3

Instruction manual
7
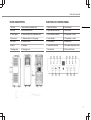
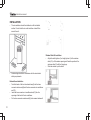
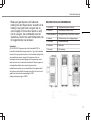
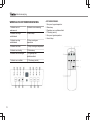
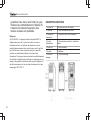
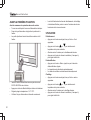
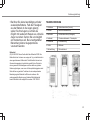
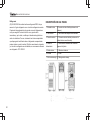
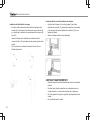
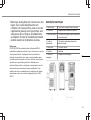
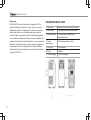
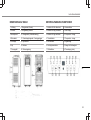
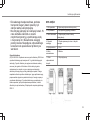
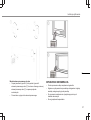
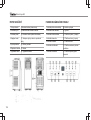
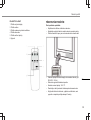
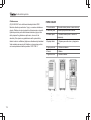
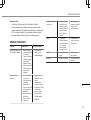
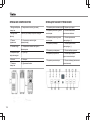
PARTS DESCRIPTION
1. Air inlet 8. Hose connector (window end)
2. Air filter 9. Hot-air exhaust hose
3. Control panel 10. Hose connector (Air conditioner end)
4. Power cord 11. Windows slider kit + fixing plugs
5. Air outlet 12. Remote control
6. Castor 13. Batteries
7. Drainage hole 14. Drainage hose
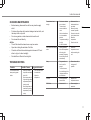
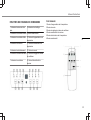
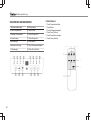
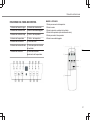
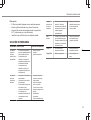
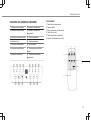
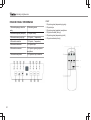
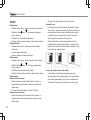
FUNCTION OF CONTROL PANEL
1. Water full indicator 8. Heat indicator
2. High ventilation indicator 9. On/off button
3. Low ventilation indicator 10. Temperature + button
4. Timer indicator 11. Temperature – button
5. Cool indicator 12. Mode button
6. Dehumidifier indicator 13. Fan speed adjustment button
7. Fan indicator 14. Timer on/off button
EN

Instruction manual
8
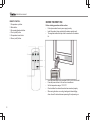
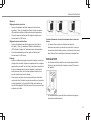
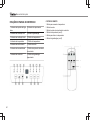
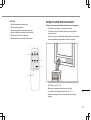
REMOTE CONTROL
1. Temperature up button
2. Mode button
3. Fan speed adjustment button
4. Timer (on/off) button
5. Temperature down button
6. Power (on/off) button
BEFORE THE FIRST USE
Before starting operations in this section:
• Find a place where there is power supply nearby.
• Install the exhaust hose and adjust the window position well.
• The supplied small white clips must be mounted on the window
kit.
• Insert the power cord into a grounded AC220~240V/50Hz socket.
• Press the power button to turn on the air-conditioner.
• Set the temperature range: 16°C-31°C.
• Check whether the exhaust hose has been mounted properly.
• When using functions on cooling, heating and dehumidifying,
allow at least 3 minutes between powering off and powering on.

Instruction manual
9
USE
Cooling operation
• Press the “mode“ button till the “Cool“ icon appears.
• Press the or button to select a desired room
temperature.
• Allow around 5 minutes for the cooling to start.
• Press the “fan speed” button to adjust airflow.
Dehumidifying operation
• Press the “Mode“ button until the “dehumidify indicator lamp“
blinks.
• The temperature will automatically be selected.
• The fan speed will automatically be selected.
Heating operation
• Press the “mode” button till the “Heat” icon appears.
• Press the or button to select a desired room
temperature.
• Allow around 5 minutes for the heating to start.
• Press the “fan speed” button to adjust airflow.
Timer operation
Timer ON setting
• When the air-conditioner is OFF, press the “Timer“ button and
select a desired ON time and adjust using the temperature
buttons.
• The ON time can be adjusted to anytime in 0-24 hours.
Timer OFF setting
• When the air-conditioner ON, press “Timer“ button and select a
desired OFF time through the temperature buttons.
• The OFF time can be adjusted to anytime in 0-24 hours.
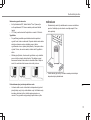
Drainage
• After a lengthy operation and before storage, you will need to
drain the water that has been collected. Please prepare a suitable
location or tray to collect the water and remove the rubber stop
from the drainage hole at the bottom of the unit. The water will
then begin to drain. After this has stopped, you can insert the
drain stop.
• You can connect a drainage hose that will allow continuous
drainage of the water. Remove the rubber stop and connect a
suitable hose. This hose needs to be directed outside or into a
suitable drain. Please keep in mind that the water will stream
downwards and never upwards.
Internal Tank Water Full Alarm Function
• The inner water tank in the air-conditioner has one water level
safety switch that controls the water level. When the water level
reaches an anticipated height, the water full indicator lamp lights
up. Follow above steps to drain the water.
EN

Instruction manual
10
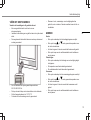
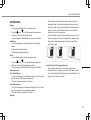
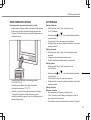
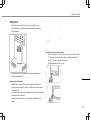
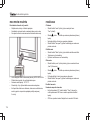
INSTALLATION
• The air-conditioner should be installed on a flat and stable
surface. Do not block the air outlet and allow at least 30cm
around the unit.
• Socket wiring should be in accordance with the local electric
safety requirements.
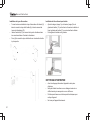
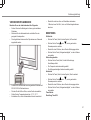
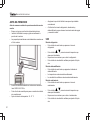
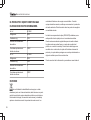
Exhaust Hose Installation
• Twist both ends of the hot-air exhaust hose(9) into the hose
connector window end(8) and the hose connector air conditioner
end(10).
• Insert the hose connector air conditioned end(10) into the
openings at the back of the air conditioner.
• Fix the hose connector window end(8) to the nearest windowsill.
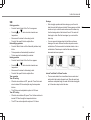
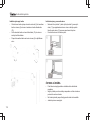
Window Slider Kit Installation
• Adjust the width (picture 1) or height (picture 2) of the windows
slider(11) to fit the window opening and fixate the position of the
windows slider(11) with the fixing plugs.
• Slide the window up to the slider.

Instruction manual
11
CLEANING MAINTENANCE
• Before cleaning, disconnect the unit from any electric supply
outlet.
• First clean the surface with a neutral detergent and wet cloth, and
then wipe it with a dry cloth.
• Do not use gasoline or other chemicals to clean the unit.
• Do not wash the unit directly.
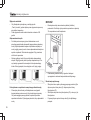
Air filter
• The air filter should be cleaned once every two weeks.
• Open the air inlet grille and take off air filter.
• Clean the air filter with neural detergent in lukewarm 40°C and
allow to dry (not in direct sunlight).
• Re-install the air filter into the inlet grille.
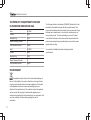
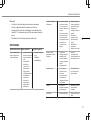
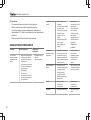
TROUBLESHOOTING
Troubles Possible Causes Suggested Remedies
The unit does not start
when pressing power
button.
• Water full indicator
lamp blinks and water
tank is full.
• Room temperature is
higher than the setting
temperature.(Electric
heating mode)
• Room temperature is
lower that the setting
temperature.(Cooling
mode)
• Drain the water out of
the water tank.
• Adjust the
temperature.
The unit doesn’t cool
enough.
• The doors or windows
are not closed.
• There are heat
sources inside the
room.
• Hot air exhaust hose
is not connected or
blocked.
• Temperature setting is
too high.
• Air inlet in blocked.
• Make sure all the
windows and doors
are closed.
• Remove the heat
sources if possible.
• Connect or clean the
hot air exhaust hose.
• Reset the
temperature.
• Clean the air inlet.
Auto Power-Off in heating
mode.
• Heating protection,
when the temperature
at the air outlet
exceeds 70 degrees,
the unit will power off
automatically.
• Allow room
temperature to cool
before re-starting the
unit.
Noisy. • The ground is not
level or not flat
enough.
• The sound comes
from the flowing of the
refrigerant inside the
air conditioner.
• Place unit on a flat,
level ground if
possible.
E0 Code. • Room temperature
sensor failed.
• Replace room
temperature sensor.
E2/E4 Code. • Water tank full • Please empty the
water tank.
EN

Instruction manual
12
THE PRODUCT OR EQUIPMENT CONTAINS
FLUORINATED GREENHOUSE GAS.
Art.nr. AC-5560
Coolant: R290
Quantity in kg: 0,215
Global Warming Potential: 3
CO2 Equivalent in tons: 0,0007
Art.nr. AC-5562
Coolant: R290
Quantity in kg: 0,235
Global Warming Potential: 3
CO2 Equivalent in tons: 0,0007
ENVIRONMENT
This appliance should not be put into the domestic garbage at
the end of its durability, but must be offered at a central point for the
recycling of electric and electronic domestic appliances. This symbol
on the appliance, instruction manual and packaging puts your
attention to this important issue. The materials used in this appliance
can be recycled. By recycling of used domestic appliances you
contribute an important push to the protection of our environment. Ask
your local authorities for information regarding the point of
recollection.
The European directive for batteries (2006/66/EC) states that it is not
permitted to throw batteries away with the household waste. They
may contain substances which are harmful to the environment. Empty
batteries can be handed over to a local, public collection point or a
local recycling centre. To avoid overheating as a result of a short
circuit, lithium batteries must be removed from the product and the
poles must be protected using insulation tape or some other means
against short-circuiting.
You can find all available information and spare parts at
www.tristar.eu!

Gebruiksaanwijzing
13
VEILIGHEID
• Lees deze gebruiksaanwijzing zorgvuldig
door voor een correct(e) gebruik, onderhoud
en installatie.
• Als u de veiligheidsinstructies negeert, kan
de fabrikant niet verantwoordelijk worden
gehouden voor de mogelijke schade.
• Het apparaat is alleen geschikt voor gebruik
binnenshuis.
• Sluit het apparaat niet aan op een
stopcontact dat beschadigd is of niet correct
is geïnstalleerd.
• Gebruik het apparaat niet:
– in de buurt van vuur.
– in een gebied met een grote kans op
spattende olie.
– in een gebied dat wordt blootgesteld aan
direct zonlicht.
– in een gebied met een grote kans op
spattend water.
– in de buurt van een bad, douche of
zwembad.
• Steek nooit uw vingers of voorwerpen in de
luchtuitlaat. Waarschuw vooral kinderen
voor deze gevaren.
• Zorg dat het apparaat rechtop blijft staan
wanneer u het vervoert en opbergt.
• Zorg dat u altijd de stroomtoevoer
uitschakelt en loskoppelt voordat u het
apparaat reinigt.
• Zorg dat u altijd de stroomtoevoer
uitschakelt en loskoppelt voordat u het
apparaat verplaatst.
•WAARSCHUWING: Om brandgevaar
te voorkomen raden we u aan het apparaat
niet te bedekken.
• Alle aansluitingen van het apparaat moeten
voldoen aan de lokale
veiligheidsvoorschriften voor elektriciteit.
Controleer zo nodig of dit het geval is.
• Als het netsnoer beschadigd is, moet het
worden vervangen door de fabrikant, de
onderhoudsmonteur van de fabrikant of door
personen met een soortgelijke kwalificatie
om gevaar te voorkomen.
• Als het netsnoer is beschadigd, moet het om
gevaarlijke situaties te voorkomen worden
vervangen door de fabrikant, diens
servicevertegenwoordiger of een bevoegde
persoon.
NL

Gebruiksaanwijzing
14
• Dit apparaat mag door kinderen jonger dan 8
jaar, personen met verminderde lichamelijke,
zintuiglijke of verstandelijke capaciteiten of
gebrek aan kennis worden gebruikt, mits dit
gebeurt onder goed toezicht of zij juiste
instructies hebben gekregen over het
gebruik van het apparaat en de gevaren van
het gebruik begrijpen. Kinderen mogen niet
spelen met het apparaat. Het apparaat mag
niet zonder toezicht worden gereinigd of
onderhouden door kinderen.
• Dit apparaat is uitsluitend voor huishoudelijk
gebruik en voor het doel waar het voor
bestemd is.
• Opmerkingen:
– In geval van schade schakelt u het
apparaat uit, koppelt u de stroomtoevoer
los en neemt u contact op met de dealer
of een aangewezen reparatiebedrijf.
– Het netsnoer moet altijd stevig worden
geaard.
– Om gevaarlijke situaties te voorkomen,
moet u de stroomtoevoer loskoppelen als
het netsnoer is beschadigd. Laat het
snoer vervangen door de dealer of een
hiertoe aangewezen reparatiebedrijf.
Waarschuwing
• Volg uitsluitend het aanbevolen ontdooi- en
reinigingsproces van de fabrikant. Probeer
het ontdooi- of reinigingsproces op geen
enkele andere manier te versnellen.
• Het apparaat moet worden opgeslagen in
een ruimte zonder voortdurend werkende
ontstekingsbronnen (bijvoorbeeld: open
vlammen, een werkend gasapparaat of een
werkende elektrische verwarming).
• Doorboor of verbrand het apparaat niet.
• Houd er rekening mee dat koelmiddelen
geurloos kunnen zijn.
• Het apparaat moet worden geïnstalleerd,
gebruikt en opgeslagen in een ruimte met
een vloeroppervlak van meer dan Xm2.
(X=10.3 voor 10000Btu/h; X=11.3 voor
12000Btu/h,14000Btu/h)
• Neem uitsluitend contact op met een
bevoegde onderhoudsmonteur voor
reparatie- of onderhoudswerkzaamheden
aan dit apparaat.
• Trek niet aan het netsnoer en vervorm of
wijzig het niet. Dompel het ook niet onder in
water. Door aan het netsnoer te trekken of

Gebruiksaanwijzing
15
het verkeerd te gebruiken, kunt u het
apparaat beschadigen en een elektrische
schok veroorzaken.
• Het is verplicht de nationale
gasvoorschriften in acht te nemen.
• Zorg dat de ventilatieopeningen niet worden
geblokkeerd.
• Mensen die werken aan een koelcircuit of
zo'n circuit openen, moeten in het bezit zijn
van een actueel, geldig certificaat van een
door de branche geaccrediteerde
beoordelingsautoriteit dat bevestigt dat ze
bekwaam zijn in een veilige omgang met
koelmiddelen conform een door de branche
erkende beoordelingsspecificatie.
• Reparatiewerkzaamheden mogen alleen
worden uitgevoerd voor zover deze zijn
aanbevolen door de fabrikant van de
apparatuur. Onderhouds- en
reparatiewerkzaamheden waarbij de hulp
van ander geschoold personeel nodig is,
moeten worden uitgevoerd onder toezicht
van een of meer personen die bekwaam zijn
in het gebruik van brandbare koelmiddelen.
• Stop het apparaat niet door het netsnoer uit
het stopcontact te trekken terwijl het
apparaat is ingeschakeld. De warmte die
hierbij ontstaat, kan namelijk een elektrische
schok of brand veroorzaken. De enige
situaties waarin u dit wel mag doen, is als u
vreemde geluiden hoort, een vreemde geur
ruikt of er rook uit het apparaat komt.
Specifieke informatie over apparaten met R290-koelgas.
• Lees alle waarschuwingen zorgvuldig door.
• Bij het ontdooien en reinigen van het
apparaat mogen alleen de hulpmiddelen
worden gebruikt die door het productiebedrijf
worden aangeraden.
• Het apparaat mag niet worden opgeslagen in
een ruimte met voortdurend werkende
ontstekingsbronnen (bijvoorbeeld: open vuur,
een werkend gasapparaat of een werkende
elektrische verwarming).
• Doorboren of verbranden is niet toegestaan.
• Het apparaat moet worden geïnstalleerd,
gebruikt en opgeslagen in een ruimte met
een vloeroppervlak van meer dan Xm2.
(X=10.3 voor 10000Btu/h; X=11.3 voor
12000Btu/h,14000Btu/h)
NL

Gebruiksaanwijzing
16
• Dit apparaat bevat Y g (zie het typeplaatje
aan de achterkant van het apparaat) R290-
koelgas.
• R290 is een koelgas dat voldoet aan de
Europese milieurichtlijnen. Doorboor geen
enkel deel van het koelcircuit.
• Als het apparaat wordt geïnstalleerd,
gebruikt of opgeslagen in een niet-
geventileerde ruimte, moet de ruimte zijn
ontworpen om de ophoping van koelmiddel
in geval van lekkages te voorkomen.
Koelmiddellekkages kunnen de kans op
brand of explosies vergroten doordat
elektrische verwarmingen, fornuizen of
andere ontstekingsbronnen ervoor zorgen
dat het koelmiddel ontbrandt.
• Het apparaat moet dusdanig worden
opgeslagen dat mechanische storingen
worden voorkomen.
• Mensen die werken aan het koelcircuit of het
bedienen, moeten in het bezit te zijn van de
juiste certificering, die is verleend door een
geaccrediteerde organisatie en die
garandeert dat ze vaardig zijn in de omgang
met koelmiddelen in overeenstemming met
een specifieke evaluatie die wordt erkend
door brancheverenigingen.
• Reparaties moeten worden uitgevoerd op
basis van de aanbevelingen van het
productiebedrijf. Onderhouds- en
reparatiewerkzaamheden waarbij de hulp
van ander geschoold personeel is vereist,
moeten worden uitgevoerd onder het
toezicht van degene die kundig is in het
gebruik van brandbare koelmiddelen.
Batterijen
• Stel de batterijen NOOIT bloot aan hoge
temperaturen of direct zonlicht. Gooi
batterijen NOOIT in open vuur.
Explosiegevaar!
• Houd batterijen uit de buurt van kinderen.
Batterijen zijn geen speelgoed!
• Open de batterijen niet met kracht.
• Vermijd contact met metalen voorwerpen
(ringen, spijkers, schroeven, etc.) om gevaar
van kortsluiting te voorkomen!
• Door kortsluiting kunnen batterijen heet
worden of zelfs ontbranden. Dit kan
brandwonden veroorzaken.
• Voor uw veiligheid moeten de contactpunten
tijdens vervoer met plakstrips worden
afgedekt.

Gebruiksaanwijzing
17
• Raak een gescheurde en/of lekkende
batterij niet aan! Spoel als de vloeistof uit de
batterij in uw ogen komt uw ogen dan zo
snel mogelijk uit met schoon water en wrijf
niet in uw ogen. Ga onmiddellijk naar het
ziekenhuis. Als dit niet wordt behandeld, kan
dit oogproblemen veroorzaken.
Koelmiddel
(CE) N 842/2006: Dit apparaat bevat het koelmiddel R290. De
hoeveelheid koelmiddel bedraagt minder dan 1kg en het koelmiddel
bevindt zich in een gesloten koelcircuit. Het koelmiddel draagt niet bij
aan ozonafbraak, maar is volgens het Kyotoprotocol wel een
broeikasgas en kan daardoor bijdragen aan de opwarming van de
aarde wanneer het in de atmosfeer terechtkomt. Daarom mogen vul-
en leegwerkzaamheden alleen worden uitgevoerd door
gekwalificeerde technici met een koelcertificaat. Het apparaat hoeft
niet opnieuw met koelmiddel te worden gevuld als het correct wordt
gebruikt en het koelcircuit onbeschadigd is. GWP
(aardopwarmingsvermogen): R290: 3
BESCHRIJVING VAN ONDERDELEN
1. Luchtinlaat 8. Slangaansluiting (raamuiteinde)
2. Luchtfilter 9. Afvoerslang voor warme lucht
3. Bedieningspaneel 10. Slangaansluiting (airconditioner-uiteinde)
4. Netsnoer 11. Raamschuifset + bevestigingspluggen
5. Luchtuitlaat 12. Afstandsbediening
6. Zwenkwiel 13. Batterijen
7. Afvoergat 14. Afvoerslang
NL

Gebruiksaanwijzing
18
WERKING VAN HET BEDIENINGSPANEEL
1. Indicator voor vol
waterreservoir
8. Indicator voor verwarming
2. Indicator voor hoge
ventilatiestand
9. Aan/uit-knop
3. Indicator voor lage
ventilatiestand
10. Knop voor hogere
temperatuur
4. Indicator voor timer 11. Knop voor lagere temperatuur
5. Indicator voor koeling 12. Modusknop
6. Indicator voor ontvochtiger 13. Regelknop voor
ventilatorsnelheid
7. Indicator voor ventilator 14. Timerknop (aan/uit)
AFSTANDSBEDIENING
1. Knop voor hogere temperatuur
2. Modusknop
3. Regelknop voor ventilatorsnelheid
4. Timerknop (aan/uit)
5. Knop voor lagere temperatuur
6. Aan/uit-knop

Gebruiksaanwijzing
19
VÓÓR HET EERSTE GEBRUIK
Voordat u de handelingen in dit gedeelte uitvoert:
• Kies een geschikte locatie in de buurt van een
stroomvoorziening.
• Installeer de afvoerslang en zorg dat het raam in de juiste stand
staat.
• De meegeleverde kleine witte klemmen moeten op de raamset
worden gemonteerd.
• Sluit het netsnoer aan op een geaard stopcontact van
AC220~240V/50Hz.
• Druk op de aan/uit-knop om de airconditioner in te schakelen.
• Stel het temperatuurbereik in: 16°C-31°C.
• Controleer of de afvoerslang correct is gemonteerd.
• Wanneer u koel-, verwarmings- en ontvochtigingsfuncties
gebruikt, moet u minstens 3 minuten wachten tussen het uit- en
inschakelen.
GEBRUIK
Koelen
• Druk op de modusknop tot het koelingspictogram verschijnt.
• Druk op de knop of om de gewenste temperatuur voor
de ruimte te selecteren.
• Het duurt ongeveer 5 minuten voordat het koelen wordt gestart.
• Druk op de knop voor de ventilatorsnelheid om de luchtstroom
aan te passen.
Ontvochtigen
• Druk op de modusknop tot het lampje voor ontvochtiging begint
te knipperen.
• De temperatuur wordt automatisch geselecteerd.
• De ventilatorsnelheid wordt automatisch geselecteerd.
Verwarmen
• Druk op de modusknop tot het verwarmingspictogram verschijnt.
• Druk op de knop of om de gewenste temperatuur voor
de ruimte te selecteren.
• Het duurt ongeveer 5 minuten voordat het verwarmen wordt
gestart.
• Druk op de knop voor de ventilatorsnelheid om de luchtstroom
aan te passen.
NL

Gebruiksaanwijzing
20
De timer instellen
Inschakeltijd van timer instellen
• Wanneer de airconditioner is uitgeschakeld, drukt u op de
timerknop en selecteert u de gewenste inschakeltijd met behulp van
de temperatuurknoppen.
• De inschakeltijd kan worden ingesteld tussen 0 en 24 uur.
Uitschakeltijd van timer instellen
• Wanneer de airconditioner is ingeschakeld, drukt u op de
timerknop en selecteert u de gewenste uitschakeltijd met behulp van
de temperatuurknoppen.
• De uitschakeltijd kan worden ingesteld tussen 0 en 24 uur. Water
afvoeren
• Wanneer u het apparaat lange tijd hebt gebruikt en voordat u het
opslaat, moet u het opgehoopte water afvoeren. Bereid een geschikte
locatie of bak voor om het water op te vangen. Verwijder vervolgens
de rubberen stop uit het afvoergat aan de onderkant van het apparaat.
Het water loopt nu uit het apparaat. Als er geen water meer uit het
apparaat loopt, kunt u de afvoerstop aanbrengen.
• Gebruik een afvoerslang waarmee water continu kan worden
afgevoerd. Verwijder de rubberen stop en sluit een geschikte slang
aan. Leid deze slang naar buiten of naar een geschikte afvoer. Houd
er rekening mee dat water altijd omlaag stroomt en nooit omhoog.
Alarmfunctie voor vol intern waterreservoir
• Het waterreservoir in de airconditioner is uitgerust met een
veiligheidsschakelaar om het waterpeil te controleren. Wanneer
het waterpeil een verwachte hoogte bereikt, gaat er een lampje
branden om aan te geven dat het waterreservoir vol is. Voer de
bovenstaande stappen uit om het water af te voeren.
INSTALLATIE
• De airconditioner moet op een vlak en stabiel oppervlak worden
geïnstalleerd. Blokkeer de luchtuitlaat niet en houd minstens
30cm ruimte vrij rond het apparaat.
• De bedrading moet voldoen aan de lokale veiligheidsvoorschriften
voor elektriciteit.
La pagina sta caricando ...
La pagina sta caricando ...
La pagina sta caricando ...
La pagina sta caricando ...
La pagina sta caricando ...
La pagina sta caricando ...
La pagina sta caricando ...
La pagina sta caricando ...
La pagina sta caricando ...
La pagina sta caricando ...
La pagina sta caricando ...
La pagina sta caricando ...
La pagina sta caricando ...
La pagina sta caricando ...
La pagina sta caricando ...
La pagina sta caricando ...
La pagina sta caricando ...
La pagina sta caricando ...
La pagina sta caricando ...
La pagina sta caricando ...
La pagina sta caricando ...
La pagina sta caricando ...
La pagina sta caricando ...
La pagina sta caricando ...
La pagina sta caricando ...
La pagina sta caricando ...
La pagina sta caricando ...
La pagina sta caricando ...
La pagina sta caricando ...
La pagina sta caricando ...
La pagina sta caricando ...
La pagina sta caricando ...
La pagina sta caricando ...
La pagina sta caricando ...
La pagina sta caricando ...
La pagina sta caricando ...
La pagina sta caricando ...
La pagina sta caricando ...
La pagina sta caricando ...
La pagina sta caricando ...
La pagina sta caricando ...
La pagina sta caricando ...
La pagina sta caricando ...
La pagina sta caricando ...
La pagina sta caricando ...
La pagina sta caricando ...
La pagina sta caricando ...
La pagina sta caricando ...
La pagina sta caricando ...
La pagina sta caricando ...
La pagina sta caricando ...
La pagina sta caricando ...
La pagina sta caricando ...
La pagina sta caricando ...
La pagina sta caricando ...
La pagina sta caricando ...
La pagina sta caricando ...
La pagina sta caricando ...
La pagina sta caricando ...
La pagina sta caricando ...
La pagina sta caricando ...
La pagina sta caricando ...
La pagina sta caricando ...
La pagina sta caricando ...
La pagina sta caricando ...
La pagina sta caricando ...
La pagina sta caricando ...
La pagina sta caricando ...
La pagina sta caricando ...
La pagina sta caricando ...
La pagina sta caricando ...
La pagina sta caricando ...
La pagina sta caricando ...
La pagina sta caricando ...
La pagina sta caricando ...
La pagina sta caricando ...
La pagina sta caricando ...
La pagina sta caricando ...
La pagina sta caricando ...
La pagina sta caricando ...
La pagina sta caricando ...
La pagina sta caricando ...
La pagina sta caricando ...
La pagina sta caricando ...
La pagina sta caricando ...
La pagina sta caricando ...
La pagina sta caricando ...
La pagina sta caricando ...
La pagina sta caricando ...
La pagina sta caricando ...
La pagina sta caricando ...
La pagina sta caricando ...
La pagina sta caricando ...
La pagina sta caricando ...
La pagina sta caricando ...
La pagina sta caricando ...
La pagina sta caricando ...
La pagina sta caricando ...
La pagina sta caricando ...
La pagina sta caricando ...
La pagina sta caricando ...
La pagina sta caricando ...
La pagina sta caricando ...
La pagina sta caricando ...
La pagina sta caricando ...
La pagina sta caricando ...
La pagina sta caricando ...
La pagina sta caricando ...
La pagina sta caricando ...
La pagina sta caricando ...
La pagina sta caricando ...
La pagina sta caricando ...
La pagina sta caricando ...
La pagina sta caricando ...
-
 1
1
-
 2
2
-
 3
3
-
 4
4
-
 5
5
-
 6
6
-
 7
7
-
 8
8
-
 9
9
-
 10
10
-
 11
11
-
 12
12
-
 13
13
-
 14
14
-
 15
15
-
 16
16
-
 17
17
-
 18
18
-
 19
19
-
 20
20
-
 21
21
-
 22
22
-
 23
23
-
 24
24
-
 25
25
-
 26
26
-
 27
27
-
 28
28
-
 29
29
-
 30
30
-
 31
31
-
 32
32
-
 33
33
-
 34
34
-
 35
35
-
 36
36
-
 37
37
-
 38
38
-
 39
39
-
 40
40
-
 41
41
-
 42
42
-
 43
43
-
 44
44
-
 45
45
-
 46
46
-
 47
47
-
 48
48
-
 49
49
-
 50
50
-
 51
51
-
 52
52
-
 53
53
-
 54
54
-
 55
55
-
 56
56
-
 57
57
-
 58
58
-
 59
59
-
 60
60
-
 61
61
-
 62
62
-
 63
63
-
 64
64
-
 65
65
-
 66
66
-
 67
67
-
 68
68
-
 69
69
-
 70
70
-
 71
71
-
 72
72
-
 73
73
-
 74
74
-
 75
75
-
 76
76
-
 77
77
-
 78
78
-
 79
79
-
 80
80
-
 81
81
-
 82
82
-
 83
83
-
 84
84
-
 85
85
-
 86
86
-
 87
87
-
 88
88
-
 89
89
-
 90
90
-
 91
91
-
 92
92
-
 93
93
-
 94
94
-
 95
95
-
 96
96
-
 97
97
-
 98
98
-
 99
99
-
 100
100
-
 101
101
-
 102
102
-
 103
103
-
 104
104
-
 105
105
-
 106
106
-
 107
107
-
 108
108
-
 109
109
-
 110
110
-
 111
111
-
 112
112
-
 113
113
-
 114
114
-
 115
115
-
 116
116
-
 117
117
-
 118
118
-
 119
119
-
 120
120
-
 121
121
-
 122
122
-
 123
123
-
 124
124
-
 125
125
-
 126
126
-
 127
127
-
 128
128
-
 129
129
-
 130
130
-
 131
131
-
 132
132
-
 133
133
-
 134
134


in altre lingue
- français: Tristar AC-5560 Manuel utilisateur
- español: Tristar AC-5560 Manual de usuario
- Deutsch: Tristar AC-5560 Benutzerhandbuch
- português: Tristar AC-5560 Manual do usuário
- slovenčina: Tristar AC-5560 Používateľská príručka
- polski: Tristar AC-5560 Instrukcja obsługi
Documenti correlati
Altri documenti
-
Eden ED-7007 Manuale utente
-
Beko BP112C Manuale del proprietario
-
Korona 82002 Manuale del proprietario
-
Midea Mobile 35C Manuale del proprietario
-
ProBreeze PB-20 Manuale utente
-
-
Electrolux EXP11CKEWI Manuale utente
-
-