
Manuale Istruzione per
Pulsiossimetro a Dito
(REF LTD805 - LTD807 pediatrico)
1. Descrizione Generale
La saturazione dell’emoglobina è la percentuale di ossiemo-
globina (HbO2), ossigeno legato all’emoglobina, nel sangue.
In altre parole, la saturazione dell’emoglobina è la concen-
trazione di ossiemoglobina nel sangue. Questo è un parame-
tro molto importante per valutare le condizioni del sistema
respiratorio. L’abbassamento dell’ossiemoglobina nel sangue
si può verificare nei seguenti casi: anestesia, trauma post-
operatorio, lesioni dovute agli specifici esami medici. In que-
sti casi, sintomi potrebbero essere astenia, vomito, mal di
testa etc. L’abbassamento dell’ossiemoglobina può mettere
al rischio la vita del paziente.
Il mini pulsiossimetro è piccolo e leggero, a basso consumo
e facile ad usare. Il metodo di misurazione è non invasivo. E’
sufficiente che il paziente inserisca un dito nella mollettina
del pulsiossimetro cioè nel sensore foto-elettrico ed il di-
splay mostrerà immediatamente il valore dell’ossiemoglobi-
na. L’apparecchio è stato sottoposto ai test clinici che hanno
confermato alta affidabilità e precisione.
2. Principio fisico
Il principio fisico dell’ ossimetro si basa sul fatto che il colore
del sangue dipende dalla quantità di Hb saturata. L’ emoglo-
bina satura è di colore rosso e quella insatura tende al blu.
L’ emoglobina infatti cambia la sua configurazione struttura-
le quando prende parte ad una reazione chimica; ognuna di
queste configurazioni presenta un tipo differente di riflessio-
ne della luce. Alla lunghezza d’ onda di 660 nm corrisponde
il rosso della HbO2 e alla lunghezza d’ onda di 940 nm corri-
sponde invece la Hb non satura. Facendo passare entrambe
le lunghezze d’ onda in un campione di sangue si avrà che la
intensità di trasmissione della luce a 660 nm sarà in funzio-
ne della quantità percentuale di HbO2. Questa percentuale
corrisponde al valore di saturazione (SpO2).
Come funziona
1. Tubo emissione raggi
2. Sensore ricezione raggi
3. Caratteristiche Tecniche
3.1 Formato del Display: LED
Display della Saturazione SPO2: 0-99%
Display delle pulsazioni cardiache (PR): 30-254 BPM
Display della frequenza dei battiti: barografo
Indicatore di batteria in esaurimento:
3.2 ALIMENTAZIONE: 2 pile alcaline AAA da 1.5V
3.3 CONSUMO DI ENERGIA: minore di 40mA
3.4 PRECISIONE DELLA MISURAZIONE:
SPO2: +-2% tra il 80% -99%,
+-3% tra 70% - 80%, <70% - non specificato
Pulsazioni : +-2 BPM tra 30-235 BPM
3.5 Dimensioni dell’apparecchio:
LTD805 lunghezza: 58mm LTD807 lunghezza: 50mm
larghezza: 30mm larghezza: 29/26mm
profondità: 34mm profondità: 28mm
peso: 50g peso: 50g
(batterie incluse) (batterie incluse)
4. Proprietà del prodotto
4.1 Il prodotto è facile da usare.
4.2 Il prodotto è piccolo, leggero (il peso totale è circa 50g
- batterie incluse) e comodo da portare.
4.3 Il consumo di energia è basso; le batterie già in dota-
zione possono essere usate in maniera continua per
30 ore.
4.4 L’apparecchio è dotato di un allarme luminoso per le
batterie in esaurimento (le misurazioni effettuate con
le batterie in esaurimento possono risultare non
precise).
4.5 Spegnimento automatico dopo 8 secondi dall’ultima mi-
surazione.
5. Campo di utilizzo del prodotto
Può essere utilizzato prima o dopo qualsiasi attività fisica
(non usare sotto sforzo). Il prodotto è consigliato per l’uso
domestico ed ospedaliero.
Attenzione: Il prodotto non è adatto per monitoraggi con-
tinui.
6. Istruzioni operative
6.1 Inserire due batterie tipo AAA nell’apposito spazio e chiu-
dere con il coperchio.
6.2 Aprire la pinza come indicato nel disegno.
6.3 Inserire bene un dito nel sensore prima di chiudere la
pinza.
6.4 Premere l’interruttore di accensione sulla parte anterio-
re dell’apparecchio.
6.5 Mantenersi fermi durante la misurazione.
6.6 Leggere i dati dal display.
6.7 Cambiamento del display: dopo aver acceso il pulsiossi-
metro, ogni volta che l’interruttore viene premuto, il modo di
visualizzazione del display cambia in 6 modi diversi, come
il seguente:
Quando si preme l’interruttore di accensione per più di 1 se-
condo, la luminosità del pulsiossimetro cambia gradatamen-
te. Ci sono 10 livelli di luminosità. Il livello di default è il 4°.
Attenzione: Quando il dito è inserito nel sensore, la super-
ficie dell’unghia deve essere rivolta verso l’alto.
Attenzione: Usare dell’alcool per pulire la gomma interna
a contatto con il dito prima e dopo ogni misurazione (la gom-
ma interna al pulsiossimetro è materiale medicale, privo di
tossine e non dannoso per l’epidermide).
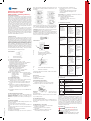
7. Descrizione del display
7.1 :
a) Interruttore di accensione
b) Barografo del battito cardiaco
c) Saturazione di emoglobina (SpO2)
d) Battito cardiaco (PR)
7.2:
a) Forma d’onda della misurazione di SpO2.
b) Batteria in esaurimento
La lunghezza della barra del battito cardiaco indica l’inten-
sità delle pulsazioni.
8. Accessori
8.1 Laccio portapulsiossimetro
8.2 2 Batterie
8.3 1 Manuale di istruzione
9. Installazione delle batterie
9.1 Inserire le due batterie tipo AAA
nell’apposito spazio secondo le corrette polarità.
9.2 Chiudere il coperchio come indicato nel disegno.
Avvertenza: Le polarità delle batterie devono essere cor-
rettamente installate. Un errata installazione può danneg-
giare l’apparecchio.
Rimuovere la batteria se il pulsiossimetro non viene utilizza-
to per un lungo periodo.
10. Inserimento del laccio
10.1 Inserire la parte più fine del laccio nell’apposito foro e
passare la parte più grossa nel cappio cosi ottenuto prima
di stringere.
11. Manutenzione e stoccaggio
11.1 Cambiare le batterie quando si accende la spia
di batterie in esaurimento.
11.2 Pulire la superficie del sensore prima di
ogni utilizzo.
11.3 Rimuovere le batterie se l’apparecchio non
viene utilizzato per un lungo periodo.
11.4 Conservare il prodotto in ambienti con
temperatura tra i -10° e i 40°C e con umidità
tra 10 e 80%.
Si consiglia tenere l’apparecchio in un luogo
asciutto. L’umidità può danneggiare il suo
funzionamento.
Avvertenza: Per lo smaltimento delle batterie esaurite se-
guire le leggi del governo locale.
11.5 Condizioni ambientali temperatura
operativa: da 5 a 40°C
temperatura stoccaggio: da -10 a 40°C
umidità: 10 – 80%
12. Soluzione dei problemi
Il prodotto è conforme alla normativa IEC60601-1-1-2.
13. Simbologia
14. Garanzia
Il prodotto è garantito 2 ANNI dalla data di acquisto. Il di-
stributore si riserva il diritto di riparare o sostituire le parti
affette da difetti di fabbricazione o nei materiali usati, senza
nessuna spesa per il cliente. La garanzia non è applicabile
in caso di danni legati ad un uso improprio, ad abusi, ad al-
terazioni o ad uno smontaggio effettuato da personale non
autorizzato. Per riparazioni, nel rispetto delle suddette con-
dizioni, inviare il prodotto munito della ricevuta di acquisto al
rivenditore locale più vicino.
Problema Possibili cause Soluzione
Ossiemoglobina
o pulsazioni
cardiache non
sono mostrati
correttamente
1-Il dito non è
posizionato
correttamente
2-Il valore di
ossiemoglobina
del paziente è
troppo basso per
essere misurato
1-Posizionare
correttamente
il dito
2-Riprovare
diverse volte,
per assicurarsi
che l’apparec-
chio non sia
danneggiato.
Ossiemoglobina
o pulsazioni
cardiache sono
mostrati in modo
instabile
1-Il dito non è
stato posizionato
fino in fondo al
sensore
2-Il dito trema
o il paziente si
muove
1- Posizionare
correttamente
il dito
2- Provare a
non muoversi
Il Pulsiossimetro
non si accende
1-La potenza del-
le pile può essere
insufficiente o
esaurita
2-Le pile non
sono posizionate
correttamente
3- L’apparecchio
può essere
difettoso
1- Sostituire
le pile
2- Posizionare
correttamente
le pile
3- Contattare il
rivenditore
Il display si spe-
gne improvvisa-
mente
1- L’apparecchio
si spegne au-
tomaticamente
dopo 8 secondi
senza ricevimen-
to del segnale
2- Le batterie
sono in esauri-
mento
1- Funzione
standard
dell’apparec-
chio
2- Sostituire le
pile
“Error 3” ,
“Error 4”
oppure
“Error 7”
1- Batterie in
esaurimento
2- Tubo di emis-
sione-sensore di
ricezione ostrui-
to o danneggiato
3- Difetto nel
circuito
dell’apparecchio
1- Sostituire
le pile
2- Contattare il
rivenditore
Simbolo Definizione
Apparecchio tipo BF
Attenzione: consultare il manuale prima
dell’uso
Percentuale della saturazione di
emoglobina
Frequenza dei battiti cardiaci
(battiti per minuto)
Batteria in esaurimento
Numero di serie
http://www.morettispa.com
e-mail: info@morettispa.com
Distribuito da:
Beijing Choice Electronic Technology Co., Ltd
http://www.choicemmed.com
Shanghai International Hoiding Corp. GmbH
(Europe) Eiffestraße 80 20537 Hamburg Germany
%SpO2
SN
BPM
0123
1.
2.
3.
4.
5.
6.
ab
c
d
a
b
MA LTD805_7 01 B
EC REP

Instruction Manual for
Pulse Oximeter
(REF LTD805 - LTD807 pediatric)
1. General Description
Haemoglobin Saturation is percentage of HbO2 (Oxyhemo-
globin), compounded with oxygen, in haemoglobin (Hb). In
other words, it indicates the saturation of HbO2 in blood. It
is a crucial physiological parameter for Respiration System.
Many respiratory diseases can lead to decrease of SPO2 sa-
turation. Moreover, such factors as organic automatic adju-
stment malfunction derived from anesthesia, side effect of
major operation and injures aroused from physical check can
also cause problems about SPO2 saturation variation, which
contributed to such adverse symptoms such as faint, vomit
and feel weakness and so on. What’s more, if can not get the
right remedy, it can lead to dangers to human’s life.
The Fingertip Pulse Oximeter with features of small dimen-
sion, low power consumption, easy-to-use and convenience
for portable. As long as you put your finger in the device
which read data though a light-sensitive probe, then the as-
sociated reading will be displayed on the indicator. It is pro-
ved by clinical trial Pulse Oximeter have outstanding precise
and could repeat to measure the SPO2 more accurately and
stably.
2.Measurement principle
The principle of the pulse oximeter is based on the fact that
the colour of blood depends on the quantity of the Oxyhe-
moglobin. While the Oxyhemoglobin is red, the colour of the
non-saturated Hemoglobin tends to blue. The hemoglobin
changes its structural configuration when it gets involved in
a chemical reaction; each of these configurations presents a
different type of light reflection. The wave length of 660nm
corresponds to red colour of the Oxyhemoglobin ( HbO2), the
non-saturated Hemoglobin corresponds to the wave length
of 940nm. Both of the wave lengths pass through a blood
sample and show the percentage of HbO2. This percentage
corresponds to the value of saturation (SpO2).
Diagram of Operation Principle
1. Glow and Infrared-ray Emission Tube
2. Glow and Infrared-ray Receipt Tube
3. Technical Parameters
3.1 Display Format: LED display
Hemoglobin sturation Display SPO2: 0-99%
Pulse Ratio Display: 30-254 BPM
Pulse rate display: barograph
Battery Voltage Low Indication:
3.2 Power Requirements: 2 AAA sige 1.5V 3.3
3.3 Power Consumption: less than 40mA
3.4 Measurement Accuracy:
SPO2: +-2% between 80%-99%,
+-3% between 70% - 80%, <70% -no definition
Pulse rate: +-2 BPM between 30-235 BPM
3.5 Dimension:
LTD805 length: 58mm LTD807 length: 50mm
width: 30mm width: 29/26mm
height: 34mm height: 28mm
weight: 50g weight: 50g
(including two AAA batteries) (including two AAA batteries)
4. Product Properties
4.1 Easy to use.
4.2Small dimension, light (total weight is about 50g inclu-
ding batteries) and portable.
4.3 Low power consumption; included two AAA batteries
can last up to 30 hours.
4.4 Low voltage warning will be indicated on display when
battery voltage is too low and normal application of the Oxi-
meter might be influenced.
4.5 No signal can be tested, device will power off automa-
tically in 8 seconds.
5. Application field
You can use it in the field such as family, hospital, and sports
(do not use the device during exercises, but can use it before
or after exercises).
Attention: The product is not suitable to monitor patient
continuously.
6. Istructions
6.1 Installing two AAA batteries into battery cassette before
closing its cover.
6.2 Open the clamp shown as in the picture below:
6.3 Put one of your fingers into rubber hole of the Oximeter
(it is better to let your finger touch the bottom) before
releasing the clamp.
6.4 Press the switch button for one time on front panel.
6.5 Do not move your body at the same time.
6.6 Read correspondent data from display screen.
6.7 Six display modes. After turn on the oximeter, each time
you press the power switch, the oximeter will change display
mode, there are 6 display modes shown as follows:
When you press the power switch for a long time (more than
one second), the brightness of the oximeter will be changed
by degrees, there are 10 levels on brightness; the default le-
vel is level four.
Attention: When you put finger into the Oximeter, your nail
surface must be upward.
Attention: Use the medical alcohol to clean the rubber
touching the finger inside of Oximeter, before and after ope-
ration. (The rubber inside of the Oximeter is medical rubber,
which has no toxin, and no harmful to the skin of human
being).
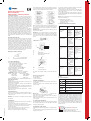
7. Brief Description of Front Panel
7.1 :
a) Power switch
b) PR Bargraph
c) Hemoglobin Saturation (SpO2)
d) Heart rate (PR)
7.2:
a) SpO2waveform
b) Low power indicator
The heart rate bargraph display corresponds with pulse
rate.
8. Pieces of Accessories
8.1 One hanging string
8.2 Two batteries
8.3 One User manual
9. Battery Installations
9.1 Push the two AAA batteries into battery cassette in cor-
rect polarities.
9.2Push the battery cover horizontally along the arrow
shown as below.
Notes: Battery polarities must be correctly located. Othe-
rwise, might cause serious damage to the device.
Please put or remove batteries in right order, or is likely to
damage the device bracket.
Please remove the battery if the Oximeter will not be used
for a long time.
10. Hang string Installations
10.1 Thread thinner end of the hang lace through the hanging
hole. Thread thicker and of the lace through the threaded
end before pulling it tightly
11. Maintenance and Storage
11.1 Replace the batteries timely when low voltage indicator
is on.
11.2 Clean surface of the fingertip Oximeter before it is used
in diagnosis for patients
11.3 Remove the batteries inside the battery cassette if the
Oximeter will not be operated for a long time.
11.4 It is better to preserve the product in a place where am-
bient temperatures range from -10° e i 40°C and humidity
range from 10 e 80%.
It is recommended that the product be kept in a dry place.
A damp ambient might affect its lifetime and even might da-
mage the product.
Notes: Please follow the articles of the local government to
waste with used batteries
11.5 Environment requirements:
Operation Temperature: 5 - 40°C
Storage Temperature: : -10 - 40°C
Humidity: 10 – 80%
12. Possible Problems and resolutions
Declaration: EMC of this product comply with IEC60601-1-1-2
standard.
13. Signal Definitions
14. GUARANTEE
This device has 2-year warranty from the purchase date which
is certified by the receipt or invoice. The distributor reserves
the right either to repair or replace necessary parts to correct
defects in the materials or workmanship without any charge.
The warranty does not apply to damage resulting from failure to
follow the operating instructions, accidents, abuse, alteration or
disassembly by unauthorized individuals. In the case you need
to get your device repaired and you fulfil the conditions of war-
ranty, send the device to the nearest retailer together with the
purchase receipt.
0123
1.
2.
3.
4.
5.
6.
ab
c
d
MA LTD805_7 01 B
a
b
Signals Definitions
The equipment is BF type
Attention: Please reference instruction
manual before operation
Hemoglobin saturation
Pulse rate or Heart rate
(Beat per Minute)
Low Voltage Indication
Serial No
%SpO2
SN
BPM
Distributed by:
http://www.morettispa.com
Beijing Choice Electronic Technology Co., Ltd
Shanghai International Hoiding Corp.
GmbH (Europe) Eiffestraße 80 20537 Hamburg Germany
Problems Possible
reason
Solution
Spo2 or PR can
not be shown
normally
1.Finger is
not plugged
correctly
2.Patient’s
Oxyhemoglo-
bin value is
too low to be
measured.
1.Retry putting in
the finger
2. Try some more
times, If you
can make sure
about no problem
existing in the
product.
Spo2 or PR is
shown unstably
1.Finger might
not be plugged
deep enough
2.Finger is
trembling or
patient’s body
is in movement
status
1.Retry putting in
the finger
2.Try not to move
The Oximeter
can not be powe-
red on
1.Powerof
batteries might
be inadequate
or not be there
at all
2.Batteries mi-
ght be installed
incorrectly
3.The Oximeter
might be
damaged
1.Please replace
batteries
2.Please reinstall
the batteries
3.Please contact
with local
customer service
centre
Indication lamps
are suddenly off
1.The product
is automatical-
ly powered off
when no signal
is detected
longer than 8
seconds
2. Low battery
1.Normal
2.Replace the
batteries
“Error 3” ,
“Error 4” or
“Error 7”
1 Low power
2 Receiving or
emission tubes
shielded or
damaged.
3 Current
control circuit
malfunctions.
1 Please change
battery
2 Please contact
with local
customer service
center
EC REP
-
 1
1
-
 2
2


Moretti LTD805 Manuale utente
- Tipo
- Manuale utente
- Questo manuale è adatto anche per
in altre lingue
- English: Moretti LTD805 User manual
Documenti correlati
Altri documenti
-
Microlife OXY 300 Manuale del proprietario
-
Microlife OXY 200 Manuale utente
-
-
Apex Digital MD300M Manuale utente
-
Microlife OXY 210 Manuale utente
-
Salter IB-PX100 Manuale del proprietario
-
Medisana PM 100 Manuale del proprietario
-
-
 Steris Anesthesia / Respiratory Rack Istruzioni per l'uso
