Tecnosystemi Electronic programmable scale Manuale del proprietario
- Categoria
- Bilance da cucina
- Tipo
- Manuale del proprietario

MANUALE D’USO / USER MANUAL
Tecnosystemi S.p.A. - Società Benefit
www.tecnosystemi.com
via dell’Industria, 2/4 - Z.I. San Giacomo di Veglia
31029 Vittorio Veneto (Treviso) - Italy
Phone +39 0438.500044 Fax +39 0438.501516
Numero Verde 800 904474 (only for Italy)
email: [email protected]
C.F. - P. IVA - R.I.TV IT02535780247 | Cap. Soc. € 5.000.000,00 i.v.
REV. 04 / 23-08-2022
COD. C10001507
BILANCIA PROGRAMMABILE ELETTRONICA
CON ELETTROVALVOLA E INDICATORE
REMOVIBILE 100 kg FORNITA IN VALIGETTA
ELECTRONIC PROGRAMMABLE SCALE WITH
SOLENOID VALVE AND REMOVABLE INDICATOR
100 kg SUPPLIED IN CARRYNG CASE
• cod. 11131111

2
CARATTERISTICHE COSTRUTTIVE
/ CONSTRUCTION CHARACTERISTICS
• Grande flusso di ricarica (1 kg in 45 secondi)
• Controller di plastica, con migliore protezione e aspetto
• Display LCD ad alta risoluzione
• Peso misurabile in kg e lb
• La memoria incorporata ricorda tutte le impostazioni precedenti
• Design compatto e robusto
• L’unità si spegne automaticamente dopo 15 minuti di non attività.
• Alta precisione e risoluzione
• Programmabile
• Può essere calibrato sul campo con pesi di riferimento economici
• Large charging flow (1 kg in 45 seconds)
• Plastic controller, with better protection and appearance
• High-resolution LCD display
• Weight measurable in kg and lb
• The built-in memory remembers all previous settings
• Compact and durable design
• The unit automatically shuts down after 15 minutes of non-activity.
• High accuracy and resolution
• Programmable
• Can be calibrated on the field with economical reference weights
• Elettrovalvola ad alte prestazioni (1 kg per 45 sec.)
• Mantiene in memoria le ultime impostazioni
• Dotata di funzione allarme
• Durata della batteria :60 ore in uso continuo
• Portata max: 100 kg
• Unità di misura: kg
• Precisione: ± 0,5% della lettura
• Risoluzione: 5 gr.
• Dimensioni piattaforma: 223mm x 223mm x
5,8mm
• Alimentazione a batterie: 5 x1.5V (7.5 Vcd)
• Temperatura di utilizzo: da + 10° c a +-50° c
• Peso: 2, 70 kg.
CARATTERISTICHE TECNICHE
/ TECHNICAL FEATURES
• High performance solenoid valve (1 kg per 45 sec.)
• Stores the last settings in memory
• Equipped with alarm function
• Battery life : 60 hours in continuous use
• Max. capacity: 100 kg
• Unit of measure: kg
• Accuracy: ± 5% of reading
• Resolution: 5 g
• Platform dimensions: 223 mm x 223 mm x 5.8 mm
• Battery powered: 5 x1.5V (7.5 VDC)
• Operating temperature: + 10 °C to +-50 °C
• Weight: 2.70 kg

3
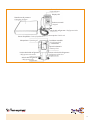
Piattaforma di pesatura
/ Weighing platform
Indicatore luminoso
/ Light indicator
Display LCD
Tastiera comandi
/ Keypad
Valvola del refrigerante / Refrigerant Valve
Cavo a spirale / Coiled cord
Punto di equilibrio / Point of equilibrium
Altoparlante / Speaker grill Cavalletto estraibile
/ Easel (extended)
Coperchio batteria
/ Battery Cover
Uscita valvola del refrigerante
/ Refrigerant valve outlet
Entrata valvola del refrigerante
/ Refrigerant valve inlet
Valvola del refrigerante
/ Refrigerant valve

4
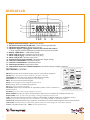
1 - Display numerico principale / Main numeric display
2 - Indicatore luminoso valvola (ON/OFF) / Valve indicator light (ON/OFF)
3 - Indicatore livello batteria / Battery level indicator
4 - Indicatore negativo “galleggiante” (Indica il peso rimosso dal cilindro)
/ “Float” negative indicator (Indicates the weight removed from the cylinder)
5 - Display “TARA/ZERO” / “TARE/ZERO” display
6 - Indica unità per lb e oz / Indicates units for lb and oz
7 - Indica unità per kg e g / Indicates units per kg and g
8 - Indica unità per lbs / Indicates units for lbs
9 - Impostazioni peso programmabili / Programmable weight settings
10 - Indicatore modalità Run / Run Mode Indicator
11 - Indicatore modalità Hold / Hold Mode Indicator
12 - Valvola Aperta/Chiusa / Open/Closed Valve
13 - Impostazioni risoluzione 2G(Alta)/5G (Bassa) / Resolution settings: 2G (High) / 5G (Low)
2
3
4
5
6
7
8
9 10 11 12 13
1
DISPLAY LCD
TASTIERINO / KEYPAD
ON/OFF: Premere per accendere. Tenere premuto 2 secondi per spegnere.
ON/OFF: Press to turn on. Press and hold for 2 seconds to turn off.
TARA/ZERO: Premere fino a far apparire TARA/ZERO sul display.
TARE/ZERO: Press until TARE/ZERO appears on the display.
UNITS: Scorre le misure metriche/inglesi
UNITS: Scroll through the metric/English measurements
SET: Premere “SET” per iniziare il programma
SET: Press “SET” to start the program
UP PAUSE: Premere per aumentare le impostazioni della ricarica o mettere in
pausa la ricarica
UP PAUSE: Press to increase charge settings or to pause
RESOL DOWN: Premere per ridurre le impostazioni della ricarica / Cambiare la risoluzione da 2G a 5G
RESOL DOWN : Press to reduce charge settings / Change resolution from 2G to 5G
“FAST” Premere per seleziona la cifra e premere “UP PAUSES” e “RESOL DOWN” per cambiare il volume
“FAST” Press to select the digit and press “UP PAUSES” and “RESOL DOWN” to change the volume
“RUN/STOP” Attiva/Disattiva progr. registrato Controllare se la valvola elettromagnetica lavora naturalmente.
“RUN/STOP” Enable/Disable the registered program Check if the electromagnetic valve works naturally.
“LIGHT” Lampada sfondo LCD / “LIGHT” LCD background lamp.

5
Seguire le seguenti istruzioni per utilizzare la bilancia con le impostazioni base:
1. Disimballare la bilancia come descritto nella sezione “disimballare la bilancia”.
2. Installare le batterie nella parte apposita come descritto nella sezione “installazione batterie”
3. Posizionare il piatto pesatore su una superficie piana.
4. Accendere la bilancia premendo ON/OFF
5. Selezionare l’unità di misura corretta premendo ripetutamente UNITS.
6. Le unità scorreranno nel modo seguente: kg.g —►Ib.oz —►Ibs —►oz. Se viene usato un contenitore per
gli oggetti da pesare, posizionarlo vuoto al centro del piatto.
7. Premere TARA/ZERO per azzerare la bilancia. Sul display apparirà zero.
8. Posizionare il materiale da misurare nel contenitore o al centro del piatto.
9. Leggere il peso sul display
10. Un numero positivo indica che il peso applicato è maggiore di zero. Un numero negativo indica che il peso
applicato è minore di zero.
11. Spegnere la bilancia tenendo premuto ON/OFF per circa 2 secondi
12. Per conservare la durata della batteria, la bilancia si spegnerà dopo 15 minuti di inattività, a meno che non
sia attivo un programma (vedere sezione programmazione). Una volta accesa, verrà ripristinata l’ultima
impostazione utilizzata.
PESATURA BASE
/ BASIC WEIGHING
Follow the instructions below to use the scale with the basic settings:
1. Unpack the scales as illustrated in the “unpack the scale” section.
2. Install the batteries in the appropriate location as illustrated in the “battery installation” section
3. Place the weighing plate on a flat surface.
4. Turn on the scale by pressing ON/OFF
5. Select the correct unit of measurement by pressing UNITS repeatedly.
6. The units will scroll as follows: kg.g —►Ib.oz —►Ibs —►oz. When using a container to weigh objects, place the
empty container in the middle of the plate.
7. Press TARE/ZERO to reset the scale. Zero will appear on the display.
8. Place the material to be weighed in the container or in the middle of the plate.
9. Read the weight on the display
10. A positive number indicates that the applied weight is greater than zero. A negative number indicates that the
applied weight is less than zero.
11. Turn off the scale by pressing and holding ON/OFF for about 2 seconds
12. To save the battery, the scale will turn off after 15 minutes of inactivity unless a program is active (see program-
ming section). Once turned on, the last setting used will be restored.

6
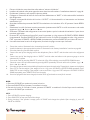
1. Se estratto, ritrarre il cavalletto.
2. Riporre la bilancia nella custodia.
1. Rimuovere la bilancia dalla custodia.
2. Durante l’uso, assicurarsi che il cavo a spirale non tocchi la parte superiore del piatto di pesatura, per evitare
imprecisioni.
3. Se si desidera, estrarre il cavalletto sulla parte posteriore della scatola di controllo. Il cavalletto può essere
utilizzato per appendere l’unità, o piegato ad angolo per l’appoggio su una superficie piana.
DISIMBALLARE LA BILANCIA
/ UNPACKING THE SCALE
REIMBALLAGGIO
/ REPACKING
1. Remove the scale from the case.
2. During use, make sure that the spiral cable does not touch the top of the weighing plate: with will prevent inac-
curacies.
3. If required, pull out the stand on the back of the control box. The stand can be used to hang the unit; when bent at
an angle, it can be used for support on a flat surface.
1. If pulled out, retract the stand.
2. Place the scale in the case.
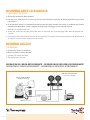
OPERAZIONI DI CARICA REFRIGERANTE - OPERAZIONI DI RECUPERO REFRIGERANTE
OPERAZIONI DI CARICA REFRIGERANTE - OPERAZIONI DI RECUPERO REFRIGERANTE
Carica di refrigerante
/ Refrigerant charge
Indicatore di pressione
/ Pressure indicator
Bilancia / Scale Pompa / Pump

7
1. Estrarre la bilancia come descritto nella sezione “estrarre la bilancia”.
2. Installare le batterie nella parte apposita come descritto nella sezione “installazione batteria” a pag. 06
3. Posizionare il piatto su una superficie piana e stabile.
4. Collegare un’estremità del tubo di ricarica al filtro disidratatore a “INLET” e l’altra estremità al serbatoio
del refrigerante.
5. Collegare un’estremità del tubo di ricarica a “OUTLET” e l’altra estremità o al manometro o al sistema
automatico A / C.
6. Accendere la Bilancia premendo ON/OFF Per selezionare la risoluzione 2G o 5G premere il tasto RESOL
DOWN
7. Selezionare le unità di misura corrette premendo ripetutamente UNITS. Le unità scorreranno nel modo
seguente: kg.g *—► Ib.oz <—► Ibs <—► oz.
8. Sistemare il serbatoio del refrigerante al centro del piatto e aprire la valvola del serbatoio. Il peso viene
mostrato sul display.
9. Premere SET per impostare il peso Se il peso è impostato su 1 kg. premere UP PAUSE o REBOL DOWN
ripetutamente. Premere RUN/STOP per iniziare la ricarica. Se il peso è impostato su oltre 1 kg, premere
FAST e premere UP PAUSE o RESOL DOWN ripetutamente, premere RUN/STOP per iniziare la ricarica
10. Una volta terminata la carica di refrigerante, la valvola si spegne e suona per 6 secondi.
NOTA:
1. Premere UP PAUSE per mettere in pausa la ricarica.
2. Premere RUN/STOP per fermare e cancellare la ricarica.
3. Durante la ricarica, se il cilindro è vuoto, premere UP PAUSE e cambiare il cilindro. Dopo averlo cambiato,
premere UP PAUSE per continuare.
1. Extract the scale as illustrated in the “extracting the scale” section.
2. Install the battery in the appropriate location as illustrated in the “battery installation” section on page 06
3. Place the plate on a flat and stable surface.
4. Connect one end of the charging tube to the dehydrator filter to “INLET” and the other end to the refrigerant
tank.
5. Connect one end of the charging tube to “OUTLET” and the other end either to the pressure gauge or to the
automatic A/C system.
6. Turn on the Scale by pressing ON/OFF. To select the 2G or 5G resolution, press the RESOL DOWN button
7. Select the correct unit of measurement by pressing UNITS repeatedly. The units will scroll as follows: kg.g *—►
Ib.oz <—► Ibs <—► oz.
8. Place the refrigerant tank in the middle of the plate and open the tank valve. The weight is shown on the display.
9. Press SET to set the weight. If the weight is set to 1 kg, press UP PAUSE or RESOL DOWN repeatedly. Press
RUN/STOP to start charging. If the weight is set to more than 1 kg, press FAST and press UP PAUSE or RESOL
DOWN repeatedly; press RUN/STOP to start charging
10. Once the refrigerant has been charged, the valve turns off and emits a sound for 6 seconds.
NOTE:
1. Press UP PAUSE to pause charging.
2. Press RUN/STOP to stop and cancel the charge.
3. During charging, if the cylinder is empty, press UP PAUSE and change the cylinder. After changing it, press UP
PAUSE to continue.

8
1. Rimuovere il coperchio della batteria dal lato posteriore della scatola di controllo premendo la linguetta alla base.
2. Se necessario, rimuovere le batterie vecchie.
3. Inserire 5 ’AA’. Riposizionare il coperchio della batteria allineando le linguette e facendolo scattare in posizione.
IMPORTANTE!
PER PREVENIRE DANNI ALLA BILANCIA, OSSERVARE CON ATTENZIONE LA POLARITÀ DELLA BATTERIA COME INDICATO
ALL’INTERNO DEL VANO BATTERIE. NON LASCIARE LE BATTERIE SCARICHE NELL’UNITÀ. RIMUOVERE LE BATTERIE SE LA
BILANCIA NON VIENE USATA PER UN LUNGO PERIODO DI TEMPO.
Se il peso applicato al piatto supera la capacità massima della bilancia (100 kg), al centro del display comparirà la
scritta ‘OL’ Per prevenire danni alla bilancia, rimuovere subito il peso dal piatto.
INSTALLAZIONE E SOSTITUZIONE DELLA BATTERIA
/ BATTERY INSTALLATION AND REPLACEMENT
INDICAZIONE OVERRAGE
/ OVERRAGE INDICATION
1. Remove the battery cover from the back of the control box by pressing the tab at the base.
2. If necessary, remove the old batteries.
3. Insert No. 5 ‘AA’ batteries. Put back the battery cover by aligning the tabs and snapping it into place.
IMPORTANT!
TO PREVENT DAMAGE TO THE SCALE, CAREFULLY OBSERVE THE POLARITY OF THE BATTERY AS INDICATED INSIDE THE BATTERY
COMPARTMENT. NEVER LEAVE SPENT BATTERIES INSIDE THE UNIT. REMOVE THE BATTERIES IF THE SCALE IS NOT USED FOR A
LONG PERIOD OF TIME.
If the weight applied to the plate exceeds the maximum capacity of the scale (100 kg), the wording ‘OL’ will appear in the
middle of the display. To prevent damage to the scale, remove the weight from the plate immediately.

9
SMALTIMENTO
DISPOSAL
GARANZIA
WARRANTY
Alla fine della sua vita utile il prodotto non deve essere smaltito insieme ai rifiuti urbani. Può essere
consegnato presso gli appositi centri di raccolta differenziata predisposti dalle amministrazioni
comunali, oppure presso i rivenditori che forniscono questo servizio. Per rimarcare l’obbligo di smaltire
separatamente gli elettrodomestici, sul prodotto è riportato il marchio del contenitore di spazzatura
mobile barrato.
At the end of its useful life, the product must not be disposed of with household waste. It can be deposited at
a dedicated recycling centre run by local councils, or at retailers who provide such a service. To highlight the
requirement to dispose of household electrical items separately, there is a crossed-out waste paper basket
symbol on the product.
La garanzia ha durata di 1 (uno) anno a decorrere dalla data di consegna indicata sul d.d.t (bolla). E’ prevista altresì
l’estensione d’ufficio, a titolo gratuito, per il secondo anno (due anni complessivi di garanzia) con decorrenza sempre
dalla data indicata nel d.d.t di consegna (bolla).
L’azienda fornitrice garantisce la qualità dei materiali impiegati e la corretta realizzazione dei componenti. La garanzia
copre difetti di materiale e di fabbricazione e si intende relativa alla fornitura dei pezzi in sostituzione di qualsiasi
componente che presenti difetti, senza che possa venir reclamata alcuna indennità, interesse o richiesta di danni.
La garanzia non copre la sostituzione dei componenti che risultano danneggiati per:
• trasporto non idoneo;
• installazione non conforme a quanto specificato in questo manuale di installazione uso e manutenzione;
• la non osservanza delle specifiche tecniche di prodotto;
• quant’altro non riconducibile a vizi originari del materiale o di produzione a condizione che il reclamo del cliente
sia coperto dalla garanzia e notificato nei termini e modalità richiesta dal fornitore, lo stesso si impegnerà, a sua
discrezione, a sostituire o riparare ciascun prodotto o le parti di questo che presentino vizi o difetti.
The warranty is valid for 2 (two) years from the delivery date indicated on the delivery note / waybill.
The supplier company guarantees the quality of the materials used and the correct construction of the components. The
warranty covers defects in materials and manufacturing defects and refers to the supply of spare parts of any components
featuring defects, without any compensation, interest or claim for damages.
The warranty does not cover the replacement of components damaged due to:
incorrect transportation;
installation not compliant with that specified in this installation, use and maintenance manual;
non-observance of product technical specifications;
Anything else that is not linked to original faults of the material or production provided that the
customer complaint is covered by the guarantee and a claim is made within the time limit and
in the way requested by the supplier, the same supplier will commit, at their own discretion,
to replace or repair any product or part of product showing signs of faults or defects.

10
NOTE
NOTES

11
NOTE
NOTES

·
W
E
A
R
E
A
B
E
N
E
F
I
T
C
O
M
P
A
N
Y
·
W
E
A
R
E
A
B
E
N
E
F
I
T
C
O
M
P
A
N
Y
·
W
E
A
R
E
A
B
E
N
E
F
I
T
C
O
M
P
A
N
Y
Tecnosystemi S.p.A. Società Benefit
www.tecnosystemi.com
via dell’Industria, 2/4 - Z.I. San Giacomo di Veglia
31029 Vittorio Veneto (Treviso) - Italia
Tel +39 0438.500044 - Fax +39 0438.501516
email: [email protected]
C.F. - P. IVA - R.I.TV IT02535780247
Cap. Soc. € 5.000.000,00 i.v.
800 904474
ONLY FOR ITALY
WATCH OUR
INSTITUTIONAL VIDEO
II
SS
OO
9
9
0
0
0
0
1
1
S
S
Y
Y
S
S
T
T
E
E
MM
CC
EE
RR
TT
II
FF
II
C
C
A
A
T
T
I
I
O
O
N
N
-
 1
1
-
 2
2
-
 3
3
-
 4
4
-
 5
5
-
 6
6
-
 7
7
-
 8
8
-
 9
9
-
 10
10
-
 11
11
-
 12
12


Tecnosystemi Electronic programmable scale Manuale del proprietario
- Categoria
- Bilance da cucina
- Tipo
- Manuale del proprietario
in altre lingue
Documenti correlati
Altri documenti
-
MasterCool 98210-A Istruzioni per l'uso
-
MasterCool 98210-BL Istruzioni per l'uso
-
Rothenberger Refrigerant scale ROSCALE 120 Manuale utente
-
-
-
-
-
 BIS ASW Istruzioni per l'uso
