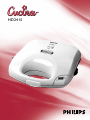
Philips HD2415 Manuale utente
- Categoria
- Accessori per mixer / robot da cucina
- Tipo
- Manuale utente
Questo manuale è adatto anche per

HD2415

2

B
H
I
C
D
E
F
G
A
3

4


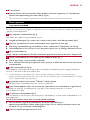
Introduction
Congratulations on acquiring your new Philips sandwich maker.With this sandwich maker you can
make all kinds of toasted sandwiches very easily.
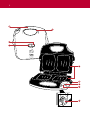
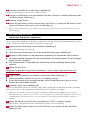
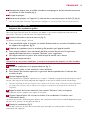
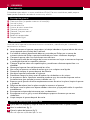
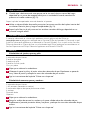
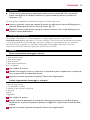
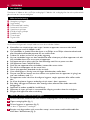
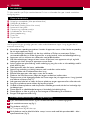
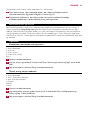
General description
A Removable cooking plates (dishwasher-proof)
B Handles of plate
C Cool-touch handgrips
D Automatic locking system
E Heating-up light
F Ready-to-cook light
G Cord storage
H Timer button
I Digital timer
Important
Read these instructions for use carefully before using the appliance and save them for future
reference.
◗ Check if the voltage indicated on the bottom of the appliance corresponds to the local mains
voltage before you connect the appliance.
◗ If the mains cord is damaged, it must be replaced by Philips, a service centre authorised by
Philips or similarly qualified persons in order to avoid a hazard.
◗ Only connect the appliance to an earthed wall socket.
◗ Do not let the mains cord hang over the edge of the table or worktop on which the
appliance is standing and keep the cord away from the hot surfaces of the appliance.
◗ Put the appliance on a flat, stable surface with sufficient free space around it.
◗ Keep the appliance out of the reach of children.
◗ Do not immerse the appliance or the mains cord in water or any other liquid.
◗ Always unplug the appliance after use.
◗ Do not let the appliance operate unattended.
◗ Always preheat the plates before putting any sandwiches between them.
◗ The temperature of accessible surfaces may be high when the appliance is operating
(e.g. areas indicated with
=).
◗ Let the appliance cool down completely before removing the plates, cleaning the appliance or
putting it away.
◗ Make sure you mount the plates securely when you place them in the appliance.
◗ Never touch the plates with sharp or abrasive items, as this will damage the non-stick
surface.
◗ This appliance is intended for household use only.
◗ This appliance is not a grill and is not intended for preparing other foods than sandwiches.
◗ Always clean the appliance after use.
Before first use
1 Remove any stickers and wipe the body of the sandwich maker with a damp cloth.
2 Open the sandwich maker (fig. 1).
3 Remove the plates from the appliance (fig. 2).
Lift them out of the appliance by the handles.
4 Clean each plate with a soft cloth or sponge in hot water with some washing-up liquid or put
them in the dishwasher (fig. 3).
ENGLISH6

5 Dry the plates.
6 Reassemble the plates by placing the rear edge of the plates in the appliance (1), lowering
them onto the appliance and pressing them down (2) (fig. 4).
B
The appliance may give off some smoke when you use it for the first time.This is normal.
Using the appliance
Making toasted sandwiches
For a more even, golden browning result you can lightly butter the sides of the bread that come into
contact with the cooking plates.
1 Insert the mains plug into the wall socket (fig. 5).
The red heating-up light goes on.
◗ You can adjust the length of the cord by winding part of it round the cord storage facility (fig.
6).
2 Prepare the ingredients for the toasted sandwiches while the appliance is heating up.
◗ For each sandwich you need two slices of bread and a suitable filling. Read the chapter
'Recipes' for suggestions.
◗ The sandwich maker is ready for use as soon as the green ready-to-cook light goes on.
3 Open the sandwich maker.
Avoid touching the metal parts (including the handles of the plates) as they become very hot!
4 Put the sandwiches to be prepared on the lower plate (fig. 7).
◗ You can also toast only one sandwich, if you wish.
◗ To ensure optimal sealing, fillings should not be spread too close to the edges of the bread
slices.
5 Close the sandwich maker (fig. 8).
Lower the upper plate onto the bread by means of the cool-touch handgrip and press both
handgrips together until you hear them lock with a click.
B
During the cooking process, the green ready-to-cook light goes out and the red heating-up light goes
on and off from time to time to indicate that the heating elements are temporarily switched on and
off to maintain the correct temperature.
6 Set the required cooking time (see section 'Timer' in this chapter).
You can also use the sandwich maker without setting the timer.
7 Open the sandwich maker after 3-5 minutes to check whether the sandwiches are golden
brown.
The cooking time depends on the type of bread and the filling and on how crispy and brown you
want your toasted sandwiches to be.
8 Remove the sandwiches (fig. 9).
Use a wooden or plastic utensil (e.g. a spatula) to remove the toasted sandwich from the sandwich
maker.
Do not use metal, sharp or abrasive kitchen utensils.
◗ If you wish to continue making sandwiches, wait until the red heating-up light goes out and
the green ready-to-cook light goes on before putting new sandwiches in the sandwich maker.
9 Unplug the sandwich maker after use.
ENGLISH 7

Timer
The timer indicates the end of the cooking time, but does NOT switch the appliance off.
Setting the timer
1 Press the timer button to set the cooking time in minutes (fig. 10).
The set time will become visible on the display.
2 Keep the button pressed to set the minutes forward quickly. Release the button once the
required cooking time has been reached.
The maximum time that can be set is 14 minutes.
A few seconds after you have set the cooking time, the timer will start counting down.
While the timer is counting down, the remaining cooking time blinks on the display.The last minute
is displayed in seconds.
3 If the preset time is not correct, you can erase it by pressing the timer button for 2 seconds
at the moment the timer starts counting down (when the time starts to blink).
4 Keep the button pressed until '00' appears on the display.
You can now set the correct cooking time.
◗ When the preset time has elapsed you will hear an audible signal for 8 seconds.
◗ You can also stop the audible signal by pressing the timer button.
Cleaning
1 Always unplug the sandwich maker before you start cleaning it.
2 Let the sandwich maker cool down completely in open position.
3 Remove excess oil from the plates with a piece of kitchen paper before cleaning them.
4 Remove the plates.
5 Clean the plates with a soft cloth or sponge in hot water with some washing-up liquid or put
them in the dishwasher.
Never use aggressive or abrasive cleaning agents and materials, as this will damage the non-stick
coating of the plates.
◗ Use a wooden or plastic spatula to remove sticky food residues (for example solidified
cheese) from the cooking plates.
6 Clean the outside of the appliance with a damp cloth.
Never immerse the appliance in water.
Storage
1 Wind the cord round the cord storage facility of the appliance (fig. 6).
2 The appliance can be stored in vertical or horizontal position (fig. 11).
Environment
◗ Do not throw the appliance away with the normal household waste at the end of its life, but
hand it in at an official collection point for recycling. By doing this you will help to preserve
the environment (fig. 12).
ENGLISH8

Remove the battery of the timer before you discard the appliance.
1 Use a crosshead screwdriver to remove the four screws in the inside plate of the lower
handle. Remove the plate and then remove the timer (fig. 13).
2 Remove the battery. Do not throw the battery away with the normal household waste, but
hand it in at an official collection point.
Guarantee & service
If you need information or if you have a problem, please visit the Philips website at www.philips.com
or contact the Philips Customer Care Centre in your country (you will find its phone number in the
worldwide guarantee leaflet). If there is no Customer Care Centre in your country, turn to your
local Philips dealer or contact the Service Department of Philips Domestic Appliances and Personal
Care BV.
Recipes
Ham, cheese and pineapple sandwiches
4 slices of white bread
2 slices of cheese
2 slices of pineapple
2 thin slices of ham
Curry powder
1 Let the sandwich maker heat up.
2 Put the cheese, the pineapple and the ham on two slices of bread. Sprinkle the ham with
some curry powder and put the other two slices of bread on top.
3 Follow the instructions in chapter 'Using the appliance'
Tomato, cheese & anchovy sandwich
4 slices of white bread
1 or 2 tomatoes (cut into slices)
2 tablespoons of grated Parmesan cheese
6 anchovies
Paprika
Marjoram
1 Let the sandwich maker heat up.
2 Put the slices of tomato, the anchovies and the grated cheese on two slices of bread. Sprinkle
with some paprika and marjoram and put the other two slices of bread on top.
3 Follow the instructions in chapter 'Using the appliance'
ENGLISH 9

Einführung
Herzlichen Glückwunsch zu Ihrem neuen Philips Sandwichmaker, mit dem Sie ganz einfach eine
Vielfalt getoasteter Sandwiches zubereiten können.
Allgemeine Beschreibung
A Herausnehmbare Platten (spülmaschinengeeignet)
B Griffe der Platten
C Cool-Touch Handgriffe
D Automatischer Deckelverschluss
E Kontrolllampe: Ein
F Kontrolllampe: Bereitschaft
G Kabelaufwicklung
H Timer-Taste
I Digitaler Timer
Wichtig
Lesen Sie diese Bedienungsanleitung vor dem ersten Gebrauch des Geräts sorgfältig durch und
bewahren Sie sie zur späteren Einsichtnahme auf.
◗ Prüfen Sie vor dem Anschließen des Gerätes, ob die Spannungsangabe auf der Unterseite des
Gerätes mit der örtlichen Netzspannung übereinstimmt.
◗ Wenn das Netzkabel defekt oder beschädigt ist, darf es nur von einem Philips Service-Center
oder einer von Philips autorisierten Werkstatt ausgetauscht werden, um Gefährdungen zu
vermeiden.
◗ Schließen Sie das Gerät nur an eine Schuko-Steckdose an.
◗ Lassen Sie das Netzkabel nicht über die Kante der Tisch- oder Arbeitsplatte hängen, auf der
das Gerät steht.Achten Sie darauf, dass das Netzkabel nicht in Berührung mit den heißen
Oberflächen des Geräts kommt.
◗ Stellen Sie das Gerät auf eine ebene, stabile Unterlage und halten Sie rund um das Gerät
ausreichend Platz frei.
◗ Halten Sie das Gerät außer Reichweite von Kindern.
◗ Tauchen Sie das Gerät und das Netzkabel nicht in Wasser oder andere Flüssigkeiten.
◗ Ziehen Sie nach dem Gebrauch stets den Netzstecker aus der Steckdose.
◗ Lassen Sie das eingeschaltete Gerät nicht unbeaufsichtigt.
◗ Heizen Sie das Gerät vor, bevor Sie Zutaten zwischen die Sandwichplatten legen.
◗ Die Oberflächen des Geräts können während des Betriebs sehr heiß sein (z. B. die mit
=
gekennzeichneten Flächen)!
◗ Lassen Sie das Gerät vollständig abkühlen, bevor Sie die Platten herausnehmen, das Gerät
reinigen oder wegstellen.
◗ Achten Sie darauf, die Platten ganz fest in das Gerät einzusetzen.
◗ Berühren Sie die Platten nicht mit spitzen oder scheuernden Gegenständen, um
Beschädigungen der Antihaft-Beschichtung zu vermeiden.
◗ Das Gerät ist nur für den häuslichen Gebrauch vorgesehen.
◗ Dieses Gerät ist kein Grill und eignet sich ausschließlich für die Zubereitung von Sandwiches.
◗ Reinigen Sie das Gerät nach jedem Gebrauch.
Vor dem ersten Gebrauch
1 Ziehen Sie alle Aufkleber ab und reinigen Sie das Gehäuse des Sandwichtoasters mit einem
feuchten Tuch.
2 Öffnen Sie das Gerät (Abbildung 1).
DEUTSCH10

3 Nehmen Sie die Platten aus dem Gerät (Abbildung 2).
Heben Sie die Platten an den Griffen aus dem Gerät.
4 Reinigen Sie alle Platten mit einem weichen Tuch oder Schwamm in heißem Spülwasser oder
im Geschirrspüler (Abbildung 3).
5 Trocknen Sie die Platten.
6 Setzen Sie die Platten mit dem hinteren Rand in das Gerät (1), senken Sie die Platten auf das
Gerät und drücken Sie sie nach unten (2) (Abbildung 4).
B
Beim ersten Gebrauch kann das Gerät etwas Rauch entwickeln. Das ist normal und kein Grund zur
Beunruhigung.
Der Gebrauch des Geräts
Getoastete Sandwiches zubereiten
Für ein gleichmäßig goldbraunes Ergebnis empfiehlt es sich, die Seiten der Brotscheiben, die mit den
Platten in Berührung kommen, leicht mit Butter zu bestreichen.
1 Stecken Sie den Netzstecker in die Steckdose (Abbildung 5).
Die rote Kontrolllampe (Ein) leuchtet.
◗ Überschüssiges Kabel können Sie um die Kabelaufwicklung legen (Abbildung 6).
2 Bereiten Sie die Zutaten für die getoasteten Sandwiches vor, während das Gerät aufheizt.
◗ Für jedes Sandwich benötigen Sie zwei Scheiben Brot und eine geeignete Füllung.Vorschläge
finden Sie unter "Rezepte".
◗ Der Sandwichmaker ist betriebsbereit, sobald die grüne Kontrolllampe (Bereitschaft)
leuchtet.
3 Öffnen Sie das Gerät
Vermeiden Sie jede Berührung mit den Metallteilen - auch mit den Griffen der Platten. Sie
werden sehr heiß!
4 Legen Sie die Sandwiches zum Toasten auf die untere Platte (Abbildung 7).
◗ Wenn Sie möchten, können Sie auch nur ein Sandwich toasten.
◗ Damit die Sandwiches gut versiegelt werden, sollten Sie den Belag nicht ganz bis an die
Ränder der Brotscheiben verteilen.
5 Schließen Sie das Gerät (Abbildung 8).
Senken Sie die obere Platte mit Hilfe des Cool-Touch Handgriffes auf das Brot, drücken Sie beide
Griffe zusammen, bis der automatische Deckelverschluss sie hörbar verriegelt.
B
Während des Toastens erlischt die grüne Kontrolllampe (Bereitschaft) gelegentlich und die rote
Kontrolllampe (Ein) geht von Zeit zu Zeit an und wieder aus. Dadurch wird signalisiert, dass sich die
Heizelemente zwischendurch ein- und ausschalten, um die erforderliche Temperatur aufrecht zu
erhalten.
6 Stellen Sie die gewünschte Zeit ein (siehe Abschnitt "Timer" in diesem Kapitel).
Sie können den Sandwichmaker auch benutzen, ohne den Timer einzustellen.
7 Öffnen Sie den Sandwichmaker nach 3 bis 5 Minuten, um zu prüfen, ob die Sandwiches
goldbraun sind.
DEUTSCH 11

Die Zubereitungszeit hängt von der Brotsorte und dem Belag ab und davon, wie knusprig und braun
Sie Ihre Sandwiches bevorzugen.
8 Nehmen Sie die Sandwiches heraus (Abbildung 9).
Nehmen Sie die fertigen Sandwiches mit einem Heber aus Holz oder Kunststoff aus dem Gerät.
Benutzen Sie keine metallnen, spitzen oder scheuernden Küchenutensilien.
◗ Wenn Sie weitere Sandwiches zubereiten möchten, warten Sie, bis die rote Kontrolllampe
(Ein) erlischt und die grüne Kontrolllampe (Bereitschaft) leuchtet, bevor Sie die Sandwiches in
das Gerät legen.
9 Ziehen Sie nach dem Gebrauch den Netzstecker aus der Steckdose.
Timer
Der Timer zeigt das Ende der Toastzeit an, schaltet das Gerät jedoch NICHT aus.
Einstellen des Timers
1 Drücken Sie die Timer-Taste, um die Toastzeit in Minuten einzustellen (Abbildung 10).
Die eingestellte Zeit erscheint auf dem Display.
2 Halten Sie die Taste gedrückt, damit die Minutenanzeige schnell weiter läuft. Lassen Sie die
Taste los, sobald die gewünschte Zeit erreicht ist.
Sie können maximal 14 Minuten einstellen.
Wenige Sekunden nach Einstellen der Toastzeit beginnt der Timer mit dem Countdown.
Während des Countdowns blinkt die verbleibende Zeit auf dem Display. Die letzte Minute wird in
Sekunden angezeigt.
3 Wenn Sie die eingestellte Zeit ändern möchten, lässt sie sich löschen: Drücken Sie die Timer-
Taste 2 Sekunden lang in dem Moment, wenn der Timer mit dem Countdown beginnt (d. h.
wenn die Zeitanzeige anfängt zu blinken).
4 Halten Sie die Taste gedrückt, bis "00" auf dem Display erscheint.
Sie können jetzt die gewünschte Zeit einstellen.
◗ Nach Ablauf der eingestellten Zeit wird 8 Sekunden lang ein Tonsignal hörbar.
◗ Sie können das Tonsignal durch Drücken der Timer-Taste stoppen.
Reinigung
1 Ziehen Sie vor dem Reinigen des Sandwichmakers stets den Netzstecker aus der Steckdose.
2 Lassen Sie das Gerät in geöffneter Stellung vollständig abkühlen.
3 Entfernen Sie überschüssiges Fett mit Küchenpapier, bevor Sie die Platten reinigen.
4 Entnehmen Sie die Platten.
5 Säubern Sie die Platten mit einem weichen Tuch oder Schwamm in heißem Spülwasser oder
im Geschirrspüler.
Reinigen Sie die Platten niemals mit Scheuermitteln oder Scheuerschwämmen, um die Antihaft-
Beschichtung nicht zu beschädigen.
◗ Entfernen Sie hartnäckige Lebensmittelreste (z. B. festgesetzten Käse) mit einem Heber aus
Holz oder Plastik von den Sandwich-Platten.
6 Reinigen Sie das Gehäuse mit einem feuchten Tuch.
Tauchen Sie das Gerät niemals in Wasser!
DEUTSCH12

Aufbewahrung
1 Legen Sie das Kabel um die Kabelaufwicklung des Geräts (Abbildung 6).
2 Das Gerät kann in senkrechter oder waagerechter Position aufbewahrt werden
(Abbildung 11).
Umweltschutz
◗ Geben Sie das Gerät am Ende der Lebensdauer nicht in den normalen Hausmüll. Bringen Sie
es zum Recycling zu einer offiziellen Sammelstelle.Auf diese Weise helfen Sie die Umwelt zu
schonen (Abbildung 12).
Entnehmen Sie die Timer-Batterie, bevor Sie das Gerät entsorgen.
1 Lösen Sie die vier Schrauben an der Innenseite des unteren Handgriffs mit einem Kreuz-
Schraubendreher. Nehmen Sie die Platte ab und entnehmen Sie dann den Timer
(Abbildung 13).
2 Nehmen Sie die Batterie heraus.Werfen Sie die Batterie nicht in den normalen Hausmüll,
sondern geben Sie sie an einer offiziellen Sammelstelle ab.
Garantie und Kundendienst
Benötigen Sie weitere Informationen oder treten Probleme auf, wenden Sie sich bitte an Ihren
Philips-Händler oder setzen Sie sich mit einem Philips Service-Center in Ihrem Land in Verbindung
(Tel. Nr. 0180/5356767). Besuchen Sie auch die Philips Website (www.philips.com).
Rezepte
Sandwich mit Schinken, Käse und Ananas
4 Scheiben Weißbrot
2 Scheiben Käse
2 Scheiben Ananas
2 dünne Scheiben Schinken
Curry
1 Lassen Sie den Sandwichmaker vorheizen.
2 Legen Sie den Käse, die Ananasscheiben und den Schinken auf zwei Scheiben Brot. Streuen
Sie etwas Curry auf den Schinken. Legen Sie dann die anderen beiden Brotscheiben darauf.
3 Folgen Sie den Anweisungen im Kapitel "Der Gebrauch des Geräts".
Tomate, Käse und Sardellen
4 Scheiben Weißbrot
1 oder 2 Tomaten, in Scheiben geschnitten
2 EL geriebener Parmesan
6 Sardellen
Paprika
Majoran
1 Lassen Sie den Sandwichmaker vorheizen.
2 Legen Sie die Tomatenscheiben, die Sardellen und den geriebenen Käse auf zwei Scheiben
Brot. Streuen Sie etwas Paprika und Majoran darüber. Legen Sie dann die anderen beiden
Brotscheiben darauf.
3 Folgen Sie den Anweisungen im Kapitel "Der Gebrauch des Geräts".
DEUTSCH 13

Introduction
Félicitations pour l'achat de votre nouveau croque-monsieur Philips. Ce croque-monsieur vous
permet de préparer facilement une grande variété de toasts.
Description générale
A Plaques détachables (résistantes au lave-vaisselle)
B Poignées des plaques
C Poignées isolantes
D Mécanisme de verrouillage automatique
E Témoin chauffage
F Témoin prêt à cuire
G Rangement cordon
H Bouton minuteur
I Minuteur digital
Important
Lisez soigneusement ce mode d'emploi avant d'utiliser l'appareil et conservez-le pour une
consultation ultérieure.
◗ Avant de brancher votre appareil, vérifiez que la tension indiquée sur le fond de l'appareil
correspond bien à la tension de votre secteur.
◗ Si le cordon d'alimentation est endommagé, il doit être remplacé par Philips ou par un
Centre Service Agréé, pour éviter tout accident.
◗ Branchez l'appareil uniquement sur une prise équipée d'une mise à la terre.
◗ Placez l'appareil de telle manière que le cordon d'alimentation ne pende pas de la table ou du
plan de travail et évitez que le cordon soit en contact avec les parties chauffantes de
l'appareil.
◗ Mettez l'appareil sur une surface plate et stable, avec suffisamment d'espace autour.
◗ Tenez l'appareil hors de portée des enfants.
◗ Ne plongez jamais l'appareil ou le cordon d'alimentation dans l'eau ou dans tout autre
liquide.
◗ Débranchez toujours l'appareil après utilisation.
◗ Ne laissez jamais l'appareil en marche sans surveillance.
◗ Préchauffez toujours l'appareil avant utilisation.
◗ Les surfaces accessibles peuvent chauffer fortement lors du fonctionnement (les zones
indiquées par
=).
◗ Laissez l'appareil refroidir complètement avant de retirer les plaques, de nettoyer l'appareil
ou de le ranger.
◗ Montez les plaques correctement lorsque vous les fixez sur l'appareil.
◗ Ne touchez jamais les plaques avec des objets pointus ou abrasifs car cela pourrait
endommager le revêtement anti-adhésif.
◗ Cet appareil est destiné à un usage domestique uniquement.
◗ Cet appareil n'est pas un gril et ne doit être utilisé que pour la préparation des sandwiches.
◗ Nettoyez toujours l'appareil après chaque utilisation.
Avant la première utilisation
1 Retirez tout autocollant et essuyez l'appareil avec un chiffon humide.
2 Ouvrez le croque-monsieur (fig. 1).
3 Retirez les plaques de l'appareil (fig. 2).
Soulevez-les à l'aide des poignées.
14
FRANÇAIS

15
4 Nettoyez les plaques avec un chiffon humide ou une éponge et de l'eau chaude savonneuse
ou lavez-les au lave-vaisselle (fig. 3).
5 Essuyez les plaques.
6 Remontez les plaques sur l'appareil (1), abaissez-les et poussez-les pour les fixer (2) (fig. 4).
B
Lors de la première utilisation, l'appareil peut dégager un peu de fumée. C'est tout à fait normal.
Utilisation de l'appareil
Préparer des sandwiches grillés
Pour que la partie extérieure du sandwich soit dorée, il faut enduire légèrement de beurre les
parties qui viennent en contact avec les plaques de cuisson.
1 Insérez la fiche dans la prise de courant (fig. 5).
Le témoin lumineux rouge s'allume.
◗ Il est possible de régler la longueur du cordon d'alimentation en enroulant l'excédent autour
du support de rangement (fig. 6).
2 Préparez les ingrédients pour le sandwich grillé pendant que l'appareil chauffe.
◗ Pour chaque sandwich, vous avez besoin de deux tranches de pain et d'une garniture
appropriée. Reportez-vous au chapitre "Recettes" pour suggestions.
◗ Le croque-monsieur est prêt à être utilisé lorsque le témoin vert s'allume.
3 Ouvrez le croque-monsieur.
Ne touchez pas les parties métalliques (y compris les poignées des plaques) car elles chauffent
fortement!
4 Mettez les sandwiches sur la plaque inférieure (fig. 7).
◗ Vous pouvez griller un seul sandwich si vous souhaitez.
◗ Pour obtenir des résultats optimaux, la garniture doit être placée bien à l'intérieur des
tranches de pain.
5 Fermez l'appareil (fig. 8).
Abaissez doucement la plaque supérieure sur le pain à l'aide de la poignée thermorésitante jusqu'à
ce que vous joigniez les deux poignées de l'appareil et activiez le mécanisme de verrouillage.
B
Pendant le grillage, le témoin lumineux vert s'éteint et le témoin rouge s'allume et s'éteint de temps
en temps pour indiquer que les éléments chauffants maintiennent la température correcte de
l'appareil.
6 Réglez la durée de cuisson nécessaire (voir section "Minuteur" dans ce chapitre).
Vous pouvez utiliser l'appareil sans régler le minuteur.
7 Ouvrez l'appareil après 3-5 minutes et vérifiez si les sandwiches à l'intérieur sont
suffisamment dorés.
Le temps de cuisson nécessaire pour obtenir des sandwiches croustillants et dorés dépend du type
de pain, de la garniture et du goût personnel.
8 Retirez les sandwiches (fig. 9).
Utilisez des ustensiles en bois ou en plastique (par exemple une spatule) pour enlever les
sandwiches de l'appareil.
FRANÇAIS

16
N'utilisez pas d'ustensiles métalliques, pointus ou abrasifs.
◗ Pour continuer de préparer des sandwiches, attendez que le témoin rouge s'éteigne et le
témoin vert s'allume avant de mettre d'autres tranches de pain sur les plaques.
9 Débranchez le croque-monsieur après chaque utilisation.
Minuteur
Le minuteur indique la fin de la période de cuisson mais n'arrête pas l'appareil.
Réglage du minuteur
1 Appuyez sur le bouton du minuteur pour régler le temps de cuisson en minutes (fig. 10).
Le temps réglé sera affiché à l'écran.
2 Maintenez appuyé le bouton pour dérouler rapidement les minutes. Relâchez le bouton
lorsque le temps de cuisson nécessaire est atteint.
La durée maximum qui peut être réglée est de 14 minutes.
Quelques secondes après avoir réglé la durée, le minuteur commence à faire le compte à rebours.
Lorsque le minuteur fait le compte à rebours, le temps restant sera affiché. La dernière minute est
affichée en secondes.
3 Si la période programmée n'est pas correcte, vous pouvez l'effacer en appuyant le bouton
pendant 2 secondes lorsque le minuteur commence à faire le compte à rebours (quand le
temps affiché sur l'écran commence à clignoter).
4 Maintenez appuyé le bouton jusqu'à ce que "00" soit affiché sur l'écran.
Vous pouvez programmer maintenant le temps de cuisson correct.
◗ Quand la période programmée s'est écoulée, vous entendrez un signal sonore pendant
8 secondes.
◗ Vous pouvez arrêter le signal sonore en appuyant sur le bouton du minuteur.
Nettoyage
1 Débranchez toujours l'appareil avant de le nettoyer.
2 Ouvrez les plaques et laissez l'appareil refroidir complètement.
3 Essuyez l'excédent d'huile avec un peu d'essuie-tout avant de nettoyer les plaques de cuisson.
4 Retirez les plaques.
5 Nettoyez les plaques à l'aide d'un chiffon doux ou une éponge dans l'eau chaude savonneuse
ou lavez-les au lave-vaisselle.
N'utilisez jamais des produits abrasifs car cela peut endommager le revêtement anti-adhésif des
plaques de cuisson.
◗ Utilisez une spatule en bois ou en plastique pour retirer tout résidu collé aux plaques de
cuisson (tel que le fromage solidifié).
6 Nettoyez l'extérieur de l'appareil avec un chiffon humide.
Ne plongez jamais l'appareil dans l'eau.
Rangement
1 Enroulez le cordon d'alimentation autour du support à la base de l'appareil (fig. 6).
2 L'appareil peut être rangé en position horizontale ou verticale (fig. 11).
FRANÇAIS

17
Environnement
◗ Ne jetez pas l'appareil en fin de vie avec les ordures ménagères, mais déposez-le à un endroit
prévu à cet effet par les pouvoirs publics pour son recyclage.Vous aiderez, ainsi, à protéger
l'environnement ( 12).
Retirez la pile du minuteur avant de mettre l'appareil au rebut.
1 Utilisez un tournevis cruciforme pour enlever les quatres vis de la plaque intérieure de la
poignée inférieure. Retirez la plaque et enlevez le minuteur (fig. 13).
2 Otez la pile. Ne la jetez pas avec les ordures ménagères, mais déposez-la à un endroit prévu à
cet effet par les autorités locales.
Garantie et service
Pour plus d'informations, visitez notre site Internet : www.philips.com ou veuillez contacter le
Service Consommateurs Philips de votre pays (vous trouverez le numéro de téléphone dans le
dépliant sur la garantie internationale). S'il n'y a aucun Service Consommateurs Philips dans votre
pays, contactez votre distributeur ou le Service Department of Philips Domestic Appliances and
Personal Care BV.
Recettes
Sandwiches au jambon, fromage et ananas
4 tranches de pain blanc
2 tranches de fromage
2 rondelles d'ananas
2 tranches minces de jambon
Curry
1 Laissez le croque-monsieur chauffer.
2 Mettez le fromage, l'ananas et puis le jambon sur deux tranches de pain. Saupoudrez le
jambon avec un peu de curry et mettez les tranches restantes de pain par-dessus.
3 Suivez les instructions du chapitre "Utilisation de l'appareil".
Sandwich à la tomate, au fromage et aux anchois
4 tranches de pain blanc
1 ou 2 tomates (coupées en rondelles)
2 cuillerées à soupe de parmesan râpé
6 anchois
Paprika
Marjolaine
1 Laissez le croque-monsieur chauffer.
2 Couvrez deux tranches de pain avec les rondelles de tomate, les anchois et le fromage râpé.
Saupoudrez le tout avec un peu de paprika et de la marjolaine et mettez les tranches
restantes de pain par-dessus.
3 Suivez les instructions du chapitre "Utilisation de l'appareil".
FRANÇAIS

Inleiding
Gefeliciteerd met de aanschaf van uw nieuwe Philips tosti-apparaat. Met dit tosti-apparaat maakt u
heel gemakkelijk allerlei soorten tosti's.
Algemene beschrijving
A Verwijderbare bakplaten (vaatwasmachinebestendig)
B Handvatten van bakplaten
C Koelblijvende handgrepen
D Automatisch vergrendelingssysteem
E Opwarmlampje
F 'Klaar voor gebruik' lampje
G Snoerhaspel
H Timerknop
I Digitale timer
Belangrijk
Lees deze gebruiksaanwijzing zorgvuldig door voordat u het apparaat gaat gebruiken. Bewaar de
gebruiksaanwijzing om hem indien nodig te kunnen raadplegen.
◗ Controleer of het voltage aangegeven op de onderkant van het apparaat overeenkomt met
de plaatselijke netspanning voordat u het apparaat aansluit.
◗ Indien het netsnoer beschadigd is, moet het vervangen worden door Philips, een door Philips
geautoriseerd servicecentrum of personen met vergelijkbare kwalificaties om gevaar te
voorkomen.
◗ Sluit het apparaat alleen aan op een geaard stopcontact.
◗ Laat het snoer niet over de rand van het aanrecht of de tafel hangen waarop het apparaat
staat en houd het snoer uit de buurt van de hete oppervlakken van het apparaat.
◗ Plaats het apparaat op een vlakke, stabiele ondergrond en zorg dat er voldoende vrije ruimte
rondom het apparaat is.
◗ Houd het apparaat buiten het bereik van kinderen.
◗ Dompel het apparaat of het snoer niet in water of een andere vloeistof.
◗ Haal na gebruik altijd de stekker uit het stopcontact.
◗ Laat het apparaat nooit zonder toezicht werken.
◗ Laat de bakplaten altijd opwarmen voordat u er brood tussen plaatst.
◗ De aanraakbare oppervlakken kunnen heet worden wanneer het apparaat in werking is (bijv.
delen aangeduid met
=).
◗ Laat het apparaat volledig afkoelen voordat u de bakplaten verwijdert, het apparaat
schoonmaakt of het opbergt.
◗ Zorg ervoor dat de bakplaten stevig op hun plaats zitten wanneer u ze in het apparaat
plaatst.
◗ Breng geen scherpe of krassende voorwerpen in aanraking met de bakplaten, aangezien de
antiaanbaklaag hierdoor beschadigd zal raken.
◗ Dit apparaat is uitsluitend bedoeld voor huishoudelijk gebruik.
◗ Dit apparaat is geen grill en is niet bedoeld voor het bereiden van andere etenswaren dan
tosti's.
◗ Maak het apparaat na gebruik altijd schoon.
18
NEDERLANDS

19
Voor het eerste gebruik
1 Verwijder stickers, indien aanwezig, en wrijf de behuizing van het apparaat schoon met een
vochtige doek.
2 Open het tosti-apparaat (fig. 1).
3 Verwijder de bakplaten (fig. 2).
Til ze aan de handvatten uit het apparaat.
4 Reinig beide bakplaten met een zachte doek of spons in heet water met een beetje
afwasmiddel of in de vaatwasmachine (fig. 3).
5 Droog de bakplaten af.
6 Bevestig de bakplaten weer in het apparaat door de achterrand in het apparaat te plaatsen
(1), de platen op het apparaat te laten zakken en ze daarna vast te drukken (2) (fig. 4).
B
Het apparaat kan wat rook afgeven wanneer u het voor de eerste keer gebruikt. Dit is normaal.
Gebruik
Tosti's maken
Voor een gelijkmatiger, goudbruin resultaat kunt u de kant van de sneetjes brood die in aanraking
komt met de bakplaat dun met boter bestrijken.
1 Steek de stekker in het stopcontact (fig. 5).
Het rode opwarmlampje gaat aan.
◗ U kunt de lengte van het snoer aanpassen door een deel ervan rond de snoerhaspel te
wikkelen (fig. 6).
2 Maak tijdens het opwarmen alvast de ingrediënten voor de tosti's klaar.
◗ Voor iedere tosti heeft u twee sneetjes brood nodig en een geschikte vulling. Ideetjes voor
de vulling vindt u in het hoofdstuk 'Recepten'.
◗ Het tosti-apparaat is klaar voor gebruik zodra het groene 'klaar voor gebruik' lampje aangaat.
3 Open het tosti-apparaat.
Raak de metalen delen (waaronder de handvatten van de bakplaten) niet aan, aangezien deze
zeer heet worden!
4 Leg de te bereiden tosti's op de onderste bakplaat (fig. 7).
◗ U kunt ook één tosti maken, als u dat wilt.
◗ Om ervoor te zorgen dat de randen van de tosti goed worden gesloten, moet de vulling zo
worden verdeeld dat deze niet te dicht bij de randen terecht komt.
5 Sluit het tosti-apparaat (fig. 8).
Laat de bovenplaat op het brood zakken met behulp van de koelblijvende handgreep en knijp beide
handgrepen samen totdat u ze hoort vastklikken.
B
Tijdens het bakken gaat zo nu en dan het groene 'klaar voor gebruik' lampje uit en het rode
opwarmlampje aan om aan te geven dat de verwarmingselementen in- en uitgeschakeld worden om
de juiste temperatuur vast te houden.
6 Stel de benodigde baktijd in (zie onder het kopje 'Timer' in dit hoofdstuk).
U kunt het apparaat ook gebruiken zonder de timer in te stellen.
NEDERLANDS

20
7 Open het tosti-apparaat na 3 tot 5 minuten om te controleren of de tosti's al goudbruin zijn.
De baktijd hangt af van het soort brood, de vulling en hoe knapperig u de tosti's wilt hebben.
8 Verwijder de tosti's (fig. 9).
Gebruik houten of kunststof keukengerei (bijv. een spatel) om de tosti's uit het apparaat te halen.
Gebruik geen metalen, scherpe of krassende voorwerpen.
◗ Als u nog meer tosti's wilt maken, wacht dan tot het rode opwarmlampje is uitgegaan en het
groene 'klaar voor gebruik' lampje is aangegaan voordat u opnieuw tosti's in het apparaat
plaatst.
9 Haal na gebruik de stekker uit het stopcontact.
Timer
De timer geeft aan dat de baktijd verstreken is, maar schakelt het apparaat NIET uit.
De timer instellen
1 Druk op de timerknop om de baktijd in te stellen (in minuten) (fig. 10).
De ingestelde tijd verschijnt op het display.
2 Houd de knop ingedrukt om het gewenste aantal minuten snel in te stellen. Laat de knop los
op het moment dat de juiste tijd op het display verschijnt.
De maximale tijd die ingesteld kan worden is 14 minuten.
Enkele seconden nadat u de baktijd heeft ingesteld, begint de timer af te tellen.
Tijdens het aftellen knippert de resterende baktijd op het display. De laatste minuut wordt in
seconden weergegeven.
3 Als de ingestelde tijd niet juist is, dan kunt u deze wissen door de timerknop twee seconden
in te drukken op het moment dat de timer met aftellen begint (d.w.z. wanneer de ingestelde
tijd begint te knippperen).
4 Houd de knop ingedrukt totdat '00' op het display verschijnt.
U kunt nu de baktijd opnieuw instellen.
◗ Wanneer de ingestelde tijd verstreken is, hoort u gedurende 8 seconden een geluidssignaal.
◗ U kunt het geluidssignaal uitschakelen door op de timerknop te drukken.
Schoonmaken
1 Haal altijd de stekker uit het stopcontact voordat u het apparaat gaat schoonmaken.
2 Zet het tosti-apparaat open en laat het goed afkoelen.
3 Gebruik een stuk keukenpapier om overtollige olie van de bakplaten te verwijderen voordat
u ze gaat schoonmaken.
4 Haal de bakplaten uit het apparaat.
5 Reinig de bakplaten met een zachte doek of spons in heet water met een beetje afwasmiddel
of in de vaatwasmachine.
Gebruik nooit agressieve of schurende schoonmaakmiddelen en -materialen om de bakplaten te
reinigen, omdat u hiermee de antiaanbaklaag beschadigt.
◗ Gebruik een houten of kunststof spatel om kleverige voedselresten (bijvoorbeeld gestolde
kaas) van de bakplaten te verwijderen.
6 Reinig de buitenkant van het apparaat met een vochtige doek.
Dompel het apparaat nooit in water.
NEDERLANDS
La pagina si sta caricando...
La pagina si sta caricando...
La pagina si sta caricando...
La pagina si sta caricando...
La pagina si sta caricando...
La pagina si sta caricando...
La pagina si sta caricando...
La pagina si sta caricando...
La pagina si sta caricando...
La pagina si sta caricando...
La pagina si sta caricando...
La pagina si sta caricando...
La pagina si sta caricando...
La pagina si sta caricando...
La pagina si sta caricando...
La pagina si sta caricando...
La pagina si sta caricando...
La pagina si sta caricando...
La pagina si sta caricando...
La pagina si sta caricando...
La pagina si sta caricando...
La pagina si sta caricando...
La pagina si sta caricando...
La pagina si sta caricando...
La pagina si sta caricando...
La pagina si sta caricando...
La pagina si sta caricando...
La pagina si sta caricando...
La pagina si sta caricando...
La pagina si sta caricando...
La pagina si sta caricando...
La pagina si sta caricando...
La pagina si sta caricando...
La pagina si sta caricando...
La pagina si sta caricando...
La pagina si sta caricando...
La pagina si sta caricando...
La pagina si sta caricando...
La pagina si sta caricando...
La pagina si sta caricando...
-
 1
1
-
 2
2
-
 3
3
-
 4
4
-
 5
5
-
 6
6
-
 7
7
-
 8
8
-
 9
9
-
 10
10
-
 11
11
-
 12
12
-
 13
13
-
 14
14
-
 15
15
-
 16
16
-
 17
17
-
 18
18
-
 19
19
-
 20
20
-
 21
21
-
 22
22
-
 23
23
-
 24
24
-
 25
25
-
 26
26
-
 27
27
-
 28
28
-
 29
29
-
 30
30
-
 31
31
-
 32
32
-
 33
33
-
 34
34
-
 35
35
-
 36
36
-
 37
37
-
 38
38
-
 39
39
-
 40
40
-
 41
41
-
 42
42
-
 43
43
-
 44
44
-
 45
45
-
 46
46
-
 47
47
-
 48
48
-
 49
49
-
 50
50
-
 51
51
-
 52
52
-
 53
53
-
 54
54
-
 55
55
-
 56
56
-
 57
57
-
 58
58
-
 59
59
-
 60
60


Philips HD2415 Manuale utente
- Categoria
- Accessori per mixer / robot da cucina
- Tipo
- Manuale utente
- Questo manuale è adatto anche per
in altre lingue
- français: Philips HD2415 Manuel utilisateur
- español: Philips HD2415 Manual de usuario
- Deutsch: Philips HD2415 Benutzerhandbuch
- Nederlands: Philips HD2415 Handleiding
- português: Philips HD2415 Manual do usuário
- dansk: Philips HD2415 Brugermanual
- svenska: Philips HD2415 Användarmanual
- Türkçe: Philips HD2415 Kullanım kılavuzu
Documenti correlati
Altri documenti
-
monzana 107269 Assembly Instructions
-
Tefal Avante 6025 Manuale del proprietario
-
Princess 122316 Istruzioni per l'uso
-
Princess 122614 Istruzioni per l'uso
-
-
Tefal SW370310 Manuale utente
-
Day 72407 Manuale utente
-
JATA SW270 Scheda dati
-
Fagor SW-420 Manuale del proprietario
-
Create GPI302B Manuale utente