
Manuale di Istruzione
IT
User Guide EN
Gebrauchsanweisung
DE
Manual del Usuario ES
Gebruikershandleiding
NL
Manuel d’utilisation
FR
Carbonator II
Region 2


Congratulations to your new sparkling water maker from Aarke.
A few minutes spent on reading this book will enable you to get the very best out of this excellent
soda maker. Carbonating water at home is convenient, aordable and environmentally friendly.
The other advantage with a carbonator over bottled mineral water is that you can choose your
own level of carbonation. You will soon get to know your carbonator and learn how you should
operate it to get the perfect level of carbonation. Some people like a real carbonation bite and
some want a milder eervescent taste.
The Aarke sparkling water maker is carefully crafted in the finest materials, designed and tested
for best possible quality and safety. However, products that include gas and high pressures
should always be handled with care. It is, therefore, important that the product is used as
intended. Please read through the safety section of this book carefully before using it.
Welcome to Aarke!
User guide English
EN

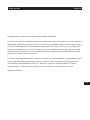
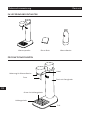
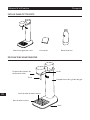
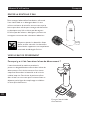
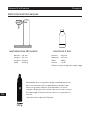
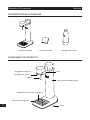
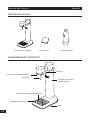
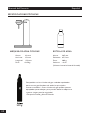
Sparkling water maker Water bottleThis book
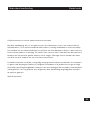
Lever
Gas
cylinder compartment
Foot
Spill tray
Spill tray grid
Nozzle
Water bottle socket
INCLUDED IN THE BOX
PRODUCT COMPONENTS
User guide English
EN

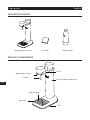
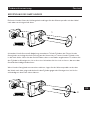
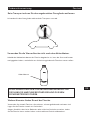
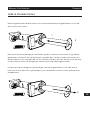
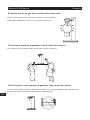
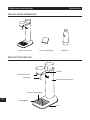
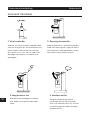
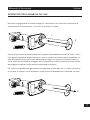
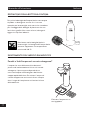
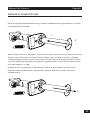
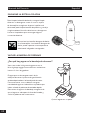
Remove the spill tray grid and then carefully lay the carbonator down on the side with the lever
upwards.
Unscrew the plastic sealing from the cylinder top. Carefully insert the gas cylinder through
the hole at the bottom. Don’t drop the cylinder into the hole. When you feel that it reaches the
bottom, begin screwing the cylinder clockwise until it is fastened. Don’t screw too hard since this
might break the threads holding the gas cylinder in place.
When you need to replace the gas cylinder, lay the carbonator down on the side with the lever
pointing up and unscrew it counterclockwise and then carefully pull it out of the compartment.
1
2
ATTACHING THE GAS CYLINDER
1
2
User guide English
EN

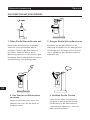
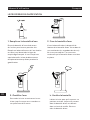
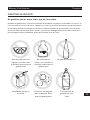
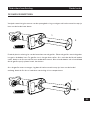
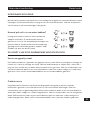
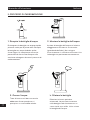
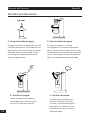
THE CARBONATION PROCESS
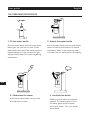
2. Attach the water bottle
Rinse the water bottle with luke warm water
before you use it for the first time. Fill the
water bottle with cold, clean water up to the
marked filling line. If you fill too much you
will get a lot of water in the spill tray during
carbonation.
Screw the water bottle into the water bottle
socket. Screw counterclockwise if viewed
from above. Don’t screw extremely hard -
just make sure the water bottle sits properly.
1. Fill the water bottle
3. Carbonate the water
Pull the lever downwards until you hear
a sound from the valve.
4. Ventilate the bottle
Release the lever back to horizontal
position. The remaining pressure in
the water bottle will be released
with a pu sound. Then unscrew the
water bottle.
User guide English
EN

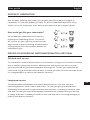
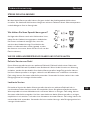
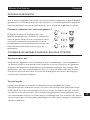
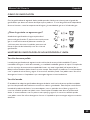
How would you like your soda water?
With the Aarke Sparkling water maker you can easily learn how to adjust the degree of
carbonation, or, how much bubbles you want. The level of carbonation depends on many
factors such as the temperature of the water and the amount of gas in the gas cylinder.
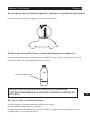
You will add more carbonation to the water by
repeating the carbonating process. The process
will consume less gas if you only lift the lever half-
ways (enough to quiet the buzzing sound but before
relieving the pressure from the bottle) between the
carbonation cycles.
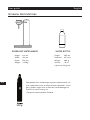
This carbonator is made of polished stainless steel. Stainless steel gets its lustre from the chrome
and its stainless quality from the nickel. Adhering to the maintenance tips will ensure that
you enjoy (the look of) your Aarke Carbonator for a long time. To clean your carbonator we
recommend using a micro fibre cloth and water. If needed you could use some mild soap. Do not
use strong detergents or cleanser with abrasive substance.
The lacquered Aarke Carbonators are made of polished stainless steel that have been
industrially painted in various colours and finishes. To clean your glossy lacquered Aarke
Carbonator we recommend using a micro fibre cloth and water. If needed you could use some
mild soap. To clean you matte lacquered Aarke Carbonator we recommend using a soft cloth
or sponge and water. If needed you could use some mild soap. Never use strong detergents or
cleanser with abrasive substance.
Polished steel version
Lacquered version
DEGREE OF CARBONATION
KEEPING YOUR SPARKLING WATER MAKER BEAUTIFUL AND CLEAN
User guide English
EN

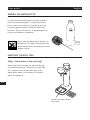
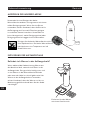
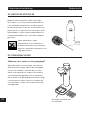
EMPTYING THE SPILL TRAY
RINSING THE WATER BOTTLE
Water that flushes through the machine during
the carbonating process ends up in the spill tray.
This is often a result of too much water in the
water bottle. Make sure the water is not filled
above the filling line.
Remove the water with a
dish-cloth.
Why is there water in the spill tray?
To clean the Aarke water bottle use clean lukewarm
water with a mild detergent. If using a dishwasher
brush, make sure the brush is intended to be used
for cleaning plastic bottles and do not leave any
scratches. Do not use solvents, strong detergents or
cleanser with abrasive substances.
Never wash the Aarke water bottles in a
dishwasher. The Aarke water bottles can
withstand a maximum temperature of 40
degrees Celsius.
User guide English
EN

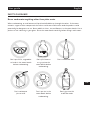
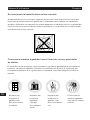
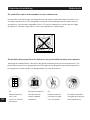
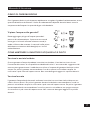
SAFETY GUIDELINES
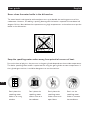
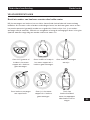
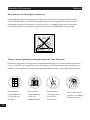
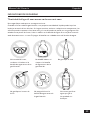
Never carbonate anything other than plain water
Don’t carbonate wine.Don’t put fruits, vegetables
or herbs in the water bottle
before carbonating.
Don’t carbonate
juice or milk.
Don’t put flavours
or syrup into the
water bottle before
carbonating.
Don’t put ice in the
water bottle before
carbonating.
Don’t give new life
to old flat soda.
When carbonating, a small amount of liquid could bubble up through the valves. If the water
contains sugar or other compounds the valves could start malfunction and the product could
potentially be dangerous to use. Never add fruit slices, ice and flavours in the water bottle. Use a
pitcher or mix it directly in your glass. Rinse the water bottle carefully before filling it with water.
User guide English
EN

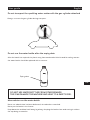
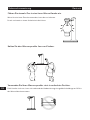
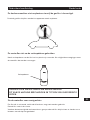
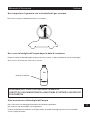
Never clean the water bottle in the dishwasher
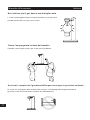
Keep the sparkling water maker away from potential sources of heat
The water bottle is designed to withstand pressures up to double the working pressure of the
carbonator. However, this ability is quickly destroyed if the bottle is exposed to heat above 40
degrees Celsius. Most dishwashers operate at very high temperatures so therefore never put the
bottle in the dishwasher.
Don’t place the
sparkling water
maker in a sunny
window.
Don’t place the
sparkling water
maker close to an
open flame.
Don’t use the
sparkling water
maker in extreme
hot conditions.
Don’t place the
sparkling water
maker close to a
hot radiator.
Due to the laws of physics, the pressure in the gas cylinder depends on the outside temperature.
The Aarke sparkling water maker is optimized for using the gas cylinder at room temperature. If
the cylinder gets too hot, it could be dangerous to use the machine.
User guide English
EN

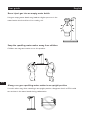
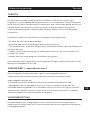
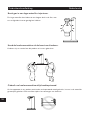
Do not transport the sparkling water maker with the gas cylinder attached
Do not use the water bottle after the expiry date
More advices on the water bottle
DO NOT USE WATER BOTTLES FROM OTHER BRANDS.
THIS CAN DAMAGE THE MACHINE AND LEAD TO A SAFETY RISK.
Always unscrew the gas cylinder during transport.
Expiry date
After the bottle has expired, the plastic may have weakened a little bit and for safety reasons
the water bottle should be replaced with a new one.
Never use a bottle that has been deformed, miscolored or scratched.
Never put the bottle in the freezer.
Keep bacterias and bad smell away by always keeping the bottle clean and storing it without
the cap being screwed on.
User guide English
EN

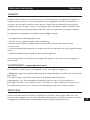
Never inject gas into an empty water bottle
Keep the sparkling water maker away from children
Always use your sparkling water maker in an upright position
Using an empty water bottle may lead to a higher pressure in the
water bottle which could result in a safety risk.
Children are way too creative to use this product.
If used in other ways than standing in an upright position, dangerous levels of CO2 could
accumulate in the water bottle during carbonation.
User guide English
EN

User guide English
WARRANTY
The Aarke sparkling water maker is designed to meet and exceed your expectations in terms of
quality and safety. Great care has been taken to ensure that it was delivered to you in a perfect
working condition. However, if your carbonator malfunctions within 2 (two) years (or according
to specific country laws) from date of purchase, and we determine the problem is due to faulty
workmanship or materials, Aarke will repair or replace the product free of charge.
This warranty is invalid if product is damaged due to:
- An accident taking place after purchase.
- Abuse and misuse according to this book.
- Modification, or repair made by anyone except an authorized Aarke Service Centre.
- Damages caused by the use of water bottles other than those provided by Aarke.
- Damages caused by the use of faulty gas cylinder.
CUSTOMER SUPPORT
If you have problems with your machine, please go through the following steps:
1. Check the troubleshooting guide
Please check the troubleshooting guide on the next page and try the suggested solutions.
2. Contact us at [email protected]
If the troubleshoot guide did not help, please contact us at [email protected]. We will answer
within 24 hours on weekdays. The customer service department is based in Sweden and can
communicate in English and the Nordic languages. If you write in other languages your request
will be forwarded to your local distributor.
EN

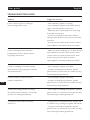
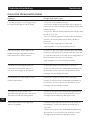
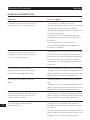
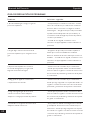
TROUBLESHOOTING GUIDE
User guide English
1. There comes no gas or too little gas
when pushing down the lever.
2. Gas is flowing into the bottle when
pushing down the lever, but the water is
not getting carbonated.
3. There is a leaking sound when pushing
down the lever and very little gas is flowing
into the water bottle.
4. There are drops of water inside the
cylinder compartment
5. Gas starts leaking out when screwing
the cylinder into the machine, even though
the lever is not being pushed down.
6. Cylinder freezes inside the machine
when in use.
- Check that the cylinder is not empty
- Try screwing the cylinder a little harder and try
again. Some old cylinders requires this.
- Make sure you are pushing the lever all the way
down (without forcing it)
- If you hear a leaking sound from the machine
when you push down the lever, please check under
problem 3.
- If nothing of this helped, please write an email to
[email protected] and describe your problem.
- Make sure you are holding the lever down until you
hear a buzz from the valve. Then release it. Don’t
release it before you hear the buzz sound. If this
doesn’t help you, please write an email to
[email protected] and describe your problem.
- Try screwing the cylinder a bit harder
- It may be something wrong with the cylinder
gasket. Please see instructions for trouble shooting
and replacing the gasket below.
- Try screwing the cylinder a bit harder.
- It may be something wrong with the cylinder
gasket. Please see instructions for trouble shooting
and replacing the gasket below.
- There may be something wrong with the cylinder
gasket. Please see instructions for trouble shooting
and replacing the rubber gasket below.
- It may be due to a leak between the cylinder and
the machine. Try screwing the cylinder a bit harder.
- It may be something wrong with the cylinder
gasket. Please see instructions for trouble shooting
and replacing the rubber gasket below.
Problem: Suggested solutions
EN

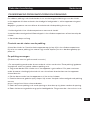
CYLINDER GASKET TROUBLESHOOTING AND REPLACEMENT
User guide English
The rubber gasket inside the cylinder holder is a very important seal between the cylinder and
the machine. If this is missing, damaged or misplaced, the machine will not work properly.
Possible symptoms of a faulty or missing cylinder gasket could be:
1. Leaking sound from the cylinder compartment when pushing down the handle
2. Water drops in the cylinder compartment or freezing of the cylinder
3. Gas cylinder is running empty quickly
4. Gas cylinder is leaking gas when it is screwed into the machine, even though the lever is
horizontal.
Checking status of gasket
Unscrew the cylinder. Turn the Aarke machine up side down. Look into cylinder compartment.
Look if there is a black gasket (a black ring) around the brass pin and that it seems to be in place
correctly.
Replacing gasket
(See aarke.com for an illustrated instruction.)
1. The extra gasket is placed under the foot below the sticker with the text “Extra gasket”.
Remove the sticker and take out the rubber gasket.
2. Make sure that the CO2 cylinder is not installed in the machine. A few inches below the black
splitline there is a screw at the back of the machine. Unscrew it.
3. Grab the upper part of the machine and lift it out from the body.
4. Turn the upper part up side down and look into it. If needed, take out the old gasket with a
tweezer / nipper or a small screwdriver.
5. Put the new gasket into the circular hole and push it in place all around the hole.
6. Put the upper part back on the main body. Make sure you put it back straight and in the right
direction. Screw the screw at the back of the machine. Done!
EN

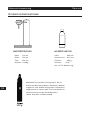
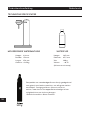
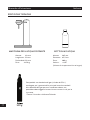
Compatible with standard gas cylinders approved for use
with carbonators from all major brands worldwide*. Other
gas cylinders might seem to work but could damage the
machine or cause safety risk.
*Except Australia and New Zeeland
SPARKLING WATER MAKER WATER BOTTLE
Height: 414 mm
Width: 153 mm
Depth: 258 mm
Weight: ≈1450 g
Height: 265 mm
Diameter: 85,5 mm
Weight: 209 g
Volume: ≈ 0,8 l
(up to the filling line)
425 g
TECHNICAL SPECIFICATIONS
User guide English
EN

Herzlichen Glückwunsch zum Kauf Ihres neuen Wassersprudlers von Aarke.
Wenn Sie sich ein paar Minuten Zeit nehmen, dieses Buch zu lesen, werden Sie diesen
hervorragenden Wassersprudler voll ausreizen können. Wasser zu Hause mit Kohlensäure zu
versetzen ist praktisch, günstig und umweltfreundlich. Ein weiterer Vorteil eines Wassersprudlers
gegenüber abgefülltem Wasser ist, dass Sie selbst entscheiden können, wie viel Kohlensäure
Sie beisetzen möchten. Sie werden nun Ihren Wassersprudler kennenlernen und erfahren, wie
Sie die perfekte Menge Kohlensäure hinzufügen können. Einige Leute schätzen einen starken
Kohlensäure-Geschmack, andere mögen es etwas dezenter.
Der Aarke-Wassersprudler wurde sorgfältig aus den besten Materialien hergestellt und auf
Qualität und Sicherheit geprüft. Allerdings sollten Geräte, die mit Gas und Hochdruck arbeiten,
stets vorsichtig behandelt werden. Daher ist es wichtig, dass Sie das Produkt wie vorgesehen
verwenden. Bitte lesen Sie die Sicherheitsanweisungen dieses Buchs gewissenhaft durch, bevor
Sie das Gerät verwenden.
Willkommen bei Aarke!
Gebrauchsanweisung Deutsch
DE

Wassersprudler WasserflascheDieses Buch
Hebel
Fach mit Gaszylinder
Fuß
Auangschale
Gitter für Auangschale
Düse
Halterung für Wasserflasche
IM LIEFERUMFANG ENTHALTEN
PRODUKTKOMPONENTEN
Gebrauchsanweisung Deutsch
DE

Entfernen Sie das Gitter der Auangschale und legen Sie den Wassersprudler mit dem Hebel
nach oben vorsichtig auf die Seite.
Schrauben Sie die Kunststo-Abdeckung vom oberen Teil des Zylinders ab. Führen Sie den
Gaszylinder vorsichtig durch die Önung an der Unterseite ein. Lassen Sie den Zylinder nicht
in das Loch fallen. Wenn Sie das Gefühl haben, dass er am Boden angekommen ist, drehen Sie
den Zylinder im Uhrzeigersinn, bis er fest sitzt. Schrauben Sie ihn nicht zu fest zu, da sonst das
Gewinde beschädigt werden kann.
Wenn Sie den Gaszylinder austauschen möchten, legen Sie den Wassersprudler so ab, dass
der Hebel nach oben zeigt und drehen Sie den Zylinder gegen den Uhrzeigersinn, bis Sie ihn
vollständig aus dem Fach ziehen können.
1
2
BEFESTIGUNG DES GASZYLINDERS
1
2
Gebrauchsanweisung Deutsch
DE

DAS VERSETZEN MIT KOHLENSÄURE
2. Bringen Sie die Wasserflasche an.
Bevor Sie die Wasserflasche verwenden,
sollten Sie sie mit lauwarmem Wasser
ausspülen. Füllen Sie die Wasserflasche
mit kaltem, sauberem Wasser bis zur
Markierung. Wenn Sie zu viel einfüllen, läuft
eine Menge Wasser während des Versetzens
mit Kohlensäure in die Auffangschale.
Schrauben Sie die Wasserflasche in die
Halterung. Schrauben Sie, von oben gesehen,
im Uhrzeigersinn. Schrauben Sie sie nicht zu
fest zu, gerade so, dass die Wasserflasche
ordentlich sitzt.
1. Füllen Sie die Wasserflasche auf.
3. Das Wasser mit Kohlensäure
versetzen
Ziehen Sie den Hebel nach unten und
halten Sie ihn unten, bis das Ventil ein
Geräusch macht.
4. Belüften Sie die Flasche
Lösen Sie den Hebel und stellen Sie
ihn wieder in die horizontale Position.
Der Restdruck in der Wasserflasche
strömt deutlich hörbar aus. Lösen Sie
dann die Wasserflasche.
Gebrauchsanweisung Deutsch
DE
La pagina si sta caricando...
La pagina si sta caricando...
La pagina si sta caricando...
La pagina si sta caricando...
La pagina si sta caricando...
La pagina si sta caricando...
La pagina si sta caricando...
La pagina si sta caricando...
La pagina si sta caricando...
La pagina si sta caricando...
La pagina si sta caricando...
La pagina si sta caricando...
La pagina si sta caricando...
La pagina si sta caricando...
La pagina si sta caricando...
La pagina si sta caricando...
La pagina si sta caricando...
La pagina si sta caricando...
La pagina si sta caricando...
La pagina si sta caricando...
La pagina si sta caricando...
La pagina si sta caricando...
La pagina si sta caricando...
La pagina si sta caricando...
La pagina si sta caricando...
La pagina si sta caricando...
La pagina si sta caricando...
La pagina si sta caricando...
La pagina si sta caricando...
La pagina si sta caricando...
La pagina si sta caricando...
La pagina si sta caricando...
La pagina si sta caricando...
La pagina si sta caricando...
La pagina si sta caricando...
La pagina si sta caricando...
La pagina si sta caricando...
La pagina si sta caricando...
La pagina si sta caricando...
La pagina si sta caricando...
La pagina si sta caricando...
La pagina si sta caricando...
La pagina si sta caricando...
La pagina si sta caricando...
La pagina si sta caricando...
La pagina si sta caricando...
La pagina si sta caricando...
La pagina si sta caricando...
La pagina si sta caricando...
La pagina si sta caricando...
La pagina si sta caricando...
La pagina si sta caricando...
La pagina si sta caricando...
La pagina si sta caricando...
La pagina si sta caricando...
La pagina si sta caricando...
La pagina si sta caricando...
La pagina si sta caricando...
La pagina si sta caricando...
La pagina si sta caricando...
La pagina si sta caricando...
La pagina si sta caricando...
La pagina si sta caricando...
La pagina si sta caricando...
La pagina si sta caricando...
La pagina si sta caricando...
La pagina si sta caricando...
La pagina si sta caricando...
-
 1
1
-
 2
2
-
 3
3
-
 4
4
-
 5
5
-
 6
6
-
 7
7
-
 8
8
-
 9
9
-
 10
10
-
 11
11
-
 12
12
-
 13
13
-
 14
14
-
 15
15
-
 16
16
-
 17
17
-
 18
18
-
 19
19
-
 20
20
-
 21
21
-
 22
22
-
 23
23
-
 24
24
-
 25
25
-
 26
26
-
 27
27
-
 28
28
-
 29
29
-
 30
30
-
 31
31
-
 32
32
-
 33
33
-
 34
34
-
 35
35
-
 36
36
-
 37
37
-
 38
38
-
 39
39
-
 40
40
-
 41
41
-
 42
42
-
 43
43
-
 44
44
-
 45
45
-
 46
46
-
 47
47
-
 48
48
-
 49
49
-
 50
50
-
 51
51
-
 52
52
-
 53
53
-
 54
54
-
 55
55
-
 56
56
-
 57
57
-
 58
58
-
 59
59
-
 60
60
-
 61
61
-
 62
62
-
 63
63
-
 64
64
-
 65
65
-
 66
66
-
 67
67
-
 68
68
-
 69
69
-
 70
70
-
 71
71
-
 72
72
-
 73
73
-
 74
74
-
 75
75
-
 76
76
-
 77
77
-
 78
78
-
 79
79
-
 80
80
-
 81
81
-
 82
82
-
 83
83
-
 84
84
-
 85
85
-
 86
86
-
 87
87
-
 88
88


Aarke Carbonator II - Blanc Manuale del proprietario
- Tipo
- Manuale del proprietario
- Questo manuale è adatto anche per
in altre lingue
Altri documenti
-
mysoda GLASSY Manuale utente
-
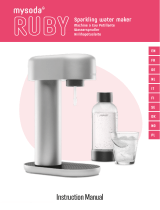 mysoda Ruby Sparkling Water Maker Manuale utente
-
mysoda Toby Sparkling Water Maker Manuale utente
-
Candy AC BO CO2 Manuale utente
-
mysoda MWD002F Manuale utente
-
Philips ADD914/10 Product Datasheet
-
-
-
Brita 4006387117252 Starter Pack Style Plus SodaONE – Noir Guida utente
-
Brita SodaTRIO Sparkling Water Maker Manuale utente
