RECARO Avan Manuale del proprietario
- Categoria
- Sedili dell'auto
- Tipo
- Manuale del proprietario

UN R129/03, i-Size
40-83 cm (bis 15 Monate, max. 13 kg) /
40-83 cm (up to 15 months, max. 13 kg)
www.recaro-kids.com
DE PLIT ES HUEN FRNL PT RO EL
AVAN
Bedienungsanleitung / User guide /
Istruzioni per l’uso/ Gebruiksaanwijzing /
Instrukcja obsługi / Notice d’utilisation /
Manual de instrucciones / Manual de instruções /
Használati útmutató / Instrucțiuni de utilizare /
Οδηγίε λειτουργία/ Manual de instruções/

2
DE – WARNUNG! Diese Kurzanleitung dient nur der Übersicht. Um maximale Sicherheit und maximalen Komfort für Ihr Kind zu erreichen, ist
es unbedingt notwendig, die gesamte Gebrauchsanleitung aufmerksam zu lesen.
EN – WARNING! The following short instruction is intended to provide only an overview. In order to achieve maximum security and comfort
for your child it is absolutely imperative that you read the whole instruction manual carefully.
IT – AVVERTENZA! Queste istruzioni brevi rappresentano solo un riepilogo. Per garantire sicurezza e comfort massimi per il vostro bambino è
assolutamente necessario leggere con attenzione le istruzioni per l’uso in tutte le loro parti.
NL – WAARSCHUWING! Deze beknopte gebruiksaanwijzing dient enkel als overzicht. Voor een maximale veiligheid en maximaal comfort voor uw
kind is het absoluut noodzakelijk om de hele gebruiksaanwijzing aandachtig te lezen.
PL – OSTRZEŻENIE! Niniejsza skrócona instrukcja służy tylko jako rozeznanie. Aby zapewnić dziecku maksymalne bezpieczeństwo imaksymalny
komfort, należy bezwzględnie uważnie przeczytać całą instrukcję obsługi fotelika samochodowego.
FR–AVERTISSEMENT! Ce guide rapide ne sert que de vue d’ensemble. Pour une sécurité et un confort maximaux pour votre enfant, il est impéra
-
tif de lire attentivement l’intégralité du manuel d’utilisation.
ES – ¡ADVERTENCIA! Esta guía breve constituye una introducción general. Para lograr la máxima seguridad y comodidad del niño, es imprescindi
-
ble leer con atención todo el manual de instrucciones.
PT — ATENÇÃO! O presente guia rápido tem como único objetivo facultar uma visão geral. A fim de proporcionar ao seu filho a máxima
segurança e conforto, é impreterível ler atentamente todas as instruções de utilização.
HU – FIGYELMEZTETÉS! Ez a rövid útmutató csak áttekintésre szolgál. Gyermeke maximális biztonsága és kényelme érdekében feltétlenül olvassa
el figyelmesen a teljes használati útmutatót.
RO – AVERTISMENT! Aceste instrucțiuni pe scurt oferă numai o privire de ansamblu. Pentru a garanta întreaga siguranță și confortul maxim
pentru copilul dvs., este neapărat necesar să citiți cu atenție toate instrucțiunile de utilizare.
EL – ΠΡΟΕΙΔΟΠΟΙΗΣΗ! Οι παρούσε σύντοε οδηγίε παρέχουν όνο ια συνοπτική εικόνα. Για να εξασφαλίσετε τη έγιστη ασφάλεια και άνεση για το παιδί
σα, πρέπει να διαβάσετε οπωσδήποτε προσεκτικά όλε τι οδηγίε χρήση.

3
DE PLIT ES HUEN FRNL PT RO EL
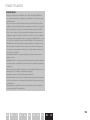
KURZANLEITUNG / SHORT INSTRUCTION / ISTRUZIONI BREVI / BEKNOPTE GEBRUIKSAANWIJZING / SKRÓCONA INSTRUKCJA / GUIDE RAPIDE /
GUÍA BREVE / GUIA RÁPIDO / RÖVID ÚTMUTATÓ / INSTRUCȚIUNI PE SCURT / ΣΥΝΤΟΜΕΣ ΟΗΓΙΕΣ
1
5
9
2
6
10 11 12
3
7
4
8

4
SICHERHEIT IST
VERTRAUENSSACHE
Vielen Dank, dass Sie sich für RECARO entschieden haben.
Dank einzigartiger Erfahrung revolutioniert RECARO seit
über 100 Jahren das Sitzen im Auto, im Flugzeug, im
Rennsport und im e-Gaming Bereich. Dieses konkurrenz
-
lose Know-how fließt in die Entwicklung jedes unserer
Kindersicherheitssysteme ein. Unser Ziel ist es, Ihnen
Produkte zu bieten, die in puncto Design, Funktionalität,
Komfort und Sicherheit neue Maßstäbe setzen. Bei der
Entwicklung des Kindersitzes standen Sicherheit, Komfort
und Bedienfreundlichkeit im Vordergrund. Das Produkt
wird unter besonderer Qualitätsüberwachung hergestellt
und erfüllt strengste Sicherheitsanforderungen.
Wir wünschen Ihnen viel Spaß und allzeit sichere Fahrt.
Ihr RECARO Kids Team
WARNUNG! Damit Ihr Kind richtig geschützt werden
kann, ist es unbedingt notwendig, den Kindersitz so zu
verwenden, wie es in dieser Anleitung beschrieben wird.
HINWEIS! Bewahren Sie die Anleitung immer griffbereit in
dem dafür vorgesehenen Fach am Kindersitz auf.
HINWEIS! Durch länderspezifische Anforderungen
(z.B. Farbkennzeichnungen am Kindersitz) können Produkt
-
merkmale in ihrer äußeren Erscheinung variieren. Die
korrekte Funktionsweise des Produktes wird davon jedoch
nicht beeinflusst.
ZULASSUNG
Avan
UN R129/03 i-Size
Größe: 40-83 cm
Alter: Geburt bis 15 Monate
Gewicht: max. 13 kg
HOMOLOGATION
Avan
UN R129/03 i-Size
Height: 40-83 cm
Age: Birth – 15 months
Weight: max. 13 kg
OMOLOGAZIONE
Avan
UN R129/03 i-Size
Altezza: 40-83 cm
Età: da zero a 15 mesi
Peso: max. 13 kg

5
DE PLIT ES HUEN FRNL PT RO EL
SAFETY IS A MATTER OF TRUST
Thank you for choosing RECARO. Thanks to our unique experience
RECARO has been revolutionising car, aircraft, racing car seating and
and e-gaming for over 100 years. This unrivaled expertise feeds into the
development of all of our child safety systems. Our aim is to offer you
products which set new standards in terms of design, functionality,
comfort and safety. We can assure you that safety, comfort and ease
of use were our highest priorities when developing the child seat. This
product is manufactured under exceptional quality control and meets the
strictest safety requirements.
We wish you lots of fun and a safe journey every time.
Your RECARO Kids team
WARNING! In order to keep your child properly protected it is absolutely
essential that you use the child seat as described in this manual.
NOTE! Always keep this instruction manual at hand in the compartment
that has been provided for that purpose on the child seat.
NOTE! Due to country-specific requirements (e.g. colour labelling on the
child seat), the product features may vary in their external appearance.
This, however, does not affect the correct functioning of the product.
LA SICUREZZA È UNA QUESTIONE DI
FIDUCIA
Grazie per aver scelto RECARO. Con la sua esperienza unica, RECARO
rivoluziona da oltre 100 anni i sedili delle auto, degli aerei, negli sport da
competizione ed elettronici. Questo know-how senza pari sfocia nello
sviluppo di ognuno dei nostri sistemi per la sicurezza per bambini. Il nostro
obiettivo è di offrirvi prodotti che diventino nuovi punti di riferimento per
design, funzionalità, comfort e sicurezza. In primo piano nello sviluppo
del seggiolino auto sono stati la sicurezza, il comfort e la facilità d’uso.
Il prodotto viene prodotto applicando un particolare controllo di qualità e
soddisfa i più severi requisiti di sicurezza.
Vi auguriamo buon divertimento e un viaggio sempre sicuro.
Il vostro team di RECARO Kids
AVVERTENZA! Affinché il vostro bambino possa essere protetto nel
modo migliore, è assolutamente necessario usare il seggiolino auto così
come descritto in queste istruzioni.
AVVISO! Conservare le istruzioni sempre a portata di mano nello scom
-
parto apposito del seggiolino auto.
AVVISO! A causa di requisiti nazionali specifici (ad es. contrassegni
colorati sul seggiolino auto) l’estetica del prodotto può variare. Ciò però
non influisce sul suo corretto funzionamento.

6
DE – INHALT
Kurzanleitung 3
Zulassung 4
Zum Schutz des Fahrzeugs 8
Verwendung im Fahrzeug 10
Sicherheit im Fahrzeug 12
Sicherheit für das Baby 14
Einstellen des Tragebügels 14
Einstellen des Sonnendachs 16
Anpassen an die Körpergrösse 16
Anschnallen mittels Gurtsystem 18
Verwendung der Babyschale mit Basis 18
Einbau der Babyschale mit Fahrzeuggurt 24
Richtiges Sichern des Babys 26
Entfernen des Bezuges 28
Reinigung 30
Pflege 30
Reisesystem 32
Verhalten nach einem Unfall 32
Produktinformation 32
Produktlebensdauer 36
Entsorgung 36
Garantiebestimmungen 38

7
DE PLIT ES HUEN FRNL PT RO EL
EN – CONTENT
Short instruction 3
Homologation 4
Protecting the vehicle 8
Correct position in the vehicle 11
Safety in the vehicle 13
Safety for the baby 15
Adjusting the carrying 15
Adjusting the sun canopy 17
Adjusting to body size 17
Strapping with harness system 19
Connecting the infant car seat with base 19
Installing the infant car seat with vehicle belt 25
Securing the baby correctly 27
Removing the cover 29
Cleaning 31
Product care 31
Travel system 33
What to do after an accident 33
Product information 33
Product lifespan 37
Disposal 37
Warranty 39
IT – INDICE
Istruzioni brevi 3
Omologazione 4
Per la protezione della vettura 8
Uso nella vettura 11
Sicurezza nella vettura 13
Sicurezza per il neonato 15
Regolazione del manico per il trasporto 15
Regolazione della cappotta parasole 17
Adattamento all’altezza del bambino 17
Allacciare le cinture di sicurezza 19
Uso dell’ovetto neonato con la base 19
Montaggio dell’ovetto neonato con la cintura di sicurezza
della vettura 25
Allacciare correttamente il neonato 27
Rimozione del rivestimento 29
Pulizia 31
Cura 31
Sistema per il viaggio 33
Comportamento dopo un incidente 33
Informazioni sul prodotto 33
Durata del prodotto 37
Smaltimento 37
Disposizioni di garanzia 39

8
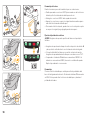
ZUM SCHUTZ DES FAHRZEUGS
An einigen Autositzen aus empfindlichem Material (z.B. Velours, Leder,
etc.) können durch die Benutzung von Kindersitzen mögliche Gebrauchs
-
spuren und/oder Abfärbungen auftreten. Um das zu vermeiden, können
Sie z.B. den RECARO Car Seat Protector verwenden. Ferner weisen wir in
diesem Zusammenhang auf unsere Reinigungshinweise hin, die vor der
ersten Verwendung des Kindersitzes unbedingt beachtet werden sollten.

9
DE PLIT ES HUEN FRNL PT RO EL
PROTECTING THE VEHICLE
Traces of use and/or discoloration can appear on some vehicle seats made
from delicate materials (e.g. velour, leather, etc.) if car seats are used. You
can avoid this by using, e.g. the RECARO Car Seat Protector. In this con
-
text also see our cleaning directions. It is essential that these are followed
before the first use of the child seat.
PER LA PROTEZIONE DELLA VETTURA
Su alcuni sedili auto in materiale sensibile (ad es. in velour, pelle, ecc.),
l’uso dei seggiolini auto può lasciare eventuali tracce d’uso e/o intaccare il
colore. Per evitare ciò è possibile usare ad es. RECARO Car Seat Protector.
Inoltre, in questo contesto ricordiamo le nostre istruzioni per la pulizia
che devono essere assolutamente osservate prima del primo uso del
seggiolino auto.

10
VERWENDUNG IM FAHRZEUG
Dies ist ein Kinderrückhaltesystem der Kategorie „i-Size“. Es ist nach
der Regelung ECE R129 zur Verwendung auf solchen Fahrzeugsitzen
genehmigt worden, die gemäß den Angaben des Fahrzeugherstellers im
Fahrzeughandbuch für i-Size Rückhaltesysteme geeignet sind. Verfügt Ihr
Fahrzeug über keinen i-Size Sitzplatz, überprüfen Sie bitte anhand der auf der
Homepage befindlichen Typenliste, ob der Einbau erlaubt ist.
WICHTIG: Eine komplette Liste der Fahrzeuge finden Sie unter
www.recaro-kids.com
WARNUNG! Weder die i-Size Babyschale noch die i-Size Basis dürfen
mit anderen Systemen kombiniert und verwendet werden. Die Zulassung
erlischt, sobald etwas verändert wird.
Prüfen Sie vor dem Kauf der Babyschale immer, ob sich die Babyschale
ordnungsgemäß in ihrem Fahrzeug einbauen lässt. Ein ordnungsgemäßer
Einbau kann entweder mittels i-Size Basis, über das ISOFIX System, oder
den 3-Punkt Gurt des Fahrzeuges erfolgen.
Gepäckstücke oder andere Gegenstände im Fahrzeug, die bei einem
Unfall Verletzungen verursachen können, müssen immer gut befestigt
werden. Andernfalls können sie sich zu tödlichen Geschossen im Fahr
-
zeug verwandeln.
Volkswagen Golf 7

11
DE PLIT ES HUEN FRNL PT RO EL
CORRECT POSITION IN THE VEHICLE
This is an i-Size Child Restraint System. It is approved to ECE R129, for
use in i-Size compatible vehicle seating positions as indicated by vehicle
manufacturers in the vehicle users’ manual. If your vehicle does not have
an i-Size seating position, please check the vehicle typelist on our home
-
page whether the installation is allowed.
IMPORTANT: For a complete list of cars, please visit www.recaro-kids.com
WARNING! Neither the i-Size infant car seat yet the i-Size base may
be combined with other systems and be used. The warranty expires as
soon as something is changed.
Always check before buying the i-Size infant car seat whether the seat
can be properly installed in your vehicle. Proper installation can be done
either by using the i-Size base, ISOFIX on the system or by using the
3-point belt system of the vehicle.
Items of luggage and other loose objects in the car, which could cause
injury in an accident, must always be safely secured. They can become
deadly projectiles in the case of a car accident.
USO NELLA VETTURA
Questo è un sistema di ritenuta per bambini della categoria “i-Size”. È stato
omologato secondo la norma ECE R129 per l’uso su sedili di autovetture
che, in base ai dati del costruttore del veicolo riportati nel relativo manuale,
siano idonei per l’uso di sistemi di ritenuta i-Size. Se la vostra autovettura
non dispone di un sedile idoneo a seggiolini della categoria i-Size,
controllare nell’elenco dei modelli compatibili riportato sull’homepage se il
montaggio è consentito.
IMPORTANTE: Un elenco completo delle autovetture è riportato al sito
www.recaro-kids.com
AVVERTENZA! Né l’ovetto neonato i-Size, né la base i-Size possono
essere combinati e usati con altri sistemi. L’omologazione perde validità
in caso di modifiche.
Controllare sempre prima dell’acquisto dell’ovetto neonato se quest’ul
-
timo possa essere montato correttamente nella vettura. Un montaggio
corretto può avvenire con la base i-Size, il sistema ISOFIX o la cintura di
sicurezza a 3 punti della vettura.
Bagagli o altri oggetti presenti nell’autovettura che in caso di incidente
possono causare lesioni devono essere sempre fissati in modo adegua
-
to. In caso contrario possono diventare proiettili mortali nella vettura.

12
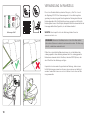
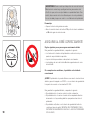
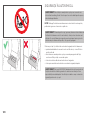
SICHERHEIT IM FAHRZEUG
WARNUNG! Verwenden Sie den Kindersitz nicht auf einem Sitz, auf dem
ein Frontairbag aktiviert ist. Dies gilt nicht für sogenannte Seitenairbags.
HINWEIS! Der großvolumige Frontairbag entfaltet sich explosionsartig und
kann Ihr Kind schwer verletzen oder sogar töten.
WARNUNG! Der Kindersitz sowie die Basis müssen, auch dann wenn
sie nicht benutzt werden, immer korrekt im Fahrzeug befestigt sein.
Bereits bei einer Notbremsung oder einem geringen Aufprall können
unbefestigte Teile andere Mitfahrer und Sie selbst verletzen.
Achten Sie zum Schutz aller Fahrzeuginsassen stets darauf, dass:
• die umklappbaren Rückenlehnen der Fahrzeugsitze eingerastet sind und
sich in einer aufrechten Position befinden
• bei Einbau des Kindersitzes auf dem Beifahrersitz, dieser in der hinters
-
ten Position steht
• im Fahrzeug alle beweglichen Gegenstände gesichert sind
• alle Personen im Fahrzeug angeschnallt sind
WARNUNG! NIE ein Baby im Auto auf dem Schoß halten. Durch die
enormen Kräfte, die bei einem Unfall frei werden, können Sie das Baby
unmöglich festhalten. Schnallen Sie sich und ein Kind niemals zusammen
mit einem Autogurt an.

13
DE PLIT ES HUEN FRNL PT RO EL
SAFETY IN THE VEHICLE
WARNING! Never use the car seat on a vehicle seat with an activated
front airbag. This does not apply to so-called side airbags.
NOTE! The large-volume front airbag expands explosively and may cause
your child serious injury or even death.
WARNING! The car seat and the base must always be secured correctly
in the vehicle even when not in use. In case of an emergency brake or
accident, an unsecured car seat may injure other passengers or yourself.
In order to guarantee the best possible safety for all passengers make
sure that:
• foldable backrests in the vehicle are locked in their upright position
• when installing the child seat on the front passenger seat, adjust the
vehicle seat in rearmost position
• you properly secure all objects likely to cause injury in the case of an
accident
• all passengers in the vehicle are buckled up
WARNING! NEVER hold a baby on your lap in a vehicle. The forces released
in a collision are way too high for any person to hold on to the baby.
Never secure yourself and the child with only one vehicle seat belt.
SICUREZZA NELLA VETTURA
AVVERTENZA! Non usare il seggiolinoauto su un sedile per il quale sia
attivato un airbag frontale. Ciò non vale per i cosiddetti airbag laterali.
AVVISO! Il grande airbag frontale si apre in modo esplosivo e può ferire
gravemente il bambino o addirittura ucciderlo.
AVVERTENZA! Il seggiolinoauto e la base devono essere sempre fissati
correttamente nella vettura anche se non in uso. Già in caso di una
frenata di emergenza o di una collisione minima, componenti non fissati
possono ferire i passeggeri e il conducente stesso.
Per la sicurezza di tutti gli occupanti della vettura prestare sempre
attenzione che
• gli schienali ribaltabili dei sedili della vettura siano bloccati e in posizione
verticale
• in caso di montaggio del seggiolino auto sul sedile del passeggero
anteriore, quest’ultimo sia nella posizione più posteriore possibile
• nella vettura tutti gli oggetti mobili siano fissati
• tutti gli occupanti della vettura abbiano allacciato la cintura di sicurezza
AVVERTENZA! NON trasportare MAI un neonato in auto tenendolo in
braccio. Le forze enormi che vengono liberate in caso di incidente rendo
-
no impossibile tener fermo il neonato. Non allacciare mai con la cintura di
sicurezza se stessi e il bambino contemporaneamente.

14
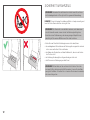
SICHERHEIT FÜR DAS BABY
WARNUNG! Schnallen Sie Ihr Kind immer mit dem integrierten Gurt-
system an.
HINWEIS! Lassen Sie Ihr Baby niemals aus den Augen.
HINWEIS! Bitte lassen Sie Ihr Baby nie unbeaufsichtigt im Fahrzeug zurück.
Nehmen Sie Ihr Baby so oft wie möglich aus der Babyschale und ent
-
lasten Sie seine Wirbelsäule. Unterbrechen Sie dazu längere Autofahrten.
Denken Sie auch außerhalb des Autos daran, Ihr Baby nicht zu lange in
der Babyschale zu lassen.
WARNUNG! Die Kunststoffteile der Babyschale erhitzen sich in der
Sonne. Ihr Baby kann sich daran verbrennen. Schützen Sie Ihr Baby
und die Babyschale vor intensiver Sonneneinstrahlung (z.B. indem Sie
ein helles Tuch über die Schale legen).
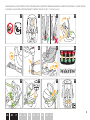
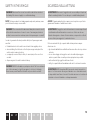
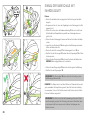
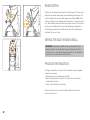
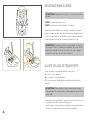
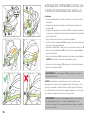
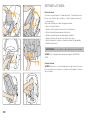
EINSTELLEN DES TRAGEBÜGELS
Sie können den Tragebügel in 3 Positionen einrasten lassen:
A: Fahrzeug- und Trageposition.
B: Zum Hineinlegen Ihres Babys.
C: Zum sicheren Stand auf einer ebenen Fläche außerhalb des Fahrzeugs.
WARNUNG! Um zu verhindern, dass der Sitz während des Tragens
kippt, überprüfen Sie, ob der Tragebügel in der Trageposition A ein
-
gerastet ist.
• Zur Verstellung des Tragebügels drücken Sie gleichzeitig die beiden
Tasten 1 links und rechts am Tragebügel.
• Schwenken Sie nun mit gedrückten Tasten 1, den Tragebügel vor oder
zurück, bis er selbsttätig in der gewünschten Position einrastet.
1
1

15
DE PLIT ES HUEN FRNL PT RO EL
SAFETY FOR THE BABY
WARNING! Always strap your child with the integrated harness system.
NOTE! Never lose sight of your baby.
NOTE! Please never leave your baby unattended in a vehicle.
Take your baby out of the infant car seat as often as possible in order
to relieve pressure from his or her spine. Take breaks during longer car
journeys for this purpose. Also ensure that you do not leave your baby for
too long in the infant car seat even when not in the vehicle.
WARNING! The plastic parts of the infant car seat heat up in the sun.
Your baby can suffer burns from this. Protect your baby and the infant
car seat from intense sun exposure (e.g. by placing a light cloth over
the seat).
ADJUSTING THE CARRYING HANDLE
You can lock the carrying handle in place in 3 positions:
A: Carrying/Driving-Position.
B: For placing the baby in the seat.
C: Safe sitting position outside the car.
WARNING! In order to prevent the seat from tipping over during car
-
rying, check whether the carrying handle is locked in place in carrying
position A.
• To adjust the carrying handle, simultaneously press the left and right
buttons 1.
• Then pivot carrying handle forwards or backwards while pressing
buttons 1 until it automatically locks in place in the desired position.
SICUREZZA PER IL NEONATO
AVVERTENZA! Allacciare sempre il bambino con il sistema di cinture
di sicurezza integrato.
AVVISO! Non lasciare mai il neonato incustodito.
AVVISO! Non lasciare mai incustodito il neonato nella vettura.
Togliere quanto più spesso possibile il neonato dall’ovetto per alleggerire
il carico sulla sua colonna vertebrale. A tal scopo prevedere delle pause
durante viaggi prolungati. Anche al di fuori dalla vettura non lasciare
troppo a lungo il neonato nell’ovetto.
AVVERTENZA! I componenti di plastica dell’ovetto neonato al sole si
riscaldano. Il neonato può subire ustioni. Proteggere il neonato e l’ovetto
dai forti raggi del sole (ad es. coprendo l’ovetto con un panno chiaro).
REGOLAZIONE DEL MANICO PER IL
TRASPORTO
Il manico per il trasporto può essere bloccato in 3 posizioni:
A: Posizione vettura e di trasporto.
B: Per adagiarvi il neonato.
C: Per una posizione sicura su una superficie piana al di fuori della vettura.
AVVERTENZA! Per impedire che l’ovetto si ribalti durante il trasporto,
controllare se il manico è bloccato nella posizione di trasporto A.
• Per la regolazione del manico per il trasporto premere contemporanea
-
mente i due tasti 1 a sinistra e a destra del manico.
• Ora, tenendo premuti i tasti 1, orientare in avanti e indietro il manico
per il trasporto finché non si blocca automaticamente nella posizione
desiderata.

16
EINSTELLEN DES SONNENDACHS
Klappen Sie das Sonnenverdeck durch Ziehen an der vorderen Kante aus.
Zum Einklappen schieben Sie das Sonnenverdeck in die Ausgangsposition
zurück. Zusätzlich können Sie an der vorderen Kante des Sonnendachs ein
Sonnenschild ausklappen.
ANPASSEN AN DIE KÖRPERGRÖSSE
Anpassen der Kopstütze
HINWEIS! Nur eine in optimaler Höhe eingestellte Kopfstütze gewährt
ihrem Kind größtmöglichen Schutz und Komfort. Die Höhenverstellung
kann in 5 Positionen erfolgen.
• Die Kopfstütze muss so eingestellt werden, dass der Abstand zwischen
den Schultern des Kindes und der Kopfstütze 3 cm (ca. 2 Finger) nicht
überschreitet.
• Lockern Sie die Schultergurte, indem Sie die Verstelltaste am Zentral
-
versteller 2 betätigen und gleichzeitig beide Schultergurte nach oben
ziehen.
• Betätigen Sie den Verstellgriff 3 auf der Rückseite der Babyschale, um
die Kopfstütze in die passende Position zu bringen.
• Achten Sie darauf, dass die Kopfstütze in der gewünschten Position mit
einem hörbaren Klick einrastet.
HINWEIS! Die Schultergurte sind mit der Kopfstütze fest verbunden und
müssen nicht separat eingestellt werden.
Entfernen der Neugeboreneneinlage
Ab 61 cm (ca. 3 Monaten) sollte die Neugeboreneneinlage 4 aus der Baby
-
schale entfernt werden, um ausreichend Platz für ihr Kind zu schaffen.
3
4
2

17
DE PLIT ES HUEN FRNL PT RO EL
ADJUSTING THE SUN CANOPY
Unfold the sun canopy by pulling on the front edge. To fold back, push the
sun canopy back to its initial position. Additionally you can fold out a sun
shield at the front edge of the canopy.
ADJUSTING TO THE BODY SIZE
Adjusting the headrest
NOTE! The headrest ensures the best possible protection for your child
only if it is adjusted to the optimum height. There are 5 height positions
that can be set.
• The headrest has to be adjusted in a way that the distance between the
child‘s shoulders and the headrest doesn’t exceed 3 cm (ca. 2 fingers
width).
• Loosen shoulder belts by pressing the adjustment button on central
adjuster 2 and simultaneously pulling both shoulder belts up.
• Operate the adjustment button 3 at the back side of the child car seat to
adjust the headrest.
• Make sure the headrest has locked into place in the new position with
an audible click.
NOTE! The shoulder belts are firmly connecxted to the headrest and do
not have to be adjusted separately.
Removing the Newborn Inlay
The newborn inlay 4 may be removed after the baby is 61 cm (approx. 3
months) to provide more space for the child.
REGOLAZIONE DELLA CAPPOTTA PARASOLE
Aprire la cappotta parasole tirando il bordo anteriore. Per chiuderla,
spingere la cappotta parasole nuovamente nella posizione di partenza.
Inoltre, sul bordo anteriore della cappotta parasole è possibile aprire uno
schermo parasole.
ADATTAMENTO ALL’ALTEZZA DEL BAMBINO
Adattamento del poggiatesta
AVVISO! Solo un poggiatesta regolato all’altezza ottimale garantisce la
massima sicurezza e il massimo comfort per il vostro bambino. La regola
-
zione in altezza può essere eseguita in 5 posizioni.
• Il poggiatesta deve essere regolato in modo che la distanza tra le spalle
del bambino e il poggiatesta non superi i 3 cm (circa 2 dita).
• Allentare le cinture di sicurezza per le spalle azionando il tasto di
regolazione centrale 2 e contemporaneamente tirando verso l’alto le due
cinture di sicurezza per le spalle.
• Azionare la maniglia di regolazione 3 sul retro dell’ovetto per portare il
poggiatesta nella posizione corretta.
• Prestare attenzione che il poggiatesta scatti nella posizione desiderata
con un clic udibile.
AVVISO! Le cinture di sicurezza sono collegato in modo fisso al poggiate
-
sta e non devono essere regolate separatamente.
Rimozione della riduzione neonato
A partire da 61 cm di altezza (circa 3 mesi) la riduzione neonato 4 dovrebbe
essere rimossa dall’ovetto per far sì che il bambino abbia spazio a
sufficienza.

18
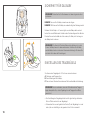
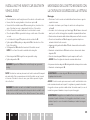
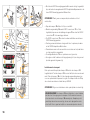
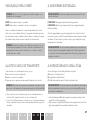
ANSCHNALLEN MITTELS GURTSYSTEM
HINWEIS! Achten Sie darauf, dass die Kopfstütze ordnungsgemäß ein-
gerastet ist, bevor Sie den Kindersitz verwenden.
HINWEIS! Sorgen Sie dafür, dass der Kindersitz frei von Spielsachen und
harten Objekten ist.
• Lockern Sie die Schultergurte, indem Sie die Verstelltaste am Zentral
-
versteller 2 betätigen und gleichzeitig beide Schultergurte nach oben
ziehen.
HINWEIS! Bitte ziehen Sie immer am Schultergurt und nicht an den
Schulterpolstern.
• Öffnen Sie das Gurtschloss 5 durch kräftiges Drücken der roten Taste.
• Setzen Sie Ihr Kind in den Kindersitz.
• Führen Sie die Schultergurte gerade über die Schultern ihres Kindes.
• Führen Sie die beiden Schlosszungen 6 zusammen und rasten Sie diese
im Gurtschloss 5 mit einem hörbaren „KLICK“ ein.
• Ziehen Sie behutsam am Zentralverstellgurt 7, um die Schultergurte
soweit zu straffen, bis diese am Körper Ihres Kindes anliegen.
HINWEIS! Für den optimalen Schutz des Kindersitzes sollten die Schulter
-
gurte so nahe wie möglich am Körper anliegen
VERWENDUNG DER BABYSCHALE MIT
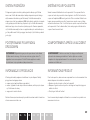
BASIS
Einbau der Basis
Wählen Sie einen zulässigen Fahrzeugsitz. Verfügt Ihr Fahrzeug über
keinen i-Size Sitzplatz, überprüfen Sie bitte anhand der Typenliste, ob der
Einbau erlaubt ist (Siehe Kapitel „VERWENDUNG IM FAHRZEUG“).
HINWEIS! Die ISOFIX Befestigungspunkte 8 sind zwei Metalllaschen pro
Sitzplatz und befinden sich zwischen Rückenlehne und Sitzfläche des Fahr
-
zeugsitzes. Im Zweifelsfall nehmen Sie die Bedienungsanleitung Ihres
Fahrzeugs zu Hilfe.
2
5
5
6
5
7

19
DE PLIT ES HUEN FRNL PT RO EL
STRAPPING WITH HARNESS SYSTEM
NOTE! Ensure that the headrest is correctly locked in place before using
the car seat.
NOTE! Ensure that the car seat is free from toys and hard objects.
• Loosen shoulder belts by pressing the adjustment button on central
adjuster 2 and simultaneously pulling both shoulder belts up.
NOTE! Please always pull on shoulder belt and not on belt pads.
• Undo the belt buckle 5 by pressing the red button firmly.
• Put your child into the car seat.
• Place shoulder belts directly over your child’s shoulders.
• Place both buckle tongues 6 together and lock them in place in belt
buckle 5 with an audible “CLICK”.
• Pull cautiously on central adjustment belt 7 in order to tighten shoulder
belts until they fit your child’s body.
NOTE! For the car seat to offer optimum protection, shoulder belts should
fit the body as closely as possible.
CONNECTING THE INFANT CAR SEAT
WITH BASE
Installation of the base
Please select an appropriate seat in the vehicle. If your vehicle does
not have an i-Size seating position, please check the vehicle typelist
that is included whether the installation is allowed. (Please see chapter
„CORRECT POSITION IN THE VEHICLE“).
NOTE! The ISOFIX anchorage points 8 are two metal lugs per seat and are
located between the backrest and the seat of the car. If you are in any
doubt, consult your car‘s instruction manual for assistance.
ALLACCIARE LE CINTURE DI SICUREZZA
AVVISO! Prestare attenzione che il poggiatesta si sia bloccato corretta-
mente prima di usare il seggiolinoauto.
AVVISO! Fare in modo che nel seggiolinoauto non siano presenti giocat
-
toli o oggetti duri.
• Allentare le cinture di sicurezza per le spalle azionando il tasto di
regolazione centrale 2 e contemporaneamente tirando verso l’alto le due
cinture di sicurezza per le spalle.
AVVISO! Tirare sempre la cintura per le spalle e non le imbottiture per
le spalle.
• Aprire la chiusura della cintura 5 premendo con forza sul tasto rosso.
• Sedere il bambino nel seggiolino auto.
• Far passare le cinture di sicurezza diritte sulle spalle del bambino.
• Congiungere le linguette della fibbia 6 e inserirle nella chiusura della
cintura di sicurezza 5 fino a udire un chiaro “CLIC”.
• Tirare leggermente la cintura di regolazione centrale 7 per tendere le
cinture per le spalle in modo che aderiscano al corpo del bambino.
AVVISO! Affinché il seggiolinoauto fornisca una protezione ottimale, le
cinture per le spalle dovrebbero aderire quanto più possibile al corpo
USO DELL’OVETTO NEONATO CON LA
BASE
Montaggio della base
Scegliere un sedile della vettura adatto. Se la vostra autovettura non
dispone di un sedile idoneo a seggiolini della categoria i-Size, controllare
nell’elenco dei modelli compatibili se il montaggio è consentito. (Vedi
capitolo “USO NELLA VETTURA”).
AVVISO! I punti di fissaggio ISOFIX 8 sono due linguette di metallo poste
su ogni sedile auto tra lo schienale e la superficie di seduta. In caso di
dubbi consultare le istruzioni per l’uso della vettura.

20
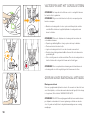
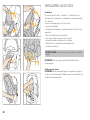
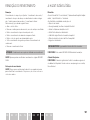
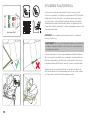
13
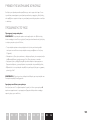
• Sind die ISOFIX Befestigungspunkte 8 Ihres Fahrzeugs schwer zugäng-
lich, so können Sie die mitgelieferten ISOFIX Einführhilfen 9 in den
beiden ISOFIX Befestigungspunkten 8 dauerhaft einhängen.
HINWEIS! Stellen Sie keine Gegenstände in den Fußraum vor den
Kindersitz.
• Klappen Sie immer den Stützfuß 10 aus, bis er vorne einrastet.
• Lösen Sie die Arretierung 14 der ISOFIX Konnektoren 11. Drücken Sie
gleichzeitig eine der seitlichen Tasten 12 und schieben Sie die ISOFIX
Arretierung 11 bis zum Anschlag aus der Basis.
• Die ISOFIX Konnektoren 11 müssen hörbar an den beiden ISOFIX
Befestigungspunkten einrasten.
• Vergewissern Sie sich, dass die Basis gut hält, indem Sie versuchen,
die Basis aus den ISOFIX Einführhilfen 9 herauszuziehen.
• Drehen Sie die Basis nach rechts und nach links, um sicherzustellen,
dass sie so straff wie möglich verrastet ist.
• Der Sicherheitsindikator 13 vorne an der Basis muss grün anzeigen.
• Anschließend schieben Sie die Basis in Richtung Rückenlehne, bis sie
fest und vollflächig anliegt.
Einstellen des Stützfußes
Drücken Sie die Verstelltaste am Stützfuß 10 und ziehen Sie gleichzeitig
den Stützfuß 10 aus. Ziehen Sie den Stützfuß 10 soweit heraus, bis dieser
den Fahrzeugboden berührt. Ziehen Sie den Stützfuß 10 bis zur nächsten
Verrastung aus, um eine optimale Kraftaufnahme zu gewährleisten. Der
Stützfußindikator 13 an der Vorderseite der Basis schaltet dann auf grün um.
HINWEIS! Achten Sie darauf, dass die Basis flächig auf dem Fahrzeugsitz
aufliegt.
WARNUNG! Der Stützfuß 10 muss immer direkten Bodenkontakt
haben. Es dürfen keine Gegenstände oder Hohlräume zwischen Fahr
-
zeugboden und dem Stützfuß 10 sein. Besitzt ihr Auto Staufächer im
Fußraum, wenden Sie sich unbedingt an den Fahrzeughersteller. Im
Zweifelsfall nutzen Sie bitte einen anderen Fahrzeugsitz.
8
9
14
10
14
11
12
8
11
13
10
La pagina si sta caricando...
La pagina si sta caricando...
La pagina si sta caricando...
La pagina si sta caricando...
La pagina si sta caricando...
La pagina si sta caricando...
La pagina si sta caricando...
La pagina si sta caricando...
La pagina si sta caricando...
La pagina si sta caricando...
La pagina si sta caricando...
La pagina si sta caricando...
La pagina si sta caricando...
La pagina si sta caricando...
La pagina si sta caricando...
La pagina si sta caricando...
La pagina si sta caricando...
La pagina si sta caricando...
La pagina si sta caricando...
La pagina si sta caricando...
La pagina si sta caricando...
La pagina si sta caricando...
La pagina si sta caricando...
La pagina si sta caricando...
La pagina si sta caricando...
La pagina si sta caricando...
La pagina si sta caricando...
La pagina si sta caricando...
La pagina si sta caricando...
La pagina si sta caricando...
La pagina si sta caricando...
La pagina si sta caricando...
La pagina si sta caricando...
La pagina si sta caricando...
La pagina si sta caricando...
La pagina si sta caricando...
La pagina si sta caricando...
La pagina si sta caricando...
La pagina si sta caricando...
La pagina si sta caricando...
La pagina si sta caricando...
La pagina si sta caricando...
La pagina si sta caricando...
La pagina si sta caricando...
La pagina si sta caricando...
La pagina si sta caricando...
La pagina si sta caricando...
La pagina si sta caricando...
La pagina si sta caricando...
La pagina si sta caricando...
La pagina si sta caricando...
La pagina si sta caricando...
La pagina si sta caricando...
La pagina si sta caricando...
La pagina si sta caricando...
La pagina si sta caricando...
La pagina si sta caricando...
La pagina si sta caricando...
La pagina si sta caricando...
La pagina si sta caricando...
La pagina si sta caricando...
La pagina si sta caricando...
La pagina si sta caricando...
La pagina si sta caricando...
La pagina si sta caricando...
La pagina si sta caricando...
La pagina si sta caricando...
La pagina si sta caricando...
La pagina si sta caricando...
La pagina si sta caricando...
La pagina si sta caricando...
La pagina si sta caricando...
La pagina si sta caricando...
La pagina si sta caricando...
La pagina si sta caricando...
La pagina si sta caricando...
La pagina si sta caricando...
La pagina si sta caricando...
La pagina si sta caricando...
La pagina si sta caricando...
La pagina si sta caricando...
La pagina si sta caricando...
La pagina si sta caricando...
La pagina si sta caricando...
La pagina si sta caricando...
La pagina si sta caricando...
La pagina si sta caricando...
La pagina si sta caricando...
La pagina si sta caricando...
La pagina si sta caricando...
La pagina si sta caricando...
La pagina si sta caricando...
La pagina si sta caricando...
La pagina si sta caricando...
La pagina si sta caricando...
La pagina si sta caricando...
La pagina si sta caricando...
La pagina si sta caricando...
La pagina si sta caricando...
La pagina si sta caricando...
La pagina si sta caricando...
La pagina si sta caricando...
La pagina si sta caricando...
La pagina si sta caricando...
La pagina si sta caricando...
La pagina si sta caricando...
La pagina si sta caricando...
La pagina si sta caricando...
La pagina si sta caricando...
La pagina si sta caricando...
La pagina si sta caricando...
La pagina si sta caricando...
La pagina si sta caricando...
La pagina si sta caricando...
La pagina si sta caricando...
La pagina si sta caricando...
La pagina si sta caricando...
La pagina si sta caricando...
La pagina si sta caricando...
La pagina si sta caricando...
La pagina si sta caricando...
La pagina si sta caricando...
La pagina si sta caricando...
La pagina si sta caricando...
La pagina si sta caricando...
La pagina si sta caricando...
La pagina si sta caricando...
La pagina si sta caricando...
-
 1
1
-
 2
2
-
 3
3
-
 4
4
-
 5
5
-
 6
6
-
 7
7
-
 8
8
-
 9
9
-
 10
10
-
 11
11
-
 12
12
-
 13
13
-
 14
14
-
 15
15
-
 16
16
-
 17
17
-
 18
18
-
 19
19
-
 20
20
-
 21
21
-
 22
22
-
 23
23
-
 24
24
-
 25
25
-
 26
26
-
 27
27
-
 28
28
-
 29
29
-
 30
30
-
 31
31
-
 32
32
-
 33
33
-
 34
34
-
 35
35
-
 36
36
-
 37
37
-
 38
38
-
 39
39
-
 40
40
-
 41
41
-
 42
42
-
 43
43
-
 44
44
-
 45
45
-
 46
46
-
 47
47
-
 48
48
-
 49
49
-
 50
50
-
 51
51
-
 52
52
-
 53
53
-
 54
54
-
 55
55
-
 56
56
-
 57
57
-
 58
58
-
 59
59
-
 60
60
-
 61
61
-
 62
62
-
 63
63
-
 64
64
-
 65
65
-
 66
66
-
 67
67
-
 68
68
-
 69
69
-
 70
70
-
 71
71
-
 72
72
-
 73
73
-
 74
74
-
 75
75
-
 76
76
-
 77
77
-
 78
78
-
 79
79
-
 80
80
-
 81
81
-
 82
82
-
 83
83
-
 84
84
-
 85
85
-
 86
86
-
 87
87
-
 88
88
-
 89
89
-
 90
90
-
 91
91
-
 92
92
-
 93
93
-
 94
94
-
 95
95
-
 96
96
-
 97
97
-
 98
98
-
 99
99
-
 100
100
-
 101
101
-
 102
102
-
 103
103
-
 104
104
-
 105
105
-
 106
106
-
 107
107
-
 108
108
-
 109
109
-
 110
110
-
 111
111
-
 112
112
-
 113
113
-
 114
114
-
 115
115
-
 116
116
-
 117
117
-
 118
118
-
 119
119
-
 120
120
-
 121
121
-
 122
122
-
 123
123
-
 124
124
-
 125
125
-
 126
126
-
 127
127
-
 128
128
-
 129
129
-
 130
130
-
 131
131
-
 132
132
-
 133
133
-
 134
134
-
 135
135
-
 136
136
-
 137
137
-
 138
138
-
 139
139
-
 140
140
-
 141
141
-
 142
142
-
 143
143
-
 144
144
-
 145
145
-
 146
146
-
 147
147
-
 148
148


RECARO Avan Manuale del proprietario
- Categoria
- Sedili dell'auto
- Tipo
- Manuale del proprietario
in altre lingue
- English: RECARO Avan Owner's manual
- français: RECARO Avan Le manuel du propriétaire
- español: RECARO Avan El manual del propietario
- Deutsch: RECARO Avan Bedienungsanleitung
- Nederlands: RECARO Avan de handleiding
- português: RECARO Avan Manual do proprietário
- polski: RECARO Avan Instrukcja obsługi
- română: RECARO Avan Manualul proprietarului
Documenti correlati
-
RECARO Young Sport HERO Manuale del proprietario
-
RECARO Mako 2 Manuale del proprietario
-
mothercare Recaro Mako Child 0720715 Manuale del proprietario
-
RECARO Mako Elite 2 Manuale del proprietario
-
-
mothercare Recaro Tian 0724186 Manuale del proprietario
-
RECARO Kio Manuale del proprietario
-
RECARO Tian Elite Manuale utente
-
RECARO Zero.1 Elite i-Size Manuale del proprietario
-
Altri documenti
-
Graco SNUGESSENTIALS Manuale del proprietario
-
CYBEX ATON M Manuale utente
-
mothercare Joie isofix i-Base_0714658 Manuale del proprietario
-
Joie i-Jemini Manuale utente
-
Joie I Base Car Seat Base Manuale utente
-
 Medisafe MediSafe Cocomoon Manuale utente
-
Nuna Pipa Manuale utente
-
-
Britax BABY-SAFE PLUS SHR II Manuale del proprietario
-
