Oregon Scientific RM512 Instructions Manual
- Categoria
- Sveglie
- Tipo
- Instructions Manual

INTRODUCTION
Thank you for purchasing the Projection Clock . Please read carefully through the following
information and keep these instructions, in case you need to refer to them in the future. If you
pass the product on to someone else, please also include these instructions.
The Radio-Controlled Projection Clock (Projection Clock) displays:
- indoor temperature
- date / time / weekday
- alarm
The Projection Clock is unsuitable for commercial use in weather forecasting or in temperature data
measurement.
PACKAGE CONTENTS
Main unit Power cable
AAA batteries
for main unit x 2
OVERVIEW 1: Press to activate the snooze functon,backlight and projection,
Press and hold to toggle projection on/off.
2:Projection lens
3: In Date mode, press to turn on/off zone. In Alarm time
mode, press to turn on/off alarm. Press and hold to enter time
and date setting.
4: Press to show alarm time of Alarm 1-5 and Alarm 6-7.
Press and hold to enter alarm setting.
5: Press to switch between Temperature and Week Day
display. Press and hold to start RCC signal receiving. In
setting mode, press to increase one unit, press and hold
to increase rapidly.
6: Press to switch between Date and the nearest coming
Alarm time. In projection, press and hold to flip the projection
display in 180 . In setting mode, press to decrease one unit,
press and hold to decrease rapidly.
7:Power jack.
8:Battery compartment. Slide down to open.
LCD DISPLAY
1: Time Display
2: Date display or Alarm time display
3: Temperature display or Week Day display
RCC signal received
Alarm ON
DST ON
Snooze Activated
Low battery indicator
Temperature mode
GETTING STARTED
INSERT BATTERIES
1: Remove the battery door from the back
2: Insert 2 R03 (AAA)/ 1.5V batteries. Please ensure the polarities (+/-) of the
batteries match upon installation.
3: Reattach the battery door.
NOTE: Replace batteries when displays, or when the display is dim.
DC POWER
Plug the power cable to the power jack and plug the USB plug to a
5V USB power adapter (Not included).
NOTE: It is suggested to insert batteries as backup power source.
CLOCK
CLOCK RECEPTION
1: Replace batteries or press button will initiate RCC receiving.
2: RCC receiving can be worked in both Date Mode and Alarm Mode.
3: The receiving process duration is 7 minutes.
4: During receiving process, the RCC signal logo flashes.
5: During receiving process, press button to quit receiving, press other buttons
can work normally.
6: If process is successful, completed RCC logo will be shown in display. If it fails within
7 minutes, RCC setting will be quit automatically.
7: RCC receiving will automatically start at 2:03, 3:03, 4:03, 5:03 every night. Auto
receiving function will cease if it is successful.
Front
back
ALARM
SETTING/ADJUSTING ALARM TIME
1. Press and hold button, enter alarm setting
2. Sequence of setting: weekday hour weekday minute weekend hour weekend
minute exit
3. During setting, the setting parameter will flash.
4. Press button to confirm setting and enter to next parameter
5. Press button once, the figure will increase 1 unit. Press and hold the button, the figures
will increase rapidly.
6. Press button once, the figure will decrease 1 unit. Press and hold the button, the
figures will decrease rapidly.
7. Press button to turn on/off alarm
8. Alarm will automatic turn on when alarm setting finish.
9. If there is no action in 20 seconds, the setting will be saved and will exit the setting mode.
TURN ON/OFF ALARM
1. When it is displaying the nearest coming Alarm time, press button once to turn on/off that
alarm. (1-5) or (6-7) will flash to indicate which alarm displaying.
2. Press button once to switch to alarm mode. Monday to Friday alarm time will be shown and
(1-5) will flash.
3. Press button once to turn on/off Monday to Friday alarm
4. Press button again to show Saturday to Sunday alarm time. (6-7) will flash.
5. Press button once to turn on/off Saturday to Sunday alarm.
OPERATION
1. At the set time, alarm signal rings.
2. During alarm rings, press any keys to end the alarm. Or press button to delay the alarm for
8 minutes.
3. If do not press any button to end the alarm, it will turn off automatically after 5 minutes.
4. Alarm will be start again at next alarm time, unless switch off the alarm function in alarm mode.
PROJECTION
The projector displays the time on your ceiling or wall and it can rotate 180 . It is easier to view in a
darkened room. For the optimal projection results, place the unit within 5-6.5 ft (1.5 - 2 m) from the
ceiling or wall.
1. Press button to activate the backlight and projection for 5 seconds.
2. Press and hold button, flip the projection display 180 .
3. Press and hold button, toggle continues projection on in case of using adapter power
source and toggle projection on for 5 minutes in case of using batteries power only. Press and
hold button again, turn off projection and toggle continues projection off
PRECAUTIONS
Hazards for children
Batteries can be life-endangering if swallowed. Please keep the Projection Clock and batteries
out of reach of children. If a battery has been swallowed, please seek medical assistance
immediately.
Keep children away from packaging material and the small parts in the scope of delivery.
Suffocation hazard if swallowed.
Injury hazard
Caution: Explosion hazard with improper handling of batteries. Batteries must not be charged,
reactivated with other means, dismantled, thrown into fire or short-circuited.
Avoid contact with skin, eyes and mucous membranes. When coming into contact with battery
acid, immediately rinse the affected areas with plenty of clear water and immediately contact a
physician.
Caution – property damage
Protect the Projection Clock from dust, impact, extreme temperatures and direct sunshine. Also
protect the Projection Clock from moisture. Exclusively position Projection Clock in a dry,
enclosed space.
Remove the batteries from the Projection Clock, if they become depleted or if you are not using
the Projection Clock for a longer period of time.
Do not expose the batteries to any extreme conditions by e.g. placing them on a radiator or
under direct sunlight.
Clean the battery and appliance contacts prior to insertion, if required.
Using same type of batteries. Do not use different types or used and new batteries together.
Do not carry out any changes to the device. Only allow repairs to be carried out by a
professional workshop.
Never use hard, scratching or abrasive detergents or similar, for cleaning the Projection Clock.
This could scratch the surfaces.
SPECIFICATIONS
L x W x H 100 x 25 x 75 mm
Weight (Main unit) 97g (Exclude batteries)
Temperature display range -10℃ to +50℃ (14℉ to 122℉)
Accuracy 0℃ to +40℃: +/- 1.5℃ (+/-3℉)
<0℃ and >+40℃: +/- 2℃ (+/-4℉)
Resolution 0.1℃ (0.2℉)
Power 2 x R03 (AAA) 1.5V batteries
5V USB adapter (Not included)
NOTE:
When the temperature is lower than -10℃(14℉), the temperature displays LL.L. When the
temperature is higher than 50℃(122℉), the temperature displays HH.H.
During alarm rings or RCC receiving process, temperature detection will be stopped.
NOTE: The technical specifications for this product and the contents of the user manual are subject
to change without notice.
EU-DECLARATION OF CONFORMITY
Disposal:
Guideline 2012/19/EC concerning the handling, collection, recycling and disposal of
electrical and electronic equipment and their components (‘waste electrical and electronic
equipment’, known as WEEE).
The crossed symbol on a rubbish container indicates that the machine or device is not allowed to be
disposed of but it must be handed over to a suitably equipped collection centre for proper recycling
or disposal.
Directives:
We declare that this device has been manufactured in accordance with the applicable rules
and regulations.
Different model receives different RCC signal:
Region Signal
EU DCF
UK MSF
NOTE: Please increase the separation of the main unit and the power adapter to avoid interference
of RCC signal receiving.
SET THE CLOCK MANUALLY
1. Press and hold button, enter time and date setting
2. Sequence of setting: Week Day Language 12/24 Hr Year (2000 – 2099) Date format
Month Date Hour Minute Zone ℃/℉ exit
3. During setting, the setting parameter will flash.
4. Press button to confirm setting and enter to next parameter
5. Press button once, the figure will increase 1 unit (when setting minute, second will reset to
0). Press and hold the button, the figures will increase rapidly.
6. Press button once, the figure will decrease 1 unit (when setting minute, second will reset to
0). Press and hold the button, the figures will decrease rapidly.
7.If there is no action in 20 seconds, the setting will be saved and will exit the setting mode.
Five languages Week Day display: GER, ENG, FRE, ITA, DUT.
Symbol Monday Tuesday Wednesday Thursday Friday Saturday Sunday
German GER MON DIE MIT DON FRE SAM SON
English ENG MON TUE WED THU FRI SAT SUN
France FRE LUN MAR MER JEU VEN SAM DIM
Italian ITA LUN MAR MER GIO VEN SAB DOM
Dutch DUT MAA DIN WOE DON VRI ZAI ZON
o
o
o

EINFÜHRUNG
Vielen Dank für den Kauf der Projektionsuhr. Lesen Sie die folgenden Informationen bitte
sorgfältig durch und bewahren Sie diese Anleitung gut auf, damit sie Ihnen bei Bedarf jederzeit
zur Verfügung steht. Falls Sie das Produkt weitergeben, legen Sie für den Empfänger bitte auch
diese Anleitung bei.
Die Projektions-Funkuhr (Projektionsuhr) zeigt die Raumtemperatur an. Sie zeigt auch das
Datum, die Uhrzeit und den Wochentag an und verfügt über eine Weckfunktion. Die
Projektionsuhr ist nicht für die gewerbliche Nutzung zur Erstellung von Wettervorhersagen oder
zur Erfassung von Temperaturdaten geeignet.
PACKUNGSINHALT
Gerät Netzkabel
2 Micro-Batterien
(AAA) für das Gerät
ÜBERSICHT 1: – Drücken, um Schlummerfunktion oder Hintergrundb-
eleuchtung und Projektion zu aktivieren. Zum Ein-/Ausschalten
der Projektion gedrückt halten.
2:Projektorobjektiv
3: – Im Datumsmodus zum Ein-/Ausschalten der Zeitzone
drücken. Im Weckzeitmodus zum Ein-/Ausschalten des Weckers
drücken. Zum Einstellen von Uhrzeit und Datum gedrückt halten.
4: – Zum Anzeigen der Weckzeit für Weckfunktion 1–5 und Weck-
funktion 6–7 drücken. Zum Einstellen der Weckzeit gedrückt halten.
5: Zum Umschalten zwischen Temperatur- und Wochentagsanzeige
drücken. Zum Starten des Funkuhrsignalempfangs gedrückt halten.
Im Einstellungsmodus für Einzelschritte aufwärts drücken oder für
schnelle Erhöhung gedrückt halten.
6: – Zum Umschalten zwischen Datum und nächster bevorstehender
Weckzeit drücken. Im Projektionsmodus gedrückt halten, um
Projektionsanzeige im Winkel von 180 0 zu schwenken. Im
Einstellungsmodus für Einzelschritte abwärts drücken oder für schnelle
Verringerung gedrückt halten.
7:Netzstromanschluss.
8:Batteriefach. Zum Öffnen nach unten schieben.
LCD-ANZEIGE
1: Anzeige der Uhrzeit
2: Anzeige von Datum oder Weckzeit
3. Anzeige von Temperatur oder Wochentag
Funkuhrsignal empfangen
Weckfunktion EIN
Sommerzeit EIN
Schlummerfunktion aktiviert
Batteriestandswarnung
Temperaturmodus
ERSTE SCHRITTE
BATTERIEN EINLEGEN
1. Batteriefachabdeckung an der Rückseite entfernen.
2. Micro-Batterien (R03/AAA/1,5 V) einlegen. Beim Einlegen der Batterien auf die Polarität (+/-) achten.
3. Batteriefachabdeckung wieder anbringen.
HINWEIS: Die Batterien sollten ausgewechselt werden, wenn angezeigt wird oder die Helligkeit des
Displays abnimmt.
GS-NETZTEIL
Schließen Sie das Netzkabel an den Netzstromanschluss an und verbinden Sie den USB-Stecker mit
einem 5-V-USB-Netzteiladapter (nicht im Lieferumfang enthalten).
HINWEIS: Es wird empfohlen, den Batteriebetrieb lediglich als Reserve zu verwenden.
UHR
SIGNALEMPFANG DER FUNKUHR
1: Durch das Auswechseln der Batterien oder mit der Taste wird der Empfang des Funksignals aktiviert.
2: Der Empfang des Funksignals ist im Datums- und im Weckmodus möglich.
3. Der Empfangsvorgang dauert 7 Minuten.
4. Während des Empfangs blinkt das Funksignal-Symbol .
5. Der laufende Empfangsvorgang kann durch Drücken der Taste abgebrochen werden. Alle anderen
Tasten funktionieren auch während des Empfangsvorgangs wie gewohnt.
6. Nach dem erfolgreichen Abschluss des Funksignalempfangs wird das Symbol auf dem Display
angezeigt. Wenn der Empfangsvorgang nicht innerhalb von 7 Minuten abgeschlossen werden kann,
wird der Funksignal-Einstellungsmodus automatisch beendet.
7. Der Funksignal-Empfangsvorgang beginnt jede Nach automatisch um 2:03, 3:03, 4:03, 5:03 Uhr.
Sobald der automatische Empfang erfolgt ist, wird die Funktion beendet.
Front
back
Das empfangene Funksignal richtet sich nach dem jeweiligen Modell:
Region Signal
EU DCF
GB MSF
HINWEIS:Sorgen Sie bitte für einen ausreichenden Abstand zwischen dem Gerät und dem Netzteil,
damit der Empfang des Funksignals nicht gestört wird.
MANUELLES EINSTELLEN DER UHRZEIT
1. Halten Sie die Taste gedrückt und stellen Sie das Datum und die Uhrzeit ein
2. Einstellreihenfolge: Sprache Wochentag 12/24 Std. Jahr (2000 – 2099) Datumsformat
Monat Datum Stunden Minuten Zeitzone ℃/℉ Beenden
3. Während der Einstellung blinkt der entsprechende Parameter.
4. Drücken Sie die Taste , um die Einstellung zu bestätigen und zur Eingabe des nächsten
Parameters zu wechseln
5. Wenn Sie die Taste einmal drücken, wird die Zahl um eine Einheit erhöht (bei der Einstellung der
Minuten wird der Sekundenwert auf 0 zurückgesetzt). Wenn Sie die Taste gedrückt halten, laufen
die Zahlen schnell vor.
6. Wenn Sie die Taste einmal drücken, wird die Zahl um eine Einheit verringert (bei der Einstellung
der Minuten wird der Sekundenwert auf 0 zurückgesetzt). Wenn Sie die Taste gedrückt halten,
laufen die Zahlen schnell rückwärts.
7. Wenn 20 Sekunden lang keine Eingabe erfolgt, wird die Einstellung gespeichert, und der
Einstellmodus wird beendet.
Wochentagsanzeige in fünf Sprachen: GER (Deutsch), ENG (Englisch), FRE (Französisch), ITA
(Italienisch), DUT (Niederländisch).
Symbol Montag Dienstag Mittwoch Donnerstag Freitag Samstag Sonntag
Deutsch GER MON DIE MIT DON FRE SAM SON
Englisch ENG MON TUE WED THU FRI SAT SUN
Französisch
FRE LUN MAR MER JEU VEN SAM DIM
Italienisch ITA LUN MAR MER GIO VEN SAB DOM
Niederländisch
DUT MAA DIN WOE DON VRI ZAI ZON
o
o
o
WECKER
Einstellen/Ändern der Weckzeit
1. Halten Sie die Taste gedrückt, um die Weckzeit einzustellen.
2. Einstellreihenfolge: Werktag Stunde Werktag Minute Wochenende Stunde
Wochenende Minute Beenden
3. Während der Einstellung blinkt der entsprechende Parameter.
4. Drücken Sie die Taste , um die Einstellung zu bestätigen und zur Eingabe des nächsten
Parameters zu wechseln
5. Wenn Sie die Taste einmal drücken, wird die Zahl um eine Einheit erhöht. Wenn Sie die
Taste gedrückt halten, laufen die Zahlen schnell vor.
6. Wenn Sie die Taste einmal drücken, wird die Zahl um eine Einheit verringert. Wenn Sie die
Taste gedrückt halten, laufen die Zahlen schnell rückwärts.
7. Drücken Sie die Taste zum Ein-/Ausschalten der Weckfunktion.
8. Nach Abschluss der Weckzeiteinstellung wird die Weckfunktion automatisch aktiviert.
9. Wenn 20 Sekunden lang keine Eingabe erfolgt, wird die Einstellung gespeichert, und der
Einstellmodus wird beendet.
WECKFUNKTION EIN-/AUSSCHALTEN
1. Wenn die nächste bevorstehende Weckzeit angezeigt wird, drücken Sie die Taste , um
diese Weckfunktion ein-/auszuschalten. Zur Kennzeichnung der angezeigten Weckzeit blinkt
(1–5) oder (6–7).
2. Drücken Sie die Taste , um in den Weckmodus zu wechseln. Die Weckzeit für Montag bis
Freitag wird angezeigt, und (1–5) blinkt.
3. Drücken Sie die Taste , um die Weckfunktion für Montag bis Freitag auszuschalten
4. Drücken Sie die Taste erneut, um die Weckzeit für Samstag und Sonntag anzuzeigen. (6–7)
blinkt.
5. Drücken Sie die Taste , um die Weckfunktion für Samstag und Sonntag auszuschalten.
BETRIEB
1. Das Wecksignal ertönt zur eingestellten Weckzeit.
2. Sie können das Wecksignal beenden, indem Sie eine beliebige Taste drücken. Oder drücken Sie
die Taste , um den Wecker für 8 Minuten zu verzögern.
3. Wenn Sie keine Taste drücken, um das Wecksignal zu beenden, schaltet es sich nach 5 Minuten
automatisch aus.
4. Der Wecker gibt beim Erreichen der nächsten Weckzeit wieder das Wecksignal aus, wenn Sie
die Weckfunktion nicht im Weckmodus ausschalten.
PROJEKTION
Der Projektor zeigt die Uhrzeit auf der Zimmerdecke oder Wand an und kann um 180 geschwenkt
werden. In einem abgedunkelten Raum ist die Projektion besser zu sehen. Die beste Projektionsschärfe
erzielen Sie, indem Sie das Gerät 1,5 – 2 m von der Wand oder Decke entfernt aufstellen.
1. Drücken Sie die Taste , um die Hintergrundbeleuchtung und die Projektion 5 Sekunden lang zu
aktivieren.
2. Halten Sie die Taste gedrückt, um das Projektions-Display um 180 zu drehen.
3. Halten Sie die Taste gedrückt, um die Projektion bei Netzstromspeisung dauerhaft oder bei
Batteriespeisung 5 Minuten lang zu aktivieren. Halten Sie die Taste erneut gedrückt, um die
Projektion wieder zu deaktivieren
VORSICHTSMASSNAHMEN
Gefahren für Kinder
Das Verschlucken von Batterien kann lebensgefährliche Folgen haben. Bewahren Sie die
Projektionsuhr und Batterien bitte außerhalb der Reichweite von Kindern auf. Wenn eine Batterie
verschluckt wurde, muss sofort medizinische Hilfe geholt werden.
Halten Sie Kinder vom Verpackungsmaterial und den Kleinteilen im Lieferumfang fern.
Erstickungsgefahr bei Verschlucken.
Verletzungsgefahr
Vorsicht: Bei unsachgemäßem Umgang mit Batterien besteht Explosionsgefahr. Batterien dürfen
nicht aufgeladen, anderweitig reaktiviert, zerlegt, ins Feuer geworfen oder kurzgeschlossen werden.
Vermeiden Sie Kontakt mit der Haut, den Augen und Schleimhäuten. Bei Berührung von
Batteriesäure die betroffenen Bereiche sofort gründlich mit frischem Wasser abspülen und sofort
einen Arzt konsultieren.
Vorsicht – Sachschäden
Schützen Sie die Projektionsuhr vor Staub, Aufprall, extremen Temperaturen und direkter
Sonneneinstrahlung. Schützen Sie die Projektionsuhr auch vor Feuchtigkeit. Verwenden Sie die
Projektionsuhr nur in trockenen, geschlossenen Räumen.
Entfernen Sie die Batterien aus der Projektionsuhr, wenn sie leer sind oder wenn Sie die
Projektionsuhr für einen längeren Zeitraum nicht verwenden.
Setzen Sie die Batterien keinen extremen Bedingungen aus, indem Sie sie z. B. auf einem
Heizkörper oder unter direkter Sonneneinstrahlung positionieren.
Reinigen Sie ggf. vor dem Einlegen der Batterien deren Kontakte und die Kontakte am Gerät.
Verwenden Sie nur Batterien des gleichen Typs. Verwenden Sie nicht verschiedene Arten von
Batterien oder gebrauchte und neue Batterien zusammen.
Nehmen Sie keine Änderungen an dem Gerät vor. Lassen Sie Reparaturen nur durch eine
professionelle Werkstatt durchführen.
Verwenden Sie keine scharfen, kratzenden oder scheuernden Reinigungsmittel für die
Projektionsuhr. Dadurch könnte die Oberfläche beschädigt werden.
TECHNISCHE DATEN
L x B x H 100 x 25 x 75 mm
Gewicht (Gerät) 97 g (ohne Batterien)
Temperaturanzeige -10 ℃ bis +50 ℃
Genauigkeit 0 ℃ bis +40 ℃: +/- 1,5 ℃
<0 ℃ und >+40 ℃: +/- 2 ℃
Auflösung 0,1 ℃
Stromspeisung 2 Micro-Batterien (R03/AAA/1,5 V)
5 V-USB-Adapter (nicht im
Lieferumfang enthalten)
HINWEIS:
Bei Temperaturen unter -10 ℃ zeigt die Temperaturanzeige LL.L an. Bei Temperaturen über 50 ℃
zeigt die Temperaturanzeige HH.H an.
Während des Wecktons und des Funksignal-Empfangsvorgangs wird die Temperaturerfassung
unterbrochen.
HINWEIS: Änderungen der technischen Daten des Produkts und des Inhalts der Bedienungsanleitung
ohne Vorankündigung bleiben vorbehalten.
EU-KONFORMITÄTSERKLÄRUNG
Entsorgung:
Richtlinie 2012/19/EC zur Behandlung, Sammlung, Wiederverwertung und Entsorgung von
Elektro- und Elektronikgeräten und deren Bestandteile (waste electrical and electronic
equipment –WEEE).
Das durchkreuzte Symbol eines Müllcontainers weist darauf hin, dass das Gerät nicht im
Haushaltsmüll entsorgt werden darf, sondern in dafür ausgerüsteten Sammelzentren zur
sachgemäßen Wiederverwertung bzw. Entsorgung abzugeben ist.
Richtlinien:
Wir erklären, dass dieses Gerät in Übereinstimmung mit den geltenden Regeln und
Vorschriften hergestellt wurde.

INTRODUCTION
Nous vous remercions d'avoir acheté l'horloge à projection. Veuillez lire attentivement les informations
suivantes et conservez ces instructions, au cas où vous auriez besoin de vous y référer. Si vous offrez
ce produit, veuillez également inclure ces instructions.
L'horloge radio-pilotée à projection (ou horloge à projection) affiche la température de la salle dans
laquelle elle se trouve. Elle affiche également la date, l'heure et le jour de la semaine et possède aussi
une fonction d'alarme. Cette horloge est impropre à l'usage commercial pour les prévisions
météorologiques ou pour les mesures de données de température.
CONTENU DE L'EMBALLAGE
Unité principale Câble d'alimentation
2 piles AAA pour
l'unité principale
VUE D'ENSEMBLE 1. : appuyez sur cette touche pour répéter une alarme ou activer
le rétroéclairage et la projection. Appuyez et maintenez enfoncé pour
activer / désactiver la projection.
2. Lentille de projection
3. : en mode de date, appuyez sur cette touche pour activer/
désactiver la zone. Dans le mode heure d'alarme, appuyez sur cette
touche pour activer/désactiver l'alarme. Maintenez cette touche
enfoncée pour entrer l'heure et la date.
4. : appuyez sur cette touche pour afficher l'heure d'alarme de l'alarme
1-5 et l'alarme 6-7. Maintenez cette touche enfoncée pour entrer le
paramètre d'alarme.
5. : appuyez sur cette touche pour basculer entre l'affichage de la
température et l'affichage du jour de la semaine. Maintenez cette
touche enfoncée pour lancer la réception du signal de pilotage radio.
En mode de réglage, appuyez sur cette touche pour augmenter d'une
unité ou maintenez-la enfoncée pour augmenter rapidement.
6. : appuyez sur cette touche pour basculer entre la date et l'heure
d'alarme à venir la plus proche. En mode de projection, appuyez sur
cette touche et maintenez-la enfoncée pour pivoter l'affichage de la
projection à 180 . En mode de réglage, appuyez sur cette touche pour
réduire d'une unité ou maintenez-la enfoncée pour diminuer rapidement.
7. Prise d'alimentation.
8. Compartiment de la batterie. Faites coulisser vers le bas pour l'ouvrir.
ÉCRAN LCD 1. Affichage de l'heure
2. Affichage de la date ou de l'heure d'alarme
3. Affichage de la température ou du jour de la semaine
Signal de pilotage radio reçu
Alarme activée
Heure d'été activée
Fonction Snooze activée
Indicateur de batterie faible
Mode de température
MISE EN ROUTE
INSERTION DES PILES
1. Enlevez le couvercle du compartiment à piles situé à l'arrière.
2. Insérez 2 piles R03 (AAA) / 1,5 V. Vérifiez la polarité (+/-) des piles.
3. Remettez le couvercle du compartiment.
REMARQUE : remplacez les piles lorsque s'affiche ou lorsque l'écran est sombre.
ALIMENTATION CC
Branchez le câble d'alimentation à la prise d'alimentation et branchez la fiche USB à un adaptateur
d'alimentation USB 5 V (non fourni).
REMARQUE : il est suggéré d'insérer des piles comme source d'alimentation de
secours.
HORLOGE
RÉCEPTION DE L'HORLOGE
1. Remplacez les piles ou appuyez sur la touche pour lancer la réception du signal de pilotage radio.
2. La réception du signal peut se faire en mode de date et d'alarme.
3. La durée du processus de réception est de 7 minutes.
4. Au cours du processus de réception, le logo du signal clignote.
5. Au cours du processus de réception, appuyez sur la touche pour arrêter la réception. Les autres
boutons fonctionnent normalement.
6. Si le processus aboutit, le logo de pilotage s'affiche définitivement à l'écran. S'il échoue dans un
délai de 7 minutes, le paramétrage du pilotage sera automatiquement annulé.
7. La réception démarre automatiquement à 2h03, 3h03, 4h03, 5h03 toutes les nuits. La fonction de
réception automatique s'arrête si elle aboutit au premier essai.
Front
back
Le signal de pilotage dépend du modèle :
Région Signal
Union Européenne DCF
Royaume-Uni MSF
REMARQUE : veuillez augmenter la distance entre l'unité principale et l'adaptateur d'alimentation pour
éviter les interférences lors de la réception du signal de pilotage.
RÉGLAGE MANUEL DE L'HORLOGE
1. Appuyez et maintenez la pression sur la touche , entrez l'heure et la date
2. Séquence de réglage : Langue du jour de la semaine 12/24 h Année (2000 - 2099) Format
de la date Mois Date Heure Minute Zone ℃/℉ sortie
3. Pendant le paramétrage, le paramètre en cours de réglage clignote.
4. Appuyez sur la touche pour confirmer le réglage et passer au paramètre suivant.
5. Appuyez une fois sur la touche . Le chiffre augmente d'une unité (lors du réglage des minutes, les
secondes sont remises à 0). Appuyez sur la touche et maintenez-la enfoncée. Les chiffres
augmentent rapidement.
6. Appuyez une fois sur la touche . Le chiffre diminue d'une unité (lors du réglage des minutes, les
secondes sont remises à 0). Appuyez sur la touche et maintenez-la enfoncée. Les chiffres
diminuent rapidement.
7. Si aucune action n'est entreprise dans les 20 secondes, le paramètre est enregistré et vous fait quitter
le mode de réglage.
Affichage des jours de la semaine en cinq langues : GER, ENG, FRE, ITA, DUT.
Symbol Lundi Mardi Mercredi Jeudi
Vendredi
Samedi
Dimanche
Allemand GER MON DIE MIT DON FRE SAM SON
Anglais ENG MON TUE WED THU FRI SAT SUN
Français FRE LUN MAR MER JEU VEN SAM DIM
Italien ITA LUN MAR MER GIO VEN SAB DOM
Néerlandais
DUT MAA DIN WOE DON VRI ZAI ZON
o
o
o
ALARME
CONFIGURATION / RÉGLAGE DE L'HEURE D'ALARME
1. Appuyez et maintenez la touche , puis entrez le réglage d'alarme.
2. Séquence de réglage : heure du lundi au vendredi minute du lundi au vendredi heure en
week-end minute en week-end sortie
3. Pendant le paramétrage, le paramètre en cours de réglage clignote.
4. Appuyez sur la touche pour confirmer le réglage et passer au paramètre suivant.
5. Appuyez une fois sur la touche . Le chiffre augmente d'une unité. Appuyez sur la touche
et maintenez-la enfoncée. Les chiffres augmentent rapidement.
6. Appuyez une fois sur la touche . Le chiffre diminue d'une unité. Appuyez sur la touche
et maintenez-la enfoncée. Les chiffres diminuent rapidement.
7. Appuyez sur la touche pour activer/désactiver l'alarme.
8. L'alarme s'active automatiquement une fois sa configuration terminée.
9. Si aucune action n'est entreprise dans les 20 secondes, le paramètre est enregistré et vous fait
quitter le mode de réglage.
ACTIVATION / DÉSACTIVATION DE L'ALARME
1. Lors de l'affichage de l'heure d'alarme à venir la plus proche, appuyez une fois sur la touche pour
activer / désactiver cette alarme. (1-5) ou (6-7) clignote pour indiquer quelle alarme est concernée.
2. Appuyez une fois sur la touche pour passer en mode d'alarme. L'heure d'alarme du lundi au
vendredi s'affiche ; (1-5) clignote.
3. Appuyez une fois sur la touche pour activer/désactiver l'alarme du lundi au vendredi.
4. Appuyez à nouveau sur la touche pour afficher l'heure d'alarme du samedi au dimanche. (6-7)
clignote.
5. Appuyez une fois sur la touche pour activer / désactiver l'alarme du samedi au dimanche.
FONCTIONNEMENT
1. À l'heure définie, le signal d'alarme sonne.
2. Lors de la sonnerie, appuyez sur n'importe quelle touche pour arrêter l'alarme. Sinon, vous pouvez
appuyer sur la touche pour retarder l'alarme de 8 minutes.
3. Si vous n'appuyez sur aucun bouton pour arrêter l'alarme, elle s'éteint automatiquement après 5
minutes.
4. L'alarme sonnera à nouveau à la prochaine heure d'alarme prévue, sauf si vous avez désactivé la
fonction d'alarme dans le mode d'alarme.
PROJECTION
Le projecteur affiche l'heure au plafond ou au mur et il peut pivoter à 180 . L'affichage est plus visible
dans une pièce sombre. Pour une projection optimale, placez l'unité à 1,5 - 2 m du plafond ou du mur.
1. Appuyez sur la touche pour activer le rétroéclairage et la projection pendant 5 secondes.
2. Appuyez sur la touche et maintenez-la enfoncée pour faire basculer l'affichage de projection de
180 .
3. Appuyez sur la touche et maintenez-la enfoncée pour activer la projection en continu (en cas
d'utilisation d'un adaptateur de courant) ou la projection pendant 5 minutes (en cas d'utilisation de
piles). Appuyez à nouveau sur la touche et maintenez-la enfoncée pour éteindre la projection.
PRÉCAUTIONS
Dangers pour les enfants
Les piles peuvent présenter un danger mortel en cas d'ingestion. Veuillez mettre l'horloge à
projection et les piles hors de portée des enfants. En cas d'ingestion de pile, contactez
immédiatement un médecin.
Éloignez les enfants des matériaux d'emballage et des petites pièces liés à la livraison. Risque de
suffocation en cas d'ingestion.
Risque de blessures
Attention : risque d'explosion en cas de mauvaise manipulation des piles. Les piles ne doivent pas
être chargées, réactivées par d'autres moyens, démantelées, jetées au feu ou court-circuitées.
Éviter tout contact avec la peau, les yeux et les muqueuses. En cas de contact avec l'acide des
piles, rincer immédiatement les zones touchées avec beaucoup d'eau claire et consulter
immédiatement un médecin.
Attention : dommages matériels
Protéger l'horloge à projection de la poussière, des chocs, des températures extrêmes et d'une
exposition directe au soleil. Protéger également l'horloge à projection de l'humidité. Installer
l'horloge à projection dans un endroit sec et clos.
Retirer les piles de l'horloge à projection si elles sont épuisées ou si vous n'utilisez pas l'horloge
pendant une durée prolongée.
Ne pas exposer les piles à des conditions extrêmes, par exemple en les plaçant sur un radiateur
ou à la lumière directe du soleil.
Nettoyer les piles et les contacts de l'appareil avant insertion, le cas échéant.
Utiliser des piles de même modèle. Ne pas utiliser de modèles différents ou des piles neuves et
usagées ensemble.
Ne pas effectuer de modifications sur l'appareil. Les réparations doivent être exclusivement
réalisées par un professionnel.
Ne pas utiliser de détergents abrasifs, d'ustensiles de nettoyage durs ou abrasifs ou tout outil
similaire pour le nettoyage de l'horloge à projection. Cela pourrait rayer les surfaces.
SPÉCIFICATIONS
L x P x H 100 x 25 x 75 mm
Poids (unité principale) 97 g (sans les piles)
Plage d'affichage de la température -10°C à +50°C (14℉ à 122℉)
Précision 0°C à +40°C : +/- 1,5 ℃ (+/-3℉)
<0 ℃ et >+40℃ : +/- 2℃ (+/-4℉)
Résolution 0,1℃ (0,2℉)
Alimentation 2 piles R03 (AAA) 1,5 V
Adaptateur USB 5 V (non fourni)
REMARQUE :
Lorsque la température est inférieure à -10°C (14℉), l'écran de température affiche LL.L.
Lorsque la température est supérieure à 50℃ (122℉), l'écran de température affiche HH.H.
Lors de la sonnerie de l'alarme ou du processus de réception du signal de pilotage, la détection
de la température est interrompue.
REMARQUE :les spécifications techniques de ce produit et le contenu du manuel d'utilisation sont
sujets à modification sans préavis.
EU - DÉCLARATION DE CONFORMITÉ
Traitement des déchets:
Directive 2012/19/EC relative aux déchets d’équipements électriques et électroniques
(WEEE) concernant la collecte sélective, le traitement de certains composants et la
valorisation des déchets par recyclage (waste electrical and electronic equipment –WEEE).
Le symbole barré d’un conteneur signale que l’appareil ne doit pas être collecté avec les déchets
ménagers, mais doit être rendu aux centres de collecte équipés, chargés du recyclage ou de
l’élimination conforme.
Directives :
Nous déclarons que cet appareil a été fabriqué conformément aux règles et règlements
applicables.

INTRODUCCIÓN
Gracias por adquirir este reloj de proyección. Lea atentamente la siguiente información y conserve
este manual en caso de que necesite consultarlo en un futuro. Si cede a un tercero este producto,
incluya también estas instrucciones.
Este reloj de proyección de radiocontrol (reloj de proyección) muestra la temperatura interior de su
entorno. También muestra la fecha, la hora y el día de la semana y cuenta con función de alarma. El
reloj de proyección no es adecuado para uso comercial, previsiones meteorológicas o medición de
los datos de temperatura.
CONTENIDOS DEL PAQUETE
Unidad principal Cable de alimentación
2 pilas AAA para la
unidad principal
DESCRIPCIÓN GENERAL
PANTALLA LCD
1. Hora
2. Fecha o alarma
3. Temperatura o día de la semana
Señal RCC recibida
Alarma ACTIVADA
DST ACTIVADO
Silenciar activado
Indicador de batería baja
Modo de temperatura
PRIMEROS PASOS
INTRODUZCA LAS PILAS
1. Retire la tapa del compartimento de las pilas de la parte posterior.
2. Introduzca 2 pilas R03 (AAA)/ de 1,5 V Asegúrese de que coloca las pilas orientadas con la polaridad
correcta (+/-).
3. Vuelva a colocar la tapa del compartimento.
NOTA: Sustituya las pilas cuando aparezca el icono o se atenúe la pantalla.
ALIMENTACIÓN CC
Enchufe el cable de alimentación en la toma de alimentación y el conector USB en un adaptador de
alimentación USB de 5 V (no incluido).
NOTA: Se sugiere insertar unas pilas como fuente de alimentación de apoyo.
RELOJ
RECEPCIÓN DEL RELOJ
1. Sustituir las pilas o pulsar el botón iniciará la recepción RCC.
2. Puede usarse tanto en modo de fecha como en modo de alarma.
3. La duración máxima del proceso de recepción es de 7 minutos.
4. Durante el proceso, el icono de la señal RCC parpadeará.
5. Durante el proceso, pulse el botón para salir del modo de recepción, el resto de los botones
funcionará de la manera habitual.
6. Si el proceso tiene éxito, aparecerá el icono de RCC completado en la pantalla. Si después de 7
minutos no se ha conseguido recepción RCC, el reloj saldrá del modo RCC automáticamente.
7. La recepción RCC se iniciará automáticamente todas las noches a las 02:03, 04:03, 05:03. La
función de recepción automática se detendrá si tiene éxito una vez.
Front
back
Cada modelo recibe una señal RCC distinta:
Región Señal
UE DCF
Reino Unido MSF
NOTA: Aumente la separación entre la unidad principal y el adaptador de alimentación para evitar
interferencias con la señal RCC:
AJUSTE MANUAL DEL RELOJ
1. Mantenga pulsado el botón para entrar en el modo de ajuste de la hora y la fecha
2. Secuencia del modo de ajuste: Idioma de día de la semana 12/24 horas año (2000 a 2099)
formato de fecha mes fecha hora minuto zona ℃/℉ salir
3. Cada parámetro parpadeará cuando lo esté ajustando.
4. Pulse el botón para confirmar el ajuste y pasar al siguiente parámetro
5. Pulse el botón una vez para aumentar la cifra en 1 unidad (al ajustar los minutos, los segundos
pasarán a 0). Mantenga pulsado el botón para aumentar la cifra rápidamente.
6. Pulse el botón una vez para reducir la cifra en 1 unidad (al ajustar los minutos, los segundos
pasarán a 0). Mantenga pulsado el botón para reducir la cifra rápidamente.
7. Si no se realiza ninguna acción en 20 segundos, el ajuste quedará guardado y se saldrá del modo
de ajuste.
Los días de la semana pueden mostrarse en cinco idiomas: GER, ENG, FRE, ITA, DUT.
Símbolo Lunes Martes Miércoles Jueves Viernes Sábado Domingo
Alemán GER MON DIE MIT DON FRE SAM SON
Inglés ENG MON TUE WED THU FRI SAT SUN
Francés FRE LUN MAR MER JEU VEN SAM DIM
Italiano ITA LUN MAR MER GIO VEN SAB DOM
Holandés DUT MAA DIN WOE DON VRI ZAI ZON
o
AJUSTE DE HORA DE LA ALARMA
1. Mantenga pulsado el botón para entrar en el modo de ajuste de la alarma
2. Secuencia del modo de ajuste: hora (lunes a viernes) minuto (lunes a viernes) hora (fin de
semana) minuto (fin de semana) salir
3. Cada parámetro parpadeará cuando lo esté ajustando.
4. Pulse el botón para confirmar el ajuste y pasar al siguiente parámetro
5. Pulse el botón una vez para aumentar la cifra una unidad. Mantenga pulsado el botón
para aumentar la cifra rápidamente.
6. Pulse el botón una vez para reducir la cifra una unidad. Mantenga pulsado el botón para
reducir la cifra rápidamente.
7. Pulse el botón para encender o apagar la alarma
8. La alarma se encenderá automáticamente cuando finalice el ajuste.
9. Si no se realiza ninguna acción en 20 segundos, el ajuste quedará guardado y se saldrá del modo
de ajuste.
ENCENDER/APAGAR LA ALARMA
1. Cuando en pantalla se muestre la próxima alarma, pulse el botón una vez para encender o
apagar dicha alarma. Parpadeará el indicador (1-5) o (6-7) para indicar cuál de las alarmas se está
mostrando (de lunes a viernes o fin de semana, respectivamente).
2. Pulse el botón una vez para pasar al modo de alarma. Se mostrará la hora de la alarma de
lunes a viernes (1-5), parpadeando.
3. Puse el botón una vez para encender/apagar la alarma de lunes a viernes
4. Pulse el botón de nuevo para mostrar la hora de alarma de fin de semana. Parpadeará el
mensaje (6-7).
5. Pulse el botón una vez para encender/apagar la alarma de fin de semana.
FUNCIONAMIENTO
1. La alarma sonará a la hora indicada.
2. Mientras suena la alarma, pulse cualquier botón para detenerla. También puede pulsar el botón
para retrasar la alarma 8 minutos.
3. Si no se pulsa ningún botón para detener la alarma, se detendrá automáticamente transcurridos 5
minutos.
4. La alarma volverá a sonar a la siguiente hora programada, a menos que se apague en el modo de
alarma.
PROYECCIÓN
El proyector muestra la hora en el techo o la pared y la proyección puede girarse 180 . Es más fácil
de ver en habitaciones oscuras. Para una proyección óptima, coloque la unidad a entre 1,5 y 2 m de
distancia del techo o la pared.
1. Pulse el botón para activar la retroiluminación y la proyección durante 5 segundos.
2. Mantenga pulsado el botón para girar la imagen proyectada 180
3. Mantenga pulsado el botón para alternar entre proyección continua, si el dispositivo está
enchufado con un adaptador de alimentación, o proyección durante 5 minutos, si se está usando la
alimentación solo por pilas. Mantenga pulsado de nuevo el botón para apagar la proyección y
desactivar el modo de proyección continuo
PRECACUCIONES
Peligro para niños
Las pilas pueden provocar daños serios si se tragan. Mantenga el reloj de proyección y las pilas
fuera del alcance de los niños. En caso de que alguien se trague una pila, busque asistencia
médica de inmediato.
Mantenga el embalaje y las piezas pequeñas fuera del alcance de los niños. Pueden provocar
asfixia si se tragan.
Peligro de lesión
Precaución: Una manipulación inadecuada de las pilas podría provocar una explosión. No cargue,
reactive de cualquier otro modo, desmantele, coloque sobre una llama ni cortocircuite las pilas.
Evite el contacto con la piel, los ojos y las membranas mucosas. Si alguna parte del cuerpo entra
en contacto con el ácido que contienen las pilas, aclare de inmediato las zonas afectadas con
agua y póngase en contacto con un médico.
Precaución: daños al dispositivo
Proteja el reloj de proyección del polvo, los golpes, las temperaturas extremas y la luz solar
directa. Proteja también el reloj de proyección de la humedad. Coloque el reloj de proyección
únicamente en un espacio cerrado y seco.
Extraiga las pilas del reloj de proyección si se agotan o no usa el dispositivo durante un periodo
prolongado.
No exponga las pilas a condiciones extremas, por ejemplo colocándolas sobre un radiador o bajo
la luz solar directa.
Limpie los contactos de las pilas y el aparato antes de introducir las pilas si fuera necesario.
Use siempre el mismo tipo de pilas. No mezcle pilas distintas ni pilas nuevas con pilas usadas.
No modifique el dispositivo. Solo debe realizar cualquier tipo de mantenimiento un taller
profesional.
Para limpiar el reloj de proyección, evite detergentes abrasivos y útiles que pudieran rayar su
superficie.
ESPECIFICACIONES
L x A x P 100 x 25 x 75 mm
Peso (unidad principal) 97g (sin pilas)
Intervalo de temperaturas que
puede mostrar la pantalla
Precisión
Entre 0 ℃ y +40 ℃: +/- 1,5℃ (+/-3℉)
<0 ℃ y >+40 ℃: +/- 2 ℃ (+/-4 ℉)
Incrementos 0,1 ℃ (0,2 ℉)
Alimentación 2 pilas R03 (AAA) de 1,5 V
Adaptador USB de 5 V (no incluido)
NOTA:
Cuando la temperatura es inferior a -10 ℃ (14 ℉), en la pantalla la temperatura se muestra como
LL.L. Cuando la temperatura es superior a 50 ℃ (122 ℉), en la pantalla la temperatura se muestra
como HH.H.
Mientras suena la alarma o durante el proceso de recepción RCC se detiene la detección de la
temperatura.
NOTA: Las especificaciones técnicas de este producto y los contenidos del manual de usuario
podrían sufrir cambios sin previo aviso.
UE - DECLARACIÓN DE CONFORMIDAD
La retirada:
Directiva 2012/19/EC sobre el tratamiento, recogida, reciclaje y eliminación de aparatos
eléctricos y electrónicos y sus componentes (Residuos de aparatos eléctricos y electrónicos
- WEEE).
El símbolo tachado de un contenedor de basura indica que el aparato no puede depositarse en un
cubo para residuos domésticos; en su lugar, debe llevarse a un centro de recogida debidamente
equipado para su reciclaje o eliminación.
Las directivas:
Declaramos que este dispositivo ha sido fabricado conforme a las normas y reglamentos
aplicables.
o
o
1. -Pulsar para silenciar una alarma o activar la retroiluminación y
proyección. Mantener pulsado para encender o apagar la proyección.
2. Lente de proyección
3. -En modo fecha, pulsar para activar o desactivar la zona. En
modo alarma, pulsar para encender o apagar la alarma. Mantener
pulsado para ajustar la hora y la fecha.
4. -Pulsar para mostrar la hora de las alarmas de lunes a viernes
(1-5) y las alarmas de fin de semana (6-7) Mantener pulsado para
entrar en el modo de ajuste de la alarma.
5. -Pulsar para alternar entre visualización de temperatura y de
día de la semana. Mantener pulsado para iniciar la recepción de
señal RCC. En el modo de ajuste, pulsar para aumentar una unidad,
mantener pulsado para aumentar rápidamente.
6. -Pulsar para alternar entre fecha y la hora de alarma más
próxima. En modo de proyección, mantener pulsado para girar la
imagen de la proyección 1800. En el modo de ajuste, pulsar para
reducir una unidad, mantener pulsado para reducir rápidamente.
7. Toma de alimentación.
8. Compartimento de las pilas. Deslizar para abrir.
Entre -10 ℃ y +50 ℃ (14 ℉ y 122 ℉)

INTRODUZIONE
Grazie per aver acquistato l'orologio con proiezione. Leggere attentamente le seguenti informazioni e
conservarle per riferimento futuro in caso di necessità.
L'orologio radiocontrollato con proiezione (orologio con proiezione) visualizza la temperatura degli
spazi interni circostanti. Visualizza inoltre la data, l'ora e il giorno della settimana, oltre a disporre di
una funzione di sveglia. L'orologio con proiezione non è adatto per scopi commerciali relativi a
previsioni meteorologiche o misurazione dei dati della temperatura.
CONTENUTO DELLA CONFEZIONE
Unità principale Cavo di alimentazione
2 batterie AAA per
unità principale
PANORAMICA 1. - Premere per posporre una sveglia o attivare la retroilluminazione
e la proiezione. Premere e tenere premuto per attivare/disattivare la
proiezione.
2. Lente di proiezione
3. - In modalità Sveglia, premere per attivare/disattivare la sveglia.
Premere e tenere premuto per immettere le impostazioni di data e ora.
4. - Premere per visualizzare l'orario della sveglia per Sveglia 1-5 e
Sveglia 6-7. Premere e tenere premuto per immettere le impostazioni
della sveglia.
5. - Premere per passare dalla visualizzazione della temperatura a
quella del giorno della settimana e viceversa. Premere e tenere premuto
per avviare la ricezione del segnale RCC. Nella modalità di
impostazione, premere per aumentare di un'unità, tenere premuto per
aumentare rapidamente.
6. - Premere per passare dalla data all'orario di sveglia più prossimo
e viceversa. In proiezione, premere e tenere premuto per ruotare il
display di proiezione di 180 . In modalità di impostazione, premere per
ridurre di un'unità, tenere premuto per ridurre rapidamente.
7. Jack di alimentazione.
8. Vano batteria. Scorrere verso il basso per aprire.
DISPLAY LCD 1. Display dell'ora
2. Display della data o display dell'orario della sveglia
3. Display della temperatura o display del giorno della settimana
Segnale RCC ricevuto
Sveglia ATTIVA
Ora legale ATTIVA
Ripetizione attivata
Indicatore di batteria scarica
Modalità di temperatura
INTRODUZIONE
INSERIRE LE BATTERIE
1. Rimuovere lo sportellino della batteria dal retro
2. Inserire 2 batterie R03 (AAA)/1,5 V. Accertarsi di inserire le batterie con la corretta polarità (+/-).
3. Rimontare lo sportellino della batteria.
NOTA: sostituire le batterie quando viene visualizzato o quando il display si spegne.
ALIMENTAZIONE CC
Collegare il cavo di alimentazione al jack di alimentazione e collegare la spina USB a un adattatore di
alimentazione USB da 5 V (non incluso).
NOTA: si consiglia di inserire le batterie come fonte di alimentazione di backup.
OROLOGIO
RICEZIONE OROLOGIO
1. Inserire le batterie o premere il pulsante per iniziare la ricezione RCC.
2. La ricezione RCC si attiva.
3. La durata del processo di ricezione è di 7 minuti.
4. Durante il processo di ricezione, il simbolo del segnale RCC lampeggia.
5. Per disattivare o riattivare la ricezione RCC, premere il pulsante
6. Se il processo viene eseguito correttamente, il simbolo di RCC completato viene visualizzato sul
display. Se non viene completato entro 7 minuti, l'impostazione RCC verrà disattivata automaticamente.
7. La ricezione RCC inizia automaticamente alle ore 2:03, 3:03, 4:03, 5:03 ogni notte. La funzione di
ricezione automatica viene interrotta non appena viene completata correttamente.
Front
back
Modelli diversi ricevono segnali RCC differenti:
Regione Segnale
Unione Europea DCF
Regno Unito MSF
IMPOSTARE L'OROLOGIO MANUALMENTE
1. Premere e tenere premuto il pulsante , immettere le impostazioni di data e ora
2. Sequenza di impostazione: Giorno della settimana nella lingua impostata 12/24 ore Anno (2000
- 2099) Formato data Mese Data Ora Minuto Fuso orario ℃/℉ esci
3. Durante l'impostazione, il relativo parametro lampeggia.
4. Premere il pulsante per confermare l'impostazione e immettere il parametro successivo
5. Premere il pulsante per incrementare / modificare il dato rapidamente.
6. Premere il pulsante per decrementare / modificare il dato.Premere e tenere premuto il pulsante
, le cifre diminuiranno rapidamente.
7. Se non viene eseguita alcuna azione in 20 secondi, l'impostazione viene salvata e la modalità di
impostazione viene chiusa.
Visualizzazione del giorno della settimana in cinque lingue: GER, ENG, FRE, ITA, DUT.
Simbolo Lunedì Martedì Mercoledì Giovedì
Venerdì
Sabato
Domenica
Tedesco GER MON DIE MIT DON FRE SAM SON
Inglese ENG MON TUE WED THU FRI SAT SUN
Francese FRE LUN MAR MER JEU VEN SAM DIM
Italiano ITA LUN MAR MER GIO VEN SAB DOM
Olandese
DUT MAA DIN WOE DON VRI ZAI ZON
o
o
o
SVEGLIA
IMPOSTAZIONE/REGOLAZIONE ORARIO SVEGLIA
1. Premere e tenere premuto il pulsante , immettere le impostazioni della sveglia
2. Sequenza di impostazione: ora giorno feriale minuto giorno feriale ora giorno fine settimana
minuto giorno fine settimana Feriale (1-5) / Festivo (6-7)
3. Durante l'impostazione, il relativo parametro lampeggia.
4. Premere il pulsante per confermare l'impostazione e immettere il parametro successivo
8. Premere il pulsante una volta, la cifra aumenta di 1 unità. Premere e tenere premuto il pulsante
, le cifre aumenteranno rapidamente.
5. Premere il pulsante una volta, la cifra diminuisce di 1 unità. Premere e tenere premuto il pulsante
, le cifre diminuiranno rapidamente.
6. Premere il pulsante per attivare/disattivare la sveglia
7. La sveglia si attiva automaticamente quando termina l'impostazione della sveglia.
8. Se non viene eseguita alcuna azione in 20 secondi, l'impostazione viene salvata e la modalità di
impostazione viene chiusa.
ATTIVARE/DISATTIVARE LA SVEGLIA
1. Quando viene visualizzato l'orario che più si avvicina a quello della sveglia, premere il pulsante
una volta per attivare/disattivare quella sveglia. (1-5) o (6-7) lampeggia ad indicare quale sveglia è
visualizzata.
2. Premere il pulsante una volta per passare alla modalità sveglia. L'orario della sveglia da lunedì a
venerdì viene visualizzato e (1-5) lampeggia.
3. Premere il pulsante una volta per attivare/disattivare la sveglia da lunedì a venerdì
4. Premere nuovamente il pulsante per mostrare l'orario della sveglia da sabato a domenica. (6-7)
lampeggia.
5. Premere il pulsante una volta per attivare/disattivare la sveglia da sabato a domenica.
FUNZIONAMENTO
1. All'orario impostato, il segnale della sveglia suona.
2. Quando la sveglia sta suonando, premere un pulsante qualsiasi per interromperla. Oppure, premere il
pulsante per ritardare l'allarme di 8 minuti.
3. Se non si preme alcun pulsante per interrompere la sveglia, essa si disattiva automaticamente dopo 5
minuti.
4. La sveglia si riattiva al successivo orario impostato, a meno che non venga disattivata la funzione
sveglia nella modalità sveglia.
PROIEZIONE
Il proiettore visualizza l'orario sul soffitto o sulla parete e può ruotare di 180 . La visualizzazione è
migliore in una stanza più buia. Per risultati di proiezione ottimali, posizionare l'unità entro 1,5 - 2 m dal
soffitto o dalla parete.
1. Premere il pulsante per attivare la retroilluminazione e la proiezione per 5 secondi.
2. Quando la proiezione è attiva Premere e tenere premuto il pulsante per ruotare il display di
proiezione di 180
3. Premere e tenere premuto il pulsante , si attiva la proiezione continua se si utilizza un
alimentatore elettrico e si attiva la proiezione per 5 minuti se si utilizza solo l'alimentazione a batterie.
Premere e tenere premuto nuovamente il pulsante , si disattiva la proiezione, anche quella
continua.
PRECAUZIONI
Pericoli per i bambini
Le batterie possono rappresentare un pericolo per la vita se vengono ingerite. Tenere l'orologio con
proiezione e le batterie lontano dalla portata dei bambini. Se una batteria viene inghiottita, richiedere
immediatamente assistenza medica.
Tenere i bambini lontano dal materiale di imballaggio e dalle piccole parti utilizzate per la consegna.
Pericolo di soffocamento in caso di ingestione.
Pericolo di lesioni
Attenzione: pericolo di esplosione in caso di gestione errata delle batterie. Le batterie non devono
essere caricate o riattivate con altri mezzi, smontate o gettate nel fuoco, o messe in cortocircuito
Evitare il contatto con la pelle, con gli occhi e con le mucose. Quando si entra in contatto con
l'acido della batteria, risciacquare immediatamente le parti interessate con abbondante acqua
pulita e rivolgersi immediatamente a un medico.
Attenzione - Danni alla proprietà
Proteggere l'orologio con proiezione da polvere, urti, temperature estreme, luce solare diretta e
umidità. Posizionare l'orologio con proiezione unicamente in un luogo asciutto e protetto.
Rimuovere le batterie dall'orologio con proiezione una volta esaurite o se non si intende utilizzare
l'orologio con proiezione per un lungo periodo di tempo.
Non esporre le batterie a condizioni estreme, ad esempio posizionandole su un termosifone o
sotto la luce diretta del sole.
Pulire la batteria e i contatti del dispositivo prima di inserirla, se necessario.
Utilizzare lo stesso tipo di batterie. Non utilizzare tipi diversi o batterie nuove e usate
contemporaneamente.
Non eseguire alcuna modifica al dispositivo. Far eseguire le riparazioni solo presso un laboratorio
specializzato.
Non utilizzare mai detergenti duri, che graffiano o abrasivi, o simili, per la pulizia dell'orologio con
proiezione, altrimenti le superfici si potrebbero graffiare.
SPECIFICHE
L x P x A 100 x 25 x 75 mm
Peso (unità principale) 97 g (batterie escluse)
Intervallo di visualizzazione temperatura
Da -10 ℃ a +50 ℃ (da 14 ℉ a 122 ℉)
Precisione Da 0 ℃ a +40 ℃: +/- 1,5 ℃ (+/-3 ℉)
<0 ℃ e >+40 ℃: +/- 2 ℃ (+/-4 ℉)
Risoluzione 0,1 ℃ (0,2 ℉)
Alimentazione 2 batterie R03 (AAA) da 1,5V
Adattatore USB da 5 V (non incluso)
NOTA:
Quando la temperatura è inferiore a -10 ℃ (14 ℉), viene visualizzata come LL.L. Quando la
temperatura è superiore a 50 ℃ (122 ℉), viene visualizzata come HH.H.
Quando la sveglia suona durante il processo di ricezione RCC, il rilevamento della temperatura
viene interrotto.
NOTA: le specifiche tecniche di questo prodotto e il contenuto del Manuale per l'utente sono soggetti
a modifica senza preavviso.
UE - DICHIARAZIONE DI CONFORMITÀ
Smaltimento:
È applicabile la direttiva europea 2012/19/EC sull'uso, la raccolta, il riutilizzo e lo
smaltimento di apparecchiature elettriche ed elettroniche e dei relativi componenti (rifiuti di
apparecchiature elettriche ed elettroniche: WEEE).
Il simbolo di un contenitore per rifiuti barrato da una croce significa che l'apparecchio non può essere
smaltito con la normale spazzatura, ma deve essere portato nei centri di raccolta attrezzati per il
corretto riutilizzo o smaltimento.
Diretive:
Si dichiara che questo apparecchio è stato prodotto nel rispetto delle regole e delle norme
vigenti.

INTRODUZIONE
Grazie per aver acquistato l'orologio con proiezione. Leggere attentamente le seguenti informazioni e
conservarle per riferimento futuro in caso di necessità.
L'orologio radiocontrollato con proiezione (orologio con proiezione) visualizza la temperatura degli
spazi interni circostanti. Visualizza inoltre la data, l'ora e il giorno della settimana, oltre a disporre di
una funzione di sveglia. L'orologio con proiezione non è adatto per scopi commerciali relativi a
previsioni meteorologiche o misurazione dei dati della temperatura.
CONTENUTO DELLA CONFEZIONE
Unità principale Cavo di alimentazione
2 batterie AAA per
unità principale
PANORAMICA 1. - Premere per posporre una sveglia o attivare la retroilluminazione
e la proiezione. Premere e tenere premuto per attivare/disattivare la
proiezione.
2. Lente di proiezione
3. - In modalità Sveglia, premere per attivare/disattivare la sveglia.
Premere e tenere premuto per immettere le impostazioni di data e ora.
4. - Premere per visualizzare l'orario della sveglia per Sveglia 1-5 e
Sveglia 6-7. Premere e tenere premuto per immettere le impostazioni
della sveglia.
5. - Premere per passare dalla visualizzazione della temperatura a
quella del giorno della settimana e viceversa. Premere e tenere premuto
per avviare la ricezione del segnale RCC. Nella modalità di
impostazione, premere per aumentare di un'unità, tenere premuto per
aumentare rapidamente.
6. - Premere per passare dalla data all'orario di sveglia più prossimo
e viceversa. In proiezione, premere e tenere premuto per ruotare il
display di proiezione di 180 . In modalità di impostazione, premere per
ridurre di un'unità, tenere premuto per ridurre rapidamente.
7. Jack di alimentazione.
8. Vano batteria. Scorrere verso il basso per aprire.
DISPLAY LCD 1. Display dell'ora
2. Display della data o display dell'orario della sveglia
3. Display della temperatura o display del giorno della settimana
Segnale RCC ricevuto
Sveglia ATTIVA
Ora legale ATTIVA
Ripetizione attivata
Indicatore di batteria scarica
Modalità di temperatura
INTRODUZIONE
INSERIRE LE BATTERIE
1. Rimuovere lo sportellino della batteria dal retro
2. Inserire 2 batterie R03 (AAA)/1,5 V. Accertarsi di inserire le batterie con la corretta polarità (+/-).
3. Rimontare lo sportellino della batteria.
NOTA: sostituire le batterie quando viene visualizzato o quando il display si spegne.
ALIMENTAZIONE CC
Collegare il cavo di alimentazione al jack di alimentazione e collegare la spina USB a un adattatore di
alimentazione USB da 5 V (non incluso).
NOTA: si consiglia di inserire le batterie come fonte di alimentazione di backup.
OROLOGIO
RICEZIONE OROLOGIO
1. Inserire le batterie o premere il pulsante per iniziare la ricezione RCC.
2. La ricezione RCC si attiva.
3. La durata del processo di ricezione è di 7 minuti.
4. Durante il processo di ricezione, il simbolo del segnale RCC lampeggia.
5. Per disattivare o riattivare la ricezione RCC, premere il pulsante
6. Se il processo viene eseguito correttamente, il simbolo di RCC completato viene visualizzato sul
display. Se non viene completato entro 7 minuti, l'impostazione RCC verrà disattivata automaticamente.
7. La ricezione RCC inizia automaticamente alle ore 2:03, 3:03, 4:03, 5:03 ogni notte. La funzione di
ricezione automatica viene interrotta non appena viene completata correttamente.
Front
back
Modelli diversi ricevono segnali RCC differenti:
Regione Segnale
Unione Europea DCF
Regno Unito MSF
IMPOSTARE L'OROLOGIO MANUALMENTE
1. Premere e tenere premuto il pulsante , immettere le impostazioni di data e ora
2. Sequenza di impostazione: Giorno della settimana nella lingua impostata 12/24 ore Anno (2000
- 2099) Formato data Mese Data Ora Minuto Fuso orario ℃/℉ esci
3. Durante l'impostazione, il relativo parametro lampeggia.
4. Premere il pulsante per confermare l'impostazione e immettere il parametro successivo
5. Premere il pulsante per incrementare / modificare il dato rapidamente.
6. Premere il pulsante per decrementare / modificare il dato.Premere e tenere premuto il pulsante
, le cifre diminuiranno rapidamente.
7. Se non viene eseguita alcuna azione in 20 secondi, l'impostazione viene salvata e la modalità di
impostazione viene chiusa.
Visualizzazione del giorno della settimana in cinque lingue: GER, ENG, FRE, ITA, DUT.
Simbolo Lunedì Martedì Mercoledì Giovedì
Venerdì
Sabato
Domenica
Tedesco GER MON DIE MIT DON FRE SAM SON
Inglese ENG MON TUE WED THU FRI SAT SUN
Francese FRE LUN MAR MER JEU VEN SAM DIM
Italiano ITA LUN MAR MER GIO VEN SAB DOM
Olandese
DUT MAA DIN WOE DON VRI ZAI ZON
o
o
o
SVEGLIA
IMPOSTAZIONE/REGOLAZIONE ORARIO SVEGLIA
1. Premere e tenere premuto il pulsante , immettere le impostazioni della sveglia
2. Sequenza di impostazione: ora giorno feriale minuto giorno feriale ora giorno fine settimana
minuto giorno fine settimana Feriale (1-5) / Festivo (6-7)
3. Durante l'impostazione, il relativo parametro lampeggia.
4. Premere il pulsante per confermare l'impostazione e immettere il parametro successivo
8. Premere il pulsante una volta, la cifra aumenta di 1 unità. Premere e tenere premuto il pulsante
, le cifre aumenteranno rapidamente.
5. Premere il pulsante una volta, la cifra diminuisce di 1 unità. Premere e tenere premuto il pulsante
, le cifre diminuiranno rapidamente.
6. Premere il pulsante per attivare/disattivare la sveglia
7. La sveglia si attiva automaticamente quando termina l'impostazione della sveglia.
8. Se non viene eseguita alcuna azione in 20 secondi, l'impostazione viene salvata e la modalità di
impostazione viene chiusa.
ATTIVARE/DISATTIVARE LA SVEGLIA
1. Quando viene visualizzato l'orario che più si avvicina a quello della sveglia, premere il pulsante
una volta per attivare/disattivare quella sveglia. (1-5) o (6-7) lampeggia ad indicare quale sveglia è
visualizzata.
2. Premere il pulsante una volta per passare alla modalità sveglia. L'orario della sveglia da lunedì a
venerdì viene visualizzato e (1-5) lampeggia.
3. Premere il pulsante una volta per attivare/disattivare la sveglia da lunedì a venerdì
4. Premere nuovamente il pulsante per mostrare l'orario della sveglia da sabato a domenica. (6-7)
lampeggia.
5. Premere il pulsante una volta per attivare/disattivare la sveglia da sabato a domenica.
FUNZIONAMENTO
1. All'orario impostato, il segnale della sveglia suona.
2. Quando la sveglia sta suonando, premere un pulsante qualsiasi per interromperla. Oppure, premere il
pulsante per ritardare l'allarme di 8 minuti.
3. Se non si preme alcun pulsante per interrompere la sveglia, essa si disattiva automaticamente dopo 5
minuti.
4. La sveglia si riattiva al successivo orario impostato, a meno che non venga disattivata la funzione
sveglia nella modalità sveglia.
PROIEZIONE
Il proiettore visualizza l'orario sul soffitto o sulla parete e può ruotare di 180 . La visualizzazione è
migliore in una stanza più buia. Per risultati di proiezione ottimali, posizionare l'unità entro 1,5 - 2 m dal
soffitto o dalla parete.
1. Premere il pulsante per attivare la retroilluminazione e la proiezione per 5 secondi.
2. Quando la proiezione è attiva Premere e tenere premuto il pulsante per ruotare il display di
proiezione di 180
3. Premere e tenere premuto il pulsante , si attiva la proiezione continua se si utilizza un
alimentatore elettrico e si attiva la proiezione per 5 minuti se si utilizza solo l'alimentazione a batterie.
Premere e tenere premuto nuovamente il pulsante , si disattiva la proiezione, anche quella
continua.
PRECAUZIONI
Pericoli per i bambini
Le batterie possono rappresentare un pericolo per la vita se vengono ingerite. Tenere l'orologio con
proiezione e le batterie lontano dalla portata dei bambini. Se una batteria viene inghiottita, richiedere
immediatamente assistenza medica.
Tenere i bambini lontano dal materiale di imballaggio e dalle piccole parti utilizzate per la consegna.
Pericolo di soffocamento in caso di ingestione.
Pericolo di lesioni
Attenzione: pericolo di esplosione in caso di gestione errata delle batterie. Le batterie non devono
essere caricate o riattivate con altri mezzi, smontate o gettate nel fuoco, o messe in cortocircuito
Evitare il contatto con la pelle, con gli occhi e con le mucose. Quando si entra in contatto con
l'acido della batteria, risciacquare immediatamente le parti interessate con abbondante acqua
pulita e rivolgersi immediatamente a un medico.
Attenzione - Danni alla proprietà
Proteggere l'orologio con proiezione da polvere, urti, temperature estreme, luce solare diretta e
umidità. Posizionare l'orologio con proiezione unicamente in un luogo asciutto e protetto.
Rimuovere le batterie dall'orologio con proiezione una volta esaurite o se non si intende utilizzare
l'orologio con proiezione per un lungo periodo di tempo.
Non esporre le batterie a condizioni estreme, ad esempio posizionandole su un termosifone o
sotto la luce diretta del sole.
Pulire la batteria e i contatti del dispositivo prima di inserirla, se necessario.
Utilizzare lo stesso tipo di batterie. Non utilizzare tipi diversi o batterie nuove e usate
contemporaneamente.
Non eseguire alcuna modifica al dispositivo. Far eseguire le riparazioni solo presso un laboratorio
specializzato.
Non utilizzare mai detergenti duri, che graffiano o abrasivi, o simili, per la pulizia dell'orologio con
proiezione, altrimenti le superfici si potrebbero graffiare.
SPECIFICHE
L x P x A 100 x 25 x 75 mm
Peso (unità principale) 97 g (batterie escluse)
Intervallo di visualizzazione temperatura
Da -10 ℃ a +50 ℃ (da 14 ℉ a 122 ℉)
Precisione Da 0 ℃ a +40 ℃: +/- 1,5 ℃ (+/-3 ℉)
<0 ℃ e >+40 ℃: +/- 2 ℃ (+/-4 ℉)
Risoluzione 0,1 ℃ (0,2 ℉)
Alimentazione 2 batterie R03 (AAA) da 1,5V
Adattatore USB da 5 V (non incluso)
NOTA:
Quando la temperatura è inferiore a -10 ℃ (14 ℉), viene visualizzata come LL.L. Quando la
temperatura è superiore a 50 ℃ (122 ℉), viene visualizzata come HH.H.
Quando la sveglia suona durante il processo di ricezione RCC, il rilevamento della temperatura
viene interrotto.
NOTA: le specifiche tecniche di questo prodotto e il contenuto del Manuale per l'utente sono soggetti
a modifica senza preavviso.
UE - DICHIARAZIONE DI CONFORMITÀ
Smaltimento:
È applicabile la direttiva europea 2012/19/EC sull'uso, la raccolta, il riutilizzo e lo
smaltimento di apparecchiature elettriche ed elettroniche e dei relativi componenti (rifiuti di
apparecchiature elettriche ed elettroniche: WEEE).
Il simbolo di un contenitore per rifiuti barrato da una croce significa che l'apparecchio non può essere
smaltito con la normale spazzatura, ma deve essere portato nei centri di raccolta attrezzati per il
corretto riutilizzo o smaltimento.
Diretive:
Si dichiara che questo apparecchio è stato prodotto nel rispetto delle regole e delle norme
vigenti.

INTRODUCTION
Thank you for purchasing the Projection Clock . Please read carefully through the following
information and keep these instructions, in case you need to refer to them in the future. If you
pass the product on to someone else, please also include these instructions.
The Radio-Controlled Projection Clock (Projection Clock) displays:
- indoor temperature
- date / time / weekday
- alarm
The Projection Clock is unsuitable for commercial use in weather forecasting or in temperature data
measurement.
PACKAGE CONTENTS
Main unit Power cable
AAA batteries
for main unit x 2
OVERVIEW 1: Press to activate the snooze functon,backlight and projection,
Press and hold to toggle projection on/off.
2:Projection lens
3: In Date mode, press to turn on/off zone. In Alarm time
mode, press to turn on/off alarm. Press and hold to enter time
and date setting.
4: Press to show alarm time of Alarm 1-5 and Alarm 6-7.
Press and hold to enter alarm setting.
5: Press to switch between Temperature and Week Day
display. Press and hold to start RCC signal receiving. In
setting mode, press to increase one unit, press and hold
to increase rapidly.
6: Press to switch between Date and the nearest coming
Alarm time. In projection, press and hold to flip the projection
display in 180 . In setting mode, press to decrease one unit,
press and hold to decrease rapidly.
7:Power jack.
8:Battery compartment. Slide down to open.
LCD DISPLAY 1: Time Display
2: Date display or Alarm time display
3: Temperature display or Week Day display
RCC signal received
Alarm ON
DST ON
Snooze Activated
Low battery indicator
Temperature mode
GETTING STARTED
INSERT BATTERIES
1: Remove the battery door from the back
2: Insert 2 R03 (AAA)/ 1.5V batteries. Please ensure the polarities (+/-) of the
batteries match upon installation.
3: Reattach the battery door.
NOTE: Replace batteries when displays, or when the display is dim.
DC POWER
Plug the power cable to the power jack and plug the USB plug to a
5V USB power adapter (Not included).
NOTE: It is suggested to insert batteries as backup power source.
CLOCK
CLOCK RECEPTION
1: Replace batteries or press button will initiate RCC receiving.
2: RCC receiving can be worked in both Date Mode and Alarm Mode.
3: The receiving process duration is 7 minutes.
4: During receiving process, the RCC signal logo flashes.
5: During receiving process, press button to quit receiving, press other buttons
can work normally.
6: If process is successful, completed RCC logo will be shown in display. If it fails within
7 minutes, RCC setting will quit automatically.
7: RCC receiving will automatically start at 2:03, 3:03, 4:03, 5:03 every night. Auto
receiving function will cease if it is successful.
Front
back
ALARM
SETTING/ADJUSTING ALARM TIME
1. Press and hold button, enter alarm setting
2. Sequence of setting: weekday hour weekday minute weekend hour weekend
minute exit
3. During setting, the setting parameter will flash.
4. Press button to confirm setting and enter to next parameter
5. Press button once, the figure will increase 1 unit. Press and hold the button, the figures
will increase rapidly.
6. Press button once, the figure will decrease 1 unit. Press and hold the button, the
figures will decrease rapidly.
7. Press button to turn on/off alarm
8. Alarm will automatic turn on when alarm setting finish.
9. If there is no action in 20 seconds, the setting will be saved and will exit the setting mode.
TURN ON/OFF ALARM
1. When it is displaying the nearest coming Alarm time, press button once to turn on/off that
alarm. (1-5) or (6-7) will flash to indicate which alarm displaying.
2. Press button once to switch to alarm mode. Monday to Friday alarm time will be shown and
(1-5) will flash.
3. Press button once to turn on/off Monday to Friday alarm
4. Press button again to show Saturday to Sunday alarm time. (6-7) will flash.
5. Press button once to turn on/off Saturday to Sunday alarm.
OPERATION
1. At the set time, alarm signal rings.
2. During alarm rings, press any keys to end the alarm. Or press button to delay the alarm for
8 minutes.
3. If do not press any button to end the alarm, it will turn off automatically after 5 minutes.
4. Alarm will be start again at next alarm time, unless switch off the alarm function in alarm mode.
PROJECTION
The projector displays the time on your ceiling or wall and it can rotate 180 . It is easier to view in a
darkened room. For the optimal projection results, place the unit within 5-6.5 ft (1.5 - 2 m) from the
ceiling or wall.
1. Press button to activate the backlight and projection for 5 seconds.
2. Press and hold button, flip the projection display 180 .
3. Press and hold button, toggle continues projection on in case of using adapter power
source and toggle projection on for 5 minutes in case of using batteries power only. Press and
hold button again, turn off projection and toggle continues projection off
PRECAUTIONS
Hazards for children
Batteries can be life-endangering if swallowed. Please keep the Projection Clock and batteries
out of reach of children. If a battery has been swallowed, please seek medical assistance
immediately.
Keep children away from packaging material and the small parts in the scope of delivery.
Suffocation hazard if swallowed.
Injury hazard
Caution: Explosion hazard with improper handling of batteries. Batteries must not be charged,
reactivated with other means, dismantled, thrown into fire or short-circuited.
Avoid contact with skin, eyes and mucous membranes. When coming into contact with battery
acid, immediately rinse the affected areas with plenty of clear water and immediately contact a
physician.
Caution – property damage
Protect the Projection Clock from dust, impact, extreme temperatures and direct sunshine. Also
protect the Projection Clock from moisture. Exclusively position Projection Clock in a dry,
enclosed space.
Remove the batteries from the Projection Clock, if they become depleted or if you are not using
the Projection Clock for a longer period of time.
Do not expose the batteries to any extreme conditions by e.g. placing them on a radiator or
under direct sunlight.
Clean the battery and appliance contacts prior to insertion, if required.
Using same type of batteries. Do not use different types or used and new batteries together.
Do not carry out any changes to the device. Only allow repairs to be carried out by a
professional workshop.
Never use hard, scratching or abrasive detergents or similar, for cleaning the Projection Clock.
This could scratch the surfaces.
SPECIFICATIONS
L x W x H 100 x 25 x 75 mm
Weight (Main unit) 97g (Exclude batteries)
Temperature display range 14℉ to 122℉(-10℃ to +50℃)
Accuracy 0℃ to +40℃: +/- 1.5℃ (+/-3℉)
<0℃ and >+40℃: +/- 2℃ (+/-4℉)
Resolution 0.1℃ (0.2℉)
Power 2 x R03 (AAA) 1.5V batteries
5V USB adapter (Not included)
NOTE:
When the temperature is lower than 14℉ (-10℃), the temperature displays LL.L. When the
temperature is higher than 122℉ (50℃), the temperature displays HH.H.
During alarm rings or RCC receiving process, temperature detection will be stopped.
NOTE: The technical specifications for this product and the contents of the user manual are subject
to change without notice.
FCC STATEMENT
This device complies with Part 15 of the FCC Rules.
Operation is subject to the following two conditions: (1) This device may not cause harmful
interference, and (2) This device must accept any interference received, including interference that
may cause undesired operation.
NOTE:
Please increase the separation of the main unit and the power adapter to avoid interference of
RCC signal receiving.
The Projection Clock receives WWVB signals as RCC signal.
SET THE CLOCK MANUALLY
1. Press and hold button, enter time and date setting
2. Sequence of setting: Week Day Language 12/24 Hr Year (2000 – 2099) Date format
Month Date Hour Minute Zone DST setting ℃/℉ exit
3. During setting, the setting parameter will flash.
4. Press button to confirm setting and enter to next parameter
5. Press button once, the figure will increase 1 unit (when setting minute, second will reset to
0). Press and hold the button, the figures will increase rapidly.
6. Press button once, the figure will decrease 1 unit (when setting minute, second will reset to
0). Press and hold the button, the figures will decrease rapidly.
7.If there is no action in 20 seconds, the setting will be saved and will exit the setting mode.
Five languages Week Day display: GER, ENG, FRE, ITA, DUT.
Symbol Monday Tuesday Wednesday Thursday Friday Saturday Sunday
German GER MON DIE MIT DON FRE SAM SON
English ENG MON TUE WED THU FRI SAT SUN
France FRE LUN MAR MER JEU VEN SAM DIM
Italian ITA LUN MAR MER GIO VEN SAB DOM
Dutch DUT MAA DIN WOE DON VRI ZAI ZON
o
o
o
NOTE: In zone setting, 0 = PST; 1 = MST; 2 = CST; 3 = EST
-
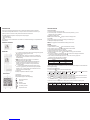 1
1
-
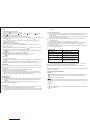 2
2
-
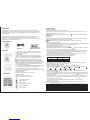 3
3
-
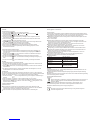 4
4
-
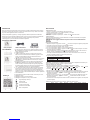 5
5
-
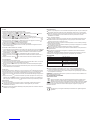 6
6
-
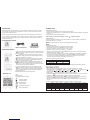 7
7
-
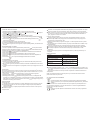 8
8
-
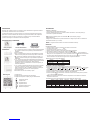 9
9
-
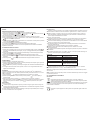 10
10
-
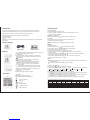 11
11
-
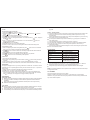 12
12


Oregon Scientific RM512 Instructions Manual
- Categoria
- Sveglie
- Tipo
- Instructions Manual
in altre lingue
- English: Oregon Scientific RM512
- français: Oregon Scientific RM512
- español: Oregon Scientific RM512
- Deutsch: Oregon Scientific RM512
Documenti correlati


Altri documenti
-
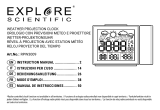 Explore Scientific RPW3009000000 Manuale del proprietario
-
Braun BC15-DCF Istruzioni per l'uso
-
TFA Radio-Controlled Projection Alarm Clock with Indoor Climate SHOW Manuale utente
-
TFA Dostmann 98.1085 Manuale del proprietario
-
-
TFA Radio-Controlled Projection Alarm Clock with Temperature Manuale utente
-
Bresser TemeoTrend P RC Weather station Manuale del proprietario
-
Equation 2023R08P06-0202 Manuale utente
