La pagina si sta caricando...

186203 > ...
APF 29
P-10
EN
To give to the user
Directions
for use
This guide is available in digital format at:
www.stuv.com
Find us also on:
May 2019

WELCOME TO THE WORLD OF STÛV!
You have just opted for an eco-friendly, high-performance heating system.
We hope that you enjoy using it from this moment on.
You will find advice and instructions for the use and maintenance of your Stûv in this document.

CONTENTS
PRESENTATION OF THE PRODUCT 4
Standards, certification and technical characteristics 4
Stûv P-10 CE marking 5
Materials and main components 5
Dimensions 6
Overview of the stove components 7
How does your StûvP10 work? 8
Fuel 9
USE 10
General recommendations 10
Environment 10
Recommendations before first use 11
Initial cautions 11
Basic usage 12
Managing the remote control 13
Description of the remote control menu 15
Lighting the Stûv P-10 19
2 usage modes: manual mode vs. calendar mode 19
Output mode or thermostat control 20
Using calendar mode 21
Configuring calendar mode 22
Shutting down the Stûv P-10 24
Some advice on getting the most our of your Stûv P-10 24
MAINTENANCE 25
Daily maintenance 25
Weekly maintenance 26
Annual maintenance 29
IN CASE OF PROBLEMS... 31
Emergency switch 31
Alarm signals 31
PRODUCT DATASHEET (EU 2015/1186) 36
DECLARATION OF PERFORMANCE (EU 305-2011) 37
THE EXTENSION OF THE STÛV GUARANTEE : A SIMPLE PROCEDURE FOR MORE PEACE OF MIND. 40
CONTACTS 43

4SN 186200 - ...
Stûv P-10 - directions for use [en] - 05/19
Standards, certification and technical characteristics
PRESENTATION OF THE PRODUCT
The Stûv P-10 stove (for intermittent
operation) comply with the
requirements of EN European
Standards in terms of efficiency,
gas emissions, safety etc….
Data provided in this notice are
supplied by a certified laboratory.
Results of tests according
to EN 14785 standards: 2006
Domestic wood pellet convection
heating appliances
Stûv P-10s are covered by:
patent nos.:
EP 2304319
JP 5390603
US 8.904.944
US 8.826.899
+ Patents pending
model drawing nos.:
DM/72417
DM/72418
002500942-0001
002500942-0002
Stûv P-10
System mass 175 kg
Nominal heat power: 8 Kw
Heat output at reduced speed 2.4 Kw
Minimum diameter of the duct for the intake of outside combustion air
(if the stove is not connected to outside air) 30 cm2
Efficiency at rated power 90.5 %
Performance at reduced power 94.5 %
Average smoke temperature at rated power, at the output of the appliance 217 °C
Average smoke temperature at reduced power, at the output of the appliance 94 °C
Minimum safety distance from adjacent combustible materials :
(The side and rear distances are measured in relation to the lower part of the device)
> behind
> on the sides
> below
> above
7 cm
10 cm
non-combustible floor
10 cm
CO emissions at rated power 0.001 %
CO emission at reduced power 0.028 %
Particle emissions (at rated power) 5 mg/Nm3
Weight-flow ratio of smokes (at rated power) 5.1 g/s
Mass flow of smoke at reduced power 2.8 g/s
Recommended draught at maximum power 6 Pa
Recommended draught at minimum power 3 Pa
Minimum draught at the output of the appliance for flue calculation. 0 Pa

5
SN 186200 - ...
Stûv P-10 - directions for use [en] - 05/19
Standards, certification and technical specifications (continued)
Materials and main components
The Stûv P-10 consists mainly of:
> Painted steel sheets/tubes for
structural and facing elements
> The bottom facings are available in
a oak-veneered wood panel finish
(light or dark)
> Vermiculite for the inside of the
combustion chamber
> Cast steel for the structural elements
of the burner
> Aluminium for the smoke extraction
flue
> HDPE for the Pellet hopper
> A trim finishing kit is available to
trim the bottom facings. In this case,
the installer should check that the
trim material chosen corresponds to
the use for which it is intended.
All of these components are
deemed to be compliant within
tolerances and national practices.
Stûv P-10 CE marking
Stûv S.A Rue Jules Borbouse 4, 5170 Bois-de-Villers
15
Notifi ed Body 1881
Declaration of performance number : 15QA151478501
EN 14785 : 2006
Stûv P-10
Read and follow operating instructions
Use only recommended fuel :
Wood pellets diameter 6 mm, quality standard EN plus A1
Version française disponible dans la notice d’utilisation
Nederlandse versie beschikbaar in de gebruikersgids
Deutsche Version in der Installationsanleitung
La versione italiana è disponibile all’interno della guida utente
Versión española disponible en el manual del usuario
Versão portuguesa disponível no Manual do Utilizador
Česká verze je k dispozici v uživatelské příručce
Wersja polska dostępna w instrukcji obsługi
Heating output nominal
nominal
nominal
nominal
peak
reardr
ηnom
8.0kWPnom
COnom
Tnom
0.001%
217°
90.5%
1000W
230V
70mm
2.4kWPpart
COpart
Tpart
0.028%
94°
94.5%
40W
50Hz
100mm
1000mm
reduced
reduced
reduced
reduced
average
sidesds
ηpart
frontdf
Measured CO
(at 13% oxygen content)
Average temperature of the
smoke at the appliance’s
outlet
Minimum clearance distance
from combustible materials
Turntable appliance : 1000 mm
in range of inspection window
Appliance effi ciency
Rated input power
Rated voltage
Rated frequency
Stûv has a determinedly proactive
responsible environmental apprach.
We think about the end-of-life of our
products.
Each of the device's components can
be isolated so that sorting can be
carried out and therefore optimum
recycling.
Removal of the various parts must
be done in accordance with local and
national regulations.
Requirements relating to the electrical power supply
Voltage 230 V
Frequency 50 Hz
Electric power consumption on ignition 1000 W
Electrical power consumption under normal operation 40 W
Requirements relating to fuel
Recommended fuel Wood pellets only
Certification Din plus, EN plus A1, NF high performance
Diameter 6 mm
Min-max length 3-30 mm
Humidity level < 10%
Ash level < 7%

6SN 186200 - ...
Stûv P-10 - directions for use [en] - 05/19
Dimensions
wood and “to be
trimmed” version
wood and “to be
trimmed” version
sheet metal version
sheet metal version
480
1400
120
120 445367
80
60
448
55
70
565 240
480
114
Ø 60
Ø 60
Ø 80
251
140
17
100
115
370
760
400 340
400
480

7
SN 186200 - ...
A
H1
H2
I
J2.2
J2.1
J1.1
J1.2
K
L
M
R
Q
O
ST
U
V
P
N2
N1
C1
C2
D
E
F
B
G
Stûv P-10 - directions for use [en] - 05/19
Overview of the stove components
A. Lantern
B. Lantern frame
C.
C1. Right-hand lantern facing
C2. Left-hand lantern facing
D. Top shelf
E. Vermiculite Ring
F. Flame modeller
G. Lantern door
H.
H1. Rear shelf
H2. Front shelf
I. Collar
J.
J.1.1 Left facing (metal panel
version)
J.1.2 Left facing (wood and to be
trimmed version)
J.2.1 Right facing (metal panel
version)
J.2.2 Right facing (wood and to be
trimmed version)
K. Bottom door
L. Grilles
M. Burner casting
N.
N1. Archimedes screw 1
N2. Archimedes screw 2
O. Rear metal panel
P. Smoke flue
Q. Fan body
R. Pellet hopper
S. Electronic card
T. Ashpan
U. Reloading hatch
V. Front cover
*Facings are available in two versions.
The illustration shows one side of each
finish.

8SN 186200 - ...
Stûv P-10 - directions for use [en] - 05/19
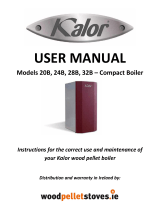
How does your Stûv P10 work?
The Stûv P-10 is a wood pellet stove
consisting of two major parts:
- A base containing the pellet hopper,
the fuel and combustion feed, smoke
extraction and all the electronics and
sensors enabling the operation of
the appliance to be adjusted and set
[diagram 1].
- A pivoting lantern where the burning
of the pellets takes place. This top part
also radiates and diffuses convection
heat; it is fitted with a window which
gives a view of a beautiful large flame
[diagram 2].
The device has an electronic
management system operating on
two variables to provide optimal
thermal comfort. Depending on the
user’s requirements, the Stûv P-10 will
adjust its output and maintain this by
adjusting:
- The quantity of pellets burned
[diagram 3]
- The quantity of air supplied to
combustion [diagram 4]
1
3
2
4

9
SN 186200 - ...
Stûv P-10 - directions for use [en] - 05/19
Fuel
What are wood pellets?
Wood pellets are a solid and eco-
friendly fuel made from sawmill
waste. Sawdust is compressed without
glue or binder so as to obtain a
standardised cylinder with a high
density and low moisture. These
characteristics give the granules
significant calorific power.
Which pellet should I choose?
The Stûv P10’s performance may vary
depending on the pellets used.
For correct use, the pellets must
comply with ENplus or DINplus A1 or
NF high performance certifications.
These references ensure that the
pellets have the following features:
- composition: 80-100%
resinous wood
- diameter: 6 mm
- Min-max length: 3 - 40 mm
- humidity level: ≤ 10%
- ash level: ≤ 7%
Burning any liquid or solid
other than pellets that comply
with the ENplus/DINplusA1/NF
high performance standard is
prohibited!
The consequences of burning
inappropriate pellets
Burning pellets that do not fulfil the
above-mentioned criteria can result in
device malfunctions such as:
- damage to the glass and smoke
ducts - noise
- b u r n e r g e t t i n g c l o g g e d u p
- b u i l d u p o f d u s t i n t h e h o p p e r
- etc.
If you notice one or more of
these when using your device, we
recommend changing the pellets you
are using.
Pellet storage
Pellets must be stored in a dry
place where the temperature is
above 5 °C.
They can be stored in bags or in
bulk but avoid storage in the open
air.
Caution!
Take care not to crush the bags to
avoid producing too much dust.
Avoid emptying dust into the
machine’s hopper as this sawdust
can disrupt the feed system.
If you use pellets stored in a bag,
after opening the bag, use the
contents within a relatively short
time. Otherwise there is a risk of
the pellets getting damp.

10 SN 186200 - ...
7cm 10cm
100cm
1
Stûv P-10 - directions for use [en] - 05/19
USE
General recommendations
Use
The stove should be used in
accordance with local and national
regulations and European standards.
Some parts of the stove – the glass
door and the outside walls – may
become very hot even during normal
usage (rated power) and significant
heat may be radiated from the glass
door.
In order to prevent any damage or
risk of fire, when the stove is in use,
remove all heat-sensitive objects from
the radiation area. Take particular care
when you leave the room.
Ensure that the glazed part is
not facing any materials that are
heat-sensitive.
Do not leave young children without
supervision in the room where the
stove is installed.
Ensure the air inlets and outlets are
always kept clear.
Caution!
The appliance is not designed to be
used with cooking utensils. Do not
place anything on the appliance or on
the facings.
Repairs / Maintenance
Any modification carried out to the
system may cause danger and will
invalidate your guarantee. Only use
Stûv spare parts in the case of repairs.
Should a fire in the flue get out of
control
Do not open the stove's door during
the initial period.
Disconnect the device.
Call the fire brigade.
If the fire has not died down after
a few minutes, use a dry powder,
soda acid or sand extinguisher (never
water).
After a chimney fire, ventilate the
room where the stove is situated.
Have the chimney cleaned and
inspected by a professional. Have
repairs carried out if necessary.
Every Stűv P-10 is subjected to a factory check.
There may be traces of combustion or light residues after this test.
The heat radiated from the glass door
and the walls may be significant.
Whichever way the stove is pointing,
observe the safety distances with
regard to combustible materials
[diagram 1], or ensure that the
materials exposed to radiated heat are
resistant to hight temperatures.
The safe distances from combustible
materials must be respected, even
when the device is switched off as
it might have been programmed to
switch on automatically or be started
remotely.
Environment
Important!
In order to best use the qualities of
your appliance and avoid any danger,
the following instructions must be
followed:
> Install the stove according to
industry best practice and local or
national regulations. A qualified
professional will ensure compatibility
of the flue.
> Read these instructions carefully
and keep them.
> Observe the instructions for
maintenance.
> Never use the appliance with the
door open or a broken window.
> Never use inflammable liquid in
or around the appliance when it is
operating.
> Only use pellets of the
recommended quality (DINplus or
ENplus A1).
> Avoid any accumulation of
unburned pellets in the burner.
> Never load the fuel elsewhere than
in the hopper.
> Dispose of ash before each use and
empty the ashpan regularly (p.14).
> Please return the warranty
registration card (found at the end of
this document), duly completed.

11
SN 186200 - ...
2
100cm
Stûv P-10 - directions for use [en] - 05/19
This section relates to the powering
up of the appliance. This powering up
must be done by an authorised Stûv
installer.
The first lighting will help check that
each setting is working properly and,
if applicable, make fine adjustments to
optimise use of the stove depending
on the specifics of the installation.
> Connect the power supply to the
mains (230V - 50Hz)
> Load the pellet hopper as indicated
in the “Basic Procedures” section.
Caution!
As each appliance is tested in the
factory, it is not necessary to pre-
load the Archimedes screw. On the
other hand, transport and handling of
the Stûv P-10 during installation may
have compacted the pellets already
in the appliance. Therefore ignore the
behaviour of the flame during the first
few minutes of operation (it might
in particular be more intense than
normal).
> Turn on the appliance by following
the steps outlined in the “Lighting
the Stûv P-10"
Note:
If for various reasons the Archimedes
screws have been emptied, it is
necessary to perform a preload.
Perform the following operations:
Caution!
Given that the lantern pivots 45°
to the left and 45° to the right, the
safety distance must follow the
direction of the flame [diagram 2].
Warning
Never leave anything on the device’s
lantern, even when it is switched off!
Environnement (suite)
Recommendations before first use
Initial cautions
Before lighting the first fire in the new
stove, ensure that no element (piece
of hardware, tool, etc.) has fallen
into the hopper or remains in the
combustion chamber.
The paint is not oven-baked ; it is
thus relatively fragile but will harden
when heated for the first few times.
Consequently, take care when
handling the appliance.
When lighting the fire for the first
few times, some smoke or unpleasant
odours may be released from the
paint, the steel’s protective oil or the
drying of the bricks. We recommend
that you keep your first fire burning
strongly for several hours with the
windows open. The paint will harden
and the odours will disappear.
The paint of some components inside
the combustion chamber will be
covered with a protective layer of
carbon resulting from combustion.
> Press and hold
> Choose the “Preload” menu
- Choose “Auto” mode for
complete and automatic loading
of the screw which lasts 10
minutes.
To cancel, press
- Choose “Normal” mode for
manual pre-loading.
Press and hold the button to
turn the screws.
> Exit the menu

12 SN 186200 - ...
45° 45°
Stûv P-10 - directions for use [en] - 05/19
Basic usage
Refuelling with pellets.
It is advisable to refuel the hopper
with pellets when the appliance is not
lit.
Caution!
If you refuel with pellets while the unit
is operating, please do not leave the
door open longer than one minute,
as beyond this the appliance might
display an alarm or even lock down
into “safe” mode.
Reminder: it is important to use
a quality pellet (complying with
DINplus, ENplus A1 or NFhp
certifications) and to only pour pellets
into the hopper. Avoid pouring in
sawdust and dust from the bottom of
the bag, as well as any other object.
Use the pusher to load more pellets in
the hopper and get rid of dust from
the valve. Do not use your hands as a
watch, bracelet or ring could damage
the seal.
The Stûv P-10 is fitted with a sensor
that detects the pellet level. If the
sensor detects a low level, the unit will
reduce its power.
If the pellet level rises, the power will
go up. If the level continues to drop,
the stove will go into "Shutdown"
mode.
The ideal is to wait until the sensor
emits a sound to fill the tank with a
15kg bag.
After refilling with pellets, close the
loading valve, making sure no pellets
are stuck in the seal.
Rotating the lantern
Use the cool handle to turn the device
lantern round 90° [diagrams 7-10].
1
3
2
4
5
6

13
SN 186200 - ...
MERCREDI 01/07/15
12:00
20.0°C
ETEINT
CHRONO 1
Stûv P-10 - directions for use [en] - 05/19
Basic usage (continued)
Managing the remote control
The Stûv P10 remote control has 6
buttons and 1 display screen:
0. Display screen
A. Battery level
B. Date and time
C. Signal quality
D. Basic information (ambient
temperature, recommended
t e m p e r a t u r e , p o w e r l e v e l )
E. Operating mode
F. Stove status indicator (see page
23)
1. Programming the timetable
This function allows you to set
the start, stop, and power levels
depending on the day and time as
well as adjust the set temperature
setting.
2. Power on/off button
3. Help
4. Menu
The Menu button is used either to
modify the power level or to get
access to the appliance’s various
settings.
It is also used to go into an option
or submenu, confirming the choice
highlighted.
5. Increase/Move up
6. Decrease/Move down
N.B.: use the down / up arrows to
wake up the remote control.
Warning!
Only use rechargeable batteries in the remote control!
8
79
0
A
B
C
D
E
F
1
2
3
4
5
6

14 SN 186200 - ...
min
10X
Stûv P-10 - directions for use [en] - 05/19
Precaution before each start
> Before each start, actuate the
ash removal control (make ten
movements).
> Check that after the operation,
the control returns to its original
position (rod to the right).
Note:
To check that the grille is turning
correctly and goes back to its original
position and to check that the ash has
been removed and that the grille is
clean, you can open the door, remove
the vermiculite ring and the flame
modeller in order to find the ash
disposal grille.
To find out the procedure to follow,
see section “Weekly Maintenance",
"cleaning the ash removal grille"
paragraph
Caution!
Only remove the ash when the
appliance is extinguished.
> Empty the ashpan for every 150 Kg
of pellets burned.
Caution!
Only remove the ashpan when the
stove is off.
Never touch the ashpan whe the
appliae is operating (risk of burns).
Check carefully that there are no
unburned pellets in the ashpan before
the appliance is lit.
3
1 2
6
4
8
5
7
min
10X

15
SN 186200 - ...
Stûv P-10 - directions for use [en] - 05/19
MENU
EXIT
SYSTEM STATUS
PELLET SET
GENERAL SETTINGS
A long press on the Menu button
provides access to the list of the
same name, including the following
submenus:
Plevel 10
Smoke T.: 115.3 °C
Fan speed: 1744 rpm
Power: 10
Room T.: 20.2 °C
AUGER 1: 1915 rpm
Pniveau 10
T.Fumees Cible: 257,7
Set Granules: 3
Vis 2 (rpm): 2299
Flux IN: 179
Flux (Pa): 19,0
Plevel 10
Target Smoke T: 257,7
Set Pellet: 3
Auger 2 (rpm): 2299
Flux IN: 179
Flux (Pa): 19,0
Plevel 10
Smoke T.: 115.3 °C
Fan speed: 1744 rpm
Power: 10
Room T.: 20.2 °C
AUGER 1: 1915 rpm
MENU
EXIT
SYSTEM STATUS
PELLET SET
GENERAL SETTINGS
Plevel 10
Target Smoke T: 257,7
Set Pellet: 3
Auger 2 (rpm): 2299
Flux IN: 179
Flux (Pa): 19,0
System status: Contains a set of continually updated information.
Description of the remote control menu
Smoke temperature to be reached according to “Set Pellets”
Set pellets
Screw rotation speed 2
Air flow measurement (no unit)
Pressure difference at the flow rate measurement diaphragm
Smoke temperature
Speed of the smoke extractor
Current power level
Ambient temperature
Screw rotation speed 1
PELLET SET: The flow of pellets in the feed system depends on the characteristics of the pellets (length, density, etc.). It
may therefore differ from one brand to another. For example, short pellets have a tendency to rise more rapidly in the
Archimedes screws, even if they turn at a constant speed.
To compensate for this difference in flow, it is possible to correct the speed of the Archimedes screws from -15% to +15%
compared to the reference value (the speed of the smoke extractor, however, is not changed, the aim being to get a correct
air/fuel ratio). This is possible using the SET GRANULES menu
Once it is operating normally (after around 1hr) at power level Pniveau20, the following points may indicate a low pellet
flow, in which case you will need to increase the SET GRANULES level:
- Low, bright flame
- White layer on the glass
the following points may indicate a high pellet flow, in which case you will need to decrease the SET GRANULES level:
- Very tall, colourful flame (touching the top of the combustion chamber)
- Blackened glass
3"
1 2

16 SN 186200 - ...
Stûv P-10 - directions for use [en] - 05/19
PELLET SET
EXIT
MENU
SYSTEM STATUS
GENERAL SETTINGS
GENERAL SETTINGS
EXIT
DATE/TIME SETTING
SCREENSAVER
PROBE REMOTE CONTROL
LANGUAGE SETTING
LOGS
GENERAL SETTINGS
EXIT
DATE/TIME SETTING
SCREENSAVER
PROBE REMOTE CONTROL
LANGUAGE SETTING
LOGS
DATE/TIME SETTING
01/07/15
14:00
WEDNESDAY
3"
GENERAL SETTINGS
EXIT
DATE/TIME SETTING
SCREENSAVER
PROBE REMOTE CONTROL
LANGUAGE SETTING
LOGS
GENERAL SETTINGS
EXIT
DATE/TIME SETTING
SCREENSAVER
PROBE REMOTE CONTROL
LANGUAGE SETTING
LOGS
PROBE REMOTE CONTROL
ON
Description of the remote control menu (continued)
> Remote control thermostat: Enable/disable the temperature sensor contained in the remote control.
When the remote control thermostat is enabled, the appliance regulates its temperature depending
on the data sent by the remote control. Otherwise, the temperature sensor probe is located in the
appliance. If you opt for regulation via the remote control sensor, place it in a suitable place: not too
sunny, not too close to the lantern, do not leave it in a room other than the one where you installed
the Stûv P-10, etc.
N.B.: if the remote control switches itself off (for example, because the batteries have run down) or goes into sleep mode, the
stove sensor automatically takes over.
Note: It is normal for there to be a slight different between the temperatures measured by the remote control sensor and the stove sensor.
General Settings: The “General Settings” menu consists of the following submenus:
> Program date/time: This screen allows you to set the date and the time.
Once in the clock menu, set the desired number using the arrow keys; to move to the
next number, press the menu button. Once the date and time are entered correctly, press
and hold the menu button to return to the "General Settings" screen.
EXIT
MENU
SYSTEM STATUS
PELLET SET
GENERAL SETTINGS 3
PelletType
NO DRAUGHT CORRECTION
Or
When the SET GRANULES level is increased above level 3 (increase of the speed of the Archimedes screws), the power
level is deliberately restricted: it is therefore normal to no longer be able to reach Plevel20.
> Maximum output as a function of the pellet setting:
> Screen Saver: This option cannot be activated..
Pellet set Max. Output
0 20
1 20
2 20
3 20
4 19
5 18
6 17

17
SN 186200 - ...
Stûv P-10 - directions for use [en] - 05/19
GENERAL SETTINGS
EXIT
DATE/TIME SETTING
SCREENSAVER
PROBE REMOTE CONTROL
LANGUAGE SETTING
LOGS
GENERAL SETTINGS
EXIT
DATE/TIME SETTING
SCREENSAVER
PROBE REMOTE CONTROL
LANGUAGE SETTING
LOGS
LANGUAGE SETTING
English
> Program Language: The “Program Language” screen is used to switch the interface between the different
languages available.
GENERAL SETTINGS
EXIT
DATE/TIME SETTING
SCREENSAVER
PROBE REMOTE CONTROL
LANGUAGE SETTING
LOGS
GENERAL SETTINGS
EXIT
DATE/TIME SETTING
SCREENSAVER
PROBE REMOTE CONTROL
LANGUAGE SETTING
LOGS
LOGS
EXIT
1. Al. auger2
2. Al. safety
3. Al. safety
ENREGISTREMENTS
1. Al. auger2
FRIDAY 19/06/15
09:12:32
Ignition 1
00:17.53
ENREGISTREMENTS
SORTIR
1. AL.VIS 2
2. A.SECURITE
3. A.SECURITE
ENREGISTREMENTS
REGISTRAZIONI
ESCI
1. Coclea 2
2. T. Max.
3. T. Max.
ENREGISTREMENTS
LOGS
EXIT
1. Al. auger2
2. Al. safety
3. Al. safety
ENREGISTREMENTS
GENERAL SETTINGS
EXIT
DATE/TIME SETTING
SCREENSAVER
PROBE REMOTE CONTROL
LANGUAGE SETTING
LOGS
GENERAL SETTINGS
SERVICE
SERVICE
OPERATING TIME: 68
SERVICE: 1432 (68)
N.IGNITIONS: 20
00/00/00
Description of the remote control menu (continued)
> Records: Each incident is logged under this tab. The information stored is: The nature of the incident, the date
and time the incident occurred and the phase during which the incident occurred.
> Service: The “Service” screen indicates the number of operating hours and number of starts made.

18 SN 186200 - ...
Stûv P-10 - directions for use [en] - 05/19
> SMART MODE : the "SMART MODE" screen is only available when the appliance is controlled by the
thermostat.
When it is set to "ON", the control anticipates the set-point temperature being reached and reduces the output. This
mode prevents the set-point temperature being significantly exceeded.
When it is set to "OFF", the appliance operates at maximum output as long as the ambient temperature is below the
set-point temperature. Once the ambient temperature exceeds the set-point temperature, the appliance operates at
minimum output.
GENERAL SETTINGS
LOGS
SERVICE
SMART MODE
SMART MODE
ON
Description of the remote control menu (continued)
GENERAL SETTINGS
EXIT
DATE/TIME SETTING
SCREENSAVER
ECO-STOP
PROBE REMOTE CONTROL
LANGUAGE SETTING
ECO-STOP
ON Or
> Eco-stop: The “Eco-stop” screen is only available when the appliance is thermostatically controlled.
When the setting is “ON”, the appliance turns off when the ambient temperature stays above the
set temperature plus one degree for more than 5 minutes. If the ambient temperature drops below
the set temperature minus one degree, the appliance will restart automatically.
Caution regarding the time it takes to shut down and restart!
When the setting is “OFF”, the appliance will drop to the minimum heat output level once the set-
point temperature has been reached, but will not extinguish automatically.
N.B.: even when the Eco-stop function is activated, you must remove the ash from the device every time before you
switch it on.

19
SN 186200 - ...
3"
Stûv P-10 - directions for use [en] - 05/19
20.0°C
Chk sensor
NORMAL
12:00
WEDNESDAY 01/07/15 WEDNESDAY 01/07/15
20.0°C
Chk motors
NORMAL
12:00
20.0°C
Load
NORMAL
12:00
WEDNESDAY 01/07/15
20.0°C
Ignition 1
NORMAL
12:00
WEDNESDAY 01/07/15
20.0°C
Ignition 2
NORMAL
12:00
WEDNESDAY 01/07/15
20.0°C
Stabiliz.
NORMAL
12:00
WEDNESDAY 01/07/15
25.0°C
Plevel 10
NORMAL
12:00
WEDNESDAY 01/07/15
> Start by removing the ash from the
device
> To light your Stûv P-10, press and
hold the button for 3 seconds
> The appliance will review its various
sensors.
> The stove then goes on to load the
screws.
> Once there is a sufficient quality of
pellets, the ignition phases start.
The flame now appears (10 - 12
minutes).
Note!
On lighting, it is possible for the
combustion chamber to be filled with
smoke. This is normal and is due, for
various reasons, to slower burning of
the pellets (e.g. slightly damp pellets
etc.) Once the flame appears, all the
smoke will disappear.
Never disconnect the appliance
when lighting it!
Never remove ash from the
device while lighting it!
> The lighting stages are completed as
soon as the level is displayed on the
screen (20 - 25 minutes).
Lighting the Stûv P-10
2 usage modes: manual mode vs. calendar mode
The Stûv P-10 allows two ways to
control power. A calendar mode which
enables direct power changes, or a
calendar mode where temperature
management is defined in advance,
day by day, half-hour by half-hour (4
possible schedules).
Whether calendar mode is activated
or not, it is possible to manage the
power of the appliance through power
levels or through a temperature to be
reached (set temperature).
1
2

20 SN 186200 - ...
Stûv P-10 - directions for use [en] - 05/19
25.0°C
Plevel 10
NORMAL
12:00
WEDNESDAY 01/07/15
THERMO REGULATION
ON
OFF
THERMO REGULATION
Or
POWER SET
15
NORMAL
Plevel 10
ROOM 1
ROOM TEMPERATURE
PRESET TEMPERATURE
18.0°C
24.0°C
A short press on the button
switches successively between the 3
screens shown below.
An initial short press allows you to
enable or disable thermostatic control
of the appliance.
If thermostatic control is enabled,
the following screen shows the
temperature of the room and allows
you to specify the required set
temperature, that is, the temperature
you wish to reach in the room where
the thermostat sensor is placed
(appliance or remote control). Raise or
lower the set temperature using the
arrow keys.
If thermostatic control is disabled,
the next screen allows you to raise
or lower the power level at which
the appliace operates. The range of
powers available goes from level 1
(+/- 2.5 Kw) to 20 ( +/- 8Kw). To
change the power, use the arrow keys
on the remote control.
2 usage modes: manual mode vs. calendar mode (continued)
Output mode or thermostat control
25.0°C
Plevel 10
NORMAL
12:00
WEDNESDAY 01/07/15
25.0°C
Plevel 10
12:00
WEDNESDAY 01/07/15
CHRONO
25.0°C
Plevel 10
12:00
WEDNESDAY 01/07/15
MODULE
Note: In order to avoid condensation
forming in the smoke flue, a
restriction is performed at the factory
to block access to level 1 to 4. Lifting
the restriction can be carried out
by your installer after checking flue
compatibility.
The bottom of the screen may display
4 different pieces of information:
> NORMAL
This information is registered when
the calendar is not enabled. The
stove is operating in manual mode.
> CHRONO
This information is registered
when the calendar is enabled. The
term CHRONO is followed by the
number 1, 2, 3 or 4. This number
corresponds to the enabled calendar
programme.
> MODULE
This word is displayed when the
room temperature measured by the
stove is greater than the setpoint
temperature when thermostatic
regulation is enabled (regulation
of the appliance according to
temperature and not power level)..
If calendar mode is not enabled,
only "module" appears on the
screen. If calendar mode and
thermostatic regulation are enabled,
"Chrono" and "module" will be
displayed alternately.
1 2 3
1/44