
OVENS
USER INSTRUCTIONS
GB
CANDY HOOVER GROUP S.R.L. • Via Privata Eden Fumagalli • 20047 Brugherio Milano Italy
HORNOS
INSTRUCCIONES PARA EL USUARIO
ES
PIEKARNIKI
INSTRUKCJA OBSŁUGI
PL
NOTICE D'EMPLOI ET D'INSTALLATION
DES FOURS ENCASTRABLES
FR
EINBAUBACKÖFEN
BEDIENUNGSANLEITUNG
DE
TROUBY
NÁVOD K OBSLUZE
CZ
FORNI
ISTRUZIONI PER L'USO
IT

CONTENTS
1. General warnings
1.1 Declaration of compliance
1.2 Safety hints
1.3 Recommendations
1.4 Installation
1.5 Electrical connection
2. Pro/Exp’r technology
2.1 Oven equipment
2.2 Rotisserie
2.3 LED VISION/U.SEE
3. Cleaning the oven
4. Service centre
5. Description of the display
5.1 Before using the oven for the first time
5.2 How to use oven
6. Cooking mode
7. Pyrolytic cycle
8. Cooking tips
GB
...............................................................04
.................................................04
.......................................................................04
..............................................................04
..........................................................................04
.........................................................04
..........................................................05
.................................................................05
...........................................................................05
............................................................05
...............................................................06
.....................................................................06
..................................................06
..............................07
.................................................................07
.....................................................................08
....................................................................09
........................................................................09
CONTENIDO
1. Advertencias generales
1.1 Declaración de cumplimiento
1.2 Consejos de seguridad
1.3 Recomendaciones
1.4 Instalación
1.5 Conexión eléctrica
2. Tecnología Pro/Exp'r
2.1 Equipamiento del horno
2.2 Asador
2.3 LED VISION/U.SEE
3. Limpieza del horno
4. Servicio Técnico
5. Descripción de la pantalla
5.1 Antes de utilizar el horno por primera vez
5.2 Cómo utilizar el horno
6. Modo de cocción
7. Ciclo pirolítico
8. Consejos de cocción
ES
.....................................................10
.............................................10
.......................................................10
..............................................................10
..........................................................................10
.............................................................10
..........................................................11
.....................................................11
.................................................................................11
...........................................................11
............................................................12
................................................................12
................................................12
..........................13
........................................................13
................................................................14
....................................................................15
..........................................................15
SPIS TREŚCI
1. Informacje ogólne
1.1 Deklaracja zgodności
1.2 Wskazówki dotyczące bezpieczeństwa
1.3 Zalecenia
1.4 Instalacja
1.5 Podłączenie elektryczne
2. Technologia Pro/Exp'r
2.1 Wyposażenie piekarnika
2.2 Rożen
2.3 Oświetlenie ledowe/ U.SEE
3. Czyszczenie piekarnika
4. Centrum serwisowe
5. Opis wyświetlacza
5.1 Przed użyciem piekarnika po raz pierwszy
5.2 Obsługa piekarnika
6. Funkcje piekarnika
7. Czyszczenie pirolityczne
8. Wskazówki dotyczące pieczenia
PL
..............................................................16
.........................................................16
.............................16
............................................................................16
............................................................................16
....................................................16
.......................................................17
....................................................17
.................................................................................17
................................................17
......................................................18
...........................................................18
..............................................................18
........................19
.............................................................19
............................................................20
...................................................21
......................................21
02
SOMMAIRE
1. Instructions générales
1.1 Declaration de conformité
1.2 Consignes de sécurité
1.3 Recommandations
1.4 Installation
1.5 Raccordement éléctrique
2. La technologie pro/exp’r
2.1 Equipement du four
2.2 Tournebroche
2.3 LED VISION / U.SEE
3. Entretien général du four
4. Assistance technique
5. Présentation du tableau de bord
5.1 Conseils avant la premiere utilisation
5.2 Comment utiliser le four
6. Modes de cuisson
7. Pyrolyse
8. Quelques conseils de cuisson
FR
.......................................................22
..................................................22
........................................................22
.............................................................22
..........................................................................22
...................................................22
....................................................23
.............................................................23
......................................................................23
...........................................................23
...................................................24
........................................................24
.......................................24
.................................25
.....................................................25
..............................................................26
..............................................................................27
..........................................27
INHALTSVERZEICHNIS
1. Allgemeine Hinweise
1.1 Konformitätserklärung
1.2 Sicherheitshinweise
1.3 Empfehlungen
1.4 Installation
1.5 Elektrischer Anschluss
2. Pro/Exp'r Technologie
2.1 Zubehör (Modellabhängig)
2.2 Grillspieß (Modellabhängig)
2.3 Led Vision
3. Reinigung
4. Technischer Kundendienst
5. Display
5.1 Nützliche Hinweise vor dem ersten Betrieb
5.2 Benutzung des Backofens
6. Backfunktionen
7. Pyrolytische Reinigung
8. Tipps
DE
............................................................28
..........................................................28
..............................................................28
......................................................................28
............................................................................28
..........................................................28
..........................................................29
....................................................29
..................................................29
............................................................................29
.............................................................................30
..................................................30
..................................................................................30
...........................31
....................................................31
....................................................................32
.......................................................33
.....................................................................................33
OBSAH
1. Všeobecná upozornění
1.1 Prohlášení o shodě
1.2 Bezpečnostní tipy
1.3 Doporučení
1.4 Instalace
1.5 Přıpojení k elektrıcké síti
2. Pro/exp'r technologıe
2.1 Vybavení trouby
2.2 Rožeň (podle modelu)
2.3 LED VISION/U.SEE
3. Čištění trouby
4. Servisní středisko
5.
5.1 Před prvním použıtím trouby
5.2 Použití trouby
6. Režim přípravy
7. Pyrolytıcký cyklus (podle modelu)
8. Typy k pečení
Popis displeje
CZ
......................................................34
.............................................................34
................................................................34
.........................................................................34
..............................................................................34
.....................................................34
.........................................................35
..................................................................35
.........................................................35
............................................................35
......................................................................36
...............................................................36
......................................................................36
...............................................37
......................................................................37
....................................................................38
....................................39
......................................................................39

INDICE
1. Avvertenze Generali
1.1 Dichiarazione Di Conformità
1.2 Suggerimenti Sulla Sicurezza
1.3 Raccomandazioni
1.4 Installazione
1.5 Collegamenti Elettrici
2. Tecnologia Pro/exp'r
2.1 Accessori Del Forno
2.2 Girarrosto
2.3 Led Vısıon
3. Pulizia Del Forno
4. Risoluzione Dei Problemi
5. Descrizione Del Display
5.1 Prima Di Utilizzare İl Forno Per La Prima Volta
5.2 Utilizzo Del Forno
6. Modalità Di Cottura
7. Ciclo Pirolitico
8. Suggerimenti Per La Cottura
IT
...........................................................40
...............................................40
.............................................40
...............................................................40
..........................................................................40
..........................................................40
..........................................................41
...........................................................41
............................................................................41
..........................................................................41
................................................................42
..................................................42
.....................................................42
.................43
...............................................................43
............................................................44
....................................................................45
..............................................45
03

The parts of this appliance that may come into contact with foodstuffs
comply with the provisions of EEC Directive 89/109.Appliance
complies with European Directives 2006/95/EC and
2004/108/EC, and subsequent amendments.When you have
unpacked the oven, make sure that it has not been damaged in
any way. If you have any doubts at all, do not use it: contact a
professionally qualified person.
Keep packing materials such as plastic bags, polystyrene, or nails out
of the reach of children because they are dangerous to children.
1. GENERAL WARNINGS
Read the instructions carefully to make the most of your oven. We
recommend you keep the instructions for installation and use for later
reference, and before installing the oven, note its serial number in
case you need to get help from the after-sales service.
When you have unpacked the oven, make sure that it has not been
damaged in any way. If you have any doubts at all, do not to use it.
Contact a professionally qualified person. Keep packing materials
such as plastic bags, polystyrene, or nails out of the reach of children
because they are dangerous to children.
The company shall not be liable if the instructions provided in
this document are not complied with.
! NOTE: Functions, properties and accessories of ovens which
are mentioned in this manual, can be change depending on oven
models.
1.2 SAFETY HINTS
•The oven must be used only for the purpose for which it was designed. It
must only be used for cooking food. Any other use, e.g. as a form of
heating, is an improper use of the oven and is therefore dangerous.
•WARNING: The appliance and its accessible parts become hot during
use. Care should be taken to avoid touching heating elements.
•The manufacturers cannot be held responsible for any damage caused
by improper, incorrect or unreasonable use.
When using any electrical appliance you must follow a few basic rules.
- Do not pull on the power cable to remove the plug from the socket.
- Do not touch the oven with wet or damp hands or feet.
- Do not use the oven unless you are wearing something on your feet.
- It is not generally a good idea to use adapters, multiple sockets for
several plugs or cable extensions.
- If the oven breaks down or develops a fault switch it off at the mains and
do not touch it.
• If the cable is damaged it must be replaced promptly.
When replacing the cable, follow these instructions.
Remove the power cable and replace it with one of the H05VV-F type. The
cable must be able to bear the electrical current required by the
oven.Cable replacement must be carried out by properly qualified
technicians.
The earthing cable (yellow-green) must be 10 mm longer than the power
cable.
Use only an approved service centre for repairs and ensure that only
original parts are used. If the above instructions are not adhered to the
manufacturers cannot guarantee the safety of the oven.
•The oven you have just acquired has the described technical
characteristics and you must not make any modifications to it.
•Never use a steam or high-pressure spray to clean the oven.
•Do not store flammable products in the oven; they can catch fire if the
oven comes on accidentally.
•Do not press on and do not let children sit on the oven door.
•Use kitchen oven gloves, when putting into or removing a dish from the
oven.
•This appliance is not intended for use by people (including children) with
reduced physical, sensory or mental capabilities, or lack of experience and
knowledge, unless they have been given supervision or instruction
concerning use of the appliance by a person responsible for their safety.
•Children should be supervised to ensure that they do not play with the
appliance.
•Children less than 8 years of age shall be kept away unless continuously
supervised.
•This appliance can be used by children aged from 8 years and above and
persons with reduced physical, sensory or mental capabilities or lack of
experience and knowledge if they have been given supervision or
instruction concerning use of the appliance in a safe way and understand
the hazards involved.
•During use the appliance becomes hot. Care should be taken to avoid
touching heating elements inside the oven.
•WARNING: Accessible parts may become hot during use. Young children
should be kept away.
•WARNING: Ensure that the appliance is switched off before replacing the
lamp to avoid the possibility of electric shock.
•CAUTION: Accessible parts may be hot when the grill is in use. Young
children should be kept away.
1.1 DECLARATION OF COMPLIANCE
•In addition to the accessories supplied with the oven, we advise you only
use dishes and baking moulds resistant to very high Temperatures.
Code produit:
Numéro de série :
1.4 INSTALLATION
The manufacturers have no obligation to carry this out. If the
assistance of the manufacturer is required to rectify faults arising from
incorrect installation, this assistance is not covered by the guarantee.
The installation instructions for professionally qualified personnel
must be followed. Incorrect installation may cause harm or injury to
people, animals or belongings. The manufacturer cannot be held
responsible for such harm or injury.
The kitchen unit in which the oven is to be fitted must be made of
material resistant to temperatures of at least 70°C.
The oven can be located high in a column or under a worktop.
Before fixing, you must ensure good ventilation in the oven space to
allow proper circulation of the fresh air required for cooling and
protecting the internal parts. Make the openings specified on last page
according to the type of fitting.
1.5 ELECTRICAL CONNECTION
THE ELECTRICAL CONNECTION SHOULD BE CARRIED OUT BY
AN APPROVED CONTRACTOR OR TECHNICIAN WITH SIMILAR
QUALIFICATIONS.
The installation receiving the appliance must comply with the standard
in force in the installation country.
The manufacturer does not accept any responsibility if this provision is
not complied with.
Connection to the network must be by earthed socket outlet, or by
means of a multipole circuit-breaker, in compliance with the
installation country.
The installation must be protected by suitable fuses, and have wires
with a large enough cross-section to supply the oven normally.
CONNECTION:
The oven is fitted with a power lead for connecting exclusively to a
voltage of 220-240 V AC across the phases or across phase and
neutral.
Connection must be carried out having first checked:
-the supply voltage indicated on the meter,
The lead protection wire (green/yellow) connected to the earth
terminal of the oven must be connected to the earth terminal of the
installation.
Caution:
•Have the earth continuity of the installation checked by an electrician
before making the connection.
•The manufacturer will not be liable for any incident, or the possible
consequences that may arise from the use of the oven not earthed, or
connected to an earth with defective continuity.
NB: Do not forget that the oven may require after-sales service.
Also, locate the socket outlet so that the oven can be connected once
it is removed from its space.
Power supply cable: If the power supply cable has to be changed,
please have this done by the after-sales service or by someone with
similar qualifications.
1.3 RECOMMENDATIONS
• After each use of the oven, a minimum of cleaning will help keep the
oven perfectly clean.
• Do not line the oven walls with aluminium foil or single-use protection
available from stores. Aluminium foil or any other protection, in direct
contact with the hot enamel, risks melting and deteriorating the
enamel of the insides.
• In order to prevent excessive dirtying of your oven and the resulting
strong smokey smells, we recommend not using the oven at very high
temperature. It is better to extend the cooking time and lower the
temperature a little.
Identification plate
04 GB

2. PRO/EXP'R TECHNOLOGY
Our technology and experience have brought a feature typical of
professional kitchens into the home. A Multijet lateral ventilation
system emit microflows of hot air directly onto the food, at low speeds,
enveloping it completely.
This enables uniform cooking, reduced loss of food moisture and
simultaneous cooking on different levels.
2.1 OVEN EQUIPMENT
It is necessary to do an initial cleaning of the equipment before the first
use of each of them. Wash them with a sponge. Rinse and dry off.
The shelf can take moulds and dishes.
2.2 ROTISSERIE (According to the model)
No pre-heating is required for rotisserie cooking.
Cooking with the door closed.
The energy consumption is 90-95% less than traditional system.
The pastry tray must be placed on the shelf. It is for cooking small
pastries like choux, biscuits, meringues, etc...
Never place the pastry tray directly on the oven bottom and on
the separator.
When the oven is in use, any unused accessories should be
removed from the oven.
2.3
Is an illumination system which replaces the traditional « light bulb ».
14 LED (for non-pyrolitic versions) or 10 High Power LED (for pyrolitic
versions) lights are integrated within the door. These produce white
high quality illumination which enables to view the inside of the oven
with clarity without any shadows on all the shelves.
Advantages :
This system, besides providing excellent illumination inside the oven,
lasts longer than the traditional light bulb its easier and to maintain and
most of all saves energy.
-Optimum view
-Long life illumination
-Very low energy consumption, -95% in comparison with the
traditional illumination High
LED VISION / U.SEE
The drip tray catches the juices from grilled foods.
Never use he drip tray as a roasting tray as fat deposits can be quickly
spread throughout the oven, which produces excess smoke.
Never place the tray directly on the oven bottom on the
separator.
The seperator divides the oven into two cavities. It seperates upper
and lower cavity when you want to use oven in dual mode. It must be
used in third shelf position.
Never leave the seperator inside the oven when the Pyrolytic
mode is on.
The pizza stone for a crisper pizza equipped according to the model
with its stand and the pizza roller.
HOW TO USE TURNSPIT
1. Unscrew the hooks
2. Put the spit into the meat
3. Fix the meat with the hooks
4. Tighten the screws
5. Insert the spit into the motor hole
6. The handle
05 GB
2
1
3
4
1- Grid
2- Spit
3- Hooks & Screws
4- Handle

4. SERVICE CENTRE
Before calling the Service Centre.
If the oven is not working, we recommend that:
•Check that, if the oven is properly plugged into the power supply.
If the cause of the fault cannot be detected:
•Disconnect the oven from the mains, do not touch the oven and call
the after sales service.
Before calling the Service Centre remember to make a note of the
serial number on the serial number specifications plate.
The oven is supplied with a guarantee certificate that ensures that it
will be repaired free of charge by the Service Centre whilst under
guarantee.
This appliance is marked according to the European
directive 2002/96/EC on Waste Electrical and
Electronic Equipment (WEEE).
By ensuring this product is disposed of correctly, you
will help prevent potential negative consequences for
the environment and human health, which could
otherwise be caused by inappropriate waste handling
of this product.
The symbol on the product indicates that this product
may not be treated as household waste.
Instead it shall be handed over to the applicable collection point for the
recycling of electrical and electronic equipment Disposal must be
carried out in accordance with local environmental regulations for
waste disposal.
For more detailed information about treatment, recovery and
recycling of this product, please contact your local city office, your
household waste disposal service or the shop where you purchased
the product.
3. CLEANING THE OVEN
•Wait for the oven to cool down before doing any cleaning by hand.
•Never clean your oven with abrasive cleaners, wire wool or sharp
objects, or the enamel may be damaged beyond repair.
•Only use soapy water or bleach (ammonia) cleaners.
•Never line the oven sides with aluminium foil.
•Do not use a steam cleaner for cleaning operations.
•Cleaning and user maintenance shall not be made by children
without supervision
GLASS PARTS
We recommend you wipe clean the glass door with absorbent kitchen
paper every time you use the oven. If the spattering is heavy, then you
can clean with a well squeezed sponge and detergent, and rinse.
Do not use harsh abrasive cleaners or sharp metal scrapers to clean
the oven door glass since they can scratch the surface, which may
result in shattering of the glass.
OVEN DOOR SEAL
If this gets dirty, clean the oven seal with a slightly damp sponge.
ACCESSORIES
Clean them with a sponge soaked in soapy water. Rinse with clean
water and dry off. Avoid abrasive cleaners.
DRIP TRAY
After grilling, remove the drip tray from the oven. Take care to pour the
warm grease into a container. Wash and rinse the drip tray in hot water
with a sponge soaked in washing up liquid.
If residues remain attached, soak them off in water and detergent.
It can also go in a dishwasher or be cleaned with a commercial oven
cleaner.
Never place a soiled drip tray in the oven.
OVEN LIGHTING
The bulb and its cover are made of material resistant to high
temperatures.
Time Set
Function /
Cavity
Arrow (-) Arrow (+) Temperature / Time Set Start / Stop
On / Off
Pro/Booster
(total cavity)
Booster
Pro
Cooking
function
lower
cavity
Temperature
Cooking duration
End of cooking
Pyrolysis necessary
Child lock
Door lock
Right Display.
Lower Cavity
End of
cooking
(total cavity)
Cooking duration
(total cavity)
Central Display.
Setting Parameters/
Main Cavity
Temperature / Time
Cooking duration
End of cooking
Temperature
Cooking function
upper cavity
Booster
Pro
Timer
Left Display.
Upper Cavity
5. DESCRIPTION OF THE DISPLAY
START
STOP
ON
OFF
06 GB

5.1 BEFORE USING THE OVEN FOR THE
FIRST TIME
PRELIMINARY CLEANING
Clean the oven before using for the first time:
•Wipe over external surface with a damp soft cloth.
•Wash all accessories and wipe inside the oven with a solution of hot
water and washing up liquid.
•Set the empty oven to the maximum temperature and leave on for
about 1 hour, this will remove any lingering smells of newness. Ensure
that the room is well ventilated while this is being done.
THINGS TO REMEMBER
Confirmation of operation on timer:
•Modification must be confirmed by pressing “ ” .
Stop the oven:
•This may be necessary if you have input an incorrect instruction. To
stop the oven, press the “ ” .
CLOCK SETTING
When the oven is connected to the electricity supply for the first time of
after a long power cut, the clock must be re-set.
To set the clock:
1.Press the “ ” for few seconds and find the “ ” by using ,
then press the “ ”. The digits on the central display will blink.
2.Set the clock by using then wait a few second or press the
“ ” again to apply your setting.
ADJUSTING THE DISPLAY CONTRAST
1. Press the “ ” for few seconds and find the “ ”by using ,
then press the “ ”. (The contrast of the display brightness is
included between “1” maximum and “5” minimum.)
2. Choose the contrast level by using then wait few seconds or
press the “ ” again to apply your setting.
NOTE: If you want to set the clock or to adjust the display contrast after
the first switching on of the oven, press the “ ” for switch on the
oven, and proceed how described in the points 1 and 2 of the specific
paragraphs.
MINUTE MIND
1.Press the “ ” for switch on the oven.
2.Press the “ ” for few seconds and find the “ ”by using the ,
then press the “ ” .
3.Set the required time by using the , then wait a few seconds or
press the “Temperature/Time SET ” again to apply your setting.
NOTE: This function allows oven to be used as an alarm clock
independently form the working oven.
CHILD LOCK
1. To set the child lock press “ ” for few seconds.
2.
To activate press “ ” “OK”
To activate press “ ” “NO”
NOTE: It is possible to activate child lock both when the oven in ON
and OFF
START
STOP
ON
OFF
ON
OFF
5.2 HOW TO USE OVEN
SINGLE MODE
To use the Single Mode, remove the seperator from the oven.
You can choose all the functions below with Single Mode.
The cooking methods suggested are set out in the table below. A
temperature is also suggested for each cooking method. This can be
modified within a pre-determined range.
07 GB
*Booster: rapid temperature raised
-
160
210
220
210
180
L2
210
240
40
60
NORMAL
Off
Bottom
Bottom+Fans
Bottom+Top
Bottom+Top+Fans
Rings+Fans
Grill
Grill+Fans
Grill+Turnspit+Fans
Defrost
Keep Warm
Pyro * **
-
50-240
50-240
50-280
50-240
50-240
L1-L3
180-230
180-240
No
No
ECO:425/65min
NORMAL:425/75min
SUP:425/1h30min
-
-
Booster
-
-
-
-
Booster
Booster
-
-
-
1.Press the “ ” to switch on the oven.
2.Press the “ ”. Choose function required to the cooking by using
.
3.The appropriate temperature or level cooking, according to the
cooking method selected is displayed. It can be modified within a pre-
determined range - see table above. To modify the temperature
setting, press the “ ” and choose the temperature by using .
Then press the “ ” again to confirm. The temperature display is
fixed but can be modified during the cooking cycle.
4.To start the cooking, press the “ ” . The oven will start
cooking and will start to heat up. The indicator light blinks until the
selection temperature has been reached. An audible sounds at the the
end of this operation and the indicator light becomes fixed.
5.To change the oven function, repeat the steps for 2 to 4.
6.To stop the cooking press the “ ”.
ON
OFF
START/STOP
START
STOP
DUAL MODE
To activate the Dual Mode, put the separator into the third position
shelf of the oven. You can choose the functions below with Dual Mode.
1- Press the “ ” switch on the oven.
2- Press the “ ” select which part of the oven cavity (UPPER or
LOWER) must be used; choose the function required to the cooking
by using the .
3- The appropriate temperature or level cooking, according to the
method selected is displayed.
It can be modified within a pre-determined range-see table below.
To modify the temperature setting, press the “ ” and choose the
temperature by using .
Then press the “ ”again to confirm. The temperature display is fixed
but can be modified during the cooking cycle.
4- To start the cooking, press the “ ” .
The oven will start cooking and will start to heat up. The indicator light
blinks until the selected temperature has been reached; an audible
sounds at the end of this operation and the indicator light becomes
fixed.
5- To stop the cooking, select the “ ”.
ON
OFF
START/STOP
Pre-set
temperature
°C
Function Mode according
to the oven model
Pre-determined
temperature °C
Function
Booster*

6. COOKING MODE
All cooking should be carried out with the door closed.
BOTTOM + FAN - The combination of the bottom heating
element and fan is ideal for fruit flans, tarts, quiches and pastries. It
prevents food from becoming too dry and encourages bread dough to rise.
Place the shelf in the bottom position in the oven.
BOTTOM - Using the lower element. Ideal for cooking all pastry
based dishes. Use this for flans, quiches, tarts, pâté and any cooking that
needs more heat and radiation from below.
BOTTOM + GRILL - Both top and bottom heating elements are
in use. This method is ideal for all traditional roasting and baking.When
cooking red meat, roast beef, leg of lamb, game, bread or foil wrapped
foods.
BOTTOM + GRILL + FAN - Both top and bottom heating
elements are used in conjunction with the fan, which circulates hot air
throughout the oven.We recommend this method for poultry, pastries, fish
and vegetables. By using this method better heat penetration is achieved
and cooking and preheating times are also reduced. The fan cooking
option allows you to cook different foods together at different positions in
the oven all at the same time, providing even heat distribution but without
the risk of mingling tastes and smells. When cooking different foods at the
same time allow a further 10 minutes.
RING + FAN - Air that has been heated is blown by the fan onto
the different levels. It is ideal for cooking different types of food at the same
time (e.g. meat and fish) without mixing tastes and smell. It cooks very
gently and is ideal for sponge cakes, pasties, etc.
GRILL - Using the top heating element. Success is guaranteed
for mixed grills, kebabs and gratin dishes. The grill should be pre-heated to
a high temperature for 5 minutes. White meats should always beplaced at
some distance from the grill element, the cooking time is slightly longer but
the meat will be more succulent. Red meat and fish fillets can be placed
directly onto the shelf with the drip tray placed beneath on lower shelf
position.
GRILL + FAN - The top heating element is used in conjunction
with the fan which circulates the hot air around the oven. Pre heating is
recommended for red meats but is not necessary for white meats. Grilling
is ideal for cooking thicker food items such as pork or poultry. Food to be
grilled should be placed directly at the centre of the middle shelf. By sliding
the drip tray underneath the shelf it will ensure that any juices are
collected. For best results always make sure that the food is not too close
to the grill element and turn the food over half way through the cooking
time.
GRILL + TURNSPIT + FAN - The advantage of using the top
oven element at the same time as the fan and rotisserie is that the food is
evenly cooked, preventing it from becoming dry and tasteless. The
rotisserie is programmed to continue rotating for approximately five
minutes after cooking, making full use of the residual oven heat.No
preheating is required for rotisserie cooking.
DEFROST - When the dial is set to this position. The fan
circulates hot air around the frozen food so that it defrosts in a few minutes
without the protein content of the food being changed or altered.
The temperature is preset in 40°C constant, no regulation is possible.
KEEP WARM - This is recommended to reheat precooked
foodstuff, positioning the shelf on the second level from top, or to defrost
bread pizza or pastry by positioning the shelf on the lower level.
The temperature is preset in 60°C constant, no regulation is possible.
RING + FAN - Air that has been heated is blown by the fan onto
the different levels. It is ideal for cooking different types of food at the same
time (e.g. meat and fish) without mixing tastes and smell. It cooks very
gently and is ideal for sponge cakes, pasties, etc.
GRILL - Using the top heating element. Success is guaranteed
for mixed grills, kebabs and gratin dishes. The grill should be pre-heated to
a high temperature for 5 minutes. White meats should always beplaced at
some distance from the grill element, the cooking time is slightly longer but
the meat will be more succulent. Red meat and fish fillets can be placed
directly onto the shelf with the drip tray placed beneath on lower shelf
position.
GRILL + FAN - The top heating element is used in conjunction
with the fan which circulates the hot air around the oven. Pre heating is
recommended for red meats but is not necessary for white meats. Grilling
is ideal for cooking thicker food items such as pork or poultry. Food to be
grilled should be placed directly at the centre of the middle shelf. By sliding
the drip tray underneath the shelf it will ensure that any juices are
collected. For best results always make sure that the food is not too close
to the grill element and turn the food over half way through the cooking
time.
RING + FAN - Air that has been heated is blown by the fan onto
the different levels. It is ideal for cooking different types of food at the same
time (e.g. meat and fish) without mixing tastes and smell. It cooks very
gently and is ideal for sponge cakes, pasties, etc.
BOTTOM - Using the lower element. Ideal for cooking all pastry
based dishes. Use this for flans, quiches, tarts, pâté and any cooking that
needs more heat and radiation from below.
BOTTOM + FAN - The combination of the bottom heating
element and fan is ideal for fruit flans, tarts, quiches and pastries. It
prevents food from becoming too dry and encourages bread dough to
rise. Place the shelf in the bottom position in the oven.
PYRO - The oven takes care of the entire inside oven cleaning -
Three choices are possible ECO, NORMAL, SUPER
08 GB
Upper Cavity
Lower Cavity
*Booster: rapid temperature raised
Pre-set
temperature °C
180
L2
190
Function Mode according
to the oven model
Ring+Fan
Grill
Grill+Fan
Pre-determined
temperature °C
160-240
L1-L3
160-240
Function
Booster*
-
-
-
*Booster: rapid temperature raised
Pre-set
temperature °C
Function Mode according
to the oven model
Pre-determined
temperature °C
Function
Booster*
-
-
-
180
160
160
Ring+Fan
Bottom
Bottom+Fan
160-240
160-240
160-240
USING UPPER AND LOWER CAVITY AT THE SAME TIME
The two cavity (UPPER and LOWER) must be used simultaneously, for
two different type of cooking; for set this modality of cooking, to set the
mode of cooking please proceed as follows:
1- Press the “ ” to select the second cavity to be used and follow the
instruction from “1” to “5” of above paragraph.
COOKING DURATION
1.Press “time set” and find “hourglass” by using “arrows”
2.Press “Temperature/Time Set” and set the cooking duration by using
“arrows”
3.To confirm your setting , press “Temperature/Time Set” again
END OF COOKING
1.Press “time set” and find “hourglass” by using “arrows”
2.Press “Temperature/Time Set” and set the end of cooking time by using
“arrows”
3.To confirm your setting , press “Temperature/Time Set” again.
NOTE: For deleting a time already set, find “barred clock” by using
“arrows” in the time set menu and press “Temperature/Time Set”
This function is typically used with “cooking duration” function.
For example if the dish has to be cooked for 45 minutes and needs to be
ready by 12:30;
- select the required function
- set the cooking duration time to 45 minutes
- set the end of cooking time to 12:30.
Cooking will start automatically at 11:45 (12:30 minus 45 mins) and will
continue until the pre-set end-of- cooking-time, when the oven will switch
itself off automatically.
If the END of cooking is selected without setting the length of
cooking time, the oven will start cooking immediately and it will stop
at the END of cooking time set.
WARNING.

7. PYROLYTIC CYCLE (According to the model)
The oven is equipped with a pyrolyser cleaning system, which
destroys food residues at high temperature.The operation is carried
out automatically by means of the programmer.The resulting fumes
are rendered “clean” by passing over a Pyrolyser wich starts as soon
as cooking begins. As very high temperatures are required by the
Pyrolyser, the oven door is fitted with a safety lock.
The pyrolyser can be stopped at any time. The door cannot be opened
until the safety lock is displayed.
NOTE : If a hob has been fitted above the oven, never use the gas
burners or the electric hot-plates while the Pyrolyser is working, this
will prevent the hob from overheating.
THREE PYROLYTIC CYCLE are pre-set.
•ECO PYROCLEAN : Cleans a moderately stained oven.Operates
for a period of 65 minutes.
•NORMAL PYROCLEAN :
for a period of
•SUPER PYROCLEAN : Cleans a heavily stained oven.Operates for
a period of 90 minutes.
Never use commercially available cleaning products on a
Pyrolytic oven !
Tip : Carrying out Pyrolytic cleaning immediately after cooking allows
you to take advantage of residual heat, thus saving energy.
Before carrying out a Pyrolytic cycle :
•Remove all accessories from the oven (seperator, grids, trays,
etc.) : They cannot withstand the high temperatures and would be
damaged by pyrolytic temperatures.
•Remove any large spillages or stains as it would take too long to
destroy them. Also excessively large amounts of grease could ignite
when subject to the very high temperatures of the Pyrolytic cycle.
•Close the oven door.
•Excess spillage must be removed before cleaning.
Using the pyrolytic cycle :
1- Press the “ ”. Choose the “ ” by using then press the
“ ” to confirm. “ ” will appear on screen. ECO mode flashes.
Remember :
ECO - cycle of 65 minutes - moderately stained oven
NORMAL - cycle of 75 minutes - normaly stained oven
SUP - cycle of 90 minutes - heavily stained oven
2- By using select required Pyrolytic mode, according the
degree of staining: ECO, NORMAL or SUP. Then press the “ ” to
confirm.
• Your choice is confirmed after 3 seconds...
The oven starts the pyrolytic cycle. The pyrolytic mode selected
flashes and the “ ” and the “ ” indicator lights will appear. During
the pyrolytic cycle, the locking oven door symbol appears, this
indicates that the door is locked. The cooling fan will operate.
The indicator light flashes until the temperature required is not
reached and then it becomes fixed.
At the end of the pyrolytic cycle the oven will automatically switch off.
For 15 seconds, an audible signal lets you know that the cycle has
ended and the “ ” and the “ ” indicator lights will flash.
•Press the “ ” to stop. Unless you do this, the symbols will
continue flashing. The symbol “ ” disappears on the Timer, the
pyrolytic mode.
This sentence is incorrect
The oven door will remain locked until the temperature has reduced.
Whist the locking oven door symbol is illuminated the oven door can
not be opened.
The cooling fan does not switch itself off until the temperature of the
oven components is reasonable.
At the end of the cycle, the indicator flashes again, it will remain also
turned on after having extinguished the oven and it will extinguish
when the inside temperature of the oven is sufficiently low.
Pyrolysis leaves a white residue on the oven walls. Wait for the oven to
cool completely then clean the inside of the oven with a damp sponge
to wipe off the residue.
Cleans a normaly stained oven. Operates
75 minutes
START
STOP
18 GB
It is better not to salt meats until after cooking as salt encourages the
meat to spatter fat. This will dirty the oven and make a lot of smoke.
Joints of white meat, pork, veal, lamb and fish can be put into the oven
cold. The cooking time is longer than in a preheated oven, but it cooks
through to the centre better as the heat has more time to penetrate the
joint.
Correct preheating is the basis of successful red meat cookery.
GRILLS
• Before loading the grill:
Remove the meat from the refrigerator a few hours before grilling. Lay
it on several layers of kitchen paper. This improves seizing, making it
tastier and avoids it staying cold at the centre.
Add pepper and spices to the meat before grilling, but add any salt
after cooking. This way it will seize better and stay juicy. Baste all the
food to be cooked with a little oil. This is best done with a wide flat
basting brush.Then sprinkle with more pepper and herbs (thyme,
etc.).
• During cooking:
Never pierce the food during cooking even when you turn it. This lets
the juice out and it becomes dry.
BAKING
Avoid using shiny tins, they reflect the heat and can spoil your cakes. If
your cakes brown too quickly, cover them with greaseproof paper or
aluminium foil.
Caution: The correct way to use foil is with the shiny side in towards
the cake. If not the heat is reflected by the shiny surface and does not
penetrate the food.
Avoid opening the door during the first 20 to 25 minutes of
cooking:
Soufflés, brioches, sponge cakes, etc. will tend to fall.You can check if
cakes are done by pricking the centre with a knife blade or metal
knitting needle. If the blade comes out nice and dry, your cake is ready
and you can stop cooking. If the blade comes out moist or with bits of
cake attached, continue baking but slightly lower the thermostat so
that it is finished off without burning.
8. COOKING TIPS
09 GB

Las piezas del aparato que puedan estar en contacto con alimentos cumplen
las disposiciones de la Directiva EEC 89/109.
El Aparato cumple las Directivas Europeas 73/23/EEC y 89/336/EC,
sustituidas por la 2006/95/EC y la 2004/108/EC y sus enmiendas
correspondientes. Cuando haya desempaquetado el horno,
Asegúrese in minusculeasegúrese de que no tiene daño alguno. Si
tiene dudas, no lo utilice: contacte con un profesional cualificado.
Procure que todo el material de embalaje, como bolsas de plástico, polietileno
o tiradores está fuera del alcance de los niños ya que son materiales peligrosos
para ellos.
1. ADVERTENCIAS GENERALES
Leer las instrucciones detalladamente para sacar el mejor partido del horno.
Recomendamos conservar las instrucciones de instalación y utilización para
futuras consultas. Antes de instalar el horno anote el número de serie por si
necesitase contactar con el servicio de atención al cliente.
Una vez desembalado el horno, asegurarse de que no está dañado. En caso de
tener dudas, no utilizar. Contactar con una persona cualificada. Conservar el
embalaje (bolsas de plástico, polietileno o clavos) fuera del alcance de los niños
ya que puede ser peligroso para ellos.
La compañía no se hará responsable en caso de no cumplir las
instrucciones indicadas en este documento.
ANTENCIÓN: Las funciones, propiedades o accesorios del horno
mencionadas en este manual pueden variar dependiendo del modelo de
horno.
1.2 CONSEJOS DE SEGURIDAD
* El horno ha de utilizarse únicamente con el fin para el que ha sido diseñado.
Sólo se puede utilizar para cocinar alimentos. Otros uso, como por ejemplo,
medio de calefacción, es un uso indebido del horno y por lo tanto es peligroso.
* ATENCIÓN: Todas las piezas accesibles y elementos calefactores están
calientes cuando esté en funcionamiento el horno. Ha de tenerse cuidado y
no tocarlas.
* ADVERTENCIA: El aparato y sus componentes accesibles se calientan
durante el uso. Se debe tener cuidado de no tocar los elementos calefactores.
* El fabricante no puede responsabilizarse de caños causados por un uso
inadecuado, incorrecto o no razonable.
Cuando se utilicen dispositivos eléctricos han de seguirse las normas
siguientes:
- No tirar del cable eléctrico para desenchufarlo.
- No tocar el horno con las manos (o los pies) húmedas o mojadas.
- No utilizar el horno salvo que lleve calzado en los pies.
- No suele ser recomendable la utilización de alargadores o ladrones para
varios enchufes o alargadores.
- Si el horno se estropea o tiene un fallo desenchúfelo de la corriente y no lo
toque.
- Si el cable está dañado ha de sustituirse inmediatamente.
Cuando se sustituya el cable, síganse las instrucciones siguientes:
Extraer el cable y sustituir por uno del tipo H05VV-F. El cable tiene que poder
soportar la carga eléctrica que requiere el horno. La sustitución del cable tiene
que hacerla un técnico cualificado.
El cable de tierra (amarillo-verde) tiene que ser 10 mm más largo que el cable
eléctrico.
Utilizar sólo el servicio de atención al cliente adecuado para las reparaciones
y asegurar que sólo se utilizan piezas originales. Si no se siguen las
instrucciones anteriores, los fabricantes no pueden garantizar la seguridad
del horno.
* El horno adquirido tiene las características técnicas descritas y usted no
puede modificarlas.
* Jamás utilice un espray de difusión o a presión para limpiar el horno.
* No guardar en el horno productos inflamables, podrían prender fuego si se
accionase el horno accidentalmente.
* No permitir que los niños se sienten en la puerta del horno, menos aún
cuando esté encendido.
* Utilizar guantes de horno cuando introduzca o saque los recipientes del
horno.
* El horno no está pensado para personas (incluidos niños) con discapacidad
física, sensorial ni mental, o que carezcan de experiencia o conocimientos,
salvo que estén supervisados o se les enseñe a manejarlo de forma segura y
de forma que comprendan los peligros que conlleva su utilización.
* El horno se calienta cuando se utiliza. Hay que tener cuidado y no tocar los
componentes internos del horno ya que podrían estar muy calientes.
Los niños menores de 8 años deben permanecer alejados o supervisados
de forma continuada por una persona adulta.
Este aparato puede ser usado por niños mayores de 8 años y personas con
capacidades físicas, sensoriales o mentales reducidas o falta de experiencia
y conocimiento siempre y cuando hayan sido supervisadas o instruidas
sobre el uso del aparato de forma segura y del conocimiento de los riesgos
que comporta.
Durante el uso, se calienta el aparato. Se debe tener cuidado de no tocar los
elementos calefactores del interior del horno.
ATENCIÓN: Los accesorios pueden calentarse durante la utilización del
horno. Mantener alejados a los niños.
ATENCIÓN: Asegurarse de que el horno está desenchufado antes de
cambiar la bombilla para evitar así la posibilidad de descarga eléctrica.
CUIDADO: Puede que las piezas internas del horno estén calientes cuando
se utilice el grill. Mantener alejados a los niños.
•
•
•
1.1 DECLARACION DE CUMPLIMIENTO
* Además de los accesorios proporcionados con el horno, sugerimos
utilizar sólo recipientes y moldes resistentes a temperaturas muy
elevadas.
Code produit:
Numóro de sórie :
1.4 INSTALACIÓN
No es obligación del fabricante instalar el horno. Si se requiere la
ayuda del fabricante para subsanar fallos derivados de una
instalación incorrecta, dicha asistencia no la cubrirá la garantía.
Han de seguirse a rajatabla las instrucciones de instalación para
personal cualificado. Una instalación incorrecta puede provocar
daños personales, materiales o en animales. El fabricante no se hace
responsable de esos posibles daños.
La cocina en la que se vaya a instalar el horno tiene que estar hecha
de un material resistente a temperaturas de al menos 70ºC.
El horno se puede colocar encima, en una columna, o debajo de
una encimera.
Antes de fijar el horno hay que asegurar una buena ventilación en el
hueco donde se vaya a colocar y que el aire necesario para enfriar y
proteger las piezas internas circula sin problema. Realizar las
aperturas especificadas en la última página según el tipo de altura.
1.5 CONEXIÓN ELÉCTRICA
LA CONEXIÓN ELÉCTRICA HA DE REALIZARLA UN
CONTRATISTA APROBADO O UN TÉCNICO CON FORMACIÓN
SIMILAR.
La instalación a la que va a conectarse el horno tiene que cumplir los
estándares vigentes en el país de instalación.
El fabricante no asume responsabilidad alguna si no se cumple la
presente esta disposición.
La conexión a la red debe que tener toma de tierra, o un cortacircuitos
multipolar, como corresponda al país de instalación.
La instalación tiene que disponer de los fusibles correspondientes y
los cables han de tener un cruce de sección de largo suficiente como
para alimentar eléctricamente el horno.
CONEXIÓN:
El horno está diseñado para una conexión exclusiva de 220-240
voltios AC en las fases o en la fase y el neutro.
La conexión tiene que hacerse comprobando primero:
- el voltaje indicado.
El cable correspondiente a la toma de tierra (amarillo/verde) del horno
tiene que conectarse a la toma de tierra de la instalación.
Atención:
*Antes de la conexión el electricista tiene que comprobar la
continuidad de tierra de la instalación.
*El fabricante no se responsabiliza de incidente, o consecuencias del
mismo, que puedan derivarse del uso de hornos que no tengan toma
de tierra o conectados a una toma de tierra con continuidad
defectuosa.
NB: Recordar que el horno puede necesitar el servicio de atención al
cliente. También es importante que el enchufe esté ubicado en un sitio
accesible para conectar el horno una vez que éste esté colocado.
Cable eléctrico: Si hay que cambiar el cable eléctrico, contactar con
el servicio de atención al cliente o con alguien de cualidades similares
1.3 RECOMENDACIONES
* Una limpieza mínima después de utilizar el horno ayudará a
mantenerlo limpio durante más tiempo.
* No forrar las paredes del horno con aluminio u otras protecciones
disponibles en tiendas. El aluminio o los protectores, en contacto
directo con el esmalte caliente puede derretirse y deteriorar el
esmalte del interior.
* Para evitar un exceso de suciedad en el horno y que pueden derivar
en olores y humo en exceso, recomendamos no utilizar el horno a
temperaturas muy elevadas. Es mejor ampliar el tiempo de cocción y
bajar un poco la temperatura.
Placa de identificación
10 ES

CÓMO UTILIZAR EL ASADOR GIRATORIO
1. Desatornillar los ganchos
2. Pase el asador a través de la carne
3. Ajuste la carne con los tornillos
4. Apretar los tornillos
5. Colocar el asador en el agujero correspondiente
6. Retire el mango
11 ES
2
1
3
4
1-Parrilla
2-Asador
3-Pinchos y tornillos
4-Mango
2. TECNOLOGÍA PRO/EXP'R (DEPENDE DEL MODELO)
Nuestra tecnología y experiencia presenta una característica típica
de las cocinas profesionales en casa. Un sistema de ventilación
Multijet lateral emite microcorrientes de aire caliente directamente a la
comida, a baja velocidad, envolviéndolo completamente.
Esto permite una cocción uniforme, reduce la pérdida de líquidos de
los alimentos y la cocción simultánea a diferentes alturas.
2.1 EQUIPAMIENTO DEL HORNO
Es necesario hacer una limpieza inicial de todas las partes del
equipamiento antes de utilizarlo por primera vez. Lavar con una
esponja. Enjuagar y secar.
La rejilla puede sostener moldes y bandejas.
2.2 ASADOR (DEPENDE DEL MODELO)
No se requiere calentamiento previo del horno para esta función.
Cocinar con la puerta cerrada.
El consumo de energía es de un 90-95% menos que con el sistema
tradicional.
La bandeja de repostería tiene que colocarse encima de la rejilla. Se
utiliza para cocinar dulces como cremas, bizcochos, merengues,
etc…
No colocar jamás la bandeja de repostería en el horno en
contacto con la parte inferior del mismo ni encima del separador
Cuando se está utilizando el horno, los accesorios innecesarios han
de extraerse del interior del horno.
2.3
Es un sistema de iluminación que sustituye el tradicional sistema “de
bombilla”. En la puerta del horno se integran 14 luces LED (en
versiones no pirolíticas) o 10 luces LED de Potencia Superior (en
modelos pirolíticos). Las luces LED crean una iluminación blanca de
calidad que permite ver dentro del horno con claridad todas las
bandejas sin sombras.
Ventajas:
Este sistema, además de proporcionar una iluminación excelente
dentro del horno, dura más que la bombilla tradicional, tiene un
mantenimiento más sencillo y, sobre todo, ahorra energía.
-Visión óptima
-Iluminación duradera
-Consumo energético muy bajo, reducción del 95% en comparación
con la iluminación tradicional.
LED VISION / U.SEE
La bandeja recoge los flujos de los alimentos asados.
No utilizar nunca la bandeja como bandeja de asar ya que la grasa
puede esparcirse rápidamente por todo el horno, lo que provocaría un
exceso de humo.
No colocar jamás la rejilla en el horno en contacto con la parte
inferior del mismo ni sobre el separador
El separador divide el horno en dos espacios. Separa la parte
superior de la inferior en caso de querer utilizar el honor en modo dual.
Debe colocarse en la tercera vía.
No colocar jamás el separador en el horno cuando éste está en
modo Pirolítico.
Soporte para pizza, para una pizza crujiente acorde al modelo del
horno, con agarraderas y cortapizzas.

4. SERVICIO TÉCNICO
Antes de llamar al Servicio Técnico.
Si el horno no funciona, recomendamos:
-Comprobar si el horno está bien conectado a la red eléctrica.
Si no se puede detectar el fallo:
-Desconectar el horno de la corriente, no tocar el horno y llamar al
servicio de atención al ciudadano.
Antes de llamar al Servicio Técnico recordar tomar nota del número
de serie de la placa de especificaciones del número de serie.
El horno tiene un certificado de garantía que asegura que se reparará
de forma gratuita por parte del Servicio Técnico mientras dicha
garantía esté en vigor.
Este electrodoméstico dispone de la marca de la
Directiva Europea 2002/96/EC sobre Residuos de
Aparatos Eléctricos y Electrónicos (WEEE).
Asegurándose de que este producto se elimina de
forma correcta se evitarán consecuencias negativas
potenciales para el medioambiente y la salud que
podrían darse en caso contrario.
El símbolo en el producto indica que el producto no
puede tratarse como residuo doméstico. En su lugar
debe llevarse al punto de recogida para el reciclaje de
equipos eléctricos y electrónicos. Debe eliminarse de acuerdo con la
normativa local medioambiental para la eliminación de residuos.
Para más información sobre el tratamiento, recuperación y reciclaje
del producto, póngase en contacto con su oficina local, el servicio de
recogida de residuos o la tienda en la que haya comprado el producto.
3. LIMPIEZA DEL HORNO
* Esperar a que se enfríe el horno antes de limpiarlo manualmente.
* No limpiar el horno con limpiadores abrasivos, estropajo de metal o
cuchillas. El esmalte tampoco ya que podría resultar dañado.
* Utilizar sólo agua con jabón o limpiadores con lejía (amoníaco)
* No forrar jamás las paredes internas del horno con papel de aluminio.
* No utilizar limpiadores a presión para su limpieza.
* Los niños no pueden realizar labores de limpieza y mantenimiento sin
supervisión
* No utilice limpiadores de vapor para la limpieza del aparato.
* La limpieza y el mantenimiento que debe realizar el usuario no será
realizada por niños sin supervisión.
PIEZAS DE CRISTAL
Recomendamos limpiar el cristal de la puerta con papel de cocina cada
vez que se utilice el horno. Si el cristal tiene muchas salpicaduras, limpiar
con una esponja y detergente, y secar posteriormente.
* No utilizar limpiadores abrasivos o cuchillas para limpiar la puerta de
cristal del horno ya que podría rayarse el cristal y provocar grietas en el
mismo.
* No utilizar limpiadores abrasivos o rascadores metálicos afilados para
limpiar el cristal de la puerta del horno ya que pueden rayar la superficie,
pudiendo comportar la rotura del cristal.
SELLO DE LA PUERTA DEL HORNO
En caso de ensuciarse, limpiar el sello del horno con una esponja
ligeramente humedecida.
ACCESORIOS
Después del uso, sacar la bandeja del horno. Lavar la rejilla con una
esponja, agua caliente y jabón. Secar.
Si quedan residuos, sumergir en agua y detergente.
También se puede meter en el lavavajillas o con limpiadores comerciales
para hornos.
No colocar rejillas sucias en el horno.
ILUMINACIÓN DEL HORNO
La bombilla y su cubierta están hechas de un material resistente a
temperaturas elevadas.
Configuración
de Hora
Modo/
Cavidad
Flecha (-)
Flecha (+)
Configuración
Temperatura/Tiempo
Inicio/Detención
Encendido/
Apagado
Pro/Booster
(cavidad total)
Booster Pro
Modo de
Programa de
cavidad
inferior
Temperatura
Duración del programa
Final del programa
Pirólisis necesaria
Bloqueo para niños
Cierre de puerta
Pantalla Derecha
Cavidad Inferior
Final del
Programa
(cavidad total)
Duración del
Programa
(cavidad total)
Pantalla Central
Parámetros de Configuración/
Cavidad Principal
Temperatura/Hora
Duración del programa
Final del programa
Temperatura
Programa de cocinado de
la cavidad superior
Booster
Pro
Alarma
Pantalla Izquierda
Cavidad Superior
5. DESCRIPCIÓN DE LA PANTALLA
START
STOP
ON
OFF
12 ES

5. 1 ANTES DE UTILIZAR EL HORNO POR
PRIMERA VEZ
LIMPIEZA PREVIA
Limpiar el horno antes de utilizarlo por primera vez:
-Limpiar la superficie externa con un paño húmedo.
-Lavar todos los accesorios y el interior del horno con agua caliente y
líquido limpiador.
-Poner el horno vacío a temperatura máxima durante 1 hora, con ello
se eliminarán los olores del dispositivo nuevo. Asegurar una buena
ventilación de la habitación durante esa hora.
RECORDAR
Confirmación del temporizador
Las modificaciones se tienen que confirmar pulsando el botón .
Detención del horno:
Puede ser necesario en caso de configurar una orden incorrecta.
Para detener el horno pulsar .
CONFIGURACIÓN DEL RELOJ
Habrá que configurarse nuevamente cuando se conecte el horno a la
corriente o después de mucho tiempo sin utilizarlo
Configurar el reloj:
1. Pulsar durante unos segundos y buscar utilizando ,
a continuación pulsar . Parpadearán los dígitos de la pantalla
central.
2. Configurar el reloj utilizando , esperar unos segundos o pulsar
de nuevo para guardar la configuración.
AJUSTE DEL CONTRASTE DE LA PANTALLA
1. Pulsar durante unos segundos y buscar utilizando ,
luego pulsar . (EL contraste del brillo de la pantalla se incluye
entre un máximo de “1” y un mínimo de “5”.)
2. Elegir el nivel de contraste utilizando y esperar unos segundos
o pulsar de nuevo para guardar la configuración.
NOTA: Si se quiere configurar el reloj o ajustar el contraste de pantalla
después de haber conectado el horno por primera vez, pulsar
para enchufar el horno y proceder como se describe en los
puntos 1 y 2 del apartado específico.
ALARMA
1.Pulsar para conectar el horno.
2.Pulsar durante unos segundos y buscar utilizando ,
a continuación pulsar .
3.Configurar el tiempo necesario utilizando , esperar unos
segundos o pulsar de nuevo para
guardar la configuración.
NOTA: Esta función permite utilizar el horno como alarma
independientemente de que esté en funcionamiento o no.
BLOQUEO PARA NIÑOS
1.Para configurar el bloqueo para niños, pulsar durante unos
segundos.
2.
Pulsar para activar
Pulsar para activar
NOTA: La función “bloqueo para niños” se puede activar tanto si el
horno está encendido (ON) como apagado (OFF).
“ ”
“ ”
“ ” “ ”
“ ”
“ ”
“ ” “ ”
“ ”
“ ”
“ ”
“ ”
“ ” “ ”
“ ”
“Temperature/Time SET ”
“ ”
“ ” “OK”
“ ” “NO”
START
STOP
ON
OFF
ON
OFF
5.2 CÓMO UTILIZAR EL HORNO
EN MODO ÚNICO
Para utilizar el Modo Único, quitar el separador del horno.
Con el modo único se pueden seleccionar todas las funciones siguientes.
En la tabla siguiente se recogen todos los métodos de cocinado
sugeridos. Se sugiere también la temperatura para cada método de
cocinado. Esta temperatura se puede modificar dentro del rango
predeterminado.
13 ES
*Booster: aumento rápido de la temperatura
-
160
210
220
210
180
L2
210
240
40
60
NORMAL
Off
Base
Base+Ventiladores
Base+Superior
Base+Superior
+Ventilador
Ring+Ventilador
Grill
Grill+Asador
Grill+Asador+
Ventilador
Descongelado
Conservar el calor
Pyro * **
-
50-240
50-240
50-280
50-240
50-240
L1-L3
180-230
180-240
No
No
ECO:425/65min
NORMAL:425/75min
SUP:425/1h30min
-
-
Booster
-
-
-
-
Booster
Booster
-
-
-
1.Pulsar para conectar el horno.
2.Pulsar . Elegir la función de cocinado utilizando .
3. Se mostrará la temperatura o nivel de cocina adecuado, según el
método de cocinado seleccionado. Se puede modificar dentro de un
rango predeterminado ver tabla anterior. Para modificar la
temperatura de configuración, pulsar y elegir la temperatura
utilizando . A continuación pulsar otra vez para confirmar.
La temperatura mostrada es fija pero se puede modificar durante el
ciclo de cocinado.
4.Para iniciar el cocinado, pulsar . El horno empezará
a funcionar y la temperatura a subir. El indicador luminoso parpadea
hasta que se alcance la temperatura seleccionada. Sonará un pitido
al final de la operación y el indicador se quedará encendido sin
parpadear.
5.Para cambiar la función del horno, repetir los pasos del 2 al 4.
6.Para detener el horno, pulsar
MODO DUAL
Para activar el Modo Dual, colocar el separador en la tercera vía del
horno. Con el Modo Dual se pueden elegir las funciones siguientes.
1- Pulsar para conectar el horno.
2- Pulsar para seleccionar la parte del horno (SUPERIOR o
INFERIOR) que ha de utilizarse; elegir la función necesaria para el
cocinado utilizando .
3- Se mostrará la temperatura o nivel de cocina adecuado, según el
método de cocinado seleccionado. Se puede modificar dentro de un
rango predeterminado ver tabla anterior. Para modificar la
temperatura de configuración, pulsar y elegir la temperatura
utilizando . A continuación pulsar otra vez para confirmar.
La temperatura mostrada es fija pero se puede modificar durante el
ciclo de cocinado.
4- Para iniciar el cocinado, pulsar .
El horno empezará a funcionar y la temperatura a subir. El indicador
luminoso parpadea hasta que se alcance la temperatura
seleccionada. Sonará un pitido al final de la operación y el indicador
se quedará encendido sin parpadear.
5- Para detener la cocción, seleccionar
“ ”
“ ”
“ ”
“ ”
“ ”.
“ ”
“ ”
“ ”
“ ”
“ ”
ON
OFF
START/STOP
START
STOP
ON
OFF
START/STOP
Temperatura
en ºC
configurada
Modo de Función según
el modelo de horno
Temperatura en ºC
predeterminada
Función
Booster*

6. MODO DE COCCIÓN
Todos los procesos de cocinado han de realizarse con la puerta cerrada.
BASE + VENTILADOR La combinación del elemento de
calentamiento inferior y el ventilador es ideal para fruta, tartas, quiches y
repostería. Evita que los alimentos se deshidraten en exceso y hace que la
masa suba. Colocar la bandeja en la parte inferior del horno.
BASE Utilizar el elemento inferior. Ideal para todo tipo de
repostería. Utilizar para flanes, quiches, tartas, pastas y procesos que
requieran más calor desde abajo.
BASE + GRILL Ambos elementos de calentamiento están en uso.
Esta función es ideal para los asados tradicionales. Carne roja, roast beef,
pierna de cordero, caza, papillote y bollos.
BASE + GRILL + VENTILADOR Utilización de los elementos
inferior y superior en combinación con el ventilador que facilita la circulación del
aire caliente en todo el horno. Se recomienda este modo para pollo, repostería,
pescado y verduras. Con este modo se mejora la penetración del calor
reduciéndose el tiempo de cocción y precalentamiento. El ventilador permite
cocinar distintos alimentos a la vez en diferentes posiciones en el horno
distribuyendo el calor sin riesgo de que se mezclen los olores y los sabores.
Cuando se cocinen distintos alimentos al mismo tiempo añada 10 minutos al
período normal de asado.
RING + VENTILADOR - Utilización de los elementos inferior y
superior en combinación con el ventilador que facilita la circulación del aire
caliente en todo el horno. Su definición es la misma que la del método de
cocinado con Ventilador.
GRILL Utilización del elemento de calentamiento superior. Éxito
asegurado para gratinados varios, kebabs y parrilla. El grill ha de calentarse
previamente a temperatura elevada durante 5 minutos. Las carnes blancas
han de colocarse siempre a cierta distancia del grill, el tiempo de cocinado es
ligeramente superior pero la carne queda más suculenta. Las carnes rojas y el
pescado se pueden colocar directamente en la bandeja con la bandeja
antigoteo justo debajo.
GRILL + VENTILADOR Se utiliza el elemento superior de
calentamiento en combinación con el ventilador circulando así el aire caliente
en todo el horno. Se recomienda el calentamiento previo para carnes rojas y
no es necesario en caso de carnes blancas. El grill es ideal para cocinar
alimentos de mayor grosor, como el cerdo o el pollo. Los alimentos que se
vayan a hacer al grill han de colocarse directamente en el centro de la
bandeja. Si se coloca la bandeja antigoteo debajo de la bandeja de la comida
se asegura que los jugos que pueda soltar no se esparcirán por el horno. Para
un mejor resultado asegurarse de que los alimentos no están demasiado
cerca del grill y dar voltear los alimentos a mitad de proceso.
GRILL + ASADOR + VENTILADOR - La ventaja de utilizar la parte
superior del horno más el ventilador y el asador es que los alimentos se
cocinan evitando que se deshidraten y se queden sin sabor. El asador está
programado para seguir girando durante unos cinco minutos una vez
finalizado el período de cocina, utilizando por completo el calor residual del
horno. No se requiere calentamiento previo para este modo de cocina.
DESCONGELADO Cuando se pone el mando en esta opción. El
ventilador activa el aire caliente alrededor del alimento congelado y lo
descongela en unos minutos sin cambiar o alterar el contenido proteínico del
alimento. La temperatura preestablecida es de 40ºC constantes, no siendo
posible su regulación.
CONSERVAR EL CALOR Se recomienda para recalentar los
alimentos cocinados previamente, colocando la bandeja en el segundo nivel
desde arriba, o para descongelar pan, pizza o repostería colocando la
bandeja en la parte más inferior.
La temperatura preseleccionada es de 60ºC constantes, no siendo posible su
regulación.
RING + VENTILADOR El ventilador distribuye el aire caliente por
todos los niveles. Es ideal para cocinar diferentes tipos de comida al mismo
tiempo (p.ej. carne y pescado), sin mezclar sabores ni olores. Cocina bien y es
especialmente recomendable para bizcochos esponjosos, repostería, etc.
GRILL Utilización del elemento de calentamiento superior. Éxito
seguro para grill mixto, kebabs y platos gratinados. El grill tiene que calentarse
previamente a una temperatura elevada durante 5 minutos. Las carnes
blancas tienen que colocarse siempre a cierta distancia del grill, el tiempo de
cocinado es ligeramente superior pero la comida quedará más jugosa. Las
carnes rojas y el pescado se pueden colocar directamente en la parrila
colocando la bandeja justo debajo.
GRILL + VENTILADOR El elemento de calentamiento superior se
utiliza con el ventilador, que hace que el aire caliente se reparta por todo el
horno. Se recomienda precalentarlo para carnes rojas, no siendo necesario
en el caso de las carnes blancas. El grill es ideal para cocinar trozos más
gruesos, como pollo y cerdo. Los alimentos con los que se quiera utilizar el grill
ha de colocarse directamente en el centro de la parrilla. Si se coloca la
bandeja justo debajo se recogen todos los jugos de los alimentos. Para lograr
mejores resultados hay que asegurarse de que la comida no esté demasiado
cerca del grill y darle la vuelta cuando haya transcurrido la mitad del tiempo de
cocinado.
RING + VENTILADOR - El ventilador distribuye el aire caliente por
todos los niveles. Es ideal para cocinar diferentes tipos de comida al mismo
tiempo (p.ej. carne y pescado), sin mezclar sabores ni olores. Cocina bien y es
especialmente recomendable para bizcochos esponjosos, repostería, etc.
FONDO Utilización del elemento inferior. Ideal para repostería:
flan, quiches, tartas, pâté y platos que requieran más calor desde la parte
inferior.
FONDO + VENTILADOR Combinación del calor desde el fondo
con el ventilador ideal para flanes de fruta, tartas, quiches y repostería en
general. Evita que la comida se reseque y hace que suba la masa. Colocar la
bandeja en la posición más baja del horno.
PYRO El horno se encarga de limpiar el interior del horno.
-Existen tres opciones ECO, NORMAL ó SUPER
14 ES
Cavidad Superior
Cavidad Inferior
* Booster: aumento rápido de la temperatura
Temperatura en
ºC configurada
180
L2
190
Modo de Función según
el modelo de horno
Ring+Ventilador
Grill
Grill+Ventilador
Temperatura en
ºC predeterminada
160-240
L1-L3
160-240
Función
Booster*
-
-
-
* Booster: aumento rápido de la temperatura
Temperatura en
ºC configurada
Modo de Función según
el modelo de horno
Temperatura en
ºC predeterminada
Función
Booster*
-
-
-
180
160
160
Ring+Ventilador
Fondo
Fondo+Ventilador
160-240
160-240
160-240
UTILIZACIÓN DE LA CAVIDAD SUPERIOR E INFERIOR AL MISMO
TIEMPO
Las dos cavidades (SUPERIOR e INFERIOR) pueden utilizarse de forma
simultánea para dos tipos de cocinado distinto; para configurar esta modalidad,
seguir los pasos siguientes:
1- Pulsar para seleccionar la segunda cavidad que se va a utilizar y seguir
las instrucciones del punto 1 al 5 del apartado anterior.
DURACIÓN DEL COCINADO
1. Pulsar “time set” y buscar “hourglass” utilizando las “flechas”
2. Pulsar “Temperature/Time Set” y configurar la duración del cocinado
utilizando las “flechas”
3. Confirmar la configuración presionando de nuevo “Temperature/Time Set”.
FINALIZACIÓN DEL COCINADO
1.Pulsar “time set” y buscar “aroow” utilizando las “flechas”
2. Pulsar “Temperature/Time Set” y configurar la duración del cocinado
utilizando las “flechas”
3. Confirmar la configuración presionando de nuevo “Temperature/Time Set”.
NOTA: Para borrar el tiempo configurado, buscar “barred clock” utilizando las
“flechas” en el menú de configuración y pulsar “Temperature/Time Set”.
Esta función se suele utilizar con la función “duración de la cocción”.
Por ejemplo, si el plato requiere 45 minutos de cocción y debe estar listo a las
12:30 h:
- Seleccionar la función deseada
- Establecer el tiempo de duración de la cocción a 45 minutos
- Definir el final del tiempo de cocción a las 12:30.
La cocción se iniciará automáticamente a las 11:45 (12:30 menos 45 minutos) y
continuará hasta el fin del tiempo de cocción preestablecido, cuando el horno
se apagará automáticamente.
ADVERTENCIA:
Si se selecciona el final de la cocción sin fijar la duración del tiempo de
cocción, el horno empezará inmediatamente a cocinar y se detendrá al
final del tiempo de cocción establecido.”
“ ”

7. CICLO PIROLÍTICO (Depende del modelo)
El horno dispone de un sistema de limpieza por pirolisis que destruye
los residuos de comida a alta temperatura. La operación se hace
automáticamente mediante el programador. Como se necesitan
temperaturas muy altas, la puerta del horno se fija con un cierre de
seguridad.
La pirolisis se puede detener en todo momento. La puerta no se podrá
abrir hasta que se muestre el cierre de seguridad.
NOTA: Si hay una encimera de cocción encima del horno no utilizar
los quemadores de gas o las placas eléctricas cuando esté en
funcionamiento el sistema pirolítico para evitar que se caliente en
exceso la cocina.
Se disponen TRES CICLOS PIROLÍTICOS preconfigurados:
*ECO PYROCLEAN: Limpia hornos medianamente sucios. Funciona
durante 65 minutos.
*NORMAL PYROCLEAN: Limpia hornos sucios. Funciona durante
75 minutos
*SUPER PYROCLEAN: Limpia hornos muy sucios. Funciona
durante 90 minutos.
No utilizar productos de limpieza en un horno pirolítico.
Consejo: La limpieza pirolítica inmediatamente posterior a la
utilización del horno permite utilizar el calor residual, con lo que se
consigue un ahorro energético.
Antes del Ciclo pirolítico:
*Retirar del horno todos sus accesorios: No pueden soportar
temperaturas elevadas y podrían dañarse con las temperaturas de
pirolisis.
*Retirar todos los restos ya que se tardaría mucho en destruirlos.
Asimismo una gran cantidad de grasa podría dar lugar a fuego
cuando se sometiese a temperaturas muy elevadas durante el ciclo
de pirolisis.
*Cerrar la puerta del horno.
*Antes de proceder con la limpieza, retirar todos los restos sólidos de
comida.
Utilización del ciclo pirolítico:
1 Pulsar . Seleccionar utilizando , a continuación
pulsar para confirmar. En la pantalla aparecerá .
Parpadeará el modo ECO.
Recuerde:
ECO ciclo de 65 minutos horno moderadamente sucio
NORMAL ciclo de 75 minutos horno sucio
SUP ciclo de 90 minutos horno muy sucio
2- Con seleccionar el modo Pirolítico necesario, según el grado
de suciedad: ECO, NORMAL o SUP. A continuación pulsar
para confirmar.
*La selección se confirmará en 3 segundos…
El horno empieza el ciclo pirolítico. El modo pirolítico seleccionado
parpadea y aparecen los indicadores luminosos de y .
Durante el ciclo pirolítico aparece el cierre de la puerta del horno, lo
que indica que la puerta está cerrada. Funcionará el ventilador de
refirgeración.
El indicador luminoso parpadeará hasta que se alcance la
temperatura, que entonces permanecerá fijo.
El arranque del ciclo pirolítico se puede demorar seleccionado un final
de tiempo. Girar el mando de control de programación a final de
tiempo y configurar la hora a la que se quiere que termine.
Al final de ciclo pirolítico el horno se apaga automáticamente.
Durante la operación de auto limpieza pirolítica, las superficies
pueden calentarse más de lo habitual; los niños deben permanecer
alejados.
Durante 15 segundos suena un pitido que indica el final del ciclo y en
la pantalla parpadean los indicadores de y .
Pulsar para detener el ciclo. En caso contrario los símbolos
seguirán parpadeando. Desaparece el símbolo del Tempo-
rizador, el modo pirolítico. La puerta del horno seguirá bloqueada ya
que la temperatura es muy alta de forma que la puerta no se podrá
abrir hasta que deje de estar iluminado el símbolo de bloqueo de
puerta.
El ventilador de refrigeración no se desconecta hasta que la
temperatura de los componentes sea la adecuada.
Al final del ciclo el indicador parpadea de nuevo y seguirá encendido
hasta que el horno se apague (se apagará cuando la temperatura
interna del horno sea lo suficientemente baja).
La pirólisis deja restos blancos en las paredes. Esperar a que el horno
se enfríe completamente, luego limpiar el interior del horno con una
esponja húmeda y retirar los restos.
“ ” “ ”
“ ” “ ”
“ ”
“ ” “ ”
“ ” “ ”
“ ”
START
STOP
Es mejor no salar la comida hasta después de cocinarla ya que la sal
hace que pierda antes la grasa, lo que ensuciará el horno y creará
mucho humo.
Las carnes blancas, cerdo, ternera, cordero y pescado con hueso o
espina se pueden meter en el horno sin calentarlo previamente. El
tiempo de cocinado es superior que en un horno precalentado, pero
cocina mejor porque el calor tiene más tiempo para llegar a la zona del
hueso.
Un calentamiento previo correcto es la base de un asado de carne
roja en su punto.
GRILL
•Antes de utilizar el grill del horno
Sacar la carne de la nevera unas horas antes. Dejarla sobre varias
capas de papel de cocina. Con ello se consigue que temple y quede
más jugosa evitando que se quede fría en el medio.
Añadir pimienta y especias a la carne antes del grill, pero la sal
después. Así se hará mejor y quedará jugosa. Añadir a la comida que
se va a cocinar un poco de aceite (esto es mejor hacerlo con un pincel
plano). Luego añadir más pimienta y hierbas aromáticas (tomillo, etc.)
•Durante el asado:
No pinchar los alimentos cuando se están haciendo, ni siquiera
cuando se les de la vuelta ya que haría que perdiese el jugo y se
secase.
ASADO
Evitar utilizar recipientes brillantes ya que reflejarían el calor podrían
estropear los bizcochos. Si el bizcocho se dora muy rápido, cubrir con
papel antiadherente o papel de aluminio.
Atención: La forma correcta de utilizar el papel es con la parte brillante
hacia el bizcocho ya que de lo contrarío el calor se reflejaría en la
superficie brillante y no llegaría a la comida.
Evitar abrir la puerta durante los primeros 20 o 25 minutos
durante el cocinado:
Los soufflés, brioches, bizcochos, etc. tienden a desinflarse. Se
puede comprobar si están hechos introduciendo un cuchillo o una
aguja de metal en el centro. Si la hoja sale limpia y seca, es que está
listo y se puede detener la cocción. Si la hoja sale mojada o con
trocitos de bizcocho adherido, dejar el horno en funcionamiento pero
bajando la temperatura del termostato para que termine de hacerse
pero sin quemarse.
8. CONSEJOS DE COCCIÓN
15 ES

Części piekarnika, które mogą wejść w kontakt z żywnością spełniają
wymagania dyrektywy unijnej 89/109/EWG. Urządzenie jest zgodne z
dyrektywami unijnymi 2006/95/WE i 2004/108/WE oraz ich
kolejnymi nowelizacjami. Po rozpakowaniu piekarnika należy
upewnić się, że nie ma on żadnych uszkodzeń. W razie
jakichkolwiek wątpliwości nie należy próbować używać piekarnika: należy
skontaktować się z serwisem. Elementy opakowania, takie jak worki z
tworzywa sztucznego, styropian, gwoździe, należy zabezpieczyć przed
dostępem dzieci, ponieważ mogą być one dla nich niebezpieczne.
1. INFORMACJE OGÓLNE
W celu maksymalnego wykorzystania możliwości piekarnika należy
dokładnie zapoznać się z niniejszą instrukcją obsługi. Instrukcję należy
przechowywać w dostępnym miejscu, aby można z niej było skorzystać w
razie potrzeby. Przed zainstalowaniem piekarnika należy spisać jego
numer seryjny na wypadek konieczności skorzystania z pomocy serwisu.
Po rozpakowaniu piekarnika należy upewnić się, że nie ma on żadnych
uszkodzeń. W razie jakichkolwiek wątpliwości nie należy próbować
używać piekarnika. Należy skontaktować się z serwisem. Elementy
opakowania, takie jak worki z tworzywa sztucznego, styropian, gwoździe,
należy zabezpieczyć przed dostępem dzieci, ponieważ mogą być one dla
nich niebezpieczne.
Producent nie ponosi żadnej odpowiedzialności w przypadku
nieprzestrzegania zaleceń zawartych w niniejszej instrukcji.
UWAGA: Funkcje, własności i wyposażenie piekarnika mogą się
różnić w zależności od modelu piekarnika.
1.2 WSKAZÓWKI DOTYCZĄCE
BEZPIECZEŃSTWA
•Piekarnik można używać wyłącznie zgodnie z jego przeznaczeniem. Można go
używać wyłącznie do przyrządzania potraw. Używanie piekarnika do
jakichkolwiek innych celów, na przykład do ogrzewanie pomieszczenia, jest
niezgodne z jego przeznaczeniem i może być niebezpieczne.
•UWAGA: Urządzenie i jego zewnętrzne części nagrzewają się podczas pracy.
Należy zachować ostrożność i unikać dotykania rozgrzanych elementów
piekarnika.
•Producent nie ponosi odpowiedzialności za uszkodzenia spowodowane
niewłaściwym, niezgodnym z przeznaczeniem lub nierozsądnym użytkowaniem
piekarnika.
Podczas użytkowania urządzenia elektrycznego należy przestrzegać kilku
podstawowych zasad:
-Nie wyjmować wtyczki z gniazdka elektrycznego pociągając za kabel
zasilający.
-Nie dotykać piekarnika mokrymi lub wilgotnymi rękami lub stopami.
-Nie obsługiwać piekarnika nie mając założonego obuwia.
-Nie stosować do zasilania piekarnika adapterów, rozgałęziaczy lub
przedłużaczy.
-W przypadku awarii lub nieprawidłowości w działaniu piekarnika, należy
odłączyć piekarnik od źródła zasilania i nie dotykać go.
-W przypadku uszkodzenia kabla zasilającego, należy natychmiast wymienić go
na nowy.
Podczas wymiany kabla zasilającego należy postępować zgodnie z poniższymi
instrukcjami:
Odłączyć kabel zasilający i zastąpić go nowym kablem typu HO5VV-F. Kabel
zasilający musi zapewnić zasilanie piekarnika wymaganym prądem
znamionowym piekarnika. Wymiany kabla zasilającego powinna dokonać osoba
o odpowiednich kwalifikacjach.
Przewód uziemiający (żółto-zielony) musi być 10 mm dłuższy od przewodów
zasilających.
Naprawy piekarnika należy powierzać wyłącznie autoryzowanemu serwisowi,
zapewniającemu stosowanie wyłącznie oryginalnych części zamiennych. W
przypadku nieprzestrzegania powyższych instrukcji, producent nie może
zagwarantować bezpieczeństwa użytkowania piekarnika.
•Zakupiony piekarnik posiada określone parametry techniczne.
Niedopuszczalne są jakiekolwiek modyfikacje piekarnika, które mogłyby
doprowadzić do zmiany tych parametrów.
•Do czyszczenia piekarnika nigdy nie należy stosować pary lub strumienia
rozpylonej cieczy pod wysokim ciśnieniem.
•W piekarniku nie należy przechowywać produktów łatwopalnych, które
mogą zapalić się przy niezamierzonym włączeniu piekarnika.
•Nie naciskać na drzwi piekarnika i nie zezwalać dzieciom na siadanie na nich.
•Przy wkładaniu potraw i ich wyjmowaniu z piekarnika należy używać rękawic
kuchennych.
•Niniejszy sprzęt nie jest przeznaczony do użytkowania przez osoby (w tym
dzieci) o ograniczonej zdolności fizycznej, czuciowej lub psychicznej, lub osoby
nie mające doświadczenia lub znajomości sprzętu, chyba że odbywa się to pod
nadzorem lub zgodnie z przekazaną im instrukcją użytkowania sprzętu przez
osobę odpowiadającą za ich bezpieczeństwo.
•Należy zwracać uwagę, aby dzieci nie bawiły się urządzeniem.
•Dzieci poniżej 8 lat nie powinny być dopuszczane do piekarnika, chyba że pod
ciągłym nadzorem.
• Niniejsze urządzenie może być używane przez dzieci powyżej 8 lat oraz osoby
o ograniczonej zdolności fizycznej, czuciowej lub psychicznej, lub osoby nie
mające doświadczenia lub znajomości sprzętu, pod warunkiem że odbywa się to
pod nadzorem lub zgodnie z przekazaną im instrukcją bezpiecznego
użytkowania sprzętu przez osobę odpowiadającą za ich bezpieczeństwo.
• Urządzenie nagrzewa się podczas pracy. Należy zachować ostrożność i unikać
dotykania rozgrzanych elementów wewnątrz piekarnika.
• OSTRZEŻENIE! Zewnętrzne części piekarnika nagrzewają się podczas pracy.
1.1 DEKLARACJA ZGODNOŚCI
•Poza wyposażeniem dostarczonym wraz z piekarnikiem, zaleca się stosować
wyłącznie naczynia i formy. które są odporne na bardzo wysokie temperatury.
Code produit:
Numéro de série :
1.4 INSTALACJA
Producent nie ma obowiązku wykonania instalacji. Usterki spowodowane
błędami instalacji nie podlegają warunkom gwarancji udzielonej przez
producenta. Instalacja powinna być wykonana przez wykwalifikowany
personel zgodnie z instrukcjami producenta. Nieprawidłowa instalacja
może stwarzać zagrożenie dla ludzi, zwierząt lub mienia. Producent nie
ponosi odpowiedzialności za tego typu szkody. Regał kuchenny, w którym
zainstalowany będzie piekarnik, musi być wykonany z materiałów
odpornych na temperaturę minimum 70°C.
Piekarnik można zamontować w górnej części regału kuchennego
lub pod blatem kuchennym.
Przed zamontowaniem piekarnika należy zapewnić dobrą wentylację w
przestrzeni piekarnika umożliwiającą stały dopływ świeżego powietrza,
niezbędnego do chłodzenia piekarnika i do zabezpieczenia jego części
wewnętrznych. W zależności od typu instalacji, należy wykonać wycięcia
w sposób pokazany na ostatniej stronie niniejszej instrukcji.
1.5 PODŁĄCZENIE ELEKTRYCZNE
PODŁĄCZENIE ELEKTRYCZNE POWINNA WYKONAĆ
AUTORYZOWANA FIRMA SERWISOWA LUB OSOBA Z
ODPOWIEDNIMI UPRAWNIENIAMI.
Domowa instalacja elektryczna, do której podłączony jest piekarnik, musi
spełniać wymagania przepisów obowiązujących w kraju instalacji.
Producent nie ponosi żadnej odpowiedzialności, jeżeli powyższy warunek
nie zostanie spełniony.
Piekarnik należy podłączyć do sieci zasilania poprzez gniazdko z
uziemieniem lub wielobiegunowy wyłącznik sieciowy o odległości styków
minimum 3 mm, zgodnie z przepisami obowiązującymi w kraju instalacji.
Instalacja elektryczna musi być zabezpieczona przy pomocy
odpowiednich bezpieczników oraz musi być wykonana przy użyciu
przewodów o dostatecznie dużym przekroju poprzecznym,
zapewniającym prawidłowe zasilanie piekarnika.
PODŁĄCZENIE DO SIECI ZASILANIA:
Piekarnik wyposażony jest w przewód zasilający przystosowany do
podłączenia do napięcia 220-240 V AC między przewodem fazowym i
neutralnym.
Przed podłączeniem do sieci zasilania należy sprawdzić:
- napięcie zasilania wskazane na liczniku,
Przewód ochronny (żółto-zielony) podłączony do zacisku uziemienia
piekarnika musi być połączony z zaciskiem uziemienia domowej instalacji
elektrycznej.
Ostrzeżenie:
• Przed podłączeniem piekarnika do sieci zasilania, należy sprawdzić
ciągłość uziemienia domowej instalacji elektrycznej przy pomocy
elektryka.
• Producent nie ponosi żadnej odpowiedzialności za wypadki i ich możliwe
konsekwencje, wynikające z używania piekarnika bez uziemienia lub
podłączonego do instalacji z wadliwym uziemieniem.
UWAGA: Należy pamiętać, że piekarnik może wymagać interwencji
serwisu. Gniazdko zasilające powinno być tak zlokalizowane, aby
możliwe było podłączenia piekarnika do sieci zasilania po wyjęciu go z
szafki.
Kabel zasilający: W przypadku gdy konieczna jest wymiana kabla
zasilającego, czynność tę powinien wykonać personel serwisowy lub
osoba o odpowiednich kwalifikacjach.
1.3 ZALECENIA
• Systematyczne czyszczenie piekarnika po każdorazowym użyciu ułatwi
utrzymanie piekarnika w doskonałej czystości.
• Nie należy wykładać ścianek piekarnika folią aluminiową lub dostępnymi
w handlu materiałami ochronnymi jednorazowego użytku. Folia
aluminiowa lub inne materiały ochronne mogą w zetknięciu z gorącą
emalią nadtapiać się i pogarszać jakość powłoki emaliowanej na
wewnętrznych ściankach piekarnika.
• Aby zapobiec nadmiernemu zabrudzeniu się piekarnika i wydzielaniu się
powstającego wskutek tego dymu, należy unikać stosowania zbyt
wysokich temperatur podczas pieczenia. Zaleca się raczej przedłużyć
czas pieczenia i nieco obniżyć temperaturę pieczenia.
16 PL
Małe dzieci należy trzymać z dala od urządzenia.
• OSTRZEŻENIE! Przed wymianą lampki należy upewnić się, że urządzenie jest
wyłączone, aby uniknąć możliwości porażenia prądem elektrycznym.
• OSTRZEŻENIE! Podczas grillowania zewnętrzne części piekarnika
nagrzewają się. Małe dzieci należy trzymać z dala od urządzenia.

2. TECHNOLOGIA PRO/EXP’R
Nasza wiedza i doświadczenie umożliwiły nam wprowadzenie do piekarników
domowych technologii typowej dla kuchni profesjonalnych. Wielootworkowy
system nawiewu bocznego emituje bezpośrednio na potrawę delikatne
mikrostrumienie gorącego powietrza, które ją spowijają w całości.
System zapewnia równomierne pieczenie, ogranicza utratę wilgoci przez
potrawy oraz umożliwia jednoczesne pieczenie potraw na różnych
poziomach.
2.1 WYPOSAŻENIE PIEKARNIKA
Przed użyciem wyposażenia piekarnika po raz pierwszy należy je
dokładnie umyć gąbką, wypłukać i wysuszyć.
Na półce można umieszczać formy i naczynia do pieczenia.
2.2 ROŻEN OBROTOWY (w zależności od modelu)
Do pieczenia na rożnie nie jest wymagane żadne nagrzewanie
wstępne.
Pieczenie odbywa się przy zamkniętych drzwiach piekarnika.
Zużycie energii jest 90-95% mniejsze niż w systemie tradycyjnym.
Blachę do ciast należy umieszczać na półce. Blacha służy do
pieczenia małych ciastek, takich jak ptysie, biszkopty, bezy, itp.
Blachy do ciast nie należy umieszczać bezpośrednio na dnie
piekarnika oraz na separatorze.
Podczas pracy piekarnika, wszystkie nieużywane elementy
wyposażenia powinny być wyjęte z piekarnika.
2.3
System oświetlenia ledowego zastępuje tradycyjną żarówkę. Układ
14 diod LED (w wersjach bez czyszczenia pirolitycznego) lub 10 diod
LED wysokiej mocy (w wersjach z czyszczeniem pirolitycznym)
zamontowano w drzwiach piekarnika. Wytwarzane wysokiej jakości
białe światło umożliwia obserwowanie wnętrza piekarnika w sposób
wyraźny bez jakichkolwiek cieni na wszystkich półkach piekarnika.
Zalety:
System ten, poza zapewnieniem doskonałego oświetlenia wnętrza
piekarnika, jest bardziej niezawodny niż tradycyjna żarówka,
łatwiejszy w utrzymaniu i przede wszystkim pozwala na
zaoszczędzenie energii.
- Optymalne oświetlenie
- Wysoka niezawodność
- Bardzo niskie zużycie energii, - 95% w porównaniu z tradycyjnym
systemem oświetlenia
OŚWIETLENIE LEDOWE/U.SEE
Taca ociekowa służy do zbierania soków z grillowanych potraw.
Tacy ociekowej nie należy używać jako blachy do pieczenia,
ponieważ nagromadzony tłuszcz może szybko rozprzestrzenić się na
cały piekarnik, w wyniku czego powstają nadmierne ilości dymu.
Tacy ociekowej nie należy umieszczać bezpośrednio na dnie
piekarnika oraz na separatorze.
Separator dzieli piekarnik na dwie komory. Oddziela komorę górną
od dolnej gdy piekarnik pracuje w systemie dwukomorowym.
Separator musi być umieszczony na poziomie trzecim.
Nigdy nie należy pozostawić separatora w piekarniku gdy
włączony jest tryb czyszczenia pirolitycznego.
Talerz do pizzy wyposażony w zależności od modelu w podstawkę i
nóż krążkowy do pizzy.
OBSŁUGA ROŻNA OBROTOWEGO
1. Odkręcić widelce
2. Nadziać mięso na pręt rożna
3. Przymocować mięso za
pomocą widelców.
4. Zacisnąć śruby.
5. Wsunąć pręt rożna w końcówkę
napędu rożna.
6. Wykręcić rękojeść.
17 PL
2
1
3
4
1 - Ramka
2 - Pręt rożna
3 - Widelce i śruby
4 - Rękojeść

4. CENTRUM SERWISOWE
Przed wezwaniem serwisu.
Jeżeli piekarnik nie działa:
•Należy upewnić się, że kabel zasilający jest włączony do gniazdka
sieciowego.
Jeżeli nie można ustalić przyczyny problemu:
• Należy odłączyć piekarnik od sieci zasilania i wezwać serwis.
Przed wezwaniem serwisu należy zanotować numer seryjny podany
na tabliczce znamionowej piekarnika.
Piekarnik dostarczany jest z kartą gwarancyjną, która zapewnia jego
bezpłatną naprawę przez Centrum Serwisowe w okresie
obowiązywania gwarancji.
Niniejsze urządzenie oznakowane jest odpowiednim
symbolem zgodnie z dyrektywą unijną 2002/96/CE
dotyczącą zużytego sprzętu elektrycznego i
elektronicznego (dyrektywa WEEE).
Poprzez zadbanie o właściwą likwidację niniejszego
produktu, przyczynisz się do ochrony środowiska
naturalnego i zapobiegniesz potencjalnie
negatywnym skutkom dla zdrowia, jakie może
stwarzać niewłaściwa likwidacja niniejszego
produktu.
Symbol umieszczony na produkcie wskazuje, że niniejszy produkt nie
powinien być traktowany tak jak odpady z gospodarstwa domowego.
Podczas likwidacji, należy go przekazać do odpowiedniego punktu
recyklingu sprzętu elektrycznego i elektronicznego. Likwidacja musi
być przeprowadzona zgodnie ze stosownymi regulacjami
dotyczącymi likwidacji odpadów.
Szczegółowe informacje dotyczące postępowania, odzyskiwania i
recyklingu niniejszego wyrobu można uzyskać w od władz lokalnych,
służb odpowiedzialnych za usuwanie odpadów lub w sklepie, w
którym ten produkt został zakupiony.
3. CZYSZCZENIE PIEKARNIKA
•Przed przystąpieniem do czyszczenia ręcznego należy poczekać aż
piekarnik wystygnie.
•Do czyszczenia piekarnika nie należy używać środków ściernych,
druciaków lub ostrych przedmiotów mogących trwale uszkodzić emalię.
•Stosować wyłącznie wodę z mydłem lub środki czyszczące na bazie
amoniaku.
•Nie należy wykładać ścianek wewnątrz piekarnika folią aluminiową.
•Do czyszczenia piekarnika nie należy używać oczyszczaczy parowych.
•Czynności związane z czyszczeniem i konserwacją piekarnika nie
powinny być wykonywane przez dzieci bez nadzoru.
CZĘŚCI SZKLANE
Zaleca się, aby po każdym użyciu piekarnika wytrzeć szklane drzwiczki
ręcznikiem papierowym. Jeżeli drzwiczki są mocno zabrudzone można je
wytrzeć wyciśniętą gąbką zwilżoną detergentem i następnie opłukać.
Nie należy używać agresywnych środków ściernych lub ostrych
metalowych przedmiotów do czyszczenia drzwiczek piekarnika,
ponieważ mogą one zarysować powierzchnię, co w rezultacie może
doprowadzić do popękania szkła.
USZCZELKA DRZWICZEK PIEKARNIKA
Jeżeli uszczelka ulegnie zabrudzeniu, należy ją wyczyścić przy użyciu
lekko wilgotnej gąbki.
WYPOSAŻENIE
Wyposażenie piekarnika należy oczyścić gąbką zwilżoną wodą z mydłem,
opłukać czystą wodą i wysuszyć. Należy unikać ściernych środków
czyszczących.
TACA OCIEKOWA
Po grillowaniu należy wyjąć tacę ociekową z piekarnika. Należy ostrożnie
zlać gorący tłuszcz do odpowiedniego pojemnika. Tacę należy umyć w
gorącej wodzie z dodatkiem płynu do zmywania naczyń przy użyciu gąbki i
następnie opłukać.
Jeżeli pozostałości po pieczeniu są trudne do usunięcia, tacę należy
namoczyć w wodzie z detergentem.
Tacę ociekową można również umyć w zmywarce do naczyń lub
wyczyścić przy pomocy dostępnego w handlu środka do czyszczenia
piekarników.
Brudnej tacy nie należy umieszczać w piekarniku.
OŚWIETLENIE PIEKARNIKA
Oświetlenie i jego osłona wykonane są z materiału odpornego na wysoką
temperaturę.
Nastawa
czasu
Funkcja/
Komora
Strzałka (-) Strzałka (+) Nastawa
temperatury /czasu
Start/ Stop
Wyłącznik
On/Off
Pro/ Booster
(cała komora)
Booster
Pro
Funkcja
pieczenia
Komora
dolna
Temperatura
Czas pieczenia
Koniec pieczenia
Konieczna piroliza
Blokada rodzicielska
Blokada drzwi
Wyświetlacz prawy
Komora dolna
Koniec
pieczenia
(cała komora)
Czas pieczenia
(cała komora)
Wyświetlacz centralny
Ustawianie parametrów/
Komora główna
Temperatura/ Czas
Czas pieczenia
Koniec pieczenia
Temperatura
Funkcja pieczenia
Komora górna
Booster
Pro
Minutnik
Wyświetlacz lewy
Komora górna
5. OPIS WYŚWIETLACZA
START
STOP
ON
OFF
18 PL

5.1 PRZED UŻYCIEM PIEKARNIKA PO RAZ
PIERWSZY
CZYSZCZENIE PRZED PIERWSZYM UŻYCIEM
Przed użyciem piekarnika po raz pierwszy należy:
•Wytrzeć powierzchnie zewnętrzne piekarnika miękką wilgotną
szmatką.
•Umyć wszystkie elementy wyposażenia i wytrzeć wnętrze piekarnika
używając roztworu gorącej wody i płynu do zmywania naczyń.
•Ustawić pusty piekarnik na maksymalną temperaturę i pozostawić
włączony przez około 1 godzinę, co pozwoli usunąć zapach nowości.
W tym czasie należy zapewnić dobrą wentylację pomieszczenia.
O CZYM NALEŻY PAMIETAĆ
Potwierdzenie operacji na programatorze:
•Zmiana ustawienia musi być potwierdzona przez naciśnięcie “ ” .
Zatrzymanie piekarnika:
•Może być konieczne w przypadku wprowadzenia nieprawidłowej
instrukcji. Aby zatrzymać piekarnik, należy nacisnąć “ ” .
USTAWIENIE ZEGARA
Po podłączeniu piekarnika do sieci zasilania po raz pierwszy lub po
dłuższej przerwie w zasilaniu, konieczne jest ustawienie zegara.
Aby ustawić zegar, należy:
1. Nacisnąć “ ” przez kilka sekund i odszukać “ ” przy użyciu
“ ”, a następnie nacisnąć “ ”. Cyfry na wyświetlaczu
centralnym będą pulsować.
2. Ustawić zegar używając “ ” i następnie odczekać kilka sekund
lub nacisnąć ponownie “ ” w celu potwierdzenia ustawienia.
REGULACJA KONTRASTU WYŚWIETLACZA
1. Nacisnąć “ ” przez kilka sekund i odszukać “ ” przy użyciu
“ ”, a następnie nacisnąć “ ”. Kontrast wyświetlacza można
wyregulować w zakresie od “1”(maksymalny) do “5” (minimalny).
2. Przy użyciu “ ” należy wybrać poziom kontrastu i następnie
należy odczekać kilka sekund lub nacisnąć ponownie “ ” w celu
potwierdzenia ustawienia.
UWAGA: Jeżeli chcemy ustawić zegar lub wyregulować kontrast po
pierwszym włączeniu piekarnika, należy nacisnąć “ ” w celu
włączenia piekarnika i postępować zgodnie z punktami 1 i 2
stosownego rozdziału.
MINUTNIK
1. Nacisnąć “ ” w celu włączenia piekarnika.
2. Nacisnąć “ ” przez kilka sekund i odszukać “ ” przy użyciu
“ ”, a następnie nacisnąć “ ”.
3. Ustawić żądany czas przy użyciu “ ”, a następnie odczekać kilka
sekund lub nacisnąć ponownie “ ” w celu potwierdzenia ustawienia.
UWAGA: Niniejsza funkcja pozwala na użycie piekarnika jako
budzika niezależnie od trybu pracy piekarnika.
BLOKADA RODZICIELSKA
1. Aby ustawić blokadę rodzicielską, należy nacisnąć “ ” przez
kilka sekund.
2.
W celu aktywacji, nacisnąć “ ” “OK”
W celu dezaktywacji, nacisnąć “ ” “NO”
UWAGA: Blokadę rodzicielską można aktywować gdy piekarnik jest
włączony, a także gdy jest wyłączony.
START
STOP
ON
OFF
ON
OFF
5.2 OBSŁUGA PIEKARNIKA
SYSTEM JEDNOKOMOROWY
W celu użycia piekarnika do pieczenia w systemie jednokomorowym,
należy wyjąć separator z piekarnika.
W przypadku pieczenia w systemie jednokomorowym można wybierać
spośród wszystkich wymienionych poniżej funkcji. Poniższa tabela
zawiera sugerowane metody pieczenia. Dla każdej z tych metod
sugerowana jest fabrycznie ustawiona temperatura. Można ją zmienić w
ustalonym zakresie.
19 PL
*Booster: szybki wzrost temperatury
-
160
210
220
210
180
L2
210
240
40
60
NORMAL
-
50-240
50-240
50-280
50-240
50-240
L1-L3
180-230
180-240
No
No
ECO:425/65min
NORMAL:425/75min
SUP:425/1h30min
-
-
Booster
-
-
-
-
Booster
Booster
-
-
-
1. Nacisnąć ” w celu włączenia piekarnika.
2. Nacisnąć
“ ”. Przy użyciu “ ” wybrać funkcję dla wymaganej
metody pieczenia.
3. Zgodnie z wybraną metodą pieczenia, na wyświetlaczu pojawi się
odpowiednia temperatura lub poziom pieczenia. Istnieje możliwość
zmiany w ustalonym zakresie - patrz tabela powyżej. Aby zmienić
ustawienie temperatury, należy nacisnąć
“ ” i wybrać nowe ustawienie
temperatury przy użyciu
“ ”. Następnie należy ponownie nacisnąć
“ ” w celu potwierdzenia wyboru. Temperatura jest ustawiona na stałe
lecz można ją zmienić w podczas trwania cyklu pieczenia.
4. Aby rozpocząć pieczenie, należy nacisnąć
“ ”. Piekarnik
rozpocznie cykl pieczenia oraz zacznie się nagrzewać. Wskaźnik świetlny
będzie pulsował do momentu osiągnięcia wybranej temperatury. Pod
koniec nagrzewania zabrzmi sygnał dźwiękowy i wskaźnik świetlny
zacznie świecić światłem stałym.
5. Aby zmienić funkcję piekarnika, należy powtórzyć kroki od 2 do 4.
6. Aby zatrzymać cykl pieczenia, należy nacisnąć
“ ”.
SYSTEM DWUKOMOROWY
W celu użycia piekarnika do pieczenia w systemie dwukomorowym,
należy umieścić separator na trzeciej półce piekarnika. Można wybierać
spośród funkcji wymienionych poniżej dla pieczenia w systemie
dwukomorowym.
1. Nacisnąć
“ ” w celu włączenia piekarnika.
2. Nacisnąć
“ ” w celu wskazania, która część komory piekarnika
(GÓRNA lub DOLNA) ma być użyta; wybrać wymaganą funkcję
piekarnika przy użyciu
“ ”.
3. Zgodnie z wybraną metodą pieczenia, na wyświetlaczu pojawi się
odpowiednia temperatura lub poziom pieczenia.
Istnieje możliwość zmiany w ustalonym zakresie – patrz tabela powyżej.
Aby zmienić ustawienie temperatury, należy nacisnąć
“ ” i wybrać
nowe ustawienie temperatury przy użyciu
“ ”.
Następnie należy ponownie nacisnąć
“ ” w celu potwierdzenia wyboru.
Temperatura jest ustawiona na stałe lecz można ją zmienić podczas
trwania cyklu pieczenia.
4. Aby rozpocząć pieczenie, należy nacisnąć
“ ”.
Piekarnik rozpocznie cykl pieczenia oraz zacznie się nagrzewać.
Wskaźnik świetlny będzie pulsował do momentu osiągnięcia wybranej
temperatury. Pod koniec nagrzewania zabrzmi sygnał dźwiękowy i
wskaźnik świetlny zacznie świecić światłem stałym.
5. Aby zatrzymać cykl pieczenia, należy nacisnąć
“ ”.
“
ON
OFF
START/STOP
START
STOP
ON
OFF
START/STOP
Fabrycznie
ustawiona
temperatura °C
Funkcje piekarnika w
zależności od modelu piekarnika
Ustalony zakres
temp °C
Funkcja
Booster*
Off
Grzałka dolna
Grzałka dolna + nawiew
Grzałka dolna i górna
Grzałka dolna i górna + nawiew
Grzałki okrągłe + nawiew
Grill
Grill + nawiew
Grill + rożen + nawiew
Rozmrażanie
Utrzymanie temperatury
Czyszczenie pirolityczne

6. FUNKCJE PIEKARNIKA
Podczas pieczenia drzwiczki piekarnika powinny być zawsze zamknięte.
GRZAŁKA DOLNA + NAWIEW - Połączenie grzania dolnego z
nawiewem doskonale nadaje się do pieczenia placków z owocami, tarty,
babeczek i ciast drożdżowych. Metoda ta zapobiega wysychaniu ciast i
pobudza rośnięcie ciasta drożdżowego. Półkę należy umieścić na poziomie
dolnym piekarnika.
GRZAŁKA DOLNA - Wykorzystywana jest dolna grzałka. Metoda
nadaje się doskonale do pieczenia potraw na bazie ciasta, takich jak placki,
babeczki, tarta, pasztet oraz do pieczenia wymagającego większej ilości ciepła
promieniującego od dołu.
GRZAŁKA DOLNA + GRILL - Wykorzystywana jest zarówno
grzałka dolna jak i górna. Metoda ta doskonale nadaje się do tradycyjnego
pieczenia mięsa czerwonego, wołowiny, udźca jagnięcego, dziczyzny, chleba
lub pieczenia potraw zawiniętych w folii.
GRZAŁKA DOLNA + GRILL + NAWIEW - Wykorzystywana jest
grzałka dolna i górna wraz z wentylatorem wymuszającym obieg gorącego
powietrza w piekarniku. Metoda ta jest zalecana do pieczenia drobiu, ciast, ryb i
warzyw. Używając tej metody uzyskuje się lepszą penetrację ciepła i skrócenie
czasów pieczenia i grzania wstępnego. Pieczenie z nawiewem umożliwia
jednoczesne pieczenie różnych potraw umieszczonych w różnych poziomach
piekarnika, z zapewnieniem równomiernego rozprowadzania ciepła bez ryzyka
mieszania smaków i zapachów. W przypadku jednoczesnego pieczenia kilku
różnych potraw, czas pieczenia należy wydłużyć o 10 minut.
GRZAŁKA OKRĄGŁA + NAWIEW - Nagrzewane powietrze jest
wdmuchiwane przez wentylator na różnych poziomach komory piekarnika.
Metoda ta doskonale nadaje się do jednoczesnego pieczenia różnych potraw
(np. mięso i ryby) bez ryzyka mieszania się smaków i zapachów. Jest to
delikatna metoda, zalecana w szczególności do pieczenia biszkoptów,
pasztecików, itp.
GRILL - Używana jest grzałka górna. Sukces gwarantowany w
przypadku mieszanych potraw grillowanych, kebabów i zapiekanek. Grzałkę
górną należy wstępnie podgrzać do wysokiej temperatury przez 5 minut. Białe
mięsa należy zawsze umieszczać w pewnej odległości od grzałki górnej - czas
pieczenia nieco się wydłuży ale mięso będzie bardziej soczyste. Mięso
czerwone i filety rybne można umieścić bezpośrednio na półce umieszczając
pod spodem tacę ociekową.
GRILL + NAWIEW - Używana jest grzałka górna w połączeniu z
wentylatorem wymuszającym obieg gorącego powietrza w piekarniku. Grzanie
wstępne jest zalecane dla potraw z mięsa czerwonego, w przypadku mięsa
białego nie jest ono konieczne. Metoda ta doskonale nadaje się do grillowania
grubszych porcji mięsa wieprzowego lub drobiu. Grillowaną potrawę należy
umieścić bezpośrednio na półce w jej środkowej części na środkowym
poziomie piekarnika. Pod półkę należy wsunąć tacę ociekową na tłuszcz
skapujący z pieczonego mięsa. Aby uzyskać jak najlepszy wynik pieczenia,
należy pamiętać, aby nie umieszczać potrawy zbyt blisko grzałki górnej, oraz
aby potrawę obrócić w połowie czasu pieczenia.
GRILL + ROŻEN + NAWIEW - Zaletą jednoczesnego użycia grzałki
górnej, wentylatora i rożna obrotowego jest zapewnienie równomiernego
pieczenia potrawy, bez wysychania i utraty smaku. Rożen zaprogramowany
jest na ciągłe obracanie się jeszcze przez około 5 minut po zakończeniu czasu
pieczenia, w celu pełnego wykorzystania ciepła pozostałego w piekarniku.
Pieczenie na rożnie nie wymaga nagrzewania wstępnego.
ROZMRAŻANIE - W ustawieniu tym wentylator wymusza obieg
gorącego powietrza wokół rozmrażanej potrawy, która zostaje rozmrożona w
ciągu kilku minut bez zmiany zawartości białka w potrawie. Temperatura jest
ustawiona fabrycznie na 40°C, bez możliwości zmiany.
UTRZYMANIE TEMPERATURY - Metoda zalecana do
podgrzewania wcześniej przyrządzonych potraw, umieszczając półkę na
drugim poziomie od góry piekarnika, lub do rozmrażania ciasta na pizzę lub
ciast po umieszczeniu półki na dolnym poziomie piekarnika.
Temperatura jest ustawiona fabrycznie na 60°C, bez możliwości zmiany.
GRZAŁKA OKRĄGŁA + NAWIEW - Nagrzewane powietrze jest
wdmuchiwane przez wentylator na różnych poziomach komory piekarnika.
Metoda ta doskonale nadaje się do jednoczesnego pieczenia różnych potraw
(np. mięso i ryby) bez ryzyka mieszania się smaków i zapachów. Jest to
delikatna metoda, zalecana w szczególności do pieczenia biszkoptów,
pasztecików, itp.
GRILL - Używana jest grzałka górna. Sukces gwarantowany w
przypadku mieszanych potraw grillowanych, kebabów i zapiekanek. Grzałkę
górną należy wstępnie podgrzać do wysokiej temperatury przez 5 minut. Białe
mięsa należy zawsze umieszczać w pewnej odległości od grzałki górnej - czas
pieczenia nieco się wydłuży ale mięso będzie bardziej soczyste. Mięso
czerwone i filety rybne można umieścić bezpośrednio na półce umieszczając
pod spodem tacę ociekową.
GRILL + NAWIEW - Używana jest grzałka górna w połączeniu z
wentylatorem wymuszającym obieg gorącego powietrza w piekarniku. Grzanie
wstępne jest zalecane dla potraw z mięsa czerwonego, w przypadku mięsa
białego nie jest ono konieczne. Metoda ta doskonale nadaje się do grillowania
grubszych porcji mięsa wieprzowego lub drobiu. Grillowaną potrawę należy
umieścić bezpośrednio na półce w jej środkowej części na środkowym
poziomie piekarnika. Pod półkę należy wsunąć tacę ociekową na tłuszcz
skapujący z pieczonego mięsa. Aby uzyskać jak najlepszy wynik pieczenia,
należy pamiętać, aby nie umieszczać potrawy zbyt blisko grzałki górnej, oraz
aby potrawę obrócić w połowie czasu pieczenia.
GRZAŁKA OKRĄGŁA + NAWIEW - Nagrzewane powietrze jest
wdmuchiwane przez wentylator na różnych poziomach komory piekarnika.
Metoda ta doskonale nadaje się do jednoczesnego pieczenia różnych potraw
(np. mięso i ryby) bez ryzyka mieszania się smaków i zapachów. Jest to
delikatna metoda, zalecana w szczególności do pieczenia biszkoptów,
pasztecików, itp.
GRZAŁKA DOLNA - Wykorzystywana jest dolna grzałka. Metoda
nadaje się doskonale do pieczenia potraw na bazie ciasta, takich jak placki,
babeczki, tarta, pasztet oraz do pieczenia wymagającego większej ilości ciepła
promieniującego od dołu.
GRZAŁKA DOLNA + NAWIEW - Połączenie grzania dolnego z
nawiewem doskonale nadaje się do pieczenia placków z owocami, tarty,
babeczek i ciast drożdżowych. Metoda ta zapobiega wysychaniu ciast i
pobudza rośnięcie ciasta drożdżowego. Półkę należy umieścić na poziomie
dolnym piekarnika.
CZYSZCZENIE PIROLITYCZNE – Czyszczenie całego wnętrza
piekarnika – do wyboru są trzy opcje: ECO, NORMAL, SUPER.
20 PL
Komora górna
Komora dolna
*Booster: szybki wzrost temperatury
Fabrycznie
ustawiona
temperatura °C
180
L2
190
Funkcje piekarnika w zależności
od modelu piekarnika
Grzałka okrągła +
nawiew
Grill
Grill + nawiew
Ustalony zakres
temperatura °C
160-240
L1-L3
160-240
Funkcja
Booster*
-
-
-
*Booster: szybki wzrost temperatury
Fabrycznie
ustawiona
temperatura °C
Funkcje piekarnika w zależności
od modelu piekarnika
Ustalony zakres
temp. °C
Funkcja
Booster*
-
-
-
180
160
160
160-240
160-240
160-240
JEDNOCZESNE UŻYCIE KOMORY DOLNEJ I GÓRNEJ
Jeżeli chcemy jednocześnie użyć obu komór (górnej i dolnej) do przyrządzenia
dwóch różnych potraw, wówczas aby ustawić ten tryb pieczenia należy postępować
w następujący sposób:
1. Nacisnąć
“ ” w celu wskazania drugiej komory i postępować zgodnie z
instrukcjami od
“1” do „5” poprzedniego rozdziału.
CZAS PIECZENIA
1. Nacisnąć „Nastawa czasu” i odszukać symbol klepsydry przy użyciu „strzałek”.
2. Nacisnąć „Nastawa temperatury i czasu” i ustawić czas pieczenia przy użyciu
„strzałek”.
3. W celu potwierdzenia ustawienia, nacisnąć ponownie „Nastawa temperatury i
czasu”.
KONIEC PIECZENIA
1. Nacisnąć „Nastawa czasu” i odszukać symbol strzałki przy użyciu
“strzałek”.
2. Nacisnąć „Nastawa temperatury i czasu” i ustawić czas zakończenia pieczenia
przy użyciu „strzałek”.
3. W celu potwierdzenia ustawienia, nacisnąć ponownie „Nastawa temperatury i
czasu”.
UWAGA: Aby anulować już ustawiony czas, należy przy użyciu „strzałek” odszukać
symbol „obramowanego zegara” w menu nastaw czasowych oraz nacisnąć
„Nastawa temperatury i czasu”.
Funkcja ta jest zazwyczaj stosowana łącznie z funkcją ‘Regulacja czasu gotowania’.
Jeśli dla przykładu określone danie należy gotować przez 45 minut i ma być
przygotowane na godz. 12:30, należy wykonać następujące czynności:
- wybierz wymaganą funkcję
- ustaw czas gotowania na 45 minut
- ustaw zakończenie czasu gotowania na godz. 12:30.
Gotowanie rozpocznie się automatycznie o godz. 11:45 (45 minut przed godz.
12:30), a zakończy o uprzednio wybranej godzinie, kiedy to piekarnik wyłączy się
automatycznie.
UWAGA!
Jeśli wybrany zostanie czas ZAKOŃCZENIA gotowania bez doprecyzowania
długości czasu gotowania, piekarnik zostanie uruchomiony od razu, a proces
gotowania zakończy się o uprzednio wybranej godzinie.
Grzałka okrągła +
nawiew
Grzałka dolna
Grzałka dolna +
nawiew
La pagina si sta caricando...
La pagina si sta caricando...
La pagina si sta caricando...
La pagina si sta caricando...
La pagina si sta caricando...
La pagina si sta caricando...
La pagina si sta caricando...
La pagina si sta caricando...
La pagina si sta caricando...
La pagina si sta caricando...
La pagina si sta caricando...
La pagina si sta caricando...
La pagina si sta caricando...
La pagina si sta caricando...
La pagina si sta caricando...
La pagina si sta caricando...
La pagina si sta caricando...
La pagina si sta caricando...
La pagina si sta caricando...
La pagina si sta caricando...
La pagina si sta caricando...
La pagina si sta caricando...
La pagina si sta caricando...
La pagina si sta caricando...
La pagina si sta caricando...
La pagina si sta caricando...
La pagina si sta caricando...
-
 1
1
-
 2
2
-
 3
3
-
 4
4
-
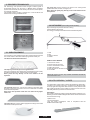 5
5
-
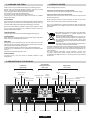 6
6
-
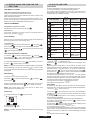 7
7
-
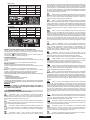 8
8
-
 9
9
-
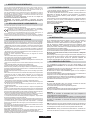 10
10
-
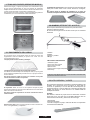 11
11
-
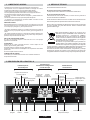 12
12
-
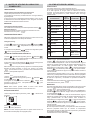 13
13
-
 14
14
-
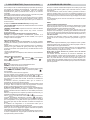 15
15
-
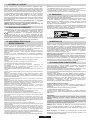 16
16
-
 17
17
-
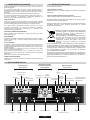 18
18
-
 19
19
-
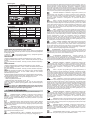 20
20
-
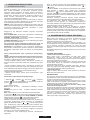 21
21
-
 22
22
-
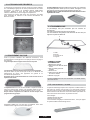 23
23
-
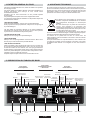 24
24
-
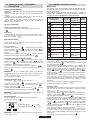 25
25
-
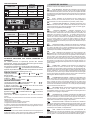 26
26
-
 27
27
-
 28
28
-
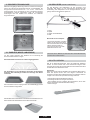 29
29
-
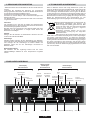 30
30
-
 31
31
-
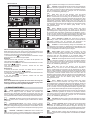 32
32
-
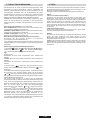 33
33
-
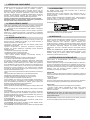 34
34
-
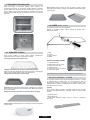 35
35
-
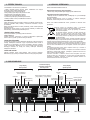 36
36
-
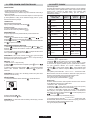 37
37
-
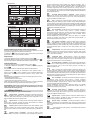 38
38
-
 39
39
-
 40
40
-
 41
41
-
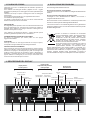 42
42
-
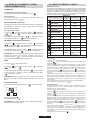 43
43
-
 44
44
-
 45
45
-
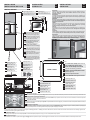 46
46
-
 47
47


