
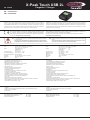
X-Peak Touch USB 2L
Cargador / Charger
No. 153075
ES - Instruccion
GB - Instruction
ES - Datos tecnicos:
Input AC 100 - 240 V; 50 Hz; 0,80 - 0,33 A; 84 W
DC 11 - 18 V; 7,2 - 4,5 A; 80 W
Output LiIon/LiPo/LiFePo: 1 - 6
NiCd/NiMH: 1 - 16
Pb 2 V ~ 20 V
Corriente de carga max. 80 W, 0,1 ~ 10,0 A
Corriente de descarga max. 10 W, 0,1 ~ 2,0 A
Corriente de balancador 450 mAh/Célula
Descargar 2,0 - 4,2 V/élément Li-Ion, LiPo, LiFePo
Dimension 180 x 145 x 60 mm
Peso 650 g
GB - Technical data:
Input AC 100 - 240 V; 50 Hz; 0,80 - 0,33 A; 84 W
DC 11 - 18 V; 7,2 - 4,5 A; 80 W
Output LiIon/LiPo/LiFePo: 1 - 6
NiCd/NiMH: 1 - 16
Pb 2 V ~ 20 V
Charging current max. 80 W, 0,1 ~ 10,0 A
Discharge current max. 10 W, 0,1 ~ 2,0 A
Balance current 450 mAh/cell
Discharge 2,0 - 4,2 V/Cells Li-Ion, LiPo, LiFePo
Dimensions 180 x 145 x 60 mm
Weight 650 g
ES - Highlights:
• Fácil manejo a través el Touch-Screen
• Adaptador Dual Power AC/DC 230V y 12V
• Balancador encorporado en Lithium
• Equilibrador individual para la descarga de las baterías
• Utilizable para varios tipos de bateías de litio
• Máxima seguridad
• Automática protección de sobretensiones
• Corriente de entrada de supervisión
• Capacidad de Limite
• Control de la temperatura con programación de corte
• Proceso de límite de tiempo
• Visulización de carga de la capacidad
• Compatible con litio, NiMh, NiCD y baterías de plombo
• Control de la resistencia interna de cada célula de litio
• Servo-tester
• Slot de carga para enchufes de USB. Por ejemplo, para las cámeras, celulares etc.
• Carga simultánea, para USB y carga y principal
• Output alimentacion ajustable 1 - 28V
GB - Highlights:
• Touch Screen
• Dual Power Built-in AC Adapter 230V and 12V
• Internal independent lithium battery balancer
• Individually balanced battery discharge
• Adaptable for various type of lithium battery
• Maximum safety
• Automatic charging current limit
• Input power monitoring
• Capacity limit
• Proscessing time limit
• Load capacity display
• Supports Lithium, NiMh, NiCd and Lead battery packs
• Graphical display of each individual cell level
• Internal resistance measurement of each individual Lithium Battery cell
• Servo Tester
• Monitored USB charging port. For example, for charging cameras, smart phones etc.
• Simultaneous charging on USB charging port and main
• Adjustable power supply function output 1 - 28V
DE - Contenido del kit:
• Cargador
• Cables de conexión: Cable de alimentación 230V y 12V (para batería del coche)
• Cable de carga: LiPo Deluxe
• Instrucciones
GB - Box content:
• Charger
• Extension lead: Electric cable 230 V and 12 V (for car battery)
• Charging lead: LiPo Deluxe
• Instructions
ES - Accesorios:
Placa adaptadora para equilibrado Universal No. 15 3043
Cable adaptador Balancer Universal No. 15 3044
Sensor de temperatura No. 15 3056
GB - Accessories:
Balancer Adapterboard Universal No. 15 3043
Adapter cable Balancer Universal No. 15 3044
Temperature sensor No. 15 3056
ES - Dichiarazione di conformità
Por la presente JAMARA e.K. dichiara che il prodotto „Cargador X-Peak Touch USB
2L, No. 153075“ cumplen con las Directivas 2014/30/UE, 2014/35/UE e 2011/65/UE.
Il testo integrale della dichiarazione di conformità UE è disponibile al seguente indi-
rizzo Internet: www.jamara-shop.com/Conformity
GB - Certicate of Conformity
Hereby JAMARA e.K. declares that the product „Charger X-Peak Touch USB 2L, No. 153075“ com-
plies with Directive 2014/30/EU, 2014/35/EU and 2011/65/EU.
The full text of the EU Declaration of Conformity is available at the following Internet address:
www.jamara-shop.com/Conformity
ES - Información general
JAMARA e.K. no se hace responsable de los daños causados al producto en sí o por medio de
esto, a menos que esto se debe al mal funcionamiento o errores de manejo. El cliente solo tiene la
responsabilidad completa para el uso y manejo adecuado, incluyendo, sin limitaciones, el montaje,
el proceso de carga, el uso de hasta la elección de la zona de aplicación. Por favor, consulte las
instrucciones de uso y funcionamiento, contiene información y avisos importantes.
GB - General information
JAMARA e.K. is not liable for any damage caused to the product itself or through this, provided this
is due to improper operation or handling errors. The Customer alone bears the full responsibility for
the proper use and handling, including without limitation, the assembly, the charging process, the
use and choice of the operation area. Please refer to the operating and user instructions, it contains
important information and warnings.
ES - Lea atentamente la instruccion completa y seguridad antes de poner el modelo
en funcionamiento.
Atención! Leer completamente las notas de advertencia / instrucciones de
seguridad estos son para su seguridad y puede evitar accidentes / lesiones
GB - Read the complete instructions and security instructions carefully before using the
model.
Caution! Please fully and carefully read warnings/ safety instructions. These
are for our own security and can avoid accidents/injuries
21/22

2
ES - Características especiales
Balancador encorporado en Lithium
Especialmente útil es el balanceador incorporado activos que pueden trabajar con hasta seis ele-
mentos de litio. (Placa adaptadora para equilibrado Universal, No.153043, Cable adaptador Balan-
cer Universal , No. 153044). La carga de estas baterías es cómodo y seguro. No es necesario
conectar un equilibrador separado para la carga.
Bilancador individual
Durante el proceso de descarga, X-Peak 90 Touch puede controlar y equilibrar cada celda de la ba-
tería de forma individual. Mensaje de error se indicará y el proceso será terminado automáticamente
si la tensión de que exista sólo una célula es anormal.
Utilizable para varios tipos de bateías de litio
Como ya le hemos comentado trabaja a la perfección con los más novedosos elementos de Litio,
tales como los elementos de Iones de Litio-hierro-fosfato (LiFePO4).
Máxima seguridad
Delta-Peak sensibilidad: El cargador controlar el voltaje en la batería durante la carga. Cuando el
voltaje de carga de la batería se alcanza o supera, el dispositivo se apaga automáticamente.
Automática protección sobretensiones
Se puede establecer el límite superior de la corriente de carga para recargar su batería de NiCd o
NiMH tipo de batería. Esto es útil para NiMh con menor capacidad en el modo de carga automática.
Corriente de entrada de supervisión
Por lo tanto, no llega a una descarga profunda, la batería del coche de la tensión de entrada del
cargador es monitoreada continuamente. Si se alcanza el límite, el cargador pasa automáticamente
detiene el proceso.
Control de la temperatura con programación de corte*
En el cargador hay un sensor de temperatura que puede infectarse. Entonces, la temperatura de la
batería puede variar hasta 80° C, tener cuidado.
* Esta función no es sólo a través de la conexión de un sensor de temperatura opcional
(No. 153056) es posible, se incluye.
Capacidad de Limit
Por razones de seguridad, la capacidad de carga se controla. El tiempo de carga („Safety‘-tempo-
rizador) se controla constantemente. Si la capacidad de carga excede el valor máximo, el proceso
se termina automáticamente.
Proceso de límite de tiempo
Para evitar posibles errores, también se puede cargar manualmente programieren tiempo.
Cíclica de carga / descarga
1 a 5 cíclico y continuo proceso de carga> descarga o carga y descarga> es operable para la
batería refrescante y equilibrado para simular la actividad de la batería. Por favor, consulte los
datos técnicos.
GB - Special features
Internal independent lithium battery balancer
The Charger has an integrated balancer connection for the included Balander board (up to 6-cell
lithium) (Optional Universal Balancer Board, No.153043, balancer adapter cable, No. 153044). It
isn‘t necessary to connect an external balancer for balance charging.
Balancing individual cells battery charging/discharging
During the process of discharging, the charger can monitor and balance each cell of the battery in-
dividually. Error message will be indicated and the process will be ended automatically if the voltage
of any single one cell is abnormal.
Adaptable to various type of lithium battery
Charger is adaptable to various types of Lithium batteries, such as Li-ion, LiPo and the new LiFe
series of batteries.
Maximum safety
Delta-peak sensitivity: the automatic charge termination program based on the principle of the Delta-
peak voltage detection. When the battery‘s voltage exceeds the threshold, the process will be ter-
minated automatically.
Automatic charging current limit
You can set up the upper limit of the charging current when charging your NiCd or NiMh battery. It is
useful for the NiMh battery of low impendance and capacity in the „Auto“ charging mode.
Input power monitoring
To portect the car battery used as DC input power from being damaged, its voltage keeps being
monitored. If it drops below the lower limit, the process will be ended automatically.
Temperatur monitoring with programmable cut-o*
The battery‘s internal chemical reaction will cause the temperature of the battery to rise. If the tem-
perature limit is reached, the process will be terminated.
*This function is available by connecting optional temperatur probe (Ord. No. 153056), which is not
included in our package.
Capacity limit
The charging capacity is always calculated as the charging current multiplied by time. If the charging
capacity exceeds the limit, the process will be terminated automatically when you set the maximum
value.
Processing time limit
You can also limit the maximum process time to avoid any possible defect.
Cyclic charging/discharging
1 to 5 cyclic and continuous process of charge>discharge or discharge>charge is operable for bat-
tery refreshing and Balancing to simulate the battery‘s activity.
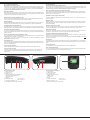
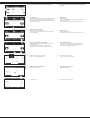
ES - Conexiones y teclas
1 Entrada 100 - 240 V
2 Conexión USB
3 Entrada 10 - 18 V
4 Conexión para el sensor de temperatura
JR conector USB (software / PC)
Conexión de Servo
5 Ventilador
6 Salidas para carga rojo = positiv (+)
negro = negativ (-)
7 Conectors equilibrado (1 - 6)
8 LED Display con Touchscreen, iluminado
GB - Connections and Controls
1 230 V AC Input
2 USB charging socket
3 10 - 18 V DC Input
4 Temperature sensor socket
USB-JR socket
Servo socket
5 Cooler
6 Charge cabel sockets red = plus (+)
black = minus (-)
7 Balancer sockets (1 - 6)
8 LED screen with Touch screen and light
1 2 3 54 7
6
8

3
ES - Puesta en marcha del cargador
El cargador puede ser alimentado de dos maneras distintas, pero no simultáneamente. Dispone de
la posibilidad de obtener la energía de una toma de corriente casera, un enchufe, o bien de una
batería de automóvil o de una fuente de alimentación estabilizada de 12 V.
Conecte el cargador a la toma de alimentación seleccionada. Si lo conecta a una toma de alimen-
tación de 12 V y corriente continua debe comprobar que la polaridad sea la correcta. Conecte la
pinza de cocodrilo roja con el polo positivo (+), y la negra con el negativo (-), de la batería o fuente
de alimentación.
Cuando la puesta en marcha, aparece „Charge Discharge“ Durante este tiempo, el procesador com-
prueba el cargador de batería y fuente de alimentación. Si se produce un fallo, por ejemplo, porque
la tensión de entrada está por debajo de 10 V o 15 V, un mensaje correspondiente aparecerá en la
Notas importantes!
• Nunca mezclar las dos fuentes de energía, el cargador se puede dañar.
• Asegúrese de utilizar el programa de carga correcto (litio, NiMh, plomo, etc.) para cada
batería. Intentar cargar una batería con un programa de carga no compatible puede causar
graves daños a la batería y al cargador. Existe riesgo de incendio o explosión. Si no está
seguro del programa de carga que debe utilizar para su batería, póngase en contacto con
el fabricante de la misma o con nuestro servicio de atención al cliente.
• El cargador es capaz de cargar de forma desequilibrada baterías de litio multicelulares en
condiciones controladas cuando se selecciona el programa de carga adecuado. La
carga desequilibrada de las baterías de litio multicelulares es responsabilidad del usuario.
Se desaconseja encarecidamente y se recomienda que las baterías de litio multicelulares
se carguen siempre de forma equilibrada. Una carga desequilibrada puede provocar una
desviación del voltaje de las celdas, lo que puede hacer que la batería envejezca más
rápidamente y, en el peor de los casos, puede dañar gravemente la batería. Existe riesgo
de incendio o explosión.
La conexión a la batería de cargada o descargada aparece por dos códigos de colores hembrillas
de 4 mm. Conecte la batería con estas tomas. Cuando conectada – en continuación, la terminal
positiva de la batería que corresponde a la roja (+) y la terminal negativa de la batería con el negro
(-). Utilice sólo el cargador de alta calidad.
Cuando se carga o descarga una batería de litio, debes usar para la seguridad necesariamente la
función de balanceador de los cargador. Es la única forma que las células de litio queden bien prote-
gidas contra una falta de tratamiento. Cuidado con los terminales y el equilibrador de la batería con
el cargador. Si el puerto balanceador no se utiliza, una carga o descarga se lleva a cabo sin el
control de la tensión de celda individual. Además, el voltaje de las células individuales no se pueden
mostrar.
GB - Using your charger for the rst time
household mains supply (220 V AC) or via 12 V DC. The 12 V DC can be either a vehicle battery or
a stabilised transformer.
Connect the charger to an input of your choice, if using 12 V pay particular attention to the polarity.
The red crocodile clip must be connected to the plus pole (+) and the black clip to the minus pole (-).
example if the input voltage is outside the allowed range of 10-15 V, a message will be displayed and
the buzzer will sound. Disconnect the power supply and rectify the fault.
Important notes!
• Never connect both power inputs simultaneously as this will destroy the charger!
• Make sure to use the correct charging programme (Lithium, NiMh, Lead etc.) for the
respective battery! Attempting to charge a battery with a non-compatible charging
programme can cause serious damage to the battery and charger. There is a risk of re
or explosion! If you are not sure which charging programme to use for your battery, please
contact the manufacturer of the battery or contact our customer service.
• The charger is capable of unbalanced charging of multi-cell lithium batteries under
controlled conditions when the appropriate charging programme is selected. Unbalanced
charging of multi-cell lithium batteries is at your own risk. We strongly advise against this
and recommend that multi-cell lithium batteries are always charged balanced. Unbalanced
charging can lead to cell voltage drift which can cause the battery to age more quickly and
in the worst case can severely damage the battery. There is a risk of re or explosion!
Battery packs to be charged or discharged are attached to the charger via 2 colour coded banana
sockets using a good quality charging cable. Make sure that the plus (+) pole of the battery is con-
nected to the red socket on the charger and that the minus (-) pole of the battery is connected to the
black socket of the charger.
When charging or discharging Lithium packs, always use the balancer function of the charger. This
To do so, you must connect both the charging cable and the balancer plug/socket (balancerboard
included). Not doing this will result in the individual cells not being protected and you will not be able
to monitor the individual cell voltage in the display.
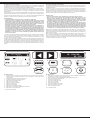
ES - Menú principal
puede cambiar en los varios puntos del menú. Para seleccionar un menú, pulse el botón
correspondiente.
2. Cursor para moverse entre las opciones del menú
3. Visualizar el programa de carga seleccionado.
4. Selecciónar el menú Balancer-Carga.
5. Seleccione el menú de carga
6. Seleccione el menú de descarga
7. Seleccione el menú Cycle.
8. Seleccione el menú Setup
9. Selecciónar el menú Balancer-Carga .
10. Selecciónar la conexión de carga-USB/conexión del servo.
11. Selecciónar el menú Digital Power
*LS > Último modo de trabajo
GB - Main Screen
1. After power on the charger, you can see the main menu, press the symbols to select a menu.
2. Arrow buttons to change the stored charging programs
3. Enter the memory into the charging/balancing charging/discharging/cycle.
4. Enter into the balancing charging mode.
5. Enter into the charging mode.
6. Enter into the discharging mode.
7. Enter into the cycle mode.
8. Enter into the setup mode.
9. Enter into the batteries doctor mode.
10. Enter into the extern function mode.
11. Enter into digital power mode.
*LS > Last working mode.
1 2 3
4
8
5
9
6
10
7
11

4
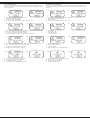
ES - Ajuste de los parámetros
Consejo:
Antes de utilizar el cargador por primera vez en funcionamiento, se
deben establecer los parámetros básicos.
1 Iluminación 20 % ~ 80 %
2 Contraste LCD 30 ~ 60
3
4
5 Máx. Output 50 - 80 W
A guardar / espalda
B reducir / abajo
C selección / aprobar
6 Baja tensión 10,0 V ~ 18,0 V
7 Temporizador 10 ~ 600 min.
8 Desconexión de temperatura interno 50 ~ 80°C
9 Desconeción de temperatura externo 50 ~ 80°C
10 Capacidad máxima de carga 500 mAh ~ 50 Ah
11 Modo de ciclo (Nixx) C->D/D->C
12 Repetición de ciclo 1 ~ 5T
13 Ciclo de pausa 5 ~ 60 min.
14 Delta-Peak NiMh 5 ~ 25 mV
15 Delta-Peak NiCd 5 ~ 20 mV
16 LiPo-Célula cargar 4.00 ~ 4.25 V
17 LiPo-Célula descargar 3.00 ~ 4.00 V
18 LiPo-Célula descargar 3.50 ~ 3.70 V
19 LiFe-Célula descargar 1.80 ~ 3.30 V
20 Batería de plomo-Célula cargar 2.00 ~ 2.50 V
21 Batería de plomo-Célula cargar 1.20 ~ 2.00 V
22 NiMh-Célula descargar 0.80 ~ 1.50 V
23 NiCd-Célula descargar 0.50 ~ 1.50 V
24 Lilo-Célula cargar 4.00 ~ 4.15 V
25 Lilo-Célula descargar 3.00 ~ 3.90 V
GB - Initial parameter set up
Pressing the „SET“ button to enter the setup menu
Tips:
Please set up correctly in the „user set“ menu before into the job for
1 Back Light 20 % ~ 80 %
2 LCD Contrast 30 ~ 60
3
4
5 Max. Out Watt 50 - 80 W
A Save / Back
B INC / Down
C DEC / Up
6 Input cut 10,0 V ~ 18,0 V
7 Safety timer 10 ~ 600 min.
8
9
10 Max. Out CAPA 500 mAh ~ 50 Ah
‚
11 Nixx Cycle Mode C->D/D->C
12 Nixx Cydle Cnt. 1 ~ 5 T
13 Cycle Waste time 5 ~ 60 min.
14 NiMh Delta-Peak 5 ~ 25 mV
15 NiCd Delta-Peak 5 ~ 20 mV
16 LiPo CHG Cut 4.00 ~ 4.25 V
17 LiPo DCHG Cut 3.00 ~ 4.00 V
18 LiFe CHG Cut 3.50 ~ 3.70 V
19 LiFe DCHG Cut 1.80 ~ 3.30 V
20 PB CHG Cut 2.00 ~ 2.50 V
21 PB DCHG Cut 1.20 ~ 2.00 V
22 NiMh DCHG Cut 0.80 ~ 1.50 V
23 NiCd DCHG Cut 0.50 ~ 1.50 V
24 Lilo CHG Cut 4.00 ~ 4.15 V
25 Lilo DCHG Cut 3.00 ~ 3.90 V
A B C
1
2
3
4
5
6
7
8
9
10
11
12
13
14
15
16
17
18
19
20
21
22
23
24
25

5
ES - Primero pasos para comenzar la carga/descarga y ciclo
1. Tipo de batería
correcto de la batería, de otra manera se pueden dañar las
células. La selección se puede establecer utilizando los botónes
2. Ajuste del número de células
Selecciónar un número de células.
La selección se puede establecer utilizando los botónes de
3. Ajuste de la corriente de carga/descarga
La selección se puede establecer utilizando los botónes de
Pulse el botón „Save“ para guardar los parámetros
establecidos. Para iniciar la carga, pulse el botón „Start“.
4. Save = Insertar el espacio de memoria
(Plazo 1 - 10 están preprogramado)
5. Voltaje de entrada / prueba-batería
Start = Iniciar el proceso
6. La carga se inicia.
GB - Getting started to balancing charging/charging/discharging
and cycle
1. Battery type
Set the battery type.
You have to check the battery carefully and set it up correctly, or
it will cause a explode.
The selection can be set using the arrow keys (up / down).
2. Number of cells
Set the numbers of cells.
The selection can be set using the arrow keys (up / down)
3. Charge/Discharge current
The selection can be set using the arrow keys (up / down)
Press „Save“ to the set presented to store parameters.
To start the charging process press „Start“
4. Save = Enter Memory location
(Place 1 - 10 are pre-programmed)
5. Input Voltage / Battery check.
Start = Start Operation
6. The charging process is started.

6
ES - Primeros pasos para comenzar la carga/descarga y
ciclo
1. Datos de carga/descarga
En la pantalla se muestra los valores utilizados más
recientementet.
2. Ajuste los datos de carga/descarga
En caso de ser necesarios algún cambio, seleccione
los datos requeridos.
3. Para ver el curso de corriente se debe pulsar el botón
„Graph“.
4. Para supervisar la células individuales se debe pulsar
el botón „Cell“.
5. Ciclo de NiMH / NiCd
GB - Getting started to balancing charging/charging/
discharging and cycle
1. Charging/Discharging data
In the digital bower menu, charger will shows the
parameters which user setted in the last time
2. Charging/Discharging set data
Should any changes be necessary, select the required
data.
3. Press „Graph“ key to view the current curve.
4. Press „Cell“ key to view the Cells
5. NiMh / NiCD Cycle
1. Lipo
Seleccione el tipo de batería (LiPo/LiFe/Lilo)
2. VOL
Seleccione la tensión/resistencia interna
Seleccione la tensión/voltio
3. BALA
Iniciar el proceso de balancer
Control del proceso de balancer, con „Stop“ se puede terminar anticipado el proceso de
balancer.
1. Lipo
can select LiPo/LiFe/Lilo
2. VOL
can select Voltage/Internal resistance
Can select Voltage/Volt
3. BALA
Start the balancer operation
Balancer control operation, with „Stop“ you can stop the Valancer operation prematurely.
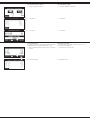
ES - Menú-Reparación de la batería GB - Battery‘s Doctor Progam

7
ES - Programas de función externos
1. Elegir entre USB y Servotester
2. USB Monitor
3. Servotester
GB - Extern function program
1. Can select USB Monitor / Servotester
2. USB Monitor
3. Servo Tester
ES - Menú Digital Power
El cargador se puede utilizar como fuente de alimentación para dispo-
sitivos eletrónicos con una tensión de salida de 3,0 V – 24 V.
1. Ajuste los valores individuales de tensión, corriente, vatio máximo
y duración.
2. Procesamiento Digital.
GB - Digital power program
In this mode, charger can provide a output power of DC 3,0 V - 24 V
for the other electronic equipment.
1. Set voltage / current / watt / run time
2. Digital power working.

8
ES - Los mensajes de error
El cargador está preparado con una serie de mensajes de error. Todos los mensajes de error se
muestran en la pantalla y van a interrumper inmediatamente el proceso para protegir el cargador
y la batería de dañaos..
GB - Warning and orror information
The Charger is protected agains faults and operator errors by the Multi-Protections-System. Faults/
Errors are displayed on the LCD screen and they interrup the active process to protect the unit and
the battery.
1. La batería se ha conectada con la polaridad inversa.
2. El circuito de carga tiene una ruptura.
3. Corto circuito en la voltaje de salida.
4. El voltaje de entrada está fuera de los límites permitidos(10 - 18 V).
1. The output ist connected to a battery with incorrect polarity.
2. Not connected or connection interruption.
3. Output short circuits.
4. Input voltage error, below or over the limit of 10 - 18 V.
5. Dispositivo de error desconocido inmediatamente desconectar de la fuente de alimentación.
6. La tensión de una batería de litio es demasiado alta.
7. La tensión de una batería de litio es demasiado baja.
5. Charger fault.
6. Total voltage too low.
7. Total voltage too high.
8. Unit cell voltage too low.
9. Una celda de una batería de litio tiene un nivel de voltaje demasiado alto.
10. Mal, conexión de alta resistencia en el circuito de carga.
11. El cargador está demasiado caliente, dejar enfriar.
12. El cargador ha superado la potencia de salida.
9. Unit cell votage too high
10. Balance port connection error.
11. Charge overheating
12. Power exceed the limit in the digital power mode.
13. La corriente admisible maxima se ha superado.
14. El tiempo de carga máximo se ha superado.
15. El capacidad máximo se ha superado.
16. La temperatura máxima de batería se ha superado.
13. Current exceed the limit in the digital power mode.
14. Exceed the maximum safe time limit.
15. Exceed the maximum capacity limit.
16. External temperature too high.
1234
5678
9 10 11 12
13 14 15 16

9
ES - Información
El cargador está equipado con una potente fuente de alimentación interna de 80 vatio y un buje
para conexión a una fuente de alimentación externa. Cuando se trabaja en una toma normal de
230 V corriente alterna, debe asegurarse de operar el cargador dentro de la potencia máxima de
80 vatio. Es decir debe elegir la corriente máxima de carga en amperios en cada batería, teniendo
en cuenta la velocidad de carga máxima permitida de la batería y de la potencia máxima de la fu-
ente de alimentación interna! Al elegir entre las corrientes que superan los 80 vatio de la fuente de
alimentación provoca la desconexión de seguridad y volver a iniciar el cargador de nuevo. Cuando
se conecta a una fuente de alimentación externa con una potencia adecuada el cargador de batería
permite una carga más altas durante el funcionamiento técnico. En la tabla puedes ver las corrien-
tes de carga de varias baterías de litio. La base para el cálculo de Vatios es Voltios se multiplicado
por Amperes.
GB - Additional information
Your charger is equipped with a powerful internal 80 watt power supply and a socket to connect to an
external power supply . When operating on a normal 230V AC power outlet you should making sure
the charger ist set to operate within the maximum power of 80 watts . You should set the max. Amp
current according to the respective battery , into the range of the allowed maximum Charging rate of
the battery and the maximum output of the internal power supply! If you choose charging currents
exceeding the 80 watts of the power supply the safety shutdown of the power supply will restart the
charger. When connecting to an external power supply to the appropriate power the charger allows
higher Loading rates within the technical performance.
In the table you can see the charging currents of various lithium batteries. The basis for calculation
of Watts is Volts multiplied by amps.
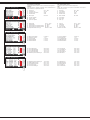
ES - Generalidades cobro de tasas en vatios / amperios LiPo
GB - Table of current in Watt/Ampere LiPo
V-max Célula
V-max p.cell
Células
cells
V-max Baterías
V-max battery
max. amperes cargador
max. Amp current
Vatio
Watt
4,2 1 4,2 10 42
4,2 2 8,4 10 84
4,2 3 12,6 7 88,2
4,2 4 16,8 5,2 87,36
4,2 5 21 4,2 88,2
4,2 6 25,2 3,5 88,2
ES - Generalidades cobro de tasas en vatios / amperios LiIon
GB - Table of current in Watt/Ampere LiIonn
V-max Célula
V-max p.cell
Células
cells
V-max Baterías
V-max battery
max. amperes cargador
max. Amp current
Vatio
Watt
4,1 1 4,1 10 41
4,1 2 8,2 10 82
4,1 3 12,3 7,2 88,56
4,1 4 16,4 5,4 88,56
4,1 5 20,5 4,3 88,15
4,1 6 24,6 3,6 88,56
ES - Seguridad
• Lea atentamente las instrucciones y seguridad antes de poner el modelo en
funcionamiento.
• Es producto no es para personas (incluidos niños) con discapacidad física, mental
y sensonriais. O ninguna experiencia ni conocimiento, a menos que vayan
acompañados de un responsable o recibir instrucciones ¿Cómo se debe usar. Los
niños deben ser supervisados para asegurarse de que no te metas con el producto.
• Los niños deben ser supervisados para asegurarse de que no jueguen con el aparato.
• Sólo para uso en interiores.
• El cargador puede calentarse durante la operación, asegúrese de que el calor se
pueda ampliar de una manera equilibrada.
• Asegúrese de que el contacto de carga con la humedad y la exposición a la luz solar directa.
• Cuando deje de utilizar, desenchufe la fuente de alimentación y las baterías.
de seguimiento, no deje desatendida.
• Evite cualquier corto circuito y comprobe la polaridad de las dos potencias, la de
entrada y la batería conectada.
• No cargar o descargar en caliente o en frío, dejar que enfríe antes de volver a usarla.
• Sólo debe cargar las baterías compuesto por elementos del mismo fabricante y
con la misma capacidad.
• En ningún caso, cargar o descargar baterías en paralelo.
• Nunca carga / descarga directa baterías equipadas con un circuito electrónico,
apague el circuito antes de de carga.
• Cuando se conecta la batería, primero conecte el cable de carga al dispositivo y
luego conectar las baterías.
• No cargar las baterías defectuosas o dañadas.
• Respetar a la indicación del fabricante de la batería.
• El cargador está diseñado exclusivamente para la carga o tipos de descarga
• No abra el cargador, y no trate de repararlo. Es peligroso, y anular la garantía.
Presentarle a nuestro departamento técnico para futuras reparaciones.
GB - Safety Information
• Whenever you operate your charger the following safety instructions must
be followed.
• This device is not intended for use by individuals (including children) with reduced
physical sensory, mental abilities, lack of experience and / or knowledge, unless
they are supervised in how the device is to be used.
• Children should be supervised to ensure that they do not play with the appliance.
• Only for indoor use.
• The charger may get hot in use, position the unit so that the heat can dissipate.
• Never expose the charger to moisture or direct sun light.
• After use always disconnect the unit from the mains and unplug any batteries.
proof surface.
• Avoid short circuits at all costs. Always observe the correct polarity.
• Batteries should always be allowed to cool down before you charge or discharge
them.
• Only charge or discharge packs containing cells from the same manufacturer and
of the same capacity.
• Do not connect packs in parallel to charge or discharge them.
• Always disconnect the pack from any electronic system (ESC etc.) before
attempting to charge it.
• Never try to charge/discharge damaged packs or cells.
• Follow the directions given by the battery manufacturer.
• The charger may only be used to charge/discharge the types of cells listed in the
• Do not open the unit. This will void the guarantee and may be dangerous. If the
charger is damaged or faulty, return it our service department for repair.
ES - Notas sobre el reciclado
Aparatos eléctricos no pueden desecharse en la basura doméstica, pero se deben
desechar de forma separada. Usted está obligado, a quitar las baterías y llevar los
aparatos eléctricos viejos en los puntos de recogida comunales. En caso de que hay
datos personales en el aparato eléctrico se deben remover de usted mismo.
GB - Disposal restrictions
Electrical appliances must not be disposed of in domestic waste and must be disposed of separately.
You are obliged to take out the batteries, if possible, and to dispose of the electrical equipment at
the communal collection points. Should personal data be stored on the electrical appliance you must
remove them by yourself.

10

11

Prohibida su reproducción o distribución, por cualquier medio, salvo consentimiento expreso de JAMARA e. K.
All rights reserved. Copyright JAMARA e.K. 2022
Copying or reproduction in whole or part, only with the expressed permission of JAMARA e.K.
JAMARA e.K.
Inh. Manuel Natterer
Am Lauerbühl 5 - DE-88317 Aichstetten
Tel. +49 (0) 75 65/94 12-0 - Fax +49 (0) 75 65/94 12-23
[email protected] ● www.jamara.com
Service - Tel. +49 (0) 75 65/94 12-777
service@ jamara.com
Reitter Modellbau Versand
Patricia Reitter
Degerfeldstrasse 11
DE-72461 Albstadt
Tel +49 (0) 7432 9802700
Fax +49 (0) 7432 2009594
Mail [email protected]
Web www.modellbauversand.de
Modellbau Zentral
Peter Hofer
Bresteneggstrasse 2
CH-6460 Altdorf
Tel +41 79 429 62 25
Mobil +41 41 870 02 13
Mail [email protected]
Web www.modellbau-zentral.ch
PenTec s.r.o.
Distributor Jamara for Czech Republic and Slovakia
Veleslavínská 30/19
Tel +420 235 364 664
Mobil +420 739 075 380
Mail servis@topdrony.cz
Web www.topdrony.cz
Viva-net d.o.o.
Distributor Jamara for Croatia
Ante Topic - Mimare 8
HR-10000 Zagreb-Susedgrad
Mail [email protected]
Web www.viva-net.hr
Nettrade Kft.
Distributor Jamara for Hungary
1033 Budapest, Hévízi út 3/b
Tel +36 30 664 3835
Mail [email protected]
Janus Trade D.O.O.
Distributor Jamara for Slovenia
Koroška cesta 53c
SI-4000 Kranj
Mail [email protected]
Web www.janustrade.si
DE
SI
JAMARA e.K.
Manuel Natterer
Am Lauerbühl 5
DE-88317 Aichstetten
Tel +49 (0) 7565 9412-0
Fax +49 (0) 7565 9412-23
Mail [email protected]
Web www.jamara.com EU
CH CZ
HR
HU
ES - Servicio asistencia GB - Service centre
-
 1
1
-
 2
2
-
 3
3
-
 4
4
-
 5
5
-
 6
6
-
 7
7
-
 8
8
-
 9
9
-
 10
10
-
 11
11
-
 12
12


in altre lingue
- English: Jamara 153075 User manual
- español: Jamara 153075 Manual de usuario
Documenti correlati
Altri documenti
-
MULTIPLEX Power Peak E7 Manuale del proprietario
-
-
-
LRP 41420 Manuale utente
-
-
ROBBE Power Peak Infinity 3 Manuale del proprietario
-
-
-
-