
EN User Manual
FR Manuel utilisateur
DE Bedienungsanleitung
ES Manual de usuario
IT Manuale d’uso
NL Gebruiksaanwijzing
RU Руководство пользователя
TR Kullanım Kılavuzu
Register your product and get support at
www.philips.com/support
PPX520
PicoPix Max One
Portable projector

User Manual
Register your product and get support at
www.philips.com/support
PPX520
PicoPix Max One
Portable projector

Introduction �������������������������������������������������3
Dear customer ...............................................................3
About this user manual ..............................................3
What’s in the box ..........................................................3
Customer service centre ............................................3
1 General safety information ��������������� 4
Setting up the product .............................................. 4
Repairs ............................................................................ 4
Power supply .................................................................5
2 Overview ������������������������������������������������5
Top view ...........................................................................5
Front view ........................................................................5
Rear view ........................................................................ 6
Remote control............................................................. 6
3 Connect ��������������������������������������������������7
HDMI connection for image projection ................7
USB-C connection for image projection ..............7
4 Operation ���������������������������������������������� 8
Place the projector...................................................... 8
Connect power supply .............................................. 8
Prepare the remote control ..................................... 8
Power on and set up .................................................. 9
Placement options .....................................................10
5 Other features ��������������������������������������11
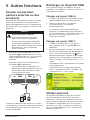
Listen through external speakers or
headphones ..................................................................11
Charge a USB device .................................................12
Use easy link ................................................................12
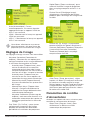
6 Change settings ���������������������������������� 13
Language settings ...................................................... 13
Input source selection ..............................................13
Picture settings ............................................................13
Power control settings .............................................. 14
Restore default settings ........................................... 14
Other settings ..............................................................14
7 Service ��������������������������������������������������15
Built-in battery care ..................................................15
Cleaning ......................................................................... 15
Update software .........................................................15
Troubleshooting .......................................................... 16
8 Appendix ����������������������������������������������18
Technical data .............................................................18
CE statement ...............................................................19
FCC statement .............................................................19
Canada regulatory compliance .............................19
Other notice .................................................................. 19
Table of contents

Introduction 3
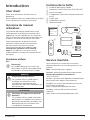
Introduction
Dear customer
Thank you for purchasing this projector.
We hope you enjoy this product and the many
functions it offers!
About this user manual
The quick start guide supplied with this product
allows you to start using this product quickly
and easily. Detailed descriptions can be found
in the following sections of this user manual.
Read the entire user manual carefully. Follow
all safety instructions in order to ensure proper
operation of this product (see General safety
information, page 4). The manufacturer
accepts no liability if these instructions are not
followed.
Symbols used
Notice
Troubleshooting
This symbol indicates tips that will help
you in using this product more effectively
and easily.
DANGER!
Danger of personal injury!
This symbol gives warning of danger
of personal injury. Physical injury or
damage can result from improper
handling.
CAUTION!
Damage to the product or loss of data!
This symbol gives warning of damage
to the product and possible loss of
data. Damage can result from improper
handling.
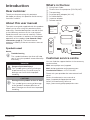
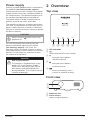
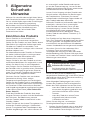
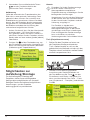
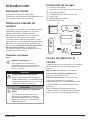
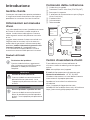
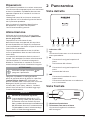
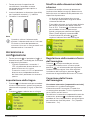
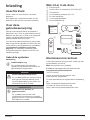
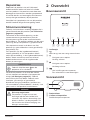
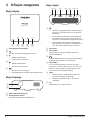
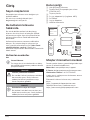
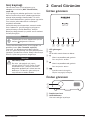
What’s in the box
a Quick Start Guide
b PicoPix Max One projector (PPX520/INT)
c Transport bag
d 2x power plug adapter (UK, US)
e 2x AAA batteries
f 1x power adapter
g Remote control
d
c
e
f
g
b
a
Quick Start
Guide
Customer service centre
You can find the support hotline in the warranty
card or online:
Web: www.philips.com/support
Mail: philips.projector.eu@screeneo.com
International Phone: +41 215 391 665
Please ask your provider for international call
costs!
Access the electronic user manual at
https://support.philipsprojection.com
Access the community forum at
https://community.philipsprojection.com

4 Philips · PicoPix Max One
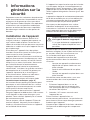
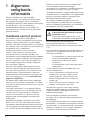
1 General safety
information
Take note of all warning and safety notes
indicated. Do not make any changes or settings
that are not described in this user manual.
Incorrect operation, and improper handling can
lead to physical injury, damage to the product
or loss of data.
Setting up the product
This product is for indoor use only. Place the
product securely on a stable, flat surface.
To help avoid possible injuries to persons or
damage to the product itself, position all cables
in such a way that no one will trip over them.
Do not operate the product in damp rooms.
Never touch the mains cable or the mains
connection with wet hands.
The product must have sufficient ventilation
and must not be covered. Do not put the
product in closed cabinets, boxes, or other
enclosures when in use. Do not cover the lens
during operation.
Protect the product from direct sunlight,
heat, intense temperature fluctuations and
moisture. Do not place the product in the
vicinity of heaters or air conditioners. Observe
the information on temperature listed in the
technical data (see Technical data, page 18).
Prolonged operation of the product causes
the surface to become warm hot. In case of
overheating, the product automatically switches
to standby mode.
Do not allow liquids to leak into the product.
Turn off the product and disconnect it from the
mains supply if liquids or foreign substances
leaked into the product. Have the product
inspected by an authorised service centre.
Always handle the product with care. Avoid
touching the lens. Never place heavy or sharp
objects on the product or on the power cable.
If the product gets too hot or emits smoke,
shut it down immediately and unplug the
power cable. Have your product checked by
an authorised service centre. Keep the product
away from open flames (e.g. candles).
The product has built-in battery. Do not
dissemble and modify. The built-in battery
should be replaced by qualified service staff
only.
Do not try to replace the built-in battery
yourself. Incorrect handling of the battery or
using the wrong type of battery can cause
damage to the product or cause injury.
DANGER!
Risk of explosion with incorrect type
of batteries!
There is a risk of explosion if the wrong
battery type is used.
Do not expose the batteries (battery pack or
embedded batteries) to excessive heat such as
sunshine, or open fire.
Under the following conditions, a layer of
moisture can appear inside the product which
can lead to malfunctions:
• if the product is moved from a cold to a
warm area;
• after a cold room is heated;
• when the product is placed in a damp
room.
Proceed as follows to avoid any moisture
buildup:
1 Seal the product in a plastic bag before
moving it to another room, in order for it to
adapt to room conditions.
2 Wait one to two hours before you take the
product out of the plastic bag.
The product should not be used in a very dusty
environment. Dust particles and other foreign
objects may damage the product.
Do not expose the product to extreme
vibrations. This may damage the internal
components.
Do not allow children to handle the product
without supervision. The packing materials
should be kept out of the hands of children.
For your own safety, do not use the product
during thunderstorms with lightning.
Repairs
Do not repair the product yourself. Improper
maintenance can result in injuries or damage to
the product. The product must be repaired by
an authorised service centre.
Please find the details of authorised service
centres on the warranty card supplied with this
product.
Do not remove the type label from this product,
as this will void the warranty.

Overview 5
Power supply
Use only a power adapter which is certified for
this product (see Technical data, page 18).
Check whether the mains voltage of the power
supply matches the mains voltage available at
the setup location. This product complies with
the voltage type specified on the product.
The power outlet shall be installed near the
product and shall be easily accessible.
The capacity of the built-in battery diminishes
with time. If the product functions only with AC
power supply, the built-in battery is defective.
Contact an authorised service centre to replace
the built-in battery.
CAUTION!
Always use the button to turn the
projector off.
Turn off the product and unplug from the
power outlet before cleaning the surface
(see Cleaning, page 15). Use a soft, lint-
free cloth. Never use liquid, gaseous or easily
flammable cleaners (sprays, abrasives, polishes,
alcohol). Do not allow any moisture to reach
the interior of the product.
DANGER!
Risk of eye irritation!
This product is equipped with a high
power LED (Light Emitting Diode),
which emits very bright light. Do not
look directly into the projector lens
during operation. This could cause eye
irritation or damage.
2 Overview
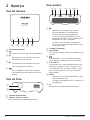
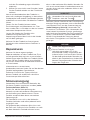
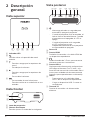
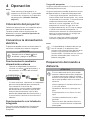
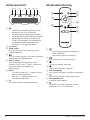
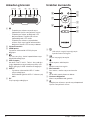
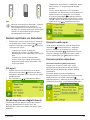
Top view
a b c d d
Max One
OK
a LED indication
b
Return to a previous menu screen.
c
• Navigate menu options�
• Decrease volume.
d
• Navigate menu options�
• Increase volume.
e
• Access the settings menu.
• Confirm a selection or entry.
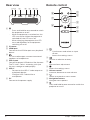
Front view
a
b
a Projection lens
b Focus camera
Adjust image sharpness.

6 Philips · PicoPix Max One
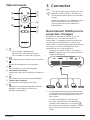
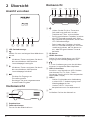
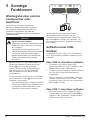
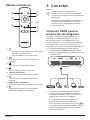
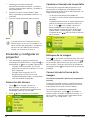
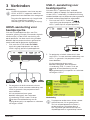
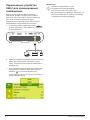
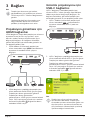
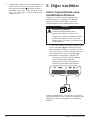
Rear view
HDMI USB DC
a b c d e f g
a
• Press and hold for one second to switch
the projector on or off.
• When the projector is switched on, the
LED turns white. When the projector is
switched off, the LED turns off.
• When charging the projector, the LED
turns red regardless of the projector
switching on or off.
b IR sensor
c HDMI port
Connect to the HDMI output on a playback
device.
d
3.5 mm audio output; connect to external
speakers or headphones.
e USB-A port
Connect to power USB devices like Amazon
Fire TV stick®, Roku® streaming stick (not
for mass storage or media player).
f USB-C
• Connect to the USB-C video output on
a playback device.
• Charge a USB-C device like a
smartphone.
g DC
Connect to the power supply.
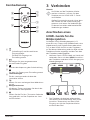
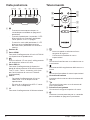
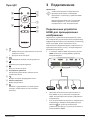
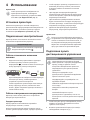
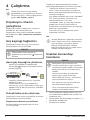
Remote control
OK
a
d
e
b
c
f
g
h
a
• Quick access and select an input
source.
• Access the settings menu.
b
Confirm a selection or entry.
c
Activate focus adjustment.
d
Access the settings menu.
e Volume control
Increase, decrease or mute volume.
f
Return to a previous menu screen.
g Navigation buttons
Navigate menu options.
h
Press and hold for one second to switch the
projector on or off.

Connect 7
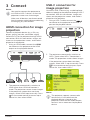
3 Connect
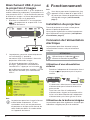
Notice
You need to connect the projector to
an HDMI or USB-C device, so that the
projection screen can show images.
Make sure all devices are disconnected
from the power outlet before establishing
or changing any connections.
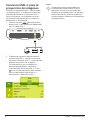
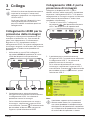
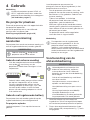
HDMI connection for image
projection
Connect a playback device (e.g. a Blu-ray
player, gaming console, camcorder, digital
camera or PC) to the projector through HDMI
connection. With this connection, images are
shown on the projection screen, and audio is
played on the projector.
1 Using an HDMI cable, connect the HDMI
connector on the projector to the HDMI
output on the playback device.
HDMI USB DC
2 The projector automatically switches to
HDMI input when HDMI connection is
made. The projection screen shows images.
• If the projection screen does not show
images, select HDMI input manually. Press
on the remote control to access input
source list, then select HDMI.
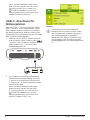
USB-C connection for
image projection
Connect a USB-C device (e.g. a mobile phone,
tablet or laptop) to the projector through USB-C
connection. With this connection, images are
shown on the projection screen, and audio is
played on the projector.
1 Using a USB-C cable, connect the
connector on the projector to the USB-C
port on the playback device.
HDMI USB DC
2 The projector automatically switches to
USB-C input when USB-C connection is
made. The projection screen shows images.
• If the projection screen does not show
images, select USB-C input manually. Press
on the remote control to access input
source list, then select USB-C.
Notice
The projector supports stereo audio
format only. If no audio from the
playback device is heard on the
projector, check that the audio output
format is set to stereo on the playback
device.

8 Philips · PicoPix Max One
4 Operation
Notice
You need to connect the projector to
an HDMI or USB-C device, so that the
projection screen can show images (see
Connect, page 7).
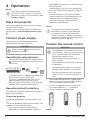
Place the projector
Place the projector on a flat surface in front of
the projection surface.
You can also install the projector in different
configurations (see Placement options, page
10).
Connect power supply
The projector can be operated by either
external power or built-in battery.
CAUTION!
Always use the button to turn the
projector on and off.
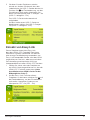
Operation by external power
• Connect the supplied power adapter to the
socket on the projector, and then to the
wall outlet.
HDMI USB DC
a
b
If needed, select an appropriate power plug
for connecting to the wall outlet.
To attach a supplied power plug to the
power adapter, align the slots on the
power plug with the two pins of the power
adapter, then slide the power plug in.
Operation by built-in battery
The projector can be also operated on built-in
battery for portability.
Charge the projector
Charge the projector for 1.5 hours before first
use.
Charge the projector when the low battery icon
appears in the projection screen.
• To charge the projector, connect the
projector to an external power supply as
described in the section of “Operation by
external power”.
• When charging, the LED on the projector
turns red. When fully charged, the red LED
turns off.
• When powered on, the external power
will be used first to run the projector and
unused power will charge the battery.
• For faster charging, charge while the
projector is powered off.
Notice
The capacity of the built-in battery
diminishes with time. If the projector
functions only with external power
supply, the built-in battery is defective.
Contact an authorised service centre to
replace the built-in battery.
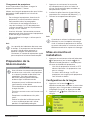
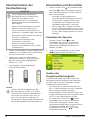
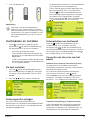
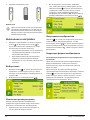
Prepare the remote control
CAUTION!
The improper use of batteries can lead
to overheating, explosion, risk of fire and
injury. Leaking batteries can possibly
damage the remote control.
Never expose the remote control to
direct sunlight.
Avoid deforming, dismantling or charging
the batteries.
Avoid exposure to open fire and water.
Replace empty batteries immediately.
Remove the batteries from the remote
control if not in use for long periods of
time.
1 Press and hold the battery compartment
cover, and simultaneously slide it open to
access the battery compartment.
2 Insert the supplied batteries (type AAA)
with correct polarity (+/- ) indicated.
3 Close the battery compartment.
Notice

Operation 9
When using the remote control, point the
remote control at the IR sensor located
on the back of the projector, and make
sure there is no obstacle between the
remote control and the IR sensor.
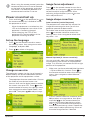
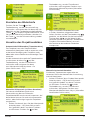
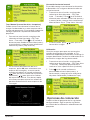
Power on and set up
1 Press and hold on the projector (or on
the remote control) for 1 second to switch
the projector on or off.
• When the projector is switched on, the
LED on the projector turns white if the
projector is not being charged.
• When charging, the LED on the
projector turns red regardless of the
projector switching on or off.
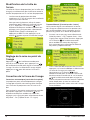
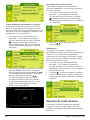
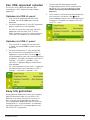
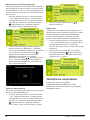
Set up the language
1 Press on the remote control to access
the settings menu, then navigate to select
Language, and press OK.
2 Press / to select a language.
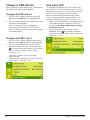
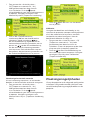
Change screen size
The projection screen size (or size of images) is
determined by the distance between the lens
of the projector and the projection surface.
• The projection distance needs to be 1.2 times
the width of your desired screen size.
• You can also use the digital zoom to reduce
the screen size up to 50%. Press on the
remote control to access the settings menu,
then navigate to select Digital Zoom, and
press OK. Then press / to adjust image
size.
Image focus adjustment
Press on the remote control to turn focus
adjustment on, then press / on the remote
control to adjust image clearness. After
adjusting image clearness, press to turn
focus adjustment off.
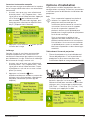
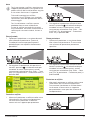
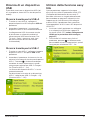
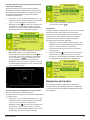
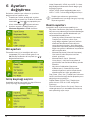
Image shape correction
Auto correction (vertical keystone)
The projector can automatically correct the
image to be rectangular when you tilt the
projector upwards or downwards.
To enable auto vertical keystone correction,
press on remote control to access the
settings menu, then navigate to select Auto
Keystone - On.
Manual keystone (4-corner correction)
You can manually adjust the image shape by
re-positioning four corners of the projection
image. This also lets you correct for left or right
position of the projector.
1 Make sure you have selected Auto Keystone
- Off to enable this function. Press on
the remote control to access the settings
menu, then navigate to select Manual
Keystone.
2 In the 4-corner correction interface, press
OK to select an image corner, then press
and hold / on the remote control to
adjust the horizontal positioning values,
and / on the remote control to adjust
the vertical positioning values. Repeat the
same step to adjust positioning values of
the other image corners if desired.

10 Philips · PicoPix Max One
Manual horizontal correction
You can manually correct keystone or distorted
images in the horizontal orientation.
1 Make sure you have selected Auto Keystone
- Off to enable this function. Press on
the remote control to access the settings
menu, then navigate to select Manual
Horiz. Keyst.
2 Press / to adjust the image shape.
Calibration
Correct the image to be rectangular when the
projector is placed level, or if the auto keystone
correction does not correct the image ideally.
Perform image shape calibration as follows.
1 Make sure you have selected Auto Keystone
- Off to enable this function. Place the
projector on the floor, or a straight (level)
surface.
2 Press on the remote control to access
the settings menu, then navigate to select
Keystone Calibration.
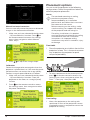
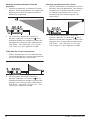
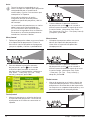
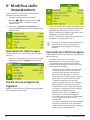
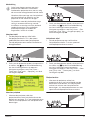
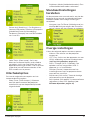
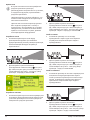
Placement options
You can install the projector in the following
configurations. Follow the guidelines below for
different projector placement.
Notice
For overhead mounting on ceiling,
purchase a projector mount
recommended by an installation
professional and follow the instructions
that come with the mount.
Before mounting on the ceiling, make
sure the ceiling can support the weight
of the projector and mounting kit.
For ceiling installation, this product
must be securely attached to the ceiling
in accordance with the installation
instructions. An improper ceiling
installation may result in accident, injury
or damage.
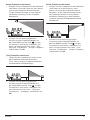
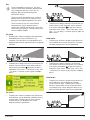
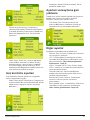
Front table
1 Place the projector on a table in front of the
projection screen. This is the most common
way to position the projector for quick
setup and portability.
2 To adjust projection to the correct position,
press on remote control to access the
settings menu, then navigate to select Proj.
Direc. - Front proj., then press OK.
Front ceiling
1 Mount the projector on the ceiling with
upside up in front of the projection screen.
A projector mount is required to mount the
projector on ceiling.

Other features 11
2 To adjust projection to the correct position,
press on remote control to access the
settings menu, then navigate to select Proj.
Direc. - Rev. front proj., then press OK.
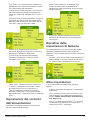
Rear table
1 Place the projector on a table behind the
projection screen. A special rear projection
screen is required.
2 To adjust projection to the correct position,
press on remote control to access the
settings menu, then navigate to select Proj.
Direc. - Rear proj., then press OK.
Rear ceiling
1 Mount the projector on ceiling with upside
up behind the projection screen. To mount
the projector on ceiling behind the screen,
a projector mount and a special rear
projection screen is required.
2 To adjust projection to the correct position,
press on remote control to access the
settings menu, then navigate to select Proj.
Direc. - Rev. rear proj., then press OK.
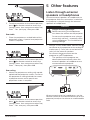
5
Other features
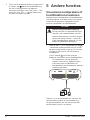
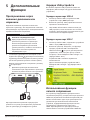
Listen through external
speakers or headphones
Connect external speakers or headphones to
the projector. With this connection, audio from
the projector is played through the external
speakers or headphones.
DANGER!
Danger of hearing damage!
Before connecting the headphones,
turn down the volume on the projector.
Do not use the projector over a longer
time at high volume – especially when
using headphones. This could lead to
hearing damage.
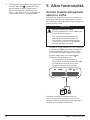
1 Using a 3.5 mm audio cable, connect the
connector on the projector to the analogue
audio input (3.5 mm jack, or red and white
jacks) on the external speakers.
Or connect the connector on the
projector to your headphones.
• The speakers of the projector are
deactivated automatically when the
external speakers or headphones are
connected to the projector.
HDMI USB DC
When connecting to the headphones, use the
volume control on the remote control (or on the
projector) to adjust the volume to a comfortable
level.

12 Philips · PicoPix Max One
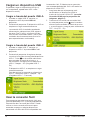
Charge a USB device
You can charge a USB device (e.g. smartphone,
MP3 player or other mobile device).
Charge via USB-A port
1 Using a USB-A cable, connect your USB
device to the USB port on the projector.
2 Turn on the projector. The USB device starts
to charge automatically.
• USB-A connection can also power a
USB device like Amazon Fire TV stick®,
Roku®streaming stick (not for mass storage
or media player).
Charge via USB-C port
1 Using a USB-C cable, connect your USB-C
device to the USB-C port on the projector.
2 Turn on the projector. Make sure USB-C
device charing function is activated. Press
on remote control to access the settings
menu, then navigate to select USB-C
Charger - On.
The USB-C device starts to charge
automatically.
To deactivate charging of a USB-C device,
select USB-C Charger - Off.
Use easy link
This projector supports easy link which uses
the HDMI CEC (Consumer Electronics Control)
protocol. You can use a single remote control
to turn on or off the easy link compliant
devices that are connected through HDMI.
The manufacturer does not guarantee 100%
interoperability with all HDMI CEC devices.
1 Make sure the projector is connected to an
HDMI device which supports HDMI CEC
function (see HDMI connection for image
projection, page 7).
2 To activate easy link function on this
projector, press on remote control to
access the settings menu, then navigate to
select CEC - On.

Change settings 13
6 Change settings
This section helps you change the settings of
the projector.
1 When the projector is turned on, press
or on the remote control (or on the
projector) to access the settings menu.
2 Use the Navigation buttons and OK to
select and change settings.
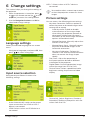
Language settings
Select your desired language for on-screen
menu.
• Navigate to Language, and press OK, then
press / to select a language.
Input source selection
Navigate to Input Source to access the
following settings.
• Auto: Automatically switch to the correct
input source when an HDMI or USB-C
device is connected.
• HDMI: Select it when an HDMI device is
connected.
• USB-C: Select it when a USB-C device is
connected.
You need to select a correct input source,
so that the projection screen can show
images.
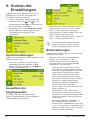
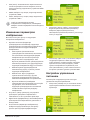
Picture settings
You can access the following picture settings.
• Keystone Correction: Select an option to
correct keystone or distorted images to be
rectangular or square.
• Auto Keystone: Enable or disable
auto correction of the image shape
when tilting the projector upwards or
downwards. When Auto Keystone is
activated, all the other image correction
options will be deactivated.
• Manual Keystone: Manually adjust four
corners of the image.
• Manual Horiz. Keyst.: Manually correct
keystone or distorted images in the
horizontal orientation.
• Keystone Calibration: Perform this
function if the auto keystone correction
does not correct the image shape
ideally.
• Proj. Direc.: Adjust the projection to
the correct position based on different
installation of the projector.
• Digital Zoom: Scale the projection image
within the range from 50% to 100%.
• Picture Preset: Select a predefined color
brightness setting for picture and video
display.
• Picture Adj.: Adjust Brightness/Contrast/
Saturation/Toneburst/Sharpness with the
values from 0 to 100.

14 Philips · PicoPix Max One
• Color Temp.: Set to Warm to enhance hotter
colors such as red; set to Cool to make
picture bluish; set to User to customize
color values in RGB mode.
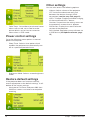
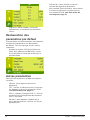
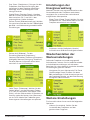
Power control settings
Go to the following menu options to control
power consumption.
• Sleep Timer: Select a time option which
enables the projector to automatically turn
off at a specified period of time.
• Brightness Mode: Select a screen brightness
mode.
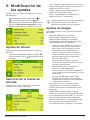
Restore default settings
If the projector does not function normally,
reset the projector to the default settings. It will
delete all the current settings.
• Navigate to Full Reset, and press OK, then
follow on-screen instructions to complete
resetting.
Other settings
You can also access the following options.
• Volume: Adjust volume of the projector.
• CEC: Activate or deactivate easy link
between the devices through HDMI
connection (see Use easy link, page 12).
• USB-C Charger: Enable or disable charging
of the connected USB-C device.
• Position: Re-position the settings menu on
the projection screen when it appears.
• SW Version: Display the current software
version of the projector.
• Soft. Update: Upgrade system software via
a USB device (see Update software, page
15).

Service 15
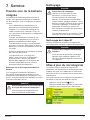
7 Service
Built-in battery care
The capacity of the built-in battery diminishes
with time. You can prolong the life of the
battery if you observe the following points:
• Without a power supply, the projector
operates on the built-in battery. When the
battery does not have sufficient power, the
projector turns off. In this case connect the
projector to the power supply.
• Charge the battery regularly. Don’t store
the projector with a completely discharged
battery.
• If the projector is not used for several
weeks, discharge the battery a little by
using the projector before storing it.
• Keep the projector and the battery away
from sources of heat.
• If the projector cannot be charged after
connecting to the power supply, use a small
pin to press the reset key (a small hole)
located on the side panel of the projector.
Note about deep discharge of battery
When the built-in battery is in deep discharge,
it may take longer for the actual charging
process to start. In this case, charge the
projector for at least five hours before using it.
DANGER!
Risk of explosion with incorrect type
of batteries!
Do not try to replace the built-in
battery yourself.
Cleaning
DANGER!
Instructions for cleaning!
Use a soft, lint-free cloth. Never use
liquid or easily flammable cleansers
(sprays, abrasives, polishes, alcohol,
etc.). Do not allow any moisture to
reach the interior of the projector.
Do not spray the projector with any
cleaning fluids.
Wipe over the surfaces gently. Be
careful that you do not scratch the
surfaces.
Cleaning the lens
Use a soft brush or lens cleaning paper for
cleaning the lens of the projector.
DANGER!
Do not use any liquid cleaning agents!
Do not use any liquid cleaning
agents for cleaning the lens, to avoid
damaging the coating film on the lens.
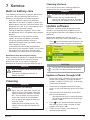
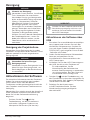
Update software
The latest software of the projector can be
found on www.philips.com/support for you
to get the best features and support from the
projector.
Before you update the software of the
projector, check the current software version:
• Press on the remote control to access the
settings menu then navigate to SW Version.
CAUTION!
Do not turn off the projector or remove
the USB flash drive during the update.
Update software through USB
1 Check the latest software version on www.
philips.com/support. Find your product
(model number: PPX520/INT), and locate
‘Software and drivers’.
2 Download the zipped software file and
save it in the root directory of the USB flash
drive.
3 Connect the USB flash drive to the USB
port on the projector.
• Recommend to use an external power
for software update to ensure enough
power supply.
4 Press on the remote control to access
the settings menu and navigate to Soft.
Update, then press OK.
5 Follow the on-screen instructions to
complete the update.

16 Philips · PicoPix Max One
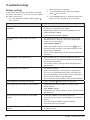
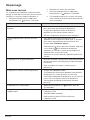
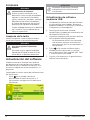
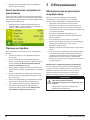
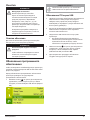
Troubleshooting
Power cycling
If a problem occurs that cannot be corrected
with the instructions in this user manual, follow
the steps given here.
1 Turn the projector off by holding down
for 1 second.
2 Wait at least ten seconds.
3 Turn the projector on again by holding
down for 1 second.
4 If the problem persists, please contact our
technical service centre or your dealer.
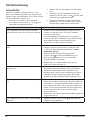
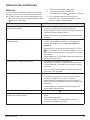
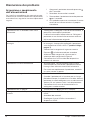
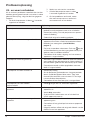
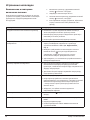
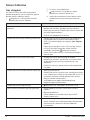
Problems Solutions
The projector cannot be turned on or
powered.
• Disconnect and reconnect the power cable, and
try to turn the projector on again.
• Low battery power. Connect the projector to an
external power supply.
• Use the original power adapter.
The projection screen does not show
images.
• You need to connect the projector to an HDMI
device or USB-C device, so that the projection
screen can show images
(see Connect, page 7).
• Select the correct input source. Press on the
remote control to access the input source list for
input source selection.
• Check if the video output of the external device is
turned on.
The projector is charged slowly. • When powered on, the external power will be
used first to run the projector and unused power
will charge the battery.
• For faster charging, charge while the projector is
powered off.
The projector turns itself off. • Low battery power.
• When the projector is running for a long period
of time, the surface becomes hot. Ventilate the
projector properly, with at least 30 cm clearness
around all the sides of the projector.
• Check that the power cable is connected correctly.
The projector cannot be turned off. • Press and hold longer than 30 seconds.
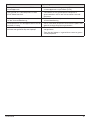
No image from the external HDMI device. • Disconnect the HDMI cable or switch off the
HDMI device.
• Wait three seconds.
• Reconnect the HDMI cable or switch on the HDMI
device again.
No sound from the external connected
device.
• Check the cables to the external device.
• Check that the sound is activated on the external
device.
• Only the original cables from the device
manufacturer may function.
No sound from external HDMI output
device.
• On the HDMI output device, set the audio setting
to Stereo (PCM).

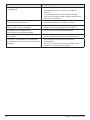
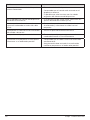
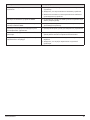
Service 17
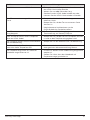
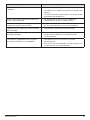
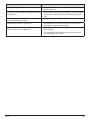
Problems Solutions
No sound when you connect your
computer via HDMI cable.
• Check that the sound is activated on the computer
and set to output to the projector.
The projector does not react to remote
control commands.
• Check the batteries of the remote control.
The temperature of the projector’s surface
is warm.
• For this projector it is normal to generate
moderate heat during operation.
What to do if the projector does not work
when connecting to a notebook PC?
• Check that the HDMI cable is plugged in correctly.
• Make sure that the notebook PC has been
switched to projector display.

18 Philips · PicoPix Max One
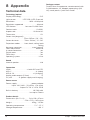
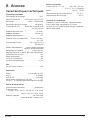
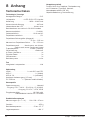
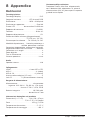
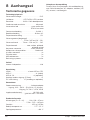
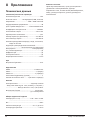
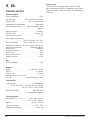
Package content
PicoPix Max One projector, remote control with
2 AAA batteries, AC adapter, power plugs (UK,
US), travel pouch, Quick Start Guide
8 Appendix
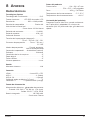
Technical data
Technology/optical
Display technology ..............................................DLP
Light source ................ LED RGB 4 LED Channels
Resolution ....................................1920 x 1080 pixel
Resolution supported ................................. 4K pixel
LED lifetime ...................... last over 30,000 hours
Contrast ratio ................................................. 10,000:1
Aspect ratio ............................................16:9 and 4:3
Throw ratio .............................................................. 1.2:1
Screen size (diagonal)..................................................
............................................. 75cm-305cm / 30”-120”
Screen distance ...............78cm-320cm / 31”-126”
Projection modes ...........front, back, ceiling, back
ceiling
Keystone correction ......................... auto (vertical)
Focus adjustment ........................................ electrical
4-corner correction ................................................ yes
Digital zoom ............................................................. yes
Touch keys ................................................................ yes
Operating system ............................................... Linux
Sound
Internal speaker ......................................................4 W
Connection
HDMI ........................................ x1 with ARC and CEC
USB-C ............................................................. x1 (video)
USB-A 2.0 ................................................x1 (charging)
Analog audio output (3.5mm) .............................. x1
DC jack ............... x1 (power supply and charging)
Power source
Power supply ..................................... power adapter
.............. Input: 100-240V~, 50-60Hz, 1.5 A (max)
...................................Output: DC 20 V, 3.25 A, 65 W
Built-in battery .................................... , mAh
.................................................... last up to 5 hours
Product details
Dimensions (W × D × H) ...........134 x 136 x 47 mm
....................................... 5.28 x 5.35 x 1.85 inches
Weight ..................................................850g / 1.87 lbs
Operating temperature.......................... 5 °C - 35 °C
Storage temperature ...................................... < 60 °C

Appendix 19
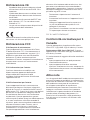
• Reorient or relocate the receiving antenna.
• Increase the separation between the
equipment and receiver.
• Connect the equipment into an outlet on
a circuit dierent from that to which the
receiver is connected.
• Consult the dealer or an experienced radio/
TV technician for help.
FCC ID: 2ASRT-PPX520/INT
Canada regulatory
compliance
This device complies with Industry Canada CAN
ICES-3 (B)/NMB-3(B)
RSS-Gen & RSS-247 statement: This device
complies with Industry Canada RSS standard(s).
Operation is subject to the following two
conditions:
1 This device may not cause interference, and
2 This device must accept any interference,
including interference that may cause
undesired operation of the device.
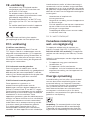
Other notice
Preservation of the environment as part
of a sustainable development plan is an
essential concern of Screeneo Innovation SA.
The desire of Screeneo Innovation SA is to
operate systems respecting the environment
and consequently it has decided to integrate
environmental performances in the life cycle
of these products, from manufacturing to
commissioning use and elimination.
Packaging: The presence of the logo (green
dot) means that a contribution is paid to an
approved national organisation to improve
package recovery and recycling infrastructures.
Please respect the sorting rules set up locally
for this kind of waste.
Batteries: If your product contains batteries,
they must be disposed of at an appropriate
collection point.
CE statement
• The product shall only be connected to a
USB interface of version USB 2.0 or higher.
• Adapter shall be installed near the
equipment and shall be easily accessible.
• The operating temperature of the EUT can’t
exceed 35°C and shouldn’t be lower than
5°C.
• The plug is considered as disconnect device
of adapter.
The Declaration of Compliance can be
consulted on the site www.philips.com.
FCC statement
15�19 Labeling requirements�
This device complies with part 15 of the FCC
Rules. Operation is subject to the following
two conditions: (1) This device may not cause
harmful interference, and (2) this device must
accept any interference received, including
interference that may cause undesired
operation.
15�21 Information to the user�
Any changes or modications not expressly
approved by the party responsible for
compliance could void the user’s authority to
operate the equipment.
15�105 Information to user�
This equipment has been tested and found
to comply with the limits for a Class B digital
device, pursuant to Part 15 of the FCC Rules.
These limits are designed to provide reasonable
protection against harmful interference in
a residential installation. This equipment
generates, uses and can radiate radio
frequency energy and, if not installed and used
in accordance with the instructions, may cause
harmful interference to radio communications.
However, there is no guarantee that interference
will not occur in a particular installation. If this
equipment does cause harmful interference
to radio or television reception, which can be
determined by turning the equipment o and
on, the user is encouraged to try to correct the
interference by one or more of the following
measures:
La pagina si sta caricando...
La pagina si sta caricando...
La pagina si sta caricando...
La pagina si sta caricando...
La pagina si sta caricando...
La pagina si sta caricando...
La pagina si sta caricando...
La pagina si sta caricando...
La pagina si sta caricando...
La pagina si sta caricando...
La pagina si sta caricando...
La pagina si sta caricando...
La pagina si sta caricando...
La pagina si sta caricando...
La pagina si sta caricando...
La pagina si sta caricando...
La pagina si sta caricando...
La pagina si sta caricando...
La pagina si sta caricando...
La pagina si sta caricando...
La pagina si sta caricando...
La pagina si sta caricando...
La pagina si sta caricando...
La pagina si sta caricando...
La pagina si sta caricando...
La pagina si sta caricando...
La pagina si sta caricando...
La pagina si sta caricando...
La pagina si sta caricando...
La pagina si sta caricando...
La pagina si sta caricando...
La pagina si sta caricando...
La pagina si sta caricando...
La pagina si sta caricando...
La pagina si sta caricando...
La pagina si sta caricando...
La pagina si sta caricando...
La pagina si sta caricando...
La pagina si sta caricando...
La pagina si sta caricando...
La pagina si sta caricando...
La pagina si sta caricando...
La pagina si sta caricando...
La pagina si sta caricando...
La pagina si sta caricando...
La pagina si sta caricando...
La pagina si sta caricando...
La pagina si sta caricando...
La pagina si sta caricando...
La pagina si sta caricando...
La pagina si sta caricando...
La pagina si sta caricando...
La pagina si sta caricando...
La pagina si sta caricando...
La pagina si sta caricando...
La pagina si sta caricando...
La pagina si sta caricando...
La pagina si sta caricando...
La pagina si sta caricando...
La pagina si sta caricando...
La pagina si sta caricando...
La pagina si sta caricando...
La pagina si sta caricando...
La pagina si sta caricando...
La pagina si sta caricando...
La pagina si sta caricando...
La pagina si sta caricando...
La pagina si sta caricando...
La pagina si sta caricando...
La pagina si sta caricando...
La pagina si sta caricando...
La pagina si sta caricando...
La pagina si sta caricando...
La pagina si sta caricando...
La pagina si sta caricando...
La pagina si sta caricando...
La pagina si sta caricando...
La pagina si sta caricando...
La pagina si sta caricando...
La pagina si sta caricando...
La pagina si sta caricando...
La pagina si sta caricando...
La pagina si sta caricando...
La pagina si sta caricando...
La pagina si sta caricando...
La pagina si sta caricando...
La pagina si sta caricando...
La pagina si sta caricando...
La pagina si sta caricando...
La pagina si sta caricando...
La pagina si sta caricando...
La pagina si sta caricando...
La pagina si sta caricando...
La pagina si sta caricando...
La pagina si sta caricando...
La pagina si sta caricando...
La pagina si sta caricando...
La pagina si sta caricando...
La pagina si sta caricando...
La pagina si sta caricando...
La pagina si sta caricando...
La pagina si sta caricando...
La pagina si sta caricando...
La pagina si sta caricando...
La pagina si sta caricando...
La pagina si sta caricando...
La pagina si sta caricando...
La pagina si sta caricando...
La pagina si sta caricando...
La pagina si sta caricando...
La pagina si sta caricando...
La pagina si sta caricando...
La pagina si sta caricando...
La pagina si sta caricando...
La pagina si sta caricando...
La pagina si sta caricando...
La pagina si sta caricando...
La pagina si sta caricando...
La pagina si sta caricando...
La pagina si sta caricando...
La pagina si sta caricando...
La pagina si sta caricando...
La pagina si sta caricando...
La pagina si sta caricando...
La pagina si sta caricando...
La pagina si sta caricando...
La pagina si sta caricando...
La pagina si sta caricando...
La pagina si sta caricando...
La pagina si sta caricando...
La pagina si sta caricando...
La pagina si sta caricando...
La pagina si sta caricando...
La pagina si sta caricando...
La pagina si sta caricando...
La pagina si sta caricando...
La pagina si sta caricando...
La pagina si sta caricando...
La pagina si sta caricando...
La pagina si sta caricando...
La pagina si sta caricando...
La pagina si sta caricando...
La pagina si sta caricando...
La pagina si sta caricando...
La pagina si sta caricando...
La pagina si sta caricando...
La pagina si sta caricando...
La pagina si sta caricando...
La pagina si sta caricando...
La pagina si sta caricando...
La pagina si sta caricando...
La pagina si sta caricando...
La pagina si sta caricando...
La pagina si sta caricando...
La pagina si sta caricando...
La pagina si sta caricando...
La pagina si sta caricando...
La pagina si sta caricando...
La pagina si sta caricando...
La pagina si sta caricando...
La pagina si sta caricando...
La pagina si sta caricando...
La pagina si sta caricando...
La pagina si sta caricando...
La pagina si sta caricando...
La pagina si sta caricando...
La pagina si sta caricando...
-
 1
1
-
 2
2
-
 3
3
-
 4
4
-
 5
5
-
 6
6
-
 7
7
-
 8
8
-
 9
9
-
 10
10
-
 11
11
-
 12
12
-
 13
13
-
 14
14
-
 15
15
-
 16
16
-
 17
17
-
 18
18
-
 19
19
-
 20
20
-
 21
21
-
 22
22
-
 23
23
-
 24
24
-
 25
25
-
 26
26
-
 27
27
-
 28
28
-
 29
29
-
 30
30
-
 31
31
-
 32
32
-
 33
33
-
 34
34
-
 35
35
-
 36
36
-
 37
37
-
 38
38
-
 39
39
-
 40
40
-
 41
41
-
 42
42
-
 43
43
-
 44
44
-
 45
45
-
 46
46
-
 47
47
-
 48
48
-
 49
49
-
 50
50
-
 51
51
-
 52
52
-
 53
53
-
 54
54
-
 55
55
-
 56
56
-
 57
57
-
 58
58
-
 59
59
-
 60
60
-
 61
61
-
 62
62
-
 63
63
-
 64
64
-
 65
65
-
 66
66
-
 67
67
-
 68
68
-
 69
69
-
 70
70
-
 71
71
-
 72
72
-
 73
73
-
 74
74
-
 75
75
-
 76
76
-
 77
77
-
 78
78
-
 79
79
-
 80
80
-
 81
81
-
 82
82
-
 83
83
-
 84
84
-
 85
85
-
 86
86
-
 87
87
-
 88
88
-
 89
89
-
 90
90
-
 91
91
-
 92
92
-
 93
93
-
 94
94
-
 95
95
-
 96
96
-
 97
97
-
 98
98
-
 99
99
-
 100
100
-
 101
101
-
 102
102
-
 103
103
-
 104
104
-
 105
105
-
 106
106
-
 107
107
-
 108
108
-
 109
109
-
 110
110
-
 111
111
-
 112
112
-
 113
113
-
 114
114
-
 115
115
-
 116
116
-
 117
117
-
 118
118
-
 119
119
-
 120
120
-
 121
121
-
 122
122
-
 123
123
-
 124
124
-
 125
125
-
 126
126
-
 127
127
-
 128
128
-
 129
129
-
 130
130
-
 131
131
-
 132
132
-
 133
133
-
 134
134
-
 135
135
-
 136
136
-
 137
137
-
 138
138
-
 139
139
-
 140
140
-
 141
141
-
 142
142
-
 143
143
-
 144
144
-
 145
145
-
 146
146
-
 147
147
-
 148
148
-
 149
149
-
 150
150
-
 151
151
-
 152
152
-
 153
153
-
 154
154
-
 155
155
-
 156
156
-
 157
157
-
 158
158
-
 159
159
-
 160
160
-
 161
161
-
 162
162
-
 163
163
-
 164
164
-
 165
165
-
 166
166
-
 167
167
-
 168
168
-
 169
169
-
 170
170
-
 171
171
-
 172
172
-
 173
173
-
 174
174
-
 175
175
-
 176
176
-
 177
177
-
 178
178
-
 179
179
-
 180
180
-
 181
181
-
 182
182
-
 183
183
-
 184
184
-
 185
185
-
 186
186
-
 187
187


in altre lingue
- English: Philips PPX520 User guide
- français: Philips PPX520 Mode d'emploi
- español: Philips PPX520 Guía del usuario
- Deutsch: Philips PPX520 Benutzerhandbuch
- Nederlands: Philips PPX520 Gebruikershandleiding
- Türkçe: Philips PPX520 Kullanici rehberi
Documenti correlati
Altri documenti
-
BenQ GS1 Manuale utente
-
ZTE MF97G Manuale utente
-
BenQ MX661 Manuale utente
-
Anker AK-D2322111 Manuale utente
-
Sim2 Grand Cinema HT305 User and Installation Manual
-
 NexiGo PJ10 LCD Projector Manuale utente
-
Yamaha DPX-830 Manuale del proprietario
-
-
-
ETOE A1192 Manuale utente
