TEAC A-R650 Manuale del proprietario
- Categoria
- Apparecchiature musicali supplementari
- Tipo
- Manuale del proprietario

ENGLISH DEUTSCH
CQX1A1523Z
Integrated Stereo Amplifier
OWNER’S MANUAL
MANUEL DU PROPRIÉTAIRE
MANUAL DEL USUARIO
BEDIENUNGSANLEITUNG
MANUALE DI ISTRUZIONI
HANDLEIDING
Z
A-R650
FRANÇAIS ITALIANOESPAÑOL NEDERLANDS

2
IMPORTANT SAFETY INSTRUCTIONS
1) Read these instructions.
2) Keep these instructions.
3) Heed all warnings.
4) Follow all instructions.
5) Do not use this apparatus near water.
6) Clean only with dry cloth.
7) Do not block any ventilation openings. Install in accordance with
the manufacturer’s instructions.
8) Do not install near any heat sources such as radiators, heat
registers, stoves, or other apparatus (including amplifiers) that
produce heat.
9) Do not defeat the safety purpose of the polarized or grounding-
type plug. A polarized plug has two blades with one wider than
the other. A grounding type plug has two blades and a third
grounding prong. The wide blade or the third prong are provided
for your safety. If the provided plug does not fit into your outlet,
consult an electrician for replacement of the obsolete outlet.
10) Protect the power cord from being walked on or pinched
particularly at plugs, convenience receptacles, and the point
where they exit from the apparatus.
11) Only use attachments/accessories specified by the manufacturer.
12) Use only with the cart, stand, tripod, bracket,
or table specified by the manufacturer, or
sold with the apparatus. When a cart is used,
use caution when moving the cart/apparatus
combination to avoid injury from tip-over.
13) Unplug this apparatus during lightning storms
or when unused for long periods of time.
14) Refer all servicing to qualified service personnel. Servicing is
required when the apparatus has been damaged in any way, such
as power-supply cord or plug is damaged, liquid has been spilled
or objects have fallen into the apparatus, the apparatus has been
exposed to rain or moisture, does not operate normally, or has
been dropped.
CAUTION
< DO NOT REMOVE THE EXTERNAL CASES OR CABINETS TO EXPOSE
THE ELECTRONICS. NO USER SERVICEABLE PARTS ARE WITHIN.
< IF YOU ARE EXPERIENCING PROBLEMS WITH THIS PRODUCT,
CONTACT TEAC FOR A SERVICE REFERRAL. DO NOT USE THE
PRODUCT UNTIL IT HAS BEEN REPAIRED.
WARNING: TO PREVENT FIRE OR SHOCK HAZARD,
DO NOT EXPOSE THIS APPLIANCE TO RAIN OR
MOISTURE.
The lightning flash with arrowhead symbol, within an
equilateral triangle, is intended to alert the user to the
presence of uninsulated “dangerous voltage” within the
product’s enclosure that may be of sufficient magnitude
to constitute a risk of electric shock to persons.
The exclamation point within an equilateral triangle is
intended to alert the user to the presence of important
operating and maintenance (servicing) instructions in the
literature accompanying the appliance.
CAUTION: TO REDUCE THE RISK OF ELECTRIC SHOCK, DO
NOT REMOVE COVER (OR BACK). NO USER-SERVICEABLE
PARTS INSIDE. REFER SERVICING TO QUALIFIED SERVICE
PERSONNEL.
< Do not expose this apparatus to drips or splashes.
< Do not place any objects filled with liquids, such as vases, on the
apparatus.
< Do not install this apparatus in a confined space such as a book
case or similar unit.
< The apparatus draws nominal non-operating power from the
AC outlet with its POWER or STANDBY/ON switch not in the ON
position.
< The apparatus should be located close enough to the AC outlet
so that you can easily reach the power cord plug at any time.
< The mains plug is used as the disconnect device, the disconnect
device shall remain readily operable.
< If the product uses batteries (including a battery pack or installed
batteries), they should not be exposed to sunshine, fire or
excessive heat.
< CAUTION for products that use replaceable lithium batteries:
there is danger of explosion if a battery is replaced with an
incorrect type of battery. Replace only with the same or
equivalent type.
< Caution should be taken when using earphones or headphones
with the product because excessive sound pressure (volume)
from earphones or head-phones can cause hearing loss.

3
ENGLISH
Contents
Thank you for choosing TEAC. Read this manual carefully to
get the best performance from this unit.
Before Using the Unit ............................................3
Connection ......................................................4
Names of Each Control ...........................................6
Remote Control Unit .............................................8
Basic Operation ..................................................8
Basic Operation 2 ...............................................10
TroubleShooting ................................................11
Specifications ...................................................12
Before Using the Unit
Read this before operation
<
As the unit may become warm during operation, always leave
sufficient space around the unit for ventilation.
<
The voltage supplied to the unit should match the voltage as
printed on the rear panel. If you are in any doubt regarding this
matter, consult an electrician.
<
Choose the installation location of your unit carefully. Avoid
placing it in direct sunlight or close to a source of heat. Also avoid
locations subject to vibrations and excessive dust, heat, cold or
moisture.
<
Do not place the unit on the amplifier/receiver.
<
Do not open the cabinet as this might result in damage to the
circuitry or electrical shock. If a foreign object should get into the
set, contact your dealer or service agency.
<
When removing the power plug from the wall outlet, always pull
directly on the plug, never yank the cord.
<
Do not attempt to clean the unit with chemical solvents as this
might damage the finish. Use a clean, dry or slightly damp cloth.
<
Keep this manual in a safe place for future reference.
<
The operations are illustrated using the European model for
example in this manual.
Maintenance
If the surface of the unit gets dirty, wipe with a soft cloth or
use diluted neutral cleaning liquid. Be sure to remove any fluid
completely. Do not use thinner, benzine or alcohol as they may
damage the surface of the unit.

4
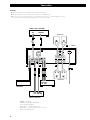
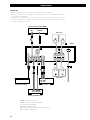
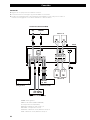
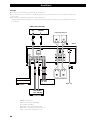
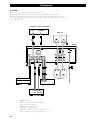
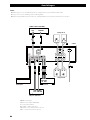
Connection
CAUTION:
<
Switch off the power to all equipment before making connections.
<
Read the instructions of each component you intend to use with this unit.
<
Be sure to insert each plug securely. To prevent hum and noise, avoid bundling the signal
interconnection cables together with the AC power cord or speaker cables.
PHONO
q
Turntable
TUNER
q
Tuner (T-R650/T-R650DAB)
CD
q
CD player (CD-P650)
AUX 1/AUX 2
q
Audio component, etc.
TAPE1/CD-R
q
Cassette tape deck, CD recorder, etc.
TAPE2
q
Cassette tape deck
RL
LR
RL
RL
TURNTABLE TAPE
Speakers B
TUNER (T-R650/T-R650DAB)
A-R650
LINE
OUT
LINE
OUT
LINE
OUT
LINE
IN
REMOTE
CONTROL
REMOTE
CONTROL
Speakers A
CD Player (CD-P650)
D
E
E
F
C
C
B
A

5
ENGLISH
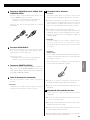
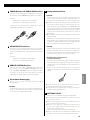
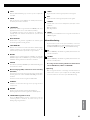
E
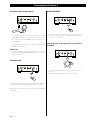
Speaker Connections
Caution:
To avoid damaging the speakers with a sudden high-level
signal, be sure to switch the power off before connecting the
speakers.
<
Check the impedance of your speakers. Connect speaker with
an impedance of 4 to 16 ohms when using only one pair of
speakers (SPEAKERS A or SPEAKERS B). When using two pairs
of speakers simultaneously, the impedance should be 8 to 16
ohms.
<
The black speaker terminals are _ (negative).
Generally, the + side of the speaker cable is marked to make
it distinguishable from the _ side of the cable. Connect this
marked side to the + terminal and the unmarked side to the
black _ terminal.
Caution:
The metal portions of the two separate wires should not touch
or an electrical short can occur. Shorted wires can create a fire
hazard or induce a failure in your equipment.
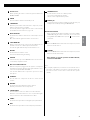
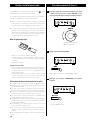
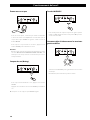
How to connect
Speakers A, B
1. Turn the terminal cap counterclockwise to loosen it. The speaker
terminal caps cannot be fully removed from the base.
2. Insert the wire into the terminal fully and turn the terminal cap
clockwise to securely connect it .
<
Make sure none of the wire insulation is under the terminal, only
the bare, stripped wire.
<
Make sure the wire is fastened firmly by pulling the cable lightly.
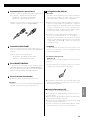
F
AC INLET
Use only the supplied power cord.
< Use of other power cord may result in fire or electric shock.
< Unplug the power cord when you are not going to use the unit
for long periods of time.
< Be sure to connect the power cord to an AC outlet which
supplies the correct voltage.
< Hold the power plug when plugging or unplugging the power
cord. Never pull or yank on the power cord.
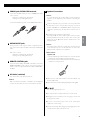
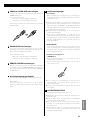
A
PHONO jacks/SIGNAL GND terminal
Connect the turntable’s RCA pin cords to PHONO jacks. Make
sure to connect:
white plug q white jack (L: left channel)
red plug q red jack (R: right channel)
Connect the turntable’s ground cord to SIGNAL GND terminal.
B
AUDIO IN/OUT jacks
Analog 2-channel audio signal is input or output from these
jacks. Connect the component with commercially-available RCA
cables.
Make sure to connect:
white plug
q
white jack (L: left channel)
red plug
q
red jack (R: right channel)
C
REMOTE CONTROL jacks
If you have TEAC T-R650, TR-650DAB or CD-P650, connect the
REMOTE CONTROL jack (A or B) of each component by the
remote control cord (provided with the T-R650, T-R650DAB or
CD-P650).
D
AC Outlet (switched)
This outlet is active only when the unit is on.
Caution:
Make sure that the total power consumption of all equipment
connected to the outlet does not exceed 500mA or 100 watts.

6
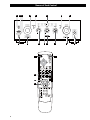
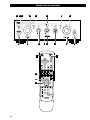
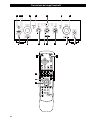
Names of Each Control
O N
M L K J
I
H
A
B C D
E D F
G
a
F
b
D
G

7
ENGLISH
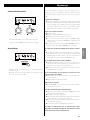
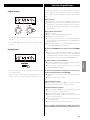
A
Remote Sensor
When operating the remote control unit, point it towards the
REMOTE SENSOR.
B
POWER
Press this switch to turn the unit standby or off.
C
STANDBY/ON
When the power switch of the main unit is depressed, use this
button to turn the unit on or standby.
The standby indicator lights when the unit is in the standby
mode. When the unit is turned on, it goes off.
D
INPUT SELECTOR
Use this knob (or buttons of the remote control unit) to select a
source.
One of the indicaotrs lights to show the selected source.
E
TAPE 2 MONITOR
When a cassette tape deck is connected to the TAPE 2 jacks, use
this button to turn on or off the tape monitor function.
The indicator lights when the tape monitor function is on.
F
MUTING
Use this button to mute the sound.
This indicator blinks during the muting.
G
VOLUME
Turn this knob (or press the VOLUME buttons of the remote
control unit) to adjust the volume.
H
MIC Jack and MIC LEVEL knob
With the microphone plugged into this jack, the sound picked
up from the microphone will be heard together with the source
sound selected by the INPUT SELECTOR.
Turn the MIC LEVEL knob to adjust the input level of the
microphone.
I
LOUDNESS
Use this button to compensate for the loss of bass at low
volumes.
J
BALANCE
Use this knob to adjust the balance of the speakers.
Normally, set the knob to the center position.
K
SOURCE DIRECT
Press this button to turn on or off the source direct function.
When the source direct function is set to on, the button lights
and you can listen to the sound without tone effects.
L
TREBLE
Use this knob to adjust the level of high frequency information.
M
BASS
Use this knob to adjust the level of low frequency information.
N
SPEAKERS buttons
Use these buttons to turn on or off the speakers.
on : Sound is output from the speakers.
off : No sound is output from the speakers.
O
PHONES jack
For private listening, insert the headphones plug into this jack,
and adjust the volume by turning the VOLUME knob.
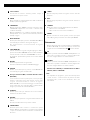
Remote Control Unit
When operating the CD Player (CD-P650) or the tuner (T-R650/
T-R650DAB) using the remote control unit, select a source first
using INPUT SELECTOR buttons (boxed
D
) on the remote
control unit.
a
ON
When the POWER switch of the main unit is depressed, use this
button to turn the unit on.
b
STANDBY
When the POWER switch of the main unit is depressed, use this
button to turn the unit standby.
Other buttons are used for operation of TEAC's CD-P650,
T-R650 and T-R650DAB.
Note:
<
To simplify explanations, instructions in this manual refer to
the names of the buttons and controls on the front panel only.
Associated controls on the remote control will also operate
similarly.

8
Basic Operation 1
The amplifier and some other TEAC components which have
mark on the front panel can be operated by the provided “UR”
remote control unit.
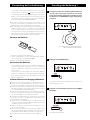
When operating the remote control unit, point it towards the
REMOTE SENSOR on the front panel of the amplifier (or other TEAC
component).
< Even if the remote control unit is operated within the effective
range, remote control operation may be impossible if there are
any obstacles between the unit and the remote control.
< If the remote control unit is operated near other appliances which
generate infrared rays, or if other remote control devices using
infrared rays are used near the unit, it may operate incorrectly.
Conversely, the other appliances may operate incorrectly.
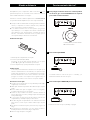
Battery Installation
1. Remove the battery compartment cover.
2. Insert two “AAA” (R03, UM-4) dry batteries. Make sure that the
batteries are inserted with their positive “+” and negative “_”
poles positioned correctly.
3. Close the cover.
Battery Replacement
If the distance required between the remote control unit and
main unit decreases, the batteries are exhausted. In this case
replace the batteries with new ones.
For more information about collection of batteries, please
contact your local municipality, your waste disposal service or the
point of sale where you purchased the items.
Precautions concerning batteries
< Be sure to insert the batteries with correct positive “+” and
negative “_” polarities.
< Use batteries of the same type. Never use different types of
batteries together.
< Rechargeable and non-rechargeable batteries can be used. Refer
to the precautions on their labels.
< When the remote control unit is not to be used for a long time
(more than a month), remove the batteries from the remote
control unit to prevent them from leaking.
< If the batteries leak, wipe away the liquid inside the battery
compartment and replace the batteries with new ones.
< Do not use any other batteries not specified. Do not mix new
batteries with old ones or use different types of batteries
together.
< Do not heat or disassemble batteries and never throw them in
the fire or water.
< Do not carry or store batteries with other metallic objects. The
battery may short circuit, leak or explode.
< Never recharge a battery.
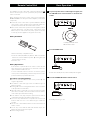
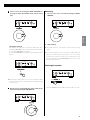
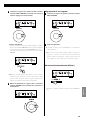
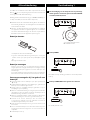
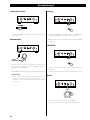
Remote Control Unit
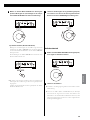
1
To protect speakers from a sudden high-level signal, turn
the VOLUME knob counterclockwise to minimize the
volume.
2
Press the POWER switch.
The unit enters standby mode, and the standby indicator lights.
3
Press the STANDBY/ON switch to turn the unit on.
The standby indicator goes off.

9
ENGLISH
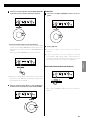
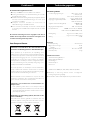
Recording
1. Select a source to be recorded by turning the INPUT
SELECTOR.
2. Start recording.
< The volume and tone control have no effect on the recording
signals.
< If a 3-head cassette tape deck is connected to TAPE 2 (PLAY and
REC) jacks, and if the tape monitor function is set to on during
recording, you can listen to not the source sound but the sound
being recorded. Press the TAPE MONITOR button to turn on or off
the tape monitor function.
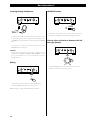
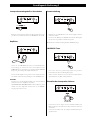
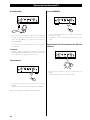
Selecting the speakers
Press the SPEAKERS button (A or B) to turn the speakers on or off.
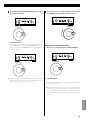
4
Select a source by turning the INPUT SELECTOR (or
pressing one of the input buttons of the remote control
unit).
Tape Monitor Function
If you want to select the source connected to TAPE 2 jacks, press
the TAPE 2 MONITOR button to turn the tape monitor function
on. The TAPE 2 MONITOR indicator lights.
Press the TAPE MONITOR button again to cancel the tape monitor
function.
< When the tape monitor function is on, sources other than TAPE 2
cannot be heard. Be sure to turn the function off while listening
to other sources.
5
Play the source, and gradually turn up the volume to the
required level by turning the VOLUME knob.

10
LOUDNESS button
This button compensate for the loss of bass at low volumes. Set
this button to the OFF position when listening at normal levels.
How to adjust the balance between the left
and right speakers
Turn the BALANCE knob to adjust the balance of the speakers.
Normally, set the knob to the center position.
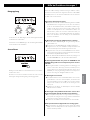
Basic Operation 2
Listening through headphones
For private listening, first reduce the volume level on the receiver
to minimum. Then insert the plug from your headphones into
the PHONES jack, and adjust the volume by turning the VOLUME
knob.
If you want to cut off the sound from speakers, press the
SPEAKERS button to turn it off.
CAUTION
Always lower the volume level prior to plugging in your
headphones. TO AVOID DAMAGING YOUR HEARING - Do not
place your headphones on your head until after you have
plugged them in.
Muting
To mute the sound temporarily, press the MUTING button.
Press the MUTING button again to restore the sound.
< While muting is engaged, the MUTING indicator blinks.

11
ENGLISH
TroubleShooting
If you experience problems with this unit, please take the time to
look through this chart and see if you can solve the problem yourself
before you call your dealer or TEAC service center.
No power
e
Check the connection to the AC power source. Check and
make sure the AC source is not a switched outlet and if it is, the
switch is turned on. Make sure there is power to the AC outlet
by plugging another item such as a lamp or fan.
No sound from speakers.
e
Adjust the volume.
e
Set the BALANCE control to “0”.
e
Check the connection to the speakers.
e
If your speakers are connected to the SPEAKERS A (or B)
terminals, make sure the SPEAKERS A (or B) button on the front
panel is depressed.
e
If the tape monitor function is ON, press the TAPE 2 MONITOR
button to turn it off.
The volume of SPEAKERS A is different from that of B.
e
The volume and sound quality may differ depending on
the speaker’s size, etc. If you want to use SPEAKERS A and B
simultaneously with the same volume, connect exactly the
same type of speakers to the SPEAKERS A and B terminals.
The sound is noisy or humming.
e
The unit is too close to a TV set or similar appliances. Relocate
the units so they no longer interfere with each other, or turn
them off.
e
Connect the turntable’s ground cord to the SIGNAL GND
terminal.
Sound cuts off during listening to the music or no sound even
though power is ON.
e
Speaker impedance is less than prescribed for this unit.
e
Turn the power off and reduce the volume.
Low bass response.
e
Speaker polarity (
+
/
_
) is reversed. Check all speakers for
correct polarity.
Remote control doesn’t work.
e
Press the POWER switch of the main unit to turn it on.
e
If the batteries are dead, change the batteries.
e
Use remote control unit within the range (5m) and point at the
front panel.
e
Clear obstacles between the remote control unit and the main
unit.
e
If a strong light is near the unit, turn it off.
If normal operation is not restored, unplug the power cord
from the outlet and plug it again.
Tone Control
Turn the BASS knob to adjust the level of low frequency
information.
Turn the TREBLE knob to adjust the level of high frequency
information.
Source Direct
Press this button to turn on or off the source direct function.
When the source direct function is set to on, the button lights
and you can listen to the sound without tone effects.

12
Specifications
Amplifier Section
Continuous Power Output ...................120 W+120 W RMS
(1 kHz, 4 ohms, 0.5%)
90 W+90 W (1 kHz, 8 ohms, 0.5%)
Total Harmonic Distortion 0.02% (1 kHz, 8 ohms, 60W)
Input Sensitivity/Impedance ...........PHONO: 2.8 mV/47 k ohms
LINE*: 180 mV/47 k ohms
Signal-to-Noise Ratio (IHF-A). . . . . . . . . . . . . . . . . . . . . . .PHONO: 65 dB
LINE*: 90 dB
Output Level/Impedance. . . . . . . . . . . . . . . TAPE: 150 mV/3.3 k ohms
Frequency Response .......PHONO: 20 to 20,000 Hz, ±1 dB (RIAA)
LINE*: 5 to 80,000 Hz, (SOURCE DIRECT,1 W)
Tone Control .............................BASS: ±10 dB at 100 Hz
TREBLE: ±10 dB at 10 kHz
Muting ..................................................–20 dB
General
Power Requirements .............................230 V AC, 50 Hz
Power Consumption ......................................300 W
Standby ................................................0.5 W
Dimensions (W x H x D) .....................435 x 142 x 355 mm
Weight (net) ..............................................9.2 kg
Standard Accessories
Remote Control Unit (UR-431) x 1
Battery (AAA, R03, UM-4) x 2
Owner’s Manual x 1
Warranty Card x 1
AC Power Cord x 1
*: LINE means TUNER, CD, AUX1, AUX2, TAPE1/CD-R, TAPE2.
< Design and specifications are subject to change without notice.
< Illustrations may differ slightly from production models.
Information for Users on Collection and Disposal of Old
Equipment and used Batteries
These symbols on the products, packaging, and/or
accompanying documents mean that used electrical and
electronic products and batteries should not be mixed with
general household waste. For proper treatment, recovery and
recycling of old products and used batteries, please take them
to applicable collection points, in accordance with your national
legislation and the Directives 2002/96/EC and 2006/66/EC.
By disposing of these products and batteries correctly, you
will help to save valuable resources and prevent any potential
negative effects on human health and the environment which
could otherwise arise from inappropriate waste handling.
For more information about collection and recycling of old
products and batteries, please contact your local municipality,
your waste disposal service or the point of sale where you
purchased the items.
Information on Disposal in other Countries outside the
European Union
These symbols are only valid in the European Union. If you wish
to discard these items, please contact your local authorities or
dealer and ask for the correct method of disposal.
Note for the battery symbol (bottom right two symbol
examples):
This symbol might be used in combination with a chemical
symbol. In this case it complies with the requirement set by the
Directive for the chemical involved.
For European Customers

13
FRANÇAIS
Sommaire Avant utilisation
Merci d'avoir choisi TEAC. Lisez ce manuel avec attention pour
obtenir les meilleures performances possibles de cet appareil.
Lisez les consignes suivantes avant toute utilisation
< Il est possible que l’appareil devienne chaud durant l’utilisation,
laissez donc toujours un espace suffisant autour de lui pour la
ventilation.
< La tension d’alimentation doit correspondre à la tension imprimée
sur le panneau arrière. Si vous avez des doutes concernant
l’alimentation de l’appareil, consultez un électricien.
< Choisissez soigneusement l’emplacement de l’appareil. Évitez
de l’exposer directement aux rayons solaires ou à une source
de chaleur. Évitez aussi les endroits sujets aux vibrations, à une
poussière excessive, à la chaleur, au froid et à l’humidité.
< N’installez pas l’appareil au dessus d’un amplificateur/récepteur.
< N’ouvrez pas le boîtier car cela peut endommager le circuit ou
causer un choc électrique. Si un objet pénètre dans l’appareil,
consultez votre revendeur ou le SAV TEAC.
< Quand vous débranchez le cordon d’alimentation de la prise
secteur, tirez toujours sur la prise, jamais sur le cordon.
< N’essayez pas de nettoyer l’appareil avec des solvants chimiques,
cela peut endommager la finition. Utilisez un chiffon propre, sec
ou légèrement humidifié.
< Conservez ce livret dans un endroit sûr pour référence ultérieure.
< Les opérations illustrées à titre d’exemple dans ce manuel le sont
avec le modèle destiné à l’Europe.
Entretien
Si la surface de l’appareil est sale, nettoyez-la avec un chiffon
doux ou utilisez une solution de nettoyage neutre diluée. Veillez
à ce qu’il ne reste pas de produit sur l’appareil. N’utilisez jamais de
diluant, de benzène ou d’alcool, ceux-ci risquant d’endommager
la surface de l’appareil.
Avant utilisation. . . . . . . . . . . . . . . . . . . . . . . . . . . . . . . . . . . . . . . . . . . . . . . . . 13
Connexions .....................................................14
Noms des commandes ..........................................16
Boîtier de télécommande .......................................18
Fonctions de base. . . . . . . . . . . . . . . . . . . . . . . . . . . . . . . . . . . . . . . . . . . . . . . 18
Dépannage .....................................................21
Caractéristiques techniques .....................................22
ATTENTION
< N'exposez pas cet appareil au ruissellement ni aux éclaboussures.
< Ne placez aucun objet contenant du liquide, tel qu'un vase, sur
l'appareil.
< N'installez pas cet appareil dans un espace confiné comme une
bibliothèque ou similaire.
< L'appareil tire un courant de veille nominal de la prise secteur
quand son interrupteur POWER ou STANDBY/ON est à l'arrêt.
< L'appareil doit être placé assez près de la prise de courant pour
que vous puissiez à tout moment attraper facilement la fiche du
cordon d'alimentation.
< La fiche d'alimentation sert de dispositif de déconnexion et doit
donc toujours rester accessible.
< Si le produit utilise des piles/batteries (y compris un pack de
batteries ou des piles installées), elles ne doivent pas être
exposées au soleil, au feu ou à une chaleur excessive.
< PRÉCAUTION pour les produits qui utilisent des batteries
remplaçables au lithium : remplacer une batterie par un
modèle incorrect entraîne un risque d'explosion. Le modèle de
remplacement doit être le même ou l'équivalent.
< Des précautions doivent être prises en cas d'utilisation
d'écouteurs ou d'un casque avec le produit car une pression
sonore excessive (volume trop fort) dans les écouteurs ou dans le
casque peut causer une perte auditive.

14
Connexions
PHONO q Platine tourne-disque
TUNER q Syntoniseur (T-R650/T-R650DAB)
CD q Lecteur de CD (CD-P650)
AUX 1/AUX 2 q Appareil audio
TAPE1/CD-R q Platine cassette, MD, enregistreur de CD, etc.
TAPE2 q Platine cassette, MD, etc.
PRÉCAUTION:
< Coupez l’alimentation de tous les appareils avant d’effectuer les raccordements.
< Lisez les instructions qui accompagnent chaque appareil que vous avez l’intention d’utiliser en
association avec cet appareil-ci.
< Veillez à ce que chaque fiche soit soigneusement insérée. Pour éviter les ronflements et les bruits
parasites, évitez d’attacher les câbles de modulation de signal avec le cordon d’alimentation secteur ou
les câbles de liaison aux enceintes.
RL
LR
RL
RL
Platine tourne-disque Platine cassette
Enceintes B
Syntoniseur (T-R650/T-R650DAB)
A-R650
LINE
OUT
LINE
OUT
LINE
OUT
LINE
IN
REMOTE
CONTROL
REMOTE
CONTROL
Enceintes A
Lecteur de CD (CD-P650)
D
E
E
F
C
C
B
A

15
FRANÇAIS
A
Prises PHONO/Borne SIGNAL GND (masse
du signal)
Branchez les cordons RCA de la platine tourne-disque aux prises
PHONO.
Veillez à brancher:
la fiche blanche q la prise blanche (L : canal gauche)
la fiche rouge q la prise rouge (R : canal droit)
Branchez le fil de masse de la platine à la borne SIGNAL GND
(masse du signal).
B
Prises AUDIO IN/OUT
Un signal audio analogique 2 canaux d’entrée ou de sortie est
disponible sur ces prises. Raccordez l’appareil avec des câbles
RCA du commerce.
Veillez à brancher :
la fiche blanche q la prise blanche (L : canal gauche)
la fiche rouge q la prise rouge (R : canal droit)
C
Prises REMOTE CONTROL
Si vous possédez le T-R650, T-R650DAB ou CD-P650 de TEAC,
connectez la prise REMOTE CONTROL (A ou B) de chaque
appareil avec le cordon de télécommande (fourni avec le
T-R650, T-R650DAB ou CD-P650).
D
Renvoi d'alimentation (commuté)
Cette sortie n’est active que lorsque l’appareil est sous tension.
Attention :
Assurez-vous que la puissance électrique totale de tous les
équipements raccordés sur cette prise n’excède pas 100 W ou
500 mA.
E
Raccordement des enceintes
Attention :
Pour éviter d’endommager les enceintes avec un signal brusque
de niveau trop élevé, veillez à mettre l’appareil hors tension
avant de raccorder les enceintes.
< Vérifiez l’impédance de vos enceintes. Branchez des enceintes
ayant une impédance de 4 à 16 ohms si vous n'employez
qu'une paire d'enceintes (SPEAKERS A ou SPEAKERS B). Si
vous employez simultanément deux paires d'enceintes, leur
impédance doit être de 8 à 16 ohms.
< Les borniers noirs des enceintes correspondent au _ (négatif).
Généralement, le côté + des câbles d’enceinte est marqué pour
le distinguer du _. Raccordez le côté ainsi marqué au bornier +
et le côté dépourvu de marque au bornier _.
Attention :
Les parties métalliques de deux fils séparés ne doivent jamais
se toucher pour éviter tout risque de court-circuit. Les fils en
court-circuit peuvent provoquer un incendie ou détériorer
sérieusement votre appareil.
Pour effectuer le raccordement
Enceintes A, B
1. Tournez le capuchon du bornier dans le sens contraire des
aiguilles d’une montre pour le desserrer. Le capuchon ne peut
pas être séparé du bornier.
2. Introduisez le fil conducteur dans le bornier puis tournez le
capuchon dans le sens des aiguilles d’une montre pour assurer
son maintien.
< Assurez-vous que le fil est bien fixé en place en tirant
légèrement sur le cordon.
< Assurez-vous que seul la partie dénudée du fil est insérée dans
le bornier et qu’aucun isolant n'empêche un bon contact entre
le fil et le bornier.
F
Entrée d'alimentation secteur
N'utilisez que le cordon d'alimentation fourni.
< L'emploi d'un autre cordon d'alimentation peut entraîner un
incendie ou un choc électrique.
< Débranchez le cordon d'alimentation si l'unité doit rester
inutilisée de façon prolongée.
< Veillez à brancher le cordon d’alimentation à une prise secteur
fournissant la tension de courant correcte.
< Pour débrancher le cordon d’alimentation de la prise murale,
tirez directement sur la prise, ne tirez jamais sur le cordon.

16
Noms des commandes
O N
M L K J
I
H
A
B C D
E D F
G
a
F
b
D
G

17
FRANÇAIS
A
Capteur de télécommande
Lorsque vous utilisez la télécommande, dirigez-la vers ce
capteur.
B
POWER
Appuyez sur cette touche pour mettre l’appareil en veille ou
hors tension.
C
STANDBY/ON
Lorsque l’interrupteur POWER de l’unité centrale est enfoncé,
cette touche permet de mettre l’appareil sous tension ou en
veille.
Le voyant de veille s’allume lorsque l’appareil est en veille.
Lorsque l’appareil est hors tension, ce voyant est éteint.
D
INPUT SELECTOR
Tournez ce bouton (ou appuyez sur les touches de la
télécommande) pour sélectionner une source.
Un des voyants s'allume pour indiquer la source sélectionnée.
E
TAPE 2 MONITOR
Quand une platine cassette est connectée aux prises TAPE 2,
cette touche sert à activer ou désactiver la fonction d'écoute de
contrôle de la bande.
Le voyant s’allume quand la fonction d'écoute de contrôle est
activée.
F
MUTING
Appuyez sur cette touche pour couper le son.
Le voyant MUTING clignote pendant la coupure du son.
G
VOLUME
Tournez ce bouton (ou appuyez sur les touches VOLUME du
boîtier de télécommande) pour régler le volume.
H
Prise de microphone (MIC) et commande de niveau micro
(MIC LEVEL)
Avec le microphone branché à cette prise, le son capté par le
microphone sera entendu avec le son de la source sélectionnée
par le sélecteur INPUT SELECTOR.
Tournez le bouton MIC LEVEL pour régler le niveau d'entrée du
microphone.
I
LOUDNESS
Cette touche permet de compenser la perte des graves quand
le volume est faible.
J
BALANCE
Utilisez ce bouton pour régler la balance des enceintes
acoustiques.
Normalement, laissez le bouton en position centrale.
K
SOURCE DIRECT
Appuyez sur cette touche pour activer ou désactiver la fonction
de source directe.
Quand celle-ci est activée, le bouton s'allume et vous pouvez
écouter le son sans correction de tonalité.
L
TREBLE
Utilisez ce bouton pour ajuster le niveau des aigus.
M
BASS
Utilisez ce bouton pour ajuster le niveau des graves.
N
SPEAKERS
Utilisez ces touches pour mettre en ou hors service les enceintes
(A ou B).
ON : le son est diffusé par les enceintes.
OFF: aucun son ne sort des enceintes.
O
Prise PHONES
Pour l’écoute privée, introduisez la fiche du casque dans cette
prise puis réglez le niveau au moyen du bouton VOLUME.
Télécommande
Quand vous pilotez le lecteur de CD (CD-P650) ou le tuner
(T-R650/T-R650DAB) avec la télécommande, sélectionnez
d'abord une source avec les touches de sélection d'entrée
(cadre
D
) de la télécommande.
a
ON
Lorsque l’interrupteur d'alimentation de l’appareil principal
est enclenché, utilisez cette touche pour mettre l’appareil en
marche.
b
STANDBY
Lorsque l’interrupteur d'alimentation de l’appareil principal est
enclenché, utilisez cette touche pour mettre l’appareil en veille.
Les autres touches servent à faire fonctionner les
CD-P650, T-R650 et T-R650DAB de TEAC.
Remarque :
< Pour simplifier les explications, les instructions utilisent les
noms des touches et commandes sur le panneau avant, sans
mentionner l’utilisation de la télécommande.

18
1
Afin de protéger les enceintes acoustiques d’un signal
soudain très fort, tournez le bouton VOLUME en sens
inverse des aiguilles d’une montre pour réduire le volume.
2
Appuyez sur l’interrupteur POWER
L’appareil passe en veille et le voyant STANDBY s’allume.
3
Appuyez sur la touche STANDBY/ON pour allumer
l’appareil.
Le voyant STANDBY s’éteint.
Fonctionnement de base 1Boîtier de télécommande
Cet amplificateur et les éléments TEAC marqués d'un en face
avant répondent à la télécommande « UR » fournie.
Si vous utilisez la télécommande, pointez-la vers le capteur situé en
face avant de l'amplificateur (ou autre élément TEAC).
< Même si le boîtier de télécommande est utilisé à distance de
fonctionnement, la commande à distance peut être impossible
s’il y a des obstacles entre le l'appareil et la télécommande.
< Si le boîtier de télécommande est utilisé près d’autres appareils
générant des rayons infrarouges, ou si d’autres télécommandes
utilisant des rayons infrarouges sont utilisées près de l'appareil,
celui-ci peut ne pas bien fonctionner. Dans la situation inverse,
les autres appareils peuvent ne pas bien fonctionner.
Mise en place des piles
1. Retirer le couvercle du compartiment des piles.
2. Introduire deux piles « AAA » (R03, UM-4). S’assurer que les piles
sont correctement mises en respectant les polarités plus + et
moins _ .
3. Replacer le couvercle.
Remplacement des piles
Si vous remarquez qu'un fonctionnement correct nécessite de
réduire la distance entre le boîtier de télécommande et l'appareil,
c'est que les piles sont usées. Dans ce cas, remplacez les piles
usagées par des neuves.
Pour plus d’informations sur la collecte des piles usagées, veuillez
contacter votre mairie, votre service d’ordures ménagères ou le
point de vente dans lequel vous avez acheté les articles.
Précautions à observer concernant les piles
<
Placez bien les piles en respectant les polarités plus “+” et moins “_” .
< Utilisez des piles du même type. N’utilisez jamais des types de
pile différents ensemble.
< Des piles ou des batteries rechargeables peuvent être utilisées.
Référez-vous à leurs étiquettes pour les précautions à respecter.
< En cas de non utilisation prolongée de la télécommande (plus
d’un mois), retirez ses piles pour éviter qu’elles ne coulent.
< Si les piles coulent, essuyez le liquide dans le compartiment des
piles et remplacez les piles par des neuves.
< N’utilisez pas d’autres piles que celles spécifiées. Ne mélangez pas
des piles neuves avec des anciennes et n’utilisez pas ensemble
des types de pile différents.
< Ne chauffez pas et ne démontez pas les piles et ne les jetez
jamais dans un feu ou dans de l’eau.
< Ne conservez et ne transportez pas les piles avec d’autres objets
métalliques. Une pile pourrait entrer en court-circuit, couler ou
exploser.
< Ne rechargez jamais une batterie sans avoir vérifié qu’elle peut
l’être.

19
FRANÇAIS
4
Sélectionnez une source en tournant le sélecteur d’entrée
(INPUT SELECTOR) (ou en appuyant sur l’une des touches
de sélection d'entrée de la télécommande).
Fonction Tape Monitor
Si vous souhaitez sélectionner la source raccordée aux prises
TAPE 2, appuyez sur la touche TAPE 2 MONITOR pour activer
la fonction d'écoute de contrôle. Le voyant TAPE 2 MONITOR
s’allume.
Pour désactiver la fonction d'écoute de contrôle Tape Monitor,
appuyez de nouveau sur la touche TAPE 2 MONITOR.
< Lorsque la fonction Tape Monitor est active, il n’est pas possible
d’écouter une autre source que celle-ci. Veillez à désactiver cette
fonction pour écouter d’autres sources.
5
Faites jouer la source et montez progressivement le
volume jusqu’au niveau désiré à l’aide du bouton
VOLUME.
Enregistrement
1. Sélectionnez la source à enregistrer en tournant le
sélecteur d’entrée (INPUT SELECTOR)
2. Lancez l’enregistrement.
< Le volume et les commandes de tonalité n’ont aucun effet sur
les signaux enregistrés.
< Si vous avez raccordé une platine cassette 3 têtes aux prises
TAPE 2 (PLAY et REC), et si la fonction d'écoute de contrôle Tape
Monitor est activée pendant l’enregistrement vous n'entendrez
pas le son de la source mais le son enregistré.
Sélection des enceintes
Appuyez sur la touche SPEAKERS (A ou B) pour mettre les
enceintes en ou hors service.

20
Fonctionnement de base 2
Touche LOUDNESS
Cette touche permet de compenser la perte des graves quand le
volume est faible. Réglez la touche sur la position OFF pour une
écoute à niveau normal.
Comment régler la balance entre les enceintes
gauche et droite
Tournez le bouton BALANCE pour régler la balance des enceintes
acoustiques.
Normalement, laissez le bouton en position centrale.
Écoute avec un casque
Pour une écoute privée, commencez par réduire au minimum
le niveau de volume sur l’amplificateur. Insérez la fiche jack du
casque dans la prise PHONES et réglez le volume à l’aide du
bouton VOLUME.
Pour couper le son provenant des enceintes, appuyez sur la
touche SPEAKERS pour les mettre hors service.
Attention :
Baissez toujours le niveau du volume avant de brancher le casque
d’écoute. POUR ÉVITER D'ENDOMMAGER VOTRE AUDITION – Ne
mettez pas votre casque d’écoute sur la tête tant que vous ne
l’avez pas branché.
Coupure du son (Muting)
Pour couper momentanément le son, appuyez sur la touche
MUTING.
Appuyez une nouvelle fois sur la touche MUTING pour rétablir le
son.
< Tant que le son est coupé, le voyant MUTING clignote.
La pagina sta caricando ...
La pagina sta caricando ...
La pagina sta caricando ...
La pagina sta caricando ...
La pagina sta caricando ...
La pagina sta caricando ...
La pagina sta caricando ...
La pagina sta caricando ...
La pagina sta caricando ...
La pagina sta caricando ...
La pagina sta caricando ...
La pagina sta caricando ...
La pagina sta caricando ...
La pagina sta caricando ...
La pagina sta caricando ...
La pagina sta caricando ...
La pagina sta caricando ...
La pagina sta caricando ...
La pagina sta caricando ...
La pagina sta caricando ...
La pagina sta caricando ...
La pagina sta caricando ...
La pagina sta caricando ...
La pagina sta caricando ...
La pagina sta caricando ...
La pagina sta caricando ...
La pagina sta caricando ...
La pagina sta caricando ...
La pagina sta caricando ...
La pagina sta caricando ...
La pagina sta caricando ...
La pagina sta caricando ...
La pagina sta caricando ...
La pagina sta caricando ...
La pagina sta caricando ...
La pagina sta caricando ...
La pagina sta caricando ...
La pagina sta caricando ...
La pagina sta caricando ...
La pagina sta caricando ...
La pagina sta caricando ...
La pagina sta caricando ...
La pagina sta caricando ...
La pagina sta caricando ...
-
 1
1
-
 2
2
-
 3
3
-
 4
4
-
 5
5
-
 6
6
-
 7
7
-
 8
8
-
 9
9
-
 10
10
-
 11
11
-
 12
12
-
 13
13
-
 14
14
-
 15
15
-
 16
16
-
 17
17
-
 18
18
-
 19
19
-
 20
20
-
 21
21
-
 22
22
-
 23
23
-
 24
24
-
 25
25
-
 26
26
-
 27
27
-
 28
28
-
 29
29
-
 30
30
-
 31
31
-
 32
32
-
 33
33
-
 34
34
-
 35
35
-
 36
36
-
 37
37
-
 38
38
-
 39
39
-
 40
40
-
 41
41
-
 42
42
-
 43
43
-
 44
44
-
 45
45
-
 46
46
-
 47
47
-
 48
48
-
 49
49
-
 50
50
-
 51
51
-
 52
52
-
 53
53
-
 54
54
-
 55
55
-
 56
56
-
 57
57
-
 58
58
-
 59
59
-
 60
60
-
 61
61
-
 62
62
-
 63
63
-
 64
64


TEAC A-R650 Manuale del proprietario
- Categoria
- Apparecchiature musicali supplementari
- Tipo
- Manuale del proprietario
in altre lingue
- English: TEAC A-R650 Owner's manual
- français: TEAC A-R650 Le manuel du propriétaire
- español: TEAC A-R650 El manual del propietario
- Deutsch: TEAC A-R650 Bedienungsanleitung
- Nederlands: TEAC A-R650 de handleiding
Documenti correlati
-
TEAC A-R630AR-650 Manuale del proprietario
-
-
TEAC A-R630mk2 Manuale del proprietario
-
TEAC AI-2000 Manuale del proprietario
-
TEAC CD-P650 Manuale del proprietario
-
TEAC AI-3000 Manuale del proprietario
-
-
-
-
TEAC LS-H265 Manuale utente
Altri documenti
-
Sony TA-FA30 Manuale del proprietario
-
-
-
-
Sony TA-FA777ES Manuale del proprietario
-
-
-
Yamaha HTR-5460 Manuale del proprietario