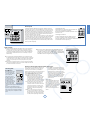
Arcam SOLO NEO Manuale utente
- Categoria
- Ricevitori multimediali per auto
- Tipo
- Manuale utente

Handbook

E2
safety
guidelines
Important safety instructions
This product is designed and manufactured to meet
strict quality and safety standards. However, you
should be aware of the following installation and
operation precautions.
1. Follow all instructions
You should read all the safety and operating
instructions before operating this equipment. Retain
this handbook for future reference and adhere to all
warnings in the handbook or on the equipment.
2. Water and moisture
The presence of electricity near water can be
dangerous. Do not use the equipment near water – for
example next to a bathtub, washbowl, kitchen sink, in
a wet basement or near a swimming pool, etc.
3. Object or liquid entry
Take care that objects do not fall and liquids are not
spilled into the enclosure through any openings.
Liquid-lled objects such as vases should not be
placed on the equipment.
4. Liing and placing the equipment
This amplier weighs 7.9kg, so take care when lifting
or moving this unit.
Only use a rack or shelf that is stable and strong
enough to support the weight of this equipment.
5. Ventilation
Do not place the equipment on a bed, sofa, rug or
similar soft surface, or in an enclosed bookcase or
cabinet, since ventilation may be impeded.
Keep a minimum of 5cm (2 inches) clear around the
apparatus to allow sucient passage of air.
6. Heat
Locate the equipment away from naked ames or
heat-producing appliances such as radiators, stoves or
other appliances that produce heat.
7. Climate
The equipment has been designed for use in
moderate climates and in domestic situations. Unplug
this equipment during lightning storms to prevent
possible damage from a strike or mains surge.
8. Cleaning
Unplug the unit from the mains supply before
cleaning.
The case should normally only require a wipe with a
soft, lint-free cloth. Do not use chemical solvents for
cleaning.
We do not advise the use of furniture cleaning sprays
or polishes as they can cause permanent white marks.
9. Grounding
Ensure that the unit is grounded (‘earthed’) properly
at all times
10. Power sources
Only connect the equipment to a power supply of
the type described in the operating instructions or as
marked on the equipment.
The primary method of isolating the equipment from
the mains supply is to remove the mains plug. The
equipment must be installed in a manner that makes
disconnection possible.
11. Power-cord protection
Power supply cords should be routed so that they are
not likely to be walked on or pinched by items placed
upon or against them. Pay particular attention to the
point where they exit from the equipment.
12. Non-use periods
If the equipment is not being used for an extended
period, we recommend that you unplug the power
cord of the equipment from the outlet, to save power.
13. Abnormal smell
If an abnormal smell or smoke is detected from the
equipment, turn the power o immediately and
unplug the equipment from the wall outlet. Contact
your dealer and do not reconnect the equipment.
14. Servicing
You should not attempt to service the equipment.
Contact your dealer to arrange servicing.
15. Damage requiring service
The equipment should be serviced by qualied
service personnel when:
A. the power-supply cord or the plug has been
damaged, or
B. objects have fallen, or liquid has spilled into the
equipment, or
C. the equipment has been exposed to rain, or
D. the equipment does not appear to operate
normally or exhibits a marked change in
performance, or
E. the equipment has been dropped or the
enclosure damaged.
Safety compliance
This equipment has been designed to meet the IEC/
EN 60065 international electrical safety standard.
This device complies with Part 15 of the FCC Rules.
Operation is subject to the following two conditions:
(1) This device may not cause harmful interference,
and (2) this device must accept any interference
received, including interference that may cause
undesired operation.
Many of these items are common sense precautions but, for your own safety and to ensure that you do not damage the unit, you must read them.
Warning
Mains plug/appliance coupler is used to disconnect
device and it shall remain readily operable.
CLASS I construction shall be connected to a MAINS
socket outlet with a protective earthing connection.
Do not defeat the safety purpose of the polarized or
grounding-type plug. A polarized plug has two blades
with one wider than the other. A grounding type plug
has two blades and a third grounding prong. The wide
blade or the third prong are provided for your safety. If
the provided plug does not t into your outlet, consult
an electrician for replacement of the obsolete outlet.
CAUTION: To reduce the risk of electric shock, do not remove cover (or back). No user serviceable parts inside. Refer
servicing to qualified service personnel.
WARNING: To reduce the risk of fire or electric shock, do not expose this apparatus to rain or moisture.
The lightning flash with an arrowhead symbol within an equilateral triangle, is intended to alert the user to the
presence of uninsulated ‘dangerous voltage’ within the product’s enclosure that may be of sufficient magnitude
to constitute a risk of electric shock to persons.
The exclamation point within an equilateral triangle is intended to alert the user to the presence of important
operating and maintenance (servicing) instructions in the literature accompanying the product.
CAUTION: In Canada and the USA, to prevent electric shock, match the wide blade of the plug to the wide slot in the socket
and insert the plug fully into the socket.

E3
English
… and thank you for purchasing the Arcam Solo Neo music system.
Arcam has been producing high-quality audio components for nearly thirty years. During that
time we have amassed a wealth of knowledge on both the design and construction of audio
components in order to give the best sound performance for the price. The design of Solo Neo
is a distillation of this knowledge into an easy-to-use package that is intended to give you years
of listening enjoyment while taking just a few minutes to learn how to use.
This handbook is intended to give you a detailed guide to using the Solo Neo music system.
It starts by giving advice on installation, moves on to describe how to use the product and
nishes with additional information on the more advanced features. Use the contents list
shown on the right to guide you to the section of interest.
We hope that your Solo Neo music system will give you years of trouble-free operation. In the
unlikely event of any fault, or if you simply require further information about Arcam products,
our network of dealers will be happy to help you. Further information can be found on the
Arcam website at www.arcam.co.uk.
The Solo Neo development team
Contents
safety guidelines ............................................. 2
welcome… ........................................................3
installation guidelines .................................. 4
making music ...................................................8
remote control ...............................................14
Setup Menu ....................................................15
Network Setup Wizard ................................19
technical specication ................................20
product guarantee .......................................21
welcome…
Safety
Safety instructions are set out on page 2 of this
handbook.
Many of these items are common sense
precautions but, for your own safety and to ensure
that you do not damage the unit, you must read
them.
This product requires an earth connection.

E4
Interconnect cables
We recommend the use of high-quality screened
cables, since inferior-quality cables will degrade the
overall quality of your system. Use only cables that
are designed for the particular application as other
cables will have dierent impedance characteristics
that will degrade the performance of your system (for
example, do not use cabling intended for video use to
carry audio signals). All cables should be kept as short
as is practically possible.
It is good practice when connecting your equipment
to make sure that the mains power-supply cabling is
kept as far away as possible from your audio cables.
Failure to do so may result in unwanted noise in the
audio signals.
installation
guidelines
General guidelines
Positioning the unit
< Place Solo Neo on a level, rm surface, avoiding
direct sunlight and sources of heat or damp.
< Do not place Solo Neo on top of a power
amplier or other source of heat.
< Do not place Solo Neo in an enclosed space
such as a bookcase or closed cabinet unless
there is good provision for ventilation. Solo is
designed to run warm during normal operation.
< Do not place any other component or item on
top of Solo Neo as this may obstruct airow
around the heat-sink, causing Solo Neo to run
hot. (The unit placed on top of Solo Neo would
become hot, too.)
< Make sure the remote-control receiver
in the centre of the front panel display is
unobstructed, otherwise this will impair the
use of the remote-control. If line-of-sight is
impractical, a remote-control repeater can be
used with the rear panel connector (see page 5).
< Do not place your record deck on top of this
unit. Record decks are very sensitive to the noise
generated by mains power supplies which will
be heard as a background ‘hum’ if the record
deck is too close.
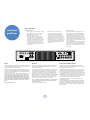
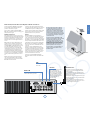
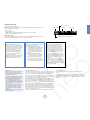
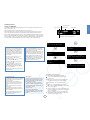
DIGITAL
OUT
AV IN
SERIAL NO .
GAME TVTAPE OUT iPodZONE 2 PRE OUT
230V
~
50 – 60HZ
400V A
MAX
PROGRAM
SPEAKER
OUTPUT
12V
REMOTE
INOUT IN
L
R
R
L
TRIGGER
LOCAL
ZONE 2
ETH ER NE T
rDock / RS23 2
US B
DAB +
/FM
Wi F i
Power
Solo Neo is supplied with a moulded mains plug already tted to the lead.
Check that the plug supplied ts your supply – should you require a new
mains lead, please contact your Arcam dealer.
Push the IEC (kettle-style) plug end of the power cable into the socket
on the back of Solo Neo, making sure that it is pushed in rmly. Put the
plug on the other end of the cable into your power supply socket and, if
necessary, switch the socket on.
Solo Neo is tted with a power switch on the rear of the product, next to
the power inlet. To use Solo Neo, make sure that this is switched on.
Solo Neo is tted with a transformer designed to accept the mains
voltage in the region that the product was shipped to. If your mains
supply voltage does not match this specication (as shown on the
rear panel), you wish to take the unit to a region with a dierent main
voltage, or the mains plug is incorrect, please consult your Arcam
dealer.
This product must be earthed.
Radio aerial and Wi- antenna
Solo Neo is tted with a combined FM/DAB (digital radio) receiver
module. In order to use the radio, you must connect an aerial to the unit –
a suitable aerial is supplied as an accessory.
The FM/DAB aerial connector is an F-type (screw) connector. The aerial
should be connected to this input by pushing the pin into the hole in the
centre of the connector, then screwing the sleeve onto the outside.
To use the supplied ‘T’ shaped wire aerial, mount it as high up as possible
on a wall with the elements positioned vertically. If accessable, try each
usable wall of the room to see which gives the best reception. Use tacks
or adhesive tape to secure the aerial to the wall, but ensure that tacks do
not come into contact with the internal wire of the aerial.
For optimal reception, the use of a roof-mounted (external) aerial is
recommended (see page 7).
A socket is provided for the supplied Wi- antenna. Fit this if you wish
to use Solo Neo with your wireless computer network for Internet radio
and network streaming functions. Note: equipment cabinets can block
wireless signals. Do not use a cabinet if you experience problems with
wireless reception.
Speakers
Solo Neo is designed to drive a single pair of speakers, rated between 4
and 8 ohms, and is tted with speaker terminals that can accept either
spade terminals or bare wires.
To connect the left speaker, unscrew the terminals on the back of Solo
Neo labelled L, insert the speaker wire (or spade) and screw the terminals
back up. Make sure that the red (positive/+) terminal of the speaker is
connected to the red terminal on Solo Neo and the black (negative/–)
terminal of the speaker is connected to the black terminal on Solo Neo.
Repeat the above to connect the right speaker to the terminals labelled R.
It is important that no stray strands of wire from these connections are
allowed to touch another cable or the product casing. Failure to ensure
this can cause a short circuit, and damage to your Solo Neo.
Do not over-tighten the loudspeaker terminals, or use a wrench, pliers,
etc., as this could cause damage to the terminals which will not be
covered under warranty.
See page 6 for tips on speaker positioning.

E5
English
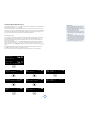
DIGITAL
OUT
AV IN
SERIAL NO .
GAME TV
TAPE OUT iPod
ZONE 2 PRE OUT
230V
~
50 – 60HZ
400V A
MAX
PROGRAM
SPEAKER
OUTPUT
12V
REMOTE
INOUT IN
L
R
R
L
TRIGGER
LOCAL
ZONE 2
ETHERN ET
rDock / RS232
US B
DAB+
/FM
WiF i
Listening with
headphones
The front-panel of Solo Neo
has a socket allowing the
connection of headphones.
To use headphones
with Solo Neo, plug the
headphones into the socket
on the left hand side of
the front panel. When
headphones are plugged
into the headphones socket
the main speaker output
and the pre-amp. output
are muted automatically (Zone 2 output remains
active).
This socket accepts headphones with an
impedance rating between 8Ω and 2kΩ, tted
with a 3.5mm stereo jack plug. The headphone
socket is always active, except when Solo Neo is
muted.
DIGITAL
OUT
AV IN
SERIAL NO .
GAME TV
TAPE OUT
iPod
ZONE 2 PRE OUT
230V
~
50 – 60HZ
400V A
MAX
PROGRAM
SPEAKER
OUTPUT
12V
REMOTE
INOUT IN
L
R
R
L
TRIGGER
LOCAL
ZONE 2
ETHE RNET
rDock / RS232
US B
DAB+
/FM
WiFi
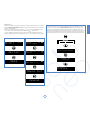
Audio outputs
TAPE OUT: This output is taken before the volume control, i.e., the source being
listened to is routed directly to this output. If you wish, this output may
be connected to a cassette recorder (or other recording device). Under no
circumstances should this output be connected to a power amplier. Note
that this output is muted when the source is set to iPod/tape, to prevent
feedback loops.
PRE OUT: To improve the sound quality still further, or if you require more than
the 50W/channel that Solo Neo oers, an external power amp. or subwoofer
can be connected. For a power amplier, connect these sockets to the input
sockets of your power amp., then connect your speakers to its speaker
terminals.
ZONE 2 OUT: This is the output to be used for a second room system. It should be
connected to the amplier in the second room. The output level varies with
the volume control for the second room.
Audio inputs
Solo Neo provides four audio inputs and a tape loop, allowing connection of
other audio sources, (games console, TV, DVD player, etc.). Three of these inputs,
together with the tape loop, are on the rear panel, with one on the front of Solo
Neo. The labels above the inputs give suggested uses, but all four inputs have
the same characteristics (all are line-level inputs) and any suitable device may be
connected to any input. (Note, however, that the name of the input shown on
the front-panel display cannot be changed.)
To connect a device to an input on the rear of Solo Neo, use a stereo phono cable
of a suitable length; for connection to the front-panel, the cable must terminate
in a stereo 3.5mm jack plug. Connect the audio output of the device to one
of the inputs of Solo Neo, making sure that the plugs are pushed in rmly. We
advise you to use high-quality interconnect cables wherever possible to ensure
the best possible sound quality.
DIGITAL
OUT
AV IN
SERIAL NO .
GAME TV
TAPE OUT iPodZONE 2 PRE OUT
230V
~
50 – 60HZ
400V A
MAX
PROGRAM
SPEAKER
OUTPUT
12V
REMOTE
INOUT IN
L
R
R
L
TRIGGER
LOCAL
ZONE 2
ETHE RNET
rDock / RS232
US B
DAB+
/FM
WiFi
Connecting a tape deck
If the iPod input is not required for use with an Arcam rDock, it
can be used as a tape input for tape playback.
Note that the
TAPE output is muted when Tape/iPod is selected
as the music source.
Connecting a record deck
Solo Neo is not tted with a phono pre-amplier. If you wish
to connect a record deck to Solo Neo, then you will need an
external pre-amplier. Please contact your dealer for further information and
recommendations on the best option for you.
DIGITAL OUT: This carries the digital output from the CD,DAB, FM, NET and USB
stages of Solo Neo, and can be used for making digital recordings using
compatible recording devices (such as MiniDisc). When a CD is being played,
this output carries a signal with a sample rate of 44.1kHz; with DAB/FM radio,
USB and Network sources the signal sample rate is 48kHz.
These connections are intended for use in multi-room
installations. Normally there is no need to make any
connections to these sockets. If you would like to
make use of these features, however, please download
the document ‘Solo Neo Remote Control’ from our
website (
www.arcam.co.uk), which includes
advice on how to make these connections.
12V TRIGGER – This output provides a 12V signal
whenever the unit is switched on (i.e., not o or
in stand-by). This signal can be used to switch
on automatically power ampliers (or other
compatable equipment) connected to Solo Neo,
as they will come on when Solo Neo is activated.
IN LOCAL – This allows remote control signals to be
received by Solo Neo if the remote sensor is
covered (or otherwise not ‘visible’ to the remote
control). An external sensor is used to receive
the signals from the remote control, which are
then fed to Solo Neo (into this input) using a
suitable cable.
IN ZONE 2 – Use this connector if you are using a
second room system that has a remote sensor.
The external sensor is used to receive the signals
from the remote control, which are then fed to
Solo Neo (into this input) using a suitable cable.
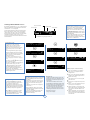
DIGITAL
OUT
AV IN
SERIAL NO .
GAME TVTAPE OUT iPodZONE 2 PRE OUT
230V
~
50 – 60HZ
400V A
MAX
PROGRAM
SPEAKER
OUTPUT
12V
REMOTE
INOUT IN
L
R
R
L
TRIGGER
LOCAL
ZONE 2
ETHE RNET
rDock / RS232
US B
DAB+
/FM
WiFi
OUT – This output carries all signals from the front
panel remote control receiver, plus commands
received through the two external sensor inputs
detailed above (‘In Local’ and ‘In Zone 2’). This
can be used to route remote-control commands
to other equipment (potentially in dierent
locations). For example, DVD player commands
could be received by Solo Neo, then routed to
a DVD player in a remote location using this
output connector.
RS232 control
Solo Neo is tted with an RS232 serial
connector that allows remote control
from a PC, or similar device. In normal
use, it is unlikely that this connector will
be used. If you wish to experiment with
this remote-control method, however,
full details of the remote control
protocol can be found on the Arcam
website.
Remote control inputs/outputs and the 12V trigger

E6
>60cm
15 –
40cm
40 – 60cm
2 – 3m
Speaker installation
The advice given here are general guidleines for speaker installation.
Refer to the documentation supplied with your speakers for more
precise positioning and installation information.
Positioning
As a rough guide, speakers should be placed on rigid stands at about
15–40cms from the rear wall and at least 60cms from any side wall.
Speakers should never be placed on the oor (unless they are oor-
standing speakers), or in corners.
The nal sound will depend on the acoustics of the listening room
and experimentation with speaker positioning is very worthwhile.
As a starting point, we suggest that the speakers are placed
2–3m apart with their backs 15cms from the rear wall.
Listening in a second room
Solo Neo provides two independent volume
controls, oering you the possibility of listening
to the same output in two dierent rooms of your house. To do this, you will require the
following:
< a power amplier (such as the Arcam P38) and speakers;
< suitable interconnect cables, such as those described above;
< a remote control receiver (optional), available from your Arcam dealer;
< a second Solo Neo remote control (optional), available from your Arcam
dealer.
Make the connections as follows:
1. Ensure that all equipment is switched o and disconnected from the mains
supply.
2. Connect the outputs of Solo Neo labelled ‘Zone 2’ to the audio inputs of the
power amplier using the interconnect cables.
3. Connect the speakers to the speaker terminals of the power amp. The speakers should
be connected in the same method as described in the panel on page 4, ‘Speakers’.
4. Plug the remote receiver from the second room into the connector labelled ‘In Zone 2’
on the rear of Solo Neo.
5. Reconnect the equipment to the mains supply and switch on. You should be able to
hear the output of Solo Neo in through the power amp. and control the volume using
the remote control.
Adjusting Zone 2 volume
Press and hold MENU on the front panel until ‘Z2 Vol’ is displayed, then use the volume
control to decrease/increase the Zone 2 volume. Press MENU again to exit.
Note that the second room is always muted when
Solo Neo is switched on – it must be unmuted
‘explicitly’ when required. This is to avoid
unexpected output in the remote location.
Speaker stands
The more rmly a speaker is held, the better it will sound. We
recommend the use of rigid metal stands of 40–60cms height.
Properly damped types that do not ‘ring’ when tapped with
a pencil (either by virtue of construction, or because they are
lled with dry silver sand) will bring out the best in a speaker.
Ensure that the stands and/or speakers do not wobble.
>60cm
15 –
40cm
40 – 60cm
2 – 3m

E7
English
VHF/FM
DAB
Solo Neo is tted with a DAB+/FM receiver module.
A roof-mounted aerial should be used wherever
possible to obtain the best reception.
Your Solo Neo is capable of superb FM and DAB/
DAB+ radio reception, but only if it is receiving a good
quality transmission signal.
DAB/DAB+ (Digital Radio)
If the transmission signal is strong in your area then
the supplied indoor aerial may be sucient (it should
be hung on a wall with both wires fully stretched out
vertically). In weak signal areas, an external aerial is
desirable in order to receive the highest number of
services.
DAB transmissions can be in either ‘Band III’ or the
‘L-band’ (or both). To determine the transmission
frequency in your area, contact your dealer, or refer
to www.WorldDAB.org. In Band III transmission areas,
use a multi-element Yagi aerial if you are a long
way from a transmitter, or use an omnidirectional
or folded dipole aerial if you are close to more than
one transmitter (in the U.K., a Band III region, this
should be mounted with the elements vertically, as
the transmissions are vertically polarised). If the DAB
services in your area are transmitted on L-band then
consult your dealer with regard to the best aerial to
use.
Whether you decide to install an external aerial, or
opt to use the supplied ribbon cable, it should be
connected to the F-type (screw) connector labelled
‘DAB+/FM’ on the rear of the unit.
The type of aerial you should use depends
on your listening preferences and the local
conditions. If you listen exclusively to FM
transmissions, for example, and the FM signal
strength is strong in your area, then a simple
omni-directional aerial mounted in your loft or
on your roof may be sucient. Listening to DAB
in a weak signal area will require a high-gain,
roof-mounted aerial.
For the best reception of both DAB and FM
signals, an aerial combiner box may be required
(as shown in the diagram opposite). This
combines the signals received by two aerials
(one for DAB, the other for FM), into one cable
that then connects to Solo Neo. If an aerial
combiner is not used, the single aerial chosen
for both DAB and FM reception may not give
optimum performance in some regions.
For the best advice, we recommend that you
contact your local Arcam dealer or aerial
installation expert.
FM Radio
Although an FM ribbon aerial is supplied as an
accessory to Solo Neo, for optimal FM radio reception
a roof- or loft-mounted aerial is advised as this will
give superior reception. In some areas cable radio may
be available or, in an apartment building, a distributed
aerial system may be installed. In either of these cases
you should have sockets in your home marked FM or
VHF (do not use those marked TV), which should be
connected to the connector labelled ‘FM’ on the rear
of Solo Neo.
If you wish to use the supplied FM ribbon cable,
mount this as high up as possible on a wall with the
‘T’-elements positioned horizontally. Try each usable
wall of the room to see which gives best reception
and use tacks or adhesive tape to secure the aerial in
a T shape, but note that no tacks should come into
contact with the internal wire of the aerial.
If you wish to receive both DAB and FM signals,
experiment with the orientation of the aerial for best
results.
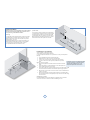
aerial combiner
Wi-Fi Antenna
If you wish to use wireless networking (Wi-Fi) to
connect to your local network, the Wi-Fi antenna
must be installed.
Locate the ‘WiFi’ socket on the rear panel. Remove
the red protective cap (if installed) and screw on the
supplied aerial as shown.
An equipment cabinet can block the wireless signal.
The wired network connection is recommended for
enclosed installations.
Wireless networking requires network settings to
be entered into the Solo Neo. See pages 18—19 for
network conguration instructions.
DIGITAL
OUT
AV IN
SERIAL NO .
GAME TVTAPE OUT iPodZONE 2 PRE OUT
230V
~
50 – 60HZ
400V A
MAX
PROGRAM
SPEAKER
OUTPUT
12V
REMOTE
INOUT IN
L
R
R
L
TRIGGER
LOCAL
ZONE 2
ETHE RNET
rDock / RS232
US B
DAB+
/FM
WiFi
Network
The Solo Neo can receive Internet
radio or stream music from
networked computers and hard
drives. Connect your router’s LAN
port to the ETHERNET socket using
Cat5 cable. See pages 18—19 for
network conguration instructions
if the network requires any
particular settings.
DAB+/ FM
Connect your DAB or FM aerial or
antenna cable to this F-type socket.
USB
Insert USB memory
devices here.
Radio aerial, Internet radio and computer network connections
Solo Neo also has USB, wired and wireless network
connections. The USB socket allows for the connection
of USB ash memory devices and MP3 players. The
network connection, whether wired or wireless, allows
for the reception of Internet radio stations and the
playback of music stored on your network.

E8
Important front panel controls
Power
Press the POWER button to
switch Solo Neo between ‘on’
and ‘standby’.
When Solo Neo is in standby
the light next to the power
button on the front panel
glows red. Pressing
POWER
when the unit is in standby
will cause the unit to switch
on, when the power button
light will turn blue.
Note that the primary power
switch for Solo Neo is on the rear of the unit. If the
power light is not illuminated at all, please read the
instructions on page 4 ‘Power’.
Volume and Mute
Use these controls to mute, increase, or decrease
the volume. If Solo Neo is muted, pressing the MUTE
button for a second time or changing the volume will
unmute it. The current volume is shown in the top
right corner of the display.
Source –/+
Used to change the audio source. If you wish to listen
to FM radio, for example, press SOURCE+ repeatedly
until ‘FM’ is shown in the top left corner of the display.
These buttons are also used when navigating the Solo
Neo menu. See the section ‘Setup menu’ (page 15) for
more information.
making music
Source selection Playback mode Current volume
Track number, song text, playback time, etc.
Play-state indicator
Skipping/scanning tracks
Press briey the
0
and
/
buttons on the front-
panel or remote control to skip to the previous or
next track of a CD.
On skipping forward, playback will start from the
beginning of the next track on the disc (if there is
one); when skipping backwards, pressing the
0
button within the rst 3 seconds of a track will
skip to the prior track (if there is one), otherwise
playback will re-start from the beginning of the
current track. From most positions, therefore, it
is normal to have to press
0
twice to skip to the
beginning of the previous track.
The
0
and
/
buttons are used also for scanning.
To scan backwards or forwards within a track,
press and hold the
0
or
/
button – the track will
be scanned until the button is released.
Special playback modes
Press MODE on the remote-control to cycle
through the repeat/shue modes for CD
playback. The options are as follows:
1. Repeat disc: the tracks on the disc are played in
order. After the last track has nished, playback
re-starts from the rst track on the disc;
2. Repeat track: playback of the current track is
repeated until cancelled;
3. Shue: the tracks on the disc are played in a
random order;
4. Repeat shue: this combines ‘repeat disc’ and
‘shue’. Each time that playback is restarted, the
track order is shued.
To cancel any of the shue/repeat modes, press
MODE repeatedly until the playback mode is
removed from the display.
Note that the repeat/shue modes are not
available during programmed playback (described
in the next panel).
Programming the playback order
The order in which tracks on a CD are played can
be programmed. This is part of the conguration
menu of Solo Neo, which is described on page 15.
1. Press MENU to open the conguration menu;
2. Press
C
(SOURCE on the front-panel), until the
top line of the display shows ‘Prog’;
3. Press OK to enter programme mode, then use
the
and + keys (front-panel:
0
and
/
) to move
the highlight to the next track to be added to
the play-list. Press
OK to add the track. Repeat
this operation until all the tracks you want to
play have been added to the play-list.
4. To exit programme mode, press
MENU. Press
MENU again to close the conguration menu.
To clear any programme, press
<
twice on the
remote-control, or eject the disc.
Display modes
Solo Neo provides four dierent display modes
when listening to the CD. The mode is changed by
pressing the INFO button on either the front-panel
or the remote-control.
1. Current track time: this is the ‘conventional’
display for a CD player, showing the track number,
together with track time.
2. Remaining track time: this shows the current
track number, together with the track time that
remains to be played.
3. CD text: if available, text from the disc (CD text)
will be displayed when in this mode (track name or
artist, for example). If CD text is unavailable, then
this mode is the same as for ‘current track time’.
4. Large-character display: this mode is a double-
height display, showing just the current track
number and the volume.
CD playback commands summary
4
(Play) – press this button to start the playback of
a CD.
<
(Stop) – press to stop the playback of a CD.
;
(Pause) – press to pause the playback of a CD.
Press again (or press play) to re-start playback.
/
(Skip/Scan forwards) – press and release this
button of skip forwards to the beginning of the
next track. Press and hold the button to scan
forwards.
0
(Skip/Scan backwards) – press and release this
button to skip backwards to the beginning of
the current/previous track. Press and hold the
button to scan backwards.
1
(Open/Close) – press to open the CD tray; press
again to close it.
Direct track access
Direct access may be gained to tracks on the disc by
using the numeric keys on the remote-control.
For tracks 1–9, press the number of the track that you
want to hear. To select a track greater than 9, press
and hold the rst digit of the track (e.g.
1) until that
number is shown in the bottom left corner of the
display (‘1–’), then press the second digit.
Listening to a CD
Quick-start – to play a CD:
1. Press the
<
/
1
button (load) on the front-panel or
1
on
the remote control to open the CD tray.
2. Place the CD in the centre of the tray, making sure that the
text printed on the CD is face-up. Press the
1
or
4
(play)
button to close the drawer.
3. Wait for the disc to load. If play was pressed to close the
drawer, then the disc will start playing automatically,
otherwise press
4
/
;
(remote:
A
) to start playback.

E9
English
Display modes
Solo Neo provides dierent display modes when
listening to the radio. The mode is changed
(cycled) by pressing the INFO button on either the
front-panel or the remote-control.
1. Programme type (DAB/FM): a short description
of the type of programme being transmitted.
2. Transmission frequency (FM): the station name
(if available) and transmission frequency.
3. Dynamic label (DAB)/ RDS (FM): 128 characters
of text used by broadcasters to give programme-
related information (e.g., ‘phone numbers, web-
addresses, etc.).
4. Data rate (DAB): this mode shows the data-rate
of the station (in kbits/s) and the transmission
mode. A higher data-rate indicates a higher
audio quality, with the maximum rate being
256kbits/s.
5. Signal quality: a bar-graph showing the quality
of the recieved signal.
Listening to the radio
Solo Neo is tted with a DAB+/FM receiver.
The DAB+ digital radio receiver is capable of receiving both DAB and DAB+ broadcasts and will be referred to as a
DAB receiver throughout this handbook.
Solo Neo provides:
< up to 30 station presets;
< full RDS information on FM (where transmitted); programme-associated data on DAB;
< FM signal-strength and DAB data-rate meters.
Switching to the radio
Press SOURCE+ or SOURCE until the radio type that you wish to listen to (DAB/FM) is displayed on the front panel.
Alternatively, press the DAB or FM button on the remote control for direct access.
Source selection Station name
Programming station presets
You can store your favourite radio station in one of the radio ‘presets’, giving quick
access to the station in the future without the bother of having to re-tune. Solo Neo
provides for 30 preset radio stations, which are shared between DAB and FM.
To store a preset, rst tune to the radio station you wish to store. To store the station
into one of presets 1–9, press and hold the appropriately numbered button on the
remote control until the ‘preset saved’ message is displayed.
An alternative method, giving access to presets 10–30, is to press
MENU to enter the
Solo Neo conguration menu (described fully on pages 15—19), then to navigate
through the menu until ‘Store Preset’ is displayed. At this point, using the
<
and
>
buttons on the remote control (
0
or
/
on the front panel) allows selection of the
preset number you wish to use for the station (if a preset is in use already, then the
name or transmission frequency of the station held in the preset is shown on the
bottom line of the display; empty presets are indicated by ‘Empty’ being shown).
When the preferred preset number is shown, press OK to store the preset. Note that
saving a radio station into a location occupied already will cause the original preset
station to be overwritten by the new one.
Your presets are retained when Solo Neo is disconnected from the power supply.
Searching for stations
Pressing the MODE button when the radio is
selected as the music source toggles between the
two tuning modes of Solo Neo – ‘Preset’ or ‘Tune’.
The selected mode is shown briey on the display.
When in preset mode, pressing the
B
or
C
buttons on the remote control (
0
or
/
on the
front panel) shows the previous/next station
preset (if these are dened). Press
O
to select.
Note that these buttons have no eect, in preset
mode, if no presets are dened.
In tune mode, by contrast, pressing these buttons
changes the FM tuning frequency or selects the
next DAB radio station from the station list.
FM
To search for new stations, ensure that Solo Neo is
in ‘Tune’ mode, as described above.
< Manual tuning. Use the
B
and
C
buttons (
0
or
/
on the front panel) to select
the desired tuning frequency. This can be
used for tuning to a specic frequency.
It is also useful if you are trying to select
a station that is too weak for automatic
tuning.
< Automatic tuning. Pressing the
B
or
C
buttons on the remote control (
0
or
/
on the front panel) for longer than one
second engages automatic tuning. Solo
Neo searches for a radio station signal of
sucient strength, then stops. To skip to the
next station, press one of the buttons again.
DAB
Tuning stations in under DAB is dierent from
conventional FM tuning, in that you do not
need to know the transmission frequency of the
station – this is handled for you by Solo Neo.
Select DAB as the source, then press the
MENU
button. Navigate through the menu options (see
page 16) until ‘DAB Setup’ is displayed. There are
two options under this menu item – ‘Scan’ and
‘Erase settings’. Selecting ‘Scan’ causes Solo Neo
to search for new DAB stations. If any are found,
then they will be added automatically to the list of
available stations. Press MENU for a second time to
exit the menu.
To select a DAB radio station, press the
B
or
C
buttons on the remote control until the name
of the station you want to listen to is displayed.
Press
O
to tune to the displayed station. If
O
is
not pressed, the display will return to the current
station after a few seconds.
Current volume
Transmission details, or other information
Selecting station presets
Solo Neo must be in preset mode before preset stations can be selected (see
above).
To cycle through your preset stations, use the
B
or
C
buttons on the remote
control (
0
or
/
on the front panel). Alternatively, presets can be selected directly by
using the numeric keypad on the remote. See page 14 for further information on
this option.
Preset mode indicator

E10
Listening to Network Radio sources
Press SOURCE+ or SOURCE until “ NET Radio” is displayed on the front panel. Alternatively, press the NET button on
the remote control until “NET Radio” is displayed.
Solo Neo must be installed on your home network and connected to the Internet in order to listen to network
radio sources. Solo Neo can be connected using a wired network connecton or can be connected wirelessly. Most
wired connections will use automatic setup. For network conguration and wireless settings, see pages 18—19.
See page 7 for network cable connection and wireless network antenna installation.
Choosing music to play
Solo Neo provides a world of radio programming via the Internet. With such a broad range of stations available,
we recommend that you set up your favourites — see panel opposite. After the Network Radio system has
initialised you will be prompted to press
O
to begin navigation.Use the remote control cursor keys B/C to
select a category to browse.
Various categories and sub-categories are available, including “My Favourites” which contains your favourite
stations. Use the remote control
O
or
>
key to enter a category. Use the remote control cursor keys B/C to
select a radio station or sub-category. Once you have found a radio station that you wish to listen to, press
O
to
select it.
Press
O
during Net Radio listening to enter navigation mode without stopping the music. Use the remote
control
<
key to navigate back one level to the previous category.
A new radio station can be chosen by navigating the categories and sub-categories, as described above.
Display modes
Solo Neo provides dierent display modes when
listening to NET Radio. The mode is changed
(cycled) by pressing the INFO button on either the
front-panel or the remote-control.
1. Station name being transmitted.
2. Text used by broadcasters to give programme-
related information (e.g., ‘phone numbers, web-
addresses, etc.).
3. Data rate: this mode shows the data rate of the
station (in kbits/s) and the transmission mode. A
higher data rate indicates a higher audio quality.
4. Large fonts display: this mode uses large size
text to display the source name and volume so
that it is easier to read from across a room.
NET Radio
Press OK to Navigate
NET Radio
Initialising...
Browse 1/6
>My Favourites
Browse 2/7
>Local United Kingdom
Browse 3/7
>BBC
BBC 1/60
>BBC Radio 1
BBC 2/60
>BBC Radio 1Xtra
BBC 3/60
>BBC Radio 2
BBC Radio 2 1/2 3/60
>BBC Radio 2
C
C
C
C
O
O
O
O
NET Radio è Vol:42
BBC Radio 2

E11
English
Adding a favourite Removing a favourite
Adding favourites
The easiest way to nd new radio stations and add them to your favourite radio stations list is to use a computer.
Navigate to http://www.arcamradio.co.uk from any computer with an internet connection. See the panel
opposite for setup information.
Favourites can be added without using a computer. Press
M
on the remote control whilst listening to a radio
station to add it to your favourites. The display shows “Add Fav?” Press
O
to add the favourite.
To remove a station from the favourites list, navigate to the station using “My Favourites”. When the station is
displayed, press
M
on the remote control. The display shows “Remove Fav?” Press
O
to remove the favourite.
vTuner
Solo Neo uses the vTuner service to allow easy browsing of internet radio stations and podcasts. To set up
this service for your Solo Neo, please visit www.arcamradio.co.uk. There, you will be asked to enter
the Media Access Controller (MAC) address which is the unique ID of your unit. This MAC address can be
found in the “Network: View Current Settings” menu and is also printed on a label xed to the rear of the unit.
Once you have entered the MAC address, you can then browse stations and podcasts and set up groups of
favourite stations. When you next connect your unit to the internet, these groups will appear in the selection
list.
Browse 1/6
>My Favourites
NET Radio è Vol:42
BBC Radio 2
Add Fav?
My Favourites 1/1
>Stations
Stations 1/4
>BBC Radio 2
Remove Fav?
Removed
Added
MAC Address:
12:34:56:78:9O:AB
Network
View Current Settings
Network Type
Wireless

E12
NET Media
Source selection
Playback mode
Current volume
Track number, song text, playback time, etc.
Play-state indicator
Listening to Network Media sources
Press SOURCE+ or SOURCE until “ NET Media” is displayed on the
front panel. Alternatively, press the NET button on the remote
control until “ NET Media” is displayed.
Solo Neo must be installed on your home network in order to
listen to network sources. Solo Neo can be connected using
a wired network connecton or can be connected wirelessly.
Most wired connections will use automatic setup. For network
conguration and wireless settings, see pages 18—19.
See page 7 for network cable connection and wireless network
antenna installation.
Skipping/scanning les
Press briey the
0
and
/
buttons on the front-
panel or remote control to skip to the previous or
next song within the current location.
On skipping forward, playback will start from the
beginning of the next song in the location (if there
is one); when skipping backwards, pressing the
0
button will skip to the previous song (if there is
one).
The
0
and
/
buttons are used also for scanning.
To scan backwards or forwards within a song,
press and hold the
0
or
/
button – the song will
be scanned until the button is released.
Choosing music to play
The organisation of a music collection is
dependent on the server where the les are
stored. The Solo Neo rst presents a list of
available servers on the network; use the remote
control cursor keys B/C to choose a uPnP
server.
When choosing a music le to play, the top line
of the front panel display shows the name of the
current location. The bottom line is used to display
songs or other choices contained within the
current network location.
Use the remote control cursor keys B/C to
choose a song to play or a location or category to
browse.
Use the remote control
O
,
$
or
>
key to play
the file or select the category.
Use the remote control
<
key to navigate up one
level to the previous category or location.
Press
O
during playback to enter navigation
mode without stopping the music. A new
song can be chosen by navigating the les and
locations present, as described above.
When playback is stopped, the Solo Neo returns to
NET Media navigation mode.
Special playback modes
Press MODE on the remote control to cycle through
the repeat/shue playback modes. The options
are as follows:
1. Repeat all: the songs on the selected server are
played in order. After the last song has nished,
playback re-starts from the rst song on the
server;
2. Shue: the songs on the server are played in a
random order;
3. Repeat shue: this combines ‘repeat all’ and
‘shue’. Each time that playback is restarted, the
song order is shued.
To cancel any of the shue/repeat modes, press
MODE repeatedly until the playback mode is
removed from the display.
Display modes
Solo Neo provides dierent display modes when
listening to les. The mode is changed by pressing
the INFO button on either the front-panel or the
remote control.
1. File metadata: if available, text from the le
metadata (MP3 tags) will be displayed when in this
mode (track name or artist, for example). If no tags
are available, then the lename will be displayed.
2. Current track time: this is the ‘conventional’
display as for a CD player, showing the track time.
3. Remaining track time: this shows the track time
that remains to be played.
4. Large-character display.
NET Media playback commands summary
4
(Play) – press this button to start playback.
<
(Stop) – press to stop playback and enter
navigation mode.
O
(OK) – press to enter navigation mode during
playback or press during navigation mode to
play the selected song.
'
(Cursor up/down) – use to browse songs and
network locations.
,
<
(Back) – press to navigate back to the previous
location.
;
(Pause) – press to pause playback. Press again
(or press play) to re-start playback.
/
(Skip/Scan forwards) – press and release this
button of skip forwards to the beginning of the
next song. Press and hold the button to scan
forwards.
0
(Skip/Scan backwards) – press and release this
button to skip backwards to the beginning of
the previous song. Press and hold the button to
scan backwards.
NOTE
For playback from a network device, the network
device needs to running a universal plug and
play (uPnP) service, such as Windows Media
Player 11. This can be downloaded free of charge
from www.microsoft.com or installed via the
Windows update installer. Windows Vista™ has this
functionality built in.
Other free and paid-for uPnP services are available
for other computer operating systems. Some
network attached storage (NAS) systems include a
built-in version of a uPnP service.
C
O
O
O
O
O
O
NET Media Vol:42
Press OK to Navigate
Browse 1/1
>Asset uPnP:Matt-Laptop
Matt-Laptop 1/11
>Artist
Matt-Laptop 2/11
>Album
Album 2/11
>[A to Z]
[A to Z] 1/28
>A..
[A] 1/3
>Amplified Heart
Amplified Heart 1/11
1 Rollercoaster
NET Media
1 Rollercoaster O:OO

E13
English
USB
Source selection Playback mode Current volume
Track number, song text, playback time, etc.
Play-state indicator
Skipping/scanning les
Press briey the
0
and
/
buttons on the front-
panel or remote control to skip to the previous or
next le within the current folder.
On skipping forward, playback will start from the
beginning of the next le in the folder (if there is
one); when skipping backwards, pressing the
0
button will skip to the prior le (if there is one).
The
0
and
/
buttons are used also for scanning.
To scan backwards or forwards within a le, press
and hold the
0
or
/
button – the le will be
scanned until the button is released.
Choosing music les to play
Music les are stored on a USB ash drive inside
folders, depending on how the USB ash drive has
been organised. When choosing a music le to
play, the top line of the front panel display shows
the name of the current folder. The bottom line is
used to display les or folders contained within
the current folder.
Use the remote control cursor keys B/C to
choose a file to play or a folder to enter.
Use the remote control
O
,
$
or
>
key to play
the file or select the folder.
Use the remote control
<
key to navigate up one
level to the previous folder.
Press
O
during playback to enter navigation
mode without stopping the music. A new le
can be chosen by navigating the les and folders
present, as described above.
When playback is stopped, the Solo Neo returns to
USB navigation mode.
Special playback modes
Press MODE on the remote control to cycle through
the repeat/shue modes for USB playback. The
options are as follows:
1. Repeat all: the les on the USB drive are
played in order. After the last track has nished,
playback re-starts from the rst track on the
drive;
2. Shue: the tracks on the drive are played in a
random order;
3. Repeat shue: this combines ‘repeat all’ and
‘shue’. Each time that playback is restarted, the
le order is shued.
To cancel any of the shue/repeat modes, press
MODE repeatedly until the playback mode is
removed from the display.
Display modes
Solo Neo provides dierent display modes when
listening to les from USB. The mode is changed
by pressing the INFO button on either the front-
panel or the remote control.
1. Current track time: this is the ‘conventional’
display as for a CD player, showing the track time.
2. Remaining track time: this shows the track time
that remains to be played.
3. Track name only
4. File format (e.g. MP3) and bitrate
5. Large-character display: this mode is a double-
height display, showing the current source and
volume.
USB playback commands summary
4
(Play) – press this button to start USB playback.
<
(Stop) – press to stop USB playback and enter folder
navigation mode.
O
(OK) – press to enter navigation mode during playback or
press during navigation mode to play theselected le.
'
(Cursor up/down) – use to browse files and folders.
,
<
(Back) – press to navigate back to the previous folder.
;
(Pause) – press to pause USB playback. Press again (or press
play) to re-start playback.
/
(Skip/Scan forwards) – press and release this button of skip
forwards to the beginning of the next le. Press and hold the
button to scan forwards.
0
(Skip/Scan backwards) – press and release this button to
skip backwards to the beginning of the previous le. Press
and hold the button to scan backwards.
Listening to music
stored on a USB drive
Press SOURCE+ or SOURCE until USB is displayed on the front panel. Alternatively, press the USB button on the
remote control for direct access.
Insert the USB drive into the rear panel USB socket. Wait for the drive to be read.
When the drive has been read, a music le can be selected to be played using the navigation cursor on the
remote control. Alternatively, press
PLAY to start playback from the rst valid music le found on the drive.
Note: This feature is designed for ‘mass-storage class compliant’ USB ash memory drives and MP3 players that
appear as a single ‘Removable Disk’ when connected to a computer. USB hard disk drives can be connected, but
the drive must have a separate power supply and be formatted as a single FAT32 partition. USB devices that do
not conform to this standard cannot be used. Arcam cannot guarantee operation with hard disk drives.
USB
Press OK to Navigate
Browse 1/5
>Folder 1
Browse 2/5
>Folder 2
O
C
Folder 2 1/7
>Journey
O
Journey 1/1O
>Don't Stop Believin'.mp3
O
O
USB Vol:42
O1 Don't Stop Belie...O:OO

E14
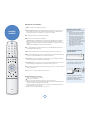
Inserting batteries into the
remote control
remote
control
SLEEP
CR50
CR50 Remote control buttons
2
(Power) – Switches Solo Neo between stand-by and on.
Track/preset selection (0–9) – Press the number of the CD track or radio preset that you want to hear. To
select a track/preset greater than 9, press and hold the rst digit of the track (e.g. 1) until the number is
shown in the bottom left corner of the display (‘1–’), then press the second digit.
INFO – Changes the information shown on the front panel display.
MODE – Some sources allow changes to the listening mode.
CD/USB/NET Media – Press the
MODE button to cycle through the repeat/shue modes for CD playback.
DAB/FM – Press
MODE to switch between ‘tune’ and ‘preset’ mode. When in tune mode, pressing
B
or
C
changes the tuned frequency (FM) or the selected station (DAB); in preset mode, the preset station is
changed.
NET Radio – Press the
MODE button to add or remove favourite stations.
DISP – Cycles the brightness of the front-panel display. There are several dierent brightness levels to chose
from, including switching the display o.
SLEEP – Activates the sleep timer function. The time until entering standby can be set in 5-minute steps.
MENU – Pressing the MENU button allows entry into the conguration menu of Solo Neo. This is described fully
on pages 15—19. Press the
MENU button for a second time to leave the menu.
Source selection – Press the appropriate button to select the audio source you would like to hear. The EXT
button cycles through the external inputs AV, TV, GAME and FRONT.
Cursor keys and OK – The cursor is used to choose items to play from USB and NET sources. These keys also
nd use in navigating the conguration menus of Solo Neo, described on pages 15—19.
Mute – Press once to mute the speaker and pre-amp outputs of Solo Neo. Press for a second time (or change the
volume) to unmute the unit.
Volume – Use the
-
/
+
buttons to adjust the volume of the music.
CD/USB/NET Media playback commands
4
(Play) – press this button to start the playback.
<
(Stop) – press to stop playback.
;
(Pause) – press to pause playback . Press again (or press play) to re-start playback.
/
(Skip/Scan backwards) – press and release this button to skip backwards to the beginning of the current/
previous track. Press and hold the button to scan backwards.
0
(Skip/Scan forwards) – press and release this button of skip forwards to the beginning of the next track.
Press and hold the button to scan forwards.
1
(Open/Close) – press to open the CD tray; press again to close it.
1. Open the battery compartment by pressing the
button on the back of the remote control.
2. Insert two ‘AAA’ batteries into the battery
compartment, following the polarity indications
given inside the compartment itself.
3. Push the battery cover back into position.
Using the remote control
Please keep in mind the following when using the
remote control:
< Ensure that there are no obstacles between
the remote control and the remote sensor
on Solo Neo. The remote has a range of
about seven meters. (If the remote sensor
is obscured, the remote control input jack
on the rear panel is available. Please contact
your dealer for further information.)
< Remote operation may become unreliable if
strong sunlight or uorescent light is shining
on the remote sensor of Solo Neo.
< Replace the batteries when you notice a
reduction in the operating range of the
remote control.

E15
English
CD Menu
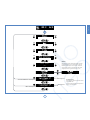
Setup Menu
Solo Neo allows you to adjust listening settings to suit your taste, and to customise various features
to t your system. Use the diagrams shown below to help you navigate through the available
settings.
Adjusting listening settings
In normal use, the display shows information on the current volume, the source being listened
to, and any source-relevant information (such as the playback time on a CD). To adjust the system
settings, press MENU on either the front-panel or on the remote control. Use the keys as indicated
to select and adjust a particular setting.
The settings available depend on the selected source. DAB radio settings can only be changed
when the source is DAB, Network settings can only be changed when the source is NET Radio or
NET Media, etc. The following settings are common to all sources:
Balance
This setting allows you to increase the volume of one channel (left or right) relative to the other
channel. It should not normally be necessary to adjust this setting but, if you habitually sit closer to
one speaker than to the other, altering the balance may help to restore the stereo image for your
listening position.
Bass
This setting changes the relative volume of the lower frequency components of your music. If you
feel that your music is not ‘warm’ enough, increase this setting; if your music is ‘boomy’, decreasing
this setting may help.
See also ‘Bass correction’, below. Note that the control is inactive when headphones are connected.
Treble
This setting changes the relative volume of the higher frequency components of your music. If you
feel that percussion items in the music (for example) are being lost, increasing this setting may
help. If high frequency sounds are too dominant, decrease this setting.
Note that the bass and treble controls are inactive when headphones are connected.
Bass correction
This setting does not normally need to be used (leave on minimum).
Bass correction may be used if Solo Neo is connected to reduced-frequency-range (‘Small’)
speakers, that cannot reproduce very low frequency sounds. Increasing this setting causes very
low frequency sounds to be progressively attenuated (since these cannot be reproduced by the
speaker), while the volume of slightly higher-frequency sounds is increased. This means that the
overall bass ‘amount’ produced by the speaker sounds the same as a full-range (‘Large’) speaker.
You cannot damage any part of your system using this setting, so we suggest that you experiment
with it, together with the bass and treble controls, until you nd the combination you prefer.
Sleep timer
This timer allows you to specify a listening period, after which Solo Neo will switch automatically
into stand-by. The period can be set in 5-minute intervals, up to 120 minutes (2 hours).
Setup Menu
CD programmimg
DE
Highlight the track to add
O
Add track to programme
Clr
Highlight and press
O
to delete
the last entry
#
(stop)
Press
STOP twice (remote only) to
clear the entire programme.
Sleep Timer
Off
Left
-dB
-dB
-dB
–
Right
+dB
+dB
+dB
+
CD programme
If you wish to program the playback
order of a CD, press
O
when this
menu item is displayed. The CD
playback order is then entered as
described in the “CD programming”
panel, shown below. When you have
nished entering the programme,
press MENU to leave “program mode”.
Press MENU for a second time to leave
the Solo Neo conguration menu.

E16
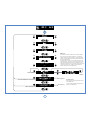
DAB Menu
Sleep Timer
Off
Left
-dB
-dB
-dB
–
Right
+dB
+dB
+dB
+
Scan for stations
Store current station to selected preset
Erase selected preset
DE
Choose preset
DE
Choose preset
Erase
settings
Empty
Empty
DAB Setup
This menu item is shown only when the selected source is DAB.
There are two options under this menu item – ‘Scan’ and ‘Erase
settings’. Selecting ‘Scan’ causes Solo Neo to search for new DAB
stations. If any are found, then they will be added automatically to
the list of available stations.
Scanning for new stations does not erase old stations that are no
longer transmitted – over time, or if you change location, this may
lead to you having a number of stations in your list that cannot
actually be received. In this case, select ‘Erase settings’, then perform
a new scan; when the scan is complete, only stations that are
available currently in your area will be shown.
Store/Erase Preset
This menu item is shown only when the selected
source is DAB or FM.
See the section ‘Programming station presets’ on
page 9 for more information.

E17
English
FM Menu
Sleep Timer
Off
Left
-dB
-dB
-dB
–
Right
+dB
+dB
+dB
+
Store current station to selected preset
Erase selected preset
DE
Choose preset
DE
Choose preset
Empty
Empty
FM Mode
This menu item is shown only when the selected source is FM.
In some weak signal areas, it can be benecial to force the
FM tuner to mono output, as mono requires a much lower
signal strength to produce acceptable results. If the signal
strength in your area is good, leave this set to ‘stereo’.
Store/Erase Preset
This menu item is shown only when the selected
source is DAB or FM.
See the section ‘Programming station presets’ on
page 9 for more information.

E18
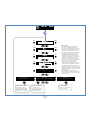
Network
Update Software
Network Menu
Sleep Timer
Off
Left
-dB
-dB
-dB
–
Right
+dB
+dB
+dB
+
Network
View Current Settings
Update Network software
The unit will download any
available update to NET MEDIA
or NET Radio playback software.
Wired connection recommended.
Display network settings
The network settings are
displayed on a series of screens.
Use the
'
&
, buttons to
view the different settings.
Run Setup Wizard
Press OK to set up your network.
See Page 19 for details.
Network
Run Setup Wizard
Network Setup
Network menu items are shown only when the
selected source is NET Radio or NET Media.
Most home networks using wired connections will
use automatic setup. Unsecured wireless networks
usually need little conguration but the use of
unsecured wireless networks is not recommended.
Secure wireless networks require the entering
of conguration information including security
key (passphrase, password). This information can
sometimes be found printed on a label on wireless
routers that are supplied by an Internet Service
Provider (ISP). If you do not know these settings,
contact the person or organisation that supplied and
set up your router or wireless access point.
Solo Neo includes a setup ‘wizard’ to aid
conguration. This wizard guides you through each
necessary setting until conguration is complete
(see page 19). A second network menu displays
current network settings for information and a third
option allows for updates to the network software (to
support future le formats, for example). Press
O
to
select a menu item.
Note: When updating network software, we
recommend the use of a wired network connection
for reliable results. Do not power o the unit whilst an
update is in progress.

E19
English
Network Type
Wired
Network
Run Setup Wizard
Enter key:
>_
Enter key:
>O
Enter key:
>OO
Network Address
Auto (DHCP On)
Network Address
Manual (DHCP Off)
Enter key:
>1OAF35D6A8D5693
NET Radio
Connecting...
Apply Settings
Press OK to accept
IP Address
O. O. O. O
Gateway
O. O. O. O
Primary DNS
O. O. O. O
Secondary DNS
O. O. O. O
Contact your Network Administrator,
network installer or Internet Service
Provider if you do not know these settings.
An example key (password) is shown.
Enter your own network key.
Network
Setup
Wizard
Network Type
Wireless
Select Network
>WirelessName1
Scanning...
Press
to choose a
wireless network.
Subnet Mask
O. O. O. O
Navigating the Network
Conguration menus
There are a large number of network
settings, but all are accessed and
adjusted using the following controls:
Go to next menu item
(unless adjusting a setting)
For settings with options (e.g. On or O;
Manual or Auto):
Change setting
For settings with numbers or letters
(e.g. IP Address; security passphrase)
Select digit to change
Increment/Decrement digit
(number or letter)
Save setting
Note: When all settings have
been adjusted according to
the needs of your network,
the settings must be applied
by navigating to the ‘Apply
Settings’ screen and pressing

E20
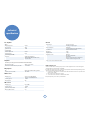
technical
specication
Pre-amplier
Inputs
Maximum input level 2.5Vrms
Input impedance
47kΩ
Signal/noise ratio 105dB
Co-axial outputs
Maximum output level 2.5Vrms
Output impedance
500Ω
Optical output (TOSLINK)
Sample rate 44.1kHz (with CD playback),
48kHz (with DAB, FM, NET & USB receiver),
otherwise muted.
Amplier
Continuous power output, per channel, 80kHz measurement bandwidth
Both channels, 4Ω, 1kHz
75Wrms, 0.013% THD+n
Distortion, both channels 4Ω, 80% power, 1kHz
0.011% THD+n
CD playback
DAC Wolfson 24-bit multilevel Delta-Sigma DAC
Frequency response (±0.5dB) 20Hz–20kHz
DAB receiver
RF tuning range 174.928—239.200MHz (Band III)
1452.960—1490.624MHz (L-band)
Sensitivity (typical) –97dBm
Input impedance
75Ω
FM receiver
RF tuning range 89.5–108MHz
Sensitivity (typical) -108dBm
Signal/noise ratio (at 200mV) 50dB
Distortion (THD at 200mV) 0.3%
General
Supply voltage* 100V, 115V or 230V AC,
depending on shipping region
Power consumption Standby 1W;
Operational 25W (typical), 400W (maximum)
Size (W x D x H) W430mm x D350mm x H79mm
Weight (net) 7.75kg
Weight (packed) 10.5kg
Supplied accessories Mains lead
Wire dipole aerial (Band III)
Wi-Fi antenna
Remote control handset and two AAA batteries
Instruction manual and registration card
* This is a Class 1 device and must be earthed.
Radio interference
Solo Neo is an audio device containing microprocessors and other digital electronics. It has been designed to
very high standards of electromagnetic compatibility.
If Solo Neo causes interference to radio or television reception (which can be determined by switching Solo Neo
o and on), the following measures should be taken:
< Re-orient the receiving antenna or route the antenna cable of the eected receiver as far as possible from
Solo Neo and its cabling.
< Relocate the receiver with respect to Solo Neo.
< Connect the receiver and Solo Neo to dierent mains outlets.
If the problem persists, please contact your Arcam dealer.
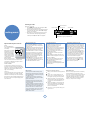
La pagina si sta caricando...
La pagina si sta caricando...
-
 1
1
-
 2
2
-
 3
3
-
 4
4
-
 5
5
-
 6
6
-
 7
7
-
 8
8
-
 9
9
-
 10
10
-
 11
11
-
 12
12
-
 13
13
-
 14
14
-
 15
15
-
 16
16
-
 17
17
-
 18
18
-
 19
19
-
 20
20
-
 21
21
-
 22
22


Arcam SOLO NEO Manuale utente
- Categoria
- Ricevitori multimediali per auto
- Tipo
- Manuale utente
in altre lingue
- English: Arcam SOLO NEO User manual
Documenti correlati
Altri documenti
-
NAD C521BEE Manuale del proprietario
-
 RuarkAudio R7 Manuale utente
-
ONKYO CS-375D Manuale utente
-
AudioSonic TXCD-1530 Manuale del proprietario
-
Sony RXD-700 Manuale utente
-
NAD C542 Manuale utente
-
Bose WAVE MUSIC SYSTEM IV Manuale del proprietario
-
Emtec H510 Manuale utente
-
 i-box i-box 79234P Spectrum FM Portable Radio Manuale utente
-
Yamaha RX-V559 Manuale del proprietario

