
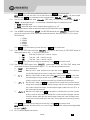
EHC-PF
User / Technical Manual
Contents subject to change without notice
Version 1.0
01/2017

TABLE OF CONTENTS
1. Introduction ........................................................................................................................ 1
1.1. General and Safety Information .......................................................................................................... 1
1.2. Specifications ............................................................................................................................... 1
1.3. Outline ....................................................................................................................................... 2
2. Unpacking and setup ............................................................................................................. 2
2.1 Packing List ................................................................................................................................. 2
3. Display and keypad ............................................................................................................... 2
3.1 Faceplate .................................................................................................................................... 2
3.2 Symbol meaning on Faceplate ............................................................................................................ 3
3.3 Keypad function ............................................................................................................................ 3
3.4 Key function in input Alphabet mode .................................................................................................... 4
3.5 The meaning of the special displayed character ....................................................................................... 4
4. Weighing operations .............................................................................................................. 6
4.1 Normal Weighing Mode .................................................................................................................... 6
4.2 ZERO function .............................................................................................................................. 6
4.3 Setting the Tare Weight .................................................................................................................... 6
4.4 Save function ............................................................................................................................... 7
4.5 Print function ............................................................................................................................... 7
4.6 Input the unit price directly ............................................................................................................... 8
4.7 Set and Recall direct and indirect PLU .................................................................................................. 8
4.8 Recall direct PLU ........................................................................................................................... 9
4.9 Recall indirect PLU ......................................................................................................................... 9
5. Parameter setting and test mode .............................................................................................. 9
5.1 LCD contrast and Backlight mode setting ............................................................................................... 9
5.2 Auto-off time setting ....................................................................................................................... 9
5.3 Display A/D inner code and working voltage ........................................................................................... 9
5.4 The details about RS232 communication ............................................................................................... 9
5.5 Date and time setting .................................................................................................................... 12
5.6 Group Code Setting ...................................................................................................................... 12
5.7 OS-2130D Back Feed setting .......................................................................................................... 13
5.8 OS-2130D Origin setting ................................................................................................................ 13
5.9 Business name setting .................................................................................................................. 13
5.10 Display Weight at ten times of Division Number ...................................................................................... 13
5.11 LCD test mode ............................................................................................................................ 13
6. Calibration ....................................................................................................................... 14
7. The meaning of some displayed symbols .................................................................................. 15
8. Troubleshooting ................................................................................................................. 16
Troubleshooting ..................................................................................................................................... 16
Battery and Charging .............................................................................................................................. 17

EHC-PF . 1 .
1.
1.1. General and Safety Information
Introduction
For use in dry environments only.
Read and understand all operating instructions before using this product. Keep this manual for future reference.
Allow sufficient warm up time. Turn the scale on and allow up to 3 minutes for internal components to stabilize before
weighing.
Record the weight shortly after placing a load on the platter. Leaving loads in place for extended periods may vary the load
cell’s output signature and may result in a less accurate reading.
Avoid extended exposure to extreme heat or cold. Optimum operation is at normal room temperature. See operating
temperature range in the specifications table. Allow the scale to acclimate to room temperature before using.
When storing the scale for extended periods, the battery must be charged every 60 days to avoid premature performance
degradation. If the operating time is no longer acceptable even after recharging, the battery must be replaced.
Electronic scales are precision instruments. Do not operate near cell phones, radios, computers or other electronic devices
that emit radio frequencies that may cause unstable readings.
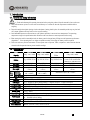
1.2. Specifications
Model
EHC-PF-6
EHC-PF-15
EHC-PF-30
EHC-PF-30D
Capacity
6kg / 15lb / 240oz 15kg / 30lb / 480oz
30kg / 60lb /
960oz
30kg / 60lb / 960oz
Division
2g / 0.005lb / 0.1oz 5g / 0.01lb / 0.2oz 10g / 0.02lb /0.5oz
0-15kg:5g; 15-30kg:10g
0-30lb: 0.01lb; 30-60lb:0.02lb
0-480oz:0.2oz; 480-960oz:0.5oz
Min weight
40g / 0.1lb / 2oz 100g / 0.2lb / 4oz 200g / 0.4lb / 10oz 100g / 0.2lb / 4oz
Tare range
100% FS 100% FS 100% FS 50% FS
Max weight
6.018kg / 15.045lb
/ 240.9oz
15.045kg / 30.09lb
/ 481.8oz
30.09kg/60.18lb
/964.5oz
30.09kg / 60.18lb
/ 964.5oz
Zero
range
Power-on
zero range
calibration zero point
-5%~+10%FS;
calibration zero point
-2%~+10%FS;
calibration zero point -1%~+10%FS;
Zero Key range
power-on zero±2%FS
Unit
kg / lb / oz
Interface
RS232 and USB(virtual RS232)
LCD display
0.73”,18 digits: 6 digit for weight reading,6 digit for unit price,6 digit for total price
Unit price range
0.00 - 9999.99 $/kg or $/lb or $/oz
Total price range
0-999.99$ (limited by bar code print function, otherwise, it can be up to 9999.99$)
PLU
265 including 5 direct PLU(Addr: 1-5)
Working temp.
-10℃~40℃
Humidity Range
<90% relative humidity, non-condensing
Power supply
12Vdc,≥500mA with positive center AC adaptor
6Vdc4AH lead-acid battery.
Real Time Clock
built-in nonvolatile real time & date (optional)
Platter size:
WxD: 335x225mm; 13.2"x8.86"
Scale dimension
WxDxH: 355x370x131mm; 14"x14.57"x5.16"

EHC-PF . 2 .
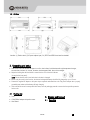
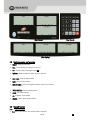
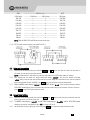
1.3. Outline
Interface: (1) Rocker switch (2) AC power adapter input (3-4) RS232 and USB if these interface installed
2. Unpacking and setup
Take out the scale from the box and place it on a firm, level surface. Avoid locations with rapid temperature changes,
excessive dust, moisture, air currents, vibrations, electromagnetic fields, heat or direct sunlight.
Adjust the leveling feet until the bubble is centered in the circle of the level indicator
(located on the front panel).
NOTE: Ensure that the scale is level each time its location is changed.
Before using the scale for the first time, the internal rechargeable battery should be fully charged for up to 12 hours.
Connect the supplied AC adapter to the power input receptacle underneath the scale. Plug the AC adapter into a properly
grounded power outlet and the battery will begin charging.
If the scale will be stored or transported in the future, save the packaging material to ensure the best possible protection
for the scale.
2.1 Packing List
3. Display and keypad
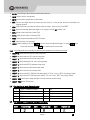
3.1 Faceplate
Scale
12Vdc/500mA adapter with positive center
User Manual

EHC-PF . 3 .
(Rear Display) (Rear Display)
(Rear Display)
3.2 Symbol meaning on Faceplate
WEIGHT
-
Weight display window
Zero
- Scale is zeroed, gross weight is 0, tare is 0
NET
- Display reading is net weight; tare is
not
0
Kg/lb/oz
- Weight unit indicator, maybe only one or two units
UNIT PRICE
-
Unit price display window
SAVE -
Unit price fixing indicator
$/KG,$/LB,$/oz
-
Unit price per kg/lb/oz indicator, maybe one or two units
TOTAL PRICE($)
-
Total price display window
PRINT
-
Data output indicator
AC
-
AC Adapter in-use indicator
CHARGE
-
Battery being charged
indicator
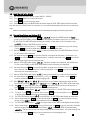
3.3 Keypad function
3.3.1 Single key function:
0-9:
numeric keys, Used to enter numerical data or alphabets

EHC-PF . 4 .
M1-M5:
Direct PLU keys, Used to directly recall the stored unit price
CLEAR
: Used to clear the recorded data
ENTER
: Used to confirm the operation or entered data
SAVE
: Save the tare weight and unit price when input the unit price, so that the data will not be cleared after one
weighing operation.
ZERO
: Used to set the zero point after the scale is stable, the range is “power-on zero point±2%FS”
TARE
: Used to tare the weigh, When total weight is 0, tare weight is cleared,
NET
indicator is off.
ST.PLU
: Ready to enter indirect store mode (PLU)
RC.PLU
: Ready to enter indirect recall mode (PLU)
PRINT
: Used to output the data when has RS232 hardware
UNIT
: Switch the unit of price and weight
ON/OFF
: When the display is off, press
ON/OFF
key to turn on the scale. When the display is on, press
ON/OFF
key for
3s to turn off the scale. Or the
ON/OFF
key is used to exit the current mode.
3.3.2 Key combinations (press these keys at same time and hold down for more than three seconds)
ON/OFF+0:
Used to enter the business’s name setup mode
ON/OFF
+
1
: Used to enter the LCD’s contrast setup mode
ON/OFF
+
2
: Used to enter the auto-off time setup mode
ON/OFF
+
3
: Used to display A/D inner code or working voltage
ON/OFF
+
4
: Used to enter RS232 parameters setup mode
ON/OFF
+
5
: Used to enter the date and time setup mode
ON/OFF
+
6
: Used to enter Group Code setup mode
ON/OFF
+
7
: Used to enter OS-2130D Back Feed setup mode(If “232.out” is set to “HOST”, this setting is invalid)
ON/OFF
+
8
: Used to enter OS-2130D Origin setup mode(If “232.out” is set to “HOST”, this setting is invalid)
ON/OFF
+
SAVE
: Used to enter displaying weight in 10 times resolution mode for testing
ON/OFF
+
PRINT
: Enter LCD test mode
3.4 Key function in input Alphabet mode
0 0 space ( ) ÀÂÆÇÈÉÊË Î ÏÔÙÛÜ 1 1ABC
2 2DEF 3 3GHI
4 4JKL 5 5MNO
6 6PQRS 7 7TUV
8 8WXYZ 9 9
3.5 The meaning of the special displayed character
Symbol
7-segments digit
Symbol
7-segments digit
Symbol
7-segments digit
0 A N

EHC-PF . 5 .
1 B O
2 C P
3 D Q
4 E R
5 F S
6 G T
7 H U
8 I V
9 J W
( K X
) L Y
M Z
À Â Æ
Ç È É
Ê Ë Î
Ï Ô Ù
Û Ü

EHC-PF . 6 .
4. Weighing operations
4.1 Normal Weighing Mode
4.1.1 Place the scale on a flat, stable surface. Level the scale using the leveling bubble at the lower left side of the display.
4.1.2 With the weighing platter empty, turn on rocker switch (located underneath on the right-hand side of the scale). Due
to the high resolution of this scale, allow 10 minutes for the scale to warm up before use for optimum results.
4.1.3 Press the ON/OFF key to power on the scale. The self-check will run and the scale will display a zero reading. The
scale is now ready for weighing.
Note: If the scale does not zero, an error code “Err04” or “Err05” will be displayed. See Troubleshooting.
4.1.4 To change the weighing unit of measure, press the Unit key to toggle between kg, lb or oz.
4.1.5 Set the tare weight if desired.
4.1.6 Place objects on the scale platter and read the weight on the indicator.
4.1.7 When finished weighing, press the ON/OFF key for 4 seconds to power off the scale.
4.2 ZERO function
4.2.1 In the normal weighing mode, press Zero key to set the scale to zero point when the scale reading is stable (the
weighing unit light without shining), at this time, zero announciator will be lit.
4.2.2 When under the tare mode, ZERO key is invalid. Before zero the scale, the tare weight needs to be cleared and make
scale go to gross weighing mode.
Note: The scale will display “Err04” or “Err05” when the scale is beyond key zero range (power-on zero point
±2%FS), display “Err03” when the data is 20e below the zero point.
4.3 Setting the Tare Weight
This scale allows for both a manually entered pre-set tare weight, as well as a “weighed” tare weight.
4.3.1 To enter a weighed tare:
a. Place an empty container on the platter and press the Tare key. The display will return to zero, eliminating the
weight of the container. The Zero light and the Net light will be lit.
Note: The gross weight must be positive to enter a weighed tare.
b. To clear the weighed tare, remove all weight from the scale. The display will show a negative weight. Press the
TARE key to return the display to zero, eliminating the weight of the container. The Tare light will go off and the
Zero light will be lit.
4.3.2 To manually enter a known tare:
c. Use the number keys to input the tare weight. Your entry will be displayed in the “WEIGHT” display window. Then
press the Tare key to confirm or press the ON/OFF key to exit and not confirm.
Example: With the platter empty, entering 100g and pressing the Tare key will display “-0. 1 0 0 ” kg.
d. To recall the previously stored tare weight, press the RC.PLU key. Press the ON/OFF key to return to weighing.
Note: The previously stored tare weight can only be recalled with the RC.PLU key when in tare setting mode.
e. To clear the manually entered tare weight, (enter “0” and) press the Tare key to confirm.
f. If unit price is in un-saved mode, the tare weight and unit price will be auto cleared after transaction and objects
being moved.

EHC-PF . 7 .
4.4 Save function
4.4.1 Under non-save mode, tare and unit price will be cleared automatically; Press SAVE key to enter save mode.
4.4.2 Under save mode, tare and unit price will not be cleared automatically; Press SAVE key to exit save mode, if the gross
weight is 0, clear tare weight and unit price.
4.5 Print function
4.5.1 Under the normal weighing mode, press PRINT key will output the data via RS232 or USB according to the setting
style, when the scale reading is stable (The weighing unit light without flashing), current weight is over Min weight, total
price and item code is available.
4.5.2 When the weight is zero and the unit price is not zero, press PRINT key output the data via RS232 according to the
setting style to make a price label.
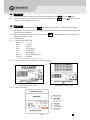
4.5.3 Print Out format:
4.5.3.1 Print Out format in HOST mode
Group Code: xx
Date: yy-mm-dd
Time: hh:mm:ss
Gross: xxxx.xxx kg/lb/oz
Tare: xxx.xxx kg/lb/oz
Net: xxxx.xxx kg/lb/oz
Unit Price: xxxxxx.xx $/kg($/lb) ($/oz)
Total Price: xxxxxx.xx $
========================
4.5.3.2 Print out format when OS-2130D printer is connected (example):
Label dimension is 58mm × 40mm Label dimension is 58mm × 60mm
4.5.3.3 Content of printed out:

EHC-PF . 8 .
4.6 Input the unit price directly
4.6.1 Use numerical key to enter unit price (range: 0000.00~9999.99)
4.6.2 Press ENTER key within 3s to confirm the unit price
4.6.3 Press CLEAR key to remove the input number
4.6.4 Put the weighing objects, the WEIGHT window will show its weight and TOTAL PRICE window will show it total value.
Note: After unit price is entered, if there is no operation in 3s, the scale with automatically confirm the unit price and exit the
mode.
If under non-save mode, the unit price will be cleared automatically after weighing and removing the objects.
4.7 Set and Recall direct and indirect PLU
4.7.1 Under the normal weighing mode, press ST.PLU key, "St.PLU" will be shown in WEIGHT window and "Addr."
(prompt to input PLU's address ) will be shown in UNIT PRICE window (The Address range is from 1 to 265, M1-M5 is
for direct PLUs). The UNIT PRICE window will display input address. if input number is out of the address range ,
“O.RANGE” will display in UNIT PRICE window for seconds.
4.7.2 Input the Address by numerical keys 0~9 and CLEAR key, use ENTER key for confirmation to go to the next step,
or press ON/OFF key to exit this mode and return back to the normal weighing mode.
4.7.3 When the TOTAL PRICE window displays “NAME” (prompt to input trade name), the UNIT PRICE window shows the
last six characters of the trade name.
4.7.4 Use numerical keys and CLEAR key to input the trade name (the length of the trade name is 20 characters), use
ENTER key to confirm the characters on flashed position or confirm the trade name, or use ON/OFF key to exit this
mode and return back to the normal weighing mode.
4.7.5 When the TOTAL PRICE window displays “INGRDT” (Ingredients, prompt to input ingredients, only available when
232.out is set to PRTd60), the UNIT PRICE window shows the last six characters of the ingredients.
4.7.6 Use numerical keys and CLEAR key to input the ingredients (the length of the ingredients is 80 char), use ENTER
key to confirm the char on flashed position or confirm the ingredients, or use ON/OFF key to exit this mode and
return back to the normal weighing mode.
4.7.7 When the TOTAL PRICE window displays “LIFE” (prompt to input shell life), the unit price shows the input data.
4.7.8 Use numerical keys and CLEAR key to input the LIFE(<=253), use ENTER key to confirm, or press ON/OFF key
to exit this mode and return back to the normal weighing mode.
4.7.9 When "Unit.0", "Unit.1" or "Unit 2" is shown in the unit price window, that means the weight unit of the
stored unit price is per Kg (Unit.0), per lb (Unit.1) or per oz (Unit. 2). TOTAL PRICE window shows empty .
4.7.10 Use UNIT key to choose $/kg, $/lb or $oz, press ENTER key to save the chosen unit and go to the next step, or
press ON/OFF to exit the input and return back to the normal weighing mode.
4.7.11 The TOTAL PRICE window displays “Unit.P” (prompt to input unit price ), the UNIT PRICE window shows input data.
4.7.12 To press 0~9 and CLEAR key to input the unit price, press ENTER key to store and confirm, or press ON/OFF key
to exit this mode and return back to the normal weighing mode.
4.7.13 The TOTAL PRICE window displays "Tare" (set the digit tare), the UNIT PRICE window displays the entered data.
4.7.14 Use the numerical keys 0-9, CLEAR key to input the tare weight, use ENTER key to store and confirm, then go to
the next, or press ON/OFF key to give up input and back to the normal weighing mode.
4.7.15 The TOTAL PRICE window displays “ITEM.C”(Set the item code), the UNIT PRICE window displays the entered data.
4.7.16 Use the numerical keys 0 - 9 , CLEAR key to input the item code, use ENTER key to store and confirm. If the data
have been changed, the UNIT PRICE window would display “Save” and the TOTAL PRICE window would display
“Data.ch”. Then go to the next store unit setting, namely, plus one to the last Address , then repeat the steps from
4.7.1-4.7.16; Or press ON/OFF key to give up input and back to the normal weighing mode;

EHC-PF . 9 .
4.8 Recall direct PLU
Recall the stored direct unit price by pressing 1-9 key down more than 2.5s, the recalled unit price will be displayed in UNIT
PRICE window. The TOTAL PRICE window will display “duP.xx”, then followed by the actual total price.
4.9 Recall indirect PLU
4.9.1 Under the normal weighing mode, press RC.PLU key to enter this mode, and display "rc.PLU" in WEIGHT window,
display "Addr." (The Address range is from 1 to 265) in TOTAL PRICE window. The UNIT PRICE window will display
input address data.
4.9.2 Use the numerical 0~9 and CLEAR key to input the PLU’s address, use Enter key to confirm and go to the next
step or press ON/OFF key to exit this mode and return back to the normal weighing mode.
4.9.3 Then the UNIT PRICE window will display the recalled unit price, the TOTAL PRICE window displays “PLU.XXX”(XXX is
the Address) and then will go back to the normal total price displaying mode later, and then use new unit price, tare
weight, new weight unit trade name, shell life)
5. Parameter setting and test mode
5.1 LCD contrast and Backlight mode setting
5.1.1 Under the normal weighing mode, press and hold down ON/OFF and 1 key at the same time until the WEIGHT
display window shows “Setup”, UNIT PRICE window shows “LCd.CST” (LCD contrast) and the TOTAL PRICE
display window shows the contrast level x(x=1-9,). Use the numerical keys to input the contrast level, and press
ENTER key for confirmation. Press ON/OFF key to exit this mode and the scale will automatically reset.
5.1.2 When WEIGHT window shows “BLGT.MD” (backlight mode) and the TOTAL PRICE window shows the backlight mode
codex(x=0-2). Use the numerical keys to input the backlight mode, and press ENTER key for confirmation. Press
ON/OFF key to exit this mode and the scale will automatically reset.
x =0 – back light is always off
=1 – back light is always on
=2 – back light is automatically turns on or off
5.2 Auto-off time setting
Under the normal weighing mode, press and hold ON/OFF and 2 key at the same time until the scale displays “Setup”
in WEIGHT window, “A.OFF.t” (auto off time) in UNIT PRICE window and auto-off time xx(xx=00~30, when 00 is used that
means no auto off function) in TOTAL PRICE window. Use numerical keys to input the auto-off time and press ENTER key for
confirmation. Press ON/OFF key to exit this mode and the scale will automatically reset.
5.3 Display A/D inner code and working voltage
When in normal working mode, press ON/OFF and 3 key at the same time till the UNIT PRICE window shows “code 2”
to enter this mode. Now WEIGHT window will show “UoL.x.x” (Voltage x.x V), this means the inner working voltage is x.x V. If
the scale uses AC power adaptor, the voltage is the power adaptor voltage after regulating. If AC adaptor is not used, this
around voltage is battery’s voltage. A/D internal code will be displayed in TOTAL PRICE window.
5.4 The details about RS232 communication
5.4.1 Under the normal working mode, press and hold ON/OFF and 4 key at the same time until the WEIGHT window
shows “Setup”. Under this mode, you can set the RS232 baud rate, data format and communication format.
5.4.2 After entering into this mode, the WEIGHT window will show “Setup”, the UNIT PRICE window will show “232.out”

EHC-PF . 10 .
(RS232 output content format) and the TOTAL PRICE window shows one of following content:
HOST:
EHC-PF is connected with host device, e.g. a PC;
PRTd40:
EHC-PF is connected with the OS-203/213, label dimension is 58mm × 40mm, date will be printed
on label;
PRTd60:
EHC-PF is connected with the OS-203/213, label dimension is 58mm × 60mm, date will be printed
on label;
PRTNd4:
EHC-PF is connected with the OS-203/213, label dimension is 58mm × 40mm, no date will be
printed on label;
PRTNd6:
EH-PF is connected with the OS-203/213, label dimension is 58mm × 60mm, no date will be printed
on label;
Use numerical keys 0,1,2,3,4 to choose RS232 output content format (0-HOST, 1-PRTD40, 2-PRTD60, 3-PRTND4,
4-PRTND6), use ENTER key for confirmation to go to the next step, or ON/OFF key to exit this mode.
5.4.3 Then, the UNIT PRICE window will show “Setup”, the UNIT PRICE window will show “232.bPS” (RS232 band rate:
bit per second) and the TOTAL PRICE window shows baud rate xxxxx. Use numerical keys 1,2,3,4,5 to choose RS232
baud rate:
1--1200bps
2--2400bps
3--4800bps
4--9600bps
5--19200bps
Press ENTER key for confirmation to go to the next step, or ON/OFF key to exit this mode.
5.4.4 Then, the UNIT PRICE window will display “232.dFt” (data format), the TOTAL PRICE window will display data format
xxx. Use 1, 2, 3 key to select data format:
1—8N1 8 bits data, no odd or even , 1 start bit, 1stop bit
2—7O1 7 bits data, 1 odd , 1 start bit, 1stop bit
3—7E1 7 bits data, 1 even, 1 start bit, 1stop bit,
Press ENTER key to confirm the input and go to the next step, or use ON/OFF key to exit this mode.
5.4.5 Then, the UNIT PRICE window will display “PRTD.DT” (OS-203/213 print date format), the TOTAL PRICE window will
display data format xxx. Use 0, 1, 2 key to select data format:
0—CANADA Canadian format: YY MM DD
1—USA USA format: DD-MMM-YY
2—Num Numerical format,
Press ENTER key to confirm the input and go to the next step, or use ON/OFF/EXIT key to exit this mode.
5.4.6 Then, the UNIT PRICE window will display “B.PRT.FT”(format of barcode for printing), the TOTAL PRICE window will
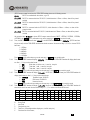
show the format of barcode. Use the numerical keys 0, 1, 2, 3 to select which format will be used.
No. Format Type 1 2 3 4 5 6 7 8 9 10 11 12 13
0 5I4P EAN13 G G I I I I I S P P P P C
1 4I5P EAN13 G G I I I I S P P P P P C
2 5I5P EAN13 G G I I I I I P P P P P C
3 4I6P EAN13 G G I I I I P P P P P P C
G: Group Code;
I: Item Code;
S: Check-sum for price;
P: Total Price (If the weight window display zero, it will be unit price);
C: Check-sum for all characters;

EHC-PF . 11 .
Press ENTER key to confirm the input and finish the setting, or use ON/OFF key to exit this mode.
NOTE: If the “Price” and “Item code” can’t be filled into the format you selected, “OUT.P.R” will show in weight
window by using PRINT key to communicate to other equipment unless “232.out” is set to “HOST”.
5.4.7 Then, the UNIT PRICE window shows “USB.OUT” (USB output), the TOTAL PRICE window shows “none” or
“Host”. Use the numerical keys 0, 1 to select enable or disable USB output if it installed in the scale:
0—None, disable USB output
1—Host, enable USB output, and it is connected with a host device, e.g. a PC
When the scale becomes stable, the data will be output from USB interface after pressing PRINT key.
5.4.8 Then, the WEIGHT window will show “Setup”, the UNIT PRICE window will show “USB.bPS” (virtual RS232 band
rate: bit per second) and the TOTAL PRICE window shows baud rate xxxxx. Use numerical keys 1,2,3,4,5 to choose
RS232 baud rate:
1--1200bps
2--2400bps
3--4800bps
4--9600bps
5--19200bps
Press ENTER key for confirmation to go to the next step, or ON/OFF key to exit this mode.
5.4.9 Then, the UNIT PRICE window will display “USB.DFT” (virtual RS232 data format), the TOTAL PRICE window will
display data format xxx. Use 1, 2, 3 key to select data format:
1—8N1 8 bits data, no odd or even , 1 start bit, 1stop bit
2—7O1 7 bits data, 1 odd , 1 start bit, 1stop bit
3—7E1 7 bits data, 1 even, 1 start bit, 1stop bit,
Press ENTER key to confirm the input and go to the next step, or use ON/OFF key to exit this mode.
5.4.10 Then, the UNIT PRICE window shows “URT.CFT” (communication format), the TOTAL PRICE window shows
communication format xxx. Use the numerical keys 0, 1, 2, 3, 4 to select the communication format:
0—
NONE
Non communication
1—
S-N
When the scale is stable, the data can be output after pressing
PRINT
key. That means the
current stable weight can be print out for many times if it keeps at stable status.
2—
S-1
When the scale is stable, the data can be output
once
after pressing
PRINT
key. That means
this stable weight can only be printed out for one time if it keeps at stable status. If one more
printing is need, the scale should become motion first, and then become stable again.
3—
Drs-1
After the scale is stable and
PRINT
key is pressed, the current data can be sent out one time
through serial communication port. If another printing is need, the scale should be unloaded
first to make scale blow Min weight
1
, and then load the weight to make scale is over 20 e
1
4—
, at
last, to wait until it become stable.
Dsrs-1
When the scale is stable, press
PRINT
key to send the current data out for one time. If another
printing is need, the scale should be unloaded first to make scale blow Min weight, then wait
the scale to become stable, after that, load the weight to make scale is over Min weight, at last,
to wait scale to become stable again, after these, the new data can be sent out by pressing
PRINT
key.
Press ENTER key to confirm the input and go to the next step, or use ON/OFF key to exit this mode.
NOTE: According the table, when item code or price is out of range, the printer will do nothing and the weight window
will display “OUT.P.R”.
5.4.11 RS-232 connects between scale and host:

EHC-PF . 12 .
SCALE --------------------------CABLE(9 pins)--------------------------- HOST
DB9(Female) --------------DB9(Male)------------DB9(Female) --------------- DB9(Male)
PIN2 TXD ------------------2--------------------------2----------------------- PIN2 RXD
PIN3 RXD ------------------3--------------------------3----------------------- PIN3 TXD
PIN5 GND ------------------5--------------------------5----------------------- PIN5 GND
PIN4 DSR ------------------4--------------------------4----------------------- PIN4 DTR
PIN6 DTR ------------------6--------------------------6----------------------- PIN6 DSR
PIN7 CTS ------------------7--------------------------7----------------------- PIN7 RTS
PIN8 RTS ------------------8--------------------------8----------------------- PIN8 CTS
PIN1 NC ------------------1--------------------------1----------------------- PIN1 NC
PIN9 NC ------------------9--------------------------9----------------------- PIN9 NC
NOTE:
PIN4 and PIN6, PIN7 and PIN8 are shorted in the scale!
5.4.12 RS-232 cable connects between scale and OS-203/213:
5.5 Date and time setting
5.5.1 Under the normal working mode, press and hold ON/OFF and 5 key for more than 3s to enter into this mode. In
this mode, you can set the system date and time.
NOTE: the date and time in scale will be lost after the scale power off if no RTC backup battery is installed.
5.5.2 After entering into this mode, the weight window will display “Setup”, the unit price window will display
“dAtE”(date, prompt to input date) and the total unit price will display the current date xx.xx.xx. Use the numerical
keys to input the date (format: YY.MM.DD), use ENTER key to confirm and go to the time setting mode.
5.5.3 When the WEIGHT window displays “Setup”,the UNIT PRICE displays “time” (time, prompt to input time) and the
TOTAL PRICE window displays the current time xx.xx.xx, Use the numerical keys to input the time (Format:hh.mm.ss),
press ENTER to confirm the input and exit this mode.
5.6 Group Code Setting
5.6.1 Under the normal working mode, press and hold ON/OFF and 6 key for more than three seconds to enter this
mode. In this mode, you can set group code.
5.6.2 The WEIGHT window displays “Setup”, the UNIT PRICE window displays “GROUP.C” and the TOTAL PRICE window
displays group code xx (the default Id code is 00). Its range is 00 to 99.
5.6.3 Use the numerical keys to input group code, then press ENTER key to confirm the input and exit this mode.

EHC-PF . 13 .
5.7 OS-2130D Back Feed setting
5.7.1 Under the normal working mode, press and hold ON/OFF and 7 key for more than 3s to enter this mode. In this
mode, you can set the back feed (OS-2130D).
5.7.2 The WEIGHT window displays “SETUP”, the UNIT PRICE window displays “BAK.FED”(Back Feed), and the TOTAL
PRICE window displays “DISABL”(Disable).
5.7.3 Use 1 key to select “ENABLE”(OS-2130D will feed about one more inch so that the user can see the whole
label.) use 0 to select “DISABLE”, use ENTER key to confirm and exit this mode.
5.8 OS-2130D Origin setting
5.8.1 Under the normal working mode, press and hold ON/OFF and 8 key for more than 3s to enter this mode. In this
mode, you can set the origin point (OS-2130D).
5.8.2 The WEIGHT window displays “SETUP”, the UNIT PRICE window displays “ORG.X”(Origin.X), and the TOTAL PRICE
window displays the X direction offset number.
5.8.3 Use numerical keys and Clear to input X offset(0-255), Press ENTER key to confirm the input and go to the next step.
5.8.4 The WEIGHT window displays “SETUP”, the UNIT PRICE window displays “ORG.Y”(Origin.Y), and the TOTAL PRICE
window displays the Y direction offset number.
5.8.5 Use digit keys and Clear to input Y offset (0-255), press ENTER key to confirm the input and the OS-2130D will print
out a new blank label sample using new start position , and then exit this mode.
5.9 Business name setting
5.9.1 Under the normal working mode, press and hold ON/OFF and 0 key for more than 3s to enter this mode. In this
mode, you can set the business name.
5.9.2 The WEIGHT window displays “bUSI.N1” (prompt to input “business name” in first line), the UNIT PRICE window
and the TOTAL PRICE window display the last 12 char of the business name.
5.9.3 Use numerical keys and CLEAR key to input the business name (the max length of the business name is 20 char), use
ENTER key to confirm the business name and exit this mode.
5.9.4 The WEIGHT window displays “bUSI.N2”(prompt to input “business name” in second line), the UNIT PRICE window
and the TOTAL PRICE window display the last 12 char of the business name.
5.9.5 Use numerical keys and CLEAR key to input the business name (the length of the business name is 20 char), use
ENTER key to confirm the business name and exit this mode.
5.10 Display Weight at ten times of Division Number
5.10.1 Under the normal working mode, long press the ON/OFF+SAVE key, until the TOTAL PRICE window display TEST.
Then the displaying weight in 10 times resolution mode for testing
5.10.2 In TEST mode, the function of ZERO, ON/OFF, TARE are available.
5.10.3 Long press the ON/OFF+SAVE key, exit the TEST mode.
NOTE: this function only for the testing.
5.11 LCD test mode
5.11.1 Under the normal working mode, long press the ON/OFF+PRINT key, until all segments of LCD are displayed
5.11.2 (a) Press 0 key--- all segments are shown;
(b) Press 1 key --- different segments will be shown;

EHC-PF . 14 .
(c) Press 2 key --- segments on different COMs will be shown;
(d) Press ENTER key ---segments will be shown in turn of above a-b-c steps
5.11.3 Press ON/OFF key --- exit this mode.
6. Calibration
6.1 When the calibration switch is ON, turn on the scale, the scale will enter the units that can be used by end user setting
mode and scale calibration mode automatically.
6.2 When the weight window displays “SETUP”, the unit price window displays “Z-T.EN”(Z-T :zero-tracking), and the
total price window display “YES” or “no” (the last time choice) that means the scale is in the units that can be used by
end user setting mode.
6.3 Use numerical keys 0 or 1 key to select the zero-tracking device to be disable or enable, then press ENTER key to
confirm.
6.4 When the unit price window displays "test.en"(test mode), and the total price window displays “YES” or “no”, use
numerical keys 0 or 1 key to select TEST to be disable or enable, then press ENTER key to confirm.
6.5 When the unit price window displays “KG.EN”, and the total price window displays the last choice “YES” or “no”, use
numerical keys 0 or 1 key to select kg to be disable or enable, then press ENTER key to confirm.
6.6 When the unit price window displays “LB.EN”, and the total price window displays the last choice “YES“ or “no“, use
numerical keys 0 or 1 key to select lb to be disable or enable, then press ENTER key to confirm.
6.7 When the unit price window displays “OZ.EN”, and the total price window displays the last choice “YES“ or “no“, use
numerical keys 0 or 1 key to select oz to be disable or enable, then press ENTER key to confirm, then the scale will save
the setting and then auto go to the calibration mode.
NOTE: if kg, lb and oz are all disabled by set to no, unit kg will be forced to enable.
6.8 After entering into the calibration mode, the weight window will display “CAL.on”, which means the calibration weight
unit will use xx. The unit price window displays “Unit.0” “Unit.1”, or “Unit.2”, which means the chosen
calibration weighing unit is kg(Unit.0), lb(Unit.1) or oz(Unit.2).
6.9 Use UNIT key to choose the calibration weighing unit kg, lb or oz (the corresponding unit indicator will be lightened on),
use ENTER key to confirm the unit and go to the next step.
NOTE: If only one of the three units is enable, it will be auto chosen as calibration weight unit. Step6.6 and step6.7 will
be skipped.
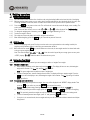
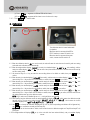
6.10 The weight window still displays CAL. xx (xx is the unit which has been selected before), unit price window displays
The calibration switch is located underneath
the platform.
When the switch is set towards the USB or
RS232 interface, it means CAL switch is on.
When the switch is set towards the power
switch, it means the CAL switch is off.

EHC-PF . 15 .
“UNLOAD”(this means that the scale is ready to calibrate the zero point position, please remove any weight on the
scale),the total price window display the output inner code of A/D. When the scale is stable and the unit indicator stops
flashing, press ENTER key to confirm the zero point calibration. After the scale is stable and gets the zero point, the scale
will go to the next step automatically.
6.11 The display of the weight window remains the same, the unit price window displays “Load”, which means the scale is
ready to calibrate the standard weight. The display of the total price and weight window remain the same. Place a
standard weight between 25%-100% FS on the center of the scale, press ENTER to confirm the standard weight
calibration after the scale is stable and the unit indicator stops flashing. When the scale gets the stable data, it will go to
the next step automatically.
6.12 The display of the weight window remains the same, the unit price window displays “INPU.LD”(Input Load Weight), the
total price window displays 0, use 0 - 9 keys or CLEAR to input loaded standard weight, then press ENTER key for
confirmation, the input data will be shown on the total price window.
6.13 When the weight window displays “UNLOAD” again,the scale is ready to re-confirm the zero point, remove any weight
on the scale, after the scale is ready and unit indicator stops flashing, press ENTER to confirm.
6.14 After calibration completes, UNIT PRICE window displays “CAL.END” and TOTAL PRICE window displays current weight.
6.15 If there’s an error occurred in calibration, the scale will display CAL.ERR; It usually means incorrect data input or
loading weight, and please try to return back to the last step to disposal.
6.16 Once the calibration switch is changed to OFF; the scale will exit the calibration mode.
7. The meaning of some displayed symbols
Err01
:
Weight signal is too large.
Err02
:
No proper data can be displayed.
Err03
:
Weight signal is too small.
Err04
:
Zero point is over the setting range.
Err05
:
Zero point is below the setting range.
Err06
:
Error in unit key operation.
Err10
:
the EEPROM can’t be accessed.
Err11
:
The parameters are not same with backup data.
Err12
:
The setting parameter(s) is not in normal range.
Err20
:
There is an error in calibration.
Err30
:
ADC is over max. range.
Err31
:
ADC is below min. range.
Err40
:
Recall error, no content stored.
CAP
.:
Capacity.
UOL.
:
Voltage.
St.PLU
:
To set and store the indirect unit price.
ADDR.
:
PLU address.
Unit
:
Weighing unit selecting.
Rc.PLU
:
Recall indirect unit price.
UNLOAD
:
To unload the weight.
LOAD
:
To load the weight.

EHC-PF . 16 .
INP.LD
:
To input load weight.
CAL.ON
:
Calibration enable switch is ON.
CAL.OFF
:
Calibration enable switch is OFF.
OUT.P.R
:
Data is out of printed barcode range.
Data.ch
:
Data has been changed.
Save
:
Data is being saved.
O.RANGE
:
The data has been entered or the weight for tare weight is out of range.
8. Troubleshooting
Troubleshooting
Troubleshooting
Possible causes
Solution
Power-on
problem
No display after
press the button
Not well load with the batteries or no
electricity or not well insert with adapter or
plug.
Check if the batteries have been load
with the wrong connection, if well
connection with batteries; Replace new
batteries; Check the power supply with
the adapter
there is something wrong with the electric
components of power on PCB,
crystal-oscillator or IC
Replace with new PCB
Key button not work Replace with new key button
Display irregular
character after
press button
LCD or its driver IC are not soldered well, or
are damaged; or some keys are not free to
move down or up
Replace LCD or its driver or re-solder
them,
Check the key button; Replace the PCB
Display 888888,
not back to 0
Err
Err04
zero point signal is over or blew the limitation;
or there are objects on the platform; or Load
cell is not at zero balance; or there is one foot
not stand on the solid base
Remove the objects on the platform;
calibrate again, change the load cell, Lay
the foot in the same level.
Err05
Err20
Load cell has no output; or the signal is too
small or too big; scale is not stable, or input
in-correct number or loaded wrong load
Check load cell and its wires ;replace
load cell, or PCB, then re-calibrate
Err01
The weight exceed 9d of the max capacity; or
the load cell output signal is too big
Remove the object; Or change the load
cell
Err31
Err30
The load cell signal is too small or too big.
calibrate again; Or replace the load cell;
Replace PCB
Err11
EEPROM on the PCB broken Replace with new PCB
Display
Lo.bAt
Voltage lower than 5.7V
Charging the battery or Replace with new
battery

EHC-PF . 17 .
Capacity
not
accurate or
calibration
can’t be
finished
Linearity is not
good
The platform is not laid in level; Four feet are
not laid in level; Moveable leg lock the seal
cover of the foot; Load cell broken; There are
some objects between load cell and scale.
Lay the platform in the same level; Set
the four feet in the same level; Check the
moveable foot; Clear the objects; Replace
the load cell.
Big tolerance
with full corner
The platform is not laid in level; Four feet are
not laid in level; Moveable foot lock the seal
cover of the foot; Load cell broken; There are
some objects between load cell and scale.
Lay the platform in the same level; Set
the four feet in the same level; Check the
moveable foot; Clear the objects; Replace
the load cell.
There is some
problem with
repeating
function
The platform is not laid in level; Bottom dust
proof wash lock the bottom bolt; Broken load
cell; Aging problem with PCB; There is some
objects between load cell and scale.
Lay the platform in level; Calibrate four
feet; Check the dust proof wash; Clear
the objects; Replace the load cell.
Calibration can’t
be finished
The inner code at 0 point is too small or too
big; not enough with the full capacity inner
code; not stable; there is some objects
between load cell and scale body; broken load
cell.
Calibrate the inner code at around
10000 on PCB and calibrate again;
Replace PCB; Clear the objects; Replace
the load cell.
Function
problem
No function with
key button
Key button not work; aging problem of the
apparatus on PCB
Check the button; Replace PCB
Not smoothly
communicating
Communication wire broken; or the interface
apparatus broken
Replace communication wire; Replace
PCB
Battery and Charging
Power is supplied by an internal rechargeable 6V 4Ah rechargeable battery. When “Lo.bAt” is displayed, the battery must be
recharged. Plug in the AC power adapter to recharge the battery. The scale may continue to be used on AC power during
charging. Full charging time is approximately 10-12 hours.
Battery life and recharge time will vary with use. Over time, the operating time per each full charge will degrade. If the
operating time is no longer acceptable, the battery must be replaced. When storing the scale for extended periods, the battery
must be charged every 90 days to avoid premature performance degradation.
-
 1
1
-
 2
2
-
 3
3
-
 4
4
-
 5
5
-
 6
6
-
 7
7
-
 8
8
-
 9
9
-
 10
10
-
 11
11
-
 12
12
-
 13
13
-
 14
14
-
 15
15
-
 16
16
-
 17
17
-
 18
18
-
 19
19


Measuretek EHC-PF-30 User's & Technical Manual
- Tipo
- User's & Technical Manual
- Questo manuale è adatto anche per
in altre lingue
- English: Measuretek EHC-PF-30
Altri documenti
-
TEC TEC EM1-31064 Manuale utente
-
CAS S-2000 Manuale del proprietario
-
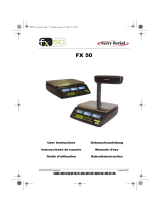 Avery Berkel FX 50 Guida utente
-
Mettler Toledo Ariva Quick Manual
-
Adam Equipment MDW 300LCM Manuale del proprietario
-
Franke Flair Manuale utente
-
-
-
-
