
IER 512C
PRINTER
N06102A
Revision Level 1
August 10, 1995

2
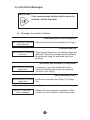
WARNING
q
This equipment generates, uses and can radiate
radiofrequency energy and, if not installed and used in
accordance with the operator’s and the user’s manuals
may cause interference with radio communications. It
has been tested and found to comply with the limits for a
class “A” computing device, pursuant to subparagraph
“J” of part 15 of FCC rules, which are designed to provide
reasonable protection against such interference when
operated in a commercial environment. Operations of
this equipment in a residential area is likely to cause
interference, in which case the user - at his own expense
- will be required to take whatever measures may be
required to correct interference.
q
The use of a braided shielded data cable is required to
meet the FCC class “A” limits.
q
THIS APPLIANCE MUST BE GROUNDED.
(FCC : Federal Communication Commission)
NOTICE
q
The information and specifications contained in this
document are subject to change without prior notice.
The warranty shall be null and void in case of use of any
spare part, special tool or consumable part not expressly
approved in writing by IER and in the event
of attempted repair or servicing of the machines by
persons lacking the requisite technical qualifications.

TABLE OF CONTENTS
3
TABLE DES MATIERES
A ) INTRODUCTION ...................................... 5
B ) DESCRIPTION ....................................... 6
1) Physical Characteristics .............................. 6
2) Front View ......................................... 6
3) Rear View ......................................... 6
4) Inside View ........................................ 8
C ) INSTALLATION....................................... 9
1) Installing the Printer ................................. 9
2) Connecting the Printer ............................... 9
3) Adjusting the Paper Path ............................. 10
4) Switching on the Printer .............................. 12
5) Loading Fanfold Blank Documents ...................... 12
6) Loading Document Rolls.............................. 14
D ) OPERATION ......................................... 16
1) Printing a Document ................................. 16
2) Key and Indicator Functions ........................... 17
3) Control Panel Key Functions .......................... 18
4) Control Panel Indicator Functions ....................... 19
5) Self Test Mode ..................................... 20
6) Printing the Configuration Test Document ................ 20
7) Printing Other Test Documents......................... 21
E ) PERIODIC MAINTENANCE ............................. 22
1) Dust Removal ...................................... 22
2) Cleaning the Printing Module .......................... 23
3) Final Check ........................................ 25

TABLE OF CONTENTS (continued)
4
F ) OPERATING FAULTS ................................. 26
1) Clearing Document Jams ............................. 26
2) Clearing the Cutter Blade ............................. 27
3) List of Error Messages ............................... 28
4) Other Operating Problems ............................ 30
G ) CONSUMABLE SUPPLIES AND DOCUMENTATION......... 31
1) List of IER 5122C Consumable Supplies ................. 31
2) IER 512C Related Documentation ...................... 31

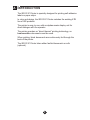
A INTRODUCTION
The IER 512C Printer is specially designed for printing self-adhesive
labels or paper strips.
In color and design, the IER 512C Printer matches the existing ATB
line of IER products.
The printer is easy to use, with an alphanumeric display unit for
direct dialogue with the operator.
The printer operates on “direct thermal” printing technology, so
heat-sensitive documents must be used.
When printing, blank documents are continuously fed through the
back of the printer.
The IER 512C Printer takes either fanfold documents or rolls
(optional).
5

B DESCRIPTION
1) Physical Characteristics
•
Dimensions:
•
a: Max height = 230 mm (9.06 in)
•
b: Max depth = 460 mm (18.11 in)
•
c: Width = 204 mm (8.03 in)
•
Weight:
•
8 kg (17.6 lbs) excluding packaging
•
10 kg (22.05 lbs) including packaging
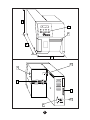
2) Front View
•
Operator control panel (1), see Page 17
•
Ejection slot (2)
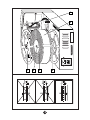
3) Rear View
•
Latch for right-hand cover (3)
•
Insertion slot consisting of two adjustable guides (4)
•
AC power connector (5)
•
On/off switch (6)
•
Serial data connector (7)
•
Printhead lever (8)
6

7
a
b
c
1
2
8
4
7
6
5
3

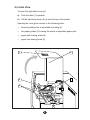
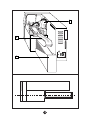
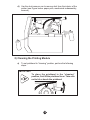
4) Inside View
To open the right-hand cover (6):
a) Push the latch (1) upwards.
b) Lift the right-hand cover (6) up onto the top of the printer.
Opening the cover gives access to the following parts:
•
thermal printhead on a retractable mounting (2)
•
two paper guides (3) forming the printer’s adjustable paper path
•
paper path locking wheel (4)
•
paper jam clearing knob (5)
8
6
2
5
4
3
1

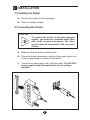
C INSTALLATION
1) Installing the Printer
a) Remove the printer from its packaging.
b) Place on a stable surface.
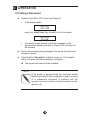
2) Connecting the Printer
CAUTION
To connect the printer to the host computer
system, you must use a shielded cable fitted
with metal covered connectors. The cable
ground must be connected to the connector
covers.
a) Make sure that the printer is switched off.
b) Connect the data transmission cable and the power supply cord
to the corresponding connectors on the printer.
c) Connect the power supply cord to the line power. The IER 512C
power supply adapts automatically to the line voltage
supplied.
9

3) Adjusting the Paper Path
Before switching on for the first time, or when changing document
widths, the paper path must be adjusted.
IMPORTANT
Loosen the paper path locking wheel before
adjusting the paper path.
a) Open the right-hand cover (see Page 8).
b) Locate the locking wheel underneath the paper guides. Loosen
(unlock) the wheel using the right hand index finger:
c) Adjust the guides to allow insertion of the documents to be used.
Insert the document fully into the paper path:
10

d) Carefully set the width of the paper path for accurate paper feed
while leaving sufficient play (“J”, see Figure below) :
e) Tighten (lock) the paper path locking wheel.
f) Close the right-hand cover.
IMPORTANT
To avoid an immediate paper jam, check that
the document runs freely along the full length
of the paper path.
11
(J)
(J)

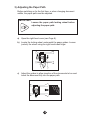
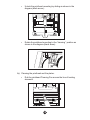
4) Switching on the Printer
a) Switch power switch to “I” to switch on the IER 512C Printer:
b) The display shows one of the two following messages:
IER 512
OFF LINE
IER 512
ON LINE
è
If the display shows an error message, see Page 28 for a
solution to the problem.
5) Loading Blank Fanfold Documents
a) Install a box of fanfold documents (3) at the rear of the printer,
self-adhesive side (or black mark) facing up.
b) Push the printhead lever (1) upwards and slide the document
strip (2) into the paper guides making up the front insertion slot
until the leading edge emerges from the front ejection slot.
c) Lower the printhead lever (1). The document strip is
automatically ejected, possibly after some backward and forward
movements (separation mark self-calibration phase).
IMPORTANT
If positioning documents in the rear insertion
slot poses a problem, check the paper path
adjustment (see Page 10).
The document stock must remain aligned with
the paper path. If the document strip is feeding
unevenly, move the document stock further
away from the insertion slot.
12

13
2
3
1

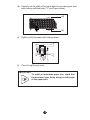
6) Loading Document Rolls
The IER 512C Printer may be fitted with an optional document roll
dispenser.
a) Take the removable flange (1) off the spindle (2).
b) Position the new roll of blank documents (3) so that the first label
is inserted heat-sensitive face uppermost.
c) Slide the core of the new roll (3) onto the hubs (4).
d) Lift the printhead lever (6) upwards.
e) Slide the document strip (5) into the paper guides making up the
front insertion slot until the strip emerges from the front
ejection slot.
f) Replace the removable flange (1) against the roll (3).
g) Lower the printhead lever (6). The document strip is
automatically ejected, possibly after some backward and forward
movements (separation mark self-calibration phase).
IMPORTANT
If positioning documents in the front insertion
slot poses a problem, check the paper path
adjustment (see Page 10).
The document roll must remain aligned with
the paper path. If the document roll is feeding
unevenly, reset the roll position (see Printer
Operation and Adjustment Manual).
14

15
6
4321
5

D OPERATION
1) Printing a Document
a) Switch on the IER 512C Printer (see Page 12).
•
If the display reads:
IER 512C
OFF LINE
press the “on/off Line” key to switch to On Line mode.
IER 512C
ON LINE
•
If an alarm buzzer sounds, check the message on the
alphanumeric display and refer to Page 28 for a solution to
the problem.
b) Send a document printing message to the printer from the host
computer system.
c) Check that the “Reception” indicator comes on. The indicator
will go out when document printing is completed.
è
The printed document is then available.
NOTE
If the printer is equipped with the document holder
feature (activated in the configuration menu), printing
of a subsequent document is inhibited until the
operator has removed the current document from the
ejection slot.
16

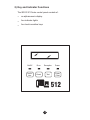
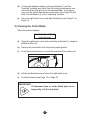
2) Key and Indicator Functions
The IER 512C Printer control panel consists of:
•
an alphanumeric display
•
four indicator lights
•
four touch-sensitive keys
17
On/Off
On/Off
Line
Reset
Power
Tes t
Paper
Feed
ReceptionError
512

3) Control Panel Key Functions
On/Off Line
Selects operating mode:
•
In On Line mode, the printer is electronically connected
to the host computer system.
•
In Off Line mode, the printer is electronically
disconnected from the host computer system and the
Self Test menus can be accessed.
Reset
This key shuts off the alarm buzzer and erases the error
message (once the error is remedied).
Test
Active in Off Line mode only, this key gives access to printer
Self Test menus.
Paper Feed
Active in Off Line mode only, this key ejects a blank
document, thus setting the position of the next document to
be printed.
This key can be inhibited from the configuration menu (see
IER 512 Printer Technical Manual).
18
On/Off
Line
Reset
Tes t
Paper
Feed

4) Control Panel Indicator Functions
On/Off
When on, shows that the printer is On Line, and therefore
able to receive from the host computer system the
information needed to print a document.
When off, shows that the printer is in Off Line mode and the
Self Test menus can be accessed.
Error
When on, indicates a mechanical error.
When flashing, indicates an error in reception of the
message from the host computer system.
See paragraph “Operating Faults”.
Reception
When on, indicates that the printer is receiving a message
from the host computer system.
The indicator goes out automatically when document printing
is complete (in On Line mode or in the Self Test menus).
Power
When on, indicates that the printer is switched on.
19
On/Off
Error
Reception
Power

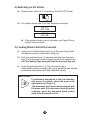
5) Self Test Mode
Selecting Self Test mode
a) Switch power switch to “I” to switch on the IER 512C Printer.
b) Press “on/off Line” to switch to Off Line mode.
c) Check that the “On/Off” indicator is off and the display reads:
IER 512
OFF LINE
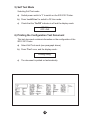
6) Printing the Configuration Test Document
This test document contains information on the configuration of the
IER 512C Printer.
a) Select Self Test mode (see paragraph above)
b) Press “Test” once, and the display reads :
Printing config.
c) The document is printed out automatically.
20
La pagina si sta caricando...
La pagina si sta caricando...
La pagina si sta caricando...
La pagina si sta caricando...
La pagina si sta caricando...
La pagina si sta caricando...
La pagina si sta caricando...
La pagina si sta caricando...
La pagina si sta caricando...
La pagina si sta caricando...
La pagina si sta caricando...
La pagina si sta caricando...
-
 1
1
-
 2
2
-
 3
3
-
 4
4
-
 5
5
-
 6
6
-
 7
7
-
 8
8
-
 9
9
-
 10
10
-
 11
11
-
 12
12
-
 13
13
-
 14
14
-
 15
15
-
 16
16
-
 17
17
-
 18
18
-
 19
19
-
 20
20
-
 21
21
-
 22
22
-
 23
23
-
 24
24
-
 25
25
-
 26
26
-
 27
27
-
 28
28
-
 29
29
-
 30
30
-
 31
31
-
 32
32


in altre lingue
- English: Ier 512C User manual
Altri documenti
-
Intermec EasyCoder 3400e Manuale utente
-
Panasonic KXP3196 Istruzioni per l'uso
-
-
Konica Minolta Bizhub 3320 Manuale utente
-
Lexmark X340 Manuale utente
-
-
Intermec EasyCoder 4420 Manuale utente
-
-
Intermec 3400 Manuale utente
-
Lexmark MX410 Series Manuale utente