Panasonic Panafax UF-490 Manuale utente
- Categoria
- Fax
- Tipo
- Manuale utente
Questo manuale è adatto anche per

Operating Instructions
Before operating this equipment, please read
these instructions completely and keep these
operating instructions for future reference.
English
Facsimile
UF-490
(For Facsimile)
Options
UE-403167
Getting to Know
Your Machine
Installing Your
Machine
Programming
Your Machine
Basic OperationsAdvanced
Features
Network FeaturesPrintout Journals
and Lists
Problem Solving Appendix

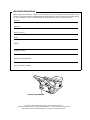
IMPORTANT INFORMATION
When requesting information, supplies or service always refer to the model and serial number of your
machine. The model and serial number plate (Main Name Plate) is located on the machine as shown below.
For your convenience, space is provided below to record information you may need in the future.
Model No.
Serial No.
Date of Purchase
Dealer
Address
Telephone Number
() –
Supplies Telephone Number
() –
Service Telephone Number
() –
Model and Serial Number
Copyright © 2001 by Matsushita Graphic Communication Systems, Inc.
All rights reserved. Unauthorized copying and distribution is a violation of law. Printed in Japan.
The contents of this Operating Instructions are subject to change without notice.

3
Table of Contents
Safety Information.......................................................................................................... 6
Function Key................................................................................................................... 9
External View.................................................................................................................. 10
Control Panel.................................................................................................................. 11
Main Unit and Accessories............................................................................................ 13
Installing the Accessories............................................................................................. 14
Installing the Drum Unit/Toner Cartridge Assembly................................................... 15
Loading the Recording Paper....................................................................................... 17
Paper Specifications....................................................................................... 17
Connecting the Telephone Line Cable and Power Cord............................................. 18
Setting the Dialing Method (Tone or Pulse)................................................................. 20
Adjusting the Volume .................................................................................................... 21
User Parameters............................................................................................................. 22
General Description........................................................................................ 22
Setting the Date and Time.............................................................................. 22
Setting Your LOGO (NAME/COMPANY)....................................................... 23
Setting Your Character ID.............................................................................. 24
Setting Your ID Number (Fax Telephone Number)........................................ 25
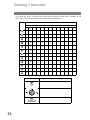
Entering Characters....................................................................................................... 26
One-Touch/Abbreviated Dialing Numbers................................................................... 27
Entering One-Touch/Abbreviated Dialing Numbers....................................... 27
Editing One-Touch/Abbreviated Dialing Numbers.......................................... 29
Printing Out a Directory Sheet........................................................................ 31
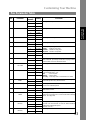
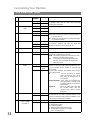
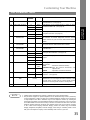
Customizing Your Machine ........................................................................................... 32
General Description........................................................................................ 32
Setting the Fax Parameters............................................................................ 32
Fax Parameter Table...................................................................................... 33
Loading Documents....................................................................................................... 36
Documents You Can Send............................................................................. 36
Documents You Cannot Send........................................................................ 36
How to Load Documents................................................................................ 37
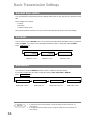
Basic Transmission Settings ........................................................................................ 38
General Description........................................................................................ 38
Contrast.......................................................................................................... 38
Resolution ...................................................................................................... 38
Communication Journal (COMM. JOURNAL) ............................................... 39
Getting to Know Your Machine
Installing Your Machine
Programming Your Machine
Basic Operations

Table of Contents
4
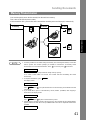
Sending Documents....................................................................................................... 40
General Description ....................................................................................... 40
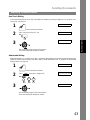
Memory Transmission.................................................................................... 41
Direct Transmission ....................................................................................... 46
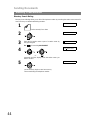
Voice Mode Transmission.............................................................................. 50
Transmission Reservation ............................................................................. 52
Redialing........................................................................................................ 54
Receiving Documents.................................................................................................... 56
Reception Modes........................................................................................... 56
Telephone Mode............................................................................................ 57
Fax / Tel Auto Switching Mode ...................................................................... 58
Fax Mode....................................................................................................... 59
TAM (Telephone Answering Machine) Interface Mode.................................. 59
Print Reduction .............................................................................................. 61
Receiving Oversize Documents..................................................................... 62
Substitute Memory Reception........................................................................ 63
Print Collation Mode....................................................................................... 63
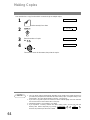
Making Copies................................................................................................................ 64
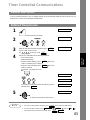
Timer Controlled Communications .............................................................................. 65
General Description ....................................................................................... 65
Deferred Transmission................................................................................... 65
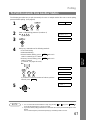
Polling ............................................................................................................................. 66
General Description ....................................................................................... 66
Setting the Polling Password ......................................................................... 66
To Poll Documents from Another Station....................................................... 67
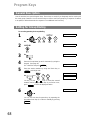
Program Keys................................................................................................................. 68
General Description ....................................................................................... 68
Setting for Group Dialing................................................................................ 68
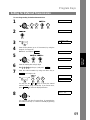
Setting for Deferred Transmission ................................................................. 69
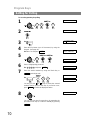
Setting for Polling........................................................................................... 70
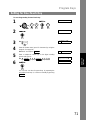
Setting for One-Touch Key ............................................................................ 71
Changing or Erasing the Program Key Settings ............................................ 72
Access Code................................................................................................................... 73
General Description ....................................................................................... 73
Setting the Access Code................................................................................ 73
Operating Your Machine with the Access Code (Restrict All Operations) .... 74
Operating Your Machine with the Access Code
(Restrict Access of Fax Parameters Only).................................................... 74
Distinctive Ring Detector (DRD) ................................................................................... 75
General Description ....................................................................................... 75
PIN Code Access............................................................................................................ 76
General Description ....................................................................................... 76
Selecting the Access Method (Prefix or Suffix).............................................. 76
Dialing with a PIN Code................................................................................. 77
Fax Forward.................................................................................................................... 78
Setting Fax Forward....................................................................................... 78
Advanced Features

Table of Contents
5
Sub-Addressing.............................................................................................................. 79
General Description........................................................................................ 79
Setting the Sub-Address into a One-Touch/ABBR. Dialing Numbers............ 80
Sending a Fax with Sub-Address................................................................... 81
Journals and Lists.......................................................................................................... 82
General Description........................................................................................ 82
Transaction Journal........................................................................................ 82
Individual Transmission Journal (IND. XMT JOURNAL)................................ 83
Communication Journal (COMM. JOURNAL)................................................ 86
One-Touch/Abbreviated and Directory Search List........................................ 88
Program List................................................................................................... 91
FAX Parameter List........................................................................................ 92
Toner Cartridge and Drum Unit Supply Order Forms..................................... 93
Power Failure Report ..................................................................................... 94
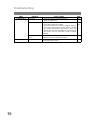
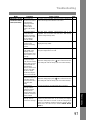
Troubleshooting............................................................................................................. 95
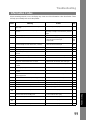
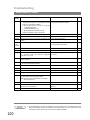
Information Codes.......................................................................................... 99
Clearing a Recording Paper Jam................................................................... 101
Clearing a Document Jam.............................................................................. 102
Cleaning the Document Scanning Area......................................................... 103
Cleaning the Printer Roller............................................................................. 104
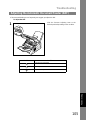
Adjusting the Automatic Document Feeder (ADF)......................................... 105
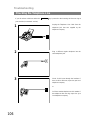
Checking the Telephone Line......................................................................... 106
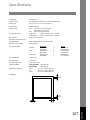
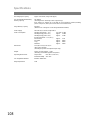
Specifications.................................................................................................................107
Recording Paper Specifications ...................................................................................109
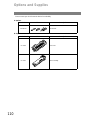
Options and Supplies ....................................................................................................110
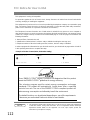
FCC Notice for User in USA ..........................................................................................111
Notice to User in Canada...............................................................................................113
Glossary..........................................................................................................................115
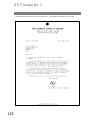
ITU-T Image No. 1...........................................................................................................118
Index................................................................................................................................119
Network Features
Printout Journals and Lists
Problem Solving
Appendix

6
Getting to Know Your Machine
Safety Information
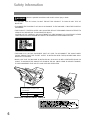
WARNING
!
denotes a potential hazard that could result in serious injury or death.
• TO PREVENT FIRE OR SHOCK, DO NOT EXPOSE THIS PRODUCT TO RAIN OR ANY TYPE OF
MOISTURE.
• TO MINIMIZE THE POSSIBILITY OF SHOCK OR DAMAGE TO THE MACHINE, IT MUST BE PROPERLY
GROUNDED.
• THIS PRODUCT UTILIZES A LASER. ONLY QUALIFIED SERVICE PERSONNEL SHOULD ATTEMPT TO
SERVICE THIS DEVICE DUE TO POSSIBLE EYE INJURY.
CAUTION-USE OF CONTROLS OR ADJUSTMENTS OR PERFORMANCE OF PROCEDURES OTHER
THAN THOSE SPECIFIED HEREIN MAY RESULT IN HAZARDOUS RADIATION EXPOSURE.
• THE MAIN PLUG ON THIS EQUIPMENT MUST BE USED TO DISCONNECT THE MAIN POWER.
PLEASE ENSURE THAT THE SOCKET OUTLET IS INSTALLED NEAR THE EQUIPMENT AND SHALL
BE EASILY ACCESSIBLE.
• MAKE SURE THAT THE MACHINE IS INSTALLED IN A SPACIOUS OR WELL VENTILATED ROOM SO
AS NOT TO INCREASE THE AMOUNT OF OZONE IN THE AIR. SINCE OZONE IS HEAVIER THAN AIR,
IT IS RECOMMENDED THAT AIR AT FLOOR LEVEL BE VENTILATED.
Manufacturer's name and address
Factory ID
Product complies with DHHS Rules 21
CFR Subchapter J in effect at date
of manufacture.

Safety Information
7
Getting to Know
Your Machine
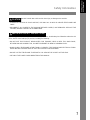
CAUTION
!
denotes hazards that could result in minor injury or damage to the machine.
• TO REDUCE THE RISK OF SHOCK OR FIRE, USE ONLY NO. 26 AWG OR LARGER TELEPHONE LINE
CABLE.
• DISCONNECT ALL POWER TO THE MACHINE BEFORE COVER(S) ARE REMOVED. REPLACE THE
COVER(S) BEFORE THE UNIT IS RE-ENERGIZED.
When using your telephone equipment, basic safety precautions should always be followed to reduce the risk
of fire, electric shock and injury to persons, including the following:
• DO NOT USE THIS PRODUCT NEAR WATER, FOR EXAMPLE, NEAR A BATH TUB, WASH BOWL,
KITCHEN SINK OR LAUNDRY TUB, IN A WET BASEMENT OR NEAR A SWIMMING POOL.
• AVOID USING A TELEPHONE (OTHER THAN A CORDLESS TYPE) DURING AN ELECTRICAL STORM.
THERE MAY BE A REMOTE RISK OF ELECTRIC SHOCK FROM LIGHTNING.
• DO NOT USE THE TELEPHONE TO REPORT A GAS LEAK IN THE VICINITY OF THE LEAK.
• USE ONLY THE POWER CORD INDICATED IN THIS MANUAL.
IMPORTANT SAFETY INSTRUCTIONS
!

Safety Information
8
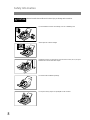
CAUTION
!
denotes hazards that could result in minor injury or damage to the machine.
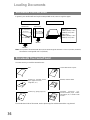
Do not install the machine near heating or an air conditioning unit.
Avoid exposure to direct sunlight.
Install the machine on a flat surface, leave at least 4 inches (10 cm) of space
between the machine and other objects.
Do not block the ventilation openings.
Do not place heavy objects or spill liquids on the machine.

9
Getting to Know
Your Machine
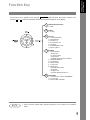
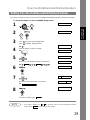
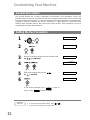
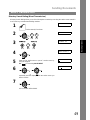
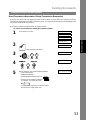
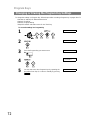
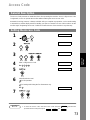
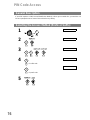
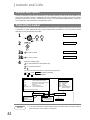
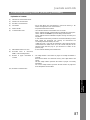
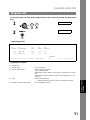
Function Key
Any function can be started by first pressing and then enter the function number, or by
pressing or scroll keys repeatedly until the desired function appears on the display.
NOTE
1. Refer to Firmware Update Utility’s Operating Instructions on the software CD for additional
details.
FUNCTION
1
3
6
7
8
Deferred Communication
1 = XMT
Polling
1 = Polling
Print List
1 = Journal (Print/View)
2 = Speed Dial List
3 = Program List
4 = Fax Parameter List
5 = Not Used
6 = Individual XMT Journal
7 = Directory Sheet
Set Mode
1 = User Parameters
• Date & Time
• Company / Name
• Character ID
• ID Number (Fax Telephone Number)
2 = Speed Dial Numbers
3 = Program Keys
4 = Fax Parameters
5 - 7 = Not Used
8 = Maintenance
• Cleaning Printer Roller
• Drum Unit
• Supply Forms
• Firmware Update (See Note 1)
Select Mode
1 = Communication Journal = OFF/ON/INC
2 - 8 = Not Used
9 = Memory XMT = OFF/ON

10
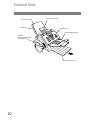
External View
Paper Tray Cover
Document Sub Tray
Control Panel
Document Return Tray
Recording Paper Tray
Handset
(Available as an option,
See page 110)
Paper Tray

11
Getting to Know
Your Machine
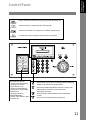
Control Panel
One-Touch Keys (01-16)
- Used for One-Touch Dialing.
(See pages 43 and 47)
Program Keys (P1-P2)
- Used to record long dialing
procedures or Group Dialing
Number keys.
(See pages 68 to 72)
UPPER/LOWER Key
- Used to switch between upper
and lower key.
- Used to enter a pause when recording or dialing a telephone
number, or to redial the last dialed number.
- Used to start Abbreviated Dialing and insert a space while
entering LOGO, character ID and station name.
(See pages 43 and 48)
- Used to separate the Sub-Address from the telephone
number
- Used to start On-Hook Dialing. (See page 51)
- Used to switch the machine into energy saving mode. (See page 34)
- Used to set Normal, Lighter or Darker. (See page 38)
- Used to set Standard, Fine, Super-Fine or Halftone. (See page 38)
- Use this button when resetting all the previously set functions.

Control Panel
12
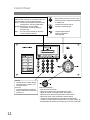
Keypad
- Used for manual number dialing,
recording phone numbers, and
numerical entries.
Tone Key
- Used to temporarily change the
dialing mode to Tone when Pulse
mode is set.
- Used to select either IN
mode or OUT mode.
(See page 56)
- Press this button when you want to stop
telecommunication, registration operation,
or audible tone.
- Used to make copies and set
operations. (See page 64)
Used for the following:
- Start or select the function.
- Search for a station name. (See pages 44 and 49)
- Adjust the monitor and ringer volume. (See page 21)
- Move the cursor while entering numbers and characters.
- Search the station name for Directory Search Dialing.
- Confirm the entered station for multi-station communication.
- Confirm the current communication modes (e.g. Page number, ID,
Dialed Telephone number, File number) when the unit is ON LINE.
LCD Display
Indicates date and time, or the current status can
be confirmed by one of the following colors.
Green : Machine is activated for communication,
printing data or scanning a document.
Orange: Document(s) are set on ADF.
The machine is ready to Accept or
Perform a task.
Red : An error has occurred or the machine
needs immediate attention.

13
Installing Your
Machine
Installing Your Machine
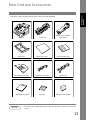
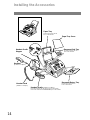
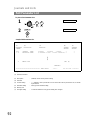
Main Unit and Accessories
Unpack the carton and check that you have all the accessories illustrated.
NOTE
1. The Starter Toner Cartridge yields approx. 1,000 pages. (Based on 3% Black, ITU-T Image No.
1 Chart)
Machine
Drum Unit
Starter Toner Cartridge
(See Note 1)
Paper Tray
Paper Tray Cover
Document Sub Tray
Document Return Tray
Telephone Line Cable Power Cord
Operating Instructions
CD-ROM
Handset Cradle Stopper

14
Installing the Accessories
Final Installed View
Handset
[Available as an Option]
Handset Cord
[Available as an Option]
Handset Cradle
[Available as an Option]
Hook the projections into the square holes on the machine.
Connect the cable into the TEL/HANDSET jack on the machine.
Document Sub Tray
Hook the projections into the
holes on the machine.
Paper Tray
Hook the projections into the
holes on the machine.
Paper Tray Cover
Handset Cradle
Stopper
Document Return Tray
Hook the projections into the
holes on the machine.

15
Installing Your
Machine
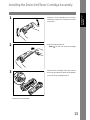
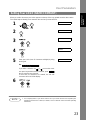
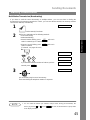
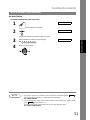
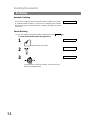
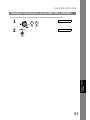
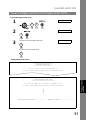
Installing the Drum Unit/Toner Cartridge Assembly
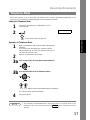
1
Unpack the Toner Cartridge and rock it back
and forth as shown for 5 or 6 times to even the
toner inside.
2
Remove the protective seal.
Note: Pull on the seal slowly and straight
out.
3
Slide the Toner Cartridge all the way into the
Drum Unit and rotate the green lever upwards
to lock the Toner Cartridge in place.
Continued on the next page...

Installing the Drum Unit/Toner Cartridge Assembly
16
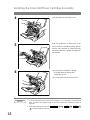
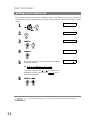
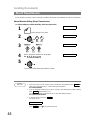
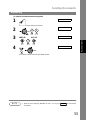
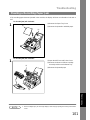
NOTE
1. If you are replacing the Drum Unit or Toner Cartridge, it is recommended to clean the Printer
Roller to maintain good printing quality. To clean the Printer Roller, follow the procedure on
page 104.
2. When replacing the Drum Unit, press
to reset the notification message.
4
Open the ADF Door and Printer Cover.
5
Align the projections on both sides of the
Drum Unit/Toner Cartridge Assembly with the
grooves in the machine as shown and insert
the Drum Unit/Toner Cartridge Assembly into
the machine.
6
(1)Push the Drum Unit/Toner Cartridge
Assembly down into the machine,
snapping it in place.
(2)Close the ADF Door and Printer Cover
FUNCTION
7
8
SET
2
SET
1
1

17
Installing Your
Machine
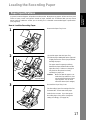
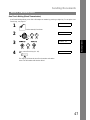
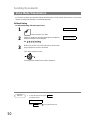
Loading the Recording Paper
In general, most bond papers will produce excellent results. Most photocopy papers will also work very well.
There are many "name" and "generic" brands of paper available. We recommend that you test various
papers until you obtain the results you are looking for. For detailed recommended paper specifications.
(See page 109)
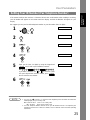
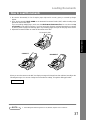
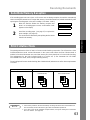
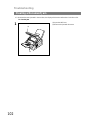
How to Load the Recording Paper
Paper Specifications
1
Remove the Paper Tray Cover.
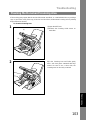
2
(1)Load the paper into the Paper Tray.
(2) Slide the paper width guide to the right until
it lightly touches the stack of paper without
bending the paper.
The paper must fit squarely and firmly
between the Paper Width Guide and the
right side of tray. If it does not, the paper
may feed into the printer incorrectly
resulting in a paper jam.
Caution: Make sure that the paper is set
under the Clips and that it does
not exceed the Maximam Paper
Capacity Mark. You can load
about 150 sheets (20 lb weight).
3
Re-install the Paper Tray Cover.
The Recording Paper Size setting of the Fax
Parameter No. 23 must match the paper
loaded in the cassette. If you change the
Recording Paper Size, please change the
setting accordingly. (See page 34)
Paper Width Guide
Clip
Max. Paper
Capacity Mark

18
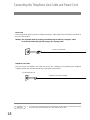
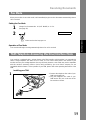
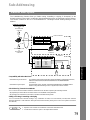
Connecting the Telephone Line Cable and Power Cord
Power Cord
Plug one end of the power cord into an ordinary 3 prong AC outlet and the other end into the receptacle on
the rear of the machine.
Warning: This apparatus must be properly grounded through an ordinary 3 prong AC outlet.
Do not break off the earth (ground) prong to fit a 2 prong outlet.
Telephone Line Cable
Plug one end of the telephone line cable into the "RJ-11C" telephone jack supplied by the telephone
company and the other end into the LINE jack on the Rear of the machine.
NOTE
1. Your machine uses little power and you should keep it ON at all times. If the power is turned
OFF for too long (Over 30 minutes), the clock contents may be lost.
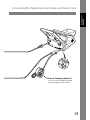
Power Cord (Included)
Telephone Line Cable (Included)
RJ-11C Telephone Jack

Connecting the Telephone Line Cable and Power Cord
19
Installing Your
Machine
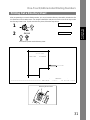
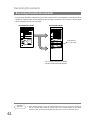
External Telephone (Optional)
You can connect an additional standard
single line telephone to the machine.

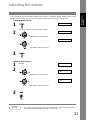
20
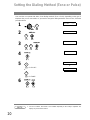
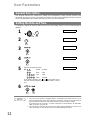
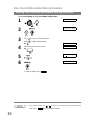
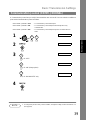
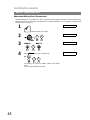
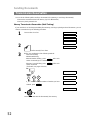
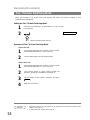
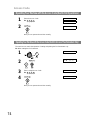
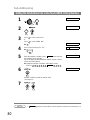
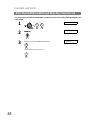
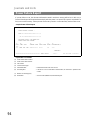
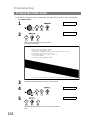
Setting the Dialing Method (Tone or Pulse)
Your machine can operate with either of two dialing methods (Tone or Pulse), depending on the type of
telephone line you are connected to. If you need to change the dialing method to Tone or Pulse, follow the
procedure below.
NOTE
1. For some countries, this feature is not available depending on the country’s regulation. The
display may not show this feature.
1
SET MODE (1-8)
2
NO.=❚ (01-99)
3
DIALING METHOD?
4
TONE<>
5
for “PULSE“.
or
for “TONE“.
PULSE<>
or
TONE<>
6
7
4
0
6
1
2
La pagina sta caricando ...
La pagina sta caricando ...
La pagina sta caricando ...
La pagina sta caricando ...
La pagina sta caricando ...
La pagina sta caricando ...
La pagina sta caricando ...
La pagina sta caricando ...
La pagina sta caricando ...
La pagina sta caricando ...
La pagina sta caricando ...
La pagina sta caricando ...
La pagina sta caricando ...
La pagina sta caricando ...
La pagina sta caricando ...
La pagina sta caricando ...
La pagina sta caricando ...
La pagina sta caricando ...
La pagina sta caricando ...
La pagina sta caricando ...
La pagina sta caricando ...
La pagina sta caricando ...
La pagina sta caricando ...
La pagina sta caricando ...
La pagina sta caricando ...
La pagina sta caricando ...
La pagina sta caricando ...
La pagina sta caricando ...
La pagina sta caricando ...
La pagina sta caricando ...
La pagina sta caricando ...
La pagina sta caricando ...
La pagina sta caricando ...
La pagina sta caricando ...
La pagina sta caricando ...
La pagina sta caricando ...
La pagina sta caricando ...
La pagina sta caricando ...
La pagina sta caricando ...
La pagina sta caricando ...
La pagina sta caricando ...
La pagina sta caricando ...
La pagina sta caricando ...
La pagina sta caricando ...
La pagina sta caricando ...
La pagina sta caricando ...
La pagina sta caricando ...
La pagina sta caricando ...
La pagina sta caricando ...
La pagina sta caricando ...
La pagina sta caricando ...
La pagina sta caricando ...
La pagina sta caricando ...
La pagina sta caricando ...
La pagina sta caricando ...
La pagina sta caricando ...
La pagina sta caricando ...
La pagina sta caricando ...
La pagina sta caricando ...
La pagina sta caricando ...
La pagina sta caricando ...
La pagina sta caricando ...
La pagina sta caricando ...
La pagina sta caricando ...
La pagina sta caricando ...
La pagina sta caricando ...
La pagina sta caricando ...
La pagina sta caricando ...
La pagina sta caricando ...
La pagina sta caricando ...
La pagina sta caricando ...
La pagina sta caricando ...
La pagina sta caricando ...
La pagina sta caricando ...
La pagina sta caricando ...
La pagina sta caricando ...
La pagina sta caricando ...
La pagina sta caricando ...
La pagina sta caricando ...
La pagina sta caricando ...
La pagina sta caricando ...
La pagina sta caricando ...
La pagina sta caricando ...
La pagina sta caricando ...
La pagina sta caricando ...
La pagina sta caricando ...
La pagina sta caricando ...
La pagina sta caricando ...
La pagina sta caricando ...
La pagina sta caricando ...
La pagina sta caricando ...
La pagina sta caricando ...
La pagina sta caricando ...
La pagina sta caricando ...
La pagina sta caricando ...
La pagina sta caricando ...
La pagina sta caricando ...
La pagina sta caricando ...
La pagina sta caricando ...
La pagina sta caricando ...
-
 1
1
-
 2
2
-
 3
3
-
 4
4
-
 5
5
-
 6
6
-
 7
7
-
 8
8
-
 9
9
-
 10
10
-
 11
11
-
 12
12
-
 13
13
-
 14
14
-
 15
15
-
 16
16
-
 17
17
-
 18
18
-
 19
19
-
 20
20
-
 21
21
-
 22
22
-
 23
23
-
 24
24
-
 25
25
-
 26
26
-
 27
27
-
 28
28
-
 29
29
-
 30
30
-
 31
31
-
 32
32
-
 33
33
-
 34
34
-
 35
35
-
 36
36
-
 37
37
-
 38
38
-
 39
39
-
 40
40
-
 41
41
-
 42
42
-
 43
43
-
 44
44
-
 45
45
-
 46
46
-
 47
47
-
 48
48
-
 49
49
-
 50
50
-
 51
51
-
 52
52
-
 53
53
-
 54
54
-
 55
55
-
 56
56
-
 57
57
-
 58
58
-
 59
59
-
 60
60
-
 61
61
-
 62
62
-
 63
63
-
 64
64
-
 65
65
-
 66
66
-
 67
67
-
 68
68
-
 69
69
-
 70
70
-
 71
71
-
 72
72
-
 73
73
-
 74
74
-
 75
75
-
 76
76
-
 77
77
-
 78
78
-
 79
79
-
 80
80
-
 81
81
-
 82
82
-
 83
83
-
 84
84
-
 85
85
-
 86
86
-
 87
87
-
 88
88
-
 89
89
-
 90
90
-
 91
91
-
 92
92
-
 93
93
-
 94
94
-
 95
95
-
 96
96
-
 97
97
-
 98
98
-
 99
99
-
 100
100
-
 101
101
-
 102
102
-
 103
103
-
 104
104
-
 105
105
-
 106
106
-
 107
107
-
 108
108
-
 109
109
-
 110
110
-
 111
111
-
 112
112
-
 113
113
-
 114
114
-
 115
115
-
 116
116
-
 117
117
-
 118
118
-
 119
119
-
 120
120


Panasonic Panafax UF-490 Manuale utente
- Categoria
- Fax
- Tipo
- Manuale utente
- Questo manuale è adatto anche per
in altre lingue
- English: Panasonic Panafax UF-490 User manual
Documenti correlati
-
Panasonic DP-2000 Manuale utente
-
Panasonic UFE1 Istruzioni per l'uso
-
-
-
-
-
-
-
-
Altri documenti
-
Sharp MX-C250E Manuale del proprietario
-
Toshiba Copier Manuale utente
-
Canon IMAGERUNNER C1028IF Manuale del proprietario
-
Minolta Minoltafax 1300 Manuale utente
-
HP LaserJet 3300 Multifunction Printer series Guida utente
-
-
Konica Minolta bizhub 20 Manuale del proprietario
-
Olivetti d-Color MF222 - MF282 - MF362 - MF452 - MF552 Manuale del proprietario
-
AND TM-2480 / TM-2481 Manuale utente
-
Duplo DFC-12 Manuale utente