
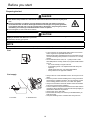
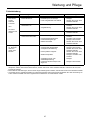
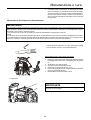
1Top cover(co mposite volum e)
OPERATOR'S MANUAL
MANUEL D'UTILISATION
BEDIENUNGSANLEITUNG
MANUALE PER L'OPERATORE
EB770
ENGLISH
FRANÇAIS
DEUTSCH
ITALIANO
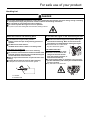
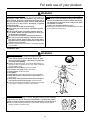
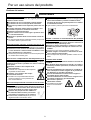
WARNING
READ THE INSTRUCTIONS CAREFULLY AND FOLLOW THE RULES FOR
SAFE OPERATION.
FAILURE TO DO SO COULD RESULT IN SERIOUS INJURY.
AVERTISSEMENT
LIRE ATTENTIVEMENT LES INSTRUCTIONS ET SUIVRE LES RÈGLES DE
SECURITÉ. LE NON-RESPECT DES RÈGLES DE SÉCURITÉ ENTRAÎNE UN
RISQUE DE BLESSURE GRAVE.
WARNUNG
LESEN SIE DIE BEDIENUNGSANLEITUNG SORGFÄLTIG DURCH, UND
BEFOLGEN SIE DIE SICHERHEITSREGELN. ANDERNFALLS BESTEHT DAS
RISIKO SCHWERER VERLETZUNGEN.
AVVERTENZA
LEGGERE E SEGUIRE ATTENTAMENTE LE ISTRUZIONI PER LAVORARE IN
CONDIZIONI DI MASSIMA SICUREZZA. LA MANCATA OSSERVANZA DELLE
ISTRUZIONI POTREBBE PROVOCARE LESIONI GRAVI.

3
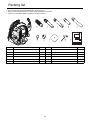
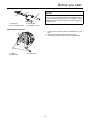
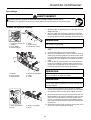
Packing list
Packing list

1Top cover
ENGLISH
(Original instructions)
OPERATOR'S MANUAL
POWER BLOWER
EB770
WARNING
READ THE INSTRUCTIONS CAREFULLY AND FOLLOW THE
RULES FOR SAFE OPERATION.
FAILURE TO DO SO COULD RESULT IN SERIOUS INJURY.

2
Important information
2Important information
Please ensure that you read the operator's manual before using your product.
Intended use of this product
The shindaiwa Blowers are designed for blowing away dust of various sorts, including fallen leaves.
Do not use this unit for any purpose other than aforementioned.
Users of the product
You should not use this product until you have read the operator's manual carefully and fully absorbed its content.
This product should not be used by anyone who has failed to read the operator's manual properly, is suffering from a
cold, tiredness or otherwise in poor physical condition, or children.
Keep in mind that the operator or user is responsible for accidents or hazards occurring to other people or their prop-
erty.
About your operator's manual
This manual contains necessary information about the assembly, operation, and maintenance of your product. Please
read it carefully and absorb its contents.
Always keep your manual in a place where it is readily accessible.
If you have lost your manual or it is damaged and no longer readable, please purchase a new one from your shindaiwa
dealer.
The units used in this manual are SI units (International System of Units). Figures in parentheses are reference values,
and there may be a slight conversion error in some cases.
Loaning or assigning your product
When loaning the product described in this manual to another party, ensure that the person borrowing and working with
the product receives the operator's manual along with the product. If you assign your product to another party, please
enclose the operator's manual with the product when handing it over.
Enquiries
Please contact your shindaiwa dealer for requests regarding information about your product, the purchase of consum-
ables, repairs, and other such enquiries.
Notices
The content of this manual may be changed without notice for the purpose of upgrades to the product. Some of the
illustrations used may differ from the product itself in order to make the explanations clearer.
This product requires the assembly of some parts.
Please consult your shindaiwa dealer if anything is unclear or of concern.
Manufacturer
YAMABIKO CORPORATION
7-2 SUEHIROCHO 1-CHOME, OHME, TOKYO 198-8760, JAPAN
Authorized Representative in Europe
CERTIFICATION EXPERTS B.V.
Stationsplein 30, 1382AD Weesp, The Netherlands

3
Contents
For safe use of your product............................................................................................... 4
Warning notices............................................................................................................. 4
Other indicators ............................................................................................................. 4
Symbols.........................................................................................................................4
Location in which the safety decal is attached............................................................... 6
Handling fuel..................................................................................................................7
Handling the engine....................................................................................................... 8
Handling the product ..................................................................................................... 9
Packing list........................................................................................................................ 12
Description........................................................................................................................ 13
Before you start ................................................................................................................14
Assembly ..................................................................................................................... 14
Preparing the fuel ........................................................................................................ 16
Engine operation............................................................................................................... 17
Starting the engine ...................................................................................................... 17
Stopping the engine..................................................................................................... 18
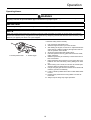
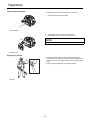
Operation .......................................................................................................................... 19
Operating blower ......................................................................................................... 19
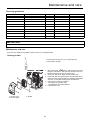
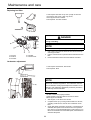
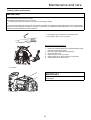
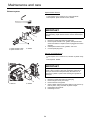
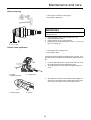
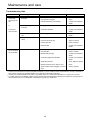
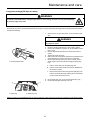
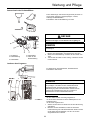
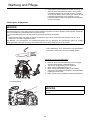
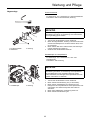
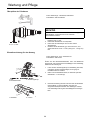
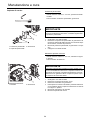
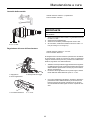
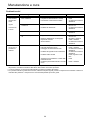
Maintenance and care ...................................................................................................... 21
Servicing guidelines..................................................................................................... 21
Maintenance and care ................................................................................................. 21
Troubleshooting table .................................................................................................. 26
Long-term storage(30 days or more)........................................................................... 27
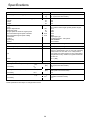
Specifications.................................................................................................................... 28
Declaration of conformity .................................................................................................. 29

4
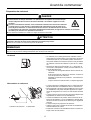
For safe use of your product
For safe use of you r product
Be careful to read this section before using your product.
The precautions described in this section contain important safety information. Please observe them carefully.
You must also read the precautions that appear in the body of the manual itself.
Text following a [diamond mark] mark describes the potential consequences of failing to observe the precaution.
Warning notices
Situations where there is a risk of physical injury to the operator and other people are indicated in this manual and on the product
itself by the following warning notices. Always read and observe them carefully in order to ensure safe operation.
Other indicators
As well as warning notices, this manual uses the following explanatory symbols:
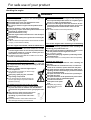
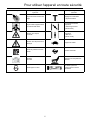
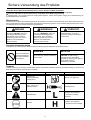
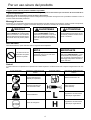
Symbols
In this manual and on the product itself, a series of explanatory symbols is used. Please make sure that you fully understand what
each symbol means.
DANGER WARNING CAUTION
This symbol accompanied by the
word "DANGER" calls attentions to
an act or a condition which will lead to
serious personal injury or death of op-
erators and bystanders.
This symbol accompanied by the
word "WARNING" calls attentions to
an act or a condition which can lead to
serious personal injury or death of op-
erators and bystanders.
"CAUTION" indicates a potentially
hazardous situation which, if not
avoided, may result in minor or mod-
erate injury.
Circle and slash sym-
bol means whatever is
shown is prohibited.
NOTE IMPORTANT
This enclosed message provides tips
for use, care and maintenance of the
product.
Framed text featuring the word "IM-
PORTANT" contains important infor-
mation about the use, checking,
maintenance and storage of the prod-
uct described in this manual.
Symbol form/shape Symbol description/applica-
tion
Symbol form/shape Symbol description/applica-
tion
Carefully read the operator's
manual
Petrol and oil mixture
Wear eyes, ears and head
protection
Purge bulb (Primer)
Safety / Alert
Carburettor adjustment
- Low speed mixture
Emergency stop
Carburettor adjustment
- High speed mixture
Finger Severing
Carburettor adjustment
- Idle speed

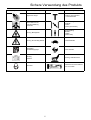
5
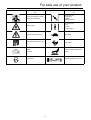
For safe use of your product
Do not use the product in plac-
es with poor ventilation
Choke Control
"Cold Start"
Position
(Choke Closed)
Beware of fire
Choke Control
"Run"
Position
(Choke Open)
Beware of electric shocks Idle speed
Guaranteed sound power lev-
el
Fast speed
Ignition
ON / OFF
Beware of high-temperature
areas
Engine start Keep bystanders away 15 m
Symbol form/shape Symbol description/applica-
tion
Symbol form/shape Symbol description/applica-
tion

6
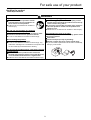
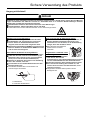
For safe use of your product
Location in which the safety decal is attached
The safety decal shown below has been attached to the product described in this manual. Ensure that you understand what the
decal means before using your product.
If the decal becomes unreadable due to wear and tear or damage, or peels off and is lost, please purchase a replacement decal
from your shindaiwa dealer and attach it in the location shown in the illustrations below. Ensure that the decal is readable at all
times.
1. Safety decal (Part number X505002310)
2. Safety decal (Part number 89016009461)
3. Safety decal (Part number X505007910)

7
For safe use of your product
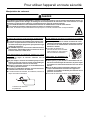
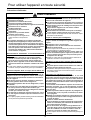
Handling fuel
DANGER
Always keep well away from fire when refuelling
Fuel is highly inflammable and leads to a risk of fire if mishandled. Use extreme care when mixing, storing or handling
or serious personal injury may result. Be careful to observe the following instructions.
Do not smoke or hold a flame near when refuelling.
Do not fuel up while the engine is hot or in operation.
If you do so, the fuel could ignite and cause fire, leading to burns.
About the container and refuelling place
Use an approved fuel container.
Fuel tanks/cans may be under pressure.
Always loosen fuel caps slowly allowing pressure to
equalize.
DO NOT fill fuel tanks indoors.
ALWAYS fill fuel tanks outdoors over bare ground.
Fuel spills can cause fire
Observe the following precautions when refuelling:
Do not add so much fuel that it reaches the mouth of the
fuel tank. Keep the fuel within the prescribed level (up to
the shoulder level of the fuel tank).
Mop up any fuel that overflows or spills out due to over-
filling.
Tighten the fuel tank cap securely after refuelling.
Fuel spills can cause fire and burns when ignited.
1. Fuel tank
2. Shoulder level
Do not start the engine in the area where you refu-
elled
You must not start the engine in the place where you
carried out the refuelling. Move at least 3m from the
place where you refuelled before starting the engine.
Fuel leaks that occur while refuel-
ling can cause fire if ignited.
Fuel leaks cause fire
After refuelling, always check
that there are no leaks or dis-
charges of fuel from the fuel
pipe, fuel system grommets, or
around the fuel tank cap.
If you do find fuel leaks or discharges, stop using the
product immediately and contact your shindaiwa dealer
to have it repaired.
Any fuel leaks could cause fire.

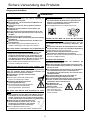
8
For safe use of your product
Handling the engine
WARNING
Starting the engine
Be particularly careful to observe the following precau-
tions when starting the engine:
Check that none of the nuts and bolts are loose
Check that there are no fuel leaks
Do not try to start the engine with the product shoul-
dered
Place the product in a flat, well ventilated place
Leave plenty of space around the product and do not al-
low people or animals near it
Remove obstructions, if any
Start the engine with the throttle lever in the start/oper-
ation position
Hold the product firmly to the ground when starting the
engine
Failure to observe the precautions could cause an accident
or injury, or even lead to a fatality.
Once the engine has started, check for abnormal vi-
brations and sounds
Check that there are no abnormal vibrations or sounds
once the engine starts. Do not use the product if there
are abnormal vibrations or sounds. Contact your shin-
daiwa dealer to have it repaired.
Accidents involving parts that fall or shatter off can cause
wounds or serious injury.
Do not touch high temperature or high voltage com-
ponents while the product is running
Do not touch the following high temperature or high volt-
age components while the product is running or for some
time after it stops.
Silencer, cylinder, and other high tempera-
ture components
You could burn yourself if you touch a high
temperature component.
Spark plug, spark plug wire, and other
high voltage components
You could receive an electric shock if you
touch a high voltage component while the
product is running.
Put safety first in the case of fire or smoke
If fire comes from the engine or smoke appears from
any area other than the exhaust vent, first distance
yourself from the product to ensure your physical safe-
ty.
Use a shovel to throw sand or other such
material on the fire to prevent it from
spreading, or put it out with a fire extin-
guisher.
A panicked reaction could result in the fire and
other damage becoming more extensive.
Exhaust fumes are toxic
The exhaust fumes from the engine contain toxic gases.
Do not operate the product indoors or in a plastic green-
house or in other ill ventilated places.
In case of conducting the work near the house, do not
conduct the work near the opened window. There is the
possibility that the exhaust fumes comes into the
house.
The exhaust fumes could cause poisoning.
Turn off the engine when checking or maintaining
the product
Observe the following precautions when checking and
maintaining your product after use:
Turn the engine off and do not attempt to check or main-
tain the product until the engine has cooled
You could burn yourself.
Remove the spark plug cap before performing checks
and maintenance
An accident could occur if the product starts unexpectedly.
Checking the spark plug
Observe the following precautions when checking the
spark plug.
If the electrodes or terminals are worn, or if there are
cracks in the ceramics, replace them with new parts.
The spark test (for checking whether the spark plug is
sparking) must be carried out by a professional. Please
ask your shindaiwa dealer.
The spark test must not be carried out in proximity of
the spark plug hole.
The spark test must not be performed in places where
there are fuel spills or inflammable gases.
You must not touch the
metal parts of the spark
plug.
The spark plug could ig-
nite a fire or give you an
electric shock.

9
For safe use of your product
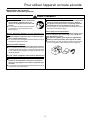
Handling the product
General precautions
WARNING
Operator's manual
Be careful to read the operator's manual
properly before using your product in or-
der to ensure correct operation.
Failure to do so could lead to an accident or
serious injury.
Do not use the product for anything
other than its intended purpose
You must not use the product for any purpose other
than those described in the operator's manual.
To do so could lead to an accident or serious injury.
Do not modify the product
You must not modify the product.
To do so could lead to an accident or serious injury. Any
malfunction resulting from a modification to the product will
not be covered by the manufacturer's warranty.
Do not use the product unless it has been checked
and maintained
You must not use the product unless it has been
checked and maintained. Always ensure that the prod-
uct is checked and maintained on a regular basis.
Failure to do so could lead to an accident or serious injury.
Loaning or assigning your product
When loaning your product to another party, ensure
that the person borrowing the product receives the op-
erator's manual along with it.
If you assign your product to another party, please en-
close the operator's manual with the product when
handing it over.
Failure to do so could lead to an accident or serious injury.
Being prepared in case of an injury
In the unlikely event of an accident or injury, please ensure
that you are prepared.
First aid kit
Towels and wipes (to stop any bleeding)
Whistle or mobile phone (for calling outside help)
If you are unable to perform first aid or call for outside help,
the injury could worsen.

10
For safe use of your product
Precautions for use
WARNING
Users of the product
The product should not be used by:
people who are tired
people who have taken alcohol
people who are on medication
people who are pregnant
people who are in poor physical
condition
people who have not read the op-
erator's manual
children
Failure to observe these instruc-
tions could lead to an accident.
The ignition system of this product generates electro-
magnetic fields during operation. Magnetic fields can
cause pacemaker interference or pacemaker failure. To
reduce health risks, we recommend that pacemaker us-
ers consult their physician and the pacemaker manu-
facturer before operating this product.
Environment of use and operation
Do not use the product in places where there is no sure
foothold, such as on steep slopes or after rainfall, as
such places are slippery and dangerous.
Do not operate the product at night or in dark places
with poor visibility.
A serious injury could result if you fall or slip, or fail to oper-
ate the product correctly.
The area within a 15 m radius is a danger zone
The area within a 15 m radius of the product is a danger
zone. Be careful to observe the following precautions
while working with the product.
Do not allow children and other people or pets to enter
the danger zone.
If another person enters the danger zone, turn off the
engine.
When approaching the operator, signal to him by, for
example, throwing twigs from outside the danger zone,
and then check that engine has been switched off.
If more than one person is working with the product,
identify the way in which you will signal to each other
and work at least 15 m apart
Thrown objects could cause serious injury to the operator or
bystanders.
Using the product
When using the product, pay special attention to observe
the following precautions.
Do not allow people who are irrelevant to the work con-
ducted or animals to be in the worksite.
Do not point the blower pipe at people or animals.
Do not use the product in places where there is no sure
foothold.
Hold the handle tightly.
Avoid using the product late at night or early in the
morning so that the neighbors will not be disturbed by
noise.
Failure to observe these instructions could lead to an acci-
dent or injury.
Turn off the engine when moving around
When moving around in the situations described below,
turn off the engine and move with the product shouldered.
Moving to the place where you are working
Moving to another area while you are working
Leaving the place where you have been working
Failure to observe these precautions could cause burns or
serious injury.
When transporting the product by car, empty the fuel
tank, put the product in the upright position, and secure
it firmly in place to prevent it from moving around.
Travelling by car with fuel in the fuel tank could lead to a fire.
Be careful not to get caught in the fan
Be careful not to get your hair caught in the fan.
Never put your hand in between the engine and the
backpack frame when the product is in operation.
The wind suction from the fan could make your hand and an-
ything being caught in the fan, resulting in a serious injury.
Vibration and cold
It is believed that a condition called Raynaud's Phenome-
non which affects the fingers of certain individuals may be
brought about by exposure to vibration and cold. Expo-
sure to vibration and cold may cause tingling and burning,
followed by loss of colour and numbness in the fingers.
The following precautions are strongly recommended be-
cause the minimum exposure which might trigger the ail-
ment is unknown.
Keep your body warm, especially the head and neck,
feet and ankles, and hands and wrists.
Maintain good blood circulation by performing vigorous
arm exercises during frequent work breaks, and also by
not smoking.
Limit the number of hours of operation.
Try to fill each day with jobs where operating the blower
or other hand-held power equipment is not required.
If you experience discomfort redness and swelling of
the fingers, followed by whitening and loss of feeling,
consult your physician before exposing yourself further
to cold and vibration.
Failure to observe these instructions could result in damage
to your health.

11
For safe use of your product
Protective gear
WARNING
Repetitive stress injuries
It is believed that over-using the muscles and tendons of
the fingers, hands, arms and shoulders may cause sore-
ness, swelling, numbness, weakness and extreme pain to
the areas just mentioned. Certain repetitive hand activities
may put you at a high risk for developing a repetitive
stress injury (RSI).
To reduce the risk of RSI, do the following:
Avoid using your wrist in a bent, extended or twisted
position.
Take periodic breaks to minimize repetition and rest
your hands. Reduce the speed and force in which you
do the repetitive movement.
Do exercises to strengthen hand and arm muscles.
See a doctor if you feel tingling, numbness or pain in
your fingers, hands, wrists or arms. The sooner RSI is
diagnosed, the more likely permanent nerve and muscle
damage can be prevented.
Failure to observe these instructions could result in damage
to your health.
Turn off the engine immediately if anything goes
wrong
Turn off the engine immediately if the product suddenly
starts to emit abnormal sounds or vibrate abnormally.
The product cannot be used when it suffers from abnor-
mal vibration or sounds.
Contact your shindaiwa dealer for repair.
Continuing to use parts when they are damaged could lead
to an accident or serious injury.
WARNING
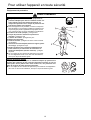
Wear protective gear
Wear appropriate work clothes and protective gear
when working with the power blower. Above all, make
sure to wear safety goggles, a dust mask, and ear muffs
at all times while working.
Without the protective gear, you could inhale the debris or
dust blown away or get them in your eyes, which could lead
to an accident or injury.
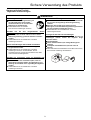
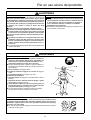
a Head protection (helmet): Protects the head
b Ear muffs or ear plugs: Protect the hearing
c Safety goggles: Protect the eyes
d Dust mask
e Safety gloves: Protect the hands from cold and vibration
f Work clothes that fit (long sleeves, long trousers): Pro-
tect the body
g Heavy duty, non-slip protective boots (with toecaps) or
non-slip work shoes (with toecaps): Protect the feet
Failure to observe these precautions could result in damage
to your sight or hearing, or lead to a serious injury.
Wear proper clothing
Do not wear ties, jewellery, or loose, dangling clothing which could be
caught in the unit. Do not wear open toed footwear, or go bare-foot or barel-
egged. In certain situations, total face and head protection may be required.
Failure to observe these precautions could result in damage to your sight or
hearing, or lead to a serious injury.

12
Packing list
Packing list
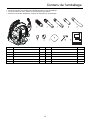
The following parts are packed separately in the packing box.
When you have unpacked the box, please check the parts that it contains.
Contact your shindaiwa dealer if anything is missing or broken.
Number Part name Quantity Number Part name Quantity
(1) Power Head 1 (7) Clamp 1
(2) Flexible Pipe 1 (8) Clamp with Guide Loop 1
(3) Swivel Pipe 1 (9) Intake cover 1
(4) Straight Pipe 1 (10) T-Wrench 1
(5) Round Straight Nozzle 1 (11) Operator's Manual 1
(6) Round Bent Nozzle 1

13
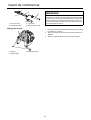
Description
Descript ion
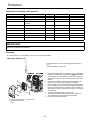
1. Spark plug Provides spark to ignite fuel mixture.
2. Spark arrester - Catalytic silencer / Silencer The silenc-
er or catalytic silencer controls exhaust noise and emis-
sion. The spark arrester screen prevents hot, glowing
particles of carbon from leaving the silencer. Keep ex-
haust area clear of flammable debris.
3. Serial number label Lists model number and serial num-
ber of unit.
4. Starter handle Pull recoil handle slowly until recoil starter
engages, then quickly and firmly. When engine starts,
return handle slowly. DO NOT let handle snap back or
damage to unit will occur.
5. Air cleaner Contains replaceable air filter element.
6. Choke Choke is located on the side of the air cleaner.
Move choke lever to position to close choke for cold
starting. Move choke lever to position to open
choke.
7. Purge bulb Pumping purge bulb before starting engine
draws fresh fuel from the fuel tank, purging air from the
carburettor. Pump purge bulb until fuel is visible. Pump
purge bulb an additional 4 or 5 times.
8. Fuel tank Contains fuel and fuel filter.
9. Fuel tank cap Covers and seals fuel tank.
10. Shoulder harness Used to support unit on operator's
back. The straps are adjustable.
11. Handle Used by operator to direct and control air flow.
12. Throttle position lever (Throttle setting device) Com-
bination stop switch and variable speed throttle lever.
When the lever is moved all the way backward, the
blower is at Wide Open Throttle (W.O.T.). When the le-
ver is moved forward to detent, the blower is at idle.
When the lever is moved forward past the idle detent the
blower will stop.
13. Throttle trigger Spring-loaded throttle trigger controls
engine speed. Releasing trigger returns engine to
speed set by Throttle position lever. Always release trig-
ger and allow engine to return to idle before shutting off
with Throttle position lever. Use throttle trigger to vary
blower speed settings for intermittent operation.
14. Locking knob Allows operator to adjust handle position
for optimum comfort and control.
15. Blower pipes Exclusive positive locking system.
16. Flexible pipe Allows for full range of movement.

14
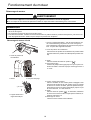
Before you start
Before you start
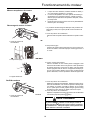
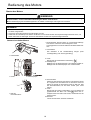
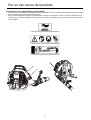
Assembly
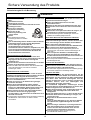
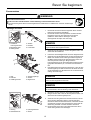
Install blower pipes
1. Assemble clamp onto end with smaller diameter of flexible
pipe.
2. Assemble clamp with guide loop onto end with larger diam-
eter of flexible pipe. Place clamp with opening side of clip di-
rected upward.
3. Assemble swivel pipe into flexible pipe and tighten clamp.
4. Insert anti-static wire through flexible pipe.
5. Assemble flexible pipe to elbow on blower. Place clamp with
guide loop around midway between end of flexible pipe and
bellows. Position guide loop on outside of flexible pipe (away
from blower) and tighten clamp.
6. Position cable along the outside of elbow. Loosen locking
knob on handle. AIign notch in handle with tabs. Install onto
swivel pipe past long ridges in pipe.
7. Clip throttle cable into guide loop.
8. Position handle for comfortable operation, and tighten lock-
ing knob hand tight.
9. Assemble straight pipe onto swivel pipe, until you feel light
resistance. Do not force connection. Hold swivel pipe and
turn straight pipe clockwise, engaging positive locking chan-
nels,until connection is firm. Do not force connection.
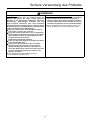
10. Assemble round straight nozzle or round bent nozzle to
straight pipe as in step 9.
WARNING
Read the operator's manual carefully to ensure that you assemble the product correctly.
Never perform maintenance or assembly procedures with engine running.
Using a product that has been incorrectly assembled could lead to an accident or serious injury.
1. Clamp with guide loop
3. Flexible pipe
5. Opening side
2. Clamp
4. Swivel pipe
6. Around midway
NOTE
Clamp with cable guide loop fits elbow end of flexible pipe.
1. Handle
3. Swivel pipe
5. Anti-static wire
2. Locking knob
4. Clamp
6. Elbow
NOTE
A light lubricant may be used to ease assembly of flexible pipe
to blower elbow.
NOTE
Hang handle freely from blower to assure throttle cable is not
twisted before installing handle.
1. Throttle cable
3. Pinch
2. Guide loop
4. Open

15
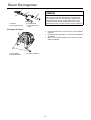
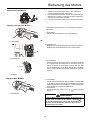
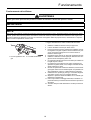
Before you start
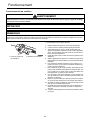
Adjusting the harness
1. Loosen upper and lower buckles, then put blower on your
back.
2. Pull strap downward to adjust position of blower.
3. Pull to adjust angle between your back and the blower.
1. Swivel pipe
3. Round straight nozzle
2. Straight pipe
4. Round bent nozzle
NOTE
Blower use will eventually loosen pipe connections. Exclusive
positive locking system allows pipes to be tightened. If loosen-
ing occurs, remove straight pipe and round straight nozzle or
straight pipe and round bent nozzle and install according to in-
structions 9 & 10.
1. Buckles
3. Adjust angle
2. Adjust position

16
Before you start
Preparing the fuel
Fuel
Fuel is a mixture of regular grade petrol and an air-cooled 2-
stroke engine oil of reputable brand name.
Minimum 89 Octane unleaded petrol is recommended. Do not
use fuel containing methyl alcohol or more than 10 % of ethyl
alcohol.
Recommended mixture ratio; 50 : 1 (2 %) for ISO-L-EGD
Standard (ISO/CD 13738), JASO FC,FD grade and Shindaiwa
One oil.
- Do not mix directly in engine fuel tank.
- Avoid spilling petrol or oil. Spilled fuel should always be
wiped up.
- Handle petrol with care, it is highly inflammable.
- Always store fuel in approved container.
Fuel supply
Always refuel in a well ventilated location. Do not pour fuel in-
doors.
Place the product and the refuelling tank on the ground when
performing the refuelling operation. Do not refuel the product
on the loading platform of a truck, or in other such places.
Always ensure that the fuel level remains below the shoulder
level of the fuel tank when refuelling.
There is a difference in pressure between the fuel tank and the
outside air. When refuelling, loosen the fuel tank cap slightly to
eliminate the difference in pressure.
Always wipe up any fuel spills.
Move at least 3m away from where you refuelled before you
start the engine.
Keep the refuelling tank in a shaded area away from fire.
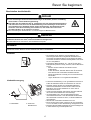
DANGER
Fuel is highly inflammable and there is a risk of fire if it is handled incorrectly. Carefully read
and observe the precautions in the section of this manual titled "For safe use of your prod-
uct".
Once the refuelling is complete, securely tighten the fuel tank cap and do not forget to
check that there are no leaks or discharges of fuel from the fuel pipe, fuel system grommets,
or around the fuel tank cap. If you do find fuel leaks or discharges, stop using the product
immediately and contact your shindaiwa dealer to have it repaired.
If the fuel ignites, it could cause burns and fire.
CAUTION
There is difference in pressure between the fuel tank and the outside air. When refuelling, loosen the fuel tank cap
slightly to eliminate the difference in pressure.
Otherwise, fuel may get spewed.
NOTE
Stored fuel ages. Do not mix more fuel than you expect use in thirty (30) days. Do not mix directly in fuel tank.
1. Fuel tank 2. Shoulder level

17
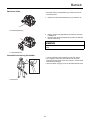
Engine operation
Engine operation
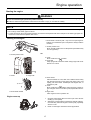
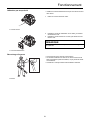
Starting the engine
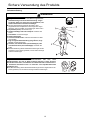
Starting a cold engine
Recoil starter: Use short pulls - only 1/2-2/3 of rope length for
starting. Do not allow the rope to snap back in. Always hold the
unit firmly.
1. Throttle position lever
Move Throttle position lever to idle position (first detent away
from stop position).
2. Choke
Move choke lever to position.
3. Purge Bulb
Pump purge bulb until fuel is visible. Pump purge bulb an ad-
ditional 4 or 5 times.
4. Recoil Starter
Place the blower on a flat, clear area. Hold the blower firmly
with left hand and pull out the starter grip gently at first, and
rapidly pull recoil starter handle/rope until engine fires, or
maximum 5 pulls.
5. Choke
Move choke lever to position and if necessary, restart en-
gine.If engine does not start after 5 pulls,repeat instructions 2-
5.
6. Engine start
Allow engine to warm up before use.
Engine warm-up
1. Once the engine starts, allow it to warm up for 2 to 3 minutes
at idling (i.e. low speed).
2. Warming the engine helps to lubricate its internal workings
more smoothly. Allow the engine to warm up fully, especially
when it is cold.
3. Never run the engine without the blower pipes fitted.
WARNING
When starting the engine, observe the precautions described from Page 4 in the section "For safe use of your prod-
uct" to ensure that you operate the product correctly.
Failure to observe the precautions could cause an accident or injury, or even lead to a fatality.
NOTE
Pull out the starter grip gently at first, and then more rapidly. Do not pull the starter rope out to more than 2/3 of its length.
Do not let go of the starter grip as it returns.
To start the engine, return the choke knob when you hear the first explosion-like sound and pull on the starter grip again. Be
careful not to miss the first explosion-like sound.
1. Throttle position lever
1. Choke 2. Purge bulb
1. Recoil starter handle

18
Engine operation
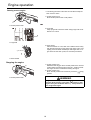
Starting a warm engine
The starting procedure is the same as Cold Start except DO
NOT close the choke.
1. Throttle Position Lever
Move throttle position lever to idle position.
2. Purge Bulb
Pump purge bulb until fuel is visible. Pump purge bulb an ad-
ditional 4 or 5 times.
3. Recoil Starter
Place the blower on a flat, clear area. Hold the blower firmly
with left hand and pull out the starter grip gently at first, and
rapidly pull recoil starter handle/rope until engine fires. If en-
gine does not start after 5 pulls, use cold start procedures.
Stopping the engine
1. Throttle position lever
Release throttle trigger. Move Throttle position lever forward
to idle position (first detent away from W.O.T. position) and al-
low engine to return to idle before shutting off engine.
2. Throttle position lever
Move Throttle position lever all the way forward to (Stop)
position.
1. Throttle position lever
1. Purge bulb
1. Starter handle
1. Throttle position lever
WARNING
If engine does not stop when Throttle position lever is
moved to STOP position, close choke - position- to stall
engine. Have your shindaiwa dealer repair stop switch be-
fore using blower again.
La pagina si sta caricando...
La pagina si sta caricando...
La pagina si sta caricando...
La pagina si sta caricando...
La pagina si sta caricando...
La pagina si sta caricando...
La pagina si sta caricando...
La pagina si sta caricando...
La pagina si sta caricando...
La pagina si sta caricando...
La pagina si sta caricando...
La pagina si sta caricando...
La pagina si sta caricando...
La pagina si sta caricando...
La pagina si sta caricando...
La pagina si sta caricando...
La pagina si sta caricando...
La pagina si sta caricando...
La pagina si sta caricando...
La pagina si sta caricando...
La pagina si sta caricando...
La pagina si sta caricando...
La pagina si sta caricando...
La pagina si sta caricando...
La pagina si sta caricando...
La pagina si sta caricando...
La pagina si sta caricando...
La pagina si sta caricando...
La pagina si sta caricando...
La pagina si sta caricando...
La pagina si sta caricando...
La pagina si sta caricando...
La pagina si sta caricando...
La pagina si sta caricando...
La pagina si sta caricando...
La pagina si sta caricando...
La pagina si sta caricando...
La pagina si sta caricando...
La pagina si sta caricando...
La pagina si sta caricando...
La pagina si sta caricando...
La pagina si sta caricando...
La pagina si sta caricando...
La pagina si sta caricando...
La pagina si sta caricando...
La pagina si sta caricando...
La pagina si sta caricando...
La pagina si sta caricando...
La pagina si sta caricando...
La pagina si sta caricando...
La pagina si sta caricando...
La pagina si sta caricando...
La pagina si sta caricando...
La pagina si sta caricando...
La pagina si sta caricando...
La pagina si sta caricando...
La pagina si sta caricando...
La pagina si sta caricando...
La pagina si sta caricando...
La pagina si sta caricando...
La pagina si sta caricando...
La pagina si sta caricando...
La pagina si sta caricando...
La pagina si sta caricando...
La pagina si sta caricando...
La pagina si sta caricando...
La pagina si sta caricando...
La pagina si sta caricando...
La pagina si sta caricando...
La pagina si sta caricando...
La pagina si sta caricando...
La pagina si sta caricando...
La pagina si sta caricando...
La pagina si sta caricando...
La pagina si sta caricando...
La pagina si sta caricando...
La pagina si sta caricando...
La pagina si sta caricando...
La pagina si sta caricando...
La pagina si sta caricando...
La pagina si sta caricando...
La pagina si sta caricando...
La pagina si sta caricando...
La pagina si sta caricando...
La pagina si sta caricando...
La pagina si sta caricando...
La pagina si sta caricando...
La pagina si sta caricando...
La pagina si sta caricando...
La pagina si sta caricando...
La pagina si sta caricando...
La pagina si sta caricando...
La pagina si sta caricando...
La pagina si sta caricando...
La pagina si sta caricando...
La pagina si sta caricando...
La pagina si sta caricando...
La pagina si sta caricando...
La pagina si sta caricando...
La pagina si sta caricando...
La pagina si sta caricando...
La pagina si sta caricando...
La pagina si sta caricando...
La pagina si sta caricando...
La pagina si sta caricando...
La pagina si sta caricando...
La pagina si sta caricando...
La pagina si sta caricando...
-
 1
1
-
 2
2
-
 3
3
-
 4
4
-
 5
5
-
 6
6
-
 7
7
-
 8
8
-
 9
9
-
 10
10
-
 11
11
-
 12
12
-
 13
13
-
 14
14
-
 15
15
-
 16
16
-
 17
17
-
 18
18
-
 19
19
-
 20
20
-
 21
21
-
 22
22
-
 23
23
-
 24
24
-
 25
25
-
 26
26
-
 27
27
-
 28
28
-
 29
29
-
 30
30
-
 31
31
-
 32
32
-
 33
33
-
 34
34
-
 35
35
-
 36
36
-
 37
37
-
 38
38
-
 39
39
-
 40
40
-
 41
41
-
 42
42
-
 43
43
-
 44
44
-
 45
45
-
 46
46
-
 47
47
-
 48
48
-
 49
49
-
 50
50
-
 51
51
-
 52
52
-
 53
53
-
 54
54
-
 55
55
-
 56
56
-
 57
57
-
 58
58
-
 59
59
-
 60
60
-
 61
61
-
 62
62
-
 63
63
-
 64
64
-
 65
65
-
 66
66
-
 67
67
-
 68
68
-
 69
69
-
 70
70
-
 71
71
-
 72
72
-
 73
73
-
 74
74
-
 75
75
-
 76
76
-
 77
77
-
 78
78
-
 79
79
-
 80
80
-
 81
81
-
 82
82
-
 83
83
-
 84
84
-
 85
85
-
 86
86
-
 87
87
-
 88
88
-
 89
89
-
 90
90
-
 91
91
-
 92
92
-
 93
93
-
 94
94
-
 95
95
-
 96
96
-
 97
97
-
 98
98
-
 99
99
-
 100
100
-
 101
101
-
 102
102
-
 103
103
-
 104
104
-
 105
105
-
 106
106
-
 107
107
-
 108
108
-
 109
109
-
 110
110
-
 111
111
-
 112
112
-
 113
113
-
 114
114
-
 115
115
-
 116
116
-
 117
117
-
 118
118
-
 119
119
-
 120
120
-
 121
121
-
 122
122
-
 123
123
-
 124
124
-
 125
125
-
 126
126
-
 127
127
-
 128
128


in altre lingue
- English: Shindaiwa EB770 User manual
- français: Shindaiwa EB770 Manuel utilisateur
- Deutsch: Shindaiwa EB770 Benutzerhandbuch
Documenti correlati
-
Shindaiwa EB770 Manuale utente
-
Shindaiwa EB252 Manuale utente
-
-
-
-
-
-
-
-