Philips GC6040 Manuale utente
- Categoria
- Ferri da stiro
- Tipo
- Manuale utente

Supervapor GC6048, 6046, 6044, 6042, 6040

2

3
B
F
D
S
N
M
I
L
P
Q
O
A
K
R
C
E
G
H
J

4


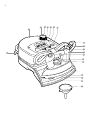
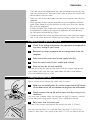
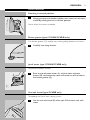
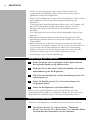
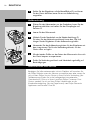
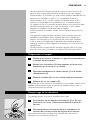
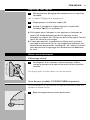
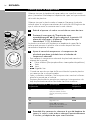
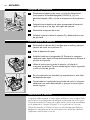
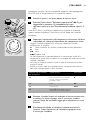
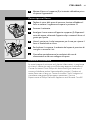
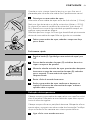
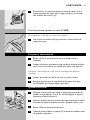
General description
A Steam tank
B Filling opening with screw cap
C Steam control
Position 1: minimum steam output
Position 5: maximum steam output (types
GC6044/GC6046/GC6048 only)
D 'Steam tank heating up' (U) pilot light.The pilot light goes out when
the appliance is ready for steam ironing.
E 'Steam tank on/off' (≤) switch with integrated pilot light
F 'Iron on/off' (≤) switch with integrated pilot light
G Manometer to verify steam pressure.When the needle is in the
green area, there is sufficient steam pressure (type GC6048 only).
H Mains cord
I Supply hose
J Iron storage hook with integrated hose storage clip
K 'Iron heating up' pilot light
L Jet-of-steam button (types GC6046/GC6048 only)
M Steam activator button
N Temperature dial
O Soleplate
P Removable iron stand
Q Button groove with jet-of-steam holes
R Anti-calc funnel (type GC6048 only)
S Cord storage facility
Important
For optimal safety, read these instructions carefully and look at the
illustrations before you start using the appliance.
- Do not put perfume, vinegar, descaling agents or other chemicals in
the steam tank.
- Never use the appliance if it is damaged in any way. Regularly check if
the mains cord and the supply hose are still undamaged and safe.
- If the mains cord of this appliance is damaged, it must always be
replaced by Philips or a service centre authorised by Philips, as
special tools and/or parts are required.
- Only use the screw cap of the steam tank that has been supplied
with the appliance, as this cap also functions as a safety valve.
- Check if the voltage indicated on the bottom of the steam tank
corresponds to the mains voltage in your home before you connect
the appliance.
- Only connect the appliance to an earthed wall socket.
- Never immerse the iron or the steam tank in water.
- Never leave the iron unattended when it is connected to the mains.
- When you have finished ironing and even when you leave the iron
for a short while, unplug the iron and put it on the iron stand.
- Always place the steam tank on a stable, level and horizontal surface.
Do not put the steam tank on the soft part of the ironing board.
- Always place the iron on the iron stand. Do not put the hot iron on
the supply hose or the mains cord.
ENGLISH6

- The iron stand and soleplate of the iron can become extremely hot
and may cause burns if touched. If you want to move the steam tank,
do not touch the iron stand.
- Make sure the mains cord does not come into contact with the hot
soleplate.
- Infirm persons should not be allowed to use the appliance without
supervision. Keep an eye on children to make sure that they do not
play with the appliance.
- If steam escapes from under the screw cap of the steam tank when
the appliance is heating up, switch the appliance off and contact a
service centre authorised by Philips
- Do not remove the screw cap from the steam tank when the steam
tank is still under pressure. Follow the instructions under 'Fast refill'.
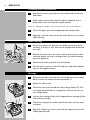
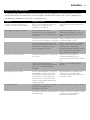
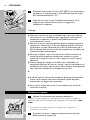
Preparing the appliance for use
1 Check if the voltage indicated on the type plate corresponds to
the mains voltage in your home.
2 Remove any sticker, protective foil or storage cover from the
soleplate.
3 Fully unwind the mains cord (I) and supply hose (H).
4 Place the steam tank (A) on a stable, level surface.
5 Place the iron on the iron stand (P).
Do not place the hot iron on the steam tank, the supply hose or the
mains cord. Make sure the mains cord does not come into contact
with the soleplate when it is hot.
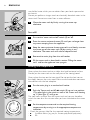
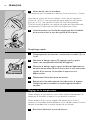
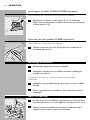
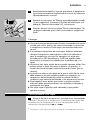
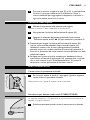
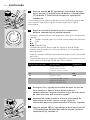
Filling the steam tank
Never immerse the iron or the steam tank in water.
1 Make sure the on/off switch (F) and the 'steam tank on/off' switch
(E) has been set to 'off' and remove the plug from the wall socket.
C
2 Slowly unscrew the cap (B) of the steam tank by turning it anti-
clockwise.
You may hear a sound when you remove the cap.This sound is caused
by the cold tank being under vacuum.This is absolutely normal.
C
3 Pour water into the steam tank.
Do not fill the steam tank beyond the maximum level (1.5 litres).
You can use tap water if it is not too hard (less than 10 DH). If the
water in your area is very hard (more than 17 DH), we advise you to
ENGLISH 7

use distilled water, which you can obtain from your local supermarket
or chemist.
Do not put perfume, vinegar, starch or chemically descaled water in the
steam tank. Do not use water from a water softener.
C
4 Close the steam tank by firmly turning the screw cap
clockwise.
Fast refill
1 First set the 'steam tank on/off' switch (E) to 'off'.
C
2 Press the steam activator button (M) until you no longer hear
any steam escaping from the appliance.
3 Keep the steam activator button pressed in and slowly unscrew
the screw cap of the steam tank (B) by turning it anti-
clockwise.The steam tank will now be depressurised.
4 Remove the mains plug from the wall socket.
5 Fill the steam tank as described in section 'Filling the steam
tank' and let the appliance heat up again.
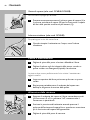
Setting the temperature
Always place the steam tank on a stable, level and horizontal surface
Do not put the steam tank on the soft part of the ironing board.
Always place the iron on the iron stand. Do not put the hot iron on
the supply hose or the mains cord. Make sure the cord does not come
into contact with the hot soleplate.
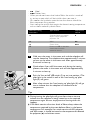
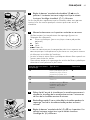
1 Put the mains plug in an earthed wall socket.
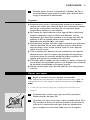
C
2 Push the 'Steam tank on/off' ≤ switch (E) to set it to position
I.The pilot light in the switch as well as the 'Steam tank heating
up' U pilot light (C) will go on.
The iron heats up faster than the steam tank and you can therefore
switch the iron on a few minutes after you have switched on the steam
tank.
C
3 Set the temperature control to the required ironing
temperature by turning it to the appropriate temperature
indication.
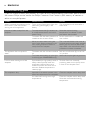
- Check the garment label for the required ironing temperature:
- 1 Synthetic fabrics (e.g. acrylic, viscose, polyamide, polyester)
- 1 Silk
ENGLISH8
H
I
L
O
A
I
G
O
D
O
N
L
A
N
A
A
L
G
O
D
O
N
H
I
L
O
M
A
X
O
/
O
F
F
L
I
N
E
N
C
O
T
T
O
N
W
O
O
L
S
I
L
K
N
Y
L
O
N

- 2 Wool
- 3 Cotton, linen
- When you do not know what kind of fabric the article is made of,
try to iron a spot which will be invisible when you wear it.
- Silk, woollen and synthetic materials: iron the reverse side of the
fabric to prevent shiny patches.
- Start ironing the articles that require the lowest ironing temperature,
such as those made of synthetic fibres.
4 Cold start: the water in the steam tank and the soleplate will
now be heated up.The soleplate takes approximately 2 minutes
to heat up, the water in the steam tank takes approximately
8 minutes to heat up.
5 Quick reheat: if you refill the steam tank during the ironing
process, the water in the steam tank will take approximately
6 minutes to heat up.
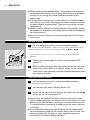
C
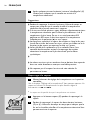
6 Push the 'Iron on/off' ≥ switch (F) to set it to position I.The
pilot light in the switch as well as the 'Iron heating up' pilot
light (K) will go on.
7 After a few minutes the 'Iron heating up' pilot light (K) will go
out to indicate that the soleplate has reached the set
temperature.
Tips
◗ During ironing the pilot light will go on from time to time to
indicate that the soleplate is being heated up to the required
temperature again.You can simply continue ironing when this
happens.
◗ If the fabric consists of various kinds of fibres, always select the
temperature required by the most delicate fibre, i.e. the lowest
temperature. For example: if an article consists of 60% polyester
and 40% cotton, it should be ironed at the temperature indicated
for polyester (1) and without steam.
ENGLISH 9
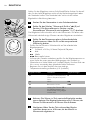
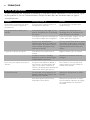
Temperature
control
1
2
3
Type of fabric
Synthetic fabrics e.g. acetate,
acrylic, viscose, polyamide,
polyester Silk
Wool
Cotton Linen
Please note: Z on the table
means that the article
cannot be ironed.
Label with ironing
instructions
B
C
D
Z

◗ When steam ironing woollen fabrics, shiny patches may occur.You
can prevent this by using a dry pressing cloth and the jet-of-steam
function or by turning the article inside out and ironing the
reverse side.
◗ The iron heats up faster than it cools down.You should therefore
start ironing the articles that require the lowest temperature, such
as those made of synthetic fibres.Then continue ironing at higher
temperatures.
◗ Velvet and other fabrics that tend to acquire shiny patches, should
be ironed in one direction only (along with the nap) while applying
very little pressure.
◗ Do not use steam when you are ironing coloured silk.This could
cause stains.
Steam ironing
1 Set the temperature dial to the recommended position.
See 'Setting the temperature'. Steam ironing is only possible at higher
ironing temperatures: set the temperature dial to 2 or 3.
B
Steam output will start as soon as the set temperature has been
reached.
C
2 While steam ironing, keep the steam activator button (M)
pressed in.
3 During steam ironing the two pilot lights (D) and (K) will go on
from time to time.When this happens, either the iron or the
steam tank is being heated up to the required temperature.You
can continue ironing.
Ironing without steam
1 Set the temperature dial to the recommended position.
See 'Setting the temperature'.
2 Do not press the steam activator button (M).
3 Switch off the steam tank by pushing the 'Steam tank on/off' ≤
switch (D) to set it to position O.
◗ Some steam will escape if you press the steam activator button
(M) by accident while you are ironing. If the tank is empty or is not
heated up yet, you will hear a clicking sound inside the steam tank.
This phenomenon is caused by the opening of the steam valve and
is harmless.
◗ If you have been ironing at a high temperature and subsequently
set the temperature dial (N) to a lower setting, wait until the 'iron
heating up' pilot light (K) goes on again before you continue
ironing.This will prevent damage to fabrics.
ENGLISH10

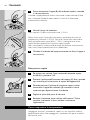
Other features
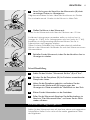
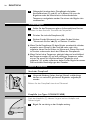
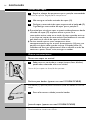
Steaming in vertical position
C
1 Hanging curtains and clothes (jackets, suits, coats) can be steam
ironed by holding the iron in vertical position.
Never direct the steam at people.
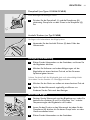
Button groove (types GC6046/GC6048 only)
The button groove (Q) enables easy ironing along buttons and seams.
C
1 Carefully iron along buttons.
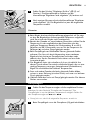
Jet of steam (type GC6046/GC6048 only)
To prewet stubborn creases.
C
1 Press the jet-of-steam button (L) and the steam activator
button (M) simultaneously: steam will come out of the holes in
the button groove (Q).
Anti-calc funnel (type GC6048 only)
To prolong the life of your ironing system.
C
1 Use the anti-calc funnel (R) when you fill the steam tank with
water.
ENGLISH 11

Cleaning and maintenance
1 Remove the mains plug from the wall socket and let the iron
cool down.
2 Wipe scale and any other deposits off the soleplate with a
damp cloth and a non-abrasive (liquid) cleaner.
Keep the soleplate smooth: avoid hard contact with metal objects.
3 Clean the upper part of the appliance with a damp cloth.
4 Regularly rinse the steam tank with water. Pour out the water
after cleaning.
After ironing
C
1 Switch the steam tank and the iron off by setting both on/of
switches (E and F) to 'off', also set the temperature dial of the
iron to 0.
2 Release the pressure in the steam tank by pressing the steam
activator button until you no longer hear any steam escaping
from the appliance.
3 Remove the mains plug from the wall socket.
4 Put the iron on the iron stand (P) and let it cool down before
you put the appliance away.
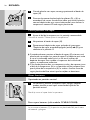
Storage
1 Remove the mains plug from the wall socket, let the iron cool
down and set the steam control to position O.
2 Empty the steam tank.
C
3 Wind the mains cord round the cord storage facility (S). Push
the supply hose behind the storage clip and hand the iron on
the storage hook.
4 Use the iron storage hook with integrated hose storage clip for
safe and easy storage.
C
5 There are handgrips on either side of the steam tank for easy
transport.
6 Regularly check if the mains cord and the supply hose are still
undamaged and safe.
ENGLISH12

Information & service
If you need information or if you have a problem, please visit the Philips
Web site at www.philips.com or contact the Philips Customer Care
Centre in your country (you will find its phone number in the
worldwide guarantee leaflet). If there is no Customer Care Centre in
your country, turn to your local Philips dealer or contact the Service
Department of Philips Domestic Appliances and Personal Care BV.
ENGLISH 13

Solution
This phenomenon will cease after a
short while.
Select the required ironing
temperature as indicated in these
instructions and the table.
Put the steam tank on a stable and
even surface.
This is normal. Hold the iron over an
old cloth and press the steam activator
button (M).The cloth will absorb the
drops.After a few seconds the steam
production will have normalised.
Push the on/off switch (E) to set it to
'on' position.
Wait until the pilot light has gone out.
To check if the iron is actually
producing steam, hold a (cold) mirror
in front of the soleplate vents.
Clean the soleplate with a damp cloth.
Clean the soleplate with a damp cloth.
Select the recommended ironing
temperature.
Possible cause(s)
This is normal. Some parts of the iron
have been greased lightly in the
factory.
The temperature dial (I) has been set
to a temperature that is too low for
steam ironing.
The steam tank has been placed on an
unstable and/or uneven surface.
When you start steam ironing, the
hose is cold. Steam condenses in the
hose, causing droplets of water to
escape from the soleplate.
The steam tank has not been switched
on.
The 'steam tank heating up' pilot light
is still on (types GC6024/6026 only).
Superheated (i.e. high-quality) steam is
hardly visible, especially when the
temperature dial has been set to
maximum position and even less so
when the ambient temperature is
relatively high.
Impurities or chemicals present in the
water have deposited on the soleplate.
You have been ironing at too high
temperatures.
Problem
When I switched the appliance on for
the first time, I saw some smoke
coming out of the appliance.
Droplets of water escape from the
soleplate.
The appliance does not produce
steam.
I see no steam coming out of the
soleplate.
The soleplate is dirty.
Troubleshooting guide
If you are unable to solve your problem by means of the troubleshooting guide below, please contact
the nearest Philips service centre, the Philips Customer Care Centre in your country or contact us
online at www.philips.com.
ENGLISH14

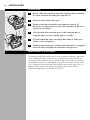
Allgemeine Beschreibung
A Wassertank
B Einfüllöffnung mit Schraubverschluss
C Dampfregler.
Position 1: Geringe Dampfabgabe
Position 5: Größte Dampfabgabe (nur Typen
GC6044/GC6046/GC6048)
D Kontrolllampe "Wassertank wird aufgeheizt" (U): Sobald die
Kontrolllampe erlischt, können Sie mit dem Dampfbügeln beginnen.
E Schalter "Wassertank Ein/Aus" (≤) mit integrierter Kontrolllampe
F Schalter "Bügeleisen Ein/Aus" (≤) mit integrierter Kontrolllampe
G Dampfdruckmesser: Befindet sich der Zeiger im grünen Bereich, ist
der Dampfdruck ausreichend (nur Typ GC6048).
H Netzkabel
I Verbindungsschlauch
J Bügeleisenhalterung mit integriertem Clip für denVerbindungsschlauch
K Kontrolllampe "Bügeleisen wird aufgeheizt"
L Dampfstoßtaste (nur Typen GC6046/GC6048)
M Dampftaste
N Temperaturregler
O Bügelsohle
P Abnehmbare Bügeleisen-Abstellfläche
Q Knopfrille mit Dampfdüsen
R Antikalk-Trichter (nur Typ GC6048)
S Netzkabelaufwicklung
Wichtig
Lesen Sie zu Ihrer Sicherheit diese Gebrauchsanweisung sorgfältig
durch, bevor Sie das Gerät zum ersten Mal benutzen.
- Füllen Sie keine Duftstoffe, Essig, Entkalker oder andere Chemikalien
in den Wassertank.
- Verwenden Sie das Gerät niemals, wenn es in irgendeiner Hinsicht
defekt oder beschädigt ist. Prüfen Sie regelmäßig das Netzkabel und
den Verbindungsschlauch auf Unversehrtheit und Sicherheit.
- Wenn das Netzkabel beschädigt ist, muss es von Philips oder einer
von Philips autorisierten Werkstatt ersetzt werden, da für die
Reparatur Spezialwerkzeug und/oder spezielle Ersatzteile benötigt
werden.
- Verwenden Sie ausschließlich den mit dem Gerät gelieferten
Schraubverschluss für den Wassertank; dieser Verschluss dient auch
als Sicherheitsventil.
- Prüfen Sie vor dem ersten Gebrauch, ob die Spannungsangabe unter
dem Wassertank mit der örtlichen Netzspannung übereinstimmt.
- Verwenden Sie das Gerät ausschließlich an einer Schukosteckdose.
- Tauchen Sie das Bügeleisen und den Wassertank niemals in Wasser.
- Lassen Sie das eingeschaltete Gerät niemals unbeaufsichtigt.
- Ziehen Sie stets den Netzstecker, und stellen Sie das Bügeleisen auf
die Abstellfläche, wenn Sie das Bügeln beendet haben oder den
Raum - sei es auch nur für kurze Zeit - verlassen.
DEUTSCH 15

- Stellen Sie den Wassertank stets auf eine feste, ebene und
waagerechte Arbeitsfläche. Stellen Sie ihn nicht auf die weiche,
gepolsterte Fläche des Bügelbretts.
- Stellen Sie das Bügeleisen immer auf die Abstellfläche. Stellen Sie das
heiße Bügeleisen nie auf den Verbindungsschlauch oder das
Netzkabel.
- Die Abstellfläche und die Bügelsohle können sehr heiß werden und
beim Berühren Verbrennungen verursachen. Achten Sie beim
Bewegen des Wassertanks darauf, die Abstellfläche nicht zu
berühren.
- Das Netzkabel darf nicht mit der heißen Bügelsohle in Berührung
kommen.
- Behinderte Personen sollten bei der Verwendung dieses Geräts
beaufsichtigt werden.Achten Sie darauf, dass Kinder nicht mit dem
Gerät spielen.
- Sollte während des Aufheizens Dampf unter dem Verschluss des
Wassertanks entweichen, schalten Sie das Gerät aus, und setzen Sie
sich mit einer von Philips autorisierten Werkstatt in Verbindung.
- Öffnen Sie den Verschluss des Wassertanks nicht, wenn sich der
Wassertank noch unter Druck befindet. Beachten Sie die
Anweisungen unter "Schnell-Nachfüllung".
Vorbereitung zum Gebrauch
1 Prüfen Sie, ob die Spannungsangabe auf dem Typenschild mit
der örtlichen Netzspannung übereinstimmt.
2 Entfernen Sie vor dem ersten Gebrauch Aufkleber, Schutzfolie
oder Abdeckung von der Bügelsohle.
3 Ziehen Sie das Netzkabel (I) und den Verbindungsschlauch (H)
vollständig heraus.
4 Stellen Sie den Wassertank (A) auf eine feste, ebene und
waagerechte Fläche.
5 Stellen Sie das Bügeleisen auf die Abstellfläche (P).
Stellen Sie das heiße Bügeleisen nicht auf den Wassertank, den
Verbindungsschlauch oder das Netzkabel.Achten Sie darauf, dass das
Netzkabel nicht in Berührung mit der heißen Bügelsohle kommt.
Den Wassertank füllen
Tauchen Sie das Bügeleisen und den Wassertank niemals in Wasser.
1 Der Ein/Aus-Schalter (F) und der Schalter "Wassertank
Ein/Aus" (E) müssen sich in der Position "Aus" befinden. Ziehen
Sie außerdem den Netzstecker aus der Steckdose.
DEUTSCH16

C
2 Lösen Sie langsam den Verschluss des Wassertanks (B) durch
vorsichtiges Drehen im Uhrzeigersinn.
Möglicherweise hören Sie beim Lösen des Verschlusses ein Zischen
Das ist absolut normal. Ursache ist das Vakuum im kalten Tank.
C
3 Gießen Sie Wasser in den Wassertank.
Füllen Sie den Wassertank nicht über das Maximum von 1,5 Liter.
Sie können Leitungswasser verwenden, sofern es nicht zu hart ist
(weniger als 10 dH). Ist Ihr Leitungswasser sehr hart (mehr als 17 dH),
empfehlen wir die Verwendung destillierten Wassers, das Sie in
Supermärkten und Drogerien erhalten.
Geben Sie keine Duftstoffe, Essig, Stärke oder chemisch entkalktes
Wasser in den Wassertank.Verwenden Sie auch kein Wasser aus einem
Wasserenthärter.
C
4 Schließen Sie den Wassertank, indem Sie den Verschluss fest im
Uhrzeigersinn drehen.
Schnell-Nachfüllung
1 Stellen Sie den Schalter "Wassertank Ein/Aus" (E) auf "Aus".
C
2 Drücken Sie die Dampftaste (M), bis Sie keinen entweichenden
Dampf mehr hören.
3 Halten Sie die Dampftaste gedrückt, und lockern Sie den
Verschluss des Wassertanks (B) langsam gegen den
Uhrzeigersinn. Dabei entweicht der Überdruck aus dem Tank.
4 Ziehen Sie den Netzstecker aus der Steckdose.
5 Füllen Sie den Wassertank. Beachten Sie die Beschreibung im
Abschnitt "Den Wassertank füllen", und lassen Sie das Gerät
wieder aufheizen.
Einstellen der Bügeltemperatur
Stellen Sie den Wassertank stets auf eine feste, ebene und waagerechte
Arbeitsfläche. Stellen Sie ihn nicht auf die weiche, gepolsterte Fläche
des Bügelbretts.
DEUTSCH 17

Stellen Sie das Bügeleisen stets auf die Abstellfläche. Achten Sie darauf,
dass Sie das heiße Bügeleisen nicht auf den Verbindungschlauch oder
das Netzkabel stellen. Das Netzkabel darf nicht mit der heißen
Bügelsohle in Berührung kommen.
1 Stecken Sie den Netzstecker in eine Schukosteckdose.
C
2 Stellen Sie den Schalter "Wassertank Ein/Aus" ≤ (E) auf
Position I. Die Kontrolllampe im Schalter und die
Kontrolllampe "Wassertank wird aufgeheizt" U (C) leuchten.
Das Bügeleisen heizt schneller auf als der Wassertank. Sie sollten den
Wassertank deshalb einige Minuten vor dem Bügeleisen einschalten.
C
3 Stellen Sie den Temperaturregler auf die erforderliche
Bügeltemperatur, indem Sie ihn auf die entsprechende
Markierung drehen.
- Prüfen Sie das Etikett im Wäschestück auf die erforderliche
Bügeltemperatur:
- 1 Synthetik, z. B.Akryl,Viskose, Polyamid, Polyester
- 1 eide
- 2 Wolle
- 3 Baumwolle, Leinen
- Ist Ihnen das Gewebe unbekannt, prüfen Sie die Bügeltemperatur an
einer Stelle, die unter normalen Bedingungen nicht sichtbar ist.
- Materialien aus Seide,Wolle und Synthetik: Bügeln Sie diese Teile von
links, um zu vermeiden, dass glänzende Stellen auftreten.
- Beginnen Sie mit den Textilien, die eine niedrige
Temperatureinstellung erfordern (z. B. Synthetik).
4 Kaltstart: Das Wasser im Tank sowie die Bügelsohle werden
jetzt aufgeheizt. Die Bügelsohle benötigt etwa 2 Minuten, das
Wasser im Wassertank ca. 8 Minuten zum Aufheizen.
5 Nachheizen:Wenn Sie den Tank während des Bügelns
nachfüllen, dauert es ca. 6 Minuten, bis das Wasser im
Wassertank aufgeheizt ist.
DEUTSCH18
H
I
L
O
A
I
G
O
D
O
N
L
A
N
A
A
L
G
O
D
O
N
H
I
L
O
M
A
X
O
/
O
F
F
L
I
N
E
N
C
O
T
T
O
N
W
O
O
L
S
I
L
K
N
Y
L
O
N
Temperaturregler
1
2
3
Gewebeart
Synthetics, z. B. Azetat,Akryl,
Viskose, Polyamid, Polyester
Seide
Wolle
Baumwolle Leinen
Wichtig: Das Zeichen Z in
der Tabelle bedeutet, dass
dieser Artikel nicht gebügelt
werden darf.
Bügelvorschriften
B
C
D
Z

C
6 Stellen Sie den Schalter "Bügeleisen Ein/Aus" ≥ (F) auf
Position I. Die Kontrolllampe im Schalter und die
Kontrolllampe "Bügeleisen wird aufgeheizt" (K) leuchten auf.
7 Nach wenigen Minuten erlischt die Kontrolllampe "Bügeleisen
wird aufgeheizt" (K). Die Bügelsohle hat jetzt die eingestellte
Temperatur erreicht.
Hinweise
◗ Beim Bügeln leuchtet die Kontrolllampe gelegentlich auf. Sie zeigt
an, dass die Bügelsohle auf die eingestellte Temperatur aufgeheizt
wird. Sie müssen das Bügeln nicht unterbrechen.
◗ Besteht das Gewebe aus verschiedenen Materialien, wählen Sie die
Temperatur für das empfindlichste der Materialien, also die
niedrigste Temperatur. Besteht das Mischgewebe z. B. aus 60 %
Polyester und 40 % Baumwolle, muss es mit der Temperatur für
Polyester (1) und ohne Dampf gebügelt werden.
◗ Beim Dampfbügeln von Wollstoffen können glänzende Stellen
auftreten. Das lässt sich durch Verwendung eines trockenen
Bügeltuchs bei aktivierter Dampffunktion verhindern oder
dadurch, dass Sie das Gewebe auf links ziehen und es auf der
Innenseite bügeln.
◗ Das Bügeleisen heizt sich schneller auf, als es sich abkühlt.Aus
diesem Grund sollten Sie zunächst die Artikel bügeln, die nur eine
niedrige Temperatur vertragen (beispielsweise Synthetikfasern).
Bügeln Sie anschließend bei höheren Temperaturen.
◗ Samt und andere Gewebe, die leicht glänzende Stellen bilden,
müssen in einer Richtung (mit dem Strich) und unter nur leichtem
Druck gebügelt werden.
◗ Gefärbte Seide darf nicht mit Dampf gebügelt werden. Das könnte
Flecken verursachen.
Dampfbügeln
1 Stellen Sie den Temperaturregler auf die empfohlene Position.
Beachten Sie den Abschnitt "Einstellen der Temperatur". Das
Dampfbügeln ist nur bei höheren Temperaturen möglich: Stellen Sie
den Temperaturregler auf 2 oder 3.
B
Dampf tritt aus, sobald die eingestellte Temperatur erreicht ist.
C
2 Beim Dampfbügeln muss die Dampftaste (M) gedrückt bleiben.
DEUTSCH 19

3 Gelegentlich leuchten beim Dampfbügeln die beiden
Kontrollleuchten (D) und (K) auf. In diesem Fall muss das
Bügeleisen oder der Wassertank auf die erforderliche
Temperatur nachgeheizt werden. Sie müssen das Bügeln nicht
unterbrechen.
Trockenbügeln
1 Stellen Sie den Temperaturregler auf die empfohlene Position.
Beachten Sie den Abschnitt "Einstellen der Temperatur".
2 Drücken Sie nicht die Dampftaste (M).
3 Schalten Sie den Wassertank aus, indem Sie den Schalter
"Wassertank Ein/Aus' ≤ (D) auf Position O stellen.
◗ Wenn Sie die Dampftaste (M) beim Bügeln versehentlich drücken,
entweicht etwas Dampf. Ist der Tank leer oder noch nicht
aufgeheizt, hören Sie ein Klicken im Wassertank. Dieses Geräusch
ist harmlos und entsteht durch das Öffnen des Dampfventils.
◗ Wenn Sie bei hoher Temperatur gebügelt habenund anschließend
den Temperaturregler (N) auf eine niedrigere Temperatur stellen,
müssen Sie warten, bis die Kontrollampe "Bügeleisen wird
aufgeheizt" (K) wieder aufleuchtet, bevor Sie das Bügeln fortsetzen.
Dies verhindert Beschädigungen des Gewebes.
Andere Merkmale
Vertikaler Dampfstoß
C
1 Hängende Kleidung (Jacken,Anzüge, Mäntel) und Vorhänge
können mit senkrecht gehaltenem Bügeleisen aufgedämpft
werden.
Richten Sie den Dampfstoß niemals auf Personen!
Knopfrille (nur Typen GC6046/GC6048)
Dank der Knopfrille (Q) können Sie ganz leicht an Knöpfen und
Nähten bügeln.
C
1 Bügeln Sie vorsichtig an den Knöpfen entlang.
DEUTSCH20
La pagina sta caricando ...
La pagina sta caricando ...
La pagina sta caricando ...
La pagina sta caricando ...
La pagina sta caricando ...
La pagina sta caricando ...
La pagina sta caricando ...
La pagina sta caricando ...
La pagina sta caricando ...
La pagina sta caricando ...
La pagina sta caricando ...
La pagina sta caricando ...
La pagina sta caricando ...
La pagina sta caricando ...
La pagina sta caricando ...
La pagina sta caricando ...
La pagina sta caricando ...
La pagina sta caricando ...
La pagina sta caricando ...
La pagina sta caricando ...
La pagina sta caricando ...
La pagina sta caricando ...
La pagina sta caricando ...
La pagina sta caricando ...
La pagina sta caricando ...
La pagina sta caricando ...
La pagina sta caricando ...
La pagina sta caricando ...
La pagina sta caricando ...
La pagina sta caricando ...
La pagina sta caricando ...
La pagina sta caricando ...
La pagina sta caricando ...
La pagina sta caricando ...
La pagina sta caricando ...
La pagina sta caricando ...
La pagina sta caricando ...
La pagina sta caricando ...
La pagina sta caricando ...
La pagina sta caricando ...
-
 1
1
-
 2
2
-
 3
3
-
 4
4
-
 5
5
-
 6
6
-
 7
7
-
 8
8
-
 9
9
-
 10
10
-
 11
11
-
 12
12
-
 13
13
-
 14
14
-
 15
15
-
 16
16
-
 17
17
-
 18
18
-
 19
19
-
 20
20
-
 21
21
-
 22
22
-
 23
23
-
 24
24
-
 25
25
-
 26
26
-
 27
27
-
 28
28
-
 29
29
-
 30
30
-
 31
31
-
 32
32
-
 33
33
-
 34
34
-
 35
35
-
 36
36
-
 37
37
-
 38
38
-
 39
39
-
 40
40
-
 41
41
-
 42
42
-
 43
43
-
 44
44
-
 45
45
-
 46
46
-
 47
47
-
 48
48
-
 49
49
-
 50
50
-
 51
51
-
 52
52
-
 53
53
-
 54
54
-
 55
55
-
 56
56
-
 57
57
-
 58
58
-
 59
59
-
 60
60


Philips GC6040 Manuale utente
- Categoria
- Ferri da stiro
- Tipo
- Manuale utente
in altre lingue
- English: Philips GC6040 User manual
- français: Philips GC6040 Manuel utilisateur
- español: Philips GC6040 Manual de usuario
- Deutsch: Philips GC6040 Benutzerhandbuch
- português: Philips GC6040 Manual do usuário
Documenti correlati
-
Philips GC6034 Manuale del proprietario
-
Philips gc6065 Manuale utente
-
Philips GC6315/01 Manuale utente
-
-
-
-
Philips GC8080/28 Manuale utente
-
-
Philips GC7240 Manuale del proprietario
-
Philips GC7330/07 Manuale utente
