
FR Manuel de l’utilisateur
GB User Manual
PT Manual do Utilizador
Benutzerhandbuch
DE
ES Manual de instrucciones
Manuale di istruzioni
IT
NL Handleiding
Lire attentivement les instructions avant de faire
fonctionner l’appareil.
Please read the instruction carefully before operating the
unit.
Leia este manual com atenção antes de qualquer
utilização.
Bitte lesen sie dieses handbuch vor dem gebrauch des
gerätes sorgfältig durch.
Antes de utilizar este aparato, lea atentamente las
siguientes instrucciones.
Leggere attentamente questo manuale prima di utilizzare
l’apparecchio.
Lees deze handleiding aandachtig voor u het toestel
gebruikt.
FR
GB
PT
DE
ES
IT
NL
EMPLACEMENT ET DESCRIPTION DES COMMANDES
LOCALIZAÇÃO E DESCRIÇÃO DOS CONTROLES
BESCHREIBUNG DES GERÄTES
LOCATION AND DESCRIPTION OF CONTROLS
ALLUMER/ÉTEINDRE L UNITÉ
LIGANDO/DESLIGANDO O APARELHO
GERÄT EIN-/AUSSCHALTEN
TURNING ON/OFF THE UNIT
FONCTION SOMMEIL
FUNÇÃO DE ADORMECER SLEEP
SLEEP FUNCTION
GRADATEUR D’INTENSITE LUMINEUSE DE L’ECRAN
AJUSTE DA LUMINOSIDADE DO VISOR
DIMMER
UTILISATION D’UN CASQUE/D’ÉCOUTEURS (câble non fourni)
UTILIZAÇÃO DE AURICULARES/AUSCULTADORES
(Cabo não incluído)
USING HEADPHONES / EARPHONES (NOT INCLUDED)
RÉGLER L’ALARME ET LE MODE D’ALARME
CONFIGURANDO O ALARME E O MODO DO ALARME
SETTING THE ALARM AND THE ALARM MODE
ECOUTER LA RADIO FM
ESCUTANDO RÁDIO FM
LISTENING TO FM RADIO
ECOUTER LA RADIO DAB/DAB+
ESCUTANDO RÁDIOS DAB/DAB+
DAB/DAB+ RADIOSENDER ANHÖREN
LISTENING TO DAB/DAB+ RADIO
ECOUTER LA RADIO PRESETS
ESCUTANDO PRÉMISSÕES DE RÁDIO
LISTENING TO RADIO PRESETS
MENU DE CONFIGURATION
MENU DE CONFIGURAÇÕES
SETUP MENU
FICHE TECHNIQUE
CARACTERÍSTICAS TÉCNICAS
TECHNICAL SPECI FICATIONS
1. Achage LCD
2. Antenne télescopique DAB+/FM
3. SCAN: Recherche automatique
4. / MODE: Marche/Standby; Pour
sélection le mode de fonctionnement:
DAB ou FM .
5. PREV: Saut precedent
6. INFO/MENU: Pour accéder au
menu principal / Pour consulter les
informations de réglages
7. NEXT: Saut suivant
1. LCD Visor
2. Antena telescópica DAB+/FM
3. SCAN: Análise automática
4. / MODE: Para ligar o aparelho/
Standby; Para selecionar o modo de
funcionamento: DAB ou FM.
5. Botão PREV
6. INFO/MENU: Para aceder o menu
principal / Para rever as informações de
conguraçã
7. Botão NEXT
8. PRESET: Memória de estações 1. LCD Anzeige
2. DAB+/FM-Teleskopantenne
3. SCAN: Auto-scan
4. / MODE: Standby/ Auswahl
einer Betriebsart; Funktionsmodus
auswählen: DAB+ oder UKW
5. Taste PREV: Suchlauf-
6. INFO/MENU: Hauptmenü önen/
Einstellungen anzeigen
7. Taste NEXT: Suchlauf+
8. PRESET: Gespeicherte Radiosender
1. LCD display
2. DAB+/FM telescopic antenna
3. SCAN: Auto scan
4. / MODE button: To turn unit on/
Standby; To select function mode:
DAB, FM
5. PREV button: Skip
6. INFO/MENU button: To access the
main menu / To review the setting
information
7. NEXT button: Skip
8. PRESET: Stations préréglées
9. VOL+: Augmentation du volume
10. Touche OK: Conrmer lasélection
SNOOZE: Repetition d’alarme
DIMMER: Réglage de l’intensité
lumineuse de l’achage
11. VOL-: Baisse du volume
12. Interrupteur M/A
13. Prise pour écouteurs
14. Prise d’alimentation CC
15. Compartiment de la batterie
9. Botão VOL+: Aumentar o
volume
10. Botão OK: Conrmar a seleção
SNOOZE: Intervalo de repetição
do alarme
DIMMER: Abaixar a intensidade
da luz da tela
11. Botão VOL-: Abaixar o volume
12. Ligar/Desligar
13. Entrada de auriculares
14. Tomada DC IN
15. Compartimento de bateria 9. Taste VOL+: Lautstärke erhöhen
10. Taste OK: Auswahl
SNOOZE: Zeitintervall für die
Alarmwiederholung
DIMMER: Helligkeit der
Displaybeleuchtung
11. Taste VOL-: Lautstärke verringern
12. Ein/Aus
13. Kopf- / Ohrhörerbuchse
14. Stromversorgungseingang Gleichstrom
15. Batteriefach
8. PRESET: Preset radio stations
9. VOL+ button: Volume up
10. OK button: Conrm the selection
SNOOZE
DIMMER: to adjust display
brightness
11. VOL- button: Volume down
12. OFF/ON switch
13. Phones jack
14. DC IN jack
15. Battery compartment
Pour allumer l’appareil, placez l’interrupteur POWER ON/OFF en position «ON» à
l’arrière de l’appareil.
Pour éteindre l’appareil, faites glisser le commutateur POWER ON/OFF sur la
position “OFF” à l’arrière de l’appareil.
Appuyez et maintenez le bouton / MODE en mode veille.
SÉLECTION DE LA SOURCE
Lorsque l’appareil est allumé, appuyez plusieurs fois sur le bouton / MODE pour
sélectionner le mode DAB, le mode FM.
REGLAGE DU VOLUME
Pour augmenter ou diminuer le volume, appuyez sur la touche VOL+/VOL-.
RÉGLAGE DE L’HEURE ET DE LA DATE
La première fois que vous écoutez la radio DAB, l’heure et la date de votre produit
seront synchronisées automatiquement à celles diusées par le service DAB en
mode 24 heures, ce qui correspond à l’heure d’été, donc il n’est pas nécessaire de
dénir l’heure et la date manuellement.
Si vous souhaitez régler l’heure et la date manuellement, allumez la radio et
suivez les étapes ci-dessous:
1. Maintenez la touche INFO/MENU enfoncée.
2. Appuyez sur le bouton PREV/NEXT pour <Temps /donn>,appuyez sur la touche
OK pour entrer cette option.
3. <Régler l’heure> s’achera et utilisez la touche PREV/NEXT pour régler l’heure.
Appuyez sur la touche OK pour conrmer. Utilisez la tocuhe PREV/NEXT pour
régler les minutes. Appuyez sur la touche OK pour conrme. Utilisez le bouton
PREV/NEXT pour régler la seconde. Appuyez sur la touche OK pour conrmer.
4. <Dénirla la date> s’achera et l’année clignotera. Utilisez la touche PREV/
NEXT et la touche OK pour régler le jour, le mois et l’année.
Para ligar a unidade, deslize a chave POWER ON/OFF para a posição “ON” na
parte traseira da unidade, depois pressione / MODE para ligar a unidade..
Para desligar a unidade, deslize a chave POWER ON/OFF para a posição “OFF”
na parte traseira da unidade.
Pressione e segure o botão / MODE para ir para o modo de espera.
SELECÇÃO DE FONTE
Quando a unidade estiver ligada, pressione repetidamente o botão / MODE para
selecionar o modo DAB ou FM.
AJUSTANDO O VOLUME
Para aumentar ou diminuir o nível de volume, pressione VOL+/VOL-.
AJUSTANDO A HORA E A DATA
A primeira vez que escutar o rádio em DAB, a hora e a data do seu produto será
sincronizada automaticamente com aquela transmitida pelo serviço DAB no
modo 24 horas, e com a hora de Verão, portanto, não há necessidade de denir
manualmente a hora e a data.
Se desejar denirmanualmente a hora e a data, ligue o rádio e siga os passos
abaixo:
1. Pressione o botão INFO/MENU.
2. Pressione o botão PREV/NEXT para <Hora / Data>. Pressione o botão OK para
entrar na opção.
3. “Set Time” (Denir hora) é apresentado, Use o botão PREV/NEXT para ajustar
a hora. Pressione o botão OK para conrma. Use o botão PREV/NEXT para
ajustar os minutos. Pressione o botão OK para conrma. Use o botão PREV/
NEXT para ajustar os minutos, Pressione o botão OK para conrma.
4. “Set Time” (Denir hora) é apresentado, Os dígitos das année piscarão. Utilize o
botão PREV/NEXT e o botão OK para ajustar o dia, mês e ano.
Gerät einschalten, stellen Sie die Taste POWER ON/OFF an der Rückseite des
Geräts auf die Position „ON“, um den Standby-Modus zu aktivieren, Schalten Sie
das Gerät dann mit der / MODE -Taste EIN.
Stellen Sie dann die Taste POWER ON/OFF an der Rückseite des Geräts auf die
Position „OFF“.
Halten Sie die / MODE -Taste gedrückt, um in den Standby-Modus zu wechseln.
QUELLE AUSWÄHLEN
Drücken Sie, wenn das Gerät eingeschaltet ist, wiederholt die Taste / MODE zur
Auswahl von DAB oder UKW.
LAUTSTÄRKE EINSTELLEN
Zum Erhöhen oder Verringern der Lautstärke drehen Sie den VOL+/VOL- Drehknopf.
EINSTELLEN DER UHRZEIT UND DES DATUMS
Das erste Mal, wenn Sie das DAB-Radio einschalten, werden das Datum und die
Uhrzeit des Geräts automatisch mit den Einstellungen der übertragenden DAB-
Sendeanstalt synchronisiert (24-Stundenformat). Dies geschieht im Einklang mit
der Sommerzeit oder Winterzeit, d.h., Sie müssen das Datum und die Uhrzeit nicht
manuell einstellen.
Falls Sie Datum und Uhrzeit dennoch manuell einstellen möchten, schalten Sie
das Radio ein und gehen Sie wie folgt vor:
1. Halten Sie die Taste INFO/MENU gedrückt.
2. Drücken Sie die Taste PREV/NEXT, um <Uhrzeit / Datum> auszuwählen. Drücken
Sie OK, um diese Option zu önen.
3. Im Display erscheint <Set Time>.Verwenden Sie den PREV/NEXT -Regler, um die
Stunden einzustellen. Bestätigen Sie mit OK. Verwenden Sie den PREV/NEXT
-Regler, um die Minuten einzustellen. Bestätigen Sie mit OK. Verwenden Sie den
PREV/NEXT -Regler, um die Zweite einzustellen. Bestätigen Sie mit OK.
4. Im Display erscheint <Set Time>. Verwenden Sie den PREV/NEXT -Regler und die
Taste OK, um Tag, Monat und Jahr einzustellen.
To turn on the unit, slide the POWER ON/OFF switch to “ON” position on back of
unit, then press / MODE to turn on the unit.
To turn o the unit, slide the POWER ON/OFF switch to “OFF” position on back
of unit.
Press and hold the / MODE button to go to Standby mode.
SELECTION FUNCTION
When the unit is on, repeatedly press / MODE button to select desired mode:
FM or DAB.
ADJUSTING VOLUME
To increase or decrease the sound level, press VOL+/VOL-.
SETTING THE TIME AND DATE
The rst time you listen to DAB radio, the time and date of your product will
synchronised automatically to that broadcast by the DAB service in 24 hours mode,
which is in line with daylight saving, so there is no need to set the time and date
manually.
If you do wish to set the time and date manually, turn on the radio and follow
the steps as below:
1. Press and hold the INFO/MENU button.
2. Press PREV/NEXT button to <Time/Date>. Press OK button to enter this option.
3. <Set Time> is displayed. Use the PREV/NEXT button to set the hour. Press the
OK button to conrm. Use the PREV/NEXT button to set the minutes. Press the
OK button to conrm. Use the PREV/NEXT button to set the second, Press the
OK button to conrm.
4. <Set Time> is displayed. Use the PREV/NEXT button and OK button to set the
year, month and date.
1. Maintenez la touche INFO/MENU enfoncée en mode FM ou DAB.
2. Appuyez plusieurs fois sur les boutons PREV/NEXT pour sélectionner <Rgler la
veille>, appuyez sur la touche OK pour conrmer.
3. Pour vous endormir avec la radio lorsque l’appareil est allumé, appuyez plusieurs
fois sur SLEEP pour choisir entre 120-90-60-45-30-15-5 minutes d’écoute.
L’indicateur s’allume. L’unité s’éteindra automatiquement après le délai spécié.
Pour annuler la fonction Sleep, appuyez plusieurs fois sur le bouton PREV/NEXT
jusqu’à ce que «OFF» s’ache, appuyez sur la touche OK pour conrmer.
1. Pressione o botão INFO/MENU para selecionar uma banda FM ou DAB/DAB+.
2. Pressione repetidamente o botão PREV/NEXT para selecionar <Sleep Set>,
pressione OK para conrmara sua seleção.
3. Para dormir com o rádio, pressione várias vezes SLEEP para selecionar entre
120-90-60-45-30-15-5 minutos. O aparelho se desligará automaticamente
depois da quantidade de tempo especicada. Para cancelar a função adormecer,
pressione várias vezes o botão PREV/NEXT áté que “OFF” (DESLIGADO) seja
exibido, pressione OK para conrmara sua seleção.
1. Press and hold INFO/MENU button in FM or DAB mode.
2. Repeatedly press PREV/NEXT button to select <Sleep Set>, then press OK
button to conrm.
3. To fall asleep with the radio, repeatedly press SLEEP to select 120-90-60-45-30-
15-5 minutes of listening. The unit will automatically turn o after the specied
time. To cancel the sleep function, repeatedly press PREV/NEXT button until
“OFF” display, press OK button to conrm.
En mode veille, appuyez sur DIMMER pour sélectionner la luminosité de l’écran.
No modo de espera, pressione repetidamente o botão DIMMER para selecionar a
intensidade do brilho da tela.
In standby mode, press DIMMER button repeatedly to select the brightness of the
screen.
Tension de sortie maximale ≤ 150mV
MISE EN GARDE SUR LE NIVEAU DE VOLUME DU CASQUE
Diminuez le volume avant de connecter un casque et augmentez-le ensuite
si nécessaire. L’utilisation prolongée d’un casque à un volume élevé peut
endommager votre système auditif. Lorsqu’un casque ou des écouteurs sont
connectés, les haut-parleurs du lecteur sont désactivés.
Attention: évitez les niveaux sonores élevés pouvant nuire à votre système auditif.
Tensão de saída máxima ≤ 150mV
PRECAUÇÕES RELATIVAS AO NÍVEL DO VOLUME DOS AURICULARES
Diminua o volume antes de ligar os auriculares e aumente-o de seguida, se
necessário. A utilização prolongada de auriculares com um volume alto pode
causar lesões no sistema auditivo. Quando se ligam auriculares ou auscultadores,
os altifalantes do leitor são desactivados.
Atenção: Evite os níveis sonoros altos que podem danicar o sistema auditivo.
Maximum output voltage ≤ 150mV
HEADPHONE VOLUME WARNING
Connect earphones with the volume set low and increase it if required. Prolonged
listening through some earphones at high volume settings can result in hearing
damage. When headphones/earphones are connected, no sound will be emitted
from the unit’s speaker.
Caution: Avoid listening to sound at levels which may be harmful to your ears.
Lorsque l’heure a été réglée.
1. Maintenez la touche INFO/MENU enfoncée en mode FM ou DAB.
2. Appuyez sur le bouton PREV/NEXT pour choisir <Alarm 1 Set> ou <Alarm 2
Set>, appuyez sur la touche OK pour conrmer.
3. Appuyez plusieurs fois sur les boutons PREV/NEXT pour sélectionner <ON>,
appuyez sur la touche OK pour conrmer.
4. Utilisez la touche PREV/NEXT pour régler l’heure, appuyez sur la touche OK
pour conrme. Utilisez la touche PREV/NEXT pour régler les minutes, appuyez
sur la touche OK pour conrmer.
5. Appuyez sur le bouton PREV/NEXT pour régler le volume, appuyez sur la touche
OK pour conrmer.
6. Appuyez sur le bouton PREV/NEXT pour régler la source de réveil sur sonnerie,
DAB ou FM. Appuyez sur la touche OK pour conrmer.
7. Appuyez sur le bouton PREV/NEXT pour specier l’une des options d’alarmes
de fréquence suivante: «Daily», «Once», «Weekends» et «Weekdays». Appuyez
sur la touche OK pour conrmer.
8. En mode veille, “ ” ou “ ” sera aché.
Remarque:
- La même procédure s’applique pour l’alarme 2.
- Si vous vous réveillez avec la radio, sélectionnez la station de votre choix, puis
maintenez la touche / MODE appuyée pour éteindre la radio avant que l’heure
de l’alarme n’arrive. Pour choisir la station, consultez «ÉCOUTER LA RADIO
DAB/DAB+» et «ÉCOUTER LA RADIO FM»..
Arrêter l’alarme
1. Répétition d’alarme
Appuyez sur SNOOZE. L’alarme s’arrête et se déclenchera à nouveau 9 minutes
plus tard.
2. Arrêt d’alarme
Appuyez sur / MODE. L’alarme 1 ou 2 ne sonnera de nouveau que le jour
suivant, à la même heure.
Remarque:
- Si vous choisissez la fréquence d’alarme «Once», l’alarme ne sonnera plus.
- Si vous choisissez la fréquence d’alarme «Daily», l’alarme sonnera de nouveau.
- Si vous choisissez la fréquence d’alarme «Weekend», l’alarme sonnera de
nouveau en n de semain.
- Si vous choisissez la fréquence d’alarme «Weekdays», l’alarme sonnera de
nouveau les jours de la semaine.
3. Annuler l’alarme
- Appuyez sur la touche INFO/MENU pour sélectionner la bande FM ou DAB/DAB+.
- Appuyez sur le bouton PREV/NEXT pour choisir <Alarm 1 Set> ou <Alarm 2 Set>,
appuyez sur la touche OK pour conrme.
- Appuyez plusieurs fois sur les boutons PREV/NEXT pour sélectionner <OFF>,
appuyez sur la touche OK pour conrme.
Quando a hora já tiver sido congurada.
1. Pressione o botão INFO/MENU para selecionar uma banda FM ou DAB/DAB+.
2. Pressione o botão PREV/NEXT para escolher <Alarm 1 Set> ou <Alarm 2 Set>,
pressione OK para conrmara sua seleção.
3. Pressione repetidamente o botão PREV/NEXT para selecionar <ON>, pressione
OK para conrmara sua seleção.
4. Pressione o botão PREV/NEXT para denir a hora, pressione o botão OK para
conrmar. Pressione o botão PREV/NEXT para ajustar os minutos, pressione o
botão OK para conrmar.
5. Em seguida, pressione o botão PREV/NEXT para ajustar o volume, pressione o
botão OK para conrmar.
6. Utilize o botão PREV/NEXT para selecionar a origem do despertador como
Alarme, DAB ou FM. Pressione o botão OK para conrma.
7. Utilize o botão PREV/NEXT para especicr uma das seguintes opções da
frequência do alarme: “Daily” (Diário), “Once” (Uma Vez), “Weekends” (Final
De Semana) e “Weekdays” (DIAS DE SEMANA). Pressione o botão OK para
conrma.
8. No modo de espera, “ ” ou “ ” será exibido no visor.
Observação:
- O mesmo procedimento se aplica para Alarme 2.
- Caso você utilize a última estação sintonizada como despertador, selecione a
estação desejada, então Mantenha o botão / MODE para desligar o rádio antes
da hora do alarme. Para sintonizar a estação, consulte “Escutando uma rádio
DAB/DAB+” e “Escutando uma rádio FM”.
Interrompendo o alarme
1. Repetição do Alarme
Prima o botão SNOOZE para parar temporariamente o alarme. Este soará de novo
ao m de alguns minutos. (default: 9 minutos )
2. Parando o alarme
Pressione / MODE. O alarme 1 ou alarme 2 soará novamente no dia seguinte
na mesma hora.
Observação:
- Caso você tenha selecionado a frequência como “Once” (Uma Vez) o alarme não
soará novamente.
- Caso você tenha selecionado a frequência como “Daily” (Diário), o alarme soará
novamente.
- Caso você tenha selecionado a frequência como “Weekends” (Final De Semana),
o alarme soará novamente todo nal de semana.
- Caso você tenha selecionado a frequência como “Weekdays” (DIAS DE
SEMANA), o alarme soará novamente, exceto no nal de semana.
3. Cancelando um Alarme
- Pressione o botão INFO/MENU para selecionar uma banda FM ou DAB/DAB+.
- Pressione o botão PREV/NEXT para escolher <Alarme 1 denido> ou <Alarme 2
denido>, pressione OK para conrmara sua seleção.
- Pressione repetidamente o botão PREV/NEXT para selecionar <OFF>, pressione
OK para conrmara sua seleção.
When the time has been set.
1. Press and hold INFO/MENU button in FM or DAB mode.
2. Press PREV/NEXT button to choose <Alarm 1 Set> or <Alarm 2 Set>, press OK
button to conrm.
3. Repeatedly press PREV/NEXT button to select <ON>, then press OK button
to conrm.
4. Press PREV/NEXT button to set the hour, press OK button to conrm. Press
PREV/NEXT button to set the minutes, press OK button to conrm.
5. Then press PREV/NEXT button to set the volume, press OK button to conrm.
6. Repeatedly press PREV/NEXT button to select the source of wake up by Buzzer,
DAB or FM. Press OK button to conrm.
7. Repeatedly press PREV/NEXT button to specify one of the following alarm
frequency options: “Daily”, “Once”, “Weekends” and “Weekdays”. Press OK
button to conrm.
8. In standby mode, “ ” or “ ” will be shown on display.
Note:
- Same procedure applies for alarm 2.
- If you wake up with last radio, select your desire station, then press / MODE
button to turn o the radio before alarm time reaches. For the station selecting,
please refer to “Listen to DAB/DAB+ radio” and “Listen to FM radio”.
Stopping the alarm
1. Alarm repetition
Press SNOOZE button. The alarm stops and will sound again 9 minutes later.
2. Alarm stop
Press / MODE button. The alarm 1 or alarm 2 will sound again the next day at
the same time.
Note:
- If you select the alarm frequency by “Once”, the alarm will not sound again.
- If you select the alarm frequency by “Daily”, the alarm will sound again.
- If you select the alarm frequency by “Weekend”, the alarm will sound again at
each weekend.
- If you select the alarm frequency by “Weekdays”, the alarm will sound again
except weekend.
3. Alarm Cancellation
- Press and hold INFO/MENU button in FM or DAB mode.
- Press PREV/NEXT button to choose <Alarm 1 Set> or <Alarm 2 Set>, press OK
button to conrm.
- Repeatedly press PREV/NEXT button to select <OFF>, then press OK button
to conrm.
En mode radio FM, tournez la touche PREV/NEXT pour une recherche manuelle.
Appuyez sur la touche SCAN une fois pour lancer la recherche automatique.
Remarque: Pour une meilleure réception, étirez l’antenne télescopique.
PRÉSÉLECTION DES STATIONS
Cette unité peut enregistrer 10 stations FM et 10 stations DAB/DAB+.
1. Appuyez plusieurs fois sur la touche / MODE pour choisir la bande FM ou
DAB/DAB+.
2. Choisissez une station de radio .
3. Tenez la touche PRESET appuyée pour passer en mode de sauvegarde de
présélection.
4. Utilisez la touche PREV/NEXT pour sélectionner un canal.
Remarque: Si vous choisissez une station qui n’a pas été allouée, «Vide»
s’achera.Si la station a déjà été allouée, la fréquence s’achera .
5. Appuyez sur la touche OK pour sauvegarder. «Memorisé» s’achera.
6. Répétez les étapes 1 à 5 pour sauvegarder d’autres stations.
No modo de rádio FM, use o ajustador PREV/NEXT para sintonizar manualmente.
Pressione o botão SCAN uma vez para iniciar uma sintonia automatica.
Observação: Para uma melhor recepção, estique a antena extensível.
ESTAÇÕES PRÉ-INSTALADAS
Este aparelho pode armazenar até 10 estações de rádio FM e 10 estações DAB/
DAB+.
1. Pressione várias vezes o botão / MODE para selecionar a banda FM ou DAB/
DAB+.
2. Selecione a estação de rádio através de uma busca manual ou automática.
3. Mantenha o botão PRESET para entrar no modo de armazenagem na memória.
4. Utilize o botão PREV/NEXT para selecionar uma estação.
Observação: Caso você escolha uma estação que ainda não tenha sido armazenada,
a frase “Empty” (Vazia) será exibida. Caso a estação já tenha sido armazenada, a
sua frequência será exibida.
5. Pressione o botão OK para salvá-la. E a frase “Stored” (Armazenada) será exibida.
6. Repita os passos de 1 a 5 para armazenar outras estações.
In FM radio mode, press PREV/NEXT button manually. Press SCAN button once
to search automatically.
Note: For a better reception, extend the telescopic antenna.
PRESET STATIONS
This unit can store 10 FM and 10 DAB/DAB+ stations.
1. Repeatedly press / MODE button to select FM or DAB/DAB+ band.
2. Select a radio station.
3. Press and hold PRESET button to enter preset store mode.
4. Use PREV/NEXT button knob to select a channel.
Note: If you choose a station that hasn’t been allocated, “Empty” will be displayed. If
the station has been allocated before, the frequency will be showed.
5. Press OK button to save it. “Stored” will be displayed.
6. Repeat step 1-5 to store other stations.
1. Appuyez plusieurs fois sur la touche / MODE pour sélectionner le mode DAB.
La radio commencera la recherche automatique des stations DAB si c’est la
première fois que l’unité est utilisée. L’écran achera une barre de progression.
Une barre de progression montrera la progression de l’analyse et le nombre de
stations trouvées pendant la recherche sera également achée.
2. Une fois la recherche terminée, la radio sélectionnera la première station
disponible et commencera à diuser. Les stations sont listées par ordre
numérique et par ordre alphabétique par défaut.
Remarque: La liste des stations de radio DAB est enregistrée dans la mémoire et
la prochaine fois que vous allumez votre radio, la recherche de la station ne se
fera plus. Il est possible d’eectuer la recherche manuellement des stations en
appuyant et en relâchant la touche SCAN.
3. Appuyez la touche PREV/NEXT pour sélectionner la liste des stations.
4. Lorsque la station souhaitée est achée,appuyez sur la touche OK pour
conrmer. Il y aura un court délai pendant lequel votre radio se calera à votre
station sélectionnée.
Remarque:
- Si aucun programme n’est trouvé avec la recherche DAB/DAB+, «Aucune
station» apparaitra sur l’écran.
- Pour une meilleure réception, étendez l’antenne télescopique ou procédez de
nouveau à une recherche totale à un autre endroit.
- Pendant l’opération de recherche, le niveau de son est automatiquement coupé.
1. Pressione repetidamente o botão / MODE para selecionar o modo DAB. O
rádio iniciará a busca automática das estações DAB se for a primeira vez que
usar a unidade. Uma barra de progresso mostrará o progresso de sintonização e
o número de estações encontradas durante a sintonização também será exibido.
2. Quando a sintonização estiver concluída, o rádio selecionará a primeira estação
disponível e começará a emitir. Por padrão, as estações são listadas em ordem
numérica e, em seguida, em ordem alfabética.
Nota: A lista de estações de rádio DAB é armazenada na memória e, assim, na
próxima vez que ligar o seu rádio, a procura de estações não é efetuada. É possível
sintonizar manualmente estações pressionando e soltando o botão SCAN.
3. Use o botão PREV/NEXT para selecionar através da lista de estações.
4. Quando a estação desejada for exibida, pressione o botão OK para conrmar.
Haverá um pequeno atraso enquanto o seu rádio sintonizar a estação selecionada.
Observação:
- Caso nenhuma transmissão seja encontrada pela sintonia de DAB/DAB+, a frase
“No Station” (Nenhuma estação DAB) será exibida na tela.
- Para ter uma melhor recepção, estique a antena ou realize uma busca completa
novamente depois de mudar de lugar.
- Durante o processo de busca, o volume será automaticamente colocado em mudo.
1. Drücken Sie wiederholt die Taste / MODE zur Auswahl des DAB-Modus.
Beim erstmaligen Gebrauch des Geräts startet das Radio die automatische
Suche nach DAB-Sendern. Das Display zeigt einen Fortschrittsbalken an. Ein
Fortschrittsbalken weist auf den Suchfortschritt hin; außerdem wird die Anzahl
der gefundenen Sender angezeigt.
2. Nach Abschluss der Suche schaltet das Radio den ersten verfügbaren Sender
ein und startet die Übertragung. Sender werden per Werkseinstellung in
numerischer und dann in alphabetischer Reihenfolge angezeigt.
Hinweis: Die DAB-Senderliste wird gespeichert; beim nächsten Einschalten des
Geräts wird die Sendersuche daher nicht erneut durchgeführt. Sie können manuell
nach Sendern suchen, indem Sie die Taste SCAN drücken und loslassen.
3. Verwenden Sie den PREV/NEXT -Regler, um durch die Senderliste zu scrollen.
4. Wenn der gewünschte Radiosender angezeigt wird, drücken Sie die Taste OK
zum Bestätigen. Das Radio schaltet den ausgewählten Sender dann mit einer
kurzen Verzögerung ein.
1. Repeatedly press / MODE button to select DAB mode. The radio will start
automatic scan for DAB stations if it’s the rst time to use the unit. The display
will display a progress bar. A progress bar will show the progress of the scan and
the number of stations found during the scan will also be displayed.
2. When the scan is complete, the radio will select the rst available station and
begin to broadcast. Stations are listed in numerical and then alphabetical order
by default.
Note: The DAB radio station list is stored in the memory and so the next time you
switch your radio on, the station search does not take place. It is possible to scan
manually for stations by pressing and releasing the SCAN button.
3. Use PREV/NEXT button to select through the list of stations.
4. When the desired station is displayed, press the OK button to conrm. There will
be a short delay while your radio tunes to your selected station.
Note:
- If no broadcasts are found by DAB/DAB+ scan, “No Station” appears in the display.
- For a better reception, extend the telescopic antenna or do the full scan again in
another place.
- During the search operation, the sound level is automatically muted.
1. Appuyez sur la touche / MODE pour sélectionner la bande FM ou DAB/DAB+.
2. Appuyez sur “PRESET” une fois, “Rappel prédéni”sera aché puis tournez la
touche PREV/NEXT pour sélectionner votre station souhaitée.
3. Appuyez sur la touche OK pour conrmer votre choix.
RÉVISION DE PLUS D’INFORMATIONS (MODE FM / DAB)
Appuyez à plusieurs reprises sur la touche INFO/MENU pour examiner certains
paramètres de l’appareil (par exemple, l’heure, la date) ou les informations
disponibles (par exemple, un texte radio, un nom) pour la station que vous écoutez.
1. Pressione o botão / MODE para selecionar uma banda FM ou DAB/DAB+.
2. Pressione PRESET uma vez, “Preset Recall” (Lista de estações guardadas) será
exibido, então use o botão PREV/NEXT para selecionar a estação desejada.
3. Pressione OK para conrmara sua seleção.
REVER MAIS INFORMAÇÕES (MODO FM / DAB)
Pressione repetidamente o botão INFO/MENU para rever algumas conguraçõe
da unidade (por exemplo, hora, data) ou informações disponíveis (por exemplo,
texto de rádio, nome) para a estação que está a ouvir.
1. Press / MODE button to select FM or DAB/DAB+ band.
2. Press PRESET once. “Preset Recall” will be displayed, then use PREV/NEXT
button to select your desire station.
3. Press OK to conrm your selection.
REVIEWING MORE INFORMATION (FM/ DAB MODE)
Repeatedly press INFO/MENU button to review some unit settings (e.g. time, date,
frequency) or available information (e.g. radio text, program type) for the station
you are listening.
Naviguez dans le menu de conguration. En mode FM ou DAB/DAB+, appuyez sur
la touche INFO/MENU pour entrer dans le menu de conguration.
Menu de paramètres FM/DAB
Heure / Date
Você pode ajustar a conguração da hora e data .
Version du software
Pour consulter la version actuelle du logiciel.
Régl. d’usine
Pour eacer tous les paramètres dénis par l’utilisateur.
Lorsque vous entrez en mode de réinitialisation, utilisez les boutons PREV/NEXT
pour sélectionner “Oui”, appuyez sur le bouton OK pour conrmer et rétablir les
paramètres d’usine. Utilisez les boutons PREV/NEXT pour sélectionner “No”,
appuyez sur OK pour annuler cette sélection.
Réglage alarme 1 / alarme 2
Vous pouvez régler l’alarme.
Mode veille
Vous pouvez dénir la fonction Sommeil.
Langue
Pour sélectionner la langue souhaitée du menu de l’appareil: English, Français,
Deutsch and Dutch.
Synchronisation de l’heure
Pour le temps de mise à jour automatique.
Lorsque l’écran ache «Time Sync» (Synchronisation de l’heure), appuyez sur le
bouton OK pour conrmer. Utilisez ensuite les boutons PREV (précédent) ou NEXT
(suivant) pour sélectionner «Update Radio» (Activation de la synchronisation) ou
«No update» (Aucune mise à jour) et appuyez sur le bouton OK pour conrmer.
12H ou 24H
Appuyez sur PREV/NEXT pour ajuster le format 12 ou 24 heures.
FM recher set
Seulement: La recherche automatique situe toutes les stations disponibles.
Tout: La recherche automatique ne situe que les recherches au signal fort.
Ecacité de la bat. (réglage de l’ecacité de la batterie)
Lorsque l’écran ache «Bat ecient» (Ecacité de la batterie), appuyez sur le
bouton OK pour conrmer. Utilisez ensuite les boutons PREV (précédent) ou NEXT
(suivant) pour sélectionner «ON» (Activée) ou «OFF» (Désactivée). Appuyez sur
le bouton OK pour conrmer. Si vous avez sélectionné «ON» alors qu’aucune
commande de l’appareil n’est en mode veille, l’appareil s’éteindra automatiquement
après 2 minutes.
Stéréo / Mono
Pour sélectionner entre “Stéréo” et “Mono” pour la radio FM.
Prune
Supprimez les stations répertoriées mais indisponibles. Cette fonction peut
supprimer toutes les stations non valides indiquées dans la liste des stations avec
un “?” devant le nom de la station. (Mode DAB uniquement)
Navegando no menu de congurações. No modo FM ou DAB/DAB, mantenha
pressionado INFO/MENU para entrar no menu de congurações.
Menu de congurações FM /DAB
Hora / Data
Você pode ajustar a conguração da hora e data .
Versão do software
Para exibir a versão atual do software do sistema.
Congurações de Fábrica
Para limpar todas as congurações denidas pelos usuários.
Ao entrar no modo de redenição, use o botão PREV/NEXT para selecionar
“Sim”, pressione o botão OK para conrmar e restaurar as congurações padrão
de fábrica. Use o botão PREV/NEXT para selecionar “Não”, pressione OK para
cancelar esta seleção.
Conjunto de alarme 1 / Conjunto de alarme 2
Pode denir o alarme.
Conjunto de sono
Pode denir a função de suspensão.
Lingual (doenst mean anything) Idioma
Para selecionar o idioma desejado no menu da unidade: English, Français,
Deutsch and Dutch.
Time Sync (Sincronização da hora)
Para atualizar automaticamente a hora.
Quando o ecrã exibir “Time Sync”, prima o botão OK para conrmar. Em seguida,
utilize o botão PREV ou NEXT para selecionar “Update radio” (atualizar rádio) ou
“No update” (não atualizar), prima o botão OK para conrmar.
12H ou 24H
Pressione PREV/NEXT para ajustar o formato de 12 ou 24 horas.
Congurações de Sintonia
Only: a busca automática listará apenas estações com sinal potente.
All: a busca automática listará todas as estações disponíveis.
Eciência da bateria (conguração de eciência da bateria)
Quando o ecrã mostrar “Bat ecient ”, pressione o botão OK para conrmar. Utilize
o botão PREV ou NEXT para selecionar “ON” ou “OFF”, pressione o botão OK para
conrmar. Se selecionar “ON” e se nenhuma operação for realizada no modo de
espera, a unidade será desligada automaticamente após 2 minutos.
Stereo / Mono
Para selecionar entre “Stereo” e “Mono” para o rádio FM.
Remover
Remova as estações que estão listadas mas não estão disponíveis. Esta função
pode remover todas as estações inválidas indicadas na lista de estações com um
“?” na frente do nome da estação. (Apenas no modo DAB)
Navigating the setup menu. In FM or DAB mode, press and hold INFO/MENU to
enter into setup menu.
FM / DAB Setting Menu
Time / Date
You can adjust the time and date setting.
System version (Software-Version)
To display the current software version.
Factory reset
To clear all users dened settings.
When you enter into reset mode, use PREV/NEXT button to select “Yes”, press OK
button to conrm to restore to factory default settings. Use PREV/NEXT button to
select “No”, press OK to cancel this selection.
Alarm 1 Set/Alarm 2 Set
You can set the alarm.
Sleep set
You can set the sleep function.
Language
To select the desired language of the unit’s menu: English, French, Dutch and
Deutsch.
Time Sync
For time auto update.
When the display shows “Time Sync”, press OK button to conrm. Use PREV or
NEXT button to select “Update radio” or “No update”, press OK button to conrm.
12H or 24H
Press PREV/NEXT to adjust 12 or 24 hour format.
FM scan setting
Only: The automatic search only locates at strong stations.
All: The automatic search locates at any available station.
Bat ecient (Battery ecient setting)
When the display shows “Bat ecient”, press OK button to conrm. Use PREV or
NEXT button to select “ON” or “OFF”, press OK button to conrm. If you selected
“ON”, when no control on the unit in standby mode, the unit will be o automatically
after 2 minutes.
Stereo / Mono
To select between “Stereo” and “Mono” for the FM radio.
Prune
Remove stations that are listed but unavailable. This function can remove all invalid
stations indicated in the station list with a “?” in front of the station name. (DAB
mode only)
TECHNICAL SPECI FICATIONS:
DC IN 5V 1A
DC 4X1.5V, battery type R6/UM3/AA (non fournies)
FREQUENCE RADIO:
FM: 87.5 - 108 MHz
DAB/DAB+: 174.928-239.2 MHz
La conception et les specications peuvent être modies sans préavis.
Par la présente, NEW ONE S.A.S déclare que l’appareil “MUSE M-102 DB” est
conforme aux exigences essentielles et autres dispositions pertinentes de la
directive 2014/53/EU. La déclaration de conformité peut être consultée sur le site
www.muse-europe.com
ALIMENTAÇÃO:
DC IN 5V 1A
DC 4X1.5V, battery type R6/UM3/AA (not provided)
FREQUÊNCIA DAS RÁDIOS:
FM: 87.5 - 108 MHz
DAB/DAB+: 174.928-239.2 MHz
O design e as especicções estão sujeitos a alterações sem aviso prévio.
Hierbij verklaart NEW ONE S.A.S dat deze “MUSE M-102 DB” voldoet aan de
essentiële eisen en andere relevante bepalingen uit richtlijn 2014/53/EU. De
verklaring van conformiteit kan worden geraadpleegd op www.muse-europe.com
POWER SUPPLY:
DC IN 5V 1A
DC 4X1.5V, battery type R6/UM3/AA (not provided)
RADIO FREQUENCY:
FM: 87.5 - 108 MHz
DAB/DAB+: 174.928-239.2 MHz
Design and specications are subject to change without notice.
Hereby, NEW ONE S.A.S, declares that this MUSE M-102 DB is in compliance with
the essential requirements and other relevant provisions of Directive 2014/53/EU.
The declaration of conformity may be consulted at www.muse-europe.com
Ande réduire les risques de lésions auditives, n’écoutez pas de la
musique à un volume élevé pendant longtemps.
Para prevenir possíveis danos auditivos, não escute em volumes muito
altos por longos períodos de tempo.
To prevent possible hearing damage, do not listen at high volume levels
for long periods.
ALIMENTATION
ALIMENTAÇÃO
STROMVERSORGUNG
POWER SUPPLY
Utilisation de l’adaptateur secteur
Les adaptateurs secteurs fournis peuvent uniquement être utilisés sur une
alimentation secteur de 100-240V 50/60Hz. L’adaptateur secteur fourni ne peut
en aucun cas être utilisé sur un autre type d’alimentation.
Avertissements:
• L’adaptateur secteur fourni est exclusivement destiné à être utilisé avec cet
appareil. Ne l’utilisez donc pas avec d’autres appareils.
• Éteignez l’appareil avant de débrancher l’adaptateur secteur an d’éviter d’abîmer
le lecteur.
• En cas de non-utilisation prolongée, débranchez l’adaptateur secteur de la prise.
• Placez l’appareil à proximité de la prise murale et veillez à ce que cette dernière
reste facilement accessible. En cas de dysfonctionnement, débranchez
immédiatement l’appareil de la prise murale.
• L’adaptateur secteur permet de débrancher l’appareil. Il doit rester facilement
accessible durant l’utilisation. Pour couper complètement l’alimentation de
l’appareil, débranchez tout à fait l’adaptateur de la prise secteur.
• N’utilisez jamais un adaptateur secteur abîmé. Placez le câble d’alimentation
de manière sûre et de façon à ne pas le coincer ou l’écraser. Si le câble est
endommagé, contactez un service de réparation.
• L’adaptateur secteur doit être débranché de la prise DC pour que l’appareil
fonctionne sur les piles.
Utilisation sur piles
1. Enlevez la trappe des piles en appuyant avec le pouce sur la zone indiquée sur
la trappe et soulevez la trappe hors du boitier.
2. Avant d’insérer les piles, Vériez les polarités (+ et -) des piles, puis installez les
piles avec les polarités correspondantes au diagramme dans le compartiment.
Installez 4 piles 1.5V, R6/UM3/ “AA” (non fournies) dans le compartiment.
3. Refermez le compartiment pour piles.
Utilização do adaptador de corrente
A fonte fornecida é adequada para ser utilizada em tomadas de 100 a 240V
50/60Hz e deverá ser apenas ligada a tomadas dentro dessas especicações.
Atenção:
• O adaptador de corrente fornecido destina-se apenas a ser utilizado com este
aparelho. Não o utilize, pois, com outros aparelhos.
• Desligue o aparelho antes de desligar o adaptador de corrente para evitar
danicar o leito.
• No caso de não utilização prolongada, desligue o adaptador de corrente da
tomada.
• Coloque o aparelho na proximidade da tomada de parede e certiquesede que
esta se mantém facilmente acessível. Em caso de avaria, desligue imediatamente
o aparelho da tomada de parede.
• O adaptador de corrente permite desligar o aparelho. Deve ser mantido facilmente
acessível durante a utilização. Para cortar completamente a alimentação do
aparelho, desligue efectivamente o adaptador da tomada de corrente.
• Nunca utilize um adaptador de corrente danicado.Coloque o cabo de alimentação
de forma segura e de modo a não carpreso nem esmagado. Se o cabo estiver
danicado,contacte um serviço de reparação.
• O adaptador CA deve ser desconectado da tomada DC para que a unidade
funcione a bateria.
Utilização das pilhas:
1. Remova a tampa do compartimento das pilhas colocando pressão na área
indicada na tampa com o polegar, e em seguida levante e retire-a do aparelho.
2. Antes de colocar as pilhas, veriquea posição dos polos (+ e -), e então instale
combinando-as com os polos gravados dentro do compartimento. Insira 4 pilhas
de 1,5V, R6/UM3/“AA” (não incluso) no compartimento.
3. Volte a fechar o compartimento das pilhas.
Gebrauch des Netzstromadapters
Der mitgelieferte Netzstromadapter ist geeignet für eine AC 100-240V 50/60Hz
Stromversorgung und darf nur an einer Steckdose mit diesen Parametern
angeschlossen werden.
Achtung:
• Der mitgelieferte Netzstromadapter darf nur mit diesem Gerät verwendet werden.
Verwenden Sie ihn nicht mit anderen Geräten.
• Schalten Sie das Gerät aus, bevor Sie den Netzstromadapter vom Gerät trennen,
um Schäden am Gerät zu vermeiden.
• Wird das Gerät längere Zeit nicht verwendet, sollte der Netzstromadapter von der
Stromsteckdose abgesteckt werden.
• Stellen Sie das Gerät in der Nähe der Stromsteckdose auf und sorgen Sie dafür,
dass die Stromsteckdose leicht zugänglich ist. Sollte die Stromsteckdose eine
Störung aufweisen, müssen Sie das Gerät sofort abstecken.
• Der Netzstromadapter erlaubt das Abstecken des Gerätes. Er muss während
des Gebrauchs leicht zugänglich sein. Um die Stromversorgung des Geräts
komplett zu unterbrechen, muss der Netzstromadapter von der Stromsteckdose
abgesteckt werden.
• Verwenden Sie auf keinen Fall einen beschädigten Netzstromadapter. Verlegen
Sie das Netzkabel so, dass es weder eingeklemmt noch gequetscht wird. Ein
beschädigtes Netzkabel muss bei einer Reparaturstelle repariert werden.
• Für den Batteriebetrieb muss das AC-Netzteil von der DC-Buchse des Gerätes
getrennt werden.
Batteriebetrieb:
1. Önen Sie das Batteriefach, indem Sie mit Ihrem Daumen auf den markierten
Bereich der Abdeckung drücken und dann die Abdeckung anheben und
herausziehen.
2. Beachten Sie die Polarität (+ und -) der Batterien. Legen Sie 4x1,5V Batterien
des Typs R6/UM3/„AA“ gemäß den Polaritätsmarkierungen im Batteriefach ein.
3. Schließen Sie das Batteriefach wieder.
AC ADAPTOR
The supplied AC adaptor is suitable for use on AC main supplies of AC 100-240V
50/60Hz and should only be connected to a mains supply within these parameters.
Cautions:
• The AC adaptor included with this unit is for its use only. Do not use it with other
equipment.
• Turn o the unit before unplugging the AC adaptor from the unit so as to avoid
the unit being damaged.
• When the unit is not going to be used for long time, disconnect the AC adaptor
from the AC outlet.
• Be sure to use it near the wall outlet and easily accessible. If a malfunction occurs,
disconnect the plug from the wall outlet at once.
• AC adaptor is used as the disconnect device. It shall remain readily operable and
should not be obstructed during intended use. To be completely disconnected
the apparatus from supply mains, the AC adaptor of the apparatus shall be
disconnected from the mains socket outlet completely.
• Never use an AC adaptor that is damaged, route power lead in a safe manner and
make sure it is not subjected to trapping or pinching. If the power lead is damaged
refer to a qualied service agent.
• The AC adaptor must be unplugged from the DC jack for the unit to run on the
batteries.
BATTERY OPERATION
1. Remove the battery compartment door by applying thumb pressure to area
indicated on battery door and then lift the door out and o the cabinet.
2. Before inserting the batteries, observe the polarities (+ and -) of the battery, then
relate the polarities to the engraved diagram inside the battery compartment,
insert 4x1.5V, R6/UM3/“AA” batteries (not supplied) into the compartment.
3. Replace the compartment door.
Avant de jeter les piles, consultez votre revendeur car celui-ci peut les
reprendre pour les recycler.
Antes de eliminar as pilhas, consulte o seu revendedor pois este pode
retomá-las para reciclagem.
Fragen Sie vor dem Entsorgen der Batterien Ihren Fachhändler vor
Ort um Rat, denn dieser kann sie zurücknehmen und sich um deren
fachgerechtes Entsorgen kümmern.
Before throwing any batteries away, consult your distributor who may be
able to take them back for specic recycling.
REMARQUES:
- Ne chargez jamais des piles non rechargeables. Ne chauez pas les piles et ne
les démontez pas.
- Pour éviter un écoulement, retirez les piles en cas de non-utilisation prolongée
de l’appareil.
- Pour des performances optimales, des piles de type Alcaline sont recommandées.
Ces piles doivent- être remplacées tous les 6 mois.
- Les piles doivent être remplacées lorsque: le volume sonore diminue ou le son
est déformé.
- “Batterie faible” s’achera à l’écran lorsque la batterie ets faible.
ATTENTION: Risque d’explosion si les piles n’ont pas été insérées correctement.
Remplacez les uniquement par des piles identiques ou de type équivalent.
OBSERVAÇÕES:
- Nunca carregue pilhas não recarregáveis. Não aqueça as pilhas e não as
desmonte.
- Para evitar que as pilhas vertam, retire-as no caso de não utilização prolongada
do aparelho.
- Recomenda-se a utilização de pilhas alcalinas. Para um funcionamento óptimo,
recomenda-se a substituição das pilhas todos os 6 meses.
- As pilhas devem ser substituídas quando: O volume diminuir, ou o som car
distorcido durante o funcionament
- “Bateria fraca” aparecerá no visor quando a bateria estiver fraca.
ATENÇÃO: Risco de explosão se a pilha não for inserida correctamente.
Substitua-a apenas por uma pilha idêntica ou de tipo equivalente.
HINWEISE:
- Nicht Wiederauadbare-Batteriendürfen nicht nochmals geladen werden. Erhitzen
Sie die Batterien nicht und demontieren Sie sie nicht.
- Um ein Ausießender Batterien zu vermeiden, wenn Sie das Gerät während
längerer Zeit nicht verwenden, nehmen Sie die Batterien aus dem Gerät.
- Wir empfehlen den Gebrauch alkalischer Batterien. Damit das Gerät optimal
funktioniert, sollten Sie diese Batterien alle 6 Monate ersetzen.- Batterien
müssen ersetzt werden, wenn die Lautstärke nachlässt oder der Klang während
des Betriebs unklar wird.
- Bei niedriger Batteriekapazität erscheint im Display die Anzeige „Low battery“.
ACHTUNG: Wenn die Batterie nicht richtig eingelegt wird, besteht die Gefahr, dass
die Batterie explodiert. Ersetzen Sie eine leere Batterie nur mit einer identischen
oder gleichwertigen Batterie.
NOTES:
- Never recharge the batteries, apply heat to them or take them apart.
- In order to avoid leakage, always remove the batteries when unit will not be used
for a long period of time.
- For optimal performance, alkaline batteries are recommended. These batteries
must be replaced every six months.
- The batteries need to be replaced when: The volume decreases, or sound is
distorted during operation.
- “Battery low” will show on display when the battery power is low.
CAUTION: Danger of explosion if battery is incorrectly replaced. Replace only with
the same or equivalent type.
RADIO PORTABLE DAB/DAB+ FM
RÁDIO PORTÁTIL DAB+/FM
TRAGABARES RADIO DAB+/FM
DAB+/ FM PORTABLE RADIO
FR
PT
DE
GB
NEW ONE S.A.S
10, Rue de la Mission, 25480 Ecole Valentin, France
NEW ONE S.A.S
10, Rue de la Mission, 25480 Ecole Valentin, France
NEW ONE S.A.S
10, Rue de la Mission, 25480 Ecole Valentin, France
IMPORTANT
- La plaque signalétique se trouve à l’arrière de cet appareil.
- Veiller à avoir une distance minimale de 5 cm autour de l’appareil pour une
aération susante et que la ventilation ne soit pas gênée en recouvrant les orices
d’aération de l’appareil avec des objets tels que journaux, nappes, rideaux.
- Ne placez pas de sources de ammes nues, telles que des bougies allumées
sur l’appareil.
- Ne pas exposer l’appareil à des gouttes d’eau ou éclaboussures.
- Ne placez pas d’objets remplis de liquides, tels que verre, vase ou objets
similaires sur l’appareil.
- N’utilisez cet appareil que sous des climats temperes.
- Ne pas jeter les piles dans le feu! Respectez l’environnement lors de la disposition
des piles usagées.
- Les piles ne doivent pas être exposées à une chaleur excessive comme le soleil,
le feu ou autre source de chaleur similaire.
- La che du cordon d’alimentation est utilisée comme dispositif de débranchement
et doit rester facilement accessible. Pour être totalement déconnecté, cette che
doit être débranchée du réseau complètement. La prise de courant ne doit pas
être obstruée et doit être facilement accessible lors de son utilisation.
- Sous l’inuence du phénomène transitoire rapide et / ou phénomène
électrostatique électrique, le produit pourrait présenter des dysfonctionnements
et l’utilisateur devra faire une réinitialisation de l’appareil.
IMPORTANTE
- A placa sinalética encontra-se debaixo do aparelho.
- Preveja um espaço mínimo de 5 cm à volta do aparelho para assegurar uma
ventilação suciente- Certique-se de que não tapa os orifícios de ventilação.
- Não coloque velas sobre ou na proximidade do aparelho.
- Certique-se de que não expõe o aparelho à chuva ou à humidae.
- Não coloque qualquer recipiente com líquido, como uma jarra, sobre ou na
proximidade do aparelho.
- Utilize este aparelho apenas em climas temperados.
- A chade alimentação de rede permite desligar o aparelho. para cortar
completamente a alimentação do aparelho, desligue completamente a chade
alimentação de rede da tomada de rede. a chade alimentação de rede não pode
estar tapada e deve ser facilmente acessível durante a utilização.
- Sob o efeito de fenómenos eléctricos transitórios e/ou electrostáticos, o produto
pode apresentar anomalias e pode ser necessário desligar o aparelho da
alimentação de rede durante alguns instantes.
- Ensure that the ventilation openings are not covered with items such as
newspapers, tablecloths, curtains, etc.
- Do not place naked ame sources, such as lighted candles on the apparatus.
- Do not expose this appliance to dripping or splashing water.
- Do not place objects lled with liquids, such as glass, vase on the device.
- Use the apparatus only in moderate climates.
- Do not throw batteries into re! Respect the environment when disposing of used
batteries.
- Batteries should not be exposed to excessive heat such as sunshine, re or other
similar heat source.
- The AC adaptor is used as a disconnect device and must be easily accessible.
To be completely disconnected from the power, the AC adaptor of the appliance
should be disconnected completely. The socket must not be obstructed and
should be easily accessible during intended use.
- Under the inuence of fast transient and / or electrostatic electric phenomenon,
the product may malfunction and the user must perform a power reset of the
device.
IMPORTANT
- The Marking plate is located at the back of the device
- Make sure to have a minimum distance of 5 cm around the unit for sucient
ventilation.
Si à l’avenir, vous deviez vous débarrasser de ce produit, sachez que les
produits électriques usagés ne doivent pas être jetés avec les ordures
ménagères. Des installations destinées au recyclage existent. Vériez
auprès de votre municipalité ou demandez à votre revendeur des
conseils. (Directive Déchets d’Equipements Electriques et Electroniques)
Caso, em algum momento no futuro, tenha de se descartar deste
aparelho, tenha em conta que os produtos eléctricos não devem ser
descartados com o lixo doméstico. Informese para conhecer o centro de
reciclagem mais próximo. Informe-se junto das autoridades locais ou do
seu revendedor local para a obtenção de pormenores adicionais.
Nota: O desenho e as especicações estão sujeitas a mudanças sem aviso prévio.
If in the future, you need to get rid of this product, please note that Waste
electrical products should not be disposed of with household waste.
Recycling facilities exist. Check with your municipality or ask your dealer
for advice. (Directive for Waste Electrical and Electronic Equipment)
INFORMATION DE SÉCURITÉ
CONSELHOS DE SEGURANÇA
SAFETY INFORMATION
ATTENTION: Pour réduire le risque de choc électrique, ne
démontez pas l’appareil. Celui-ci ne contient aucune pièce
réparable par l’utilisateur. Conez toute réparation à du
personnel qualify.
ATENÇÃO: Para reduzir o risco de choque eléctrico, não
desmonte o aparelho. O aparelho não tem nenhuma parte que
possa ser reparada pelo utilizador. Cone qualquer reparação a
um técnico qualicad.
CAUTION: To reduce the risk of electric shock, do not open the
device, there is no party inside for the user. Refer all servicing to
qualied personnel.
Ce symbole signale la présence de tensions dangereuses à l’intérieur de
l’appareil.
Este símbolo assinala a presença de tensões perigosas no interior do
aparelho.
The lightning with the arrow symbol in the triangle is a warning sign alerting
the user to “dangerous voltage” inside the unit.
Ce symbole rappelle que la documentation fournie avec l’appareil contient
d’importantes instructions.
Este símbolo recorda que a documentação fornecida com o aparelho
contém instruções importantes.
The exclamation point in the triangle is a warning sign alerting the user of
important instructions accompanying the product.
Nos emballages peuvent faire l’objet d’une consigne de tri, pour en
savoir plus: www.quefairedemesdechets.fr
M-102 DB

M-102DB/IB/V1(D)
EINSCHLAFFUNKTION
FUNCIÓN DE TEMPORIZADOR DE APAGADO AUTOMÁTICO
(SLEEP)
DIMMER
AJUSTE DEL NIVEL DE INTENSIDAD DE LA LUZ DE LA PANTALLA
RIDUZIONE DELLA LUMINOSITÀ
SCHERMDIMMER
GEBRAUCH EINES KOPFHÖRERS / OHRHÖRERS (nicht enthalten)
USO DE CASCOS O AURICULARES (cable no incluido)
COLLEGAMENTO DI CUFFIE O AURICOLARI (cavo non incluso)
GEBRUIK VAN EEN HOOFDTELEFOON (kabel niet meegeleverd)
EINSTELLEN DER WECKZEIT UND DES ALARMMODUS
PROGRAMACIÓN DE LA ALARMA Y AJUSTE DEL MODO ALARMA
IMPOSTAZIONE DELLA SVEGLIA E DELLA MODALITÀ DELLA
SVEGLIA
TECHNISCHE EIGENSCHAFTEN
CARACTERÍSTICAS TÉCNICAS
SPECIFICHE TECNICHE
TECHNISCHE KENMERKEN
1. Betätigen Sie die INFO/MENU -Taste, um das UKW- oder DAB/DAB+ -Band
zu wählen.
2. Drücken Sie wiederholt die Taste PREV/NEXT, um <Sleep Set> auszuwählen,
und drücken Sie dann zur Bestätigung die Taste OK.
3. Wenn Sie mit Musik einschlafen möchten, drücken Sie die Taste gefolgt von
SLEEP, um den Sleep-Timer mit 120-90-60-45-30-15-5 Minuten einzustellen.
Nach Ablauf der programmierten Zeit schaltet sich das Gerät automatisch aus.
Um den Sleep-Timer zu löschen, drücken Sie wiederholt die Taste PREV/NEXT,
bis im Display „OFF“ erscheint, The unit will automatically turn o after the
specied time. Bestätigung die Taste OK.
1. Pulse repetidamente el botón INFO/MENU para seleccionar la banda FM o DAB/
DAB+.
2. Presione repetidamente el botón PREV/NEXT para seleccionar <Sleep Set>,
pulse el botón OK para conrmar.
3. Para quedarse dormido con la radio, pulse repetidamente SLEEP para
seleccionar 120-90-60-45-30-15-5 minutos de escucha. La unidad se apagará
automáticamente una vez haya transcurrido el tiempo especicado. Para
cancelar la función de apagado automático, presione repetidamente el botón
PREV/NEXT hasta que aparezca “OFF”, pulse el botón OK para conrmar.
Im Standby-Modus, Betätigen Sie die Tasten DIMMER, um die Bildschirmhelligkeit
einzustellen.
En modo de espera, Pulse el botón DIMMER para seleccionar el brillo de la
pantalla.
In modalità standby, Premere il tasto DIMMER per selezionare il livello di luminosità
del display.
In de standby-modus, Druk op DIMMER om de helderheid van het display in te
schallen.
Maximale Ausgangsspannung ≤ 150mV
WARNUNG IN ZUSAMMENHANG MIT DER LAUTSTÄRKE BEIM GEBRAUCH
DES KOPFHÖRERS
Vor dem Anstecken eines Kopfhörers zuerst die Lautstärke verringern; sie kann danach
bei Bedarf wieder erhöht werden. Das längere Hören mit einem Kopfhörer bei großer
Lautstärke kann Ihr Gehör unwiderruich schädigen. Wenn ein Kopf- oder Ohrhörer an
das Gerät angeschlossen wird, deaktiviert das die Lautsprecher des Players.
Achtung: Vermeiden Sie große Lautstärken, sie schädigen Ihr Gehör.
Tensión de salida máxima ≤ 150mV
ADVERTENCIA SOBRE EL NIVEL DE VOLUMEN DE LOS CASCOS O DE LOS
AURICULARES
Disminuya el volumen antes de conectar los cascos o auriculares y auméntelo a
continuación en caso de que sea necesario. El uso prolongado de los auriculares
(o de los cascos) a un volumen elevado puede dañar el sistema auditivo. Cuando
se utilicen cascos o auriculares, la salida de audio de los altavoces queda
automáticamente desactivada.
Atención: No utilice los cascos o auriculares a un volumen demasiado alto. Podría
dañar su sistema auditivo.
Tensione massima di uscita ≤ 150mV
AVVERTENZA SUL VOLUME DELLE CUFFIE
Diminuite il volume prima di collegare le cue e aumentatelo successivamente se
necessario. L’uso prolungato delle cue ad alto volume può danneggiare l’udito.
Se le cue / auricolari sono collegati all’apparecchio, gli altoparlanti del lettore si
disattivano automaticamente.
Attenzione: evitate di utilizzare l’apparecchio ad un volume troppo elevato per non
danneggiare il vostro udito.
Maximaal vermogen ≤ 150mV
WAARSCHUWING MET BETREKKING TOT HET VOLUME VAN DE
HOOFDTELEFOON
Verminder het geluidsvolume vooraleer u een hoofdtelefoon aansluit. Vervolgens
kan u het geluid naar wens luider zetten. Langdurig luisteren naar het toestel op
hoog volume kan het oor van de gebruiker beschadigen. Het geluid wordt niet
langer door de luidsprekers gestuurd, van zodra u een hoofdtelefoon aansluit.
OPGEPAST: vermijd het luisteren naar het toestel op hoge volumes die het oor van
de gebruiker kunnen beschadigen.
Schalten Sie das Gerät, nachdem die Uhrzeit eingestellt wurde.
1. Betätigen Sie die INFO/MENU -Taste, um das UKW- oder DAB/DAB+-Band zu
wählen.
2. Drücken Sie die Taste PREV/NEXT, um <Alarm 1 Set> oder <Alarm 2 Set>
auszuwählen, drücken Sie die Taste OK zum Bestätigen.
3. Appuyez plusieurs fois sur les boutons PREV/NEXT pour sélectionner <ON>,
drücken Sie die Taste OK zum Bestätigen.
4. Verwenden Sie den PREV/NEXT -Regler, um die Stunden einzustellen.
Bestätigen Sie mit OK. Verwenden Sie den PREV/NEXT -Regler, um die
Minuten einzustellen. Bestätigen Sie mit OK.
5. Drücken Sie dann die Taste PREV/NEXT, um die Lautstärke einzustellen .
Bestätigen Sie mit OK.
6. Drücken Sie wiederholt die Taste PREV/NEXT, um die Alarmquelle auf Summer,
DAB oder UKW zu stellen. Betätigen Sie die OK -Taste zur Bestätigung.
7. Drücken Sie wiederholt die Taste PREV/NEXT, um eine der folgenden
Alarmoptionen festzulegen: “Daily”, “Once”, “Weekends” und “Weekdays”.
Betätigen Sie die OK-Taste zur Bestätigung.
8. Im Standby-Modus wird “ ” oder “ ” auf dem Display angezeigt.
Hinweis:
- Dasselbe Verfahren gilt für Alarm 2.
- Wenn als Alarmquelle den zuletzt gewählten Sender benutzen, wählen Sie
den gewünschten Sender und Halten Sie die Taste / MODE, um das Radio
auszuschalten, bevor die Alarmzeit erreicht wird. Zur Senderauswahl, lesen
Sie bitte den Abschnitt “DAB/DAB+ RADIOSENDER ANHÖREN“ und “FM
RADIOSENDER ANHÖREN“.
Stoppen des Weckalarms
1. Alarmwiederholung
Drücken Sie die Taste SNOOZE, um den Alarm kurzfristig zu unterbrechen. Der
Alarm schaltet sich nach einigen Minuten wieder ein. Standardeinstellung: 9 Minuten.
2. Alarmstopp
Betätigen Sie die Taste / MODE. Der Alarm 1 oder Alarm 2 wird am nächsten Tag
zur eingestellten Weckzeit erneut aktiviert.
Hinweis:
- Wenn die Alarmwiederholung auf “Once” gestellt wurde, wird der Alarm nicht
wieder aktiviert.
- Wenn die Alarmwiederholung auf “Daily” gestellt wurde, wird der Alarm jeden Tag
aktiviert.
- Wenn die Alarmwiederholung auf “Weekend” gestellt wurde, wird der Alarm jedes
Wochenende aktiviert.
- Wenn die Alarmwiederholung auf “Weekdays” gestellt wurde, wird der Alarm nur
an Wochentagen aktiviert.
3. Alarm deaktivieren
- Betätigen Sie die INFO/MENU -Taste, um das UKW- oder DAB/DAB+ -Band zu
wählen.
- Drücken Sie die Taste PREV/NEXT, um <Alarm 1 Set> oder <Alarm 2 Set>
auszuwählen, und drücken Sie zur Bestätigung die Taste OK.
- Drücken Sie wiederholt die Taste PREV/NEXT, um <OFF> auszuwählen, und
drücken Sie dann zur Bestätigung die Taste OK.
Cuando la hora haya sido ajustada.
1. Pulse repetidamente el botón INFO/MENU para seleccionar la banda FM o DAB/
DAB+.
2. Presione el botón PREV/NEXT para seleccionar <Alarm 1 Set> o <Alarm 2 Set>,
pulse el botón OK para conrmar.
3. Presione repetidamente el botón PREV/NEXT para seleccionar <ON>, pulse el
botón OK para conrmar.
4. Utilice el dial de PREV/NEXT para congurarla hora, pulse el botón OK para
conrmar. Utilice el dial PREV/NEXT para congurarlos minutos, pulse el botón
OK para conrmar.
5. Luego presione el botón PREV/NEXT para ajustar el volumen, pulse el botón OK
para conrmar.
6. Repeatedly press PREV/NEXT button to select the source of wake up by Buzzer,
DAB or FM. Press OK button to conrm.
7. Presione repetidamente el botón PREV/NEXT para especicaruna de las
siguientes opciones de frecuencia de alarma: “Daily” (Diaria), “Once” (Una vez),
“Weekends” (Fines de semana) y “Weekdays” (Días laborables). Pulse el botón
OK para conrma.
8. En el modo de espera, se mostrará “ ” o “ ” en la pantalla.
Nota:
- El mismo procedimiento se aplica para la Alarma 2.
- Si se quiere despertar con la última emisora reproducida, seleccione la emisora que
desee, Mantenga pulsado el botón / MODE para apagar la radio antes de que se
alcance la hora de la alarma. Para la selección de la emisora, por favor, consulte
“PARA ESCUCHAR LA RADIO DAB/DAB+” y “PARA ESCUCHAR LA RADIO FM”.
Apagado de la alarma
1. Repetición de la alarma
Pulse el botón SNOOZE para detener momentáneamente la alarma. Esta volverá a
sonar transcurridos unos minutos. (por defecto: 9 minutos)
2. Detención de la alarma
Pulse / MODE. La alarma 1 o alarma 2 sonarán de nuevo al día siguientes a la
misma hora.
Nota:
- Si selecciona la frecuencia de alarma “Once”, esta no volverá a sonar
- Si selecciona la frecuencia de alarma “Daily”, esta sonará de nuevo.
- Si selecciona la frecuencia de alarma “Weekend”, esta sonará de nuevo los nes
de semana
- Si selecciona la frecuencia de alarma “Weekdays”, esta sonará de nuevo, excepto
los nes de semana.
3. Cancelación de la alarma
- Pulse repetidamente el botón INFO/MENU para seleccionar la banda FM o DAB/
DAB+.
- Presione el botón PREV/NEXT para elegir <Alarm 1 Set> o <Alarm 2 Set>, pulse
el botón OK para conrmar.
- Presione repetidamente el botón PREV/NEXT para seleccionar <OFF>, pulse el
botón OK para conrmar.
- Selezionando l’opzione di frequenza “Daily” (Ogni Giorno) la sveglia si ripete.
- Selezionando l’opzione di frequenza “Weekend” la sveglia si ripete ogni weekend.
- Selezionando l’opzione di frequenza “Weekdays” (Infrasettimanale) la sveglia si
ripete ogni giorno escluso il weekend.
3. Disattivazione della sveglia
- Premete più volte il tasto INFO/MENU per selezionare la banda FM o la banda
DAB/DAB+.
- Premere il pulsante PREV/NEXT per scegliere <Alarm 1 Set> o <Alarm 2 Set>,
Premere il tasto OK per confermare.
- Premere ripetutamente il tasto PREV/NEXT per selezionare <OFF>, Premere il
tasto OK per confermare.
Una volta impostata l’ora.
1. Premete più volte il tasto INFO/MENU per selezionare la banda FM o la banda
DAB/DAB+.
2. Premere il tasto PREV/NEXT per scegliere <Alarm 1 Set> o <Alarm 2 Set>,
premere OK per annullare l’operazione.
3. Premere ripetutamente il tasto PREV/NEXT per selezionare <ON>, premere OK
per annullare l’operazione.
4. Utilizzate la manopola PREV/NEXT per impostare l’ora. Premete il tasto OK per
confermare. Utilizzate la manopola PREV/NEXT per impostare i minuti. Premete
il tasto OK per confermare.
5. Quindi premere il pulsante PREV/NEXT per impostare il volume, Premete il tasto
OK per confermare.
6. Utilizzate la manopola PREV/NEXT per selezionare l’origine della sveglia
(segnale acustico, DAB o FM). Premere il tasto OK per confermare.
7. Utilizzate la manopola PREV/NEXT per specicareuna delle seguenti opzioni di
frequenza della sveglia: “Daily” (Ogni Giorno), “Once” (Una volta), “Weekend” o
“Weekday” (Infrasettimanale). Premere il tasto OK per confermare.
8. In modalità standby, sul display viene visualizzato “ ” o “ ”.
Nota:
- La stessa procedura si applica per la sveglia 2.
- Se si desidera svegliarsi con l’ultima stazione radio ascoltata, selezionare la
stazione radio desiderata, quindi premere il tasto / MODE per spegnere la radio
prima dell’ora della sveglia. Per la selezione della stazione, consultare le sezioni
“ASCOLTO DELLA RADIO DAB/DAB+” e “ASCOLTO DELLA RADIO FM”.
Arresto della sveglia
1. Ripetizione della sveglia
Premere il pulsante SNOOZE per arrestare momentaneamente l’allarme. Questo
suonerà nuovamente dopo alcuni minuti. (Di default: 9 minuti.)
2. Arresto della sveglia
Premere il tasto / MODE. La sveglia 1 o 2 si avvia di nuovo il giorno successivo
alla stessa ora.
Note:
- Selezionando l’opzione di frequenza “Once” (Una Volta) la sveglia non si ripete.
Stromversorgung:
DC IN 5V 1A
DC 4X1.5V, battery type R6/UM3/AA (nicht enthalten)
RADIOFREQUENZ:
FM: 87.5 - 108 MHz
DAB/DAB+: 174.928-239.2 MHz
Design und technische Daten unterliegen unangekündigten Änderungen.
NEW ONE S.A.S erklärt hiermit, dass dieser „MUSE M-102 DB“ den wesentlichen
Anforderungen und anderen geltenden Vorgaben der Richtlinie 2014/53/EU
entspricht. Die Konformitätserklärung lässt sich unter www.muse-europe.com
herunterladen.
ALIMENTACIÓN:
DC IN 5V 1A
DC 4X1.5V, tipo de pila R6/UM3/AA (no incluidas)
FRECUENCIA DE RADIO:
FM: 87.5 - 108 MHz
DAB/DAB+: 174.928-239.2 MHz
El diseño y las especicacionespueden ser sujetos a cambios sin previo aviso.
Por la presente, NEW ONE S.A.S declara que el « MUSE M-102 DB » cumple con los
requerimientos esenciales y otras provisiones aplicables de la Directiva 2014/53/EU.
La declaración de conformidad podrá consultarse en www.muse-europe.com
ALIMENTAZIONE:
INGRESSO CC 1A
CC: 4 batterie R6/UM3/AA 1,5V (non fornite)
FREQUENZA RADIO:
FM: 87.5 - 108 MHz
DAB/DAB+: 174.928-239.2 MHz
Il design e le specich tecniche sono soggetti a modichesenza preavviso.
Con la presente, NEW ONE S.A.S dichiara che « MUSE M-102 DB » è conforme ai
requisiti essenziali e alle altre disposizioni fondamentali della direttiva 2014/53/EU.
La dichiarazione di conformità è consultabile alla pagina www.muse-europe.com
VOEDING:
DC IN 5V 1A
DC: 4X1,5V, batterijtype R6/UM3/AA (niet inbegrepen)
RADIOFREQUENTIE:
FM: 87.5 - 108 MHz
DAB/DAB+: 174.928-239.2 MHz
Ontwerp en specicatieszijn onderhevig aan verandering zonder kennisgeving.
Hierbij verklaart NEW ONE S.A.S dat deze “MUSE M-102 DB” voldoet aan de
essentiële eisen en andere relevante bepalingen uit richtlijn 2014/53/EU. De
verklaring van conformiteit kan worden geraadpleegd op www.muse-europe.com
Um mögliche Gehörschäden zu vermeiden, sollten Sie nicht über längere
Zeit bei hohen Lautstärken Musik hören.
Para evitar posibles daños en el oído, no escuche a un volumen elevado
durante largos periodos.
Per prevenire possibili danni all’apparato uditivo,non ascoltare la radio
con il volume alto per un lungo periodo.
Luister niet voor lange perioden op hoog volume om mogelijke
gehoorschade te voorkomen.
NEW ONE S.A.S
10, Rue de la Mission, 25480 Ecole Valentin, France
NEW ONE S.A.S
10, Rue de la Mission, 25480 Ecole Valentin, France
NEW ONE S.A.S
10, Rue de la Mission, 25480 Ecole Valentin, France
NEW ONE S.A.S
10, Rue de la Mission, 25480 Ecole Valentin, France
WICHTIG
- Das Typenschild bendet sich auf der Unterseite des Geräts
- Achten sie auf einen mindestabstand von 5 cm um das gerät, um eine ausreichende
belüftung zu gewährleisten.
- Achten Sie darauf, dass Sie keinesfalls die Belüftungsönungendes Gerätes
bedecken.
- Stellen Sie keine oenen Flammen, wie brennende Kerzen auf dasGerät.
- Achten sie darauf, dass sie ihr gerät niemals regen oder feuchtigkeit aussetzen.
- Stellen sie keinen mit üssigkeitgefüllten behälter (wie z.b. eine vase) auf oder in
der nähe des geräts ab.
- Verwenden sie das gerät nur in gemässigten klimazonen.
- Mit dem netzkabel kann das gerät vom stromnetz getrennt werden. ziehen sie
den netzstecker vollständig aus der netzsteckdose heraus, um das gerät komplett
vom stromnetz zu trennen. Der netzstecker darf nicht behindert werden und muss
während der verwendung leicht zugänglich sein.
- Unter der einwirkung von vorübergehenden elektrischen oder elektrostatischen
phänomenen kann das produkt fehlfunktionen aufweisen. Es kann sich als notwendig
erweisen, das gerät einige momente von der netzstromversorgung zu trennen.
ADVERTENCIA
- La placa de datos técnicos está situada en la parte inferior del aparato.
- Deje libre un espacio de, al menos, 5 cm alrededor del aparato para garantizar
una ventilación adecuada.
- Asegúrese de que los oriciosde ventilación no están obstruidos con periódicos,
manteles, cortinas, etc.
- No coloque velas encendidas cerca o encima del aparato.
- No exponga este aparato a la lluvia o la humedad.
- No coloque ningún recipiente con líquido, como un jarrón, cerca o encima del
aparato.- Utilice este aparato únicamente en climas templados.
- El enchufe le permite desconectar el aparato. Para cortar completamente la
alimentación, desenchufe el aparato de la toma de corriente. Se ha de poder
acceder fácilmente al enchufe durante el uso del aparato; Procure que el acceso
al mismo permanezca despejado.
- Como resultado de fenómenos eléctricos transitorios y/o electroestáticos, pueden
producirse fallos en el funcionamiento del aparato. En estos casos, puede ser
necesario desenchufar el aparato de la fuente de alimentación durante unos
instantes.
IMPORTANTE
- La targhetta segnaletica si trova nella parte posteriore dell’apparecchio.
- La targhetta informativa si trova nella parte inferiore dell’apparecchio.
- Lasciare uno spazio di almeno 5 cm attorno all’apparecchio per garantire una
ventilazione suciente
- Garantire sempre la corretta ventilazione dell’apparecchio e non ostruire le
aperture di ventilazione.
- Non collocare delle candele sopra o vicino all’apparecchio.
- Non esporre l’apparecchio a pioggia o umidità.
- Non collocare alcun recipiente contenente liquidi, come un vaso, sopra o in
prossimità dell’apparecchio.
- Utilizzate questo apparecchio solo in condizioni climatiche temperate.
- Non gettare le pile nel fuoco! Smaltire le pile usate rispettando l’ambiente.
- Non esporre le pile a fonti di calore eccessivo, come raggi solari, fuoco o altre
fonti di calore simili.
- La spina di alimentazione va di norma scollegata, e deve essere facilmente
accessibile. Per interrompere completamente l’alimentazione dell’apparecchio,
scollegare la spina di alimentazione dalla presa di corrente. La presa di
alimentazione deve restare facilmente accessibile durante l’uso, accertarsi che
l’accesso alla presa sia libero.
- Per eetto di fenomeni transitori elettrostatici e/o elettrici, è possibile che il prodotto
non funzioni correttamente. In tal caso è opportuno scollegare per qualche istante
l’apparecchio dalla corrente.
BELANGRIJK
- Het signalementsplaatje bevindt zich aan de onderkant van het toestel.
- Voorzie een ruimte van minimum 5 cm rond het toestel om te zorgen voor
voldoende ventilatie.
- De ventilatie mag niet worden geblokkeerd door de ventilatieopeningen te
bedekken met items als kranten, tafelkleed, gordijnen, enz.
- Plaats geen kaars op of in de buurt van het toestel.
- Zorg ervoor dat u het toestel niet blootstelt aan regen of vochtigheid.
- Plaats geen enkele met vloeistof gevulde kom zoals een vaas op of in de buurt
van het toestel.
- Gebruik dit toestel enkel bij een gematigd klimaat.
- Via de stroomstekker kunt u het toestel uitschakelen. om de voeding van het
toestel volledig te verbreken, moet u de stroomstekker uit het stopcontact trekken.
de stroomstekker mag niet geblokkeerd worden en moet tijdens het gebruik
gemakkelijk toegankelijk zijn.
- Onder invloed van tijdelijke elektrische en/of elektrostatische verschijnselen kan
het product storingen ondervinden en kan het noodzakelijk zijn om de stekker van
het toestel gedurende enkele minuten uit het stopcontact te trekken.
Wenn Sie dieses Gerät später einmal entsorgen möchten, beachten
Sie bitte, dass elektrische Geräte nicht mit dem Hausmüll entsorgt
werden dürfen. Erkundigen Sie sich nach der nächstgelegenen
Wertstosammelstelle. Für weitergehende Informationen wenden Sie
sich an die örtlichen Behörden oder an Ihren Händler.
Si en un futuro desea deshacerse de este aparato, recuerde que los
productos eléctricos no deben tirarse junto a los desechos domésticos.
Deposítelo en centros de reciclaje adecuados. Consulte a las autoridades
locales o a su proveedor a este respecto.
Se in futuro volete sbarazzarvi di questo apparecchio, ricordate che
le apparecchiature elettroniche non devono essere gettate insieme ai
riutidomestici. Informatevi per sapere dove si trova il centro di riciclaggio
più vicino. Per ulteriori dettagli, rivolgetevi alle autorità locali o al vostro
rivenditore. (Direttiva sui riutidelle apparecchiature elettriche ed
elettroniche).
Indien u dit toestel in de toekomst wilt weggooien, houd er dan rekening
mee dat elektrische toestellen niet mogen weggeworpen worden met het
huishoudelijke afval. Informeer naar het dichtstbijzijnde recyclagecentrum.
Voor meer informatie wendt u zich tot de lokale overheden of uw verdeler.
Bemerkung: Gestaltung und Ausführung bleiben Änderungen vorbehalten.
Nota: Los diseños y especicaciones están sujetos a cambio sinprevio aviso.
Nota: Il modello e le caratteristiche tecniche possono subire variazioni senza preavviso.
Opmerking: Ontwerp en specicaties zijn onderhevig aan verandering zonder
kennisgeving.
SICHERHEITSANWEISUNGEN
INSTRUCCIONES DE SEGURIDAD
INFORMAZIONI RELATIVE ALLA SICUREZZA
VEILIGHEIDSINSTRUCTIES
ACHTUNG: Nehmen Sie das Gerät nicht auseinander! Anderenfalls
setzen Sie sich der Gefahr eines Elektroschocks aus! Dieses
Gerät enthält keine Teile, die vom Benutzer selbst repariert werden
können. Überlassen Sie alle Reparaturen an ihm ausschließlich
qualizierten Fachleuten
ATENCIÓN: Para reducir el riesgo de descarga eléctrica, no des-
monte el aparato. En su interior no existe ninguna pieza que pueda
ser reparada por el usuario. Cualquier servicio de mantenimiento y
reparación deberá llevarse a cabo por personal técnico cualicado.
ATTENZIONE: Per ridurre il rischio di scossa elettrica, non
smontate l’apparecchio. Questo apparecchio non contiene pezzi
riparabili dall’utente. Per ogni riparazione rivolgetevi esclusivamente
ad un tecnico qualicato.
OPGEPAST: Om het risico op elektrische schokken te vermijden,
mag u het toestel niet demonteren. Het toestel bevat geen enkel
onderdeel dat door de gebruiker zelf kan gerepareerd worden.
Contacteer altijd een gekwaliceerde technieker indien een
reparatie nodig is.
Dieses Symbol weist auf gefährliche elektrische Spannungen innerhalb
des Geräteshin.
Este símbolo indica la presencia de voltaje peligroso en el interior del
aparato.
Questo simbolo indica la presenza di tensione pericolosa all’interno
dell’apparecchio.
Dit symbool waarschuwt voor gevaarlijke spanningen in het toestel.
Dieses Symbol soll daran erinnern, dass die mit dem Gerät gelieferte
Anleitung wichtige Hinweise enthält.
Este símbolo indica que la documentación que acompaña al aparato
contiene instrucciones importantes.
Questo simbolo indica che, nella documentazione che accompagna
l’apparecchio, sono presenti istruzioni importanti.
Dit symbool herinnert de gebruiker eraan dat er belangrijke instructies in de
meegeleverde documentatie staan.
DESCRIPCIÓN DEL APARATO
DESCRIZIONE DELL’APPARECCHIO
BESCHRIJVING VAN HET APPARAAT
ENCENDIDO/APAGADO DE LA UNIDAD
ACCENSIONE/SPEGNIMENTO DELL’APPARECCHIO
HET APPARAAT IN-/UITSCHAKELEN
INSTELLEN VAN HET ALARM EN DE ALARMMODUS
PARA ESCUCHAR LA RADIO FM
ASCOLTO DELLA RADIO FM
LUISTEREN NAAR FM RADIO
PARA ESCUCHAR LA RADIO DAB/DAB+
ASCOLTO DELLA RADIO DAB/DAB+
LUISTEREN NAAR DAB/DAB+ RADIO
FUNZIONE SLEEP
SLAAPFUNCTIE (AUTOMATISCH UITSCHAKELEN)
PARA ESCUCHAR LAS RADIOS PRESINTONIZADAS
ASCOLTO DELLA RADIO PREIMPOSTATE
LUISTEREN NAAR VOORKEURSZENDERS
MENÚ DE CONFIGURACIÓN
MENU DI IMPOSTAZIONE
INSTELLINGENMENU
1. Pantalla LCD
2. Antena telescópica DAB+/FM
3. SCAN: Auto escáner
4. / MODE: Espera /Standby; Para
seleccionar el modo de función: DAB o FM
5. Botón PREV: Salto-
6. INFO/MENU: Para acceder al menú
principal / Para revisar la información de
conguración
7. Botón NEXT: Salto+
8. PRESET: Emisoras presintonizadas
1. Display LCD
2. Antenna telescopica DAB+/FM
3. SCAN: ricerca automatica
4. / MODE: standby/fonte; selezione
dell’origine: DAB, FM
5. Tasto PREV: Salta-
6. INFO/MENU: accesso al menu
principale/visualizzazione informazioni
relative alle impostazioni
7. Tasto NEXT: Salta+
8. PRESET: preselezione delle stazioni
1. LCD-display
2. Telescopische FM/DAB+-antenne
3. SCAN: Auto aftasten
4. Toets / MODE: standy / bron;
Voor het selecteren van de modus:
DAB, FM
5. Toets PREV: Skip-
6. INFO/MENU: Om het hoofdmenu
te openen / Om instellingen en
informatie te bekijken
7. Toets NEXT: Skip+
9. Botón VOL+: subir volumen
10. Botón OK: Conrmar la selecció
SNOOZE: Intervalo de
repetición de la alarma
DIMMER: Iluminación atenuada
en pantalla
11. Botón VOL-: bajar volumen
12. Encendido / Apagado
13. Toma para auriculares
14. Entrada de alimentación
15. Compartimento para la pila
9. Tasto VOL+: aumento volume
10. Tasto OK: conferma della
selezione
SNOOZE: Ripetizione dell’allarme
DIMMER: consente di regolare
luminosità dello schermo
11. Tasto VOL-: riduzione volume
12. Interruttore di accensione ON/OFF
13. Presa cu
14. Jack DC IN
15. Vano batterie
8. PRESET: Voorkeurszenders
9. Toets VOL+: volume verhogen
10. Toets OK: bevestig selectie
SNOOZE: Alarm tijdelijk uitschakelen
DIMMER: lichtintensiteit van het
scherm
11. Toets VOL-: Volume verlagen
12. AAN/UIT-knop
13. Aansluiting hoofdtelefoon
14. Ingang voor DC (voeding)
15. Batterijvak
Para encender la unidad, deslice el interruptor de ENCENDIDO/APAGADO a la
posición de “ON” (encendido), pulse el botón / MODE para encender la unidad.
Para apagar la unidad, continuación deslice el interruptor de ENCENDIDO/
APAGADO a la posición “OFF” (apagado) en la parte trasera de la unidad.
Mantenga presionado el botón / MODE para ir al modo de espera.
SELECCIÓN DE FUENTE
Cuando la unidad esté encendida, pulse repetidamente el botón / MODE para
seleccionar el modo DAB, modo FM.
AJUSTE DE VOLUMEN
Para aumentar o disminuir el nivel de sonido, presione VOL+/VOL-.
AJUSTE DE FECHA Y HORA
La primera vez que escuche la radio DAB/DAB+, la fecha y la hora de su producto
se sincronizarán automáticamente con la emitida por el servicio DAB en modo 24
horas, que se ajusta automáticamente al horario de verano.
Si desea congurarla fecha y la hora manualmente, encienda la radio y siga
los pasos descritos a continuación:
1. Mantenga pulsado el botón INFO/MENU.
2. Presione el botón PREV/NEXT para <Time/Date>. Pulse el botón OK para
acceder a esa opción.
3. Entonces se mostrará <Set Time> en la pantalla. Utilice el dial PREV/NEXT
para congurarlos hora. Pulse el botón OK para conrmar. Utilice el dial PREV/
NEXT para congurarlos minutos. Pulse el botón OK para conrmar. Utilice el
dial PREV/NEXT para congurarlos segundo, Pulse el botón OK para conrmar.
4. Entonces se mostrará <Set Time> en la pantalla. Utilice el dial de PREV/NEXT y
el botón OK para congurar el día, el mes y el año.
REGOLAZIONE DELL’ORA E DELLA DATA
Al primo utilizzo della radio DAB, l’apparecchio si sincronizza in automatico sull’ora
e la data del servizio DAB, nel formato a 24 ore e in linea con l’ora legale, pertanto
non è necessario impostare la data e l’ora manualmente.
Se desiderate impostare l’ora manualmente, accendete l’apparecchio ed
eseguite i seguenti passaggi:
1. Tenete premuto il tasto INFO/MENU.
2. Premere il pulsante PREV/NEXT su <Ora / Data>. Premete il tasto OK per
accedere al menu.
3. Viene visualizzato <Set Time>. Utilizzate la manopola PREV/NEXT per impostare
l’ora. Premete il tasto OK per confermare. Utilizzate la manopola PREV/NEXT
per impostare i minuti. Premete il tasto OK per confermare. Utilizzate la manopola
PREV/NEXT per impostare i minuti, Premete il tasto OK per confermare.
4. Viene visualizzato <Set Time>. Utilizzate la manopola PREV/NEXT e il tasto OK
per impostare il giorno, il mese e l’anno.
Per accendere l’unità, Scorrere l’interruttore di accensione/spegnimento sul retro
dell’unità in posizione “ON”, quindi premere / MODE per accendere l’unità.
Per spegnere l’unità, quindi scorrere l’interruttore di accensione/spegnimento sul
retro dell’unità in posizione “OFF”.
Tenere premuto il tasto / MODE per passare alla modalità Standby.
SELEZIONE DELLA FONTE
Da apparecchio acceso, premete più volte il tasto / MODE per selezionare una
modalità tra DAB, FM.
REGOLAZIONE DEL VOLUME
Per aumentare o diminuire il volume audio, premere VOL+/VOL-.
Om het apparaat in te schakelen, Schuif POWER AAN/UIT op de achterkant van
het apparaat naar de stand “AAN”, Druk vervolgens op de / MODE -knop om het
apparaat AAN te zetten.
Om het apparaat uit te schakelen, schuif POWER AAN/UIT op de achterkant van
het apparaat naar de stand “UIT”.
Houd de / MODE -knop ingedrukt om naar de standby-modus te gaan.
SELECTEREN BRON
Druk, als het apparaat is ingeschakeld, herhaaldelijk op / MODE om de DAB-
modus of FM-modus te selecteren.
HET VOLUME INSTELLEN
Druk op VOL+/VOL- om het geluidsniveau te verhogen of te verlagen.
DE TIJD EN DATUM INSTELLEN
De eerste keer dat u naar DAB/ DAB+-radio luistert, zullen de tijd en datum van uw
product automatisch worden gesynchroniseerd met de tijd en datum die worden
uitgezonden door de DAB-dienst. Dit gebeurt in de 24-uursmodus in lijn met de
zomertijd en het is dus niet nodig om de tijd en datum handmatig in te stellen.
Als u de tijd en datum handmatig wilt instellen, schakel de radio dan in en
volg de onderstaande stappen:
1. Druk op INFO/MENU ingedrukt.
2. Druk op de PREV/NEXT -knop om <Tijd / Datum> te selecteren. Druk nogmaals
op OK om deze optie te openen.
3. <Set Time> wordt weergegeven. Gebruik de knop PREV/NEXT om de uren in
te stellen. Druk ter bevestiging op OK. Gebruik de knop PREV/NEXT om de
minuten in te stellen. Druk ter bevestiging op OK. Gebruik de knop PREV/NEXT
om de seconde in te stellen. Druk ter bevestiging op OK.
4. <Set Time> wordt weergegeven. Gebruik de knoppen PREV/NEXT en OK om de
dag, maand en het jaar in te stellen.
Als de tijd is ingesteld.
1. Houd de INFO/MENU -knop ingedrukt in de FM- of DAB-modus.
2. Druk op de PREV/NEXT -knop om <Alarm 1 Set> of <Alarm 2 Set> te kiezen,
Druk ter bevestiging op OK.
3. Druk herhaaldelijk op PREV/NEXTom <ON> te selecteren, Druk ter bevestiging
op OK.
4. Gebruik de knop PREV/NEXT om de uren in te stellen. Druk ter bevestiging
op OK. Gebruik de knop PREV/NEXT om de minuten in te stellen. Druk ter
bevestiging op OK.
5. Druk vervolgens op de PREV/NEXT -knop om het volume in te stellen, Druk ter
bevestiging op OK.
6. Druk herhaaldelijk op de PREV/NEXT om de wekbron te selecteren: buzzer
(zoemer), DAB of FM. Druk ter bevestiging op OK.
7. Druk herhaaldelijk op de PREV/NEXT om een van de volgende alarmfrequenties
te selecteren: “Daily” (dagelijks), “Once” (eens), “Weekends” (weekenden) en
“Weekdays” (weekdagen). Druk ter bevestiging op OK.
8. In de stand-bymodus wordt ‘ ’ of ‘ ’ weergegeven op het display.
Opmerking:
- Dezelfde procedure geldt voor Alarm.
- Als u gewekt wilt worden met de laatst beluisterde radiozender, Houd op /
MODE om de radio uit te schakelen voordat de alarmtijd is bereikt. Voor het
afstemmen op een zender, raadpleeg de hoofdstukken “LUISTEREN NAAR DAB/
DAB+ RADIO” en “NAAR FM-RADIO LUISTEREN”.
Het alarm stoppen
1. Alarm tijdelijk stoppen
Druk op de toets SNOOZE om het alarm tijdelijk te onderbreken. Dit zal opnieuw
weerklinken na enkele minuten. (standaard: 9 minuten).
2. Alarm stoppen
Druk op / MODE. Alarm 1 of alarm 2 wordt de volgende dag op hetzelfde tijdstip
opnieuw geactiveerd.
Opmerking:
- Als de alarmfrequentie is ingesteld op “Once”, dan zal het alarm de volgende dag
niet meer activeren.
- Als de alarmfrequentie is ingesteld op “Daily”, dan zal het alarm de volgende dag
weer activeren.
- Als de alarmfrequentie is ingesteld op “Weekend”, dan zal het alarm elke dag in
het weekend worden geactiveerd.
- Als de alarmfrequentie is ingesteld op “Weekdays”, dan zal het alarm de volgende
werkdag weer worden geactiveerd (niet op zaterdag en zondag).
3. Alarm annuleren
- Houd de INFO/MENU -knop ingedrukt in de FM- of DAB-modus.
- Druk op de PREV/NEXT -knop om <Alarm 1 Set> of <Alarm 2 Set> te kiezen,
Druk ter bevestiging op OK.
- Druk herhaaldelijk op de PREV/NEXT -knop om <UIT> te selecteren, Druk ter
bevestiging op OK.
En el modo de radio FM, gire el botón PREV/NEXT para la sintonización manual.
Pulse el botón SCAN una vez para la búsqueda automática.
Nota: Para una mejor recepción, extienda la antena telescópica.
ESTACIONES PRESINTONÍAS
Esta unidad podrá memorizar hasta 10 emisoras FM y 10 DAB/DAB+.
1. Pulse repetidamente el botón / MODE para seleccionar la banda FM o DAB/
DAB+.
2. Seleccione la búsqueda automática o manual de una emisora de radio.
3. Mantenga pulsado el botón PRESET para entrar en el modo de memorización
de emisoras.
4. Utilice el dial de PREV/NEXT para seleccionar un canal.
Nota: Si elige una emisora que no ha sido asignada, “Empty” se mostrará en
el display. Si la emisora hubiera sido asignada anteriormente, se mostrará su
frecuencia.
5. Pulse el botón OK para guardarlo, “Stored” se mostrará en el display.
6. Repite los pasos 1-5 para memorizar otras emisoras.
In modalità FM ruotate la manopola PREV/NEXT per avviare la ricerca manuale
delle stazioni. Premete una volta il tasto SCAN per avviare la ricerca automatica.
Nota: per una migliore ricezione, estendete l’antenna telescopica.
STAZIONI PREIMPOSTATE
Questo apparecchio consente di memorizzare noa 10 stazioni FM e 10 stazioni
DAB/DAB+.
1. Premete più volte il tasto / MODE per selezionare la banda FM o la banda
DAB/DAB+.
2. Selezionate una stazione radio manualmente o mediante la ricerca automatica.
3. Tenete premuto il tasto PRESET per accedere alla modalità di memorizzazione
delle preselezioni.
4. Utilizzate la manopola PREV/NEXT per selezionare una stazione.
Nota: se si seleziona una stazione non memorizzata, sul display viene visualizzata
la dicitura “Vuoto”. Se la stazione è stata memorizzata in precedenza, sul display
viene visualizzata la relativa frequenza.
5. Premere il tasto OK per confermare l’impostazione, Sul display viene visualizzata
la dicitura “In mem”.
6. Per memorizzare altre stazioni ripetere i passaggi 1-5.
Draai in de FM-modus aan PREV/NEXT om handmatig af te stemmen. Druk één
keer op SCAN om automatisch te scannen.
Opmerking: Voor betere ontvangst wordt aanbevolen de telescopische antenne
volledig uit te strekken.
VOORKEURSZENDERS
Deze radio kan 10 FM- en 10 DAB/DAB+ zenders opslaan als voorkeurszenders.
1. Druk herhaaldelijk op / MODE om de FM- of DAB/DAB+ band te selecteren.
2. Stem met behulp van handmatig of automatisch afstemmen af op een
radiozender.
3. Houd PRESET ingedrukt om de opslagmodus voor voorkeurszen-ders te
openen.
4. Gebruik de knop PREV/NEXT om een kanaal te selecteren.
Opmerking: Als u een voorkeurszender selecteert die nog niet is geprogrammeerd,
dan zal de tekst “Empty” op het display worden getoond. Als u wel een zender heeft
opgeslagen onder het gekozen nummer, dan zal de frequentie worden getoond.
5. Druk op OK om de zender op te slaan, De tekst “Stored” wordt getoond op het
display.
6. Herhaal stap 1-5 om andere zenders op te slaan.
1. Pulse repetidamente el botón / MODE para seleccionar el modo DAB. Si es
la primera vez que utiliza la unidad, la radio buscará automáticamente emisoras
DAB. La pantalla mostrará una barra de progreso. Una barra de progreso mostrará
el progreso de la búsqueda y también el número de emisoras encontradas.
2. Cuando la búsqueda termine, la radio seleccionará la primera emisora disponible
y comenzará con la retransmisión. Las emisoras se listarán por orden numérico y
después por orden alfabético por defecto.
Nota: La lista de emisoras de radio DAB será almacenada en la memoria, de esta
manera la próxima vez que encienda la radio, la búsqueda de emisoras no se
realizará. Puede buscar emisoras manualmente pulsando y soltando el botón SCAN.
3. Gire el dial PREV/NEXT para seleccionar entre la lista de emisoras.
4. Cuando la emisora deseada se muestre en pantalla, pulse el botón OK para
conrma. Habrá una breve espera mientras su radio sintoniza la emisora
seleccionada.
Nota:
- Si no se hubiera ninguna retransmisión con la búsqueda DAB/DAB+, “No station”
aparecerá en el display.
- Para una mejor recepción, extienda la antena telescópica o realice de nuevo una
búsqueda completa desde otra posición.
- Durante la operación de búsqueda, el nivel de sonido quedará interrumpido
automáticamente.
1. Premete più volte il tasto / MODE per selezionare la modalità DAB. Al primo
utilizzo, l’apparecchio avvia in automatico la ricerca delle stazioni DAB. Il display
visualizzerà una barra di avanzamento. Una barra di stato indica l’avanzamento
della ricerca insieme al numero di stazioni trovate.
2. Al termine della ricerca, l’apparecchio seleziona la prima stazione disponibile
e ne avvia la riproduzione. Per impostazione predenita,le stazioni vengono
elencate in ordine numerico e successivamente alfabetico.
Nota: l’apparecchio memorizza le stazioni radio DAB trovate, pertanto alla
successiva accensione l’apparecchio non eettua alcuna ricerca. Per cercare altre
stazioni manualmente dovrete premere e rilasciare più volte il tasto SCAN.
3. Utilizzare il tasto PREV/NEXT per selezionare l’elenco delle stazioni.
4. Quando sul display viene visualizzata la stazione che desiderate ascoltare,
premete il tasto OK per confermare la selezione. L’apparecchio impiegherà
qualche secondo per sintonizzarsi sulla stazione selezionata.
Note:
- Se durante la ricerca non viene trovata nessuna stazione, sul display compare la
dicitura “Ness. staz.”.
- Per una migliore ricezione, estendete l’antenna telescopica o eseguite di nuovo la
ricerca da una dierente posizione.
- Durante la ricerca l’audio viene disattivato.
1. Druk herhaaldelijk op / MODE om de DAB-modus te selecteren. Als de radio
voor het eerst wordt gebruikt, zal er een automatisch scan naar DAB-zenders
worden gestart. Het display geeft een voortgangsbalk weer. Daarnaast wordt het
aantal zenders dat is gevonden tijdens de scan getoond.
2. Als de scan is voltooid, zal de radio de eerst beschikbare zender selecteren
en het afspelen starten. Zenders worden standaard eerst gerangschikt op
numerieke volgorde en daarna op alfabetische volgorde.
Opmerking: De DAB-zenderlijst wordt opgeslagen in het geheugen. Als u de radio
wordt uitgeschakeld en daarna weer wordt ingeschakeld, zal er dus niet opnieuw
een zenderscan worden uitgevoerd. Het is mogelijk om handmatig naar zenders te
scannen door op SCAN te drukken.
3. Draai aan de knop PREV/NEXT om een zender uit de lijst te selecteren.
4. Als de gewenste zender wordt weergegeven, druk dan ter bevestiging op OK. Er
zal een korte vertraging zijn terwijl uw radio op de geselecteerde zender afstemt.
Opmerking:
- Als er geen uitzendingen worden gevonden met de DAB/DAB+ scan, dan zal de
melding “No station“ (Geen DAB-station) op het display verschijnen.
- Voor betere ontvangst wordt aanbevolen de telescopische antenne volledig uit
te strekken of de volledige scan nogmaals uit te voeren op een andere plaats.
- Het geluid wordt tijdens het scannen naar zenders automatisch uitgeschakeld.
1. Tenere premuto il tasto INFO/MENU in modalità FM o DAB.
2. Premere ripetutamente il tasto PREV/NEXT per selezionare <Sleep Set>,
Premere il tasto OK per confermare.
3. Per addormentarsi con la radio, premere più volte il tasto SLEEP per selezionare
un intervallo di ascolto tra 120-90-60-45-30-15-5 minuti. L’unità si spegne in
automatico all’intervallo specicato. Per annullare la funzione sleep, premere
ripetutamente il tasto PREV/NEXT no a quando “OFF” non viene visualizzato,
premere il tasto OK per confermare.
1. Houd de INFO/MENU -knop ingedrukt in de FM- of DAB-modus.
2. Druk herhaaldelijk op PREV/NEXT om <Sleep Set> te selecteren, Druk ter
bevestiging op OK.
3. Om in slaap te vallen met de radio, herhaaldelijk op SLEEP om de resterende
luistertijd in te stellen op 120-90-60-45-30-15-5 minuten. Het apparaat zal
automatisch uitschakelen nadat de geselecteerde tijd is verstreken. Druk om de
slaapfunctie te annuleren herhaaldelijk op PREV/NEXT tot “OFF” wordt getoond
op het display. Druk ter bevestiging op OK.
1. Pulse el botón / MODE para seleccionar la banda FM o DAB/DAB+.
2. Pulse PRESET una vez, se mostrará “RECUPERANDO PROGRAMACIÓN”
en la pantalla, entonces utilice el dial PREV/NEXT para seleccionar la emisora
deseada.
3. Pulse OK para conrmarsu selección.
REVISAR MÁS INFORMACIÓN (FM/MODO DAB)
Pulse repetidamente el botón INFO/MENU para revisar algunos ajustes de su
unidad (p. ej. hora, fecha) o información disponible (p. ej. texto de la radio, nombre)
correspondiente a la emisora que esté escuchando.
1. Premere il tasto / MODE per selezionare la banda FM o DAB/DAB+.
2. Premete una volta il tasto PRESET: sul display viene visualizzata la dicitura
“Richiama preselezione”. Premere il tasto PREV/NEXT per selezionare la
stazione desiderata.
3. Premete il tasto OK per confermare la selezione.
VISUALIZZAZIONE DI ULTERIORI INFORMAZIONI (MODALITÀ FM/ DAB)
Premere più volte il tasto INFO/MENU per vericare alcune delle impostazioni
dell’apparecchio (ad es. ora, data ecc.) oppure per visualizzare le informazioni
disponibili per la stazione corrente (ad es. testo radio, nome della radio ecc.).
1. Druk op / MODE om de FM- of DAB/DAB+ band te selecteren.
2. Druk één keer op PRESET, de melding “Preset Recall” wordt getoond op het
display, draai daarna aan de knop PREV/NEXT om de gewenste zender te
selecteren.
3. Druk op OK om uw keuze te bevestigen.
MEER INFORMATIE BEKIJKEN (FM/ DAB-MODUS)
Druk herhaaldelijk op INFO/MENU om bepaalde radio-instellingen (bijv. tijd, datum)
of informatie die beschikbaar is voor de huidige zender (bijv. radiotekst, naam) te
bekijken.
Navegación por el menú de conguración. En el modo FM o DAB/DAB+, mantenga
pulsado el botón INFO/MENU para entrar en el menú de conguración.
Menú de ajuste de FM/DAB
Hora / Fecha
Puede congurar la hora y la fecha.
System version (Versión de software)
Para mostrar la versión actual del software.
Factory reset (Conguración de fábrica)
Cuando acceda al modo de reinicio, gire el dial PREV/NEXT para seleccionar “Yes”,
pulse el botón OK para confrmar el reinicio a valores de fábrica por defecto. Gire
el dial PREV/NEXT para seleccionar “No”, pulse OK para cancelar esta selección.
Alarma 1 / Alarma 2
Puede congurar la alarma.
Sleep set (Función De Temporizador De Apagado Automático)
Puede congurar la función de apagado automático.
Language (Idioma)
Para seleccionar el idioma deseado para el menú de la unidad: English, Français,
Deutsch and Dutch.
Sinc. Hora (sincronización de hora)
Para que la hora se autoactualice.
Cuando la pantalla muestre “Time Sync”, pulse el botón OK para conrmar. A
continuación, utilice los botones PREV o NEXT para seleccionar “Actualizar radio”
o “No actualizar”, pulse el botón OK para conrmar.
12H o 24H
Presione PREV/NEXT para ajustar el formato de 12 o 24 horas.
Conguración de escaneo FM
Only: la búsqueda automática solo se detendrá cuando encuentre emisoras con
una buena señal.
All: la búsqueda automática e detendrá en cualquier emisora disponible.
Bat eciente (conguración de eciencia de la batería)
Cuando la pantalla muestre “Bat eciente”, pulse el botón OK para conrmar.
Utilice el botón PREV o NEXT para seleccionar “ON” u “OFF”, pulse el botón OK
para conrmar. Si seleccionó “ON”, la unidad se apagará automáticamente tras 2
minutos de inactividad en modo en reposo.
Estéreo / mono
Para seleccionar entre “Stereo” y “Mono” para la radio FM.
PRUNE (eliminar emisoras que aparecen en la lista, pero no están disponibles)
Elimine emisoras que estén listadas pero no disponibles. Esta función puede
eliminar todas las emisoras no válidas de la lista de emisoras, que tengan el
carácter “?” delante del nombre de la emisora. (solo modo DAB)
Navigazione nel menu di impostazione. In modalità FM o DAB/DAB, tenete
premuto il tasto INFO/MENU per accedere al menu di impostazione.
Menu di impostazione FM/ DAB
TIME (Ora) / Date(data)
È possibile impostare l’ora e la data.
System version (Versione del software)
Consente di visualizzare la versione corrente del software.
Factory reset (Ripristino valori di default)
Consente di annullare tutte le impostazioni denite dall’utent. In modalità di
ripristino, ruotare la manopola PREV/NEXT per selezionare “Yes”, premere OK per
confermare il ripristino delle impostazioni originali di fabbrica. Ruotare la manopola
PREV/NEXT per selezionare “No”, premere OK per annullare l’operazione.
Sveglia 1 / Sveglia 2
È possibile impostare la sveglia.
Funzione Sleep
È possibile impostare la funzione “Sleep.”
Lingua
Consente di selezionare la lingua dei menu: English, Français, Deutsch e Dutch.
Sincronizzazione dell’Ora
Per l’aggiornamento automatico dell’ora.
Quando lo schermo mostra “Sincr. Ora”, premi il tasto OK per confermare.
Quindi usa i tasti PREV o NEXT per selezionare “Aggiorna radio” o “Nessun
aggiornamento”, e premi il tasto OK per confermare.
12H o 24H
Premere PREV/NEXT per regolare il formato 12 o 24 ore.
Ricerca complete FM
Only(Solo stazioni forti): la ricerca automatica localizza solo stazioni con segnale
forte.
All(Tutte le stazioni): la ricerca automatica localizza qualsiasi stazione disponibile.
Batteria eciente (Bat ecient)
Quando sullo schermo leggi “Bat eciente”, premi OK per confermare. Seleziona
“ON” o “OFF” usando i tasti PREV e NEXT, quindi premi OK per confermare. Se
selezioni “ON”, l’apparecchio si spegnerà automaticamente dopo non aver ricevuto
alcun comando per due minuti.
Stereo / Mono
Per scegliere tra “Stereo” e “Mono” per la radio FM.Stereo/Mono
PRUNE (Elimina)
Consente di rimuovere le stazioni non disponibili contenute nell’elenco. Le stazioni
non valide che possono essere eliminate sono contrassegnate dall’icona “?”. (solo
in modalità DAB)
Navigeren door het instellingenmenu. Houd in de FM- of DAB/DAB+ modus INFO/
MENU ingedrukt om het instellingenmenu te openen.
Instellingenmenu FM/DAB
Time / Date (Tijd/datum)
U kunt de instelling van de tijd en datum aanpassen.
System version (softwareversie)
Om de huidige softwareversie weer te geven.
Factory reset (Fabrieksreset)
Selecteer deze optie om alle door de gebruiker ingestelde instellingen te wissen.
Draai na het openen van de resetmodus aan de knop PREV/NEXT om “Yes”
te selecteren en druk op OK om het herstellen van de fabrieksinstellingen te
bevestigen. Draai aan PREV/NEXT om “No” te selecteren en druk daarna op OK
om het herstellen van de fabrieksinstellingen te annuleren.
Alarm 1 / Alarm 2
U kunt het alarm instellen.
Slaapfunctie
U kunt de slaapfunctie instellen.
Language (Taal)
Om de taal waarin de menu’s worden weergegeven te selecteren: English,
Français , Dutch and Deutsch.
Time Sync (tijdsynchronisatie)
Voor automatisch bijwerken van de tijd.
Als het display de melding “Time Sync” toont, druk dan ter bevestiging op OK.
Gebruik vervolgens PREV of NEXT om “Update radio” (radio bijwerken) of “No
update” (niet bijwerken) te selecteren en druk op OK om te bevestigen.
12H of 24H
Druk op PREV/NEXT om het 12- of 24-uursformaat aan te passen.12H or 24H.
Scaninstelling FM
Only: de automatische scanfunctie zoekt alleen naar zenders met een sterk signaal.
All: de automatisch scanfunctie zoekt naar alle beschikbare zenders.
Bat ecient (energiebesparende instelling)
Als het display de melding “Bat ecient” toont, druk dan ter bevestiging op OK.
Gebruik PREV of NEXT om “ON” (aan) of “OFF” (uit) te selecteren en druk ter
bevestiging op OK. Als u “ON” hebt geselecteerd en er in de standbymodus
gedurende 2 minuten geen gebruik wordt gemaakt van de bedieningselementen,
dan schakelt het apparaat automatisch uit.
Stereo / Mono
Om te kiezen tussen “Stereo” en “Mono” voor de FM-radio.
Prune (Niet-beschikbare zenders verwijderen)
Verwijder zenders die in de lijst voorkomen maar niet langer beschikbaar zijn. Deze
functie kan alle ongeldige zenders, deze worden in de zenderlijst weergegeven met
een “?” voor de zendernaam, verwijderen. (alleen DAB-modus)
ALIMENTACIÓN
ALIMENTAZIONE
VOEDING
Utilización del adaptador de red
El adaptador de corriente suministrado es adecuado para el uso con una toma
de corriente AC de 100-240V 50/60Hz y deberá enchufarse solo a la red de
suministro dentro de estos parámetros.
Atención:
• El adaptador de red que se suministra ha sido diseñado exclusivamente para
utilizarse con este aparato. No lo utilice con ningún otro aparato.
• Apague el aparato antes de desenchufarlo al adaptador de red para evitar que
se produzcan daños.
• Cuando no vaya a utilizar el aparato durante un período de tiempo prolongado,
desenchufe el adaptador de red de la toma de corriente.
• Coloque el aparato cerca de la toma de pared y compruebe que puede accederse
a esta última fácilmente. Si se produce un fallo en el funcionamiento del aparato,
desconéctelo inmediatamente de la toma de pared.
• El adaptador de red se utiliza para conectar y desconectar el aparato. El acceso al
mismo debe permanecer despejado en todo momento. Para cortar por completo
la alimentación del aparato, ha de desenchufar el adaptador de red de la toma
de pared.
• No utilice nunca el adaptador si está dañado. Coloque el cable de alimentación de
forma segura de manera que no pueda ser aplastado o dañado de otro modo. Si
el cable está dañado, contacte con un servicio de reparación.
• El adaptador de corriente alterna (AC) deberá ser desconectado de la conexión
de corriente continua (CC) para que la unidad funcione con pilas.
Instalación de las pilas:
1. Retire la tapa del compartimento para pilas aplicando presión con el dedo pulgar
en el área indicada en la tapa, después levante esta y sáquela hacia fuera.
2. Antes de introducir las pilas, observe las polaridades (+ y -) de las pilas.
Asociándolas con el diagrama mostrado en el interior del compartimento,
introduzca 4 pilas AA de 1,5V, R6/UM3/ (no incluidas) en su interior.
3. Cierre el compartimento de las pilas.
Adattatore di rete
L’adattatore CA fornito è adatto per l’utilizzo con prese CA 100-240V 50/60Hz e
deve essere collegato solo a prese che rispettano questi parametri.
Attenzione:
• L’adattatore di rete fornito in dotazione è destinato esclusivamente all’uso con il
presente apparecchio. Non utilizzatelo con altri apparecchi.
• Per non danneggiare il lettore, spegnete l’apparecchio prima di scollegare
l’adattatore di rete.
• In caso di un prolungato periodo di non utilizzo, scollegate il cavo di alimentazione
dalla presa.
• Posizionate l’apparecchio nei pressi della presa a muro e fate in modo che
questa resti facilmente accessibile. In caso di malfunzionamento scollegate
immediatamente l’apparecchio dalla presa a muro.
• L’adattatore di rete permette di scollegare l’apparecchio. Deve essere facilmente
accessibile durante l’uso. Per mettere del tutto l’apparecchio fuori tensione,
scollegatelo dall’alimentazione di rete.
• Non utilizzate mai un adattatore di rete danneggiato. Posizionate il cavo di
alimentazione in modo sicuro e in modo che non venga calpestato o schiacciato.
Se il cavo è danneggiato, rivolgetevi ad un servizio di assistenza.
• Per alimentare l’apparecchio a batterie scollegate l’adattatore di rete dall’ingresso
DC IN.
Utilizzo delle batterie
1. Rimuovete lo sportellino del vano batterie premendo l’area indicata sullo
sportellino con il pollice, quindi sollevatelo.
2. Prima di inserire le batterie controllate i poli delle batterie (+ e -), quindi fateli
combaciare con le indicazioni di polarità sul vano batterie. Inserite nel vano
batterie 4 batterie AA 1,5V (non fornite).
3. Richiudete il coperchio del vano batterie.
Gebruik van de netstroomadapter
De netstroomadapter gebruikt een netstroom van AC 100-240V 50/60Hz. De
meegeleverde netstroomadapter mag nooit gebruikt worden op een ander type
voeding.
OPGEPAST:
• De meegeleverde netstroomadapter mag uitsluitend met dit toestel gebruikt
worden. Gebruik hem niet met een ander toestel.
• Deactiveer het toestel vooraleer u de stekker uit het stopcontact trekt, om
beschadiging van het toestel te vermijden.
• Als het toestel lange tijd niet gebruikt wordt, trek de stekker van de netstroom-
adapter dan uit het stopcontact.
• Plaats uw toestel dicht bij een stopcontact en zorg ervoor dat het stopcontact
makkelijk bereikbaar blijft. Van zodra u een functiestoornis vaststelt, dient u de
stekker van het toestel uit het stopcontact te trekken.
• De netstroomadapter maakt het mogelijk om de stroomvoorziening naar het toestel
te onderbeken. Zorg ervoor dat deze altijd makkelijk bereikbaar blijft tijdens het
gebruik. Om de voeding van het toestel volledig te onderbreken, dient u de stekker
van de netstroomadapter uit het stopcontact te trekken.
• De netstroomadapter moet worden losgekoppeld van de DC-ingang als u het
apparaat wilt gebruiken op batterijstroom.
Gebruik met batterijen:
1. Verwijder de deur van het batterijvak door met de duim druk uit te oefenen op
het gebied dat is aangegeven op de batterijdeur en til de deur vervolgens uit en
van de behuizing.
2. Bekijk vóór het plaatsen van de batterijen de polariteiten (+ en -) van de batterij
en plaats de batterij vervolgens zoals aangegeven op de afbeelding in het
batterijvak. Plaats 4x 1,5V, R6/UM3/ “AA” batterijen (niet meegeleverd) in het vak.
3. Sluit het batterijcompartiment weer.
Antes de tirar las pilas, consulte a su proveedor: puede entregárselas
para reciclarlas.
Prima di gettare le batterie, rivolgetevi al rivenditore di duciaqualora
metta a disposizione un servizio di raccolta e riciclaggio delle batterie.
Raadpleeg uw dealer alvorens de batterijen weg te werpen omdat hij ze
zou kunnen terugnemen om te recycleren.
NOTAS:
- Nunca cargue pilas que no son recargables. No caliente las pilas ni las desmonte.
- Si no va a utilizar el aparato durante un largo periodo de tiempo, retire las pilas
para evitar una pérdida de líquido de las mismas.
- Para un máximo rendimiento, se recomienda el uso de pilas alcalinas. Estas pilas
deberán ser sustituidas cada 6 meses.
- Las baterías se tienen que sustituir cuando: el volumen disminuye, o el sonido
está distorsionado durante el funcionamiento.
- Se mostrará el texto “Batería baja” en la pantalla cuando la batería esté
agotándose.
ATENCIÓN: Riesgo de explosión si las pilas no se introducen correctamente.
Cambie las pilas únicamente por otras del mismo tipo o uno equivalente.
NOTA:
- Non caricate mai batterie non ricaricabili. Non scaldate le batterie e non apritele.
- Per evitare ogni fuoriuscita di liquido pericoloso, estraete le batterie in caso di un
lungo periodo di non utilizzo.
- Si raccomanda l’uso di batterie alcaline. Per ottenere un funzionamento ottimale,
si raccomanda di sostituire le batterie ogni 6 mesi.
- Le batterie devono essere sostituite quando: il volume diminuisce, o il suono
risulta distorto durante l’uso.
- Quando la batteria è scarica, sul display viene visualizzata la dicitura “Batteria
scarica”.
ATTENZIONE: Se le batterie non sono correttamente inserite c’è il rischio di
esplosione. Sostituitele unicamente con batterie identiche o di tipo equivalente.
OPMERKINGEN:
- Zorg ervoor dat u nooit niet-oplaadbare batterijen oplaadt. Verwarm de batterijen
nooit en probeer ze nooit te openen.
- Om lekkage te voorkomen, verwijder de batterijen altijd als het apparaat voor een
lange periode niet wordt gebruikt.
- Het gebruik van alkalinebatterijen is aan te raden. Om een optimale werking te
verzekeren, is het aan te raden om de batterijen elke 6 maanden te vervangen.
- Vervang de batterijen wanneer het volume vermindert of het geluid vervormt
tijdens het gebruik.
- De melding “Battery low” wordt op het display getoond als de batterijen bijna
leeg zijn.
OPGEPAST: Ontplongsgevaarals de batterij niet juist ingevoegd wordt. Vervang
de batterij enkel door een identieke batterij of door een batterij van hetzelfde type.
RADIO PORTÁTIL DAB/DAB+ FM
RADIO PORTATILE FM/DAB/DAB+
DAB/DAB+-FM DRAAGBARE RADIO
ES
IT
NL
Hinweis:
- Falls während der DAB/DAB+ Suche keine Sender gefunden werden, erscheint
im Display die Anzeige „Keine Station“.
- Im Hinblick auf einen besseren Empfang sollten Sie die Teleskopantenne
vollständig ausziehen oder die Sendersuche an einem anderen Ort wiederholen.
- Während der Suche ist der Ton automatisch ausgeschaltet.
FM RADIOSENDER ANHÖREN
AUFRUFEN GESPEICHERTER SENDER
SETUP-MENÜ
Drücken Sie im FM Radiomodus mit PREV/NEXT die manuelle Sendersuche aus.
Drücken Sie einmal SCAN, um die automatische Suche zu starten.
Hinweis: Ziehen Sie die Teleskopantenne für einen besseren Empfang aus.
SENDERSPEICHER
Dieses Gerät kann bis zu 10 UKW- und 10 DAB/DAB+ -Sender speichern.
1. Betätigen Sie die / MODE -Taste wiederholt, um das UKW- oder DAB/DAB+
-Band zu wählen.
2. Wählen Sie die manuelle oder automatische Sendersuche.
3. Halten Sie die PRESET -Taste gedrückt, um in den Speichermodus zu gelangen.
4. Verwenden Sie den PREV/NEXT -Regler zur Auswahl eines Senders.
Hinweis: Wenn Sie einen Sender, der nicht zugewiesen worden ist, wählen, wird
“Empty” angezeigt. Wenn der Sender zuvor zugeordnet wurde, wird die Frequenz
angezeigt.
5. Betätigen Sie den OK Knopf. Die Meldung „Stored“ wird daraufhin angezeigt.
6. Wiederholen Sie die Schritte 1 bis 5, um weitere Sender zu speichern.
1. Betätigen Sie die / MODE -Taste, um das UKW- oder DAB/DAB+-Band zu
wählen.
2. Drücken Sie einmal die Taste PRESET; im Display erscheint „Preset Recall“.
Wählen Sie dann mit dem PREV/NEXT -Regler den gewünschten Sender aus.
3. Betätigen Sie den OK Knopf um die Auswahl des Senders zu bestätigen.
INFORMATIONEN ANZEIGEN (UKW-/ DAB-MODUS)
Drücken Sie wiederholt die Taste INFO/MENU, um Geräteeinstellungen (z.B. Zeit,
Datum, Frequenz) oder verfügbare Informationen (z.B. Radiotext, Programmtyp)
für den aktuellen Sender anzuzeigen.
Navigation durch das Setup-Menü. Halten Sie im UKW oder DAB Modus die Taste
INFO/MENU gedrückt, um das Setup-Menü zu önen.
FM / DAB Einstellungsmenü
Zeit / Tag
Mit dieser Funktion können Sie die Uhrzeit- und Datumseinstellungen kongurieren.
System version (Software-Version)
Wird die aktuelle Software-Version angezeigt.
Factory reset (Werkseinstellung)
Alle benutzerdenierten Einstellungen werden zurückgesetzt.
Wenn Sie den Rückstellungsmodus aufgerufen haben, benutzen Sie mit dem
PREV/NEXT -Regler die Option „ Yes “ und drücken Sie die Taste OK, um die
Rückstellung zu bestätigen. Um die Funktion abzubrechen, benutzen Sie mit dem
PREV/NEXT -Regler die Option „ No “ und drücken Sie die Taste OK.
Alarm 1 / Alarm 2
Sie können den Weckruf einstellen.
Sleep set (Schlaf eingestellt)
Sie können die Sleep-Funktion einstellen.
Sprache
Wählen Sie eine Sprache für die Menüanzeige aus: English, Français, Deutsch
and Dutch.
Time Sync (Zeit synchronisieren)
Für die automatische Aktualisierung der Zeit.
Wenn im Display die Anzeige „Time Sync“ erscheint, drücken Sie die Taste OK zum
Bestätigen. Wählen Sie dann mit den Tasten PREV und NEXT die Option „Update
radio“ oder „No update“ und bestätigen Sie mit der Taste OK.
12H oder 24H
Drücken Sie PREV/NEXT, um das 12- bzw. 24-Stundenformat auszuwählen.
Suchlauf-Einstellung
Only(Nur): Die automatische Suche listet nur Sender mit starkem Signal auf.
All(Alle): Die automatische Suche listet alle verfügbaren Sender auf.
„Bat ecient“ (Batterie-eziente Einstellung)
Wenn im Display die Anzeige „Bat ecient“ erscheint, drücken Sie OK zum
Bestätigen. Wählen Sie dann mit den Tasten PREV und NEXT die Option „ON“
oder „OFF“ und bestätigen Sie mit OK. Falls Sie nach der Auswahl der Option „ON“
im Standby-Modus keine weitere Taste drücken, schaltet sich das Gerät nach 2
Minuten automatisch aus.
Stereo / Mono
Auswahl zwischen „Stereo“ und „Mono“ für das UKW-Radio.
Prune (Löschen)
Löschen Sie Sender, die angezeigt, jedoch nicht mehr empfangen werden. Mit
dieser Funktion können alle Sender, die in der Senderliste vor ihrem Namen mit
einem „?“ gekennzeichnet sind, gelöscht werden. (nur im DAB-Modus)
-
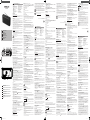 1
1
-
 2
2


in altre lingue
- français: Muse M-102 DB Manuel utilisateur
- español: Muse M-102 DB Manual de usuario
- Deutsch: Muse M-102 DB Benutzerhandbuch
- Nederlands: Muse M-102 DB Handleiding
- português: Muse M-102 DB Manual do usuário
Documenti correlati
Altri documenti
-
Auna 10033111 Manuale del proprietario
-
AEG MC 174 Manuale utente
-
Tangent CINQUE CD-DAB RADIO Manuale del proprietario
-
Albrecht DR 884 Hybridradio Internet/DAB+/UKW Manuale del proprietario
-
Rotel RCX-1500 Manuale del proprietario
-
-
One Concept 10034057 Manuale utente
-
TechniSat TECHNIRADIO Solar Manuale del proprietario