Nextar MA323 Manuale utente
- Categoria
- Smartwatch
- Tipo
- Manuale utente
Questo manuale è adatto anche per

MA323
MA323
| Digital MP3 Player
| Digital MP3 Player
| Digital MP3 Player
Instruction Manual
Instruction Manual
Instruction Manual
Instruction Manual

1
THANK YOU
Tha nk you for purchas ing our Digital MP3 Player. This unique ly des igned de vice combine s
an MP3 P la yer, voice re corde r; FM ra dio a nd re mova ble Fla sh Me mory drive a ll in one unit.
You ca n move a nd s tore fi le s be twee n compute rs and e njoy your MP3 mus ic collection
anytime a nd anywhe re .
1. FEATURE S UMMARY
Firmwa re Upg rad a b le
Check our we bsite ofte n for the latest driver, fi rmware a nd s oftware update s :
www.ne xtar.com
Re m ova ble Dis k
Use this unit a s a re mova ble drive, s toring fi le s, mus ic or anything you wa nt (drive rs re quired
for ope rating sys te ms prior to Windows 2000)
Bu ilt-in FM Ra d io a n d FM Rad io Re c ord ing
Lis te n to FM s ta tions a nd s e t your fa vorite s ta tions by using Auto Pre s et or Ma nua l P res e t.
The pla yer ca n s a ve 40 (20 for AM, 20 for FM) loca l s ta tions . You ca n a ls o re cord your
fa vorite s ongs or progra ms dire ctly from the radio
Voic e Re c ord ing
Re cord your voice with the built-in microphone a nd s a ve in WAV or ACT forma ts. Pla yba ck
your re cording at a ny time .

2
Se ven P re s et Eq u alize r
Built-In e qua lize r ca n be s e t to Normal, Rock, P op, Clas s ica l, J a zz, S oft or Bas s .
Mu ltip le P la yb a c k Me n u s
Unique A-B repeat function a nd Ra ndom Play a llows us e rs a va rie ty of playba ck options
High Resolution LCD
High res olution displa y with graphica l me nus
USB Co n ne c tion
Quick conne ction to USB port.
Mu ltip le Fo rm a t S upp o rt
This unit s upports the popular MP 3 forma t for the wide s t compa tibility of digital fi le s . It also
supports WMA, WMV, MP 1, MP 2 AS F and WAV for gre ate r compa tibility a nd compre ss ion
options
2. INTRODUCTION
Tha nk you for purcha s ing our MP3 playe r. Be fore us ing the unit ple as e re ad this ma nua l
ca re fully to obtain the be s t poss ible performa nce from your player. Keep this ma nua l for
future re fe re nce

3
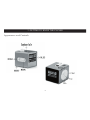
3. GETTING TO KNOW THE PLAYER
App e a ra n ce a nd Co n tro ls

4
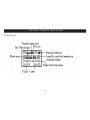
3. GETTING TO KNOW THE PLAYER
LCD Dis pla y

5
4. BAS IC FUNCTIONS
Sta rt u p /S hutd own
Sta rt up or shutdown playe r by pres s ing a nd holding the “PLAY” button.
En te ring Me n u Menus
Me nus: Ma in me nu (e ntere d by momenta rily holding Me nu ke y whe n not pla ying), Pla y
subme nu (e ntere d by pre s s ing Me nu ke y while pla ying), a nd S top submenu (e ntere d by
pre s sing Me nu ke y whe n not playing).
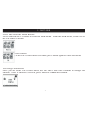
Brows ing Tracks
Brows e forwa rd (to the next track) by pre ss ing the NEXT button, a nd ba ckward (pre vious
song) by pre s sing the PREV.
Us in g th e Diffe re n t Fu nc tion Me n u s
Pre s s a nd hold the Me nu button for 2 s e c. This will ta ke you to the Ma in Menu. From he re ,
us e the PREV and NEXT buttons to move to the va rious menus options. Select the me nu
option by again pre ssing the Menu button. To e xit the me nus, pres s the NEXT button until
the EXIT option appe a rs. Pre s s Menu to e xit

6
Adju s tin g Vo lum e
Decre as e volume by pre ssing the “ - “ side of the - VOLUME + button. Incre as e volume by
pre s sing the “+” s ide of the s witch.
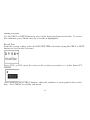
(HOLD) Fu n c tio n
Move the HOLD switch to the position s howing the clos ed lock (le ft).
Whe n Hold is ON, all controls are locke d out and a lock icon a ppe ars in the ce nte r top of the
LCD dis play. If you pre s s a ny controls, you will se e on the dis play: KEY LOCKED
Be s ure to s witch the HOLD button to the UNLOCK pos ition (right) to us e the unit.
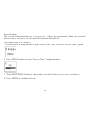
Eq u alize r Fu n c tio n
From the P LAY me nu pre ss the MENU button to switch to the PLAY s ubme nu
Play Screen Play sub-menu
Use the P REV / NEXT buttons to s croll to the EQUALIZER selection
From the EQUALIZER s ub-me nu, use PREV or NEXT to s e le ct your preferre d s e tting.
Once you have s electe d your preferred e qua lize r s etting, press MENU to confi rm.

7
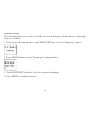
5. FM TUNER
Pre s s an d Hold the Me nu Butto n
Pre s s a nd hold for 2 s econds to e nte r the Ma in Menu. From the ma in me nu, scroll ove r to
the FM Tuner s e le ction
En te ring FM Tune r Menu
Once you a re a t the FM TUNER menu s e le ction, pres s Me nu a gain to e nter that menu
Se le c tin g FM S ta tions
Once you a re in the FM TUNER menu, us e the P REV and NEXT buttons to cha nge FM
sta tions. Once a s tation is s e le cted, press Me nu to confi rm tha t s ta tion.

8
Auto Search Stations
From the FM TUNER me nu, pres s and hold Menu button for 2 seconds . You will ente r
the FM TUNER s ubmenu. Us e the P REV or NEXT button to s croll to the AUTO S EARCH
se lection. Pre s s Menu button a gain to sta rt s ca nning. The unit will sca n to the ne xt a va ilable
sta tion
Saving Stations
From the FM TUNER menu, press and hold Menu button for 2 seconds. You will enter
the FM TUNER submenu. Use the PREV or NEXT button to scroll to the SAVE STATION
selection. Press the MENU button to save the current station.
Dele ting S ta tion s
From the FM Tune r s ubme nu, s croll to the DELETE S TATION s e le ction a nd pre ss the
MENU button to de lete the s tation
Ma nu a l Sta tio n Sc a n
From the FM Tune r ma in me nu, pre ss the P LAY button to go to ma nua l sca nning Me nu.
Pre s s P REV or NEXT to s ca n to the ne xt ra dio s ta tion ma nua lly.
Re tu rn To Mu s ic Me n u
Go to the FM TUNER s ubme nu, a nd s croll to the MUSIC se lection. Pre s s the Menu button
to return to the mus ic Me nu.

9
FM Re co rdin g
From FM Tune r Me nu, pre s s Menu to go to the FM Tune r subme nu. S croll the me nu se lections
(aga in using PREV and NEXT buttons) to the FINE REC or LONG REC option. P res s Me nu
aga in to s ta rt re cording the FM ra dio. P re ss PLAY/PAUS E/STOP button to stop re cording
and re turn to the FM Tune r Menu.
NOTE: FM RECORDING FILES ARE SAVED AS “FXXX.WAV” FILES IN THE FM
FOLDER

10
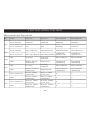
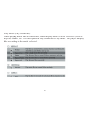
6. BUTTON/CONTROL FUNCTIONS
Mu s ic mo d e a n d Voic e mo d e
Ke y
Action
Stop sta te
Play sta te
Play subme nu
Stop Subme nu
Play
Press a nd hold
Shutdown
Shutdown
Shutdown
Shutdown
Press a nd re le a s e
Play
Stop
Exit menu
Exit menu
Me nu
Press a nd hold
Enter main me nu
Enter main me nu
Enter main me nu
Enter main me nu
Press a nd re le a s e
Enter/stop s ubme nu
Enter/play subme nu
Confi rm this
option or ente r
Confi rm this
option or ente r
Next
Dia l
Next song
Next song
and play it
Move submenu
Move submenu
Hold
Browser forward
continuously
Skip forward
Fast forward
continuously
Fast forward
continuously
Prev
Dia l
La st song
La st song
and play it
Move submenu
Move submenu
Hold
Browser ba ckwa rd
continuously
Skip backward
Fast ba ckwa rd
continuously
Fast ba ckwa rd
continuously
Vol+
Press a nd re le a s e
Increase volume
by one s te p
Increase volume
by one s te p
X
X
Hold
Increase volume
continuously
Increase volume
continuously
X
X
Vol-
Press a nd re le a s e
Decreas e volume
by one s te p
Decreas e volume
by one s te p
X
X
Hold
Decreas e volume
continuously
Decreas e volume
continuously
X
X

11
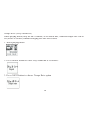
Fo r FM Mo de :
Operation
Action
FM Status
FM Submenu
PLAY
press a nd
hold
Power off
Power off
Press
When sta tion e xis ts : ne xt s ta tion;
When without sta tion: X
Exit the menu
MENU
Press a nd
hold
Enter main me nu
Enter main me nu
Press
Enter main me nu
Confi rm curre nt option or
enter next s ubme nu
Press
Increase 100KHz gra dua lly or s top s e a rch
Switch subme nu
Press a nd
hold
Increase 100KHz s e a rch continuous ly
Continuous forwa rd
Press
Decreas e 100KHz gra dua lly or s top s e a rch
Switch subme nu
Press a nd
hold
Decreas e 100KHz s e a rch continuous ly
Continuous ba ckwa rd
V+
Press
Volume incre a s e
X
press a nd
hold
Volume incre a s e continuously
X
V-
Press
Volume de cre a s e
X
Press a nd
hold
Volume de cre a s e continuously
X

12
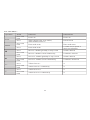
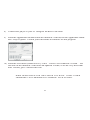
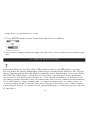
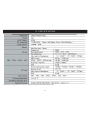
7. S YS TEM SETTINGS
System Settings
A va rie ty of sys te m s e ttings ca n be controlled de pending upon your fi rmwa re ve rs ion. To
ente r the s ys te ms se ttings menu, pre s s the MENU button. Us e the P REV a nd/or NEXT
buttons to s croll the SYSTEM icon. P re s s MENU a ga in to enter the s e ttings sub-menu.
Below a re the va rious s yste m se ttings:
Operation
Description
Record Time
Sets re cord da te a nd time for re cordings
Scree n
Sets s cre e n s a ve r (bla nk s cre e n)
La nguage
Select menu la ngua ge
Power Off
Set automa tic powe r-off time
Replay
Set the re pla y mode function
Contras t
Change a nd s e t s cre e n contra s t (light/da rk)
Online Mode
Set functions for “priva te dis k” mode
Me mory Info
Display total memory a nd % us e d
Firmware Re v
Display current fi rmwa re re vis ion
Firmware Upgrd
Set functions to upda te fi rmware
Exit
Exit the syste m s e ttings me nu

13
Making Selections
Use the P REV or NEXT buttons to move to the de sired s ubme nu s election. To a ccess
tha t subme nu, pre s s Menu once the se lection is highlighte d.
Record Time
From the s yste m s e tting, s elect the RECORD TIME s ub-me nu (us ing the P REV or NEXT
buttons to s croll to the se lection).
Pre s s VOL+ or VOL- move the curs or to the s e ction you wa nt to s e t - in the format YY-
MM-DD.
The n, us ing the NEXT/P REV buttons, a djus t the numbers to corre spond to the corre ct
da te . Pre s s MENU to e xit this s ub-me nu

14
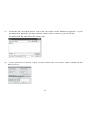
Screen Settings
The screen se tting functions a s a s cre e n s ave . Afte r a prese t amount of time (in se conds )
whe n no keys a re pres s e d, the unit will automatica lly turn off.
Opera ting s te ps is as follows:
1. From Syste m S e tting inte rfa ce , pus h P REV/NEXT ke y to se lect “S cre e n Time ” option
2. Pre s s MENU button to e nte r “Scre en Time ” se tting inte rface:
3. P ush NEXT/PREV button to a djus t time (s e conds be fore s cre e n save r activa te s )
4. Pre s s MENU to confi rm a nd e xit.

15
Language Settings
This s e le ction a llows use r to the s elect the on-s cre e n language for their playe r. Opera ting
ste ps is a s follows:
1. From Syste m S e tting inte rfa ce , pus h P REV/NEXT ke y to se lect “La nguage” option
2. Pre s s MENU button to e nte r “La ngua ge ” se tting inte rface:
3. P ush NEXT/PREV button to s e le ct the preferre d la nguage
4. Pre s s MENU to confi rm a nd e xit.

16
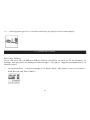
Power Settings
This s e le ction a llows use r to s et a n a utoma tic powe r off time. The s e le ction proce ss
is ide ntica l to the langua ge s e tting inte rface. Use the P REV/NEXT ke ys to s elect the
“Powe r” option. P re ss the MENU button to enter the powe r subme nu a nd the P REV/
NEXT buttons to ma ke your s e le ctions. The numbe rs you s e le ct a re in s e conds. If “0” is
se lecte d, the function is turned off.
“Slee p Time r” refers to a s etting whe re you ca n s e t a fi xe d pe riod of time (unit: minutes )
at which the pla ye r will turn off automa tically whe n no ke ys a re pre ss e d no ma tte r which
mode the pla ye r is in. Note : Sleep Time r s e ttings a re va lid only once a nd the se t time will
be cle a re d a fte r powe r off. This se tting mus t be re se t e ach time it is us ed.
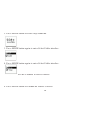
Replay Mode
This s e le ction a llows use r to s et the pla yer re pe a t mode . The s election process is ide nti-
ca l to the e qua lize r s e tting inte rfa ce.
Use the P REV/NEXT ke ys to se lect the “Re playr” option. P ress the MENU button to e nte r
the subme nu a nd the PREV/NEXT buttons to ma ke your s e le ctions .
Ma nual Re play: me a ns that in A-B Repla y Mode the endpoint B ca n be only s e t ma nua lly.
Auto Re play: mea ns that in A-B Repla y Mode the endpoint B ca n be only se t automa ti-
ca lly.

17
Contrast Settings
This s e le ction a llows use r to s et the contras t (light/da rk) of the LCD s cre e n. The s e le ction
proce ss is ide ntica l to the “S cree n” se tting inte rfa ce. Use the P REV/NEXT ke ys to se lect
the “contra st” option. P res s the MENU button to e nte r the contra s t s ubmenu a nd the
PREV/NEXT buttons to ma ke your s e le ctions . The se lection will ma ke the s cree n lighte r,
or da rke r. P re ss the Me nu button to confi rm you s e le ction.
“Slee p Time r” refers to a s etting whe re you ca n s e t a fi xe d pe riod of time (unit: minutes )
at which the pla ye r will turn off automa tically whe n no ke ys a re pre ss e d no ma tte r which
mode the pla ye r is in. Note : Sleep Time r s e ttings a re va lid only once a nd the se t time will
be cle a re d a fte r powe r off. This se tting mus t be re se t e ach time it is us ed.
Replay Mode
This s e le ction a llows use r to s et the pla yer re pe a t mode . The s election process is ide nti-
ca l to the e qua lize r s e tting inte rfa ce.
Use the P REV/NEXT ke ys to se lect the “Re playr” option. P ress the MENU button to e nte r
the subme nu a nd the PREV/NEXT buttons to ma ke your s e le ctions .
Ma nual Re play: me a ns that in A-B Repla y Mode the endpoint B ca n be only s e t ma nua lly.
Auto Re play: mea ns that in A-B Repla y Mode the endpoint B ca n be only se t automa ti-
ca lly.

18
Online Mode (Private Space Settings)
The ope ra ting s te ps are the s ame a s those for the Equa lize r s e ttings .
Some ope rating sys te ms (thos e re le a s ed prior to Windows 2K S P 4) ca nnot s upport two
driver le tte rs on one USB dis k. Thus , if the “Private S pace” function is on, choos e which
disk you are going to us e, i.e ., “s ingle ordina ry dis k” or “s ingle e ncrypted disk” in order for
a corre ct display of the s e le cte d dis k a fter conne cting to your P C.
The Private S pa ce functions a re e xplaine d later in this manua l.
Memory Settings
The ope ra ting s te ps are the s ame a s those for the Equa lize r s e ttings . This s etting displa ys
the tota l me mory ca pa city of the pla yer, a nd the % of me mory currently be ing use d.
Firmware Version
The ope ra ting s te ps are the s ame a s those for the Equa lize r s e ttings . This s e tting dis -
plays the current vers ion of fi rmwa re ins ta lled on the playe r.
Firmware Upgrade
This s ub-me nu ope ration will be e xpla ine d late r in this ma nua l

19
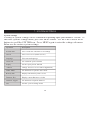
8. UP GRADING FIRMWARE
To Upgrade The Unit Firmware
This unit s upports fi rmwa re upgrade s via downloa dable fi le s a nd utilities ins talle d on your
PC from the Softwa re CDROM included with this pla ye r. Ma ke s ure you ins ta ll the s e utili-
tie s before atte mpting to upgra de your fi rmwa re.
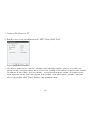
1) P ress MENU to e nter the main menu
2) P ress the PREV or NEXT buttons to na viga te to the “Sys te m S e tting” subme nu
3) P ress MENU a gain to a cce ss the S yste m Se tting s ubmenu. P re s s the P REV or
.......
NEXT buttons to move to the Firmwa re s ubmenu
La pagina sta caricando ...
La pagina sta caricando ...
La pagina sta caricando ...
La pagina sta caricando ...
La pagina sta caricando ...
La pagina sta caricando ...
La pagina sta caricando ...
La pagina sta caricando ...
La pagina sta caricando ...
La pagina sta caricando ...
La pagina sta caricando ...
La pagina sta caricando ...
La pagina sta caricando ...
La pagina sta caricando ...
La pagina sta caricando ...
La pagina sta caricando ...
La pagina sta caricando ...
La pagina sta caricando ...
La pagina sta caricando ...
La pagina sta caricando ...
-
 1
1
-
 2
2
-
 3
3
-
 4
4
-
 5
5
-
 6
6
-
 7
7
-
 8
8
-
 9
9
-
 10
10
-
 11
11
-
 12
12
-
 13
13
-
 14
14
-
 15
15
-
 16
16
-
 17
17
-
 18
18
-
 19
19
-
 20
20
-
 21
21
-
 22
22
-
 23
23
-
 24
24
-
 25
25
-
 26
26
-
 27
27
-
 28
28
-
 29
29
-
 30
30
-
 31
31
-
 32
32
-
 33
33
-
 34
34
-
 35
35
-
 36
36
-
 37
37
-
 38
38
-
 39
39
-
 40
40


Nextar MA323 Manuale utente
- Categoria
- Smartwatch
- Tipo
- Manuale utente
- Questo manuale è adatto anche per
in altre lingue
- English: Nextar MA323 User manual
Altri documenti
-
Sulzer XTA, XTAK Installation and Operating Instructions
-
Matsui MAT7DB2656E Manuale utente
-
Greenlee DM-60 A Manuale utente
-
KitchenAid 720-0745B Istruzioni per l'uso
-
Becker DP4100 Manuale utente
-
Zanussi ZDB1500CH Manuale utente
-
Electrolux EAT7000 Manuale utente
-
Panasonic SCAK27 Manuale del proprietario
-
Biamp 29 Series Manuale utente
-
Hitachi DV-P250C Manuale utente