
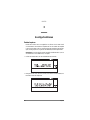
iS35-HD
i40M-HD
ENGLISH
FRANÇAIS
DEUTSCH
ITALIANO
Additional information
Informations supplémentaires
Ergäzende informationen
Informazioni aggiuntive

Introduction
1
iS35-HD / i40M-HD
Additional information
CHAPTER
1
Introduction
Warning!
Warning:
The “HDK-iS35” (code FDD0003002) or “HDK-i40M” (code FDD0003001)
kit must be installed by an Authorized Korg Service Centre. The instruments contain
live parts that may cause serious personal injuries.
Do not install the kit on your
own. Korg declines any responsibility in case of damages to persons or prop-
erties caused by the opening of the instrument by unauthorized personnel.
iS35 and i40M Owner’s Manual
The Korg iS35-HD or i40M-HD is an iS35 or i40M provided with hard disk. If you
have an iS35, you can convert it into an iS35-HD with the “HDK-iS35” kit. If you have
an i40M, you can convert it into an i40M-HD with the “HDK-i40M” kit. Installation
must be carried out by an Authorized Korg Service Centre.
The iS35-HD or i40M-HD is basically an iS35 or i40M. Refer to the iS35 or i40M
Owner’s Manual for information on how to use the instrument. This manual describes
the functions related to the hard disk in the Disk/Global, Song Play and Song Edit
operating modes.
Hard disk structure
The iS35-HD or i40M-HD hard disk is divided into partitions. A partition is a disk unit
that is separate from the other ones. Each partition must be considered as an high-
capacity disk capable of containing the same data as a disk (midifiles, styles,
arrangements, programs, etc.).

2
Chapter 1
Just like in an MS-DOS® computer, partitions are identified by a letter or number
from C and Z, and from 1 to 9. The number of partitions is set by Korg when produc-
ing the hard disk.
Each partition can contain up to 224 files.
Hard disk automatic stop
The hard disk automatically stops when not used. It starts again and gets ready in a
few seconds when you perform an operation on it.
Displaying the songs in alphabetical order
In the previous releases of the operating system, songs were displayed in the order
in which they were saved on the disk. The iS35-HD or i40M-HD operating system
displays the songs in alphabetical order, making it easier to search a song on the
hard disk.
Selecting the songs with the numerical keypad
In this release of the operating version, you can select the songs by entering the pro-
gressive number that was automatically assigned when saving them. The progres-
sive number is displayed on Page 1 in the Song Play mode. See “Selecting the
songs with the progressive number” on page 5.
New Disk functions
The “Copy” (see “Copying a file” on page 9) and “Format HD” (see “Formatting the
hard disk” on page 11) functions have been introduced to make file management on
the hard disk easier.
Upgrading the operating system
The iS35-HD and i40M-HD operating system can be upgraded by loading the new
system from disk. The new operating system can be downloaded from www
.korg.it.
Disclaimer
Korg is not responsible for loss of data arising from the incorrect use of the hard disk
or hardware malfunctioning.
© 1999 Korg Italy. All rights reserved.

Using the hard disk
3
CHAPTER
2
Using the hard disk
Selecting the disk unit
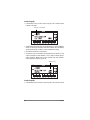
In Disk/Global mode
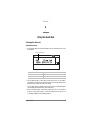
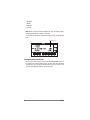
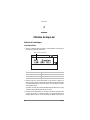
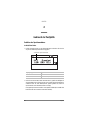
1
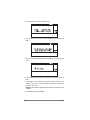
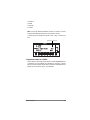
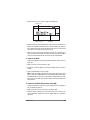
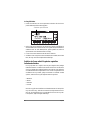
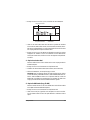
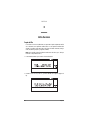
Press DISK/GLOBAL to enter the Disk/Global mode. The selected disk unit is shown
on the top left:
2
Hold the DISK/GLOBAL or TRK SELECT button pressed and use the TEMPO/
VALUE buttons (or the DIAL) to select the desired disk unit. Hold the TEMPO/VALUE
button pressed to scroll the disk units on the display.
In the example above the C partition of the hard disk has been selected (this partition
is automatically selected when turning on the instrument).
3
Release the DISK/GLOBAL or TRK SELECT button. Now you can use all loading
(LOAD) or saving (SAVE) functions, as well as the utility functions (UTILITY), such
as formatting (FORMAT) and file deleting (DELETE).
Display Disk unit
DISK disk
HD-C … HD-Z, HD-1 … HD-9 hard disk partition
Selected disk unit

4
Chapter 2
In Song Play mode
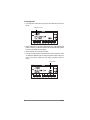
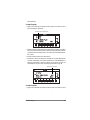
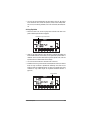
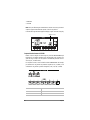
1
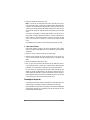
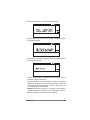
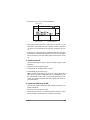
Press SONG PLAY to enter the Song Play mode. The selected disk unit is shown on
top left.
2
Hold the SONG PLAY or TRK SELECT button pressed and use the TEMPO/VALUE
buttons (or the DIAL) to select the desired disk unit. Hold the TEMPO/VALUE button
pressed to scroll the disk units on the display.
3
Release the SONG PLAY or TRK SELECT button.
4
Select the song with the buttons in the TEMPO/VALUE section (or the DIAL). Songs
are displayed in alphabetical order. The progressive number assigned to the song is
shown on top left (see “Selecting the songs with the progressive number” on
page 5).
Selected disk unit
Song number

Using the hard disk
5
In Song Edit mode
1
Press SONG EDIT to enter the Song Edit mode. The selected disk unit is shown on
top left.
2
Hold the SONG EDIT or TRK SELECT button pressed and use the TEMPO/VALUE
buttons (or the DIAL) to select the desired disk unit. Hold the TEMPO/VALUE button
pressed to scroll the disk units on the display.
3
Release the SONG EDIT or TRK SELECT button.
4
Select the song with the buttons in the TEMPO/VALUE section (or the DIAL). Songs
are displayed in alphabetical order.
Selecting the songs with the progressive number
In the Song Play mode you can select a song by entering the progressive number
(from 000 to 999) that is automatically assigned to the song when saving it on disk
(disk or hard disk). If, for instance, you save the song MICHELLE first and then
MYWAY, RAGTIME, and CHOPIN the following numbers will be assigned to the
songs:
1. MICHELLE
2. MYWAY
3. RAGTIME
4. CHOPIN
When you delete a song, its progressive number will become free. If you save a new
song, the new song will be saved in the free location. If, for instance, you delete the
song RAGTIME and save PRELUDE the order of the songs will be as follows:
Selected disk unit

6
Chapter 2
1. MICHELLE
2. MYWAY
3. PRELUDE
4. CHOPIN
Note:
Numbers cannot be manually assigned to the songs. The number is always
assigned automatically when saving the song on disk.
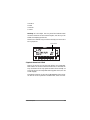
The number of the selected song is shown on the display on Page 1 in the Song Play
mode:
Entering the number in the iS35-HD
When you are on Page 1 in the Song Play mode, the ARRANGEMENT section can
be converted into a numerical keypad used to select the songs. Since the number
assigned to the song is always a three-digit number, it may be necessary to enter
one or two zeros before the number (i.e. “9” becomes “009”).
Song number

Using the hard disk
7
Use the buttons in the ARRANGEMENT section to enter the number. For instance,
to select song number 95, press 0 (A or B), 9 (USER), and 5 in a sequence. To select
song number 9 press 0 (A or B), 0 (A or B), and 9 (USER) in a sequence.
Entering the number in the i40M-HD
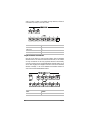
When you are on Page 1 in the Song Play mode, the PROGRAM/ARRANG section
can be converted into a numerical keypad used to select the songs. Since the
number assigned to the song is always a three-digit number, it may be necessary to
enter one or two zeros before the number (i.e. “9” becomes “009”). To enter the
number, press the PROGRAM/ARRANG button to light up the ARRANG LED and
use the buttons in the PROGRAM/ARRANG section:
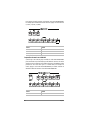
Button Number
BANK A, B 0
BANK USER 9
NUMBER [1-8] 1-8
))9
12345678

8
Chapter 2
1
Press the PROGRAM/ARRANG button to light up the ARRANG LED.
2
Enter the song number. For instance, to select song number 95, press 0 (A, B or C),
9 (D, E or F), and 5 in a sequence. To select song number 9, press 0 (A, B or C), 0
(A, B or C), and 9 (D, E or F) in a sequence.
Button Number
BANK A, B, C 0
BANK D, E, F 9
NUMBER [1-8] 1-8
)))
12345678
999

Other functions
9
CHAPTER
3
Other functions
Copying a file
The COPY FILE function (CPY) allows for copying files from a disk to a hard disk
partition, or from a hard disk partition to another partition. All the file types recog-
nized by the instruments (arrangements, styles, backing sequences, programs, midi-
files) can be copied.
Note:
Files cannot be copied within the same disk unit (i.e. from partition HD-C to
partition HD-C).
1
Press DISK/GLOBAL to enter the Disk/Global mode.
2
Move the cursor to UTIL (UTILITY) and press ENTER/YES. The Utility page will
appear on the display.

10
Chapter 3
3
Move the cursor to CPY (COPY) and press ENTER/YES.
4
Hold the DISK/GLOBAL or TRK SELECT button pressed and use the TEMPO/
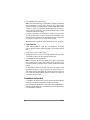
VALUE buttons (or the DIAL) to select the disk unit (partition or disk drive) that con-
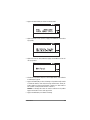
tains the files to be copied. The name of the origin disk unit is shown on top left.
5
Move the cursor to the name of the disk unit to which the files must be copied in the
second line of the display and select the destination unit with the TEMPO/VALUE
buttons (or the DIAL). Now you can copy the files in any of the three procedures indi-
cated below:
A - Copying a single file
This function allows you to copy a single file from the origin to the destination unit.
1
Move the cursor to the name of the file to be copied.
2
Select the file with the TEMPO/VALUE buttons (or the dial).
3
Press ENTER/YES to start copying.
Note:
The “FILENAME.MID exists” message will appear (where FILENAME is the
name of the file being copied) if the destination unit contains a file under the same
name. Press ENTER/YES to confirm copying or EXIT/NO to cancel. The first free
progressive number will be assigned to the file.
B - Copying all the midifiles (songs, .MID files)
This function allows you to copy all the midifiles contained in the disk or hard disk
partition.
1
Move the cursor to the name of the files to be copied.
2
Hold the [UP/+] button pressed to go to the end of the song list. The last item but one
on the list is the “MIDI Files” option. Select this option.
3
Press ENTER/YES to start copying.
Note:
When copying all the midifiles, the files in the origin disk unit will be merged
with the files in the destination disk unit. If the origin disk unit contains files that
File to be copied
Destination unit
Origin unit

Other functions
11
already exist in the destination unit, the existing files will be deleted and replaced
with the files from the origin disk unit. For instance, if the “MICHELLE.MID” file exists
both in the origin and destination unit, the file in the destination unit will be deleted
and replaced with the file from the origin unit.
The copy function identifies the free progressive numbers and assigns them to the
new files. The progressive numbers that are still free will be assigned to the remain-
ing files. For this reason, the progressive number assigned to the songs in the desti-
nation unit may be different from the number they have in the origin unit.
See “Selecting the songs with the progressive number” on page 5.
C - Copying all the files
This function allows you to copy all the files (arrangements, styles, backing
sequences, programs, midifiles) contained in the disk or hard disk partition.
1
Move the cursor to the name of the file to be copied.
2
Hold the [UP/+] button pressed to go to the end of the song list. The last item on the
list is the “All Files” option. Select this option.
3
Press ENTER/YES to start copying.
Note:
When copying all the files, the files in the origin disk unit will be merged with
the files in the destination disk unit. If the origin disk unit contains files that already
exist in the destination unit, the existing files will be deleted and replaced with the
files from the origin disk unit.
As regards the midifiles (songs, .MID files), the copy function identifies the free pro-
gressive numbers and assigns them to the new files. The progressive numbers that
are still free will be assigned to the remaining files. For this reason, the progressive
number assigned to the songs in the destination unit may differ from the number they
have in the origin disk unit.
Formatting the hard disk
The procedure used to format disks is described in the Owner’s Manual. This section
illustrates how to format the hard disk.
Each hard disk partition must be individually formatted once the “HDK-iS35” or
“HDK-i40M” kit has been installed. Formatting will only delete the partition you have
selected, not the entire hard disk.

12
Chapter 3
1
Press DISK/GLOBAL to enter the Disk/Global mode.
2
Move the cursor to UTIL (UTILITY) and press ENTER/YES. The Utility page will
appear.
3
Move the cursor to FMT (FORMAT) and press ENTER/YES. The Format page will
appear.
4
Select the desired hard disk partition as described in “Selecting the disk unit” on
page 3.
5
Press ENTER/YES to start formatting. The “Already formatted. Continue?” or “Disk
contains xx files. Continue?” message will appear if the partition has already been
formatted or contains data.
Warning:
All data contained in the partition will be deleted! Press EXIT/NO to cancel
formatting.
6
Press ENTER/YES to confirm formatting.

Introduction
13
iS35-HD / i40M-HD
Informations supplémentaires
CHAPITRE
1
Introduction
Attention!
Attention:
Le kit “HDK-iS35” (code FDD0003002) ou “HDK-i40M” (code
FDD0003001) doit être installé par du personnel d’un Centre d’Assistance Agréé
Korg. A l’interne de l’instrument, il y a des tensions dangereuses qui peuvent provo-
quer des blessures aux personnes.
Ne jamais installer de par soi-même le kit.
Korg décline toutes responsabilités envers les dommages aux choses ou aux
personnes provoqués par l’ouverture de l’instrument de la part de personnes
non autorisées.
Mode d’emploi iS35 et i40M
Korg iS35-HD et i40M-HD sont un iS35 ou un i40M dotés de disque dur. Si vous pos-
sédez un iS35, vous pouvez le transformer en iS35-HD en installant le kit “HDK-
iS35”. Si vous possédez un i40M, vous pouvez le transformer en i40M-HD en instal-
lant le kit “HDK-i40M”. L’installation doit être effectuée par un Centre d’Assistance
Agréé Korg.
iS35-HD et i40M-HD sont, pratiquement, un iS35 ou un i40M, il faut donc consulter
le Mode d’emploi du iS35 ou du i40M relativement aux informations sur l’usage de
l’instrument. Ce mode d’emploi supplémentaire explique uniquement les fonctions
liées au disque dur et relatives aux modes opérationnels Disk/Global, Song Play et
Song Edit.

14
Chapitre 1
Structure du disque dur
Le disque dur du iS35-HD ou du i40M-HD est subdivisé en partitions, Une partition
constitue une unité de disque séparée des autres. On peut considérer chaque parti-
tion comme une disquette de grande capacité, en mesure de stocker exactement les
mêmes données d’une disquette (fichiers MIDI, styles, arrangements, Programs,
etc.).
Comme dans un ordinateur MS-DOS®, les partitions sont identifiées par une lettre
de l’alphabet ou par un numéro, dans une plage variant de C à Z et de 1 à 9. Le
nombre de partitions est défini par Korg lors de la fabrication du disque dur.
Chaque partition peut stocker au maximum 224 fichiers.
Arrêt automatique du disque dur
Quand le disque dur est inutilisé, il s’arrête automatiquement. Lors d’une successive
opération sur disque dur, il démarre de nouveau pour être prêt en quelques instants.
Affichage des morceaux dans l’ordre alphabétique
Les précédentes versions du système opérationnel affichaient les morceaux selon
leur ordre de sauvegarde sur disquette. Le système opérationnel du iS35-HD ou du
i40M-HD permet d’afficher les morceaux dans l’ordre alphabétique, en simplifiant
ainsi la recherche du morceau dans le disque dur.
Sélection des morceaux à l’aide du pavé numérique
Avec cette version du système opérationnel, on peut sélectionner les morceaux en
tapant leur numéro progressif, automatiquement affecté lors de la sauvegarde et affi-
ché à page 1 du mode Song Play. Voir “Sélectionner les morceaux à l’aide du
numéro progressif affecté” à page 18.
Nouvelles fonctions Disk
Pour simplifier la gestion des fichiers stockés dans le disque dur, deux nouvelles
fonctions ont été introduites: “Copy” (voir “Copier des fichiers” à page 22) et “Format
HD” (voir “Formatage du disque dur” à page 24).
Mise à jour du système opérationnel
Le système opérationnel du iS35-HD et du i40M-HD peut être mis à jour en char-
geant le nouveau système depuis disquette. Le nouveau système opérationnel peut
être prélevé en contactant le site www
.korg.it.

Introduction
15
Responsabilité
Korg décline toutes responsabilités envers la perte de données dérivant d’une incor-
recte utilisation du disque dur ou du mauvais fonctionnement du matériel.
© 1999 Korg Italy. Tous droits réservés

16
Chapitre 2
CHAPITRE
2
Utilisation du disque dur
Sélection de l’unité disque
En mode Disk/Global
1
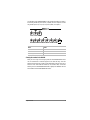
Appuyez sur DISK/GLOBAL pour afficher le mode Disk/Global. L’écran affiche en
haut à gauche l’unité disque sélectionnée:
2
Maintenez enfoncé le bouton DISK/GLOBAL ou TRK SELECT et appuyez sur
TEMPO/VALUE (ou tournez la MOLETTE) pour sélectionner l’unité disque désirée.
Si le bouton TEMPO/VALUE est maintenu enfoncé, les unités disque sont rapide-
ment déroulées à l’écran.
La partition C du disque dur (partition automatiquement sélectionnée lors de la mise
sous tension de l’instrument) est illustrée dans le schéma.
3
Relâchez le bouton DISK/GLOBAL ou TRK SELECT. Maintenant, vous pouvez utili-
ser toutes les fonctions de chargement (LOAD) ou de sauvegarde (SAVE) et les
fonctions utilitaires (UTILITY), comme le formatage (FORMAT) et l’effacement de
Indication à l’écran Unité disque
DISK disquette
HD-C … HD-Z, HD-1 … HD-9 partition du disque dur.
Unité disque sélectionnée

Utilisation du disque dur
17
fichiers (DELETE).
En mode Song Play
1
Appuyez sur SONG PLAY pour afficher le mode Song Play. L’écran affiche en haut à
gauche l’unité disque sélectionnée:
2
Maintenez enfoncé le bouton SONG PLAY ou TRK SELECT et appuyez sur TEMPO/
VALUE (ou tournez la MOLETTE) pour sélectionner l’unité disque désirée. Si le bou-
ton TEMPO/VALUE est maintenu enfoncé, les unités disque sont rapidement dérou-
lées à l’écran.
3
Relâchez le bouton SONG PLAY ou TRK SELECT.
4
Sélectionnez le morceau en appuyant sur les boutons de la section TEMPO/VALUE
(ou tournez la MOLETTE). Les morceaux sont affichés dans l’ordre alphabétique. Le
numéro progressif affecté au morceau est affiché en haut à gauche de l’écran (voir
“Sélectionner les morceaux à l’aide du numéro progressif affecté” à page 18).
En mode Song Edit
1
Appuyez sur SONG EDIT pour afficher le mode Song Edit. L’écran affiche en haut à
Unité disque sélectionnée
Numéro du morceau

18
Chapitre 2
gauche l’unité disque sélectionnée.
2
Maintenez enfoncé le bouton SONG EDIT ou TRK SELECT et appuyez sur TEMPO/
VALUE (ou tournez la MOLETTE) pour sélectionner l’unité disque désirée. Si le bou-
ton TEMPO/VALUE est maintenu enfoncé, les unités disque sont rapidement dérou-
lées à l’écran.
3
Relâchez le bouton SONG EDIT ou TRK SELECT.
4
Sélectionnez le morceau en appuyant sur les boutons de la section TEMPO/VALUE
(ou tournez la MOLETTE). Les morceaux sont affichés dans l’ordre alphabétique.
Sélectionner les morceaux à l’aide du numéro progressif
affecté
En mode Song Play, on peut sélectionner un morceau en composant son numéro
progressif (numéro compris entre 000 et 999). Quand on sauvegarde un morceau
sur disque (disquette ou disque dur), un numéro progressif est automatiquement
affecté au morceau. Par exemple, si l’on sauvegarde en premier le morceau
MICHELLE et puis MYWAY, ensuite RAGTIME et pour finir CHOPIN, le numéro
affecté aux morceaux sera le suivant:
1. MICHELLE
2. MYWAY
3. RAGTIME
4. CHOPIN
Si l’un des morceaux est supprimé par la suite, son numéro progressif reste libre.
Lors de la successive sauvegarde d’un morceau, celui-ci occupera cet emplacement
qui s’est libéré. Par conséquent, si l’on supprime, par exemple, le morceau RAG-
TIME et que l’on sauvegarde le morceau PRELUDE, l’ordre des morceaux sera le
suivant:
Unité disque sélectionnée

Utilisation du disque dur
19
1. MICHELLE
2. MYWAY
3. PRELUDE
4. CHOPIN
Note:
On ne peut pas affecter manuellement un numéro à un morceau. Le numéro
est toujours automatiquement affecté lors de la sauvegarde du morceau.
Le numéro du morceau sélectionné est affiché à l’écran, à Page 1 du mode Song
Play:
Composition du numéro sur le iS35-HD
Quand la Page 1 du mode Song Play est affichée, la section ARRANGEMENT peut
se transformer en pavé numérique pour sélectionner les morceaux. Le numéro
affecté au morceau est toujours de trois chiffres et il faut donc éventuellement le faire
précéder d’un ou de deux zéros (par ex., “9” devient “009”).
Numéro du morceau
La pagina si sta caricando...
La pagina si sta caricando...
La pagina si sta caricando...
La pagina si sta caricando...
La pagina si sta caricando...
La pagina si sta caricando...
La pagina si sta caricando...
La pagina si sta caricando...
La pagina si sta caricando...
La pagina si sta caricando...
La pagina si sta caricando...
La pagina si sta caricando...
La pagina si sta caricando...
La pagina si sta caricando...
La pagina si sta caricando...
La pagina si sta caricando...
La pagina si sta caricando...
La pagina si sta caricando...
La pagina si sta caricando...
La pagina si sta caricando...
La pagina si sta caricando...
La pagina si sta caricando...
La pagina si sta caricando...
La pagina si sta caricando...
La pagina si sta caricando...
La pagina si sta caricando...
La pagina si sta caricando...
La pagina si sta caricando...
La pagina si sta caricando...
La pagina si sta caricando...
La pagina si sta caricando...
La pagina si sta caricando...
La pagina si sta caricando...
-
 1
1
-
 2
2
-
 3
3
-
 4
4
-
 5
5
-
 6
6
-
 7
7
-
 8
8
-
 9
9
-
 10
10
-
 11
11
-
 12
12
-
 13
13
-
 14
14
-
 15
15
-
 16
16
-
 17
17
-
 18
18
-
 19
19
-
 20
20
-
 21
21
-
 22
22
-
 23
23
-
 24
24
-
 25
25
-
 26
26
-
 27
27
-
 28
28
-
 29
29
-
 30
30
-
 31
31
-
 32
32
-
 33
33
-
 34
34
-
 35
35
-
 36
36
-
 37
37
-
 38
38
-
 39
39
-
 40
40
-
 41
41
-
 42
42
-
 43
43
-
 44
44
-
 45
45
-
 46
46
-
 47
47
-
 48
48
-
 49
49
-
 50
50
-
 51
51
-
 52
52
-
 53
53


Korg I40M-HD Manuale del proprietario
- Tipo
- Manuale del proprietario
- Questo manuale è adatto anche per
in altre lingue
- English: Korg I40M-HD Owner's manual
- français: Korg I40M-HD Le manuel du propriétaire
- Deutsch: Korg I40M-HD Bedienungsanleitung