
Installation Guidelines for
KODAK SA101 Alarm System

2
CONTENTS
I- Installing the central unit Pages 3 - 4
II- Home page Page 5
III- Central unit set-up Page 6
IV- Installation and settings: Pages 7 - 13
cameras and accessories
V- Using the scenarios Pages 14 - 16
VI- Additional informations Pages 17 - 18

3
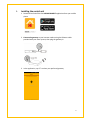
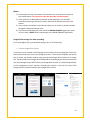
I- Installing the central unit
1. Download and install the free KODAK CONNECT application from your mobile
phone.
2. Connect the gateway to your internet modem using the Ethernet cable
provided with your alarm system, then plug the gateway in.
3. In the application, tap “+” to select your preferred gateway.

4
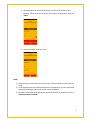
4. The application will automatically detect the device ID number of your
gateway. Please enter the name you want to give to the gateway, then tap
“Next”
5. Enter a password, then tap “Save”
NOTE:
1) The gateway must be always connected to your internet network via the Ethernet
cable.
2) If the application does not detect automatically your gateway, you can use manual
settings by entering the device ID number and its password.
3) The device ID number of the gateway is located at the back of the device, and the
default password is 123456.

5
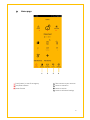
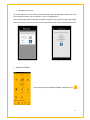
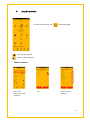
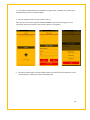
II-
Home page
1 :
Panic button, in case of emergency
1
: Direct access to your cameras
2 :
Arm/Disarm button
2
: Access to scenarios
3 :
Record button
3
: Access to events
4
: Access to advanced settings
1
2
3
1
2
3
4

6
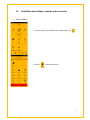
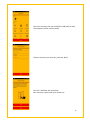
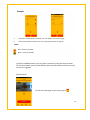
III- Setting the gateway
On the home page, tap (settings)
The Admin default password is 123456
You will be directed to the following page:
Setting the gateway siren
To add emergency
contacts in case of alarm
Setting the notifications you
want to receive
To select the cameras /
accessories that you want
to enable under various
modes

7
IV- Installation and settings: cameras and accessories
• ADD A CAMERA
In the Home page of your Kodak Connect application, tap
Then tap to add your camera

8
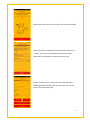
Switch your camera on, then tap “Next” to start the installation
Select your Wi-Fi network (make sure that your network is on
2.4 GHz), then enter the related password and tap “Next”
Wait then for 90 seconds for your camera to re-start
Choose a name for your camera, then enter the password
(default password 123456). Your camera is now set. You can
access it from the home page

9
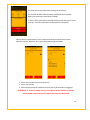
Camera set-up:
When you are on the Live Video page of your camera, go to
advanced settings (the Admin default password is 123456)
You will be directed to the following page:
To enable
automatic time
adjusting
To link your camera to
Google Drive
(see next page)
To enable/disable the
motion detection

10
Notes:
1) Please make sure that your camera is connected to the same internet network as
your mobile phone. The system can only operate under 2.4 GHz network.
2) If the camera is not detected automatically by the application, you can add it
manually by entering its device ID number, which can be found at the back of the
camera.
3) If you connect the camera via an Ethernet cable, you can switch to wireless network
through the advanced settings menu.
4) If you have already used your camera with the KODAK SECURITY application, make
sure you make a RESET before connecting it to the KODAK CONNECT application.
Google Drive settings for video recording
To set up Google Drive, go to advanced settings, then to “Cloud setting”.
o Create a Google Drive account
If you have not yet created a Cloud Storage account while you were setting your camera, be
aware that you can do it at any time during this process. The assistant will guide you step by
step to create your private cloud by using your personal Google Drive account as a storage
site. The download time to Google Drive will depend on the quality of your internet connection.
The Cloud Storage account differs from your Google Drive account; it is dedicated specifically
to the management of your cameras, whereby each camera is saved on the same Cloud
Storage account, and then linked to your Google Drive account.

11
o Manage your cameras
Go to the Device List to see all the cameras saved on your Cloud Storage account. Once you
have selected a camera, you can delete it, or link it to google Drive
You can also delete the camera from the Cloud Storage account in order to stop using Google
Drive as the way to store on the cloud. In this case, the video files will be saved on the SD Card.
• ADD AN ACCESSORY
In the Home Page of the KODAK CONNECT application, tap

12
Select the accessory that you would like to add (here we take
the example of a door contact switch)
Choose a name for your accessory, then tap “Next”.
Tap “Pair” and follow the instructions.
Your accessory is paired with your central unit.

13
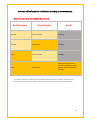
Summary table of potential notifications according to camera settings
Note: The camera is set with a default “Armed” mode
Kodak Connect
“Armed” mode
Result
Disarmed
Camera unticked
Recording
Disarmed
Camera ticked
Recording
Armed
Camera unticked
Recording
Armed
Camera ticked
Alarm from the central unit +
notification indicating a motion
detection by the camera and a
recording
If you don’t want your camera to start recording each time there is motion detection when
you are at home, you should disarm the camera, and re-arm it when you leave the place.

14
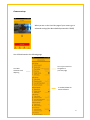
V-
Using the scenarios
To access the scenarios, tap in the Home Page
Click on the
accessory to create
a scenario)
Tap +
Choose another
accessory
Red = Scenario enabled
White = Scenario disabled
Create a scenario

15
If you have a KODAK Camera, you can create a scenario by using the Preset function.
This function enables you to record different points that the camera will focus on if any
accessory is triggered.
Demonstration:
On the Live Video page of your camera, go to
Example
1. If the door contact switch is enabled, then the outdoor siren starts ringing
2. If the camera detects a motion, then the smart plug switches the light on
Icons
Red = accessory enabled
Black = accessory disables

16
You have now reached the Preset settings of the camera.
This function enables video recording in different points (usually
where your accessories have been installed).
To do so, orient your camera towards the point that you want to select
and tap 1. Proceed in the same manner with the next points.
Now to link the various points of your camera with the accessories (door contact
switches, sensors, detectors, etc.), go to the Scenario page as follows:
1- Select the accessory that you want to link
2- Select your camera
3- Select the point that the camera must focus one if the accessory is triggered
WARNING, in "Armed" mode, priority is not given to the scenarios, and the
preset mode is operational only when the camera is disarmed.

17
VI- Additional information
1 – To enable the SOS mode via the remote control, tap the ! button for 3 consecutive seconds.
2 – All notifications are displayed in English language, whatever language has been selected, due
to the software used in this application.
Examples of notifications:
è Your system is now armed.
è Your sensor has been triggered
è Your system is now disarmed.

18
3 – Our products and applications are updated on a regular basis. To update your system, go to
advanced settings, then to Firmware update.
4- You can change the picture of your system. To do so:
When you are on the Home Page of the KODAK CONNECT system, make a long press on the
square box, tap to select a picture, then choose a picture in your gallery.
5- The motion detector goes into sleep mode for about 2 minutes after every detection in order
to avoid repetitive notifications and increase battery life.
-
 1
1
-
 2
2
-
 3
3
-
 4
4
-
 5
5
-
 6
6
-
 7
7
-
 8
8
-
 9
9
-
 10
10
-
 11
11
-
 12
12
-
 13
13
-
 14
14
-
 15
15
-
 16
16
-
 17
17
-
 18
18


in altre lingue
- English: Kodak SA101
Altri documenti
-
Trendnet TV-IP862IC Manuale utente
-
Edimax IC-3116W Manuale utente
-
Ubiquiti UCK-G2-PLUS Guida Rapida
-
Digital Watchdog DW-VP16xT16P Manuale utente
-
D-Link DCS-960L Manuale utente
-
ZTE BLADE V7 LITE Manuale utente
-
Trendnet TV-IP743SIC Guida utente
-
-
-