Hoover HVH 750/1 B Manuale utente
- Categoria
- Piani cottura
- Tipo
- Manuale utente
Questo manuale è adatto anche per

IT
ISTRUZIONI D’USO E INSTALLAZIONE
PIANI VETROCERAMICA
INSTALLATIONS- UND BEDIENUNGSANLEITUNG
CERANFELDER
DE
ES
INSTRUCTIONS FOR USE AND INSTALLATION
CERAMIC HOBS
GB
MANUAL DE UTILIZAÇÃO E DE INSTALLAÇÃO
PLACAS VITROCERÂMICAS
PT
INSTALLATIE- EN GEBRUIKSINDTRUCTIES
VITROKERAMISCHE KOOKVLAKKEN
NL
DA
FIN
KÄYTTÖ- JA ASENNUSOHJEET
KERAAMISET LIEDET
HOOVER - Via Privata Eden Fumagalli - 20047 Brugherio (Milano) - Italy
BRUGS- OG INSTALLATIONSVEJLEDNING
KERAMISKE PLADER

1 GB
READ THE INSTRUCTIONS BOOKLET CAREFULLY TO MAKE THE MOST OF YOUR HOB.
We recommend you keep the instructions for installation and use for later reference, and before installing the hob, note its serial number
below in case you need to get help from the after sales service.
We are constantly striving to improve product quality and as such may modify appliances to incorporate the latest technical improvements.
Glass Ceramic Hobs conform to directives 73/23/CEE and 89/336/CEE.
Made in FRANCE - 232 -
220 - 240 V
P. Motors = 30 W
Mod : FE GD21 RB
P. Maxi (Oven) - 2350 W
Code: 39354774 -0306 0511
Mod: FE GD21 RB
Code: 39354774 - 0306 0511
220 - 240 V
Code: 39354774
- 0306 0511
Code: 39354774
- 0306 0511
Code: 39354774
- 0306 0511
Identification plate
(located under the hob's bottom casing)
• It is strongly recommended to keep children away from the cooking zones while they are in operation or when they are switched off,
so long as the residual heat indicator is on, in order to prevent the risks of serious burns.
• When cooking with fats or oils, take care always to watch the cooking process as heated fats and oils can catch fire rapidly.
• The hob’s control area is sensitive, do not place hot containers on it.
• Aluminium foil and plastic pans must not be placed on heating zones.
• After every use, some cleaning of the hob is necessary to prevent the build up of dirt and grease. If left, this is recooked when the
hob is used and burns giving off smoke and unpleasant smells, not to mention the risks of fire propagation.
• It is advisable not to stare directly at the halogen elements.
• Do not touch the heat zones during operation or for a while after use.
• Never cook food directly on the glass ceramic hob. Always use the appropriate cookware.
• Always place the pan in the centre of the unit that you are cooking on.
• Do not use the surface as a cutting board.
• Do not slide cookware across the hob.
• Do not store heavy items above the hob. If they drop onto the hob, they may cause damage.
• Do not use the hob as a working surface.
• Do not use the hob for storage of any items.
• In the unlikely event of a surface crack appearing, do not use the hob. Immediately disconnect the hob from the electrical power supply
and call the After Sales Service.
GENERAL WARNINGS
HVHCOOKING HOB
4 Hilight
220-240/50
7100
B 595x510
X 570x500
560x490
4 Hilight
220-240/50
7600
B 775x510
X 750x500
560x490
Burners
Supply voltage (V/Hz)
Installed electric power (W)
Product size (l x p) mm.
Building-in dimensions (AxB)

A power cord is not supplied with the appliance, but the hob is
equipped with a terminal block which enables you to choose the
correct connection for the particular power supply.
Installing a domestic appliance can be a complicated operation which if not carried out correctly, can seriously affect consumer
safety. It is for this reason that the task should be undertaken by a professionally qualified person who will carry it out in
accordance with the technical regulations in force. In the event that this advice is ignored and the installation is carried out
by an unqualified person, the manufacturer declines all responsibility for any technical failure of the product whether or not
it results in damage to goods or injury to individuals.
2 GB
BUILT-IN
The furniture in which your hob will be installed and all adjacent
furniture, should be made from materials that can withstand high
temperatures. In addition, all decorative laminates should be fixed
with heat-resistant glue.
Installation:
• A watertight seal is supplied with the hob.
Before fitting:
- turn the hob upside down, with the glass surface facing downwards.
Make sure the glass is protected.
- fit the seal round the hob.
- make sure that it is correctly fitted to avoid any leakage into the
supporting cabinet.
• Leave a gap of at least 5 cm between the appliance and the
vertical sides of the adjacent furniture.
• If, when installing the hob, the lower hob face is adjacent to an
area normally accessible when handling or cleaning, fit a partition
1 cm below the base of the hob to avoid any risk of scorching
or damage.
INSTALLATION
"The installation must conform to the standard directives."
The manufacturer declines all responsibility for any damage that
may be caused by unsuitable or unreasonable use.
Warning :
• Always check before any electrical operation, the supply tension
shown on the electricity meter, the adjustment of the circuit-
breaker, the continuity of the connection to earth to the installation
and that the fuse is suitable.
• The electrical connection to the installation should be made via
a socket with a plug with earth, or via an omnipole cut-out switch
with an opening gap of at least 3 mm.
If the appliance has a socket outlet, it must be installed so that
the socket outlet is accessible.
• The yellow/green wire of the power supply cable must be
connected to the earth of both power supply and appliance
terminals.
• The manufacturer cannot be held responsible for any accidents
resulting from the use of an appliance which is not connected
to earth, or with a faulty earth connection continuity.
• Any queries regarding the power supply cord should be referred
to After Sales Service or a qualified technician.
ELECTRICAL CONNECTION
min 10 mm
Sp da 25 a 45 mm
Accessible
space
Seal
Hob
min 70 cm
min 15 cm
min 5,5 cm
10 mm
mini
50 mm
Opening
500 X 50
Opening
500 X 10
It is forbidden
to fit the hob
above a non-
ventilated oven
To proceed with the connection, you must adhere to the following
instructions.
• Before making the connection, make sure that the installation
is protected by a suitable fuse, see table, and that it is fitted
with wires of a large enough section to supply the appliance
normally.
• Choose the supply cord in accordance with the recommendations
in the table.
• Turn the hob, with the glass side against the worktop, providing
you have protected the glass !
CONNECTION TO THE TERMINALS ON THE TERMINAL BLOCK:
ELECTRICAL CONNECTION
3 G 2,5 mm2
H05RR-F,
H05VV-F,
H05V2V2-F
3 G 2,5 mm2
H05RR-F,
H05VV-F,
H05V2V2-F
4 G 2,5 mm2
H05RR-F,
H05VV-F,
H05V2V2-F
4 G 2,5 mm2
H05RR-F,
H05VV-F,
H05V2V2-F
5 G 1,5 mm2
H05RR-F,
H05VV-F,
H05V2V2-F
Monophase
220-240V~
Two phases
220-240V2~
Two phases
220-415V2N~
Three phases
220-240V3~
Three phases
380-415V3N~
25 A 25 A 25 A 25 A 16 AFUSE
CABLE
AREA
TYPE
2 Phase
shunt 1-2
shunt 2-3
5 Neutral
shunt 4-5
T Earth
CONNEC-
TION TO
THE
TERMIMAL
BLOCK
2 Phase
shun 1-2
shunt 2-3
5 Phase
shunt 4-5
T Earth
1 Phase
3 Phase
shunt 2-3
5 Neutral
shunt 4-5
T Earth
1 Phase
shunt 1-2
3 Phase
shunt 3-4
5 Phase
T Earth
1 Phase
2 Phase
3 Phase
5 Neutral
shunt 4-5
T Earth
• Open the cover in the following
sequence:
• find the two tabs located on the
sides,
• put the blade of a flat screw-
driver in front of each tab, push
in and press,
• remove the cover.
• Connect the power supply cable:
• comply with the information of the table and the markings
on the terminal board and install the shunts (the shunts, inserted
in the terminal board, make a bridge between two terminals),
• strip the end of each
conductor and attach
them to the terminals,
complying with the infor-
mation given in the table,
• unscrew the cable clamp,
• pass the lead through the
cable clamp.
When you have finished
the connection operation
to the appliance terminals,
tighten the cable clamp and
close the cover.
Note: make sure the terminal board screws are tight.
SHUNT
L2
L3

• After powering up the hob, wait 8 seconds to activate the
electronic controls.
- Press the button , for 3 seconds.
Electronic control of the hob is activated. In each display zone
the heat level is displayed and the control LED blinks.
- After 10 seconds whithout use, the electronic control goes off
and the starting operation has to be repeated.
3 GB
HOW TO OPERATE THE GLASS CERAMIC HOB
HOB COOKWARE ADVICE
• Always use good quality cookware with perfectly flat and
thick bases : using this type of cookware will prevent hot spots
that cause food to stick. Thick metal pots and pans will provide
an even distribution of heat.
• Ensure that the base of the pot or pan is dry : when filling
pans with liquid or using one that has been stored in the
refrigerator, ensure that the base of the pan is completely dry
before placing it on the hob. This will help to avoid staining the hob.
• Use pans whose diameter is wide enough to completely
cover the surface unit : the size of the pan should be no smaller
than the heating area. If it is slightly wider the energy will be
used at its maximum efficiency.
THE CHOICE OF COOKWARE - The following information will
help you to choose cookware which will give good performance.
Stainless Steel :
highly recommended.
Especially good with a
sandwich clad base. The sandwich base combines the benefits
of stainless steel (appearance, durability and stability) with the
advantages of aluminium or copper (heat conduction, even heat
distribution).
Aluminium :
heavy weight recommended.
Good conductivity.
Aluminium residues sometimes appear as scratches on the hob,
but can be removed if cleaned immediately.
Because of its low melting point, thin aluminium should not be
used.
Cast Iron :
usable, but not recommended.
Poor performance.
May scratch the surface.
Copper Bottom / stoneware:
heavy weight recommended.
Good
performance, but copper may leave residues which can appear
as scratches. The residues can be removed, as long as the hob
is cleaned immediately. However, do not let these pots boil
dry. Overheated metal can bond to glass hobs. An overheated
copper pot will leave a residue that will permanently stain the hob.
Porcelain/enamel : Good perfomance only with a thiny smooth,
flat base.
Glass-ceramic :
not recommended.
Poor performance. May
scratch the surface.
Using good quality cookware is critical for setting the best
performance from your hob.
Control LED
Cooking zone programming indicator
Locking indicator lamp
• STARTING A COOKING ZONE
- Press the selection button of
the required cooking zone. In
the display zone, the control
LED is on steady. It shows that
the zone is live.
- Press the or button to select a heat level between 1 and
9. Hold down the or button and the heat level increases
or decreases gradually.
The following examples are for information only. Personal
experience should then let you adapt these settings to your taste
and habits.
0 : Off
1 : )
2 : ) ..... Melting heat
3 : Keeping hot
4 : Heating up
5 : Thawing, stewing, full cooking, low temperature
cooking
6 : Cooking without lid
7 : Frying, meat browning and roasting
8 : High temperature cooking and roasting, seizing
9 : Frying, boiling large quantities of water.......
• STOPPING A COOKING ZONE
- Press the selection button of the required cooking zone.
- Press the button to display heat level . Now the zone goes
off, the indicator goes off after 10 seconds.
- To stop rapidly, press the and buttons at the same time.
The heat level automatically goes down to .
The cooking zone goes off.
• GENERAL STOP
The cooking zones and the timer can be stopped at any
moment by pressing for 3 seconds on the On-Off button.
• RESIDUAL HEAT INDICATOR
The control panel tells the user when the surface temperature of
the cooking zones exceeds about 60°C, by the following displaying:
. When the temperature goes back below 60°C, the display
goes off.
For ending the cooking, we advise switching off the cooking zone
and using the residual heat of the zone to finish cooking gently.
N.B. After a cut in the current, the residual heat indicator disappears
completely, even if the surface temperature exceeds 60°C.
• OPERATING THE ADDITIONAL COOKING ZONE
( Only on some models)
• TO STOP THE ADDITIONAL ZONE:
- The cooking zone with addition must be live: in the display zone,
the lamp must be on. If not, select the relevant zone again.
- Press de button . The display LED for the additional zone
disappears. The additional cooking zone goes off.
- To rapidly stop the complete cooking zone, press the o
buttons at the same time. The heat level automatically goes
down to . The cooking zone goes off.
• TO START THE ADDITIONAL COOKING ZONE:
- Press the button . In the next 10 seconds
- Press the button for the zone with the addition. In the display
zone, the blinking lamp goes steady. It shows that the zone is
live.
- Select a heat level between 1 and 9. ( or )
- Press the button to start the additional zone.
• PROGRAMMING A COOKING ZONE
Every cooking zone can be programmed for a maximum time of
99 minutes. Only one zone, at a time, can be programmed.
- Start the required zone by following the previous instructions.
The control LED near the heat level must be displayed, it shows
that the zone is live.
- Press the Timer button.
The zone mark around the timer display shows the controlled
zone.
- Press the button to select the time in minutes.
This is saved automatically after three seconds.
The programmed time can be modified at any moment by pressing
the timer selection button, the timer control LED must be on.
When the time has run, the cooking zone goes off automatically
and an audible beep sounds for 1 minute. Press any button to
stop it.

4 GB
If there are still some stubborn stains:
- Place a few more drops of specialised cleaning fluid on the
surface.
- Scrape with a scraper, holding it at an angle of 30° to the hob,
until the stains disappear.
- Wipe with a soft cloth or dry kitchen paper until the surface is
clean.
- Repeat the operation if necessary.
A FEW HINTS:
Frequent cleaning leaves a protective layer which is essential to
prevent scratches and wear. Make sure that the surface is clean
before using the hob again. To remove marks left by water, use
a few drops of white vinegar or lemon juice. Then wipe with
absorbent paper and a few drops of specialised cleaning fluid.
The control knobs can be removed for a complete cleaning.
However, you must care not to let any liquid go into the open
zones, and then to push the knobs fully on fitting back.
The glass ceramic surface will withstand scraping from flat-
bottomed cooking vessels, however, it is always better to lift them
when moving them from one zone to another.
NB:
Do not use a sponge which is too wet.
Never use a knife or a screwdriver.
A scraper with a razor blade will not damage the surface, as
long as it is kept at an angle of 30°.
Never leave a scraper with a razor blade within the reach of
children.
Never use abrasive products or scouring powders.
• The metal surround (on some models): to safely clean the
metal surround wash with soap and water, rinse, then dry with
a soft cloth.
30° Maxi
The programmed time can be reset to using the button
or pressing the and buttons at the same time, the cooking
zone is then no longer linked to the timer but stays operational.
So you will have to stop the zone independently.
The timer can be used alone as a reminder, it will ring at the end
of the programmed time.
• FAST HEATER OPERATION
Every cooking zone on the hob is equipped with a fast heater for
raising the cooking zone’s temperature faster:
Starting the fast heater
- Start the required zone, press the button to obtain position
release the button briefly and press it again; the display
alternates showing “fast heater” and heat level.
- If necessary reduce to the required heat position.
E.g. 1800 W zone at position 6 = 32% of 1800 W power released
When the “Fast heater” is on, the zone supplies 1800 W power
for 2.5 minutes, and adjusts to 576 W after this time.
* For increased safety, the cooking zones cut off automatically if
they are left on too long. The cut off depends on the heat level
used.
Cooking
position
Power
released
(%)
Time of
fast heater
(minutes)
Maximum
operating
time before
automatic
cut off*
0 : 0 % : 0 : 0 H
1 : 3 % : 1 : 6 H
2 : 6 % : 3 : 6 H
3 : 11 % : 5 : 5 H
4 : 16 % : 6,5 : 5 H
5 : 19 % : 8,5 : 4 H
6 : 32 % : 2,5 : 1,5 H
7 : 45 % : 3,5 : 1,5 H
8 : 65 % : 4,5 : 1,5 H
9 : 100 % : 0 : 1,5 H
• Before carrying out any maintenance work on the hob, allow it
to cool down.
• Only products, (creams and scrapers) specifically designed for
glass ceramic surfaces should be used. They are obtainable
from hardware stores.
• Avoid spillages, as anything which falls on to the hob surface
will quickly burn and will make cleaning more difficult.
• It is advisable to keep away from the hob all substances which
are liable to melt, such as plastic items, sugar, or sugar-based
products.
MAINTENANCE:
- Place a few drops of the specialised cleaning product on the
hob surface.
- Rub any stubborn stains with a soft cloth or with slightly damp
kitchen paper.
- Wipe with a soft cloth or dry kitchen paper until the surface is
clean.
CLEANING AND MAINTENANCE
The locking function holds the current settings, or prevents anyone
from starting the hob. It is also used for cleaning the control strip
as the controls can be locked without the hob being on.
- Start the required cooking zones.
- Select a heat level for each of them.
- Press the button to set the data; in this way no other
button works, except the On/Off button.
The locking indicator lamp comes on.
To release the locking function, just press the button;
the indicator lamp goes off, all the controls work again.
If when the controls are locked, the timer is on, the time will be
counted automatically and the zone switched off at the end of the
programmed time.
If the locking control is on when the hob is finally shut down, the
locking control stays operational and prevents any action when
the hob is restarted, press the button to release the
locking function.
• LOCKING BUTTON OPERATION

This appliance is marked according to the
European directive 2002/96/EC on Waste
Electrical and Electronic Equipment (WEEE).
By ensuring this product is disposed of correctly,
you will help prevent potential negative
consequences for the environment and human
health, which could otherwise be caused by
inappropriate waste handling of this product.
The symbol on the product indicates that this
product may not be treated as household waste.
Instead it shall be handed over to the applicable collection point
for the recycling of electrical and electronic equipment
Disposal must be carried out in accordance with local
environmental regulations for waste disposal.
For more detailed information about treatment, recovery and
recycling of this product, please contact your local city office,
your household waste disposal service or the shop where you
purchased the product.
PROBLEM SOLVING
Cooking zones that do not maintain a rolling boil or a fast
enough frying rate.
• You must use pans which are absolutely flat. If light is visual
between the pan base and a straight edge, the surface unit will
not transfer heat properly.
• Pan bottoms should closely match the diameter of the heat zone
selected.
Foods cook slowly.
• Improper cookware being used. Pan bases should be flat, fairly
heavy-weight and the same diameter as the heat zone selected.
Tiny scratches (may appear as cracks or abrasions) on the
glass surface of the hob.
• Incorrect cleaning methods, cookware with rough bases, or
coarse particles (salt or sand) trapped between the cookware
and the surface of the hob.
Use recommended cleaning procedures, be sure cookware
bases are clean before use and use cookware with smooth
bases.
Metal markings (may appear as scratches).
• Do not slide aluminium cookware across the surface.
Use recommended cleaning procedure to remove marks.
• Incorrect cleaning materials have been used, spillage or grease
stains remain on the surface, use a razor scraper and
recommended cleaning product.
Dark streaks or specks.
• Use a razor scraper and recommended cleaning product.
Areas of discoloration on cooktop.
• Marks from aluminium and copper pans as well as mineral
deposits from water or food can be removed with the cleaning
cream.
Hot sugar mixtures / plastic melted to the surface.
• See the Glass Hob Cleaning section.
The hob is out of order, or some heat zones do not work.
• The shunt bars are not properly fitted on the terminal block.
Check the connection is made in conformity with the instructions
page 2.
The hob does not operate.
• A big spill or object covers at least two buttons, for at least 10
seconds. Clean up the spill or remove the object.
• The control panel is locked. Press the “Locking” button to release.
The hob does not cut off
• The control panel is locked. Press the “Locking” button to release.
Refer to the section, page 4.
The hob stops automatically
• A spill covers at least two buttons for more than 10 seconds; the
hob switches to safety, and an audible beep sounds so long as
the buttons are covered. Clean up the spill or remove the object.
• The cooking zones stop automatically if they are left on for too
long. Refer to the section, page 4.
Frequency of on/off operations for cooking zones
• The on-off cycles vary according to the required heat level:
- low level: short operating time,
- high level: long operating time.
“H” display, residual heat indicator, blinking
• The electronic temperature is too high. A technician should verify
the fitting in compliance with the recommendations, page 2.
5 GB
AFTERCARE
Before calling out a Service Engineer please check the
following:
— that the plug is correctly inserted and fused;
If the fault cannot be identified:
switch off the appliance — do not tamper with it — call the Aftercare
Service Centre. The appliance is supplied with a guarantee
certificate that ensures that it will be repaired free of charge at
the Service Centre.

Tutte queste caratteristiche sono indicative, il produttore non è responsabile per errori di stampa. Perseguendo una politica di aggiornamento
tecnico-qualitative, il produttore si riserva il diritto di apportarvi modifiche migliorative, rispettando le norme vigenti.
DICHIARAZIONE DI CONFORMITÀ:Questa apparecchiatura, nelle parti destinate a venire a contatto con sostanze alimentari,
É conforme alla prescrizione della Direttiva CEE 89/109 e al D.L. di attuazione n° 108 del 25.01.92.
Apparecchio conforme alle Direttive Europee 89/336/CEE, 73/23/CEE e successive modifiche.
6 IT
LEGGERE ATTENTAMENTE LE ISTRUZIONI INCLUSE IN QUESTO LIBRETTO. Vi danno importanti indicazioni sulla sicurezza
d'installazione, d'impiego e di pulizia, ed anche qualche consiglio per un'ottimale utilizzo del piano di cottura. Conservare con cura
questo documento per consultazione ulteriore e notare qui sotto, prima dell'installazione del piano, il numero di serie dell'apparecchio,
nel caso di un ulteriore richiesta d'intervento del servizio di assistenza.
Made in FRANCE - 232 -
220 - 240 V
P. Motors = 30 W
Mod : FE GD21 RB
P. Maxi (Oven) - 2350 W
Code: 39354774 -0306 0511
Mod: FE GD21 RB
Code: 39354774 - 0306 0511
220 - 240 V
Code: 39354774
- 0306 0511
Code: 39354774
- 0306 0511
Code: 39354774
- 0306 0511
Placca segnaletica
(situata sotto la cassetta inferiore del piano)
• Tutti le parti accessibili sono calde durante il funzionamento del piano, tenere lontano i bambini durante il funzionamento del prodotto
e fino a quando non si spegneranno le spie di calore residuo.
• Si raccomanda, dopo ogni utilizzo, un minimo di pulizia dell'apparecchio, per evitare l'accumulo di sporcizie e grassi.
Questi, infatti, ricuocerebbero ad ogni uso dell'apparecchio, carbonizzandosi e liberando fumi ed odori sgradevoli, con il rischio di
incendiarsi.
• I grassi di cottura o l'olio caldo provocano degli schizzi. Badare di non allontanarsi dall'apparecchio, tali sostanze possono
infiammarsi.
• Non depositare oggetti sulla parte comandi dei piani con comandi digitali.
• La carta stagnola e i recipienti in materia plastica non devono essere appoggiati sulle superfici calde.
• Il bruciatore alogeno emette una luce abbastanza forte, non fissarla costantemente.
• Quando la spia del calore residuo è accesa, non toccare il fuoco in funzionamento o appena spento.
• Non cucinare mai direttamente sul piano, utilizzare sempre le pentole.
• Appoggiare sempre la pentola ben centrata sul bruciatore da utilizzare.
• Non utilizzare la superficie vetroceramica né come piano per tagliare né come piano di lavoro.
• Non far scivolare le pentole sul piano: rischio di graffiature.
• Non appoggiare oggetti pesanti sul piano, potrebbero cascare e rovinare il piano.
• Non lasciare oggetti depositati sul piano di qualunque tipo essi siano.
• Nel raro caso che possa esserci un’incrinatura sotto il piano in vetroceramica, staccare immediatamente l’apparecchio dall’alimentazione,
e chiamare direttamente il Servizio Assistenza.
AVVERTENZE GENERALI
HVHPIANO COTTURA
4 Hilight
220-240/50
7100
B 595x510
X 570x500
560x490
4 Hilight
220-240/50
7600
B 775x510
X 750x500
740x490
Beuciatori
Tensione alimentazione (V/Hz)
Potenza elettrica installata (W)
Dimensioni prodotto (l x p) mm.
Dimensioni foro incasso (AxB)

Il piano vetroceramica viene fornito senza cavo di alimentazione
ed è quindi munito di una morsetteria. La morsetteria vi offre
diverse possibilità di collegamento.
Il collegamento e la messa in funzione degli apparecchi elettrodomestici nel loro ambiente è un’operazione delicata che, se non
viene effettuata correttamente, può causare delle conseguenze anche gravi per la sicurezza dei consumatori. Per questo è
importantissimo che l’operazione di collegamento venga svolta da un professionista , che DEVE attenersi alle norme tecniche in
vigore. Se nonostante questa raccomandazione, il consumatore deciderà di realizzare personalmente il collegamento, il produttore
non sarà ritenuto responsabile per eventuali incidenti tecnici sul prodotto, e neppure per eventuali incidenti a cose o persone.
7 IT
INSERIMENTO NEL MOBILE
Il mobile o il supporto in cui deve essere incassato il piano e le
pareti dei mobili attigui devono essere di un materiale resistente
per sopportare una temperatura elevata.
Inoltre è necessario che il rivestimento che ricopre il mobile o il
supporto sia fissato con una colla resistente alle alte temperature
affinché non si scolli.
Una guarnizione di tenuta stagna è consegnata con il piano di
cottura.
• Prevedere uno spazio di 5 cm. tra l’apparecchio e le pareti
verticali adiacenti.
• Prevedere un divisore orizzontale sotto il cassone del piano,
delle stesse dimensioni del vano. Lasciare almeno 1 cm di spazio
sotto il cassone del piano.
Prima dell’installazione:
Girare il piano, parte in vetro verso il basso.
Abbiate cura di proteggere il vetro.
Mettere la guarnizione avvolta intorno al piano.
Abbiate cura nell’eseguire il lavoro, in quanto tutto questo eviterà
qualsiasi infiltrazione dentro il mobile di supporto.
INSTALLAZIONE
L’installazione deve essere conforme alle norme vigenti del Paese
d'installazione.
Il produttore declina ogni responsabilità nel caso questa disposizione
non venga rispettata.
Attenzione:
- Prima di effettuare il collegamento, controllare la tensione
d’alimentazione indicata sul contatore, la regolazione del
disgiuntore, il calibro del fusibile e la continuità della “terra”.
- Il collegamento alla rete deve essere effettuato mediante una
presa di corrente munita di messa a terra o mediante dispositivo
a interruzione omnipolare con una distanza di apertura dei contatti
di almeno 3 mm.
- Il filo di protezione verde/giallo deve essere collegato ai morsetti
di terra, da una parte per l’apparecchio e dall’altra parte per il
collegamento.
- Non possiamo essere ritenuti responsabili per incidenti o per le
eventuali conseguenze di incidenti dall’uso di un apparecchio
non collegato a terra o cui la messa a terra sia difettosa.
- Qualsiasi intervento dovrà essere effettuato dal Servizio di
Assistenza o comunque da una persona qualificata.
COLLEGAMENTO ELETTRICO
min 10 mm
Sp da 25 a 45 mm
Spazio
accessibile
Guarnizione
Piano
min 70 cm
min 15 cm
min 5,5 cm
10 mm
mini
50 mm
Apertura
500 X 50
Apertura
500 X 10
E’ vietato
installare il
piano su un
forno non
raffreddato.
Per procedere al collegamento, attenersi scrupolosamente alle
indicazioni di sotto indicate:
• Prima di realizzare il collegamento, verificare che l’installazione
sia protetta da un fusibile appropriato, vedere la tabella sottostante,
controllare la sezione dei fili dell’installazione.
• Scegliere il cavo d’alimentazione attenendosi sempre alla tabella.
• Girare il piano, con la parte del vetro contro il piano di lavoro,
facendo molta attenzione a proteggere il vetro!
COLLEGAMENTO ALLA MORSETTIERA DELL’APPARECCHIO
CONNESSIONI ELETTRICHE
3 G 2,5 mm2
H05RR-F,
H05VV-F,
H05V2V2-F
3 G 2,5 mm2
H05RR-F,
H05VV-F,
H05V2V2-F
4 G 2,5 mm2
H05RR-F,
H05VV-F,
H05V2V2-F
4 G 2,5 mm2
H05RR-F,
H05VV-F,
H05V2V2-F
5 G 1,5 mm2
H05RR-F,
H05VV-F,
H05V2V2-F
Monofase
220-240V~
Bifase
220-240V2~
Bifase
220-415V2N~
Trifase
220-240V3~
Trifase
380-415V3N~
25 A 25 A 25 A 25 A 16 AFUSIBILE
CAVO
SEZIONE
TIPO
2 Fase
Ponticello 1-2
Ponticello 2-3
5 Neutro
Ponticello 4-5
T Terra
COLLEGA-
MENTO
ALLA
MORSET-
TIERA
2 Fase
Ponticello 1-2
Ponticello 2-3
5 Fase
Ponticello 4-5
T Terra
1 Fase
3 Fase
Ponticello 2-3
5 Neutro
Ponticello 4-5
T Terra
1 Fase
Ponticello 1-2
3 Fase
Ponticello 3-4
5 Fase
T Terra
1 Fase
2 Fase
3 Fase
5 Neutro
Ponticello 4-5
T Terra
• Per aprire il coperchio della
morsettiera:
• individuare le due linguette
situate ai lati,
• inserire la punta di un cacciavite
piatto davanti ad ogni linguetta,
spingere e premere,
• sollevare il coperchio.
• Collegare il cavo alimentazione:
• svitare il passacavo,
• posizionare il cavo nel passacavo,
• spelare l’estremità dei conduttori e collegarli ai terminali. far
riferimento alle informazioni
della tabella seguente ed alla
numerazione presente sulla
morsettiera, inserire i
ponticelli (shunt)- i ponticelli,
che trovate nella morsettiera,
servono a collegare tra loro
diversi punti dei terminali.
Quando la connessione è
terminata riavvitare il
passacavo e chiudere il
coperchio della morsettiera.
Attenzione ! : un serraggio non corretto delle viti dei terminali
può comportare il rischio di surriscaldamento del cavo di
alimentazione.
SHUNT
L2
L3

• Attendere alcuni secondi dopo la prima accensione del piano
per permettere l’attivazione dei comandi elettronici.
- Premere il tasto per 3 secondi.
I comandi del piano sono attivi. Viene visualizzato il livello di
potenza di ogni zona di cottura. I LED di controllo lampeggiano.
-Trascorsi 10 secondi senza alcun utilizzo, i controlli elettronici
si spengono e la procedura di accensione deve essere ripetuta.
8 IT
UTILIZZO DEL PIANO VETROCERAMICA
CONSIGLI D’UTILIZZO
• Utilizzare recipienti di buona qualità con fondo piatto e
spesso: il fondo assolutamente piatto elimina tutti i punti di
surriscaldamento sui quali si attaccano gli alimenti e lo spessore
del metallo permette una perfetta distribuzione del calore.
• Assicurarsi che il fondo del recipiente sia asciutto: al momento
di riempire il recipiente o quando viene utilizzata una pentola
che esce direttamente dal frigorifero, ad esempio, assicurarsi
che il fondo sia perfettamente asciutto; questa precauzione
eviterà che il piano di cottura si sporchi.
• Utilizzare recipienti di diametro sufficientemente grande da
coprire completamente il fuoco: è consigliabile assicurarsi
che il fondo sia grande almeno quanto la zona di cottura. Se il
fondo è leggermente più grande, l’energia viene utilizzata in
maniera ottimale.
LA SCELTA DEI RECIPIENTI
Le informazioni seguenti vi aiuteranno a scegliere i recipienti più
adatti e migliori per ottenere dei buoni risultati.
Inox: consigliato. Particolarmente buono con il fondo “Sandwich”.
Il fondo “Sandwich” unisce le qualità dell’Inox (aspetto, durata e
stabilità) con i vantaggi dell’alluminio o del rame (trasmissione del
calore e ripartizione uniforme).
Alluminio: raccomandato fondo spesso. Buona conduttività.
Talvolta i residui di alluminiopossono lasciare qualche macchia
sul piano, che possono essere tolte se pulite rapidamente.
L’alluminio con poco spessore non deve essere utilizzato.
Ghisa/Vetroceramica: sconsigliato. Prestazioni scarse. Può rigare
la superficie.
Fondo in rame: raccomandato fondo spesso. Buona performance,
ma il rame può lasciare delle macchie che possono sembrare
delle righe, che si possono togliere se il piano viene pulito
rapidamente. Tuttavia, non lasciare evaporare l’acqua
completamente dai recipienti, il metallo surriscaldato può aderire
alla superficie. Un recipiente in rame surriscaldato può lasciare
delle macchie che rischiano di sporcare definitivamente il piano.
Porcellana/Acciaio smaltato: buone prestazioni. Solamente con
fondo piatto, poco spesso e liscio.
Per ottenere dei buoni risultati di cottura, è necessario
utilizzare dei recipienti di buona qualità.
LED di controllo
Spia programmazione zona di cottura
Spia blocco comandi
• ACCENDERE UNA ZONA DI COTTURA
- Premere il tasto di selezione
della zona di cottura desiderata.
Il led di controllo dellazona
interessata diventa fisso,
indicando che la zona è attiva.
- Premere i tasti o e selezionare il livello di potenza da 1 a
9. Tenendo premuti i tasti o il livello di potenza aumenta o
diminuisce progressivamente.
Le seguenti indicazioni sono fornite solo a titolo indicativo. La
Vostra personale esperienza Vi permetterà di adattare le cotture
al Vostro gusto.
0 : Spento
1 : )
2 : ) ..... Sciogliere, fondere
3 : Mantenimento in caldo
4 : Riscaldamento
5 : Scongelamento, cotture lente
6 : Cotture senza coperchio
7 : Friggere, rosolare, arrostire
8 : Cotture a temperatura elevata, arrostire
9 : Friggere, portare ad ebollizione importanti
quantità di acqua
• SPEGNERE UNA ZONA DI COTTURA
- Premere il tasto della zona di cottura desiderata.
- Premere il tasto fino a che il display indica . Ora la zona di
cottura è spenta, il display si spegne dopo 10 secondi.
- Per spegnere immediatamente premere contemporaneamente
i tasti e . Il display scende subito a e la zona di cottura
si spegne.
• SPEGNERE TUTTO IL PIANO
Le zone di cottura ed il timer possono essere fermati
quando si desidera premendo il tasto On \ Off
• INDICATORE DI CALORE RESIDUO
Sul display compare la lettera quando la superficie della zona
di cottura supera la temperatura di 60°C. La lettera si spegne
quando la temperatura scende sotto i 60°C.
Suggerimento: utilizzare il calore residuo della zona di cottura per
completare la cottura in modo lento.
N.B. dopo una interruzione di corrente, la spia di calore residuo
si spegne, amche se la temperatura di superficie supera i 60°C.
• UTILIZZO DELLA ZONA DI COTTURA ESTESA
( solo su alcuni modelli )
• PER SPEGNERE LA ZONA ESTESA:
- La zona di cottura deve essere attiva; la spia sul display deve
essere accesa. Se la zona non è attiva, selezionarla.
- Premere il tasto . Il LED della zona estesa si spegne. La zona
estesa si spegne.
- Per fermare rapidamente l’intera zona di cottura premere
contemporaneamente i tasti e . Il livello di potenza scende
automaticamente a e la zona cottura si spegne
• PER ATTIVARE LA ZONA ESTESA:
- Premere il tasto Nei successivi 10 secondi
- Premere il tasto della zona di cottura interessata. Sul display il
led lampeggiante diventa fisso, indicando che la zona è attiva.
- Scegliere un livello di potenza tra 1 e 9. ( tasti o )
- Premere il tasto per attivare la zona di cottura estesa.
• PROGRAMMAZIONE DELLA ZONA DI COTTURA
Ogni zona di cottura può essere programmata per funzionare sino
ad un massimo di 99 minuti. E’ possibile programmare una zona
alla volta.
- Attivare la zona di cottura seguendo le indicazioni precedenti.
Il LED di controllo vicino all’indicatore di potenza deve essere
acceso; questo indica che la zona è attiva
- Premere il tasto Timer.
Di fianco al display del timet si accende la spia di programmazione
della zona cottura che viene programmata.
- Premere il tasto per selezionare il tempo in minuti.
L’impostazione è memorizzata dopo 3 secondi.
Il tempo di programmazione può essere modificato a piacere
premendo il tasto timer, il LED di controllo deve essere acceso.
Trascorso il tempo impostato la zona di cottura si spegne
automaticamente. Un segnale sonoro è emesso per 1 minuto
(premere qualsiasi tasto per spegnerlo prima).

9 IT
- Asciugare con uno straccio asciutto fino a quando la superficie
non sia pulita.
Se dopo questa manutenzione le macchie persistono:
- Versare di nuovo qualche goccia di un prodotto specifico.
- Strofinare con l’aiuto di una lametta rispettando l’angolo di 30°
rispetto al piano, insistendo fino alla scomparsa delle macchie.
- Asciugare con uno straccio asciutto o della carta assorbente
fino a che la superficie non sia pulita.
- Ripetere l’operazione se necessario.
CONSIGLI:
Una pulizia frequente farà in modo di mantenere sempre lucido
il vostro piano.
Assicurarsi che la superficie sia pulita prima di riutilizzare il piano.
Per togliere le tracce d’acqua e di calcare, utilizzare qualche
goccia d’aceto bianco, o di succo di limone. Per concludere
asciugare con l’aiuto di un foglio di carta assorbente poi applicare
qualche goccia di prodotto specifico e asciugare.
Le manopole possono essere tolte per una pulizia in profondità,
tuttavia bisogna stare molto attenti di non far penetrare del
liquido nelle parti aperte, e fare attenzione a rimontare le
manopole.
Il vetro del piano in vetroceramica sopporta lo sfregamento degli
utensili da cucina a fondo piatto, ma è comunque consigliabile
sollevarli prima di appoggiarli.
NOTA :
- Evitare d’usare una spugna troppo bagnata.
- Non utilizzare mai utensili affilati.
- L’utilizzo di una lametta da barba non può danneggiare la
superficie, se la si tiene inclinata di 30° rispetto al piano.
- Tenere lontano dalla portata dei bambini la lametta.
- Non utilizzare dei prodotti abrasivi o delle pagliette metalliche.
• La cornice del piano (solo su alcuni modelli): per pulire senza
danneggiare la cornice del vostro piano, lavarla con acqua e
sapone ed asciugare con un panno pulito ed asciutto.
30° Maxi
Il tempo impostato può essere riportato utilizzando il tasto
o premendo contemporaneamente i tasti e , il funzionamento
della zona di cottura è ora indipendente dal timer ma rimane
funzionante.
Per spegnere la zona di cottura seguire le istruzioni precedenti.
Il timer può essere utilizzato come promemoria, suonerà allo
scadere del tempo impostato.
• BOOSTER
Ogni zona di cottura è equipaggiata con una funzione booster
che permette un aumento veloce della temperatura.
Attivare il booster
- Attivare la zona di cottura desiderata, premere il tasto sino
ad ottenere il livello di potenza , rilasciare brevemente il tasto
e premerlo di nuovo; sul display appaiono alternativamente
(booster) e (livello di potenza).
- Se necessario ridurre la potenza al livello desiderato.
Esempio zona cottura da 1800 W in posizione 6 = 32% di 1800
W = 576 W forniti. Quando il booster è attivo, lazona funziona a
1800W per 2,5 minuti, poi si porta ai 576 W impostati.
* Per motivi di sicurezza le zone di cottura si spengono
automaticamente se fatte funzionare in continuo per un tempo
troppo lungo. Il tempo dipende dal livello di potenza impostato.
Livello
impostato
Potenza
fornita
(%)
Tempo
inserimento
booster
(minuti)
Massimo
tempo di
funzione prima
dello spegnimento
automatico*
0 : 0 % : 0 : 0 H
1 : 3 % : 1 : 6 H
2 : 6 % : 3 : 6 H
3 : 11 % : 5 : 5 H
4 : 16 % : 6,5 : 5 H
5 : 19 % : 8,5 : 4 H
6 : 32 % : 2,5 : 1,5 H
7 : 45 % : 3,5 : 1,5 H
8 : 65 % : 4,5 : 1,5 H
9 : 100 % : 0 : 1,5 H
• E’ importante prima di iniziare la pulizia della superficie in
vetroceramica, attendere che la stessa si sia completamente
raffreddata.
• Per la pulizia della superficie in vetroceramica devono essere
utilizzati solo prodotti specifici: crema e lametta. I suddetti prodotti
si trovano facilmente in commercio, nei supermercati.
• Evitare le fuoriuscite di liquido, le sostanze che cadono sul piano
di cottura si carbonizzano rapidamente e sono quindi più difficili
da pulire.
• Si raccomanda di tenere lontano dal piano di cottura tutto quanto
possa fondere, come ad esempio, tutti gli oggetti di plastica, la
carta stagnola, lo zucchero……
MANUTENZIONE:
- Versare qualche goccia di un prodotto specifico per la pulizia
della superficie in vetroceramica.
- Strofinare con insistenza dove vi fossero delle macchie insistenti,
con l’aiuto di uno straccio asciutto, o di una spugna leggermente
umida.
MANUTENZIONE DEL PIANO VETROCERAMICA
La funzione di blocco mantiene inalterate le scelte effettuate o
previene l’accensione accidentale del piano cottura. E’ utile anche
durante la pulizia della zona dei comandi.
- Attivare le zone cottura richieste.
- Selezionare il livello di potenza desiderato.
- Premere il tasto per bloccare le scelte. Ad eccezione
del tasto ON/OFF nessun altro tasto è ora attivo.
La spia di blocco comandi si accende.
Per togliere la funzione di blocco premere il tasto ; la
spiasi spegne ed i comandi funzionano nuovamente.
Se il timer è attivo quando i controlli vengono bloccati, il conto
alla rovescia prosegue e la zona di cottura interessata viene
automaticamente spenta allo scadere del tempo impostato.
Se la funzione di blocco è attivata a piano spento, i comandi sono
bloccati e questo evita qualsiasi accensione accidentale o non
voluta. Premere il tasto per togliere la funzione di blocco.
• BLOCCO DI SICUREZZA

Macchie scure
Utilizzare una lametta da barba e seguire il capitolo
“MANUTENZIONE”.
Macchie sul piano
Macchie causate da recipienti in alluminio, dall’acqua o da alimenti,
possono essere eliminate con una crema pulente.
Segni di caramello o di plastica fusa sul piano.
Controllare il capitolo “MANUTENZIONE”.
Il piano non funziona oppure alcuni fuochi non sono
funzionanti.
I ponticelli (shunt) sulla morsettiera non sono posizionati
correttamente. Fate controllare da un professionista che il raccordo
sia stato effettuato conformemente alle raccomandazioni della
pagina 7.
Il piano non funziona (piani con comandi digitali).
• Un oggetto o residuo di cibo sta coprendo almeno due comandi
per almeno 10 secondi. Effettuare la pulizia o rimuovere l’oggetto
• Il pannello comandi è bloccato, sbloccarlo.
Il piano non si spegne
• Il pannello comandi è bloccato, sbloccarlo.
Il piano si spegne automaticamente
• Un residuo di cibo copre almeno due comandi per almeno 10
secondi; il piano si spegne per sicurezza ed un segnale sonoro
viene emesso sino alla pulizia del residuo di cibo.
• Le zone di cottura si spengono automaticamente se vengono
fatte funzionare per un tempo troppo lungo. Vedere la tabella di
pagina 9.
ON \ OFF frequenti delle zone di cottura
• I cicli ON \ OFF variano a seconda del livello di potenza scelto:
- bassa potenza: tempi di funzionamento brevi,
- alta potenza: tempi di funzionamento lunghi.
Simbolo “H” , indicatore del calore residuo, lampeggia
• La temperatura del modulo elettronico di comando è troppo
elevata. Un tecnico qualificato deve verificare le condizioni di
installazione; vedere pagina 7.
SERVIZIO ASSISTENZA CLIENTI
Prima di chiamare il servizio di Assistenza Tecnica in caso di
mancato funzionamento vi consigliamo di verificare il buon
inserimento della spina nella presa di corrente.
Nel caso non si individui la causa di mal funzionamento:
spegnere l’apparecchio non manometterlo e chiamare il Servizio
di Assistenza Tecnica.
• CERTIFICATO DI GARANZIA: cosa fare?
Il Suo prodotto è garantito, alle condizioni e nei termini riportati
sul certificato inserito nel prodotto ed in base alle previsioni del
decreto legislativo 24/02, fino a 24 mesi decorrenti dalla data di
consegna del bene.
Il certificato di garanzia dovrà essere da Lei conservato,
debitamente compilato, per essere mostrato al Servizio Assistenza
Tecnica Autorizzato, in caso di necessità, unitamente ad un
documento fiscalmente valido rilasciato dal rivenditore al momento
dell’acquisto (bolla di consegna, fattura, scontrino fiscale, altro)
sul quale siano indicati il nominativo del rivenditore, la data di
consegna, gli estremi identificativi del prodotto ed il prezzo di
cessione.
Il Servizio di Assistenza Tecnica Autorizzato, verificato il diritto
all’intervento, lo effettuerà senza addebitare il diritto fisso di
intervento a domicilio, la manodopera ed i ricambi che sono
totalmente gratuiti.
• ESTENSIONE DELLA GARANZIA FINO A 5 ANNI: come?
Le ricordiamo inoltre che sullo stesso certificato di garanzia
convenzionale Lei troverà le informazioni ed i documenti necessari
per prolungare la garanzia dell’apparecchio sino a 5 anni e così,
in caso di guasto, non pagare il diritto fisso di intervento a domicilio,
la manodopera ed i ricambi.
Per qualsiasi informazione necessitasse, La preghiamo rivolgersi
al numero telefonico del Servizio Clienti 0392086811.
• ANOMALIE E MALFUNZIONAMENTI: a chi rivolgersi?
Per qualsiasi necessità il centro assistenza autorizzato è a Sua
completa disposizione per fornirLe i chiarimenti necessari;
comunque qualora il Suo apparecchio presenti anomalie o mal
funzionamenti, prima di rivolgersi al Servizio Assistenza Autorizzato,
consigliamo vivamente di effettuare i controlli indicati sopra.
• UN SOLO NUMERO TELEFONICO PER OTTENERE ASSISTENZA
Qualora il problema dovesse persistere, componendo il “Numero
Utile” sotto indicato, sarà messo in contatto direttamente, con il
Servizio Assistenza Tecnica Autorizzato che opera nella Sua zona
di residenza.
• MATRICOLA DEL PRODOTTO. Dove si trova?
È importante che comunichi al Servizio
Assistenza Tecnica Autorizzato la sigla
del prodotto ed il numero di matricola
(16 caratteri che iniziano con la cifra 3)
che troverà sul certificato di garanzia op-
pure sulla targa matricola del prodotto.
In questo modo Lei potrà contribuire ad evitare trasferte inutili del
tecnico, risparmiando oltretutto i relativi costi.
Questo elettrodomestico è marcato conformemente
alla Direttiva Europea 2002/96/CE sui rifiuti da
apparecchiature elettriche ed elettroniche (WEEE).
Assicurandovi che questo prodotto sia smaltito
correttamente, aiuterete ad evitare possibili
conseguenze negative all’ambiente e alla salutedelle
persone, che potrebbero verificarsi a causa d’un
errato trattamento di questo prodotto giunto a fine vita. Il simbolo
sul prodotto indica che questo apparecchio non può essere
trattato come un normale rifiuto domestico; dovrà invece essere
consegnato al punto più vicino di raccolta per il riciclo delle
apparecchiature elettriche ed elettroniche. Lo smaltimento deve
essere effettuato in accordo con le regole ambientali vigenti per
lo smaltimento dei rifiuti. Per informazioni più dettagliate sul
trattamento, recupero e riciclo di questo prodotto, per favore
contattare l’ufficio pubblico di competenza (del dipartimento
ecologia e ambiente), o il vostro servizio di raccolta rifiuti a
domicilio, o il negozio dove avete acquistato il prodotto.
PROBLEMI E SOLUZIONI
I fuochi non mantengono i sughi o le fritture a fuoco basso.
Utilizzare esclusivamente recipienti a fondo piatto. Se una luce
filtra tra il recipiente e il piano, il fuoco non trasmette il calore
correttamente. Il fondo del recipiente deve ricoprire interamente
il diametro del fuoco scelto.
Cotture troppo lente.
Utilizzo dei recipienti non adatti. Utilizzare solo degli utensili a
fondo piatto pesante e con un diametro almeno uguale al fuoco.
Graffi o scalfitture sulla superficie in vetro del piano.
Errato sistema di pulizia, utilizzo di recipienti con fondo ruvido,
presenza di particelle abrasive (sale, sabbia, zucchero) tra il piano
e il fondo del recipiente.
Consultare il capitolo relativo alla pulizia, assicurarsi che i fondi
dei recipienti siano adatti prima dell’utilizzo e utilizzare solo
recipienti con fondo liscio.
Segni di metallo (possono sembrare graffi)
Non far scivolare dei recipienti di alluminio sul piano. Attenersi
alle istruzioni di pulizia. Se non vengono utilizzati dei materiali di
buona qualità, le macchie di qualsiasi tipo esse siano persisteranno.
Aiutatevi con una lametta da barba e seguite le istruzioni del
capitolo "MANUTENZIONE”.
10 IT

HVH
4 Hilight
220-240/50
7100
B 595x510
X 570x500
560x490
4 Hilight
220-240/50
7600
B 775x510
X 750x500
740x490
KOCHMULDEN
Kochstellen
Spannung/Frequenz (V/Hz)
Gesamtanschulußwert (W)
Maße (B x T) in mm.
Einbaumaße (AxB)
ALLGEMEINE HINWEISE
11 DE
LESEN SIE DIE BEDIEUNGSANLEITUNG SORGFÄLTIG DURCH, UM DEN GRÖßTMÖGLICHEN NUTZEN AUS IHREM GERÄT ZU
ZIEHEN. Wir empfehlen Ihnen, die Installations- und Bedienungsanleitung für eine spätere Nutzung aufzubewahren. Notieren Sie auf
diesem Heft VOR DER INSTALLATION die Seriennummer des Gerätes, die bei einem eventuellen späteren Einsatz des Kundendienstes
nötig ist.
Alle Daten dienen der Information. Bemüht, die Qualität ihrer Produkte stets zu verbessern, behält sich Der Hersteller leichte Änderungen
in Verbindung mit technischen Innovationen vor.
Ceranfelder gemäß den Bestimmungen 73/23/CEE et 89/336/CEE.
Made in FRANCE - 232 -
220 - 240 V
P. Motors = 30 W
Mod : FE GD21 RB
P. Maxi (Oven) - 2350 W
Code: 39354774 -0306 0511
Mod: FE GD21 RB
Code: 39354774 - 0306 0511
220 - 240 V
Code: 39354774
- 0306 0511
Code: 39354774
- 0306 0511
Code: 39354774
- 0306 0511
Matrikelschild:
(befindet sich auf der Unterseite des Gerätes)
• Um das Risiko von Verbrennungen auszuschließen, halten Sie Kleinkinder fern, wenn das Gerät im Betrieb ist, auch nachdem die
Kochstellen abgeschaltet wurden, solange die Restwärmeanzeige leuchtet,.
• Wenn Sie mit Fett oder Öl kochen, achten Sie darauf, immer den Kochvorgang zu überwachen, da sich zu heißes Fett oder Öl leicht
entzünden kann.
• Keine Alufolie oder Kunststoffbehälter auf die heiße Ceranoberfläche abstellen.
• Die Halogenkochzone des Ceranfeldes strahlt ein starkes Licht aus, vermeiden Sie daher, direkt in die Halogenkochzone zu schauen.
• Wir empfehlen Ihnen, das Ceranfeld nach jeder Benutzung zu reinigen, um eine Ansammlung von Verschmutzungen und Fettrückständen
zu vermeiden. Sie würden sich bei jeder neuen Benutzung erhitzen und verkohlen und dabei störenden Rauch und unangenehme
Ausdünstungen verbreiten. Außerdem stellen sie ein Brandrisiko dar.
• Die Steuerplatine des Gerätes ist empfinlich. Achten Sie darauf, keine heißen Behälter darauf abzustellen.
• Niemals direkt auf dem Ceranfeld kochen. Benutzen Sie stets Kochgeschirr.
• Stellen Sie Töpfe und Pfannen immer in die Mitte des Kochfelds.
• Benutzen Sie die Ceranoberfläche nicht als Schneidebrett oder Arbeitsfläche.
• Schieben Sie das Kochgeschirr nicht von Kochfeld zu Kochfeld: das könnte Kratzer verursachen.
• Bewahren Sie keine schweren Gegenständen über dem Ceranfeld auf, sie könnten herunterfallen und das Ceranfeld beschädigen.
• Benutzen Sie die Ceranoberfläche nicht als Aufbewahrungsort für irgendwelche Gegenstände
• Im unwahrscheinlichen Fall, daß auf der Kochfläche ein Riß auftreten sollte, unterbrechen Sie sofort die Stromzufuhr zum Ceranfeld
und setzen Sie sich mit unserem Kundendienst in Verbindung.

Der Einbau und die Installation eines Elektrogerätes sind Arbeiten, die mit besonderer Sorgfalt durchgeführt werden müssen. Eine nicht
fachgerechte Installation kann die Sicherheit des Gerätes beeinträchtigen und die Unversehrtheit des Benutzers gefährden. Es ist daher
zwingend notwendig, die Installationsarbeiten einem qualifizierten Fachmann zu überlassen, der sie nach allen Regeln der Kunst und gemäß
der geltenden Normen durchführen kann. Sollte der Endverbraucher trotz dieser dringenden Empfehlung die Installation selber vornehmen, lehnt
Der Hersteller Gruppe jede Verantwortung für technische Defekte am Gerät oder für eventuell resultierende Schäden an Personen oder Sachen ab.
12 DE
EINBAU
Das Möbel oder die Arbeitsplatte, in die das Ceranfeld eingebaut
werden soll, so wie die Wände der angrenzenden Möbel müssen
aus hitzebeständigem Material bestehen.
Insbesondere bei Schränken aus Furnierholz müssen die
verwendeten Klebstoffe hitzebeständig sein, um Verformungen
und Entleimungen zu vermeiden..
Installation:
• Mit dem Ceranfeld wird einen Dichtungsstreifen mitgeliefert.
Gehen Sie wie folgt vor:
- drehen Sie das Gerät mit dem Glas nach unten um. Schützen
Sie dabei die Glasoberfläche.
- Kleben Sie den Dichtungsstreifen rund um das Gerät.
- achten Sie auf einen einwandfreien Sitz des Dichtungsstreifens,
um das Durchsickern von Feuchtigkeit in das untenstehende
Möbel zu verhindern
• Der Abstand des Gerätes zu den angrenzenden Wänden muß
mindestens 5 cm betragen
• Falls das Gerät so eingebaut wird, daß unterhalb des Ceranfeldes
ein zugängliches Möbelteil vorgesehen ist, muß unterhalb des
Gerätegehäuses eine Zwischenplatte eingebaut werden, um
das Risiko einer Verbrennung bzw. einer Beschädigung
auszuschließen. Diese muß einen Abstand von mindestens
1 cm vom Geräteboden haben.
INSTALLATION
«Die Installation des Gerätes muß gemäß den im Land der
Installation geltenden Normen erfolgen.».
Die Hersteller lehnt jede Verantwortung für die Mißachtung dieser
Richtlinie ab.
Achtung:
• Vor dem elektrischen Anschluß überprüfen Sie die auf dem
Zähler angegebene Netzspannung, die Sicherung und die
einwandfreie Erdung der Hausinstallation
• Der elektrische Anschluß ans Stromnetz erfolgt mit einem Stecker
mit Erdung oder mittels einer Vorrichtung zur allpoligen
Unterbrechung mit einem Öffnungsabstand zwischen den
Kontakten von mindestens 3 mm.
Wenn das Gerät an einer Steckdose angeschlossen wird, muß
diese auch nach der Installation leicht zugänglich sein.
• Das gelb-grüne Erdungskabel muß an die Klemmleiste des
Gerätes einerseits und der Hausinstallation andererseits
angeschlossen werden.
• Wir lehnen jegliche Verantwortung für Schäden oder deren
Folgen ab, die aus der Benutzung eines nicht oder mangelhaft
geerdeten Gerätes resultieren.
ELEKTRISCHER ANSCHLUß
min 10 mm
Sp da 25 a 45 mm
Dichtungsstreifen
Gerätegehäuse
min 70 cm
min 15 cm
min 5,5 cm
10 mm
mini
50 mm
Öffnung
500 X 50
Öffnung
500 X 10
Einphasig
220-240V
~
Zweiphasig
220-240V2~
Zweiphasig
220-415V2N~
Drei Phasen
220-240V3~
Drei Phasen
380-415V3N~
25 A 25 A 25 A 25 A 16 A
SICHERUNG
3 G 2,5 mm2
H05RR-F,
H05VV-F,
H05V2V2-F
QUER-
SCHNIT
TYP
3 G 2,5 mm2
H05RR-F,
H05VV-F,
H05V2V2-F
4 G 2,5 mm2
H05RR-F,
H05VV-F,
H05V2V2-F
4 G 2,5 mm2
H05RR-F,
H05VV-F,
H05V2V2-F
5 G 1,5 mm2
H05RR-F,
H05VV-F,
H05V2V2-F
2 Phase
Shunter 1-2
Shunter 2-3
5 Neutral
Shunter 4-5
T Erde
ANSCHLUß
AUF DEM
KLEMMB-
RETT
Shunter:
Brücke mit
Shunter
herstellen
2 Phase
Shunter 1-2
Shunter 2-3
5 Phase
Shunter 4-5
T Erde
1 Phase
3 Phase
Shunter 2-3
5 Neutral
Shunter 4-5
T Erde
1 Phase
Shunter 1-2
3 Phase
Shunter 3-4
5 Phase 5
T Erde
1 Phase
2 Phase
3 Phase
5 Neutral
Shunter 4-5
T Erde
• Alle Eingriffe am Versorgungskabel sind ausschließlich durch
den Werkskundendienst oder durch ähnlich qualifiziertes
Fachpersonal durchzuführen.
Das Ceranfeld wird ohne Versorgungskabel geliefert. Sie ist mit
einem Klemmbrett versehen, das die Wahl des für die Installation
geeigneten Anschlusses ermöglicht.
ANSCHLUß AN DAS KLEMMBRETT DES CERANFELDS:
Die folgenden Hinweise sind unbedingt zu beachten:
- Die Installation muß durch eine geeignete Sicherung abgesichert
sein. Siehe hierzu Tabelle. Die Kabel müssen einen der Last
entsprechenden Querschnitt haben.
- Das Versorgungskabel muß entsprechend den Angaben der
Tabelle auf gewählt werden.
Um den Anschluß vorzunehmen, gehen Sie wie folgt vor:
- drehen Sie das Ceranfeld mit dem Glas nach unten um. Schützen
sie dabei die Glasoberfläche!
Öffnen Sie das Gehäuse wie
nachfolgend beschrieben:
• suchen Sie die beiden Laschen
an den Seitenteilen,
• Schieben Sie die Spitze eines
Schraubenziehers vor jede
Lasche und drücken Sie
• heben Sie das Gehäuse ab
Verbindung des Versorgungskabels :
• Platzieren Sie unter Beachtung der Hinweise und unter
Berücksichtigung der Markierungen auf dem Klemmbrett die
Shunt-Brücken an ihre Stelle (die Shunts des Klemmbretts
ermöglichen die Herstellung einer Brücke zwischen zwei Klemmen)
• Isolieren Sie die Leiter ab
und befestigen Sie diese an
den Klemmen unter
Berücksichtigung der
Angaben in der Tabelle.
• Schrauben Sie den
Kabelschoner ab
• Ziehen Sie das Versorgun-
gskabel durch den
Kabelschoner
Wenn Sie den Abschluß an
das Klemmbrett des Gerätes
abgeschlossen ist, schrauben
Sie den Kabelschoner wieder fest und schließen Sie das Gehäuse
Anmerkung: Achten Sie darauf, die Schrauben des Klemmbretts
fest anzuziehen.
SHUNT
L2
L3
Der Einbau in
Kombination mit
einem Backofen
ohne
Abkühlventilator
ist nicht gestattet.

Anzeige Programmierung Kochzone
Leuchtanzeige Steuerung
Bedienfeldes
• ABSCHALTEN
- Die Kochstelle mit zuschaltbarer Zone muß aktiv sein. Im
Einstellungsfeld muß der Punkt leuchten. Sollte dies nicht der
Fall sein, wählen Sie erneut die gewünschte Kochzone.
- Drücken Sie die Taste . Die Leuchtanzeige der zuschaltbaren
Zone erlischt. Die zuschaltbare Kohzone schaltet sich ab.
- Um schnell abzuschalten, drücken Sie gleichzeitig die Tasten
und . Die Leistung geht sofort auf zurück und die Kochzone
schaltet sich ab.
13 DE
BEDIENUNG DES CERANFELDS
WAHL DES RICHTIGEN KOCHGESCHIRRS
• Benutzen Sie immer Kochgeschirr von guter Qualität mit
gleichmäßig flachem Boden: Der flache Boden verhindert
verinzelte heiße Stellen und somit das Anbrennen der Speisen.
Dicke Metalltöpfe und Pfannen ermöglichen eine gleichmäßige
Verteilung der Hitze.
• Vergewissern Sie sich, daß der Boden Ihres Kochgeschirrs
trocken ist: Wenn Sie die Töpfe mit Flüssigkeit füllen, oder
wenn Sie Kochgeschirr benutzen, das im Kühlschrank aufbewahrt
wurde, vergewissern Sie sich, daß der Boden völlig trocken ist.
Das ist eine notwendige Maßnahme, um Ihr Kochfeld nicht zu
verschmutzen.
• Benutzen Sie Kochgeschirr, dessen Durchmesser groß
genug ist, um das Kochfeld völlig abzudecken: Der
Durchmesser des Kochgeschirrs sollte nicht kleiner sein als das
Kochfeld. Wenn der Durchmesser etwas größer ist, wird die
Energie der Kochstelle optimal genutzt.
~~~~~~~~~~~~~~~~~~~~~
Die nachfolgenden Informationen werden Ihnen bei der Auswahl
des Kochgeschirrs mit guter Kochleistung helfen:
Rostfreier Edelstahl:
sehr empfehlenswert
Besonders gut durch den sogenannten “Sandwich-Boden”. Der
Sandwich-Boden kombiniert die Vorteile des Edelstahls
(Erscheinung, Haltbarkeit und Stabilität) mit denen von Aluminium
oder Kupfer (Leitfähigkeit, gleichmäßige Hitzeverteilung).
Aluminium:
es wird schweres Aluminium empfohlen
Gute Leitfähigkeit. Manchmal bleiben Aluminiumrückstände in
Form von Kratzern auf der Kochfläche zurück, aber sie können
entfernt werden, wenn die Kochfläche sofort gereinigt wird. Dünnes
Aluminium sollte nicht verwendet werden.
Glas-Keramik:
nicht empfehlenswert
Schlechte Leistung. Kann die Oberfläche verkratzen.
Kupferböden:
es wird schweres Kupfer empfohlen.
Gute Leistung, aber Kupfer könnte Rückstände in Form von
Kratzern hinterlassen. Sie können jedoch entfernt wrden, wenndie
Kochfläche sofort gereinigt wird. Lassen Sie dieses Geschirr nie
ohne Inhalt auf dem Herd. Überhitztes Metall kann auf dem Glas
verschmelzen. Ein überhitzter Kupfertopf hinterläßt nicht mehr zu
entfernenden Rückstände auf der Ceranfläche.
Porzellan/ Email:
gute Ergebnisse.
Gute Ergebnisse werden nur mit dünnen, flachen, glatten Böden
erzielt.
Die Benutzung von guten Kochgeschirr ist sehr wichtig, um
beste Ergebnisse mit Ihrem Ceranfeld zu erzielen:
• Nachdem Sie das Ceranfeld eingeschaltet haben, warten Sie
ca. 8 Sekunden, um die elektronische Steuerung zu aktivieren.
- Drücken Sie die Taste für 3 Sekunden
Nun ist die elektronische Steuerung des Gerätes aktiviert. Für
jede Kochzone erscheint die Hitzeleistung und die
Leuchtanzeige der Steuerung blinkt.
- Wenn Sie 10 Sekunden lang nichts unternehmen, schaltet sich
die elektronische Steuerung ab und Sie müssen den
Einschaltvorgang wiederholen.
- Drücken Sie die Taste oder um eine Leistung zwischen 1
und 9 zu wählen.
- Wenn Sie die Taste oder gedrückt halten, erhöhen bzw.
vermindern Sie die eingestellte Leistung.
Die nachfolgenden Beispiele dienen zu Ihrer Information. Die
persönliche Erfahrung wird Ihnen ermöglichen, die vorgeschlagenen
Einstellungen Ihren Bedürfnissen und Ihrem Geschmack
anzupassen.
0 : Aus
1 : )
2 : ) ..... Schmelzen
3 : Warmhalten
4 : Aufwärmen
5 : Auftauen, schmoren, garen bei niedriger Temperatur
6 : Garen ohne Deckel
7 : Anbraten, rösten, Fleischbraten
8 : Garen und braten bei hoher Temperatur, backen
9 : Fritieren, Wasser zum Kochen bringen ....
• KOCHSTELLE ABSCHALTEN
Die Kochstelle muß aktiv sein. Die Leuchtanzeige für die Steuerung
im Einstellungsfeld muß leuchten. Sollte das nicht er Fall sein,
wählen sie erneut die gewünschte Kochzone.
- Drücken Sie die Taste bis die Leistung erscheint. Die
Kochzone schaltet sich augenblicklich ab. Nach 10 Sekunden
erscheint die Anzeige .
- Um schnell abzuschalten, drücken Sie gleichzeitig die Tasten
und . Die Leistung geht sofort auf zurück und die Kochzone
schaltet sich ab.
• RESTWÄRMEANZEIGE
Um anzuzeigen, daß die Temperatur der Kochstellenoberfläche
über 60°C beträgt, erscheint im Steuerungsfeld die Anzeige: .
Wir empfehlen, gegen Ende der Garzeit die Kochzone abzuschalten
und die Restwärme auszunutzen, um den Garvorgang schonend
zu Ende zu bringen.
Wenn die Temperatur unter 60°C gefallen ist, erlischt die Anzeige .
HINWEIS: nach einem eventuellen Stromausfall bleibt die
Restwärmeanzeige ausgeschaltet, selbst wenn die Temperatur
der Glasoberfläche über 60°C beträgt.
• AKTIVIEREN
- Drücken Sie die Taste . Innerhalb der nachfolgenden 10
Sekunden:
- Drücken Sie die Taste, die der Kochzone mit zuschaltbarem Feld
entspricht. Im Einstellungsbereich bleibt der blinkende Punkt an
und zeigt an, daß die Kochzone aktiv ist.
- Wählen Sie eine Leistung zwischen 1 und 9
- Drücken sie die Taste um die zuschaltbare Zone zu aktivieren.
Die Leuchtanzeige der zusachalbaren Zone leuchtet auf (PVD
605 - PVD 756)
• ZUSCHALTBARE KOCHZONE EINSCHALTEN
(Bei einigen modellen)
• KOCHSTELLE EINSCHALTEN
- Drücken Sie die Wahltaste der
gewünschten Kochzone. Die
Leuchtanzeige der Steuerung
bleibt an und zeigt somit, daß
die Kochzone aktiv ist.
• CERANFELD ABSCHALTEN
Es ist möglich, die Funktion der Kochzonen und des
Minutenzählers durch Drücken der Taste ON-OFF für 3
Sekunden jederzeit abzuschalten.
• PROGRAMMIERUNG EINER KOCHSTELLE
Jede Kochzone ist für eine maximale Dauer von 99 Minuten
programmierbar. Man kann nur jeweils EINE Kochstelle
programmieren.
- Schalten Sie die gewünschte Kochzone mit den oben beschrie-
benen Anweisungen ein.
Die Leuchtdiode für die Leistungsanzeige
muß leuchten, um anzuzeigen, daß die Kochzone aktiv ist.
- Drücken Sie die Taste Minutenzähler
Die Anzeige der Kochstelle um das Einstellungsfeld des
Minutenzählers weist auf die gesteuerte Kochzone hin
- Drücken Sie die Taste um eine Dauer in Minuten zu wählen
Die eingestellte Zeit wird nach drei Sekunden automatisch
gespeichert.

14 DE
• Vor der Reinigung der Glaskeramikoberfläche warten Sie
bitte ab, bis diese vollständig abgekühlt ist.
• Benutzen Sie ausschließlich speifische Reinigungsmittel
für Ceranoberflächen, wie z.B. Reinigungscremen und
Schaber. Nehmen Sie handelsübliche Produkte, die leicht
auf dem Markt zu finden sind.
• Vermeiden Sie das Überlaufen von Speisen auf die
Glasoberfläche. Diese verkohlen schnell während des
Kochvorgangs und erschweren die Reinigung.
• Halten Sie alles, was schnell schmelzen kann, wie
Gegenstände aus Kunststoff, Alufolie aber auch Zucker und
stark zuckerhaltige Produkte, von der Glasoberfläche fern.
PFLEGE :
- Beträufeln Sie die Ceranoberfläche mit einigen Tropfen eines
spezifischen Reinigungsmittel für Ceranfelder
- Wischen Sie die Flecken weg mit einem weichen Tuch oder mit
leicht befeuchtetem Küchenpapier
- Trocknen Sie die Oberfläche mit einem wichen Tuch oder mit
Küchenpapier ab.
Sollten noch hartnäckige Flecken vorhanden sein:
- Beträufeln Sie die Oberfläche erneut mit dem Reinigungsmittel.
- Entfernen Sie die Flecken mit einem Schaber, wobei
dieser in einem Winkel von ca. 30° zur Ceranoberfläche gehalten
werden soll.
- Trocknen Sie die Oberfläche mit einem weichen Tuch oder mit
Küchenpapier ab.
- Wiederholen Sie den Vorgang falls notwendig.
EINIGE EMPFEHLUNGEN:
Durch häufiges Reinigen bildet sich eine Schutzschicht, die
Abnutzung und Kratzer vorbeugt.
Versichern Sie sich, daß die Ceranoberfläche sauber ist, bevor
Sie das Ceranfeld erneut benutzen.
Um Kalk- und Wasserflecken zu entfernen, benutzen Sie einige
Tropfen Essig oder Zitronensaft. Trocknen Sie mit Küchenkrepp
gut ab. Wischen Sie schließlich mit einigen Tropfen eines
spezifischen Reinigungsmittel ab.
Die Ceranoberfläche kann die Reibung von flachen Geschirrböden
zwar gut aushalten, es ist jedoch empfehlenswert, Töpfe und
Pfannen anzuheben, um sie zu verschieben.
ACHTUNG:
- Vermeiden Sie den Gebrauch eines zu nassen Schwammes.
- Benutzen Sie niemals Werkzeuge aus Stahl wie Messer oder
Schraubenzieher.
- Die Benutzung eines Schabers mit Rasierklinge kann die
Oberfläche nicht beschädigen, wenn ein Neigungswinkel
con 30° zwischen Schaber und Oberfläche eingehalten wird.
- Lassen Sie bitte den Schaber mit Klinge nicht in Reichweite
von Kindern.
- Benutzen Sie keine ätzenden Mittel oder Stahlwolle zur
Reinigung der Ceranoberfläche.
• Reinigung des Bedienfeldes, ja nch Modell:
Um das Bedienfeld Ihres Ceranfeldes zu reinigen, ohne es zu
beschädigen, benutzen Sie Seifenwasser, wischen Sie ab und
trocknen Sie mit einem weichen Tuch.
REINIGUNG UND PFLEGE DES
CERANFELDES
30° Maxi
die eingestellte Zeit kann jederzeit verändert werden. Drücken
Sie die Wahltaste für den Minutenzähler, die Leuchtdiode des
Minutenzählers muß leuchten. Wenn die Zeit abgelaufen ist,
schaltet sich die Kochzone automatisch ab und es ertönt ein
akustisches Signal. Drücken Sie irgendeine Taste, um es zu
unterbrechen.
Die eingestellte Zeit kann wieder auf gebracht werden,
entweder mit der Taste oder durch gleichzeitiges Drücken auf
die tasten und . Somit wird die Kochzone nicht mehr über
den Minutenzähler gesteuert und muß manuell abgeschaltet werden.
Der Minutenzähler kann auch einzeln als Eieruhr benutzt werden.
Am Ende der Zeit ertönt ein Klingelzeichen.
• LEISTUNGSVERSTÄRKER
Alle Kochzonen des Ceranfelds sind mit einem Leistun-
gsverstärker ausgestattet, der bei Bedarf einen schnelleren
Temperaturanstieg der Kochzonen ermöglicht.
Leistungsverstärker einschalten:
- Schalten Sie die gewünschte Kochzone ein, drücken Sie die
Taste bis zur Position “9”, lassen Sie kurz los und drücken
Sie erneut die Taste . Die Anzeige zeigt blinkend “Leistun-
gsverstärker” und Hitzeleistung.
- Schalten Sie bei Bedarf auf die gewünschte Hitzeleistung zurück
BEISPIEL: eine Kochzone mit 1800 W Leistung ist auf Pos.
6 eingestellt: entwickelte Leistung: 32% von 1800 W
Wenn die Funktion “Leistungsverstärker” eingeschaltet ist, liefert
die Kochzone die volle Leistung von 1800 W während 2,5 Minuten
und schaltet erst nach dieser Zeit auf 576 W herunter.
* Die Kochzonen schalten sich nach einer bestimmten Zeit
automatisch ab, wenn sie zu lange in Betrieb bleiben. Diese Zeit
hängt von der eingestellten Leistung ab.
Einstellung
der
Kochzone
entwickelte
Leistung
(%)
Dauer der
erhöhten
Leistung
(Minuten)
maximale
Funktionsdauer
vor
automatischem
Abschalten *
0 : 0 % : 0 : 0 STD.
1 : 3 % : 1 : 6 STD.
2 : 6 % : 3 : 6 STD.
3 : 11 % : 5 : 5 STD.
4 : 16 % : 6,5 : 5 STD.
5 : 19 % : 8,5 : 4 STD.
6 : 32 % : 2,5 : 1,5 STD.
7 : 45 % : 3,5 : 1,5 STD.
8 : 65 % : 4,5 : 1,5 STD.
9 : 100 % : 0 : 1,5 STD.
Die Taste Sperren ermöglicht die Festlegung der vorgenom-
menen Einstellungen bzw. verhindert das ungewollte
Einschalten der Kochzonen. Sie ist ebenfalls nützlich während
der Reinigung des Gerätes, da man die Steuerungstasten
blockieren kann, auch wenn das Ceranfeld nicht in Betrieb ist.
- Schalten Sie die gewünschte(n) Kochzone(n) ein.
- Wählen Sie die gewünschte Leistungseinstellung
- Drücken Sie die Taste um die Einstellungen zu fixieren
Ab sofort kann keine andere Taste als die ON/OFF Taste aktiviert
werden
Die Anzeige Sperrfunktion leuchtet auf
Um die Sperrfunktion zu deaktivieren, drücken Sie erneut die
Taste ; die Anzeige erlischt, und alle Steuertasten können
wieder betätigt werden.
Wenn der Minutenzähler eingeschaltet ist, während die
Sperrfunktion aktiv ist, wird die Kochzone nach Ablauf der
eingestellten Zeit automatisch abgeschaltet.
Wenn die Sperrfunktion nach dem Abschalten des Ceranfelds
eingeschaltet wird, bleibt die Sperre erhalten und verhindert
jegliche Einstellung beim erneuten Einschalten des Gerätes.
Drücken Sie Taste um die Sperrfunktion aufzuheben.
• TASTE SPERREN (KINDERSICHERUNG)

Das Ceranfeld bzw. eine oder mehrere Kochflächen
funktionieren nicht.
• Die Shunt-Brücken wurden nicht korrekt auf dem Klemmbrett
positioniert. Lassen Sie durch einen Fachmann überprüfen, daß
der elektrische Anschluß nach den Anweisungen auf Seite 11
und 12 erfolgt ist.
Die Aufschrift “H” in der Restwärmeanzeige blinkt.
• Die Temperatur des elektronischen Moduls ist zu hoch.
Lassen Sie durch einen Fachmann überprüfen, daß der Einbau
nach den Anweisungen auf Seite 12 erfolgt ist.
TECHNISCHER KUNDENDIENST
Sollte Ihr Backofen einmal nicht richtig funktionieren, prüfen
Sie zuerst, ob die Stromversorgung gewährleistet ist. Ist die
Uhrsache der Fehlfunktion nicht ausfindig zu machen, wenden
Sie sich bitte an Ihren zuständigen Werkskundendienst unter
Angabe des Modells und der Seriennummer, die auf dem
Typenschild angegeben sind. Auf Ihr Gerät gewähren wir eine
Garantie von 24 Monaten ab Kaufdatum. Bewahren Sie Ihre
Kaufrechnung sorgfältig auf und legen Sie sie bei Bedarf als
Garantienachweis dem Kundendienst vor. Die
Garantiebedingungen sind im beigefügten Serviceheft angegeben.
PROBLEMLÖSUNGEN
Die Kochzonen halten keine konstante Kochtemperatur oder
das Anbraten geht nicht schnell genug
• Sie sollten Kochgeschirr mit absolut flachem Boden verwenden.
Wenn Licht zwischen dem Boden des Kochgeschirrs und dem
Kochfeld durchdringt, wird die Hitze nicht richtig weitergeleitet.
• Der Boden des Kochgeschirrs muß den Durchmesser
der Kochfläche völlig bedecken.
Die Speisen kochen zu langsam
• Das falsche Kochgeschirr wurde ausgesucht. Wählen Sie ziemlich
schweres Geschirr mit flachem Boden, dessen Durchmesser
mindestens dem Durchmesser der Kochfläche entspricht..
Leic hte Kratzer oder Abreibungen erscheinen auf dem Glas
Ihres Ceranfeldes.
• Es wurden die falschen Reinigungsmethoden angewendet,
Kochgeschirr mit rauem Boden wurde benutzt oder raue
Gegenstände wie Salz oder Sand befanden sich zwischen
Kochtopf und Ceranfeld. Verwenden Sie die empfohlenen
Reinigungsmethoden, vergewissern Sie sich, daß die Böden
Ihrer Kochtöpfe und das Kochgeschirr sauber sind und achten
Sie auf glatte Böden. Kleine Kratzer sind nicht mehr zu entfernen,
aber sie werden im Laufe der Zeit mit einer guten Reinigung
weniger sichtbar.
Metallrückstände:
• Schieben Sie Aluminiumtöpfe nicht über die Kochflächen.
Verwenden Sie die empfohlenen Reinigungsmethoden.
• Die falschen Reinigungsmittel/Gegenstände wurden verwendet,
die Flecken bleiben auf der Oberfläche. Verwenden Sie den
Schaber mit der Rasierklinge und die empfohlene
Reinigungsmethode.
Dunkle Flecken
• Verwenden Sie den Schaber mit der Rasierklinge und die
empfohlene Reinigungsmethode.
Helle Verfärbungen auf dem Ceranfeld
• Rückstände von Aluminium- oder Kupferpfannen, sowie
Mineralablagerungen durch Wasser oder Lebensmittel können
mit der Reinigungscreme entfernt werden.
Geschmolzener Zucker oder Plastik
• Lesen Sie den Abschnitt zur Reinigung und Pflege des
Ceranfeldes.
Das Ceranfeld funktioniert nicht.
• Größere Überlaufreste oder ein Gegenstand bedecken
mindestens 2 Tasten für mehr als 10 Sekunden. Reinigen Sie
die Oberfläche oder entfernen Sie den Gegenstand.
• Das Bedienfeld ist durch die Sperrfunktion blockiert.
Um die Sperre aufzuheben, drücken Sie die Taste
“Sperrfunktion”
Das Ceranfeld läßt sich nicht ausschalten.
• Das Bedienfeld ist durch die Sperrfunktion blockiert.
Um die Sperre aufzuheben, drücken Sie die Taste
“Sperrfunktion”. Schauen Sie im Kapitel “Leistungsverstärker”
unter dem Punkt über die “maximale Funktionsdauer” auf Seite
14 nach.
Das Ceranfeld schaltet sich automatisch ab
• Größere Überlaufreste oder ein Gegenstand bedecken
mindestens 2 Tasten für mehr als 10 Sekunden. Das Ceranfeld
schaltet auf Sicherheitsbetrieb um und ein akustisches Signal
ertönt, solange die Tasten bedeckt bleiben. Reinigen Sie die
Oberfläche oder entfernen Sie den Gegenstand..
• Die Kochflächen schalten sich nach einer gewissen Zeit
automatisch ab, wenn sie für längere Zeit in Betrieb sind. Siehe
Kapitel “Leistungsverstärker” unter dem Punkt über die “maximale
Funktionsdauer” auf Seite 14.
Ein- und Abschaltphasen der Kochzonen
• Die Ein- und Abschaltphasen der Kochstellen variieren je nach
der eingestellten Leistungsstufe
- niedrige Leistung: kurze Einschaltphasen
- hohe Leistung: lange Einschaltphasen
15 DE
Dieses Elektrohaushaltsgerät ist entsprechend
der EU-Richtlinie 2002/96/CE über Elektro- und
Elektronik-Altgeräte (WEEE) gekennzeichnet.
Bitte sorgen Sie dafür, dass das Gerät
ordnungsgemäß entsorgt wird, damit mögliche
negative Auswirkungen auf Umwelt und
Gesundheit vermieden werden, die bei einer
unsachgemäßen Entsorgung des Altgerätes
entstehen könnten.
Das Symbol auf dem Produkt bedeutet, dass dieses Gerät nicht
in den normalen Hausmüll gehört, sondern den jeweiligen
kommunalen Rücknahmesystemen für Elektro- und Elektronik-
Altgeräte übergeben werden muss. Die Entsorgung muss im
Einklang mit den geltenden Umweltrichtlinien für die
Abfallentsorgung erfolgen.
Für nähere Informationen über Entsorgung und Recycling dieses
Produktes wenden Sie sich bitte an Ihre kommunalen
Einrichtungen (Umweltamt) oder an die
Abfallentsorgungsgesellschaft Ihrer Stadt bzw. an Ihren Händler.

HVH
4 Hilight
220-240/50
7100
B 595x510
X 570x500
560x490
4 Hilight
220-240/50
7600
B 775x510
X 750x500
740x490
Zonas de calor
Voltagem/Frequencia (V/Hz)
Potencia eléctrica (W)
Dimensões do produto (l x p) mm.
Dimensões de encastramento (AxB)
INDICAÇÕES DE CARÁCTER GERAL
16 PT
LER ATENTAMENTE ESTE MANUAL, PARA PODER TIRAR TODO O PARTIDO DO APARELHO. Aconselhamos que este manual seja
guardado para posterior consulta e que nele seja anotado, antes da instalação do aparelho, o respectivo número de série
para os casos em que, eventualmente, seja necessário recorrer à intervenção do Serviço Após Venda.
Todas as características são dadas a título meramente indicativo. O fabricante, sempre com a constante preocupação de melhorar a
qualidade da sua produção, pode introduzir modificações nos seus aparelhos por evolução da técnica, no estrito cumprimento das
normas de consumo em vigor.
As placas vitrocerâmicas estão em conformidade com as directivas 73/23/CEE e 89/336/CEE.
Made in FRANCE - 232 -
220 - 240 V
P. Motors = 30 W
Mod : FE GD21 RB
P. Maxi (Oven) - 2350 W
Code: 39354774 -0306 0511
Mod: FE GD21 RB
Code: 39354774 - 0306 0511
220 - 240 V
Code: 39354774
- 0306 0511
Code: 39354774
- 0306 0511
Code: 39354774
- 0306 0511
Placa de identificação
(na parte inferior do aparelho)
• Durante o funcionamento do aparelho ou após desligar uma das placa de cozedura, aconselha-se a manter as crianças afastadas
enquanto o indicador de calor residual estiver aceso, para evitar o risco de queimaduras graves.
• Sempre que cozinhar com margarina, óleo ou qualquer outra gordura, ter o cuidado de ir vigiando o cozinhado, porque as gorduras,
quando muito aquecidas, podem rapidamente inflamar.
• As folhas de alumínio e os recipientes de plástico não devem ser colocados sobre as superfícies quentes.
• A placa de cozedura de halogéneo que equipa alguns aparelhos emite uma luz bastante forte. Não olhar fixamente para as lâmpadas
desta placa.
• Após utilização da placa vitrocerâmica, convém fazer uma pequena limpeza para evitar a acumulação de sujidade e de gordura, pois
estas, se tornarem a cozer, queimam e provocam fumo e cheiros desagradáveis, sem contar com o risco de propagação de
incêndio.
• O painel de comando da placa é muito sensível; não lhe pôr em cima recipientes quentes.
• Nunca cozinhar directamente sobre a placa sem utilizar recipientes.
• Colocar sempre os recipientes bem ao centro da placa de cozedura seleccionada.
• Não utilizar a superfície da placa como tábua para cortar alimentos ou para efectuar outros trabalhos.
• Não arrastar os recipientes sobre a placa, pois pode riscar.
• Não colocar objectos pesados em cima placa, porque podem cair e danificá-la.
• Não colocar sobre a placa nenhum objecto seja ele de que natureza for.
• No caso improvável de aparecer uma racha no vidro, desligar imediatamente o aparelho da corrente e contactar directamente o
Serviço Após Venda.

A instalação de aparelhos electrodomésticos no local a que se destinam é uma operação delicada que, caso não seja
devidamente efectuada, pode ter graves consequências relativamente à segurança dos seus utilizadores.
Assim sendo, torna-se imperativo confiar esta tarefa a um profissional, para que a sua execução seja feita de acordo com
as normas técnicas em vigor. Se apesar deste aviso a instalação for feita por alguém não qualificado, o Fabricante declina
qualquer responsabilidade em caso de avaria técnica do produto, quer provoque ou não danos materiais e/ou pessoais.
17 PT
ENCASTRAMENTO
O móvel ou o suporte, em que vai ser encastrado o aparelho,
assim como as paredes desse móvel que lhe poderão ficar
justapostas devem ser de material resistente a altas temperaturas.
Além disso, a colagem do revestimento desse móvel ou desse
suporte deverá ser de cola resistente ao calor, para evitar que descole.
Instalação:
• Com a placa vitrocerâmica é fornecida uma junta vedante. Para
sua aplicação:
- virar a placa, com a face de vidro para baixo; ter o cuidado de
proteger o vidro;
- colocar a junta à volta da placa;
- ter o cuidado de aplicar devidamente a junta, para evitar
infiltrações no móvel que lhe serve de suporte.
• Deixar um espaço de 5 cm, no mínimo, entre o aparelho e as
paredes verticais que lhe são próximas.
• Se a parte inferior da caixa que forma o aparelho ficar próximo
de uma zona a que se acede habitualmente para manipular e/ou
guardar objectos, colocar, quando se proceder à sua instalação,
uma divisória que fique a 1 cm do fundo da caixa, para evitar
o risco de queimaduras ou quaisquer danos.
INSTALAÇÃO
A instalação eléctrica a que vai ser ligado o aparelho deve estar
conforme às normas vigentes no país.
O fabricante declina qualquer responsabilidade em caso de incum-
primento desta disposição.
Atenção:
• Antes da ligação, verificar o seguinte: a corrente de alimentação
indicada no contador, a regulação do disjuntor, a adequação do
fusível e a continuidade da terra da instalação.
• A ligação à rede deve ser feita através de tomada de corrente
com ligação à terra ou através de um dispositivo de corte
omnipolar, com uma distância de abertura dos contactos de pelo
menos 3 mm.
Caso o aparelho possua ficha eléctrica, esta deve ficar acessível
quando o aparelho for instalado.
• Um dos lados do fio de protecção (verde/amarelo) deve ser
ligado aos bornes de terra do aparelho e o outro lado do fio à
instalação.
• Declinamos qualquer responsabilidade por acidentes ou pelas
suas eventuais consequências, em caso de não ligação à terra
do aparelho ou por uma ligação à terra com deficiente
continuidade.
LIGAÇÃO ELÉCTRICA
min 10 mm
Sp da 25 a 45 mm
Junta
Caixa que forma o
aparelho
min 70 cm
min 15 cm
min 5,5 cm
10 mm
mini
50 mm
Abertura
500 X 50
Abertura
500 X 10
É interdito o
encastramento de
um Forno
Não Ventilado por
debaixo da placa
vitrocerâmica
Monofásica
220-240V~
Bifásica
220-240V2~
Bifásica
220-415V2N~
Trifásica
220-240V3~
Trifásica
380-415V3N~
25 A 25 A 25 A 25 A 16 AFUS ÍVEL
3 G 2,5 mm2
H05RR-F,
H05VV-F,
H05V2V2-F
SECÇÃO
TIPO
3 G 2,5 mm2
H05RR-F,
H05VV-F,
H05V2V2-F
4 G 2,5 mm2
H05RR-F,
H05VV-F,
H05V2V2-F
4 G 2,5 mm2
H05RR-F,
H05VV-F,
H05V2V2-F
5 G 1,5 mm2
H05RR-F,
H05VV-F,
H05V2V2-F
2 Phase
shunter 1-2
shunter 2-3
5 Neutre
shunter 4-5
T Terre
LIGAÇÃO
Á PLACA
DE
BORNES
Derivar:
fazer uma
ligação
com
caixa de
derivação
2 Phase
shunter 1-2
shunter 2-3
5 Phase
shunter 4-5
T Terre
1 Phase
3 Phase
shunter 2-3
5 Neutre
shunter 4-5
T Terre
1 Phase
shunter 1-2
3 Phase
shunter 3-4
5 Phase 5
T Terre
1 Phase
2 Phase
3 Phase
5 Neutre
shunter 4-5
T Terre
LIGAÇÃO AOS BORNES DA PLACA:
Para ligação, há que respeitar obrigatoriamente as instruções
abaixo indicadas.
- A instalação deve estar protegida por um fusível apropriado (ver
quadro) e possuir fios com secção suficiente para alimentar
normalmente o aparelho.
- Escolher o cabo de alimentação em função das indicações do
quadro.
Para efectuar a ligação, é necessário:
- Virar a placa; a parte de vidro deve ficar assente na superfície
de trabalho. Ter o cuidado de proteger o vidro!
Abrir a tampa e seguir as
etapas abaixo indicadas:
- identificar as duas linguetas que
se encontram nos lados;
- com uma chave de fendas
carregar na parte da frente de
cada uma das linguetas;
- levantar a tampa.
Ligar o cabo de alimentação:
- respeitar as marcações da placa de bornes e as indicações do
quadro e aplicar as caixas de derivação (as caixas de derivação,
inseridas na placa de bornes , dão a possibilidade de se
estabelecer uma ponte eléctrica entre dois bornes);
- descarnar a extremidade de
cada fio condutor e fixá-los
aos bornes, respeitando
as indicações do quadro
- desapertar o cerra-cabos;
- passar o cabo pelo cerra-
cabos.
Uma vez concluída a ope-
ração de ligação aos bornes
do aparelho, apertar o
cerracabos e fechar a tampa.
Nota: Ter o cuidado de apertar os parafusos da placa de bornes.
SHUNT
L2
L3
• Qualquer intervenção no cabo de alimentação deve ser impera-
tivamente efectuada pelo Serviço Após Venda ou por um técnico
com qualificação idêntica. A placa vitrocerâmica é fornecida sem
cabo de alimentação. Possui uma placa de bornes que permite
escolher o tipo de ligação eléctrica adequada à instalação.

Testemunho de comando
De trancamento testemunho
Identificação de programação
• PARA DESACTIVAR
A zona de cozedura deve estar a funcionar. O testemunho de
comando deve estar aceso na zona de afixação. Caso contrário,
seleccionar novamente a placa de cozedura em causa.
- Pressionar a tecla . O testemunho de activação da zona
complementar da placa de cozedura apaga-se, o que indica que
a zona complementar de cozedura está desligada.
- Para paragem instantânea da zona complementar de cozedura,
pressionar ao mesmo tempo as teclas e . O nível de potência
baixa automaticamente para . A placa complementar desliga-se.
18 PT
UTILIZAÇÃO DO APARELHO
A ESCOLHA DOS RECIPIENTES
• Usar recipientes de boa qualidade com o fundo plano. O
fundo rigorosamente plano elimina os pontos de aquecimento
excessivo que fazem com que os alimentos peguem e a
espessura de um metal de boa qualidade permite a perfeita
distribuição do calor.
• Ter o cuidado de verificar que o fundo dos recipientes está
seco. Quando se enche um recipiente ou quando, por exemplo,
se retira do frigorífico, há que ter esta precaução para evitar
sujar a placa.
• Utilizar recipientes com diâmetro suficiente para cobrir toda
a placa de cozedura.
O fundo do recipiente deve ser pelo menos tão grande como
a zona de cozedura; se for ligeiramente maior, a energia é
aproveitada da melhor forma.
~~~~~~~~~~~~~~~~~~~~~
As informações que se seguem vão ajudar na selecção dos
recipientes mais adequados, de forma a obterem-se os melhores
resultados.
Inox:
aconselhado
Especialmente com fundo “sanduíche”. Este fundo alia as
qualidades do inox (aspecto, durabilidade e estabilidade) às
vantagens do alumínio ou do cobre (transmissão do calor e
repartição uniforme).
Alumínio:
recomendado o fundo espesso
Boa condutividade. O alumínio deixa por vezes marcas na placa,
que desaparecem se forem rapidamente limpas. Não deve ser
utilizado alumínio pouco espesso.
Ferro fundido / Vitrocerâmica:
desaconselhado
Fraca prestação. Pode riscar a superfície.
Fundo de cobre:
recomendado o fundo espesso
Boa prestação, mas o cobre pode deixar marcas que aparecem
por vezes sob a forma de riscos; desaparecem se a placa for
limpa rapidamente. Não deixar evaporar a água completamente
dos recipientes. O metal bastante aquecido pode aderir à superfície.
Um recipiente de cobre demasiado quente pode deixar marcas
que podem ficar para sempre na placa.
Porcelana / Esmalte:
boa prestação
Só com fundo plano, pouco espesso e liso.
Há que utilizar recipientes de qualidade para obter bons
resultados:
• Depois de ligar a placa vitrocerâmica, esperar 8 segundos
para activar o comando electrónico.
- Pressionar a tecla durante 3 segundos.
O comando electrónico da placa fica activo. O nível de potência
surge em cada zona de afixação e o testemunho de comando
pisca.
- Caso não haja qualquer intervenção durante 10 segundos, o
comando electrónico desactiva-se, pelo que deve novamente
proceder-se à activação.
- Pressionar a tecla ou para seleccionar o nível de potência
entre 1 e 9.
- Se se mantiver premida a tecla ou , o nível de potência au-
menta ou diminui progressivamente.
Os exemplos que se seguem são dados a título meramente
indicativo. A experiência de cada utilizador levará à adaptação
destas regulações, conforme o seu gosto e hábitos pessoais.
0 : Desligado
1 : )
2 : ) ..... Derreter
3 : Manter quente
4 : Aquecer
5 : Descongelar, estufar, cozer no ponto, cozer a
baixa temperatura
6 : Cozer sem tampa
7 : Saltear, corar e assar carne
8 : Cozer e assar a alta temperatura, alourar
9 : Fritar, ferver grandes quantidades de água ...
• DESACTIVAÇÃO DE UMA PLACA DE COZEDURA
A zona de cozedura deve estar a funcionar. O testemunho de
comando deve estar aceso na zona de afixação. Caso contrário,
seleccionar novamente a placa de cozedura pretendida.
- Pressionar a tecla até aparecer afixado o nível de potência
A placa de cozedura desliga então instantaneamente e a
indicação desaparece ao fim de 10 segundos.
- Para desligar rapidamente, pressionar ao mesmo tempo as
teclas e . O nível de potência baixa automaticamente para
. A placa desliga-se.
• INDICAÇÃO DE CALOR RESIDUAL
Quando a temperatura da superfície das zonas de cozedura
ultrapassa cerca de 60°C, o utilizador é de tal informado através
da afixação do painel de comando, . Logo que a temperatura
baixa para menos de 60
°
C, a afixação apaga-se.
No final da cozedura dos alimentos, aconselhamos a desligar a
placa e a aproveitar o seu calor residual, para que o cozinhado
possa terminar brandamente.
N.B.: Após corte da corrente, a indicação de calor residual
desaparece definitivamente e o mesmo acontece quando a
temperatura da superfície ultrapassa os 60°C.
• PARA ACTIVAR
- Carregar na tecla . Nos 10 segundos seguintes,
- Pressionar a tecla correspondente à placa de cozedura com
complemento. Na zona de afixação, o testemunho deixa de
piscar e fica fixo, o que indica a sua activação.
- Escolher um nível de potência entre entre 1 e 9.
- Pressionar a tecla para activar a zona de cozedura
complementar.
O testemunho da placa complementar (PVD 605
- PVD 756) acende.
• FUNCIONAMENTO DA PLACA DE COZEDURA
COMPLEMENTAR (Em alguns modelos)
• ACTIVAÇÃO DE UMA PLACA DE COZEDURA
- Pressionar a tecla da placa que
pretende utilizar. O testemunho
de comando da zona de
afixação torna-se fixo, o que
indica que essa zona está ligada.
• ARRET GENERAL
Pode parar-se, a qualquer momento, o funcionamento
das placas de cozedura e do conta-minutos, pressionando
para tal a tecla ligar/desligar, durante 3 segundos.
• PROGRAMAÇÃO DE UMA PLACA DE COZEDURA
Podem programar-se as placas de cozedura com uma duração
máxima de 99 minutos.
As placas podem ser programadas uma de cada vez.
- Ligar a placa de cozedura pretendida, repetindo para tal as
operações anteriormente indicadas.
O testemunho de comando,
junto de nível de potência, deve ficar afixado, indicando assim
que a placa está ligada.
- Pressionar a tecla do conta-minutos .
A identificação da placa, junto à afixação do conta-minutos, recorda
qual a placa accionada.
-
Pressionar a tecla para seleccionar os minutos.

19 PT
• É importante esperar que a superfície vitrocerâmica da placa
arrefeça completamente, antes de a limpar.
• Utilizar apenas produtos de limpeza próprios para superfícies
vitrocerâmicas (creme e raspador), à venda vulgarmente no
comércio.
• Evitar que os alimentos transbordem. Os alimentos que
caem na superfície de cozedura queimam rapidamente, o
que torna difícil a sua limpeza.
• Recomenda-se a manter afastado da superfície de cozedura
tudo o que é susceptível de derreter, tal como objectos
plásticos, açúcar ou produtos à base de açúcar.
LIMPEZA:
- Aplicar algumas gotas de produto de limpeza próprio para
superfícies vitrocerâmicas.
- Nas zonas manchadas, caso existam, passar, com mais
insistência, um pano macio ou papel de cozinha ligeiramente
humedecido.
- Lavar, se necessário.
- Limpar depois com um pano macio ou papel de cozinha secos,
até a superfície ficar limpa.
Se após esta limpeza corrente as manchas continuarem:
- Aplicar novamente algumas gotas do produto próprio.
- Raspar com um raspador, mantendo um ângulo de
30º em relação à superfície, até as manchas persistentes
desaparecerem. Se necessário, lavar.
- Limpar com um pano macio ou papel de cozinha secos, até a
superfície ficar limpa.
- Repetir a operação, se necessário.
CONSELHOS:
As limpezas frequentes deixam uma camada protectora essencial
à prevenção de riscos e desgaste.
Certificar-se de que a superfície está limpa, antes de utilizar a
placa.
Para retirar manchas de água e de calcário, aplicar algumas gotas
de vinagre branco ou sumo de limão. Lavar e limpar com papel
absorvente e depois utilizar o produto de limpeza próprio para
limpeza final.
O vidro vitrocerâmico suporta o arrastar dos recipientes de cozinha
com fundo plano, mas, apesar de tudo, é aconselhável levantá-
los para os deslocar.
LIMPEZA DA PLACA VITROCERÂMICA
NOTA :
- Evitar usar uma esponja demasiado húmida.
- Nunca utilizar utensílios de aço, tais como facas ou chaves de
fendas.
- Se o raspador com lâmina de barbear for utilizado de forma a
fazer um ângulo de 30º em relação à superfície não causará
quaisquer danos.
- Não deixar o raspador com a lâmina ao alcance de crianças.
- Não utilizar produtos abrasivos ou pós que possam riscar.
• Enquadramento da placa, consoante o modelo:
Para limpar o enquadramento da placa sem o danificar, lavá-lo
com água e sabão, enxaguá-lo e depois secá-lo com um pano
macio.
30° Maxi
O registo é feito automaticamente ao fim de três segundos.
O tempo programado pode ser modificado em qualquer momento,
voltando para tal a pressionar a tecla de selecção do conta-
minutos. O testemunho de comando do conta-minutos deve
acender. Uma vez esgotado o tempo marcado, a placa de
cozedura desliga automaticamente, ouvindo-se então um sinal
sonoro durante 1 minuto. Pressionar qualquer tecla para o parar.
O tempo programado pode ser posto a com tecla : a placa
de cozedura deixa então de estar sob controlo do conta-minutos,
mas permanece em funcionamento, pelo que será necessário
desligá-la manualmente.
O conta-minutos pode ser utilizado apenas como auxiliar de
memória; ouvir-se-á um sinal sonoro no final do tempo programado.
• FONCTIONNEMENT DE L’ACCELERATEUR DE CHAUFFE
Todas as placas de cozedura que equipam a placa
vitrocerâmica têm um acelerador de aquecimento, que permite
uma subida mais rápida da temperatura nas zonas de
cozedura:
Activação do acelerador de aquecimento:
- Pôr a funcionar a placa de cozedura pretendida. Pressionar a
tecla até à posição 9 e deixar brevemente de nela carregar.
Voltar a pressionar a referida tecla : o visor indicará então
alternadamente «acelerador de aquecimento» e «nível de
potência».
- Reduzir, se necessário, para a posição de aquecimento pretendida.
Ex.: Placa de cozedura de 1800 W na posição 6 = potência
libertada 32 % de 1800 W.
Quando o “'D2acelerador de aquecimento”'D3 está activo, a placa
fornece uma potência de 1800 W, durante 2,5 minutos, e ficará
regulada a 576 W, após este lapso de tempo.
* Para maior segurança, as placas de cozedura param
automaticamente se forem deixadas a funcionar durante muito
tempo. A paragem depende do nível de potência utilizado.
Posição de
cozedura
Potência
libertada
(%)
Duração de
aceleração
de aquecimento
(minutos)
Duração de
funcionamento
máx. antes de
esactivação
automática*
0 : 0 % : 0 : 0 H
1 : 3 % : 1 : 6 H
2 : 6 % : 3 : 6 H
3 : 11 % : 5 : 5 H
4 : 16 % : 6,5 : 5 H
5 : 19 % : 8,5 : 4 H
6 : 32 % : 2,5 : 1,5 H
7 : 45 % : 3,5 : 1,5 H
8 : 65 % : 4,5 : 1,5 H
9 : 100 % : 0 : 1,5 H
A função de trancamento fixa as regulações do momento ou evita
que alguém ponha a funcionar a placa vitrocerâmica. Também
se utiliza para limpeza do painel de comandos, já que os comandos
podem trancar-se sem que a placa esteja a funcionar.
- Pôr a funcionar a ou as placas pretendidas.
- Escolher a potência que se deseja para cada uma delas.
- Pressionar a tecla para registo dos dados.
Só fica então acessível a tecla ligar/desligar, pois todas as outras
deixam de ficar operacionais.
O testemunho do trancamento acende-se.
Para anular o trancamento, basta voltar a pressionar a tecla
;o testemunho apaga-se e todos os comandos ficam
novamente operacionais
Se o conta-minutos estiver activo quando os comandos são
trancados, no final do tempo programado, o tempo será descontado
automaticamente e a placa desligada.
Se o comando do trancamento estiver activo quando se
desliga definitivamente a placa, este ficará operacional e
impedirá qualquer acção quando a placa for posta novamente
a funcionar. Pressionar a tecla para destrancar os
comandos da placa.
• FUNCIONAMENTO DA TECLA DE TRANCIAMENTO
La pagina si sta caricando...
La pagina si sta caricando...
La pagina si sta caricando...
La pagina si sta caricando...
La pagina si sta caricando...
La pagina si sta caricando...
La pagina si sta caricando...
La pagina si sta caricando...
La pagina si sta caricando...
La pagina si sta caricando...
La pagina si sta caricando...
La pagina si sta caricando...
La pagina si sta caricando...
La pagina si sta caricando...
La pagina si sta caricando...
La pagina si sta caricando...
La pagina si sta caricando...
La pagina si sta caricando...
La pagina si sta caricando...
La pagina si sta caricando...
La pagina si sta caricando...
La pagina si sta caricando...
-
 1
1
-
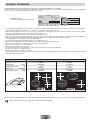 2
2
-
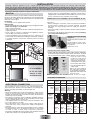 3
3
-
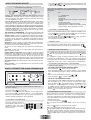 4
4
-
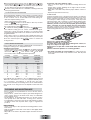 5
5
-
 6
6
-
 7
7
-
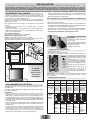 8
8
-
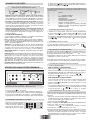 9
9
-
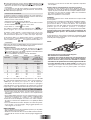 10
10
-
 11
11
-
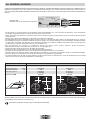 12
12
-
 13
13
-
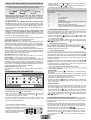 14
14
-
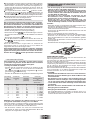 15
15
-
 16
16
-
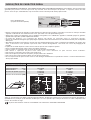 17
17
-
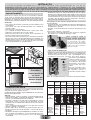 18
18
-
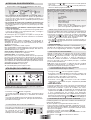 19
19
-
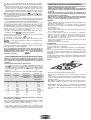 20
20
-
 21
21
-
 22
22
-
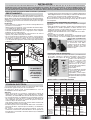 23
23
-
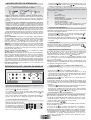 24
24
-
 25
25
-
 26
26
-
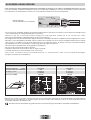 27
27
-
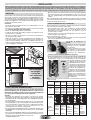 28
28
-
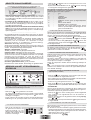 29
29
-
 30
30
-
 31
31
-
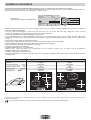 32
32
-
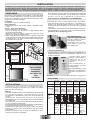 33
33
-
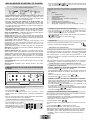 34
34
-
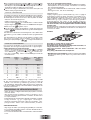 35
35
-
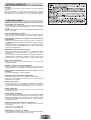 36
36
-
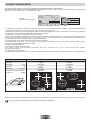 37
37
-
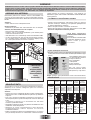 38
38
-
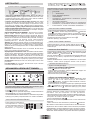 39
39
-
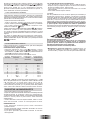 40
40
-
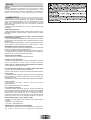 41
41
-
 42
42


Hoover HVH 750/1 B Manuale utente
- Categoria
- Piani cottura
- Tipo
- Manuale utente
- Questo manuale è adatto anche per
