Hoover HVI 640 X Manuale utente

Categoria
Piani cottura
Tipo
Manuale utente

Questo manuale è adatto anche per

IT
ISTRUZIONI D’USO E INSTALLAZIONE
PIANI INDUZIONE
INSTALLATIONS- UND BEDIENUNGSANLEITUNG
CERANFELDER
DE
ES
INSTRUCTIONS FOR USE AND INSTALLATION
INDUCTION HOBS
GB
MANUAL DE UTILIZAÇÃO E DE INSTALLAÇÃO
PLACAS DE INDUÇÃO
PT
INSTALLATIE- EN GEBRUIKSINDTRUCTIES
INDUCTIEKOOKPLAAT
NL
DA
FIN
KÄYTTÖ- JA ASENNUSOHJEET
INDUKTIOLIESITASOT
HOOVER - Via Privata Eden Fumagalli - 20047 Brugherio (Milano) - Italy
BRUGS- OG INSTALLATIONSVEJLEDNING
INDUKTIONSKOGEPLADER
We are constantly striving to improve product quality and as such may modify appliances to incorporate the latest technical improvements.
Appliance complies with European Directives 73/23/EEC and 89/336/EEC, replaced by 2006/95/EC and 2004/108/EC, and
subsequent amendments.
1 GB
READ THE INSTRUCTIONS BOOKLET CAREFULLY TO MAKE THE MOST OF YOUR HOB.
We recommend you keep the instructions for installation and use for later reference, and before installing the hob, note its serial number
below in case you need to get help from the after sales service.
Identification plate
(located under the hob's bottom casing)
Made in FRANCE - 232 -
220 - 240 V
P. Motors = 30 W
Mod : FE GD21 RB
P. Maxi (Oven) - 2350 W
Code: 39354774 - 0306 0511
Mod: FE GD21 RB
Code: 39354774 - 0306 0511
220 - 240 V
Code: 39354774
- 0306 0511
Code: 39354774
- 0306 0511
Code: 39354774
- 0306 0511
It is strongly recommended to keep children away from the cooking zones while they are in operation or when they are switched off,
so long as the residual heat indicator is on, in order to prevent the risks of serious burns.
• When cooking with fats or oils, take care always to watch the cooking process as heated fats and oils can catch fire rapidly.
The hob’s control area is sensitive, do not place hot containers on it.
Aluminium foil and plastic pans must not be placed on heating zones.
After every use, some cleaning of the hob is necessary to prevent the build up of dirt and grease. If left, this is recooked when the
hob is used and burns giving off smoke and unpleasant smells, not to mention the risks of fire propagation.
• Do not left metallic objects such as knives, forks, spoons or lids on the induction zone,because if they are too large or too heavy, they
could become hot.
Never cook food directly on the glass ceramic hob. Always use the appropriate cookware.
Always place the pan in the centre of the unit that you are cooking on.
Do not use the surface as a cutting board.
Do not slide cookware across the hob.
Do not store heavy items above the hob. If they drop onto the hob, they may cause damage.
Do not use the hob as a working surface.
Do not use the hob for storage of any items.
In the unlikely event of a surface crack appearing, do not use the hob. Immediately disconnect the hob from the electrical power supply
and call the After Sales Service.
This appliance is not intended for use by persons (including children) with reduced physical, sensory or mental capabilities, or lack
of experience and knowledge, unless they have been given supervision or instruction concerning use of the appliance by a person
responsible for their safety.
Children should be supervised to ensure that they do not play with the appliance.
GENERAL WARNINGS
COOKING HOB
Cooking zones
Supply voltage (V/Hz)
Installed electric power (W)
Product size
(W x D x H in mm)
Building-in dimensions
(AXB)
4 Induction 4 Induction
220-240/50 220-240/50
574 x 505 x 55 752 x 505 x 55
HVI 740HVI 640
Installing a domestic appliance can be a complicated operation which if not carried out correctly, can seriously affect consumer
safety. It is for this reason that the task should be undertaken by a professionally qualified person who will carry it out in
accordance with the technical regulations in force. In the event that this advice is ignored and the installation is carried out
by an unqualified person, the manufacturer declines all responsibility for any technical failure of the product whether or not
it results in damage to goods or injury to individuals.
2 GB
BUILT-IN
The furniture in which your hob will be installed and all adjacent
furniture, should be made from materials that can withstand high
temperatures. In addition, all decorative laminates should be fixed
with heat-resistant glue.
Installation:
A watertight seal is supplied with the hob.
Before fitting:
- turn the hob upside down, with the glass surface facing downwards.
Make sure the glass is protected.
- fit the seal round the hob.
- make sure that it is correctly fitted to avoid any leakage into the
supporting cabinet.
It it important to fit the hob on a level supporting surface.
Deformations caused by incorrect fitting can alter the specifications
of the worktop and the performance of the hob.
Leave a gap of at least 5 cm between the appliance and any
neighbouring vertical surfaces.
It is absolutely essential that the recess conforms with the
dimensions indicated.
The height of the flush-mounted part of the hob is 5,5 cm.
If there is an intermediate division :
- the clearance between the bottom of the casing and an
intermediate floor or part of a furniture unit must greater than
2,5 cm so as to allow air circulate.
The minimum distance should be 8 cm.
- furthermore, you should ensure that there is at the rear a
ventilation (8 cm) on all the width.
You can not build the hob in above an oven with no fan, a
dishwasher, fridge, freezer or washing machine.
• The body of the hob is fitted which 4 location holes to take the
fixing clamps intended to fix the hob in the unit. Place the 4 fixing
clamps, before building-in the hob, in such a way that the hob
is placed perfectly in the support unit.
INSTALLATION
Seal
Hob
25 mm
mini
50 mm
Opening
500 X 50
Opening
500 X 10
"The installation must conform to the standard directives."
The manufacturer declines all responsibility for any damage that
may be caused by unsuitable or unreasonable use.
Warning :
• Always check before any electrical operation, the supply tension
shown on the electricity meter, the adjustment of the circuit-
breaker, the continuity of the connection to earth to the installation
and that the fuse is suitable.
• The electrical connection to the installation should be made via
a socket with a plug with earth, or via an omnipole cut-out switch
with an opening gap of at least 3 mm.
If the appliance has a socket outlet, it must be installed so that
the socket outlet is accessible.
ELECTRICAL CONNECTION
The yellow/green wire of the power supply cable must be
connected to the earth of both power supply and appliance
terminals.
The manufacturer cannot be held responsible for any accidents
resulting from the use of an appliance which is not connected
to earth, or with a faulty earth connection continuity.
• Any queries regarding the power supply cord should be referred
to After Sales Service or a qualified technician.
The hob is fitted with a power supply cord which allows it to
be connected only to a power supply of 220-240 V between
phases or between phase and neutral.
• Connect to a socket, to choose the correct fuse, you must refer
on the table.
It is however possible to connect the hob to :
Two phases 220-240V2~, Threephases 220-240V3~
or Three phases 380-415V3N~.
To proceed to the new connection, you must adhere the following
instructions.
• Before making the connection make sure that the installation is
protected by a suitable fuse, see table, and that it is fitted with
wires of a large enough section to supply the appliance normally.
1- Operations to be carried out on the existing connection :
- turn over the hob, glass side against the work top, taking care
to protect the glass.
- open the cover.
- pull out the supply cord :
. remove the screws retaining the shunt bars and the conductors
of the supply cord,
. unscrew he cable clamp to release the power supplying cord,
. pull out the supply cord.
2- Operations to be carried out to make a new connection :
- choose the power supply cord in accordance with the
recommendations in the table.
- pass the power supply cable into the clamp.
- strip the end of each conductor of the supply cord on a 10 mm
length, by taking in account the requested length of the cord for
the connection to the terminal block.
- according to the installation and with the help of shunt bars which
you should have recovered in the first operation, fix the conductor
as shown on the chart.
- screw the cable clamp and fix the cover.
CONNECTION TO THE TERMINALS ON THE TERMINAL BLOCK:
HVI 740
HVI 640
3 GB
HOB COOKWARE ADVICE
Always use good quality cookware with perfectly flat and
thick bases : using this type of cookware will prevent hot spots
that cause food to stick. Thick metal pots and pans will provide
an even distribution of heat.
Ensure that the base of the pot or pan is dry : when filling
pans with liquid or using one that has been stored in the
refrigerator, ensure that the base of the pan is completely dry
before placing it on the hob. This will help to avoid staining the hob.
Use pans whose diameter is wide enough to completely
cover the surface unit : the size of the pan should be no smaller
than the heating area. If it is slightly wider the energy will be
used at its maximum efficiency.
Using good quality cookware is critical for setting the best
performance from your hob.
INDUCTION
USE PROCEDURE
An electronic generator powers a coil located inside the appliance.
This coil creates a magnetic field, so that when the pan is placed
on the hob, it is permeated by the induction currents.
These currents make the pan into a real heat transmitter,
while the glass ceramic hob remains cold.
This system is designed for use with magnetic-bottomed
pans.
Put simply, induction technology has two main advantages :
- as heat is emitted only by the pan, heat is maintained at its
maximum level and cooking takes place without any heat loss.
- There is no thermal inertia, as cooking automatically starts when
the pan is placed on the hob and stops when it is removed.
A HIGH SAFETY APPLIANCE ....
If your hob is correctly installed and used, the safety devices will
rarely be needed.
Ventilation fan : to protect and cool the supply and control
components. It has two speeds, operating automatically. The
fan works even if the plates are off and this till the
electronic system has enough cooled down.
Safety "Transistor" : a probe checks permanently the
temperature of the electronic components. If the heat is increasing
excessively, it automatically decreases the power of the
plates then cuts them down (the display for power level is flashing)
as far as the temperature of the components meets with the
standard again, the hob starts working.
• Safety "Empty pan" : a probe is placed under each heating
area. It will immediately detect a wrong temperature for the
empty pan, or the glass ceramic.
Safety "Detection" : the presence detector allows the working
and so the heating. A small object (eg a spoon, knife or ring)
placed on the heating area will not be considered as a pan and
therefore the hob will not come on.
Safety "Boiling over and splashing" : if any boiling over and
splashing occur, the hob will stop. If a big spill or object covers
at least two buttons, for at least 10 seconds, clean up the spill
or remove the object, the hob is not operating.
HOW TO OPERATE THE HOB
1 - HOB ON / OFF BUTTON
2 - COOKING ZONE SELECTION BUTTON
3 - DISPLAY: heat level, residual heat indicator, booster operation..
4 - “-” BUTTON
5 - “+” BUTTON
6 - “TIMER” SELECTION BUTTON
7 - TIMER DISPLAY
8 - CONTROL LOCKING BUTTON WITH INDICTOR LAMP
9 - COOKING ZONE PROGRAMMING INDICATOR: when
displayed, it shows that the timer controls the cooking zone
10 - CONTROL LED:
. on: the cooking zone or timer is active, modification is possible
. off: the cooking zone or timer is set to the last recorded data
11 - Booster selection button
Control unit
The following information will help you select the pans best adapted
to obtain good results.
The following examples are for information only. Personal
experience should then let you adapt these settings to your taste
and habits.
0 : Off
U : Simmering to 65°C
1 : )
2 : ) ..... Melting heat
3 : Keeping hot
4 : Heating up
5 : Thawing, stewing, full cooking, low temperature
cooking
6 : Cooking without lid
7 : Frying, meat browning and roasting
8 : High temperature cooking and roasting, seizing
9 : Frying, seizing
Booster : Boiling large quantities of liquids...
• RESIDUAL HEAT INDICATOR
The control panel tells the user when the surface temperature
of the cooking zones exceeds about 60° C, by the following
displaying: “H” . When the temperature goes back below 60°C,
the “H” display goes off.
For ending the cooking, we advise switching off the cooking zone
and using the residual heat of the zone to finish cooking gently.
N.B. After a cut in the current, the residual heat indicator disappears
completely, even if the surface temperature exceeds 60°C.
• STOPPING A COOKING ZONE
- Press the selection button of the required cooking zone.
- Press the button to display heat level . Now the zone goes
off, the indicator goes off after 10 seconds.
- To stop rapidly, press the and buttons at the same time.
The heat level automatically goes down to .
The cooking zone goes off.
4 GB
NOTE:
The induction hob works with a generator wich supplies
simultaneously 2 zones per area, according to model :
Each area take in charge a maximum power of 3700 W.
Consequently, in the same area, when the Booster function is on
and the second plate has reached a power level of 9 or 8 the
latest is automatically decreased to the level 7 and this decrease
is shown by a flashing display for information.
Warning :
the Booster works during 10 minutes, after this time,
it stops and the plate starts heating again at the setting 9, the
power of the generator being decreased, the power level of the
second plate comes back to its previous setting.
The different positions correspond to the following power ratings :
THE DIFFERENT POSITION
For increased safety, the cooking zones cut off automatically if
they are left on too long.
The cut off depends on the heat level used.
• STARTING A COOKING ZONE
- Press the selection button of
the required cooking zone. In
the display zone, the control
LED is on steady. It shows that
the zone is live.
- Press the or button to select a heat level between 1 and
9. Hold down the or button and the heat level increases
or decreases gradually.
• GENERAL STOP
The cooking zones and the timer can be
stopped at any moment by pressing for
3 seconds on the On-Off button.
THE USE
After powering up the hob, wait 8 seconds to activate the
electronic controls.
- Press the button , for 3 seconds.
Electronic control of the hob is activated. In each display zone
the heat level is displayed and the control LED blinks.
- After a few seconds whithout use, the electronic control goes off
and the starting operation has to be repeated.
When the hob is operating, the pan detector provides the advantage
of automatically stopping or starting the heat of the cooking zone
in contact with or on removal of the pan.
If therefore offers energy savings.
If the cooking zone is used with a suitable pan* :
the display
shows the heat level or when the booster is operating.
* The induction needs pans compatibles so fitted with magnetic-
bottomed, see table page 3 and pans big enough to fully cover
the zone.
If the cooking zone is used without a pan or with an unsuitable
pan :
the display shows . The zone does not start. If no pan
is detected after 10 minutes, the starting operation is cancelled.
IMPORTANT:
To stop the cooking zone, you must stop the hob normally,
you cannot just remove the pan. The pan detector does not
work as the hob on/off button.
• PAN DETECTOR
• PROGRAMMING A COOKING ZONE
Every cooking zone can be programmed for a maximum time of
99 minutes. Only one zone, at a time, can be programmed.
- Start the required zone by following the previous instructions.
The control LED near the heat level must be displayed, it shows
that the zone is live.
- Press the Timer button .
The zone mark around the timer display shows the controlled
zone.
- Press the or - button to select the time in minutes.
This is saved automatically after three seconds.
The programmed time can be modified at any moment by pressing
the timer selection button, the timer control LED must be on.
When the time has run, the cooking zone goes off automatically
and an audible beep sounds for 1 minute. Press the timer
button to stop it.
5 GB
The programmed time can be reset to using the button
or pressing the and buttons at the same time, the cooking
zone is then no longer linked to the timer but stays operational.
So you will have to stop the zone independently.
The timer can be used alone as a reminder, it will ring at the end
of the programmed time.
The locking function holds the current settings, or prevents anyone
from starting the hob. It is also used for cleaning the control strip
as the controls can be locked without the hob being on.
To lock :
- Press the on/off button .
- Start the required cooking zones.
- Select a heat level for each of them;
- Press the button to set the data ; in this way no other button
works, except the on/off button.
The locking indicator lamp comes on.
To unlock :
To release the locking function just press the button ; the
indicator lamp goes off, all the controls work again.
If when the controls are locked, the timer is on, the time will be
counted automatically and the zone switched off at the end of the
programmed time.
If the locking control is on when the hob is finally shut down,
the locking control stays operational and prevents any action
when the hob is restarted, press the button to release the
locking function.
• LOCKING BUTTON OPERATION
The booster function allows to get by a simple pressure the
cooking zone working with a high power according to the zone,
for 10 minutes period.
Ideal to bring to the boil large quantities of liquids ...
ACTIVATION OF THE BOOSTER FUNCTION
Activation of the BOOSTER function :
- Press the setting key of the cooking zone fitted
with the booster function.
The control led is displayed.
- Press the key to start the Booster.
The Booster is active for 10 minutes.
The P mark (power) appears.
When the time is over, the power level decreases to 9.
A pressure on the key "-" cancels the booster function, and the
power level decreases to 9.
• FAST HEATER OPERATION
All zones are fitted with a "Fast heater" which allows to get a faster
temperature increase of the heating areas. Ideal to seal meat or
to bring quickly to the boil large quantitites of liquids.
Starting the fast heater
. Press the on/off button .
. Start the required zone, press the + button to obtain position “9”,
release the button briefly and press it again; the display alternates
showing “A” (fast heater) and “9” (heat level).
. If necessary choose the required heat position.
Cooking Power released Time of fast
position % heater minutes
000
U (65°C) -
131
263
3115
4 16 6,5
5 19 8,5
6 32 2,5
7 45 3,5
8 65 4,5
91000
E.g. 1800 W zone at position 6 = 32% of 1800 W power
released = 576W
When the “Fast heater” is on, the zone supplies 1800 W
power for 2.5 minutes, and adjusts to 576 W after this time.
. When the "Fast heater" is done, the display of the power level
remains steady.
PROBLEM SOLVING
The induction hob gives shorings out.
Normal. The cooking fan of the electronic components is on.
The induction hob gives a light whistling out.
• Normal. According to the working frequency of the inductors, a
light whistling can occur when using several cooking zones on
maximum power.
Cooking zones that do not maintain a rolling boil or a fast
enough frying rate.
You must use pans which are absolutely flat.
• Pan bottoms should closely match the diameter of the heat zone
selected.
This appliance is marked according to the
European directive 2002/96/EC on Waste
Electrical and Electronic Equipment (WEEE).
By ensuring this product is disposed of correctly,
you will help prevent potential negative
consequences for the environment and human
health, which could otherwise be caused by
inappropriate waste handling of this product.
The symbol on the product indicates that this
product may not be treated as household waste.
Instead it shall be handed over to the applicable collection point
for the recycling of electrical and electronic equipment
Disposal must be carried out in accordance with local
environmental regulations for waste disposal.
For more detailed information about treatment, recovery and
recycling of this product, please contact your local city office,
your household waste disposal service or the shop where you
purchased the product.
6 GB
AFTERCARE
Before calling out a Service Engineer please check the
following:
— that the plug is correctly inserted and fused;
If the fault cannot be identified:
switch off the appliance — do not tamper with it — call the Aftercare
Service Centre. The appliance is supplied with a guarantee
certificate that ensures that it will be repaired free of charge at the
Service Centre.
If there are still some stubborn stains:
- Place a few more drops of specialised cleaning fluid on the
surface.
- Scrape with a scraper, holding it at an angle of 30° to the hob,
until the stains disappear.
- Wipe with a soft cloth or dry kitchen paper until the surface is
clean.
- Repeat the operation if necessary.
A FEW HINTS:
Frequent cleaning leaves a protective layer which is essential to
prevent scratches and wear. Make sure that the surface is clean
before using the hob again. To remove marks left by water, use
a few drops of white vinegar or lemon juice. Then wipe with
absorbent paper and a few drops of specialised cleaning fluid.
The control knobs can be removed for a complete cleaning.
The glass ceramic surface will withstand scraping from flat-
bottomed cooking vessels, however, it is always better to lift them
when moving them from one zone to another.
NB:
Do not use a sponge which is too wet.
Never use a knife or a screwdriver.
A scraper with a razor blade will not damage the surface, as
long as it is kept at an angle of 30°.
Never leave a scraper with a razor blade within the reach of
children.
Never use abrasive products or scouring powders.
30° Maxi
Before carrying out any maintenance work on the hob, allow it
to cool down.
Only products, (creams and scrapers) specifically designed for
glass ceramic surfaces should be used. They are obtainable
from hardware stores.
Avoid spillages, as anything which falls on to the hob surface
will quickly burn and will make cleaning more difficult.
It is advisable to keep away from the hob all substances which
are liable to melt, such as plastic items, sugar, or sugar-based
products.
MAINTENANCE:
- Place a few drops of the specialised cleaning product on the
hob surface.
- Rub any stubborn stains with a soft cloth or with slightly damp
kitchen paper.
- Wipe with a soft cloth or dry kitchen paper until the surface is
clean.
CLEANING AND MAINTENANCE
Foods cook slowly.
• Improper cookware being used. Pan bases should be flat, fairly
heavy-weight and the same diameter as the heat zone selected.
Tiny scratches (may appear as cracks or abrasions) on the
glass surface of the hob.
Incorrect cleaning methods, cookware with rough bases, or
coarse particles (salt or sand) trapped between the cookware
and the surface of the hob.
Use recommended cleaning procedures, be sure cookware
bases are clean before use and use cookware with smooth
bases.
Metal markings (may appear as scratches).
Do not slide aluminium cookware across the surface.
Use recommended cleaning procedure to remove marks.
• Incorrect cleaning materials have been used, spillage or grease
stains remain on the surface, use a razor scraper and
recommended cleaning product.
Dark streaks or specks.
Use a razor scraper and recommended cleaning product.
Areas of discoloration on cooktop.
Marks from aluminium and copper pans as well as mineral
deposits from water or food can be removed with the cleaning
cream.
Hot sugar mixtures / plastic melted to the surface.
See the Glass Hob Cleaning section.
The hob is out of order, or some heat zones do not work.
The shunt bars are not properly fitted on the terminal block.
Check the connection is made in conformity with the instructions
page 2.
The hob does not operate.
A big spill or object covers at least two buttons, for at least 10
seconds. Clean up the spill or remove the object.
The control panel is locked. Press the “Locking” button to release.
The hob does not cut off
The control panel is locked. Press the “Locking” button to release.
Refer to the section, page 5.
The hob stops automatically
• A spill covers at least two buttons for more than 10 seconds; the
hob switches to safety, and an audible beep sounds so long as
the buttons are covered. Clean up the spill or remove the object.
• The cooking zones stop automatically if they are left on for too
long. Refer to the section, page 4.
Frequency of on/off operations for cooking zones
The on-off cycles vary according to the required heat level:
- low level: short operating time,
- high level: long operating time.
“H” display, residual heat indicator, blinking
The electronic temperature is too high. A technician should verify
the fitting in compliance with the recommendations, page 2.
7 IT
LEGGERE ATTENTAMENTE LE ISTRUZIONI INCLUSE IN QUESTO LIBRETTO. Vi danno importanti indicazioni sulla sicurezza
d'installazione, d'impiego e di pulizia, ed anche qualche consiglio per un'ottimale utilizzo del piano di cottura. Conservare con cura
questo documento per consultazione ulteriore e notare qui sotto, prima dell'installazione del piano, il numero di serie dell'apparecchio,
nel caso di un ulteriore richiesta d'intervento del servizio di assistenza.
Made in FRANCE - 232 -
220 - 240 V
P. Motors = 30 W
Mod : FE GD21 RB
P. Maxi (Oven) - 2350 W
Code: 39354774 -0306 0511
Mod: FE GD21 RB
Code: 39354774 - 0306 0511
220 - 240 V
Code: 39354774
- 0306 0511
Code: 39354774
- 0306 0511
Code: 39354774
- 0306 0511
Placca segnaletica
(situata sotto la cassetta inferiore del piano)
Tutti le parti accessibili sono calde durante il funzionamento del piano, tenere lontano i bambini durante il funzionamento del prodotto
e fino a quando non si spegneranno le spie di calore residuo.
Si raccomanda, dopo ogni utilizzo, un minimo di pulizia dell'apparecchio, per evitare l'accumulo di sporcizie e grassi.
Questi, infatti, ricuocerebbero ad ogni uso dell'apparecchio, carbonizzandosi e liberando fumi ed odori sgradevoli, con il rischio di
incendiarsi.
I grassi di cottura o l'olio caldo provocano degli schizzi. Badare di non allontanarsi dall'apparecchio, tali sostanze possono
infiammarsi.
Non depositare oggetti sulla parte comandi dei piani con comandi digitali.
La carta stagnola e i recipienti in materia plastica non devono essere appoggiati sulle superfici calde.
• Si raccomanda di non depositare oggetti metallici o coperchi sul piano (il metallo é conduttore e assorbe il calore).
Non cucinare mai direttamente sul piano, utilizzare sempre le pentole.
Appoggiare sempre la pentola ben centrata sul bruciatore da utilizzare.
Non utilizzare la superficie vetroceramica né come piano per tagliare né come piano di lavoro.
• Non far scivolare le pentole sul piano: rischio di graffiature.
• Non appoggiare oggetti pesanti sul piano, potrebbero cascare e rovinare il piano.
• Non lasciare oggetti depositati sul piano di qualunque tipo essi siano.
• Nel raro caso che possa esserci un’incrinatura sotto il piano in vetroceramica, staccare immediatamente l’apparecchio dall’alimentazione,
e chiamare direttamente il Servizio Assistenza.
Questo apparecchio non è destinato ad essere usato da bambini e persone incapaci o inesperte all'uso del prodotto, a meno che non
vengano sorvegliate o istruite riguardo all'uso dell'apparecchio da una persona responsabile della loro sicurezza.
Sorvegliare i bambini in modo tale da assicurarsi che non giochino con l'apparecchio.
AVVERTENZE GENERALI
Tutte queste caratteristiche sono indicative, il produttore non è responsabile per errori di stampa. Perseguendo una politica di aggiornamento
tecnico-qualitative, il produttore si riserva il diritto di apportarvi modifiche migliorative, rispettando le norme vigenti.
DICHIARAZIONE DI CONFORMITÀ:Questa apparecchiatura, nelle parti destinate a venire a contatto con sostanze alimentari,
É conforme alla prescrizione della Direttiva CEE 89/109 e al D.L. di attuazione n° 108 del 25.01.92.
Apparecchio conforme alle Direttive Europee 73/23/CEE e 89/336/CEE , sostituite rispettivamente da 2006/95/CE e 2004/108/CE,
e successive modifiche.
PIANO COTTURA
Bruciatori
Tensione alimentazione
(V/Hz)
Potenza elettrica installata (W)
Dimensioni prodotto (l x p x h)mm.
Dimensioni foro incasso (AxB)
4 Induzione 4 Induzione
220-240/50 220-240/50
574 x 505 x 55 752 x 505 x 55
HVI 740HVI 640
Il collegamento e la messa in funzione degli apparecchi elettrodomestici nel loro ambiente è un’operazione delicata che, se non
viene effettuata correttamente, può causare delle conseguenze anche gravi per la sicurezza dei consumatori. Per questo è
importantissimo che l’operazione di collegamento venga svolta da un professionista , che DEVE attenersi alle norme tecniche in
vigore. Se nonostante questa raccomandazione, il consumatore deciderà di realizzare personalmente il collegamento, il produttore
non sarà ritenuto responsabile per eventuali incidenti tecnici sul prodotto, e neppure per eventuali incidenti a cose o persone.
8 IT
INSERIMENTO NEL MOBILE
INSTALLAZIONE
L’installazione deve essere conforme alle norme vigenti del Paese
d'installazione.
Il produttore declina ogni responsabilità nel caso questa disposizione
non venga rispettata.
Attenzione:
- Prima di effettuare il collegamento, controllare la tensione
d’alimentazione indicata sul contatore, la regolazione del
disgiuntore, il calibro del fusibile e la continuità della “terra”.
- Il collegamento alla rete deve essere effettuato mediante una
presa di corrente munita di messa a terra o mediante dispositivo
a interruzione omnipolare con una distanza di apertura dei contatti
di almeno 3 mm.
- Il filo di protezione verde/giallo deve essere collegato ai morsetti
di terra, da una parte per l’apparecchio e dall’altra parte per il
collegamento.
- Non possiamo essere ritenuti responsabili per incidenti o per le
eventuali conseguenze di incidenti dall’uso di un apparecchio
non collegato a terra o cui la messa a terra sia difettosa.
- Qualsiasi intervento dovrà essere effettuato dal Servizio di
Assistenza o comunque da una persona qualificata.
COLLEGAMENTO ELETTRICO
Guarnizione
Piano
25 mm
mini
50 mm
Apertura
500 X 50
Apertura
500 X 10
Il mobile o il supporto in cui deve essere incassato il piano e le
pareti dei mobili attigui devono essere di un materiale resistente
per sopportare una temperatura elevata.
Inoltre è necessario che il rivestimento che ricopre il mobile o il
supporto sia fissato con una colla resistente alle alte temperature
affinché non si scolli.
Una guarnizione di tenuta stagna è consegnata con il piano di
cottura.
Prima dell’installazione:
Girare il piano, parte in vetro verso il basso.
Abbiate cura di proteggere il vetro.
Mettere la guarnizione avvolta intorno al piano.
Abbiate cura nell’eseguire il lavoro, in quanto tutto questo eviterà
qualsiasi infiltrazione dentro il mobile di supporto.
Assicurarsi che la superficie sulla quale verrà installato il prodotto
sia piana.
• Possibili deformazioni provenienti da una errata installazione
del piano cottura possono influire negativamente sul
funzionamento dell’apparecchio.
• Prevedere uno spazio di almeno 5 cm. fra il piano di cottura e
le pareti che lo circondano.
• Realizzare il foro per l’inserimento come indicato in figura.
• La parte incassata del piano cottura ha un’altezza di 5,5 cm.
• Nel caso di un pannello divisorio :
- assicurarsi che la distanza fra la parte sottostante l’apparecchio
ed il pannello e/o qualsiasi altra parete del mobile, superi i
2,5 cm per garantire la circolazione dell’aria (ovvero la distanza
minima tra il piano di lavoro ed il pannello divisorio è 8 cm).
- prevedere dietro l’apparecchio uno spazio di 8 cm per una
corretta ventilazione.
• Non è possibile installare questo prodotto sopra un forno
non raffreddato, una lavastoviglie, un frigorifero, un
congelatore o una lavatrice.
• Il fondo del piano é dotato di 4 alloggiamenti per le squadrette
di fissaggio che bloccano il piano al mobile. Posizionare
le 4 squadrette prima dell’inserimento del piano nel mobile.
Questo apparecchio é venduto provvisto di cordone di
alimentazione senza spina e deve essere utilizzato
esclusivamente con una tensione di 230 V tra fasi o tra fase
e neutro.
dopo aver verificato che il fusibile è adeguato (vedere tabella),
collegare alla presa
La morsetteria offre anche diverse possibilità di collegamento:
Bifase 220-240 V2~ Trifase 220-240 V3~ Trifase 380-415 V3N~
Per procedere al collegamento, attenersi scrupolosamente alle
indicazioni di sotto indicate:
Prima di realizzare il collegamento, verificare che l’installazione
sia protetta da un fusibile appropriato, vedere la tabella sottostante,
controllare la sezione dei fili dell’installazione.
1– Operazioni da eseguire sul collegamento esistente
• Girare il piano, con la parte del vetro contro il piano di lavoro,
facendo molta attenzione a proteggere il vetro!
• sollevare il coperchio.
• scollegare il cavo alimentazione presente:
. svitare le viti che fissano i conduttori del cavo e i ponticelli,
. allentare le viti del serracavo
. sfilare il cavo alimentazione
2– Operazioni da eseguire per realizzare il nuovo collegamento
• Scegliere il cavo d’alimentazione attenendosi sempre alla tabella.
• posizionare il cavo nel passacavo,
• spelare l’estremità dei conduttori e collegarli ai terminali. Far
riferimento alle informazioni della tabella seguente ed alla
numerazione presente sulla morsettiera, utilizzare i ponticelli
recuparati nell’operazione precedente,
• Riavvitare il passacavo,
• Chiudere il coperchio della morsettiera.
CONNESSIONI ELETTRICHE SULLA MORSETTIERA
HVI 740
HVI 640
Fusibile
Fusibile
Fusibile
Cavo
Cavo
Cavo
Monofase 220-240 V
Bifase 220-240 V2
Trifase 220-240 V3
Trifase 380-415 V3N
Ph = Fase N = Neutro T = Terra
CONSIGLI D’UTILIZZO
Utilizzare recipienti di buona qualità con fondo piatto e
spesso: il fondo assolutamente piatto elimina tutti i punti di
surriscaldamento sui quali si attaccano gli alimenti e lo spessore
del metallo permette una perfetta distribuzione del calore.
Assicurarsi che il fondo del recipiente sia asciutto: al momento
di riempire il recipiente o quando viene utilizzata una pentola
che esce direttamente dal frigorifero, ad esempio, assicurarsi
che il fondo sia perfettamente asciutto; questa precauzione
eviterà che il piano di cottura si sporchi.
• Utilizzare recipienti di diametro sufficientemente grande da
coprire completamente il fuoco: è consigliabile assicurarsi
che il fondo sia grande almeno quanto la zona di cottura. Se il
fondo è leggermente più grande, l’energia viene utilizzata in
maniera ottimale.
Per ottenere dei buoni risultati di cottura, è necessario
utilizzare dei recipienti di buona qualità.
9 IT
INDUZIONE
Simbolo sulle
pentole
INDUZIONE
Le informazioni seguenti vi aiuteranno a scegliere i recipienti più
adatti e migliori per ottenere dei buoni risultati.
Verificare la presenza del marchio a lato
sull’etichetta della pentola. Tale simbolo
identifica i materiali idonei per la cottura
ad induzione.
Utilizzare pentole magnetiche (ferro smaltato,
ghisa, acciaio ferritico) per verificare utilizzare
una calamita (deve essere attratta)
INOX Non utilizzabile
Ad eccezione dell’inox ferritico
ALLUMINIO Non utilizzabile
GHISA Buone prestazioni
ATTENZIONE: può graffiare la superficie in vetro
Ferro smaltato Buone prestazioni
Si raccomandano pentole con fondo piatto,
spesso e spigoli arrotondati
Vetro Non utilizzabile
Porcellana Non utilizzabile
Fondo in rame Non utilizzabile
Le diverse posizioni corrispondono ai seguenti livelli di potenza :
Posizione
INDUZIONE
LE DIVERSE POSIZIONI
% potenza
Max tempo di funzionamento
prima del cut-off (spegnimento forzato)
1 2,5 10 ore
2 5 10 ore
3 7,5 5 ore
4 12,5 4 ore
5 18 3 ore
6 24 3 ore
7 45 2 ore
8 60 2 ore
9 100 1 ora
UTILIZZO DEL PIANO VETROCERAMICA
FUNZIONAMENTO
Un generatore elettronico alimenta una bobina all’interno
dell’apparecchio. L’induttore crea un campo magnetico che induce
delle correnti detti “correnti d’induzione” le quali attraversano il
recipiente disposto sul piano cottura. Tali correnti trasformano il
recipiente in vero e proprio generatore di calore mentre la superficie
di vetro rimane fredda.
Il sistema funziona SOLO con pentole aventi fondo metallico
magnetico
L’induzione consente di ottenere due risultati fondamentali :
- essendo il calore trasmesso dal solo recipiente, la potenza di
riscaldamento restituita è massima e la cottura avviene senza
dispersione di calore,
- non esiste inerzia termica in quanto il contatto del recipiente
sulla zona di cottura ne comanda o interrompe la messa in
servizio (inizio o arresto istantaneo della cottura).
UN APPARECCHIO AL ALTA SICUREZZA....
Il vostro piano a induzione è dotato di numerosi dispositivi di
sicurezza per proteggerlo contro qualsiasi funzionamento anormale
o errato. Se il piano é installato ed utilizzato correttamente tali
dispositivi entreranno in funzione solo di rado.
• Turbina di ventilazione : protegge e raffredda gli organi di
comando e di alimentazione. Ha due velocità che vengono
attivate automaticamente. La turbina funziona anche se le zone
cottura sono spente, e continua a funzionare fino a quando il
comando elettronico non è sufficientemente raffreddato.
• Sicurezza "Transistor" : una sonda sorveglia in permanenza
la temperatura delle componenti elettroniche. Se il calore aumenta
in modo eccessivo, automaticamente diminuisce la potenza delle
zone cottura sino a giungere al loro totale spegnimento (in questo
caso il display del livello di potenza lampeggia) fin tanto che la
temperatura dei componenti non rientri negli standard; a questo
punto il piano riprende a funzionare.
• Sicurezza pentola vuota : una sonda installata sotto ogni zona
di cottura rileva la temperatura anormala di un recipiente vuoto
o della superficie in vetro del piano.
• Sicurezza “Segnalazione” : il rivelatore di presenza pentola
abilita il funzionamento della zona cottura. Un oggetto metallico
di piccole dimensioni (cucchiaio, coltello,...) posto sulla zona di
cottura non verrà rilevato, per cui il riscaldamento non avrà
luogo.
• Sicurezza ”fuoriuscita” : sono previste protezioni per arrestare
il funzionamento del piano nel caso di un’eventuale fuoriuscita
di liquidi. Per poter far ripartire il piano è necessario pulire le
tracimazioni.
1. Tasto ON / OFF
2. Tasto selezione zona cottura
3. Display : livello potenza, spia calore residuo, booster, ...
4. Tasto “-“
5. Tasto “+”
6. Tasto TIMER
7. Display TIMER
8. Tasto BLOCCO DI SICUREZZA + spia
9. Indicatore zona cottura, se acceso indica che il timer controlla
la zona interessata
10. LED di controllo :
acceso: la zona di cottura o il timer sono attivi, è possibile
modificare i parametri
spento: la zona cottura o il timer mantengono i parametri
scelti
11. Tasto BOOSTER
IL RECIPIENTE TRASFORMA
IL FLUSSO
D’INDUZIONE
IN CALORE
Flusso induzione
Superficie vetro
Induttore
10 IT
Per garantire la sicurezza le zone cottura si spengono
automaticamente se sono lasciate funzionare per un tempo
eccessivo. I tempi per lo spegnimento forzato dipendono dal livello
di potenza.
NOTA:
II piano induzione contiene due generatori, ciascuno dei quali
comanda simultaneamente due zone cottura (area):
Ogni generatore può fornire fino ad un massimo di 3700 W. Di
conseguenza, per la stessa area, quando la funzione Booster è
attiva e la seconda zona cottura è messa al livello 8 o 9, la potenza
di quest’ultima è automaticamente ridotta al livello 7; tale situazione
è segnalata dal lampeggio del display che segnala il livello di
potenza.
ATTENZIONE: come indicato nella
tabella precedente la funzione
Booster è attiva per 10 minuti, trascorsi i quali la zona cottura
riprende a funzionare al livello 9, anche la potenza della seconda
zona cottura, se ridotta per problemi di potenza massima, ritorna
all’impostazione desiderata.
USO
Attendere alcuni secondi dopo la prima accensione del piano
per permettere l’attivazione dei comandi elettronici.
- Premere il tasto per 3 secondi.
I comandi del piano sono attivi. Viene visualizzato il livello di
potenza ”0” ad ogni zona di cottura. I LED di controllo
lampeggiano.
-Trascorsi 10 secondi senza alcun utilizzo, i controlli elettronici
si spengono e la procedura di accensione deve essere ripetuta.
• RILEVAZIONE PENTOLA
Quando il piano è in funzione il rilevatore della pentola fornisce
il vantaggio di fermare o far partire automaticamente la zona di
cottura in funzione della presenza/assenza della pentola stessa.
Il sistema offre quindi la funzione aggiuntiva di risparmio di energia.
Se la zona cottura è utilizzata con una pentola adatta*:
il
display indica il livello di potenza o il funzionamento della funzione
booster “ ”.
* L’induzione richiede pentole con fondo idoneo, vedere tabella
pagina 9, e di diametro sufficiente a coprire l’intera zona utilizzata.
Se la zona cottura è utilizzata con una pentola non adatta:
sul display appare il simbolo “ ” . La zonacottura non si accende.
Se nessuna pentola viene rilevata trascorsi 10 minuti l’operazione
di accensione viene cancellata:
IMPORTANTE:
La zona cottura deve essere fermata manualmente, non è
possibile farlo solo togliendo la pentola. La funzione di
rilevamento della pentola non è equivalente ad un tasto
ON/OFF.
• SPEGNERE UNA ZONA DI COTTURA
- Premere il tasto della zona di cottura desiderata.
- Premere il tasto - fino a che il display indica . Ora la zona di
cottura è spenta, il display si spegne dopo 10 secondi.
- Per spegnere immediatamente premere contemporaneamente
i tasti - e + . Il display scende subito a e la zona di cottura
si spegne.
• SPEGNERE TUTTO IL PIANO
Le zone di cottura ed il timer possono essere fermati
quando si desidera premendo il tasto On \ Off
• INDICATORE DI CALORE RESIDUO
Sul display compare la lettera quando la superficie della zona
di cottura supera la temperatura di 60°C. La lettera si spegne
quando la temperatura scende sotto i 60°C.
Suggerimento: utilizzare il calore residuo della zona di cottura per
completare la cottura in modo lento.
N.B. dopo una interruzione di corrente, la spia di calore residuo
si spegne, anche se la temperatura di superficie supera i 60°C.
• RISCALDAMENTO RAPIDO
ACCENDERE UNA ZONA DI COTTURA
- Premere il tasto di selezione
della zona di cottura desiderata.
Il led di controllo della zona
interessata diventa fisso,
indicando che la zona è attiva.
- Premere i tasti - o + e selezionare il livello di potenza da 1 a
9. Tenendo premuti i tasti + o - il livello di potenza aumenta o
diminuisce progressivamente.
Le seguenti indicazioni sono fornite solo a titolo indicativo. La
Vostra personale esperienza Vi permetterà di adattare le cotture
al Vostro gusto.
0 : Spento
U : Cotture delicate
1 : )
2 : ) ..... Sciogliere, fondere
3 : Mantenimento in caldo
4 : Riscaldamento
5 : Scongelamento, cotture lente
6 : Cotture senza coperchio
7 : Friggere, rosolare, arrostire
8 : Cotture a temperatura elevata, arrostire
9 : Friggere
Booster : Portare ad ebollizione grandi quantità di liquidi...
Ogni zona di cottura è equipaggiata con una funzione che permette
un aumento veloce della temperatura.
Ideale per portare velocemente a bollitura grandi quantità di liquidi
Attivare il riscaldamento rapido
- Premere il tasto ON / OFF
- Attivare la zona di cottura desiderata, premere il tasto sino ad
ottenere il livello di potenza 9 , rilasciare brevemente il tasto e
premerlo di nuovo; sul display appaiono alternativamente A e 9
(livello di potenza).
- Se necessario ridurre la potenza al livello desiderato.
000
U (65°C) -
131
263
3115
4 16 6,5
5 19 8,5
6 32 2,5
7 45 3,5
8 65 4,5
9 100 0
Esempio zona cottura da 1800 W in posizione 6 = 32% di 1800 W
= 576 W forniti. Quando il RISCALDAMENTO RAPIDO è attivo,
la zona funziona a 1800W per 2,5 minuti, poi si porta ai 576
W impostati.
A funzione riscaldamento rapido terminata il livello di potenza è
fisso sul display
Livello
Impostato
Potenza fornita
(%)
Tempo
inserimento
Riscaldamento
Rapido
(minuti)
11 IT
• E’ importante prima di iniziare la pulizia della superficie in
vetroceramica, attendere che la stessa si sia completamente
raffreddata.
• Per la pulizia della superficie in vetroceramica devono essere
utilizzati solo prodotti specifici: crema e lametta. I suddetti prodotti
si trovano facilmente in commercio, nei supermercati.
• Evitare le fuoriuscite di liquido, le sostanze che cadono sul piano
di cottura si carbonizzano rapidamente e sono quindi più difficili
da pulire.
• Si raccomanda di tenere lontano dal piano di cottura tutto quanto
possa fondere, come ad esempio, tutti gli oggetti di plastica, la
carta stagnola, lo zucchero……
MANUTENZIONE:
- Versare qualche goccia di un prodotto specifico per la pulizia
della superficie in vetroceramica.
- Strofinare con insistenza dove vi fossero delle macchie insistenti,
con l’aiuto di uno straccio asciutto, o di una spugna leggermente
umida.
MANUTENZIONE DEL PIANO VETROCERAMICA
- Asciugare con uno straccio asciutto fino a quando la superficie
non sia pulita.
Se dopo questa manutenzione le macchie persistono:
- Versare di nuovo qualche goccia di un prodotto specifico.
- Strofinare con l’aiuto di una lametta rispettando l’angolo di 30°
rispetto al piano, insistendo fino alla scomparsa delle macchie.
- Asciugare con uno straccio asciutto o della carta assorbente
fino a che la superficie non sia pulita.
- Ripetere l’operazione se necessario.
CONSIGLI:
Una pulizia frequente farà in modo di mantenere sempre lucido
il vostro piano.
Assicurarsi che la superficie sia pulita prima di riutilizzare il piano.
Per togliere le tracce d’acqua e di calcare, utilizzare qualche
goccia d’aceto bianco, o di succo di limone. Per concludere
asciugare con l’aiuto di un foglio di carta assorbente poi applicare
qualche goccia di prodotto specifico e asciugare.
Il vetro del piano in vetroceramica sopporta lo sfregamento degli
utensili da cucina a fondo piatto, ma è comunque consigliabile
sollevarli prima di appoggiarli.
NOTA :
- Evitare d’usare una spugna troppo bagnata.
- Non utilizzare mai utensili affilati.
- L’utilizzo di una lametta da barba non può danneggiare la
superficie, se la si tiene inclinata di 30° rispetto al piano.
- Tenere lontano dalla portata dei bambini la lametta.
- Non utilizzare dei prodotti abrasivi o delle pagliette metalliche.
30° Maxi
La funzione booster permette, con la sola pressione di un tasto,
di ottenere una zona cottura con potenza elevata per 10 minuti.
Ideale per portare ad ebollizione grandi quantità di liquidi.
• UTILIZZO DELLA FUNZIONE BOOSTER
I
N
D
U
Z
I
O
N
E
POTENZA
POTENZA
BOOSTER
• PROGRAMMAZIONE DELLA ZONA DI COTTURA
Ogni zona di cottura può essere programmata per funzionare sino
ad un massimo di 99 minuti. E’ possibile programmare una zona
alla volta.
- Attivare la zona di cottura seguendo le indicazioni precedenti.
Il LED di controllo vicino all’indicatore di potenza deve essere
acceso; questo indica che la zona è attiva
- Premere il tasto Timer .
Di fianco al display del timer si accende la spia di programmazione
della zona cottura che viene programmata.
- Premere il tasto + per selezionare il tempo in minuti.
L’impostazione è memorizzata dopo 3 secondi.
Il tempo di programmazione può essere modificato a piacere
premendo il tasto timer, il LED di controllo deve essere acceso.
Trascorso il tempo impostato la zona di cottura si spegne
automaticamente. Un segnale sonoro è emesso per 1 minuto
(premere qualsiasi tasto per spegnerlo prima).
Il tempo impostato può essere riportato utilizzando il tasto -
o premendo contemporaneamente i tasti + e - , il funzionamento
della zona di cottura è ora indipendente dal timer ma rimane
funzionante.
Per spegnere la zona di cottura seguire le istruzioni precedenti.
Il timer può essere utilizzato come promemoria, suonerà allo
scadere del tempo impostato.
La funzione di blocco mantiene inalterate le scelte effettuate o
previene l’accensione accidentale del piano cottura. E’ utile anche
durante la pulizia della zona dei comandi.
- Per attivare:
- Premere il tasto on/off .
- Attivare le zone cottura richieste.
- Selezionare il livello di potenza desiderato.
- Premere il tasto per bloccare le scelte. Ad eccezione
del tasto ON/OFF nessun altro tasto è ora attivo.
La spia di blocco comandi si accende.
Per togliere la funzione di blocco premere il tasto ; la
spia si spegne ed i comandi funzionano nuovamente.
Se il timer è attivo quando i controlli vengono bloccati, il conto
alla rovescia prosegue e la zona di cottura interessata viene
automaticamente spenta allo scadere del tempo impostato.
Se la funzione di blocco è attivata a piano spento, i comandi sono
bloccati e questo evita qualsiasi accensione accidentale o non
voluta. Premere il tasto per togliere la funzione di blocco.
• BLOCCO DI SICUREZZA
Attivazione della funzione BOOSTER :
- Premere il tasto della zona cottura dotata della funzione
booster.
Il led di controllo si accende.
- Premere il tasto per attivare
la funzione Booster.
La funzione Booster è attiva per 10 minuti.
Sul display appare il simbolo P (potenza).
Trascorsi i10 minuti il livello di potenza si riporta a 9.
Premendo il tasto “-“ la funzione booster viene disattivata ed il
livello di potenza dimunuisce.
Questo elettrodomestico è marcato conformemente
alla Direttiva Europea 2002/96/CE sui rifiuti da
apparecchiature elettriche ed elettroniche (WEEE).
Assicurandovi che questo prodotto sia smaltito
correttamente, aiuterete ad evitare possibili
conseguenze negative all’ambiente e alla salutedelle
persone, che potrebbero verificarsi a causa d’un errato
trattamento di questo prodotto giunto a fine vita. Il simbolo sul prodotto
indica che questo apparecchio non può essere trattato come un
normale rifiuto domestico; dovrà invece essere consegnato al punto
più vicino di raccolta per il riciclo delle apparecchiature elettriche ed
elettroniche. Lo smaltimento deve essere effettuato in accordo con
le regole ambientali vigenti per lo smaltimento dei rifiuti. Per
informazioni più dettagliate sul trattamento, recupero e riciclo di
questo prodotto, per favore contattare l’ufficio pubblico di competenza
(del dipartimento ecologia e ambiente), o il vostro servizio di raccolta
rifiuti a domicilio, o il negozio dove avete acquistato il prodotto.
12 IT
PROBLEMI E SOLUZIONI
Il piano induzione emette rumori .
• Normale. La ventola di raffreddamento dei componenti elettronici
è in funzione.
Il piano induzione emette un leggero fischio.
• Normale. In funzione della frequenza del generatore induzione,
potrebbe essere udito un leggero fischio quando più zone di
cottura stanno funzionando al massimo.
I fuochi non mantengono i sughi o le fritture a fuoco basso.
Utilizzare esclusivamente recipienti a fondo piatto. Il fondo del
recipiente deve ricoprire interamente il diametro del fuoco scelto.
Cotture troppo lente.
Utilizzo dei recipienti non adatti. Utilizzare solo degli utensili a
fondo piatto pesante e con un diametro almeno uguale al fuoco.
Graffi o scalfitture sulla superficie in vetro del piano.
Errato sistema di pulizia, utilizzo di recipienti con fondo ruvido,
presenza di particelle abrasive (sale, sabbia, zucchero) tra il piano
e il fondo del recipiente.
Consultare il capitolo relativo alla pulizia, assicurarsi che i fondi
dei recipienti siano adatti prima dell’utilizzo e utilizzare solo
recipienti con fondo liscio.
Segni di metallo (possono sembrare graffi)
Non far scivolare dei recipienti di alluminio sul piano. Attenersi
alle istruzioni di pulizia. Se non vengono utilizzati dei materiali di
buona qualità, le macchie di qualsiasi tipo esse siano persisteranno.
Aiutatevi con una lametta da barba e seguite le istruzioni del
capitolo "MANUTENZIONE”.
Macchie scure
Utilizzare una lametta da barba e seguire il capitolo
“MANUTENZIONE”.
Macchie sul piano
Macchie causate da recipienti in alluminio, dall’acqua o da alimenti,
possono essere eliminate con una crema pulente.
Segni di caramello o di plastica fusa sul piano.
Controllare il capitolo “MANUTENZIONE”.
Il piano non funziona (piani con comandi digitali).
Un oggetto o residuo di cibo sta coprendo almeno due comandi
per almeno 10 secondi. Effettuare la pulizia o rimuovere l’oggetto
• Il pannello comandi è bloccato, sbloccarlo.
Il piano non si spegne
Il pannello comandi è bloccato, sbloccarlo.
Il piano si spegne automaticamente
• Un residuo di cibo copre almeno due comandi per almeno 10
secondi; il piano si spegne per sicurezza ed un segnale sonoro
viene emesso sino alla pulizia del residuo di cibo.
• Le zone di cottura si spengono automaticamente se vengono
fatte funzionare per un tempo troppo lungo. Vedere la tabella di
pagina 9.
Il piano non funziona oppure alcuni fuochi non sono
funzionanti.
I ponticelli (shunt) sulla morsettiera non sono posizionati
correttamente. Fate controllare da un professionista che il raccordo
sia stato effettuato conformemente alle raccomandazioni della
pagina 8.
ON \ OFF frequenti delle zone di cottura
I cicli ON \ OFF variano a seconda del livello di potenza scelto:
- bassa potenza: tempi di funzionamento brevi,
- alta potenza: tempi di funzionamento lunghi.
Simbolo “H” , indicatore del calore residuo, lampeggia
• La temperatura del modulo elettronico di comando è troppo
elevata. Un tecnico qualificato deve verificare le condizioni di
installazione; vedere pagina 8.
SERVIZIO ASSISTENZA CLIENTI
CERTIFICATO DI GARANZIA CONVENZIONALE: cosa fare?
Il Suo prodotto è garantito, alle condizioni e nei termini riportati
sul certificato inserito nel prodotto ed in base alle previsioni del
decreto legislativo 24/02, nonché del decreto legislativo 6 settembre
2005, n. 206, per un periodo di 24 mesi decorrenti dalla data di
consegna del bene.
Così come riportato nei testi dei Decreti Legislativi citati, il certificato
di garanzia dovrà essere da Lei conservato, debitamente compilato,
per essere mostrato al Servizio Assistenza Tecnica Autorizzato,
in caso di necessità, unitamente ad un documento fiscalmente
valido rilasciato dal rivenditore al momento dell’acquisto (bolla di
consegna, fattura, scontrino fiscale, altro) sul quale siano indicati
il nominativo del rivenditore, la data di consegna, gli estremi
identificativi del prodotto ed il prezzo di cessione
Resta pure inteso che, salvo prova contraria, poiché si presume
che i difetti di conformità che si manifestano entro sei mesi dalla
consegna del bene esistessero già a tale data, a meno che tale
ipotesi sia incompatibile con la natura del bene o con la natura
del difetto di conformità, il Servizio di Assistenza Tecnica Autorizzato
Gias, verificato il diritto all’intervento, lo effettuerà senza addebitare
il diritto fisso di intervento a domicilio, la manodopera ed i ricambi.
Per contro, nel successivo periodo di diciotto mesi di vigenza della
garanzia, sarà invece onere del consumatore che intenda fruire
dei rimedi accordati dalla garanzia stessa provare l’esistenza del
difetto di conformità del bene sin dal momento della consegna;
nel caso in cui il consumatore non fosse in grado di fornire detta
prova, non potranno essere applicate le condizioni di garanzia
previste e pertanto il Servizio di Assistenza Tecnica Autorizzato
Gias effettuerà l’intervento addebitando al consumatore tutti i costi
relativi.
ESTENSIONE DELLA GARANZIA FINO A 5 ANNI : come?
Le ricordiamo inoltre che sullo stesso certificato di garanzia
convenzionale Lei troverà le informazioni ed i documenti necessari
per prolungare la garanzia dell’apparecchio sino a 5 anni e così,
in caso di guasto, non pagare il diritto fisso di intervento a domicilio,
la manodopera ed i ricambi.
Per qualsiasi informazione necessitasse, La preghiamo rivolgersi
al numero telefonico del Servizio Clienti 199.12.13.14.
ANOMALIE E MALFUNZIONAMENTI: a chi rivolgersi ?
Per qualsiasi necessità il centro assistenza autorizzato è a Sua
completa disposizione per fornirLe i chiarimenti necessari;
comunque qualora il Suo prodotto presenti anomalie o mal
funzionamenti, prima di rivolgersi al Servizio Assistenza Autorizzato,
consigliamo vivamente di effettuare i controlli indicati sotto.
UN SOLO NUMERO TELEFONICO PER OTTENERE ASSISTENZA.
Qualora il problema dovesse persistere, componendo il “Numero
Utile” sotto indicato, sarà messo in contatto direttamente con il
Servizio Assistenza Tecnica Autorizzato
che opera nella Sua zona di residenza.
Attenzione, la chiamata è a pagamento;
il costo verrà comunicato, tramite
messaggio vocale, dal Servizio clienti
dell’operatore telefonico utilizzato. Dettagli sono presenti sul sito
internet www.hoover.it
MATRICOLA DEL PRODOTTO. Dove si trova?
E’ indispensabile che comunichi al Servizio Assistenza Tecnica
Autorizzato la sigla del prodotto ed il numero di matricola (16
caratteri che iniziano con la cifra 3) che troverà sul certificato di
garanzia oppure sulla targa matricola del prodotto (applicata sotto
al prodotto). In questo modo Lei potrà contribuire ad evitare
trasferte inutili del tecnico, risparmiando oltretutto i relativi costi.
13 DE
LESEN SIE DIE BEDIENUNGSANLEITUNG SORGFÄLTIG DURCH, UM DEN GRÖßTMÖGLICHEN NUTZEN AUS IHREM GERÄT
ZU ZIEHEN. Wir empfehlen Ihnen, die Installations- und Bedienungsanleitung für eine spätere Nutzung aufzubewahren. Notieren Sie
auf diesem Heft VOR DER INSTALLATION die Seriennummer des Gerätes, die bei einem eventuellen späteren Einsatz des Kundendienstes
nötig ist.
• Um das Risiko von Verbrennungen auszuschließen, halten Sie Kinder fern, wenn das Gerät im Betrieb ist, auch nachdem die
Kochstellen abgeschaltet wurden, solange die Restwärmeanzeige leuchtet.
Wenn Sie mit Fett oder Öl kochen, achten Sie darauf, immer den Kochvorgang zu überwachen, da sich zu heißes Fett oder Öl leicht
entzünden kann.
Keine Alufolie oder Kunststoffbehälter auf die heiße Ceranoberfläche abstellen.
• Lassen Sie keine metallischen Gegenstände wie Messer, Gabeln, Löffel oder Deckel auf dem Induktionsfeld liegen, da sie, wenn sie
sehr groß bzw. lang oder besonders schwer sind, sehr heiß werden können!
• Wir empfehlen Ihnen, das Ceranfeld nach jeder Benutzung zu reinigen, um eine Ansammlung von Verschmutzungen und Fettrückständen
zu vermeiden. Sie würden sich bei jeder neuen Benutzung erhitzen und verkohlen und dabei störenden Rauch und unangenehme
Ausdünstungen verbreiten. Außerdem stellen sie ein Brandrisiko dar.
Die Steuerplatine des Gerätes ist empfindlich. Achten Sie darauf, keine heißen Behälter darauf abzustellen.
Niemals direkt auf dem Ceranfeld kochen. Benutzen Sie stets Kochgeschirr.
Stellen Sie Töpfe und Pfannen immer in die Mitte des Kochfelds.
Benutzen Sie die Ceranoberfläche nicht als Schneidebrett oder Arbeitsfläche.
Schieben Sie das Kochgeschirr nicht von Kochfeld zu Kochfeld: das könnte Kratzer verursachen.
Bewahren Sie keine schweren Gegenständen über dem Ceranfeld auf, sie könnten herunterfallen und das Ceranfeld beschädigen.
Benutzen Sie die Ceranoberfläche nicht als Aufbewahrungsort für irgendwelche Gegenstände
Im unwahrscheinlichen Fall, dass auf der Kochfläche ein Riss auftreten sollte, unterbrechen Sie sofort die Stromzufuhr zum Ceranfeld
und setzen Sie sich mit unserem Kundendienst in Verbindung.
Kinder oder Personen mit eingeschränkten körperlichen oder geistigen Fähigkeiten oder mit ungenügenden Kenntnissen und Erfahrung
dürfen nur dann das Gerät benutzen, wenn sie beaufsichtigt werden oder hinreichend Anweisungen zur sicheren Behandlung des
Gerätes durch eine für ihre Sicherheit verantwortliche Person erhalten haben.
Kinder sind zu beaufsichtigen, um sicher zu stellen, dass sie nicht mit dem Gerät spielen.
ALLGEMEINE HINWEISE
Matrikelschild:
(befindet sich auf der Unterseite des Gerätes)
Made in FRANCE - 232 -
220 - 240 V
P. Motors = 30 W
Mod : FE GD21 RB
P. Maxi (Oven) - 2350 W
Code: 39354774 -0306 0511
Mod: FE GD21 RB
Code: 39354774 - 0306 0511
220 - 240 V
Code: 39354774
- 0306 0511
Code: 39354774
- 0306 0511
Code: 39354774
- 0306 0511
Alle Daten dienen der Information. Bemüht, die Qualität ihrer Produkte stets zu verbessern, behält sich Der Hersteller leichte Änderungen
in Verbindung mit technischen Innovationen vor.
Das Gerät entspricht den Europäischen Richtlinien 73/23/CEE und 89/336/CEE, ersetzt durch 2006/95/CE bzw. 2004/108/CE ,
und deren nachträglichen Veränderungen.
KOCHMULDEN
Kochstellen
Spannung/Frequenz
(V/Hz)
Gesamtanschulusswert (W)
Maße (B x T x H) mm.
Einbaumaße (AxB)
4 Induktion 4 Induktion
220-240/50 220-240/50
574 x 505 x 55 752 x 505 x 55
HVI 740HVI 640
Der Einbau und die Installation eines Elektrogerätes sind Arbeiten, die mit besonderer Sorgfalt durchgeführt werden müssen. Eine nicht
fachgerechte Installation kann die Sicherheit des Gerätes beeinträchtigen und die Unversehrtheit des Benutzers gefährden. Es ist daher
zwingend notwendig, die Installationsarbeiten einem qualifizierten Fachmann zu überlassen, der sie nach allen Regeln der Kunst und gemäß
der geltenden Normen durchführen kann. Sollte der Endverbraucher trotz dieser dringenden Empfehlung die Installation selber vornehmen, lehnt
der Hersteller jede Verantwortung für technische Defekte am Gerät oder für eventuell resultierende Schäden an Personen oder Sachen ab.
14 DE
EINBAU
Das Möbel oder die Arbeitsplatte, in die das Ceranfeld eingebaut
werden soll, so wie die Wände der angrenzenden Möbel müssen
aus hitzebeständigem Material bestehen.
Insbesondere bei Schränken aus Furnierholz müssen die
verwendeten Klebstoffe hitzebeständig sein, um Verformungen
und Entleimungen zu vermeiden.
Installation:
Mit dem Ceranfeld wird ein Dichtungsstreifen mitgeliefert.
Gehen Sie wie folgt vor:
- Drehen Sie das Gerät mit dem Glas nach unten um. Schützen
Sie dabei die Glasoberfläche.
- Kleben Sie den Dichtungsstreifen rund um das Gerät.
- Achten Sie auf einen einwandfreien Sitz des Dichtungsstreifens,
um das Durchsickern von Feuchtigkeit in das untenstehende
Möbel zu verhindern
Bitte achten Sie darauf, dass das Kochfeld in eine ebene Fläche
eingebaut wird.
• Eventuelle Verformungen, die wegen einer fehlerhaften und
unsachgemäßen Montage verursacht worden sind, können die
Eigenschaften der Arbeitsfläche verändern und somit die Leistung
des Kochfelds beeinträchtigen.
• Zwischen dem Kochfeld und den Wänden der angrenzenden
Möbel sorgen Sie für einen Abstand von mindestens 5 cm.
• Der Ausschnitt muss unbedingt den angegebenen Abmessungen
entsprechen.
• Die Höhe des in der Arbeitsplatte bzw. im Möbel eingebauten
Teils des Kochfelds beträgt 5,5 cm.
• Bei Vorhandensein von Zwischenplatten:
- Der Abstand zwischen dem Boden des Gehäuses und der dem
angrenzenden Möbel gehörigen Zwischenplatte muss größer
als 2,5 cm sein, damit die Luftzirkulation ermöglicht wird. Der
Mindestabstand der angrenzenden Möbel / des Rahmens zu
dem Kochfeld beträgt dementsprechend 8 cm.
- Außerdem müssen Sie sicherstellen, dass auch hinter den
Kochfeldern bzw. entlang der ganzen Breite der Luftumlauf
(8 cm) gewährleistet ist.
Das Ceranfeld darf nicht über einem Ofen ohne Ventilator,
einem Geschirrspüler, einem Kühlschrank, einem
Gefrierschrank oder einer Waschmaschine montiert werden.
Der Körper des Kochfeldes ist mit 4 Positionierlöchern für die
Klammern zur Befestigung der Ceranfeldes selber im Möbel bzw.
in der Arbeitsplatte ausgestattet.
Vor dem Einbau des Kochfelds positionieren Sie die vier
Klemmen so, dass das Kochfeld fest in der Einbaueinheit sitzt.
INSTALLATION
Das gelb-grüne Erdungskabel muss an die Klemmleiste des
Gerätes einerseits und der Hausinstallation andererseits
angeschlossen werden.
Wir lehnen jegliche Verantwortung für Schäden oder deren
Folgen ab, die aus der Benutzung eines nicht oder mangelhaft
geerdeten Gerätes resultieren.
Alle Eingriffe am Versorgungskabel sind ausschließlich durch
den Werkskundendienst oder durch ähnlich qualifiziertes
Fachpersonal durchzuführen.
Das Kochfeld bedarf keines Stromversorgungskabels. Es ist
nämlich mit einem Klemmbrett zur Auswahl des für die
elektrische Hausinstallation geeigneten Anschlusses
ausgestattet.
Das Klemmbrett hat unterschiedliche Anschlussmöglichkeiten:
Zweiphasig 220-240 V2~, Dreiphasig 220-240 V3~,
Dreiphasig 380-415 V3N~
Um eine neue Verbindung herzustellen, beachten Sie bitte
folgende Anweisungen:
• Bevor Sie die Verbindung herstellen, stellen Sie sicher, dass das
Gerät durch eine angemessene Sicherung geschützt – siehe
hierzu die unten stehende Tabelle - und mit Kabeln mit zu einer
normalen Versorgung ausreichendem Querschnitt ausgestattet ist.
1- Arbeiten an bereits vorhandenen Anschlüssen:
• Drehen Sie das Kochfeld so um, dass die Seite aus Glas auf
der Arbeitsplatte aufliegt, wobei für einen geeigneten Schutz des
Glases zu sorgen ist.
• Klappen Sie den Deckel auf
• Drehen Sie die Schrauben heraus, welche die Einheit mit den
Shunt-Schienen und den Leitern des Netzkabels halten;
• Lösen Sie die Kabelschellen, um das Netzkabel entfernen zu
können;
• ziehen Sie das Netzkabel heraus.
2- Schritte zur Herstellung einer neuen Verbindung
- Wählen Sie das Netzkabel gemäß den Anweisungen in der
unten stehenden Tabelle.
- Führen Sie das Netzkabel durch die Kabelschelle hindurch;
- Isolieren Sie die Enden jedes Leiters auf eine Länge von 10 mm
ab; dabei berücksichtigen Sie die erforderliche Länge des
Netzkabels für den Anschluss an das Klemmbrett.
- Auf der Grundlage der nachstehenden Tabelle positionieren Sie
die Shunt-Schienen, die Sie im dem vorherigen Arbeitsschritt
aufgehoben haben, unter Beachtung der entsprechenden
Markierungen auf dem Klemmbrett (die Shunt-Schienen
ermöglichen es, eine Brücke zwischen zwei Klemmen
herzustellen) und befestigen Sie die Leiter. Überprüfen Sie die
Befestigung an den verschiedenen Klemmen.
- Schrauben Sie die Kabelschelle wieder auf und schließen Sie
den Deckel fest.
Installation des Gerätes muss gemäß den im Land der Installation
geltenden Normen erfolgen.
Die Hersteller lehnt jede Verantwortung für die Missachtung dieser
Richtlinie ab.
Achtung:
Vor dem elektrischen Anschluss überprüfen Sie die auf dem
Zähler angegebene Netzspannung, die Sicherung und die
einwandfreie Erdung der Hausinstallation.
Der elektrische Anschluss ans Stromnetz erfolgt mit einem
Stecker mit Erdung oder mittels einer Vorrichtung zur allpoligen
Unterbrechung mit einem Öffnungsabstand zwischen den
Kontakten von mindestens 3 mm.
Wenn das Gerät an einer Steckdose angeschlossen wird, muss
diese auch nach der Installation leicht zugänglich sein.
ELEKTRISCHER ANSCHLUSS
Dichtungsstreifen
Gerätegehäuse
25 mm
mini
50 mm
Öffnung
500 X 50
ANSCHLUSS AN DIE KLEMMEN VOM KLEMMBRETT
Sicherung
Kabel
Sicherung
Kabel
Sicherung
Kabel
Ph = Phase N = Nulleiter T = Erdung
Einphasig 220-240 V~
Zweiphasig 220-240 V2~
Dreiphasig 220-240 V3~ Dreiphasig 380-415 V3N~
HVI 740HVI 640
15 DE
WAHL DES RICHTIGEN KOCHGESCHIRRS
Benutzen Sie immer Kochgeschirr von guter Qualität mit
gleichmäßig flachem Boden: Der flache Boden verhindert
vereinzelte heiße Stellen und somit das Anbrennen der Speisen.
Dicke Metalltöpfe und Pfannen ermöglichen eine gleichmäßige
Verteilung der Hitze.
Vergewissern Sie sich, dass der Boden Ihres Kochgeschirrs
trocken ist: Wenn Sie die Töpfe mit Flüssigkeit füllen, oder
wenn Sie Kochgeschirr benutzen, das im Kühlschrank aufbewahrt
wurde, vergewissern Sie sich, dass der Boden völlig trocken ist.
Das ist eine notwendige Maßnahme, um Ihr Kochfeld nicht zu
verschmutzen.
Die Benutzung von gutem Kochgeschirr ist sehr wichtig,
um beste Ergebnisse mit Ihrem Ceranfeld zu erzielen:
INDUKTION
Um es mit einfachen Worten auszudrücken:
Das Induktionsverfahren bietet zwei Hauptvorteile:
- Da die Kochfläche nur durch die Abwärme des Topfes oder der
Pfanne erwärmt wird, wird die Hitze auf ihrem höchsten Niveau
erhalten und der Kochvorgang erfolgt ohne messbaren Energieverlust.
- Es entsteht keine Wärmeträgheit, da das Induktionsfeld erst
dann arbeitet, wenn der Kochtopf auf dem Ceranfeld platziert
wird, und die Stromzufuhr unterbrochen wird, wenn er entfernt wird.
DIE SICHERHEITSVORRICHTUNGEN - Wenn Ihr Kochfeld
sachgemäß installiert und benutzt wird, kommt der Einsatz der
Schutzvorrichtungen äußerst selten vor.
Ventilator: Zum Schutz der Stromversorgungs- und
Steuervorrichtungen. Er verfügt über zwei Geschwindigkeiten,
die automatisch geschaltet werden. Der Ventilator läuft selbst,
wenn das Kochfeld abgeschaltet ist, und zwar solange, bis die
elektronischen Vorrichtungen sich ausreichend abgekühlt haben.
Sicherheitstransistor: Eine Sonde überprüft ständig die
Temperatur an den elektronischen Komponenten. Wenn die
Hitze einen zu hohen Wert erreicht, wird die Leistung des
Kochfeldes automatisch verringert bzw. heruntergeschaltet (die
Leistungsanzeige blinkt), bis es sich ausschaltet. Sobald die
Temperatur an den Komponenten auf das von den Normen
vorgeschriebene Niveau zurückgesunken ist, startet das Kochfeld
wieder.
Schutzvorrichtung gegen den "leeren Kochtopf": Unter jeder
Kochzone befindet sich eine Vorrichtung, die jede eventuelle
Fehltemperatur, die für den leeren Topf oder für die
Glaskeramikoberfläche nicht geeignet ist, sofort erkennt.
Schutzvorrichtung "Erkennung": Der Präsenzsensor erlaubt
erst den Betrieb und somit die Erwärmung. Liegt ein kleiner
Gegenstand (zum Beispiel ein Löffel, ein Messer oder ein
Ring) auf dem Kochfeld, wird er nicht als Kochtopf erkannt und
demzufolge setzt sich das Kochfeld nicht in Betrieb.
Schutzvorrichtung "Überkochen und Spritzer": Im Falle von
eventuellem Überkochen, schaltet sich das Kochfeld automatisch
ab. Entfernen Sie die Speiseresten, um das Kochfeld wieder in
Betrieb zu setzen
TOUCH-CONTROL-BEDIENTAFEL
1 - EIN/AUS TASTE
2 - TASTE ZUR AUSWAHL DER KOCHZONE
3 - DISPLAY: Wärmestufe oder Restwärmeanzeige
4 - TASTE “-”
5 - TASTE “+”
6 - TIMER TASTE
7 - TIMER DISPLAY
8 - KONTROLLVERRIEGELUNGSTASTE MIT ANZEIGELAMPE
9 - ANZEIGE ZUR PROGRAMMIERUNG DER KOCHZONE:
Wenn angezeigt, heißt dies, das der Timer gerade die jeweilige
Kochzone überwacht
10 - KONTROLLEUCHTE :
. On: Die Kochzone oder der Timer ist aktiv, Änderung der
Einstellungen sind möglich,
. Off: Die Kochzone oder der Timer ist auf die zuletzt
programmierten Angaben einsgestellt.
11 - BOOSTER-FUNKTION TASTE
Benutzen Sie Kochgeschirr, dessen Durchmesser groß
genug ist, um das Kochfeld völlig abzudecken: Der
Durchmesser des Kochgeschirrs sollte nicht kleiner sein als das
Kochfeld. Wenn der Durchmesser etwas größer ist, wird die
Energie der Kochstelle optimal genutzt.
Folgende Hinweise werden Ihnen bei der Auswahl des jeweils
geeigneten Kochgeschirrs und somit zum Erzielen bester
Kochleistungen behilflich sein.
Topf
verwandelt
die Induktionsströme
in Hitze
Induktionströme
Magnetspule
Glaskeramikfeld
BESCHREIBUNG DES VERFAHRENS
Ein elektronischer Generator versorgt eine im Inneren
des Geräts untergebrachte Magnetspule.
Diese Wicklung erzeugt ein magnetisches Feld, so
dass der Kochtopf, wenn er auf dem Kochfeld abgestellt wird, von
den Induktionsströmen durchzogen wird.
Diese Ströme machen den Topf zu einem wahren Wärmeleiter,
während die Glaskeramikoberfläche kalt bleibt.
Dieses System ist für den Gebrauch mit Kochtöpfen mit
magnetischem Boden ausgelegt.
Elektronischer Generator
Wenn das Kochfeld in Betrieb ist, sorgt die Metallbodenerkennung
für das automatische Aus- oder Einschalten der Wärmezufuhr an
die Kochzone, wenn der Kochtopf davon entfernt bzw. darauf
gelegt wird. Somit wird Energieeinsparung ermöglicht.
Wenn die Kochstelle mit geeignetem Kochgeschirr benutzt wird*: Das
Display zeigt die Wärmestufe oder, wenn der Booster aktiv ist,
ein an.
* Die Induktion erfordert den Gebrauch von geeignetem, d.h. mit
einem Metallboden ausgestattetem Kochgeschirr, siehe Tabelle;
deren Durchmesser muss außerdem mindestens so groß wie der
Durchmesser der Kochzone sein, damit diese
vollständig bedeckt wird.
Wenn die Kochstelle eingeschaltet ist aber kein geeigneter oder
gar kein Kochtopf darauf steht:
Auf dem Display erscheint das Symbol Die Kochzone startet
nicht. Wenn kein Kochtopf bzw. kein Metallboden erkannt wird,
wird der Startbefehl nach 10 Minuten automatisch rückgängig
gemacht.
WICHTIG:
Um die Kochstelle auszuschalten, müssen Sie das Kochfeld
ordnungsgemäß ausschalten, anstatt einfach den Kochtopf zu
entfernen. Der Metallbodenmelder hat nicht die Funktion eines
Ein-/Aus-Schalters.
• KOCHSTELLE ABSCHALTEN
Die Kochstelle muss aktiv sein. Die Leuchtanzeige für die Steuerung
im Einstellungsfeld muss leuchten. Sollte das nicht der Fall sein,
wählen sie erneut die gewünschte Kochzone.
- Drücken Sie die Taste “-” bis die Leistung “0” erscheint. Die
Kochzone schaltet sich augenblicklich ab. Nach 10 Sekunden
erscheint die Anzeige “0”.
- Um schnell abzuschalten, drücken Sie gleichzeitig die Tasten
“+” und “-”. Die Leistung geht sofort auf “0” zurück und die
Kochzone schaltet sich ab.
- Drücken Sie die Taste oder um eine Leistung zwischen 1
und 9 zu wählen.
- Wenn Sie die Taste oder gedrückt halten, erhöhen bzw.
vermindern Sie die eingestellte Leistung.
Die nachfolgenden Beispiele dienen zu Ihrer Information. Die
persönliche Erfahrung wird Ihnen ermöglichen, die vorgeschlagenen
Einstellungen Ihren Bedürfnissen und Ihrem Geschmack
anzupassen.
0 : Aus
U: 65°C
1 : )
2 : ) ..... Schmelzen
3 : Warmhalten
4 : Aufwärmen
5 : Auftauen, schmoren, garen bei niedriger Temperatur
6 : Garen ohne Deckel
7 : Anbraten, rösten, Fleischbraten
8 : Garen und braten bei hoher Temperatur, backen
9 : Frittieren, Wasser zum Kochen bringen
Booster : Aufkochen von großen Flüssigkeitsmengen
• RESTWÄRMEANZEIGE
Um anzuzeigen, dass die Temperatur der Kochstellenoberfläche
über 60°C beträgt, erscheint im Steuerungsfeld die Anzeige: “H”.
Wir empfehlen, gegen Ende der Garzeit die Kochzone abzuschalten
und die Restwärme auszunutzen, um den Garvorgang schonend
zu Ende zu bringen.
Wenn die Temperatur unter 60°C gefallen ist, erlischt die
Anzeige “H”.
HINWEIS: Nach einem eventuellen Stromausfall bleibt die
Restwärmeanzeige ausgeschaltet, selbst wenn die Temperatur
der Glasoberfläche über 60°C beträgt.
16 DE
Jeder Bereich kann eine maximale Leistung von 3700 W erreichen.
Demzufolge, wenn in einem Bereich der Booster in Betrieb ist
und die zweite Kochzone des Bereiches eine Leistungsstufe von
9 oder 8 erreicht hat, wird die Energieversorgung dieser
Kochstelle automatisch auf Stufe 7 herabgesetzt. Dieser Rückgang
wird durch ein blinkendes Display angezeigt.
Achtung: Wie in der Leistungstabelle angegeben, arbeitet der
Booster für maximal 10 Minuten. Nach Ablauf dieser höchsten
Betriebszeit schaltet er sich aus und die Kochzone geht bei
Erreichen der Stufe 9 wieder an; da die Leistung des Generators
gesunken ist, geht die Leistungsstufe der zweiten Platte auf den
ursprünglich eingestellten Wert zurück.
Die verschiedenen Positionen entsprechen den folgenden Stromwerten
Zur Erhöhung der Sicherheit schalten sich die Kochfelder
automatisch aus, wenn sie zu lange in Betrieb gewesen sind. Die
zulässige maximale Betriebszeit hängt vom jeweils eingestellten
Temperaturniveau ab.
ANMERKUNG: Die Kochfelder werden von einem Generator
gespeist, welcher 2 Kochzonen je Bereich gleichzeitig versorgt,
und zwar je nach Modell:
DIE VERSCHIEDENEN WÄRMESTUFEN
• KOCHSTELLE EINSCHALTEN
- Betätigen Sie den Knopf,
welcher der Kochzone
zugeordnet ist, die Sie benutzen
möchten. Im Displaybereich die
Kontrolleuchte kontinuierlich. Das
bedeutet, daß die Kochzone aktiv
ist.
ANWEISUNGEN FÜR DEN GEBRAUCH
• METALLBODENERKENNUNG (Induktion)
• Nachdem Sie das Ceranfeld eingeschaltet haben, warten Sie
ca. 8 Sekunden, um die elektronische Steuerung zu aktivieren.
- Drücken Sie die Taste für 3 Sekunden
Nun ist die elektronische Steuerung des Gerätes aktiviert. Für
jede Kochzone erscheint die Hitzeleistung “0” und die
Leuchtanzeige der Steuerung blinkt.
- Wenn Sie 10 Sekunden lang nichts unternehmen, schaltet sich
die elektronische Steuerung ab und Sie müssen den
Einschaltvorgang wiederholen.
• CERANFELD ABSCHALTEN
Es ist jederzeit möglich, die Funktion der
Kochzonen und des Minutenzählers durch
Drücken der Taste ON-OFF für 3
Sekunden abzuschalten.
INDUKTION
Wärme-
stufen
Leistung
in %
Maximale
Betreibszeit vor dem
automatischen
Abschalten
Stunden
Stunden
Stunden
Stunden
Stunden
Stunden
Stunden
Stunden
Stunden
• PROGRAMMIERUNG EINER KOCHSTELLE
Jede Kochzone ist für eine maximale Dauer von 99 Minuten
programmierbar. Man kann nur jeweils EINE Kochstelle
programmieren.
- Schalten Sie die gewünschte Kochzone mit den oben beschrie-
benen Anweisungen ein.
Die Leuchtdiode für die Leistungsanzeige
muss leuchten, um anzuzeigen, daß die Kochzone aktiv ist.
- Drücken Sie die Taste Minutenzähler
Die Anzeige der Kochstelle um das Einstellungsfeld des
Minutenzählers weist auf die gesteuerte Kochzone hin
- Drücken Sie die Taste “+” oder “-” um eine Dauer in Minuten
zu wählen.
Die eingestellte Zeit wird nach drei Sekunden
automatisch gespeichert.
Die eingestellte Zeit kann jederzeit verändert werden. Drücken
Sie die Wahltaste für den Minutenzähler, die Leuchtdiode des
Minutenzählers muss leuchten. Wenn die Zeit abgelaufen ist,
schaltet sich die Kochzone automatisch ab und es ertönt ein
akustisches Signal. Drücken Sie die Minutenzähler Taste, um
es zu unterbrechen.
Die eingestellte Zeit kann wieder auf “00” gebracht werden,
entweder mit der Taste “-” oder durch gleichzeitiges Drücken
auf die Tasten “-” und “+”. Somit wird die Kochzone nicht mehr
über den Minutenzähler gesteuert und muss manuell abgeschaltet
werden.
Der Minutenzähler kann auch einzeln als Eieruhr benutzt werden.
Am Ende der Zeit ertönt ein Klingelzeichen.
17 DE
Die Verriegelungsfunktion dient dazu, die eingestellte Leistungsstufe
zu erhalten oder zu verhindern, daß jemand das Kochfeld
einschaltet. Sie wird deshalb dann benutzt, wenn das Bedienfeld
gereinigt werden soll: Die Tasten werden nämliche verriegelt und
das Kochfeld bleibt ausgeschaltet.
Um das Kochfeld zu sperren:
- Aktivieren Sie Die Kochzonen, die Sie verwenden möchten.
- Wählen Sie für jede Kochzone die gewünschte Wärmestufe.
- Drücken Sie auf die Taste , um die Angaben einszustellen;
in diesem Zustand ist keine andere Taste in Betrieb, bis auf den
Ein-/Aus-Schalter.
Die Verriegelungsanzeigelampe erleuchtet.
Um das Kochfeld zu entsperren:
Um die Verriegelungsfunktion abzustellen, müssen Sie nur die
Taste drücken, die Anzeigelampe geht aus und alle Tasten
sind wieder betriebsbereit.
Ist der Timer, wenn die Befehlstasten verriegelt sind, eingeschaltet,
wird die Zeit automatisch abgezählt und die entsprechende
Kochzone wird bei Ablauf der eingestellten Kochzeit ausgeschaltet.
Ist die Verriegelungsfunktion aktiv, wenn das Kochfeld abgeschaltet
wird, bleibt sie in Betrieb und verhindert jeden Eingriff, wenn das
Kochfeld wieder eingeschaltet wird. Um dann die Verriegelung
freizugeben, brauchen Sue nur, die Taste zu drücken.
• VERRIEGELUNGSTASTE
• LEISTUNGSVERSTÄRKER
Die Booster-Funktion ermöglicht durch einfachen Knopfdruck den
Betrieb der Kochstelle über einen Zeitraum von 10 Minuten bei
einer mächtigen Leistung je nach Bereich.
Ideal, wenn eine große Flüssigkeitsmenge zum Kochen gebracht
werden soll.
AKTIVIERUNG DER BOOSTER-FUNKTION
Alle Kochzonen des Ceranfelds sind mit einem Leistungs-
verstärker ausgestattet, der bei Bedarf einen schnelleren
Temperaturanstieg der Kochzonen ermöglicht.
Leistungsverstärker einschalten:
- Schalten Sie die gewünschte Kochzone ein, drücken Sie die
Taste “+” bis zur Position “9”, lassen Sie kurz los und drücken
Sie erneut die Taste “+” . Die Anzeige zeigt blinkend “A”
“Leistungs-verstärker” und “9” Hitzeleistung.
- Schalten Sie bei Bedarf auf die gewünschte Hitzeleistung zurück.
BEISPIEL: eine Kochzone mit 1800 W Leistung ist auf Pos.
6 eingestellt: entwickelte Leistung: 32% von 1800 W
Wenn die Funktion “Leistungsverstärker” eingeschaltet ist, liefert
die Kochzone die volle Leistung von 1800 W während 2,5 Minuten
und schaltet erst nach dieser Zeit auf 576 W herunter.
Wenn der “Leistungsverstärker” aktiv ist, bleibt die Anzeige der
Leistungsstufe permanent eingeschaltet.
Einstellung
der
Kochzone
entwickelte
Leistung
(%)
Dauer der
erhöhten
Leistung
(Minuten)
maximale
Funktionsdauer
vor
automatischem
Abschalten *
0 : 0 % : 0 : 0 STD.
1 : 3 % : 1 : 6 STD.
2 : 6 % : 3 : 6 STD.
3 : 11 % : 5 : 5 STD.
4 : 16 % : 6,5 : 5 STD.
5 : 19 % : 8,5 : 4 STD.
6 : 32 % : 2,5 : 1,5 STD.
7 : 45 % : 3,5 : 1,5 STD.
8 : 65 % : 4,5 : 1,5 STD.
9 : 100 % : 0 : 1,5 STD.
Wenn die o.a. Zeit abgelaufen ist, sinkt die Leistung auf Stufe 9.
Durch Betätigung der Taste "-" wird die Booster-Funktion
aufgehoben und die Leistung geht auf Stufe 9 zurück
.
Aktivierung der Booster-Funktion
- Drücken Sie den Einstellknopf der mit der Booster-
Funktion ausgestatteten Kochzone.
Die Kontrollanzeige leuchtet au
f
- Drücken Sie den Knopf zum Starten
der Booster-Funktion.
Der Booster ist nun 10 Minuten lang in
Betrieb.
Ein "P" (Power) erscheint.
I
N
D
U
K
T
I
O
N
LEISTUNG
LEISTUNG
Vor der Reinigung der Glaskeramikoberfläche warten Sie
bitte ab, bis diese vollständig abgekühlt ist.
• Benutzen Sie ausschließlich spezifische Reinigungsmittel
für Ceranoberflächen, wie z.B. Reinigungscremen und
Schaber. Nehmen Sie handelsübliche Produkte, die leicht
auf dem Markt zu finden sind.
Vermeiden Sie das Überlaufen von Speisen auf die
Glasoberfläche. Diese verkohlen schnell während des
Kochvorgangs und erschweren die Reinigung.
Halten Sie alles, was schnell schmelzen kann, wie
Gegenstände aus Kunststoff, Alufolie aber auch Zucker und
stark zuckerhaltige Produkte, von der Glasoberfläche fern.
PFLEGE :
- Beträufeln Sie die Ceranoberfläche mit einigen Tropfen eines
spezifischen Reinigungsmittel für Ceranfelder
- Wischen Sie die Flecken weg mit einem weichen Tuch oder mit
leicht befeuchtetem Küchenpapier
- Trocknen Sie die Oberfläche mit einem weichen Tuch oder mit
Küchenpapier ab.
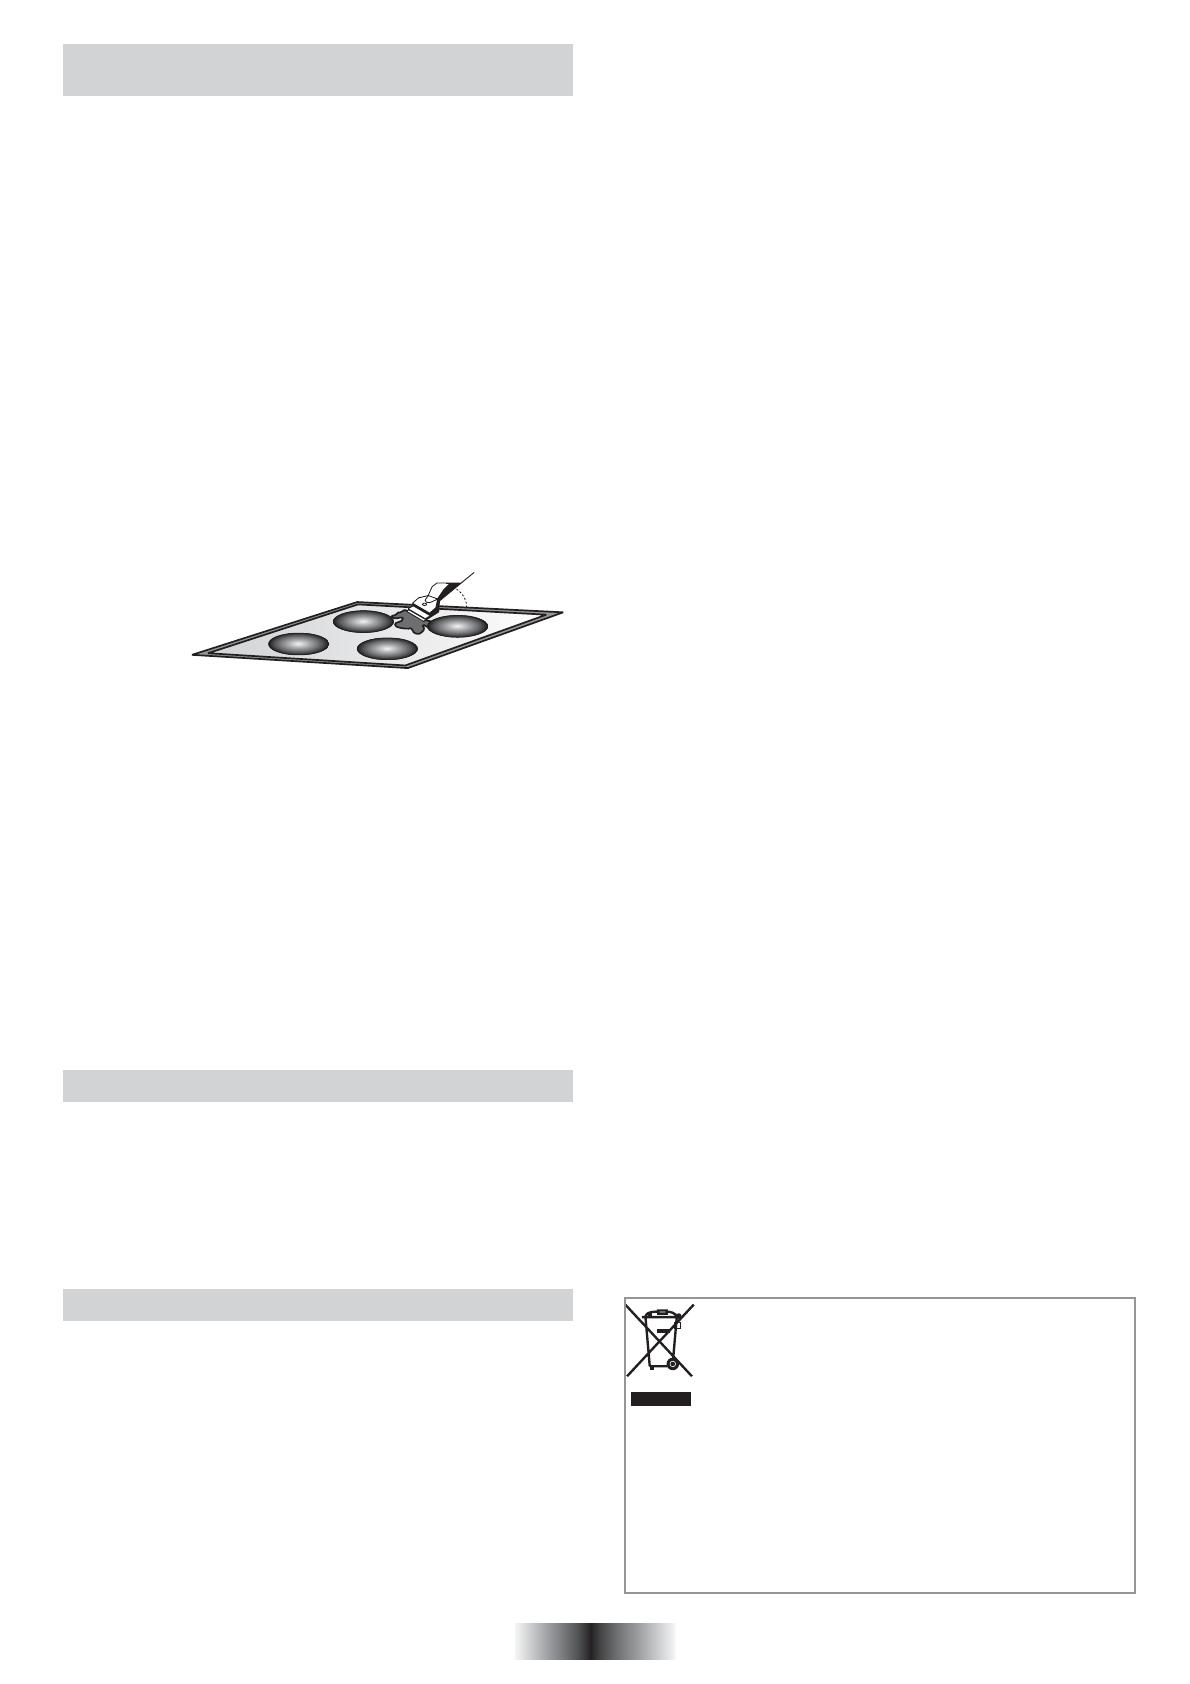
Sollten noch hartnäckige Flecken vorhanden sein:
- Beträufeln Sie die Oberfläche erneut mit dem Reinigungsmittel.
- Entfernen Sie die Flecken mit einem Schaber, wobei
dieser in einem Winkel von ca. 30° zur Ceranoberfläche gehalten
werden soll.
- Trocknen Sie die Oberfläche mit einem weichen Tuch oder mit
Küchenpapier ab.
- Wiederholen Sie den Vorgang falls notwendig.
EINIGE EMPFEHLUNGEN:
Durch häufiges Reinigen bildet sich eine Schutzschicht, die
Abnutzung und Kratzer vorbeugt.
Versichern Sie sich, dass die Ceranoberfläche sauber ist, bevor
Sie das Ceranfeld erneut benutzen.
Um Kalk- und Wasserflecken zu entfernen, benutzen Sie einige
Tropfen Essig oder Zitronensaft. Trocknen Sie mit Küchenkrepp
gut ab. Wischen Sie schließlich mit einigen Tropfen eines
spezifischen Reinigungsmittel ab.
Die Ceranoberfläche kann die Reibung von flachen Geschirrböden
zwar gut aushalten, es ist jedoch empfehlenswert, Töpfe und
Pfannen anzuheben, um sie zu verschieben.
ACHTUNG:
- Vermeiden Sie den Gebrauch eines zu nassen Schwammes.
- Benutzen Sie niemals Werkzeuge aus Stahl wie Messer oder
Schraubenzieher.
- Die Benutzung eines Schabers mit Rasierklinge kann die
Oberfläche nicht beschädigen, wenn ein Neigungswinkel
von 30° zwischen Schaber und Oberfläche eingehalten wird.
- Lassen Sie bitte den Schaber mit Klinge nicht in Reichweite
von Kindern.
- Benutzen Sie keine ätzenden Mittel oder Stahlwolle zur
Reinigung der Ceranoberfläche.
PROBLEMLÖSUNGEN
Das Induktionsfeld stößt ein Brummen aus.
Normal. Der Lüfter der elektronischen Komponenten ist
eingeschaltet.
Das Kochfeld stößt ein leises pfeifendes Geräusch aus:
Normal. In Abhängigkeit von der Häufigkeit, mit der die Induktoren
eingesetzt werden, kann ein leises Pfeifen zu hören sein, wenn
mehrere Kochfelder gleichzeitig bei höchster Leistungsstufe
betrieben werden.
Die Kochzonen halten keine konstante Kochtemperatur oder
das Anbraten geht nicht schnell genug
Sie sollten Kochgeschirr mit absolut flachem Boden verwenden.
Wenn Licht zwischen dem Boden des Kochgeschirrs und dem
Kochfeld durchdringt, wird die Hitze nicht richtig weitergeleitet.
Der Boden des Kochgeschirrs muss den Durchmesser
der Kochfläche völlig bedecken.
18 DE
TECHNISCHER KUNDENDIENST
Sollte Ihr Ceranfeld einmal nicht richtig funktionieren, prüfen
Sie zuerst, ob die Stromversorgung gewährleistet ist. Ist die
Ursache der Fehlfunktion nicht ausfindig zu machen, wenden Sie
sich bitte an Ihren zuständigen Werkskundendienst unter Angabe
des Modells und der Seriennummer, die auf dem Typenschild
angegeben sind. Auf Ihr Gerät gewähren wir eine Garantie von
24 Monaten ab Kaufdatum. Bewahren Sie Ihre Kaufrechnung
sorgfältig auf und legen Sie sie bei Bedarf als Garantienachweis
dem Kundendienst vor. Die Garantiebedingungen sind im
beigefügten Serviceheft angegeben.
REINIGUNG UND PFLEGE DES
CERANFELDES
Die Speisen kochen zu langsam
Das falsche Kochgeschirr wurde ausgesucht. Wählen Sie ziemlich
schweres Geschirr mit flachem Boden, dessen Durchmesser
mindestens dem Durchmesser der Kochfläche entspricht.
Leichte Kratzer oder Abreibungen erscheinen auf dem Glas
Ihres Ceranfeldes.
Es wurden die falschen Reinigungsmethoden angewendet,
Kochgeschirr mit rauem Boden wurde benutzt oder raue
Gegenstände wie Salz oder Sand befanden sich zwischen
Kochtopf und Ceranfeld. Verwenden Sie die empfohlenen
Reinigungsmethoden, vergewissern Sie sich, dass die Böden
Ihrer Kochtöpfe und das Kochgeschirr sauber sind und achten
Sie auf glatte Böden. Kleine Kratzer sind nicht mehr zu entfernen,
aber sie werden im Laufe der Zeit mit einer guten Reinigung
weniger sichtbar.
Metallrückstände:
Schieben Sie Aluminiumtöpfe nicht über die Kochflächen.
Verwenden Sie die empfohlenen Reinigungsmethoden.
• Die falschen Reinigungsmittel/Gegenstände wurden verwendet,
die Flecken bleiben auf der Oberfläche. Verwenden Sie den
Schaber mit der Rasierklinge und die empfohlene
Reinigungsmethode.
Dunkle Flecken
Verwenden Sie den Schaber mit der Rasierklinge und die
empfohlene Reinigungsmethode.
Helle Verfärbungen auf dem Ceranfeld
Rückstände von Aluminium- oder Kupferpfannen, sowie
Mineralablagerungen durch Wasser oder Lebensmittel können
mit der Reinigungscreme entfernt werden.
Geschmolzener Zucker oder Plastik
Lesen Sie den Abschnitt zur Reinigung und Pflege des
Ceranfeldes.
Das Ceranfeld funktioniert nicht.
Größere Überlaufreste oder ein Gegenstand bedecken
mindestens 2 Tasten für mehr als 10 Sekunden. Reinigen Sie
die Oberfläche oder entfernen Sie den Gegenstand.
Das Bedienfeld ist durch die Sperrfunktion blockiert.
Um die Sperre aufzuheben, drücken Sie die Taste
“Sperrfunktion”
Das Ceranfeld lässt sich nicht ausschalten.
Das Bedienfeld ist durch die Sperrfunktion blockiert.
Um die Sperre aufzuheben, drücken Sie die Taste
“Sperrfunktion”. Schauen Sie im Kapitel “Die verschiedenen
Wärmestufen” unter dem Punkt über die “maximale
Funktionsdauer” nach.
Das Ceranfeld schaltet sich automatisch ab
Größere Überlaufreste oder ein Gegenstand bedecken
mindestens 2 Tasten für mehr als 10 Sekunden. Das Ceranfeld
schaltet auf Sicherheitsbetrieb um und ein akustisches Signal
ertönt, solange die Tasten bedeckt bleiben. Reinigen Sie die
Oberfläche oder entfernen Sie den Gegenstand.
Die Kochflächen schalten sich nach einer gewissen Zeit
automatisch ab, wenn sie für längere Zeit in Betrieb sind. Siehe
Kapitel “Die verschiedenen Wärmestufen” unter dem Punkt über
die “maximale Funktionsdauer”.
Ein- und Abschaltphasen der Kochzonen
Die Ein- und Abschaltphasen der Kochstellen variieren je nach
der eingestellten Leistungsstufe
- niedrige Leistung: kurze Einschaltphasen
- hohe Leistung: lange Einschaltphasen
Das Ceranfeld bzw. eine oder mehrere Kochflächen
funktionieren nicht.
• Die Shunt-Brücken wurden nicht korrekt auf dem Klemmbrett
positioniert. Lassen Sie durch einen Fachmann überprüfen, dass
der elektrische Anschluss nach den Anweisungen erfolgt ist.
Die Aufschrift “H” in der Restwärmeanzeige blinkt.
Die Temperatur des elektronischen Moduls ist zu hoch.
Lassen Sie durch einen Fachmann überprüfen, dass der Einbau
nach den Anweisungen erfolgt ist.
30° Maxi
Dieses Elektrohaushaltsgerät ist entsprechend der EU-
Richtlinie 2002/96/CE über Elektro- und Elektronik-
Altgeräte (WEEE) gekennzeichnet. Bitte sorgen Sie
dafür, dass das Gerät ordnungsgemäß entsorgt wird,
damit mögliche negative Auswirkungen auf Umwelt und
Gesundheit vermieden werden, die bei einer unsachgemäßen
Entsorgung des Altgerätes entstehen könnten. Das Symbol auf dem
Produkt bedeutet, dass dieses Gerät nicht in den normalen Hausmüll
gehört, sondern den jeweiligen kommunalen Rücknahmesystemen für
Elektro- und Elektronik-Altgeräte übergeben werden muss. Die Entsorgung
muss im Einklang mit den geltenden Umweltrichtlinien für die
Abfallentsorgung erfolgen.
Für nähere Informationen über Entsorgung und Recycling dieses Produktes
wenden Sie sich bitte an Ihre kommunalen Einrichtungen (Umweltamt)
oder an die Abfallentsorgungsgesellschaft Ihrer Stadt bzw. an Ihren
Händler.
19 PT
LER ATENTAMENTE ESTE MANUAL, PARA PODER TIRAR TODO O PARTIDO DO APARELHO. Aconselhamos que este manual seja
guardado para posterior consulta e que nele seja anotado, antes da instalação do aparelho, o respectivo número de série
para os casos em que, eventualmente, seja necessário recorrer à intervenção do Serviço Após Venda.
Durante o funcionamento do aparelho ou após desligar uma das placa de cozedura, aconselha-se a manter as crianças afastadas
enquanto o indicador de calor residual estiver aceso, para evitar o risco de queimaduras graves.
Sempre que cozinhar com margarina, óleo ou qualquer outra gordura, ter o cuidado de ir vigiando o cozinhado, porque as gorduras,
quando muito aquecidas, podem rapidamente inflamar.
As folhas de alumínio e os recipientes de plástico não devem ser colocados sobre as superfícies quentes.
Após utilização da placa vitrocerâmica, convém fazer uma pequena limpeza para evitar a acumulação de sujidade e de gordura, pois
estas, se tornarem a cozer, queimam e provocam fumo e cheiros desagradáveis, sem contar com o risco de propagação de
incêndio.
Nunca deixe objectos de metal, como, por exemplo, facas, garfos, colheres ou tampas, na zona de indução, na medida em que, se
forem demasiado grandes ou demasiado pesados, podem aquecer excessivamente.
• O painel de comando da placa é muito sensível; não lhe pôr em cima recipientes quentes.
Nunca cozinhar directamente sobre a placa sem utilizar recipientes.
Colocar sempre os recipientes bem ao centro da placa de cozedura seleccionada.
Não utilizar a superfície da placa como tábua para cortar alimentos ou para efectuar outros trabalhos.
Não arrastar os recipientes sobre a placa, pois pode riscar.
Não colocar objectos pesados em cima placa, porque podem cair e danificá-la.
Não colocar sobre a placa nenhum objecto seja ele de que natureza for.
• No caso improvável de aparecer uma racha no vidro, desligar imediatamente o aparelho da corrente e contactar directamente o
Serviço Após Venda.
Este aparelho não está indicado para ser utilizado por crianças e por pessoas incapazes ou inexperientes no que toca à utilização
do produto, excepto se forem devidamente supervisionadas ou instruídas sobre a utilização do aparelho por uma pessoa responsável
pela sua segurança.
• As crianças devem ser vigiadas de modo a assegurar que não brinquem com o aparelho.
INDICAÇÕES DE CARÁCTER GERAL
Made in FRANCE - 232 -
220 - 240 V
Mod :
P. Maxi
Code: 39354774 -0306 0511
Mod:
Code: 39354774 - 0306 0511
220 - 240 V
Code: 39354774
- 0306 0511
Code: 39354774
- 0306 0511
Code: 39354774
- 0306 0511
Placa de identificação
(na parte inferior do aparelho)
Todas as características são dadas a título meramente indicativo. O fabricante, sempre com a constante preocupação de melhorar a
qualidade da sua produção, pode introduzir modificações nos seus aparelhos por evolução da técnica, no estrito cumprimento das
normas de consumo em vigor.
Este aparelho está em conformidade com as Directivas Europeias 73/23/EEC e 89/336/EEC, substituídas pelas 2006/95/EC
e 2004/108/EC, e respectivas alterações posteriores.
Zonas de calor
Voltagem/Frequencia (V/Hz)
Potencia eléctrica (W)
Dimensões do produto
(l x p x h mm.)
Dimensões de encastramento
(AXB)
4 Inductions 4 Inductions
220-240/50 220-240/50
574 x 505 x 55 752 x 505 x 55
HVI 740HVI 640
1 / 1

Hoover HVI 640 X Manuale utente

Categoria
Piani cottura
Tipo
Manuale utente
Questo manuale è adatto anche per