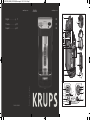
Krups KM900855 Manuale utente
- Categoria
- Macchine da caffè
- Tipo
- Manuale utente

www.krups.com
EN
FR
ES
www.krups.com
Réf. NC00116598
English . . . . . . . . . . . . p. 5
Français . . . . . . . . . . . p. 25
Español . . . . . . . . . . . p. 45
H MIN PROG
12
OPEN
ON/OFF
LARGE
MANUAL
SMALL
Max
a
g
n
p
o1
o2
q
r1/r2
x
u
v
w
t
s
f
e
d
b
h
i
j
k
l
m
c
Réalisation : Espace Graphique
ARUBA
KR_CAFETIERE_ARUBA_NC00116598_Mise en page 1 06/11/12 10:24 PageC1

1
2
Max
2
1
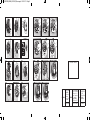
Fig.1 Fig.2 Fig.3
Fig.4 Fig.5 Fig.6
Fig.7 Fig.8 Fig.9
Fig.10 Fig.11 Fig.12
Fig.13 Fig.14
Fig.1 Fig.15
Fig.16 Fig.17 Fig.18
Fig.19 Fig.20 Fig.21
Fig.22 Fig.23
FECHA DE COMPRA:
CANADA
GROUPE SEB
CANADA
345 Passmore
Avenue
Toronto, ON
M1V 3N8
MEXICO
G.S.E.B. MEXICANA,
S.A. de C.V. Goldsmith
38 Desp. 401, Col.
Polanco Chapultepec
Delegacion
Miguel Hildalgo
11 560 Mexico D.F.
U.S.A.
GROUPE SEB
USA
2121 Eden Road
Millville,
NJ 08332
1-800-418-3325 (01800) 112 83 25 800-526-5377
KR_CAFETIERE_ARUBA_NC00116597_Mise en page 1 30/10/12 17:10 PageC4

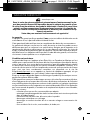
English
IMPORTANT SAFEGUARDS
When using electrical appliances, basic safety
precautions should always be followed to reduce the
risk of fire, electric shock and/or injury to persons,
including the following:
1 - Read all instructions prior to first use.
2 - Do not touch hot surfaces. Use handles or knobs.
3 - To protect against fire, electric shock and injury to
persons, do not immerse cord, plugs or machine in
water or other liquid.
4 - Not intented for use by children.
5 - Close supervision is necessary when any appliance
is used near children. Keep appliance out of reach
of children.
6 - This appliance is not designed to be used by
children or people without knowledge or
experience with the product, unless they are
supervised or given prior instructions concerning
the use of the appliance by someone responsible
for their safety.
7 - Children must be supervised to ensure that they do
not play with the appliance.
8 - Burns can occur from touching hot plate, hot water
or steam. Exercise caution.
9 - Unplug machine from outlet as soon as you stop
using it over a prolonged period and when you
clean it. Allow to cool before putting on or taking off
parts, before cleaning the machine and before
storing.
5
KR_CAFETIERE_ARUBA_NC00116597_Mise en page 1 30/10/12 17:21 Page5

English
6
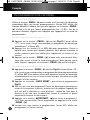
10 - All machines are subject to stringent quality
control. Practical tests using machines taken at
random are conducted and this may explain any
slight marks or coffee residue showing prior to
use.
11 - Do not operate any machine with a damaged cord
or plug or after the machine malfunctions, or has
been damaged in any manner. Return machine to
the Krups Service Center for examination, repair
or adjustment.
12 - To reduce the risk of injury do not drape cord over
the counter top or table top where it can be pulled
on by children or tripped over unintentionally.
13 - Do not let cord touch hot surfaces.
14 - The use of accessory attachments not
recommended by Krups may result in fire, electric
shock or injury to persons.
16 - Do not place on or near a hot gas or electric
burner, or in a heated oven.
17 - To disconnect the machine, turn the control to
“OFF”, then remove plug from wall outlet. Do not
yank cord, instead grasp plug and pull to
disconnect.
18 - Do not use appliance for other than intended use.
19 - Do not pour liquids other than water and
descaling solutions specified in this manual into
the water tank.
20 - Protect the machine against humidity and freezing.
21 - Do not pour water into the appliance if it is still hot.
KR_CAFETIERE_ARUBA_NC00116597_Mise en page 1 30/10/12 17:09 Page6

English
22 - Always close the top lid (a) when running the
coffee maker.
23 - Always place your coffee maker on a flat, stable,
heat resistant work surface away from water
splashes and any external sources of heat.
24 - Do not leave the empty coffee tank on the hot
plate.
25 - The water tank is equipped with one permanent
magnet. Avoid placing water tank near appliances
and objects that can be damaged by magnetism,
e.g. credit cards, diskettes and other data
devices, video tapes, television and computer
monitors with picture tubes, mechanical clocks,
hearing aids and loud speakers. Patients with
pacemakers or defibrillators: do not hold
water tank directly over pacemaker or
defibrillator.
26 - This machine is for household use only.
27 - The container is designed for use with this
appliance. It must never be used on a range top.
28 - Do not set a hot container on a wet or cold
surface.
29 - Do not use a cracked container or a container
having a loose or weakened handle.
30. - Do not clean container with cleansers, steel wool
pads, or other abrasive material.
7
KR_CAFETIERE_ARUBA_NC00116597_Mise en page 1 30/10/12 17:09 Page7

English
8
Coffee tank:
A. The coffee tank is designed for use only with this appliance. It must
never be used on a range top.
B. Do not set a hot coffee tank on a wet or cold surface.
C. Do not use a cracked coffee tank or a coffee tank having a loose
or weakened handle.
D. Do not clean coffee tank with harsh cleansers, steel wool pads, or
other abrasive materials.
E. Do not use the coffee tank over an open flame, on an electric
stovetop or in an oven.
F. Never place your coffee tank in a microwave oven or on a stove
top.
SAVE THESE
INSTRUCTIONS
CAUTION
This machine is for household use only. Any servicing other than cleaning
and user maintenance should be performed by the nearest authorized Krups
Service Center. Visit our website at : www.krups.com or contact our
Consumer Service Department for the Service Center nearest to you.
To reduce the risk of fire or electric shock, do not dismantle the machine.
Repairs should be done by an authorized Krups Service Center only.
KR_CAFETIERE_ARUBA_NC00116597_Mise en page 1 30/10/12 17:09 Page8

English
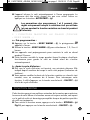
SHORT CORD INSTRUCTIONS
A. We do not recommend using an extension cord with this device.
B. If an extension cord is absolutely necessary,
1- the marked electrical rating of the extension cord should be at least
as great as the electrical rating of the machine,
2- the longer cord should be arranged so that it will not drape over
the counter top or table top where it can be pulled on by children
or tripped over.
C. This machine has a polarized plug (one blade is wider than the other).
To reduce the risk of electric shock, this plug is intended to fit into a
polarized outlet only one way. If the plug does not fit fully into the outlet,
reverse the plug. If it still does not fit, contact a qualified electrician.
Do not attempt to modify the plug in any way.
D. If the power cord is damaged, it must be replaced by a special cable
or unit available from the manufacturer or its after-sales service.
In the interest of improving products, Krups reserves the right to change
specifications without prior notice.
9
KR_CAFETIERE_ARUBA_NC00116597_Mise en page 1 30/10/12 17:09 Page9

English
10
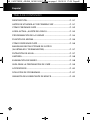
TABLE OF CONTENTS
DESCRIPTION...........................................................................................P. 11
BEFORE USING FOR THE FIRST TIME............................................P. 11
MAKING COFFEE.....................................................................................P. 12
CURRENT TIME; SETTING THE CLOCK..........................................P. 13
PROGRAMMING THE UNIT ................................................................P. 14
AROMA FUNCTION .................................................................................P. 15
DISPENSING COFFEE...........................................................................P. 15
DRIP TRAYS (ADJUSTABLE AND PERMANENT) ...........................P. 16
WATER FILTRATION .................................................................................P. 17
CLEANING ..................................................................................................P. 17
DESCALING ...............................................................................................P. 16
COFFEE BREWING GUIDE .................................................................P. 19
ACCESSORIES.........................................................................................P. 20
TROUBLESHOOTING.............................................................................P. 21
KRUPS MANUFACTURER'S WARRANTY ........................................P. 23
KR_CAFETIERE_ARUBA_NC00116597_Mise en page 1 30/10/12 17:09 Page10

English
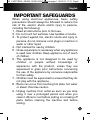
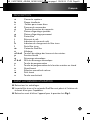
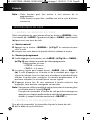
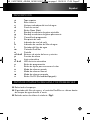
DESCRIPTION
a Top lid
b Heating base
c Water window
d Control panel
e Open button
f Adjustable drip tray
g Permanent drip tray
h Brew basket
i Coffee tank
j Coffee level indicator
k Water filter change indicator
l Water filter holder
m DuoFilter cartridge
n Display
o1 & o2 Hours and minutes setting buttons
p Aroma function
q Auto-Start
r1 & r2 Auto-Start LED’s
s Programming button
t Keep warm setting button
u Large setting
v Manual volume setting
w Small setting
x On/Off button
BEFORE USING YOUR MACHINE FOR THE FIRST TIME
n
Remove all packaging.
n
The water filter holder and DuoFilter cartridge are located inside the
water tank during shipping.
n
Remove them before using the appliance Fig.1.
11
KR_CAFETIERE_ARUBA_NC00116597_Mise en page 1 30/10/12 17:09 Page11

English
12
Fo l l ow th e st e p s b e l ow to ru n a f ir s t br e w c y cl e to
r i n s e t h e sy s te m .
n
Fill the water tank up to the max level and do not use coffee, coffee filter
or water filter.
n
Then follow the instructions ‘MAKING COFFEE’ and ‘DISPENSING
COFFEE’.
n
To replace the DuoFilter cartridge first remove it from its plastic covering
Fig.3.
n
Rinse the filter cartridge under tap water for 1 minute.
n
Unhinge the water filter holder, place the filter into the filter holder.
n
Firmly press the filter holder into the bottom of the water tank Fig.4.
MAKING COFFEE
n
Open the top lid by pressing the open button (e) Fig.1 and fill the water
tank Fig.5 with cold water taking careful note of the number of cups.
Use filtered water if possible.
For best result in cup, the coffee tank (j) has a scale inside which indicates
the recommended water-per-cup volume. Feel free to use it filling in the
water tank.
For easier pouring and measurement, the water gauge segments blacken
as water rises Fig.6.
n
Insert the coffee tank (i) and the brew basket (h) securely in place (b).
Be sure the coffee maker stands on an appropriate counter top. Then
check the coffee tank (i) sits straight on the heating base (b) before
starting the brew cycle Fig.7.
n
Add paper filter into the brew basket Fig.8.
n
Add ground coffee into the basket Fig.9
• Measure one rounded coffee scoop per 5 oz. cup of water.
• For more details please refer to the brewing guide on page 17
n
Close the lid Fig.10. The machine is ready for brewing.
Note : Be careful to put back in place both coffee tank and brew basket
before initiating the brew cycle
n
For immediate brewing, press the ON/OFF button (x) and the brew
cycle will begin Fig.11.
- The ON/OFF button (x) will blink red while the machine is brewing and
stay illuminated while the coffee is kept warm on the heating base (b).
KR_CAFETIERE_ARUBA_NC00116597_Mise en page 1 30/10/12 17:09 Page12

English
- You can turn the machine off at any time by pressing the ON/OFF
button (x) again.
DURING THE BREW CYCLE STEAM RISES FROM THE
TOP OF THE MACHINE. BE CAREFUL TO KEEP HANDS
AWAY FROM THIS AREA UNTIL AFTER THE BREW
CYCLE IS COMPLETED !
keep warm function:
n
The heating plate will maintain the temperature in the coffee tank (i) for
2 hours after which the machine will shut off automatically. This is for sa-
fety and convenience. The auto-off time can be adjusted to 1, 2, 3 or 4
hours. See page 12 – Programming the unit.
n
When keeping the coffee warm it is best to leave the brew basket above
the water tank.
WARNING :
Do not exceed the maximum capacity of the water tank
as shown by the water gauge (c).
Place the ground coffee into the paper filter.
Do not put coffee inside the pump.
Do not put coffee in the water tank, it could block the
valve.
Note : After use, discard grounds, and rinse the filter basket under running
water.
CURRENT TIME; SETTING THE CLOCK
n
Day time clock setting can be adjusted at any time except during keep
warm.
n
When the machine is first plugged in, the clock blinks in order for you to
set the clock.
n
Press the H (o1) and MIN (o2) buttons to set the time Fig.12. This will
ensure the AUTO-START (q) function to start at the proper time.
n
You can press and hold the buttons to move quickly through the hours
or minutes.
13
KR_CAFETIERE_ARUBA_NC00116597_Mise en page 1 30/10/12 17:09 Page13

English
14
PROGRAMMING THE UNIT
1 ) PR OG B U T T O N :
Use the PROG button (s) to access the 2 AUTO-START (q) functions of
brewing at preset time. The LCD will display a different function each time
PROG (s) is pressed. The blinking display of previous setting or 9:99 at
first use and the icon show you that the unit is in a programming mode.
Au t o -O n s e tt i n g # 1 :
n
Press PROG (s) once Fig.13, P1 displays and the AUTO-START
program #1 is indicated with a red light (r1).
n
Press the H and MIN buttons (o) to set a time for the machine to start
brewing automatically. You can press and hold the buttons to move
quickly through the hours or minutes.
n
Press PROG (s) when done. You will then be invited to set the second
program. You can skip this second step by pressing PROG (s) once
again.
Au t o -O n s e tt i n g # 2 :
n
Press PROG (s) twice Fig.14, P2 appears on the screen and the
AUTO-START program #2 is indicated with a red light (r2). This second
preset start time can be used for days with others wake times (on
weekends for example).
n
Press AUTO START button to activate the programmation Fig.15.
n
After programming the automatic start time as described above, be sure
to prepare the machine for a brew cycle with water in the tank, coffee in
the brew basket, lid closed and coffee tank securely in place.
n
Press the AUTOSTART button (q) to choose preset number 1 or
number 2. You can check the preset times by pressing PROG (s).
n
Once the programming is done, the LCD displays pictograms with the
current time.
n
The machine will brew automatically at the set time. The program will
need to be activated when needed again just by pressing on
AUTOSTART (q).
The setting of Autostart functions 1 & 2 can be adjusted
only during stand by mode (neither during brewing or
keep warm).
KR_CAFETIERE_ARUBA_NC00116597_Mise en page 1 30/10/12 17:09 Page14

English
2 ) K E E P WA R M B U T T O N
a - Preset:
n
Press KEEP WARM button (t), the pictogram appears on the
display.
n
Use the KEEP WARM button (t) to change between 1, 2, 3 or 4 hours.
n
Machines are pre-set for a 2 hour keep warm.
n
This function controls how long the heating plate will be maintained
before automatically turning off.
b - After the brew cycle:
n
As soon as the brew cycle ends, a chronometer (countdown timer) is
activated. It provides you with the time since the coffee has been
brewed (freshness indicator).
n
You can change the length of keep warm at any moment within the limit
of 4 hours. The keep warm function can be stopped by pressing
ON/OFF (x) when the brew cycle is completed.
AROMA FUNCTION
This function allows a proper extraction of the coffee flavour from the coffee
ground. Even if the aroma function is always in use, its influence on coffee
taste is more distinguishable with small batches.
n
To activate the Aroma function, press the STRONG button (p) Fig.16,
then press ON/OFF (x).
Note : - This function can be set at any programming step.
- This function cannot be changed once the brew cycle has started.
DISPENSING COFFEE
1 ) D I S P E N S I N G M O D E S
Use at your convenience the MANUAL (v), LARGE (u) or SMALL (w)
button to serve a cup of coffee.
a - MANUAL setting
n
Press and hold MANUAL (v) Fig.17 to adjust volume in the cup.
n
Release to stop the coffee flow.
15
KR_CAFETIERE_ARUBA_NC00116597_Mise en page 1 30/10/12 17:09 Page15

English
16
b - PRESET settings
n
One simple push on either LARGE (u) Fig.18 or SMALL (w) Fig.19
will provide you with preset volumes per cup.
Factory preset:
- LARGE = 8 ounces
- SMALL = 4 ounces
n
Volume is individually adjustable for both LARGE (u) and SMALL (w)
buttons. Just press and hold to adjust volume per cup. Then release to
record the new setting volume. Next use will provide you with this new
setting.
n
One impulse is enough. If you press the button for a long time your
previous record will be cancelled.
Note: You can check the remaining coffee through the window at the front (j)
Fig.20.
For more convenience, coffee dispensing can be stopped by pres-
sing any button on the right side of the control panel (including
ON/OFF).
2 ) AVA I L A B I L I T Y
For more convenience, dispensing coffee and volume adjustments are pos-
sible:
n
From the beginning of the brew cycle.
n
At any moment, until the end of the selected keep warm duration.
Note : For more easiness, you can still dispense a cup 10 minutes after the
keep warm has stopped.
DRIP TRAYS (ADJUSTABLE AND PERMANENT)
1 ) AD J U S TA B L E D R I P T R AY
n
Three heights are available to adjust the drip tray according to your cup
size Fig. 21, 22, 23.
2 ) PE R M A N E NT D R I P T R AY
n
For an easier maintenance, this drip tray collects additional liquids and
deposits to prevent damages on the coffee dispenser.
KR_CAFETIERE_ARUBA_NC00116597_Mise en page 1 30/10/12 17:09 Page16

English
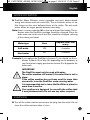
WATER FILTRATION
n
DuoFilter Water Filtration: active vegetable and resin based double
acting anti-chlorine and anti-scale filter. The anti-chlorine action of the
filter brings out the most delicate flavors of the coffee. The anti-scale
action allows for longer periods between descaling.
Note: there is a rotary indicator (k) on the top of water filter holder. This in-
dicates when the DuoFilter cartridge should be changed. Place the
index mark next to the month the filter should be changed, referring
to the criteria just below.
Example: if you replace the DuoFilter in January (1) you should set the in-
dicator to March (3) or May (5), depending on the hardness of
your local water supply: position the number 3 or 5 opposite the
index mark.
IMPORTANT:
The DuoFilter must only be used with water.
The coffee machine still works if the water filter is not in
place.
If the coffee machine has not been used for more than
one month, rinse the DuoFilter under running water.
It is recommended not to leave the DuoFilter in place for
more than 5 months.
Your appliance is designed for use with the coffee tank
it was purchased with. Do not use any other recipient.
CLEANING
n
Turn off the coffee machine and remove the plug from the outlet. Do not
clean the coffee machine when it is hot.
Water type Uses
Replace Duo Filter
every :
Soft water
120 4 months
Hard water
80 2 months
17
KR_CAFETIERE_ARUBA_NC00116597_Mise en page 1 30/10/12 17:09 Page17

English
18
n
Never immerse the coffee machine in water or put it under running
water.
n
Clean the body of the coffee machine with a damp cloth or sponge.
n
Open the top lid (a), remove the paper filter. The coffee tank (i), brew
basket (h), water filter holder (l), drip tray (f) and its grill also can be
washed in warm soapy water and rinsed thoroughly, or cleaned in the
upper rack of a dishwasher.
n
Do not use scouring agents or harsh cleansers on any part of the coffee
machine.
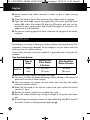
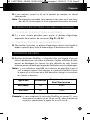
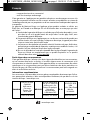
DESCALING
Descaling is necessary to keep your coffee machine running efficiently. The
frequency of descaling depends on the hardness of your water and how
often you use the coffee machine.
If you notice the brew cycle has slowed it is generally time to descale the
machine.
See the chart below:
n
Before descaling, remove the water filter (m).
n
You may use either the Krups descaling solution diluted in 16 ounces of
water or 8 ounces of white vinegar.
n
Pour the solution or vinegar into the water tank and start the coffee
machine (without coffee).
n
Allow half the liquid to run into the coffee tank, then switch off and let
stand for 1 hour.
n
Restart the coffee machine to complete the cycle.
n
Rinse the coffee machine by running it through 2 full cycles with water
only.
n
Do not forget to regularly remove the adjustable drip tray (f) to check if
any water remains in the permanent drip tray (g).
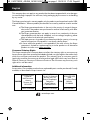
Type of
water
Without Duo
Filter Water
Filtration
With DuoFilter
Water filtration
KM9000
Hard
Soft
60 uses
120 uses
120 uses
180 uses
KR_CAFETIERE_ARUBA_NC00116597_Mise en page 1 30/10/12 17:09 Page18

English
COFFEE BREWING GUIDE
T H E C O F FE E
Choose your beans wisely. It is best to use premium whole beans from a
trusted brand or roaster. Arabica beans provide the best flavors and have
less caffeine, while Robusta beans are easier to grow and less expensive,
they have less flavor and higher caffeine content. Robusta beans are some-
times used in blends to add a particular bitterness to the brew. Beans can
be roasted very lightly to provide a smooth aromatic taste or roasted dark
to provide stronger flavors, and anywhere in between. A good roaster will
be able to describe the flavors that the beans will impart to your brewed
coffee.
Note: experiment with coffee grounds made from different beans and different
roasts to identify one or several that suits your taste.
TH E CO F F E E / WAT E R R AT I O
The amount of ground coffee must be carefully measured against the volume
of water for each brew cycle. It is important to use enough coffee to avoid over
extraction. A small amount of coffee would be overwhelmed by a large volume
of hot water. The coffee level indicator measures “cups” as 5 oz each. Maximum
capacity is slightly more than 50 oz total water volume before brewing. The
volume of brewed coffee will be slightly less because the ground coffee will
absorb a certain amount.
Krups recommends using 7 grams of ground coffee per 5 oz cup of water.
7 grams can be measured in one rounded tablespoon.
If the resulting brew seems too strong you can adjust by using slightly less
ground coffee. If you prefer a much lighter taste it is best to brew at the
recommended ratio and dilute the resulting brew with a measure of hot water.
This allows the best flavor to be extracted from the beans while avoiding over
extraction of too small an amount of ground coffee.
TH E WAT E R
The water is a critical factor in the taste of your brewed coffee. Filtered water
is normally the best choice to help avoid the minerals and chlorine that can be
found in municipal water systems. However if your water tastes good then it
should be good for your coffee.
Never pour milk, prepared coffee, tea, etc. into a water tank.
19
KR_CAFETIERE_ARUBA_NC00116597_Mise en page 1 30/10/12 17:09 Page19

TH E G R I N D
The method of grinding and the level of fineness of the grind have a significant
impact on the resulting taste of the brewed coffee. Ideally you should grind
fresh roasted whole beans just before brewing. Be aware that this machine is
set to brew the most common grinds found on store shelves. Typically
pre-ground coffees are of a similar size, medium-coarse. A very fine grind will
produce much stronger flavors but risks becoming extracted during the brew
cycle producing a more bitter taste. You can learn more about coffee grinding
and about Krups range of grinders at our website www.krupsusa.com.
ACCESSORIES
n
Accessories can be purchased at many retail stores, and through Krups
website.
- Duo Filter (m) water filtration cartridges - pack of 2: F472
- Krups descaling solution: F054
English
20
KR_CAFETIERE_ARUBA_NC00116597_Mise en page 1 30/10/12 17:09 Page20

English
21
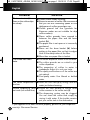
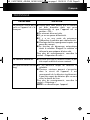
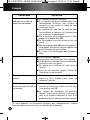
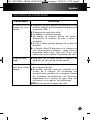
PROBLEM SOLUTION
The coffee does not brew
or the machine does not
switch on.
n
Check to ensure the appliance is plugged
into a working outlet, and the appliance is
in the «ON» position.
n
The water tank is empty.
n
There was a power failure.
n
There was a power surge. Unplug the
machine, then plug it back in.
n
The clock must be reset after a power
failure.
n
The Auto-Off function switches off the
coffee maker. Switch off the coffee maker
then switch it back on to make more coffee.
For more information, refer to the section «
Making coffee ».
Appliance appears to be
leaking.
n Make sure that the water tank has not been
filled beyond the max. fill level.
It takes a long time to
brew.
n It may be time to descale your coffee
dispenser.
n Numerous minerals may accumulate in the
coffee maker’s circuit. Periodic descaling of
the machine is recommended. More
frequent descaling may be necessary
depending on the hardness of the water.
For more information, refer to the
“Descaling” section.
NOTE: do not dismantle the machine.
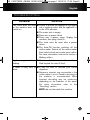
TROUBLESHOOTING
KR_CAFETIERE_ARUBA_NC00116597_Mise en page 1 30/10/12 17:09 Page21

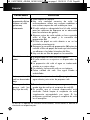
English
22
If your appliance still does not work properly, please call your respective
country’s Consumer Service.
PROBLEM SOLUTION
The brew basket (h) over-
flows or the coffee drips
too slowly.
n
Coffee maker needs cleaning.
n
Excessive amount of coffee. We recommend
that you use one measuring spoon or one
tablespoon of coffee ground per cup.
n
Coffee ground too fine (grounds for
Espresso maker are not suitable for drip
coffee makers).
n
Some coffee grounds have seeped in
between the paper filter and the brew
basket (h).
n
The paper filter is not open or is incorrectly
positioned.
n
Rinse out the brew basket (h) before
putting in the paper filter so that its edges
stick to the damp sides of the filter.
n More than one paper filter in basket.
The coffee has a bad
taste.
n The coffee dispenser needs to be cleaned.
n The coffee grounds are no suited to your
coffee dispenser.
n The proportion of coffee to water is
inadequate. Adjust it to suit your taste.
n The quality and freshness of the coffee are
not optimal.
n Poor-quality water. Use filtered or bottled
water.
The coffee temperature is
too low.
n Warm the coffe tank
(i)
by rinsing it with hot
water just before brewing.
Coffee dispensing does
not work (no coffee flow)
n Check the front window to ensure some
coffee remains in the coffee tank
(i)
n The dispensing system may be clogged.
You can clean the coffee tank simply by
rinsing it with water. If the trouble remains
put your coffee tank in the dishwasher.
KR_CAFETIERE_ARUBA_NC00116597_Mise en page 1 30/10/12 17:09 Page22
La pagina si sta caricando...
La pagina si sta caricando...
La pagina si sta caricando...
La pagina si sta caricando...
La pagina si sta caricando...
La pagina si sta caricando...
La pagina si sta caricando...
La pagina si sta caricando...
La pagina si sta caricando...
La pagina si sta caricando...
La pagina si sta caricando...
La pagina si sta caricando...
La pagina si sta caricando...
La pagina si sta caricando...
La pagina si sta caricando...
La pagina si sta caricando...
La pagina si sta caricando...
La pagina si sta caricando...
La pagina si sta caricando...
La pagina si sta caricando...
La pagina si sta caricando...
La pagina si sta caricando...
La pagina si sta caricando...
La pagina si sta caricando...
La pagina si sta caricando...
La pagina si sta caricando...
La pagina si sta caricando...
La pagina si sta caricando...
La pagina si sta caricando...
La pagina si sta caricando...
La pagina si sta caricando...
La pagina si sta caricando...
La pagina si sta caricando...
La pagina si sta caricando...
La pagina si sta caricando...
La pagina si sta caricando...
La pagina si sta caricando...
La pagina si sta caricando...
La pagina si sta caricando...
La pagina si sta caricando...
La pagina si sta caricando...
La pagina si sta caricando...
-
 1
1
-
 2
2
-
 3
3
-
 4
4
-
 5
5
-
 6
6
-
 7
7
-
 8
8
-
 9
9
-
 10
10
-
 11
11
-
 12
12
-
 13
13
-
 14
14
-
 15
15
-
 16
16
-
 17
17
-
 18
18
-
 19
19
-
 20
20
-
 21
21
-
 22
22
-
 23
23
-
 24
24
-
 25
25
-
 26
26
-
 27
27
-
 28
28
-
 29
29
-
 30
30
-
 31
31
-
 32
32
-
 33
33
-
 34
34
-
 35
35
-
 36
36
-
 37
37
-
 38
38
-
 39
39
-
 40
40
-
 41
41
-
 42
42
-
 43
43
-
 44
44
-
 45
45
-
 46
46
-
 47
47
-
 48
48
-
 49
49
-
 50
50
-
 51
51
-
 52
52
-
 53
53
-
 54
54
-
 55
55
-
 56
56
-
 57
57
-
 58
58
-
 59
59
-
 60
60
-
 61
61
-
 62
62


Krups KM900855 Manuale utente
- Categoria
- Macchine da caffè
- Tipo
- Manuale utente
in altre lingue
- English: Krups KM900855 User manual
- français: Krups KM900855 Manuel utilisateur
- español: Krups KM900855 Manual de usuario
- português: Krups KM900855 Manual do usuário
Documenti correlati
Altri documenti
-
Tefal CM600840 Manuale utente
-
-
Tefal Smart&Light CM600810 Manuale utente
-
-
Black & Decker BXCO1000E Manuale del proprietario
-
Solac espression CA 4805 Istruzioni per l'uso
-
Palson Supreme Manuale del proprietario
-
Makita DCM500 Manuale del proprietario
-
Philips RI9836/11 Manuale utente
-
Gaggia 886876201020 Manuale utente