AJA IPR-1G-HDMI Manuale utente
- Categoria
- Apparecchiature musicali supplementari
- Tipo
- Manuale utente
Questo manuale è adatto anche per

IP Mini-Converters
JPEG 2000 IP Video/Audio Converters
Version 1.0r1
Published December 9, 2019
Installation and Operation Guide

IP Mini-Converters JPEG 2000 IP Video/Audio Converters v1.0r1 2 www.aja.com
Notices
Trademarks
AJA® and Because it matters.® are registered trademarks of AJA Video Systems, Inc.
for use with most AJA products. AJA™ is a trademark of AJA Video Systems, Inc. for
use with recorder, router, software and camera products. Because it matters.™ is a
trademark of AJA Video Systems, Inc. for use with camera products.
CION®, Corvid Ultra®, lo®, Ki Pro®, KONA®, KUMO®, ROI® and T-Tap® are registered
trademarks of AJA Video Systems, Inc.
AJA Control Room™, KiStor™, Science of the Beautiful™, TruScale™, TruZoom™,
V2Analog™ and V2Digital™ are trademarks of AJA Video Systems, Inc.
All other trademarks are the property of their respective owners.
Copyright
Copyright © 2019 AJA Video Systems, Inc. All rights reserved. All information in
this manual is subject to change without notice. No part of the document may be
reproduced or transmitted in any form, or by any means, electronic or mechanical,
including photocopying or recording, without the express written permission of AJA
Video Systems, Inc.
Contacting AJA Support
When calling for support, have all information at hand prior to calling. To contact AJA
for sales or support, use any of the following methods:
Telephone +1.530.271.3190
FAX +1.530.271.3140
Web https://www.aja.com
Support Email support@aja.com
Sales Email sales@aja.com

IP Mini-Converters JPEG 2000 IP Video/Audio Converters v1.0r1 3 www.aja.com
Contents
Notices . . . . . . . . . . . . . . . . . . . . . . . . . . . . . . . . . . . . . .2
Trademarks . . . . . . . . . . . . . . . . . . . . . . . . . . . . . . . . . . . . . . . . . . . 2
Copyright . . . . . . . . . . . . . . . . . . . . . . . . . . . . . . . . . . . . . . . . . . . . 2
Contacting AJA Support . . . . . . . . . . . . . . . . . . . . . . . . . . . . . . . . . . . 2
Chapter 1 – Introduction . . . . . . . . . . . . . . . . . . . . . . . . . . .5
In This Manual . . . . . . . . . . . . . . . . . . . . . . . . . . . . . . . . . . . . . . . . . 5
Overview. . . . . . . . . . . . . . . . . . . . . . . . . . . . . . . . . . . . . . . . . . . . .5
Features. . . . . . . . . . . . . . . . . . . . . . . . . . . . . . . . . . . . . . . . . . . . 6
System Requirements . . . . . . . . . . . . . . . . . . . . . . . . . . . . . . . . . . . 7
Simplied Block Diagram . . . . . . . . . . . . . . . . . . . . . . . . . . . . . . . . . . 7
I/O Connections . . . . . . . . . . . . . . . . . . . . . . . . . . . . . . . . . . . . . . . . 8
Ready, Lock, and LAN LED Behavior . . . . . . . . . . . . . . . . . . . . . . . . . . 9
Installation Overview . . . . . . . . . . . . . . . . . . . . . . . . . . . . . . . . . . . . 10
Initial Installation for IP Mini-Converters . . . . . . . . . . . . . . . . . . . . . . 11
Chapter 2 – eMini-Setup . . . . . . . . . . . . . . . . . . . . . . . . . . 12
Overview. . . . . . . . . . . . . . . . . . . . . . . . . . . . . . . . . . . . . . . . . . . . 12
Acquiring eMini-Setup . . . . . . . . . . . . . . . . . . . . . . . . . . . . . . . . . . . 12
eMini-Setup Documentation . . . . . . . . . . . . . . . . . . . . . . . . . . . . . 12
Installing eMini-Setup . . . . . . . . . . . . . . . . . . . . . . . . . . . . . . . . . . . 13
PC Installation . . . . . . . . . . . . . . . . . . . . . . . . . . . . . . . . . . . . . . . 13
Mac Installation . . . . . . . . . . . . . . . . . . . . . . . . . . . . . . . . . . . . . . 14
Running eMini-Setup . . . . . . . . . . . . . . . . . . . . . . . . . . . . . . . . . . . . 14
PC Startup . . . . . . . . . . . . . . . . . . . . . . . . . . . . . . . . . . . . . . . . . 14
Mac Startup . . . . . . . . . . . . . . . . . . . . . . . . . . . . . . . . . . . . . . . . 15
Operating eMini-Setup . . . . . . . . . . . . . . . . . . . . . . . . . . . . . . . . . . . 15
Control Network Tab Screen . . . . . . . . . . . . . . . . . . . . . . . . . . . . . . . 16
Media Network Tab Screen . . . . . . . . . . . . . . . . . . . . . . . . . . . . . . . . 17
Update Tab Screen. . . . . . . . . . . . . . . . . . . . . . . . . . . . . . . . . . . . . . 18
Firmware Update Procedure. . . . . . . . . . . . . . . . . . . . . . . . . . . . . . 18
Info Tab Screen . . . . . . . . . . . . . . . . . . . . . . . . . . . . . . . . . . . . . . . . 19
Chapter 3 – IP Mini-Converter Web Interface. . . . . . . . . . . . . .20
Overview. . . . . . . . . . . . . . . . . . . . . . . . . . . . . . . . . . . . . . . . . . . . 20
Remote Control Overview . . . . . . . . . . . . . . . . . . . . . . . . . . . . . . . . . 20
Networking Option – Using Only the Media LAN Port for Control and Media
Settings . . . . . . . . . . . . . . . . . . . . . . . . . . . . . . . . . . . . . . . . . . . 20
Web Browser via Ethernet . . . . . . . . . . . . . . . . . . . . . . . . . . . . . . . . . 21
General Screen Information . . . . . . . . . . . . . . . . . . . . . . . . . . . . . . 21
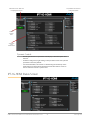
IPT-1G-HDMI Status Screen . . . . . . . . . . . . . . . . . . . . . . . . . . . . . . . . 22
IPR-1G-HDMI Status Screen . . . . . . . . . . . . . . . . . . . . . . . . . . . . . . . . 23
Cong Screen for IPT-1G Models . . . . . . . . . . . . . . . . . . . . . . . . . . . . . 24
Cong Screen for IPR-1G Models . . . . . . . . . . . . . . . . . . . . . . . . . . . . . 26
Presets Screen . . . . . . . . . . . . . . . . . . . . . . . . . . . . . . . . . . . . . . . . 28
Presets Screen Controls . . . . . . . . . . . . . . . . . . . . . . . . . . . . . . . . . 28
Network Screen . . . . . . . . . . . . . . . . . . . . . . . . . . . . . . . . . . . . . . . 29
Firmware Screen . . . . . . . . . . . . . . . . . . . . . . . . . . . . . . . . . . . . . . . 31
Downloading and Installing Updated Firmware . . . . . . . . . . . . . . . . . 31
Booting the IP Mini-Converters from the Safeboot Firmware . . . . . . . . . 32
Appendix A – Frequently Asked Questions (FAQ) . . . . . . . . . . .34
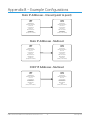
Appendix B – Example Congurations. . . . . . . . . . . . . . . . . .36
Appendix C – Specications . . . . . . . . . . . . . . . . . . . . . . . . 37
IPT-1G-SDI Tech Specs . . . . . . . . . . . . . . . . . . . . . . . . . . . . . . . . . . . 37
IPT-1G-HDMI Tech Specs . . . . . . . . . . . . . . . . . . . . . . . . . . . . . . . . . . 38
IPR-1G-SDI Tech Specs . . . . . . . . . . . . . . . . . . . . . . . . . . . . . . . . . . . 39

IP Mini-Converters JPEG 2000 IP Video/Audio Converters v1.0r1 4 www.aja.com
IPR-1G-HDMI Tech Specs . . . . . . . . . . . . . . . . . . . . . . . . . . . . . . . . . . 40
Appendix D – Safety and Compliance . . . . . . . . . . . . . . . . . . 41
Warranty and Liability Information . . . . . . . . . . . . . . . . . . . . 49
Limited Warranty on Hardware. . . . . . . . . . . . . . . . . . . . . . . . . . . . . . 49
Limitation of Liability . . . . . . . . . . . . . . . . . . . . . . . . . . . . . . . . . . . . 49
Governing Law and Language; Your Rights. . . . . . . . . . . . . . . . . . . . . . 49
Index. . . . . . . . . . . . . . . . . . . . . . . . . . . . . . . . . . . . . . .51

IP Mini-Converters JPEG 2000 IP Video/Audio Converters v1.0r1 5 www.aja.com
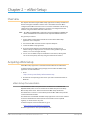
Chapter 1 – Introduction
In This Manual
Chapter 1 - Introduction Introduces the units through an
overview, listing of features, system
requirements, a block diagram, the
I/O connections, and an installation
overview
Chapter 2 - eMini-Setup Describes using the eMini-
Setup application to initially
communicate with and congure an
IP Mini-Converter over a direct USB
connection.
Chapter 3 - IP Mini-Converter Web
Interface
Describes the web interface, which is
used to further congure and more
fully control the unit.
Appendix A - FAQ Provides a set of frequently asked
questions along with their answers.
Appendix B - Example Congurations Provides three diagrams with essential
conguration information for point-to-
point and multicast applications using
static and DHCP IP addresses.
Appendix C - Specications Provides technical specications for
each of the four IP Mini-Converter
models.
Appendix D - Safety and Compliance Covers all necessary safety and
compliance information.
Index The index oers an alphabetized
topical reference point into the
content of the manual, mapped to the
corresponding page numbers.
Overview
AJA IP Mini-Converters are designed for point of use applications for encoding,
transport, reception and decoding of IP based video sources. Rugged, compact
and fanless, the IP Mini-Converters (models IPT-1G-SDI, IPT-1G-HDMI, IPR-1G-
SDI, and IPR-1G-HDMI) provide the bridge between Baseband and IP video for a
range of applications, such as transporting and receiving video over IP to or from
remote facilities in post production, source monitoring, digital signage, and video
walls. IP Mini-Converters ease the cost of extensive monitoring distribution in a
facility.
The IPT-1G-SDI encodes SDI video and audio as VSF TR-01 compliant JPEG
2000 encapsulated within an MPEG-2 Transport Stream. Similarly, the IPT-1G-
HDMI encodes HDMI 1.4 video and audio as VSF TR-01 compliant JPEG 2000
encapsulated within an MPEG-2 Transport Stream.
The IPR-1G-SDI decodes VSF TR-01 compliant JPEG 2000, and formats the data
for SDI output. The IPR-1G-HDMI decodes VSF TR-01 compliant JPEG 2000, and
formats the data for HDMI 1.4 output. The audio associated with the video stream
is extracted, synchronized, and then embedded into the HDMI or SDI signal as
well as output on an analog RCA audio interface.

IP Mini-Converters JPEG 2000 IP Video/Audio Converters v1.0r1 6 www.aja.com
Features
IPT-1G-SDI
3G-SDI to JPEG 2000 IP Video and Audio Converter
• 1x 3G-SDI BNC output with 4:2:2 10-bits/pixel
• 1 x 3G-SDI BNC loop-through
• 1x RJ-45 (IEC 60603-7) for 10/100/1000Base-T Ethernet media ouput
• Essence support: VSF TR-01 compliant JPEG 2000
• Rugged, fanless, portable design
• Full 10-bit pixel processing pipeline
• Network (LAN) control and status
• Quick network setup with AJA eMini-Setup software
IPT-1G-HDMI
HDMI to JPEG 2000 IP Video and Audio Converter
• Full size HDMI 1.4 video input
• 1x RJ-45 (IEC 60603-7) for 10/100/1000Base-T Ethernet media ouput
• Essence support: VSF TR-01 compliant JPEG 2000
• Rugged, fanless, portable design
• Full 10-bit pixel processing pipeline
• Network (LAN) control and status
• Quick network setup with AJA eMini-Setup software
IPR-1G-SDI
JPEG 2000 IP Video and Audio to 3G-SDI Converter
• 1x RJ-45 (IEC 60603-7) for 10/100/1000Base-T Ethernet media input
• Essence support: VSF TR-01 compliant JPEG 2000
• Rugged, fanless design
• 2x 3G-SDI BNC output with 4:2:2 10-bits/pixel
• Embedded and analog audio outputs
• Full 10-bit pixel processing pipeline
• Network (LAN) control and status
• Quick network setup with AJA eMini-Setup software
IPR-1G-HDMI
JPEG 2000 IP Video and Audio to HDMI Converter
• 1x RJ-45 (IEC 60603-7) for 10/100/1000Base-T Ethernet media input
• Essence support: VSF TR-01 compliant JPEG 2000
• Rugged, fanless, portable design
• Full size HDMI 1.4 video output
• Embedded and analog audio outputs
• Full 10-bit pixel processing pipeline
• Network (LAN) control and status
• Quick network setup with AJA eMini-Setup software

IP Mini-Converters JPEG 2000 IP Video/Audio Converters v1.0r1 7 www.aja.com
Software
• Built in web server for full remote control and conguration
• eMini-Setup software with a USB connection for initial conguration
System Requirements
Remote computer configuration and control is accomplished using the IP Mini-
Converter’s internal web server. A Mac OSX or Windows computer with a web
browser installed is all that is required. A USB port is also required for the initial
configuration using eMini-Setup.
NOTE: Safari is the preferred web browser for control on the Mac, and additionally
Chrome and Firefox on Windows. Other web browsers may work, but AJA cannot
guarantee consistent operation for all web browsers or web browser versions.
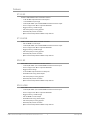
Simplified Block Diagram
Figure 1. IP Mini-Converters Simplified Block Diagram
Video over IP
Processing
Audio
D/A
Video
Audio
HDMI
Transmitter
(IPR-1G-HDMI
only)
2-Channel
RCA Analog Audio
Monitor Output
HDMI Output
with Embedded
Audio
Control LAN
Media LAN
USB Port
(connect to PC or Mac)
For initial setup of
network interfaces
Video over IP
Receiver
SDI Out 1
SDI Out 2
SDI
Transmitter
(IPR-1G-SDI
only)
Video over IP
Processing
Video
Audio
2-Channel
RCA Analog
Audio Input
Control LAN
Media LAN
USB Port
(connect to PC or Mac)
For initial setup of
network interfaces
Video over IP
Transmitter
SDI Loop Through
SDI Input
HDMI Input
with Embedded
Audio
(IPT-1G-SDI only)
(IPT-1G-HDMI only)
IPT-1G-SDI / IPT-1G-HDMI
IPR-1G-SDI / IPR-1G-HDMI

IP Mini-Converters JPEG 2000 IP Video/Audio Converters v1.0r1 8 www.aja.com
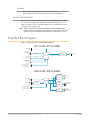
I/O Connections
Figure 2. IPT-1G-SDI Connections
2 Channel
Unbalanced
Analog Audio
Output
(RCA Jacks)
Input SDI
Connector
USB
Port
+5-20 VDC
Power
Input
Control
LAN
Media
LAN
Lock LED
Ready LED
Loop Through
SDI Connector
Figure 3. IPT-1G-HDMI Connections
2 Channel
Unbalanced
Analog Audio
Input
(RCA Jacks)
Input
HDMI
Connector
USB
Port
+5-20 VDC
Power
Input
Control
LAN
Media
LAN
Lock LED
Ready LED

IP Mini-Converters JPEG 2000 IP Video/Audio Converters v1.0r1 9 www.aja.com
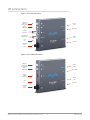
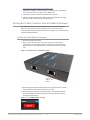
Figure 4. IPR-1G-SDI Connections
2 Channel
Unbalanced
Analog Audio
Output
(RCA Jacks)
Output
SDI
Connectors
USB
Port
+5-20 VDC
Power
Input
Control
LAN
Media
LAN
Lock LED
Ready LED
Figure 5. IPR-1G-HDMI Connections
2 Channel
Unbalanced
Analog Audio
Output
(RCA Jacks)
Output
HDMI
Connector
USB
Port
+5-20 VDC
Power
Input
Control
LAN
Media
LAN
Lock LED
Ready LED
Ready, Lock, and LAN LED Behavior
The Ready LED illuminates green when the unit has finished powering up and is
ready to use.
The Lock LED behavior is as follows:
• O (indicating not locked) when no Program Clock Reference (PCR) has been
received.

IP Mini-Converters JPEG 2000 IP Video/Audio Converters v1.0r1 10 www.aja.com
• Illuminated amber when in the process of locking (PCR has been received, but
Phase-Locked Loop (PLL) and/or genlock are not yet locked).
• Illuminated green when the PLL and genlock are both locked.
NOTE: Achieving locked status may take 5 or more minutes depending on network jitter
behavior. The output of the unit will still function during the locking period.
The Control LAN and Media LAN LEDs illuminate to indicate a link. Blinking
indicates activity. Yellow and Green indicate a 10Mbps connection. Green only
indicates a 100Mbps connection. Yellow only indicates a 1000Mbps connection.
Installation Overview
Detailed instructions are provided in "Chapter 2 – eMini-Setup" on page 12
and "Chapter 3 – IP Mini-Converter Web Interface" on page 20 As an overview,
however, IP Mini-Converters installation typically consists of the following steps:
1. Apply power to the unit.
2. Determine the unit's IP address (DHCP), or initially congure its network
settings using eMini-Setup and a USB connection. This allows you to then
access the unit’s user interface through a web browser.
3. Close the eMini-Setup application, and disconnect the USB cable.
4. Connect the unit to your Ethernet network. Use the Control LAN to make
conguration changes. Use the Media LAN for the incoming (for IPR-1G) or
outgoing (for IPT-1G) video signal over IP stream.
5. Launch a web browser and access the IP Mini-Converters using its IP
address. Continue device conguration as needed from the web interface.
6. Connect the IP Mini-Converters output.
7. Congure the IP Mini-Converters basic operation.
The current IP Mini-Converters configuration settings are retained, even when
powered off, so subsequent installations for an identical decoding or encoding
session can be done with the following simple steps:
1. Apply power to the IP Mini-Converters.
2. Connect the unit to your network using the Control LAN and Media LAN
and connect the unit’s output.
NOTE: Two LAN connections to the unit are not necessarily required on an ongoing basis.
If it is desirable for your installation, after the IP Mini-Converters is set up, you
can access all control parameters through the Media LAN with the appropriate
network configuration. See "Networking Option – Using Only the Media LAN Port
for Control and Media Settings" on page 20 for more information.
NOTE: The IP Mini-Converters pack an unprecedented feature set into mini converter
boxes. As a result, the units use approximately 12 watts of power. They will be very
warm to the touch, which is normal. The units are engineered to operate across
the full temperature range, from 0 to 40 degrees C.
NOTE: For highest reliability, the mini converters rely on convection cooling instead
of using a built-in fan. Therefore, when installing the units, mount in a
location where they have access to air for proper cooling. Do not stack the
IP Mini-Converters with other mini converters.

IP Mini-Converters JPEG 2000 IP Video/Audio Converters v1.0r1 11 www.aja.com
Initial Installation for IP Mini-Converters
Network Configuration
The IP Mini-Converters require a network connection to encode or decode an IP
stream. IP Mini-Converterss are shipped from the factory with DHCP enabled, so
if your network has a DHCP server, by simply connecting the IP Mini-Converters
to your network with an Ethernet cable, the DHCP server will assign the units
compatible IP addresses.
IP Mini-Converters are shipped from the factory with UPnP (Universal Plug and
Play) services enabled, so they are discoverable through Windows Explorer (for
networked Windows PCs).
The eMini-Setup application, available as a free download from the AJA website,
is used to identity the IP Mini-Converters' current IP addresses, if configured, or to
manually set the initial network configuration to work in your environment. Refer
below to "Chapter 2 – eMini-Setup" on page 12 for information about installing
and using AJA’s eMini-Setup application.
Once configured and connected to your network, the IP Mini-Converters are
ready for encoding and deccoding.

IP Mini-Converters JPEG 2000 IP Video/Audio Converters v1.0r1 12 www.aja.com
Chapter 2 – eMini-Setup
Overview
This chapter describes using the eMini-Setup application to initially communicate
with and configure an IP Mini-Converter over a direct USB connection. Once
configured, the IP Mini-Converter can be accessed via an Ethernet network using
a web browser. Subsequently, that device can then be reconfigured over that
network, using its IP address and built-in web server.
NOTE: The eMini-Setup application is only used to setup selected Ethernet capable AJA
devices, and cannot be used to connect to or setup other AJA Mini-Converters.
The general procedure is:
1. Acquire eMini-Setup from the AJA website and install the eMini-Setup
application onto a computer.
2. Connect the IP Mini-Converter to that computer’s USB port.
3. Launch the eMini-Setup application.
4. Go to the Control Network tab and Media Network tab, where the IP
address settings are displayed. You can use the existing DHCP assigned IP
address, or it can be changed manually.
5. You can also use eMini-Setup to load rmware to the device, although this
can also be done quickly and easily using the web browser interface.
Acquiring eMini-Setup
AJA’s eMini-Setup application is available for download from the AJA website.
To download the latest eMini-Setup package, which includes the eMini-Setup
application and documentation:
1. Go to:
https://www.aja.com/family/software#eminisetup
2. Click the link corresponding to the version you want to download for Mac or
Windows.
eMini-Setup Documentation
Included with the eMini-Setup download is the AJA device's Installation and
Operation Guide, which can be accessed from the eMini-Setup UI via the Help/
Manual drop-down menu. This manual includes eMini-Setup information.
Documentation can also be accessed directly from the Mac eMini-Setup installer
in the Documentation folder.
Documentation included with the eMini-Setup application is the version available
at the time of distribution. However, AJA’s documentation can be updated
regularly, so newer versions may exist.
To download just the latest documentation, go to:
https://www.aja.com/family/ip-converters
Click the support button and open the Manuals link.

IP Mini-Converters JPEG 2000 IP Video/Audio Converters v1.0r1 13 www.aja.com
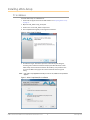
Installing eMini-Setup
PC Installation
To install eMini-Setup on a Windows PC:
1. Download the application from the AJA website. See "Acquiring eMini-Setup"
on page 12.
2. Open the AJA_eMini-Setup_win.zip le.
3. Double-click on the AJA_eMini-Setup.msi le.
4. The Setup Wizard will guide you through the installation.
Figure 6. eMini-Setup PC Wizard
5. Click Next to begin. Answer the questions in the subsequent dialogues,
including device software installation if displayed. When nished, an AJA
eMini-Setup shortcut will be installed on the desktop, and you will be able
to locate the eMini-Setup application in the AJA folder in the Programs
listing.
NOTE: If the eMini-Setup application already exists on the PC, a different Setup Wizard
appears.
Figure 7. eMini-Setup Wizard, Re-installation

IP Mini-Converters JPEG 2000 IP Video/Audio Converters v1.0r1 14 www.aja.com
With this screen you can Repair (reinstall) or Remove (uninstall) eMini-Setup on
the PC.
Mac Installation
To install the application on a Mac:
NOTE: Mac computers must be Intel-based (G5, G4 and earlier models will not work with
eMini-Setup).
1. Download the application from the AJA website. See "Acquiring eMini-Setup"
on page 12.
2. Unzip the le.
3. Double-click on the AJA eMini-Setup.dmg le.
4. Answer the prompt and a utility program will be launched.
Figure 8. eMini-Setup Mac Installer
5. To complete the installation drag the “AJA eMini-Setup” icon to the
Applications folder.
Running eMini-Setup
Connect your Ethernet capable AJA device to the PC or Mac via the supplied USB
cable, and then connect the external power supply (supplied) to that AJA device.
PC Startup
To run eMini-Setup on a PC, double-click on the AJA eMini-Setup icon on your
desktop, or open the AJA folder in the program list and click on the AJA eMini-
Setup application located inside the eMini-Setup folder.

IP Mini-Converters JPEG 2000 IP Video/Audio Converters v1.0r1 15 www.aja.com
Mac Startup
To run eMini-Setup on a Mac, open the Applications folder and locate the AJA
eMini-Setup application. Double-click the application to launch it.
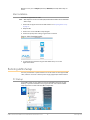
Operating eMini-Setup
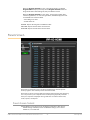
The eMini-Setup application provides a graphical user interface for viewing
settings, modifying settings, and updating software.
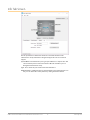
Figure 9. Example eMini-Setup Screen
Tabbed
screens
Select an
attached
AJA device
LAN connection
status
USB connection
status
Selecting an AJA device from the pull down menu on the upper right causes
eMini-Setup to connect to the selected AJA device.
Version - The version of firmware installed in the AJA device is displayed below
the graphic.
Sn - This is the factory set unique serial number of your AJA device. If you ever call
AJA Support for service, you may be asked for this number.
A status field at the bottom of the screen shows if the eMini-Setup application is
connected and communicating with an AJA device.
File Menu - The File drop-down menu on the eMini-Setup application bar has a
Revert to Factory Settings menu item that allows you to change the settings
back to the AJA device’s factory defaults.
Edit Menu - The Edit drop-down menu has standard Cut, Copy and Paste
functions for editing text.
Help Menu - The Help drop-down menu has a link to the AJA device’s manual.

IP Mini-Converters JPEG 2000 IP Video/Audio Converters v1.0r1 16 www.aja.com
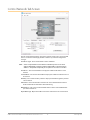
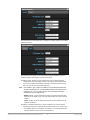
Control Network Tab Screen
Use this Control Network tab to change the network setup on the connected AJA
device. You must click the Apply button to initiate any network configuration
changes.
IP Address Type - Choose from DHCP or Static IP Address.
NOTE: A basic setup would be to run an Ethernet cable directly between the device
and your laptop and set both the computer and IPT/IPR to sequential static IP
addresses. This provides a rapid way to set up to access the web user interface.
IP Address - The current IP Address is displayed. A different IP address can be
entered.
Subnet Mask - The current Subnet Mask is displayed. A different subnet mask can
be entered.
Gateway - The current Gateway address is displayed. A different gateway address
can be entered.
UPnP Host - Choose from Enable or Disable to control whether the AJA device
makes itself visible for Windows network browsing.
MAC Address - This is the permanent MAC address of the Control LAN Ethernet
port of the AJA device.
Open Web Page - Opens the IP Mini-Converter's web interface in a web browser.

IP Mini-Converters JPEG 2000 IP Video/Audio Converters v1.0r1 17 www.aja.com
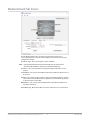
Media Network Tab Screen
Use this Media Network tab to change the media network setup on the
connected AJA device. You must click the Apply button to initiate any network
configuration changes.
IP Address Type - Choose from DHCP or Static IP Address.
NOTE: If you intend to directly connect an IPT to an IPR, then you will need to use
sequential static IP addresses for both units (Transmit and Receive).
IP Address - The current IP Address is displayed. A different IP address can be
entered.
Subnet Mask - The current Subnet Mask is displayed. A different subnet mask can
be entered.
Gateway - The current Gateway address is displayed. A different gateway address
can be entered. On the Media LAN, the gateway may be left blank. (A gateway
is required on the Control LAN).
MAC Address - This is the permanent MAC address of the Media LAN Ethernet
port of the AJA device.
Open Web Page - Opens the IP Mini-Converter's web interface in a web browser.

IP Mini-Converters JPEG 2000 IP Video/Audio Converters v1.0r1 18 www.aja.com
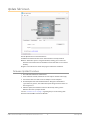
Update Tab Screen
Use this Update tab to install new firmware.
Installed - This field shows the version of the firmware currently installed.
Browse - This button opens a navigation window, allowing you to select the
firmware and load that version of firmware into the AJA device’s non-volatile
memory.
Progress - This indicator bar shows the progress of firmware installation.
Firmware Update Procedure
1. Check the AJA website for new rmware.
2. If new software is found, download it and uncompress the le archive (.zip).
3. Connect the device to a Mac or PC via a USB port on the computer.
4. Click the Update tab. Click the Browse button. Navigate to the rmware
(.ajas extension), open it, and conrm the update. Progress will be shown via
the “Progress” bar.
5. After the update, the AJA device must be rebooted by clicking on the
Reboot button in the prompt window.
See also: "Firmware Screen" on page 31 regarding the process of working with
firmware with the IP Mini-Converter's Web UI.

IP Mini-Converters JPEG 2000 IP Video/Audio Converters v1.0r1 19 www.aja.com
Info Tab Screen
This tab provides basic information about the connected AJA device. This
information is mostly useful when calling AJA Support for service or technical
support.
System Name - This field allows you to give your AJA device a unique name. This
can be useful if you have several attached to a Mac/PC via USB so you can
distinguish between them easily.
Type - This is the factory set model name of the AJA device.
Authentication - If Authentication has been Enabled on the web browser Access
tab, you can disable the security feature by clicking the Disable button.

IP Mini-Converters JPEG 2000 IP Video/Audio Converters v1.0r1 20 www.aja.com
Chapter 3 – IP Mini-Converter Web Interface
Overview
Once you have established network connectivity with the IP Mini-Converter, you
can further configure and more fully control the unit through its web interface.
Subsequently, eMini-Setup is no longer required to interface with the unit.
NOTE: It is often best to remove the USB connection once you have acquired the web
interface. This prevents accidentally using eMini-Setup to change parameters
already set via the web UI.
Remote Control Overview
An optimized web server in the IP Mini-Converter allows remote control and
parameter setting adjustments via a browser client running on a network wired
computer. The network can be a closed local area network, a direct connection
between an IP Mini-Converter and a computer, or even exposed through a
firewall to a WAN.
Each IP Mini-Converter uses a standard RJ-45 connector for the LAN connection.
For 10/100 Mbps, the LAN connection uses Auto MDI-X. For 1000 Mbps, the LAN
connection uses standard straight-through CAT 5 Ethernet cables or null-modem
(cross-over) cables without any configuration or strapping required.
NOTE: Safari is the preferred web browser for control on the Mac, and additionally
Chrome and Firefox on Windows. Other web browsers may work, but AJA cannot
guarantee consistent operation for all web browsers or web browser versions.
To connect to the IP Mini-Converter, attach the unit to your network and enter
its Control Network IP address into the web browser. If authentication has been
configured, you may need to enter a password.
Networking Option – Using Only the Media LAN Port for
Control and Media Settings
It is an option to setup your network connection to the IP Mini-Converter through
an Ethernet switch so that only one Ethernet cable connects directly to the unit.
To implement this approach, follow these general steps:
1. Note the IP address of the unit’s Media LAN port. This should be a static IP
address.
2. Connect the controlling computer’s Ethernet port that is being used to
control the unit into an Ethernet switch. This requires disconnecting the
Ethernet cable from the Control LAN port of the unit.
3. Connect the Media LAN port of the unit into the Ethernet switch.
4. Connect the source of the Media IP stream into the Ethernet switch.
5. Set the controlling computer’s Ethernet port that is being used to control
the IP Mini-Converter to DHCP.
6. From the controlling computer, point a web browser to the IP address noted
in step 1. The IP Mini-Converter’s web user interface displays in the browser.
La pagina si sta caricando...
La pagina si sta caricando...
La pagina si sta caricando...
La pagina si sta caricando...
La pagina si sta caricando...
La pagina si sta caricando...
La pagina si sta caricando...
La pagina si sta caricando...
La pagina si sta caricando...
La pagina si sta caricando...
La pagina si sta caricando...
La pagina si sta caricando...
La pagina si sta caricando...
La pagina si sta caricando...
La pagina si sta caricando...
La pagina si sta caricando...
La pagina si sta caricando...
La pagina si sta caricando...
La pagina si sta caricando...
La pagina si sta caricando...
La pagina si sta caricando...
La pagina si sta caricando...
La pagina si sta caricando...
La pagina si sta caricando...
La pagina si sta caricando...
La pagina si sta caricando...
La pagina si sta caricando...
La pagina si sta caricando...
La pagina si sta caricando...
La pagina si sta caricando...
La pagina si sta caricando...
La pagina si sta caricando...
-
 1
1
-
 2
2
-
 3
3
-
 4
4
-
 5
5
-
 6
6
-
 7
7
-
 8
8
-
 9
9
-
 10
10
-
 11
11
-
 12
12
-
 13
13
-
 14
14
-
 15
15
-
 16
16
-
 17
17
-
 18
18
-
 19
19
-
 20
20
-
 21
21
-
 22
22
-
 23
23
-
 24
24
-
 25
25
-
 26
26
-
 27
27
-
 28
28
-
 29
29
-
 30
30
-
 31
31
-
 32
32
-
 33
33
-
 34
34
-
 35
35
-
 36
36
-
 37
37
-
 38
38
-
 39
39
-
 40
40
-
 41
41
-
 42
42
-
 43
43
-
 44
44
-
 45
45
-
 46
46
-
 47
47
-
 48
48
-
 49
49
-
 50
50
-
 51
51
-
 52
52


AJA IPR-1G-HDMI Manuale utente
- Categoria
- Apparecchiature musicali supplementari
- Tipo
- Manuale utente
- Questo manuale è adatto anche per
in altre lingue
- English: AJA IPR-1G-HDMI User manual
- Deutsch: AJA IPR-1G-HDMI Benutzerhandbuch
Documenti correlati
-
AJA IPR-10G-HDMI Manuale utente
-
AJA HD10A-Plus Installation and Operation Guide
-
AJA KUMO CP Manuale utente
-
AJA HELO Manuale utente
-
AJA HB-R-SDI Installation and Operation Guide
-
-
-
-
AJA ROI-DP Istruzioni per l'uso
-