ZTE Z861BL Manuale utente
- Categoria
- Smartphone
- Tipo
- Manuale utente
Questo manuale è adatto anche per

ZTEUSA.COM
Z861BL
CREATE
YOUR
OWN PATH
USER
MANUAL
Z8090195300MT

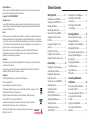
Getting Started .................................. 5
Installing the nano-SIM Card .................... 5
Installing a microSDXC™ Card .................. 5
Charging the Battery ................................... 5
Extending the Battery Life......................... 6
Powering Your Phone On/O ................... 7
Setting Up Your Phone for the
First Time ......................................................... 7
Locking/Unlocking the Screen
and Keys ........................................................... 7
Using the Touch Screen .............................. 8
Getting to Know Your Phone.................... 9
Getting to Know the Home Screen ........ 11
Personalizing ...................................... 13
Changing the System Language ............ 13
Setting the Date and Time ........................ 13
Changing the Ringtone and
Notication Sound ....................................... 13
Turning System Sounds On/O .............. 14
Adjusting Volumes ....................................... 14
Switching to Silent or
Vibration Mode ............................................. 14
Using Do Not Disturb Mode ..................... 14
Applying New Wallpapers ......................... 15
Setting the Theme........................................ 16
Setting the Home Screen
Transition Eect ............................................ 16
1
About This Manual
Thank you for choosing this ZTE mobile device. In order to keep your device in its best condition,
please read this manual and keep it for future reference.
Copyright © 2016 ZTE CORPORATION
All rights reserved.
No part of this publication may be quoted, reproduced, translated or used in any form or by any
means, electronic or mechanical, including photocopying and microlm, without the prior written
permission of ZTE Corporation.
Notice
ZTE Corporation reserves the right to make modications on print errors or update specications in
this manual without prior notice. This manual has been designed with the utmost care to ensure the
accuracy of its content. However, all statements, information and recommendations contained therein
do not constitute a warranty of any kind, either expressed or implied. Please refer to chapter For Your
Safety to be sure to use your phone properly and safely.
We oer self-service for our smart terminal device users. Please visit the ZTE ocial website
(at www.ztedevice.com) for more information on self-service and supported product models.
Information on the website takes precedence.
Disclaimer
ZTE Corporation expressly disclaims any liability for faults and damages caused by unauthorized
modications of the software.
Images and screenshots used in this manual may dier from the actual product. Content in this
manual may dier from the actual product or software.
Trademarks
ZTE, ZFIVE, and the ZTE logos are trademarks of ZTE Corporation.
LTE is a trademark of ETSI.
Google and Android are trademarks of Google, Inc.
The Bluetooth® trademark and logos are owned by the Bluetooth SIG, Inc. and any use of such
trademarks by ZTE Corporation is under license.
Dolby, Dolby Audio and the double-D symbol are trademarks of Dolby Laboratories.
The microSDXC™ logo is a trademark of SD-3C, LLC.
Qualcomm and Snapdragon are trademarks of Qualcomm Incorporated, registered
in the United States and other countries. Used with permission.
Other trademarks and trade names are the property of their respective owners.
Edition Time: June 2016
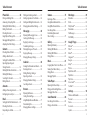
Table of Contents
Changing the Screen Brightness ............ 16
Protecting Your Phone With
Screen Locks ................................................... 16
Protecting Your Phone With
Screen Pinning .............................................. 17
Knowing the Basics .......................... 19
Monitoring the Phone Status ................... 19
Managing Notications .............................. 20
Managing Shortcuts and Widgets .......... 22
Organizing With Folders ............................ 23
Rearranging the Primary Shortcuts ....... 24
Opening and Switching Apps .................. 24
Entering Text .................................................. 25
Changing Input Methods .......................... 25
TouchPal Keyboard ...................................... 25
Google Keyboard.......................................... 29
Editing Text ..................................................... 32
Connecting to Networks
and Devices .......................................... 33
Connecting to Mobile Networks............. 33
Connecting to Wi-Fi® ................................... 34
Connecting to Bluetooth® Devices ......... 37
Connecting to Your Computer
via USB .............................................................. 39
Using the microSDXC Card........................ 40
Connecting to Virtual Private
Networks ......................................................... 40

Camera ................................................... 73
Capturing a Photo ........................................ 73
Using Manual Camera Mode .................... 74
Using Other Camera Modes ..................... 74
Recording a Video ........................................ 75
Customizing Camera and
Video Settings................................................ 75
Gallery .................................................... 77
Opening the Gallery .................................... 77
Working With Albums ................................. 77
Working With Pictures ................................ 78
Playing Videos ............................................... 80
Music ....................................................... 81
Copying Music Files to Your Phone ........ 81
Viewing Your Music Library....................... 81
Playing Music ................................................. 82
Managing Playlists ....................................... 84
Video Player ......................................... 85
Opening the Video Library ........................ 85
Playing and Controlling Videos ............... 85
Managing Video Files .................................. 86
Sound Recorder ................................. 88
Recording a Voice Memo ........................... 88
Playing a Voice Memo ................................. 88
3
Phone Calls ........................................... 42
Placing and Ending Calls ........................... 42
Answering or Rejecting Calls ................... 42
Working With the Call History .................. 43
Calling Your Contacts .................................. 44
Checking Voicemail ..................................... 44
Using Options During a Call ..................... 45
Managing Multi-party Calls ...................... 45
Adjusting Your Call Settings ..................... 46
Contacts ................................................. 52
Checking Contact Details .......................... 52
Adding a New Contact ............................... 52
Setting Up Your Own Prole ..................... 52
Importing, Exporting, and
Sharing Contacts .......................................... 53
Working With Favorite Contacts ............. 54
Working With Groups .................................. 54
Searching for a Contact .............................. 56
Editing Contacts ........................................... 56
Accounts ................................................ 58
Adding or Removing Accounts ............... 58
Conguring Account Sync ........................ 58
Email ........................................................ 60
Setting Up the First Email Account ........ 60
Checking Your Emails .................................. 60
Responding to an Email ............................. 60
2
Table of ContentsTable of Contents
Writing and Sending an Email ................. 61
Adding a Signature to Your Emails ......... 62
Adding and Editing Email Accounts ...... 62
Changing General Email Settings ........... 63
Messaging ............................................ 64
Opening the Messaging Screen .............. 64
Sending a Text Message ............................. 64
Replying to a Message ................................ 65
Forwarding a Message ............................... 65
Deleting Messages or Threads ................. 65
Copying a Message ...................................... 66
Changing Message Settings ..................... 66
Calendar ................................................ 68
Viewing Your Calendars and Events ...... 68
Creating an Event ......................................... 69
Editing, Deleting, Sharing, or
Exporting an Event ...................................... 69
Changing Calendar Settings .................... 69
Searching an Event ...................................... 70
Browser .................................................. 71
Opening the Browser .................................. 71
Setting the Home Page .............................. 71
Using Multiple Browser Windows ........... 71
Downloading Files ....................................... 72
Changing Browser Settings ...................... 72
More Apps ............................................ 89
Calculator ........................................................ 89
Clock.................................................................. 89
Dolby Audio™ ................................................ 90
Downloads ...................................................... 90
File Manager ................................................... 90
Wi-Fi Utility ..................................................... 90
Google™ Apps ..................................... 91
Chrome™ ......................................................... 91
Drive™ ............................................................... 91
Gmail™ .............................................................. 91
Hangouts™ ...................................................... 91
Google .............................................................. 91
Maps™ ............................................................... 91
Photos............................................................... 91
Play Movies & TV ........................................... 91
Play Music........................................................ 91
Play Store ......................................................... 92
Voice Search™ ................................................ 92
YouTube™ ........................................................ 92
Settings .................................................. 93
Wireless and Networks ............................... 93
Personal ........................................................... 94
Device ............................................................... 97
Accounts ....................................................... 100
System ........................................................... 100

Installing the nano-SIM Card (Included)
Power o your phone before installing or removing the
nano-SIM card.
NOTE: Your phone will come with the SIM card already installed.
WARNING! To avoid damage to the phone, do not use any other
kind of SIM cards, or any non-standard nano-SIM card cut from
a SIM card. You can get a standard nano-SIM card from your
service provider.
1. Insert the tip of the tray eject tool into the hole on the card tray.
2. Pull out the card tray and place the nano-SIM card on the tray,
as shown. Carefully slide the tray back into place.
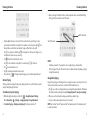
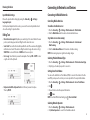
Installing a microSDXC Card (Not Included)
The microSDXC card can be installed and removed while the phone
is turned on. Unmount the microSDXC card before removing it.
1. Insert your ngernail into the bottom left corner of the back
cover and lift it up gently.
2. Hold the microSDXC card with the cut corner oriented as shown
and slide it into the card slot.
NOTE: Your phone supports a microSDXC card up to 64 GB.
3. Replace the back cover.
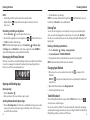
Charging the Battery
Your phone’s battery should have enough power for the phone to turn
on, nd a signal, and make a few calls. You should fully charge the battery
as soon as possible.
If the battery is low, there will be a pop-up message on the screen. As you charge your
phone, the lock screen will show you the exact battery level on the status bar each time
you wake up your phone.
Upgrading the Phone
Software .............................................. 101
Troubleshooting .............................. 102
For Your Safety ................................. 106
General Safety ............................................ 106
Radio Frequency (RF) Energy ................ 107
FCC Regulations ......................................... 108
Hearing Aid Compatibility (HAC)
Regulations for Mobile Phones ............ 109
Distraction.................................................... 110
Product Handling ...................................... 110
Electrical Safety .......................................... 113
Radio Frequency Interference .............. 115
Explosive Environments .......................... 116
Specications ................................... 117
Notes .................................................... 118
Table of Contents
4
Getting Started
5

Getting Started
6
Getting Started
7
NOTE: To charge your ZFIVE™ L LTE®, you must use the USB Type-C™ cable and connector
that is included with your phone. The ZFIVE L LTE cannot be charged with a standard
Micro USB charger.
Do not change the built-in rechargeable battery in your phone by yourself. The battery
can only be changed by ZTE or ZTE authorized service provider.
WARNING! Use only ZTE-approved chargers and cables. The use
of unapproved accessories could damage your phone or cause the
battery to explode.
1.
Connect the adapter to the charging/USB Type-C port.
2. Connect the charger to a standard AC wall outlet. If the phone is on,
you’ll see a charging icon, such as or , appear in the Status Bar.
3. Disconnect the charger when the battery is fully charged.
NOTE: If the battery is extremely low, you may be unable to power on the phone even
when it is being charged. In this case, try again after charging the phone for at least
20 minutes. Contact customer service if you still cannot power on the phone after
prolonged charging.
Extending the Battery Life
Active applications, screen brightness levels, Bluetooth and Wi-Fi usage, and GPS
functionality can drain your battery. You can follow the helpful tips below to conserve
your battery power:
• Reduce the screen backlight time.
• Lower the screen brightness.
• Turn auto-sync, Wi-Fi, and Bluetooth o when not in use.
• Disable the GPS function when not in use. Most applications using this function
will periodically query the GPS satellites for your current location; each query drains
your battery.
Powering Your Phone On/O
• Press and hold the Power/Lock Key to turn on your phone.
• To turn it o, press and hold the Power/Lock Key to open the options menu.
Tap Power o > OK.
NOTE: If the phone freezes or takes too long to respond, press and hold the Power/Lock
Key for about 10 seconds to restart the phone.
Setting Up Your Phone for the First Time
When you rst power on your phone after you purchase it or reset it to factory settings
(see Settings – Device – Backup & Reset), you may need to set it up before using it.
1. Tap the language eld to select the language you want, and tap
.
2. Follow the prompts to set up your Wi-Fi connection, Google account, Google services,
and other options.
Locking/Unlocking the Screen and Keys
Your phone allows you to quickly lock the screen and keys (put the phone into Sleep
mode) when not in use and also to turn the screen back on and unlock it when you
need it.
Locking the Screen and Keys
To quickly turn the screen o and lock the keys, press the Power/Lock Key.
NOTE: To save battery power, the phone automatically turns o the screen after a certain
period of time when you leave it idle. You will still be able to receive messages and calls
while the phone screen is o.
Unlocking the Screen and Keys
1. Press the Power/Lock Key to turn the screen on.

8 9
Getting to Know Your Phone
2. Press and hold a blank area of the screen. You can also press and hold at the
bottom right to open the Camera app. Or, double tap a notication to open the
related app.
NOTE: If you have set an unlock pattern, PIN, or password for your phone (see
Personalizing – Protecting Your Phone With Screen Locks), you’ll need to swipe up on the
screen and draw the pattern or enter the PIN/password to unlock your screen.
Using the Touch Screen
Your phone’s touch screen lets you control actions through a variety of touch gestures.
• Tap – When you want to type using the on-screen keyboard, select on-screen items
(such as application and settings icons), or press on-screen buttons, simply tap them
with your nger.
• Press and Hold – To open the available options for an item (for example, a message or
link in a web page), press and hold the item.
• Swipe or Slide – To swipe or slide means to quickly drag your nger vertically or
horizontally across the screen.
• Drag – To drag, press and hold your nger with some pressure before you start to
move your nger. While dragging, do not release your nger until you have reached
the target position.
• Pinch – In some apps (such as Maps, Browser, and Gallery), you can zoom in and out
by placing two ngers on the screen at once and pinching them together (to zoom
out) or spreading them apart (to zoom in).
• Rotate the screen – For most screens, you can automatically change the screen
orientation from portrait to landscape by turning the phone sideways.
NOTES:
• The Auto-rotate screen check box needs to be selected for the screen orientation
to automatically change. Press the Home Key > > Settings > Display > Auto-
rotate screen.
• You can also access the screen rotation control by sliding down the Status Bar twice
and tapping Auto-rotate.
Getting Started Getting Started
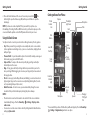
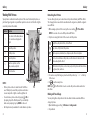
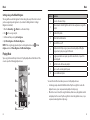
* You can switch the positions of the Back Key and Recent Apps Key. Press the Home Key >
> Settings > Navigation key and select one option.
Earpiece
Power/
Lock Key
Charging/
USB Type-C
Port
Touch
Screen
Back Key
*
Recent
Apps
Key
*
Volume
Up/Down
Key
Microphone
Flash
Speaker
3.5 mm
Headset
Jack
Home Key/
Indicator
Light
Front
Camera
Proximity &
Light Sensor
Back
Camera
Microphone
nano-SIM
Card Tray

10 11
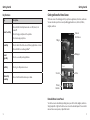
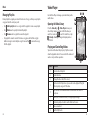
Getting to Know the Home Screen
The home screen is the starting point for your phone’s applications, functions, and menus.
You can customize your home screen by adding application icons, shortcuts, folders,
widgets, and more.
Extended Home Screen Panels
Your home screen is extendable, providing more space for shortcuts, widgets, and more.
Simply swipe left or right on the home screen to see the extended panels. You can add or
remove home screen panels, or adjust their order.
Getting Started Getting Started
Key Description
Power/Lock Key
Press and hold to turn Airplane mode on or o, restart, or to
power o.
Press to change your phone to Sleep mode.
Press to wake up your phone.
Home Key
Press to return to the home screen from any application or screen.
Press and hold to access Google Now™.
Recent
Apps Key
Press to see recently used applications.
Back Key Press to go to the previous screen.
Volume Up/
Down Key
Press or hold to turn the volume up or down.
Key Functions
Widget
Shortcut
Primary
Shortcuts
Status &
Notications
Wallpaper
Folder

Getting Started
12 13
To add a new home screen panel:
1. Press the Home Key > , or press and hold an empty area of the home screen and
select Widgets.
2. Press and hold an application icon or a widget and drag it to the right edge of the
screen to create a new home screen panel and put the icon or widget on it.
To delete a home screen panel:
1. Press and hold an empty area of the home screen and slide left or right to view the
home screen thumbnails.
2. Tap
on the top right corner of a thumbnail.
3. Tap OK. The items on the panel will also be removed.
NOTES:
• A home screen panel cannot be left empty. If the icon, widget, or folder is the only
item on the current home screen panel, the panel will be deleted as you remove
the item.
• When there are only three home screen panels, you cannot delete any of them.
To adjust the order of a home screen panel:
1. Press and hold an empty area of the home screen and slide left or right to view
the home screen thumbnails.
2. Press and hold a thumbnail and drag it left or right to the place you need.
NOTE: Tap at the bottom of a home screen thumbnail to set it as the main
home screen.
Changing the System Language
1. Press the Home Key > > Settings > Language & input > Language.
2. Select the language you need.
Setting the Date and Time
1. Press the Home Key > > Settings > Date & time.
2. Set the date, time, time zone, and date/time format.
• To adjust the date and time automatically, check Automatic date & time.
• To adjust the date and time manually, uncheck Automatic date & time and
tap Set date / Set time to change the date and time.
• To adjust the time zone automatically, check Automatic time zone.
• To adjust the time zone manually, uncheck Automatic time zone and tap
Select time zone to set the correct time zone.
•
To adjust the format of time and date, tap Use 24-hour format.
Changing the Ringtone and Notication Sound
You can customize the default ringtone for incoming calls and the default notication
sound quickly.
1. Press the Home Key > > Settings > Sound & notication.
2. Tap Phone ringtone or Default notication ringtone.
3. Scroll through the list and select the ringtone you’d like to use.
4. Tap OK.
NOTE: See Contacts – Editing Contacts – Setting a Ringtone for a Contact for how to assign
a special ringtone to an individual contact.
Personalizing

1514
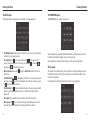
Turning on Do Not Disturb Mode
1. Press the Home Key > > Settings > Sound & notication > Do not disturb.
2. Tap Do not disturb and select Always or Scheduled.
3. Set the detailed settings.
• If you have selected Scheduled, set the days and start/end time you'd like your
phone to be in Do not disturb mode.
• Tap Disturb rules to choose if you'd like to allow certain notications or not.
– Priority only: Only notications you have marked as priority are allowed.
– Alarms only: Only alarms are allowed.
– Total silence: No notications are allowed.
• If you have allowed priority interruptions, you can customize the sounds or vibration
under Priority interruptions.
NOTE: To turn o Do not disturb mode quickly, press the Volume Up/Down Key and
then tap END NOW.
Applying New Wallpapers
You can set the wallpaper for the home screen.
1. Press and hold an empty place on the home screen.
2. Tap Wallpapers.
3. Swipe left or right on the wallpaper panel to select a wallpaper, or tap GALLERY or
LIVE WALLPAPER to choose the image or animation you want to use as the wallpaper.
NOTES:
• In addition, you can press the Home Key > > Settings > Display > Wallpaper
to pick an image from Gallery, Photos, Wallpapers, or an animation from
Live Wallpapers.
• Some cropping may be needed for Gallery and Photos images.
Turning System Sounds On/O
1. Press the Home Key > > Settings > Sound & notication > Other sounds.
2. Tap Dial pad tones, Screen locking sounds, Charging sounds, Touch sounds, or
Vibrate on touch.
Adjusting Volumes
1. Press the Home Key > > Settings > Sound & notication.
2. Drag the sliders below Media volume, Alarm volume, Ring volume, and
Notication volume to adjust the volume for each type of audio.
NOTE: You can adjust the media volume when a media application is in use by pressing
the Volume Up/Down Key. If no media application is active, press the Volume Up/Down
Key to adjust ringtone volume (or the earpiece volume during a call).
Switching to Silent or Vibration Mode
You can set the phone to silent or vibration mode by using one of the following methods.
• Press the Volume Up/Down Key when no media application is active to show the
volume management window. Drag the slider to the left or keep pressing the Volume
Down Key to switch the phone to vibration mode. Press the key again in vibration
mode to switch the phone to silent mode.
• Swipe down from the top of the screen to open the Notication Panel and drag
the panel downward. Tap Sound or Vibrate to switch the phone to vibration or
silent mode.
• Press the Home Key > > Settings > Sound & notication > Notication mode
and select Vibrate or Mute to switch to vibration or silent mode.
NOTE: In addition to silent mode and vibration, you can also allow priority apps to send
out notications when you switch the phone to priority interruption mode.
Using Do Not Disturb Mode
You can limit interruptions with Do not disturb mode. This mode silences your phone so
that it doesn’t make sounds or vibrate when you don’t want it to.
PersonalizingPersonalizing

Setting the Theme
1. Press and hold an empty place on the home screen.
2. In the window that appears at the bottom, tap Themes.
3. Tap a theme to select it.
Setting the Home Screen Transition Eect
1. Press and hold an empty place on the home screen.
2. In the window that appears at the bottom, tap Eects.
3. Tap an eect to select it.
Changing the Screen Brightness
1. Press the Home Key > > Settings > Display > Brightness level.
2. Drag the slider to manually adjust the screen brightness.
NOTE: With the proximity and light sensor, your phone can automatically adjust the
screen brightness for available light. Tap Adaptive brightness in the Display settings
screen to turn the feature on or o.
Protecting Your Phone With Screen Locks
You can protect your phone by creating a screen lock. When enabled, you can press and
hold a blank area on the home screen, and then draw a pattern or enter a numeric PIN or
password to unlock the phone’s screen and keys.
1. Press the Home Key > > Settings > Security.
2. Tap Screen lock.
3. Tap None, Long press, Pattern, PIN, or Password.
• Tap None to disable screen lock protection.
• Tap Long press to enable screen lock and allow unlocking with a “press and hold”
gesture. You can unlock the screen by tapping and holding a blank area on the
lock screen.
• Tap Pattern to create a pattern that you must draw to unlock the screen.
• Tap PIN or Password to set a numeric PIN or a password that you must enter to
unlock the screen.
4. For Pattern, PIN, or Password lock, select whether to protect your phone by requiring
your pattern, PIN or password before it starts up. Tap CONTINUE.
NOTE: When this feature is enabled, your phone cannot receive calls, messages, or
notications until it starts up.
5. For Pattern, PIN, or Password, select how you would like notications and their
contents to show when the phone is locked, then tap DONE.
NOTES:
• Screen lock options are listed in the approximate order of the strength of their security,
starting with None and Long press, which provide no security. A pattern provides
minimal security, although it can be more convenient than the stronger options.
• Remember the pattern, PIN, or password you set. Otherwise, you will have to upgrade
the phone software to use the phone (see Upgrading the Phone Software).
Protecting Your Phone With Screen Pinning
You can use the screen pinning feature to keep an app in view, so others cannot switch to
other apps or access your personal information.
Turning on Screen Pinning
1. Press the Home Key > > Settings > Security > Screen pinning.
2. Tap the On/O switch.
3. If you have set a screen lock, you can tap Ask for unlock pattern/PIN/password
before unpinning. You will need to draw the pattern or enter the PIN/password to
unpin the screen.
PersonalizingPersonalizing
16 17

18 19
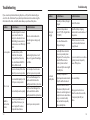
Monitoring the Phone Status
The Status Bar at the top of the home screen provides phone and service status icons on
the right side. Below are some of the icons you may see.
Pinning a Screen
1. Ensure that screen pinning is turned on.
2. Open the app you want to keep in view.
3. Press the Recent Apps Key.
4. If there are many app tabs, swipe up to nd on the front-most tab.
5. Tap .
Unpinning the Screen
1. To unpin the screen and return to normal use, press and hold the Recent Apps Key.
2. If you have checked Ask for unlock pattern/PIN/password before unpinning when
pinning the screen, press and hold on the lock screen and draw the pattern or enter
the PIN/password.
Personalizing
Knowing the Basics
Indicators and Icons
Indicator What it means
2G connected
3G connected
4G LTE connected
/
Do not disturb mode
Ringer o
Vibration on
Battery low
Battery partially drained
Battery full
/
Battery charging
Alarm set
Indicator What it means
No signal
Signal strength
No nano-SIM card installed
Airplane mode
Bluetooth on
Connected to a Wi-Fi
network
Wi-Fi in use
Speaker on
Phone microphone o
GPS on

2120
Knowing the Basics
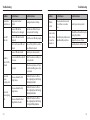
Managing Notications
The Status Bar at the top of the home screen provides notication icons on the left side.
Below are some of the icons you may see.
Indicator What it means
Upcoming event
New Wi-Fi network
detected
Downloading data
Sending data
USB connected
Updates available
Wired headset connected
Indicators and Icons
Indicator What it means
New SMS
New MMS
/
New email
/
New Gmail message(s)
Missed call
Call in progress
/
Song playing
Opening/Closing the Notication Panel
Notications report the arrival of new messages, calendar events, and alarms, as well as
ongoing events. You can open the Notication Panel to view the details of notications.
• To open the Notication Panel, swipe your nger down from the top of the screen.
• To close the Notication Panel, swipe your nger up
from the bottom of the screen or
press the Back Key.
Responding to or Removing a Notication
In the Notication Panel, you can respond to a notication or remove the notications.
The Notication Panel also supports expandable notications that let you perform
additional actions right from the notication itself.
• To respond to a notication, tap it.
• Slide down with one nger to expand certain notications. You can also swipe two
ngers vertically or pinch-zoom to expand or collapse certain notications.
• To remove a notication, swipe it left or right.
• To remove all notications, tap .
• To manage notications you have received, press and hold a notication to identify the
application that created it. You can then tap and manage the following settings.
– Block all: Hide future notications from this app.
– Treat as priority: Show notications from this app when Do not disturb mode is set
to Priority only.
– Allow peeking: Allow this app to show certain notications briey in the current
screen.
– Hide sensitive content: Hide content in this app's notications when the phone is
locked.
• Most apps that send notications, such as Gmail, have notication settings that you
can adjust.
NOTE: If you turn o notications for an app, you may miss its important alerts and
updates. The notications of some apps cannot be turned o.
Knowing the Basics

22
Knowing the Basics
23
Knowing the Basics
2. Slide to browse the available applications or widgets.
3. Press and hold a widget or an application icon and drag it to a home screen panel.
NOTE: While holding the item, you can drag it to the right edge of the screen to create a
new home screen panel and put the item on it.
Moving Shortcuts or Widgets
1. Press and hold a widget or shortcut on the home screen.
2. Drag it to the place you need.
Removing Shortcuts or Widgets
1. Press and hold a widget or shortcut on the home screen.
2. Drag it to to remove it.
Adjusting Widget Size
1. Press and hold a widget on the home screen and then release it.
2. An outline appears around the widget. Drag the outline to resize the widget.
NOTE: Not all widgets can be resized.
Organizing With Folders
You can create folders on the home screen and add several shortcuts to a folder.
You can move or remove folders the same way as moving or removing shortcuts.
1. On the home screen, press and hold the shortcut you want to add into a folder.
2. Drag the shortcut to . A new folder will be created, and the shortcut is added into
the folder.
3. To add more shortcuts into the folder, press and hold each shortcut and drag it over
the folder before releasing it.
4. To remove a shortcut from a folder, tap the folder to open it. Press and hold the
shortcut and drag it to the home screen.
Using Quick Settings
The Quick Settings in the Notication Panel make it convenient to view or change the
most common settings for your phone.
Swipe down with two ngers from the top of the screen, or open the Notication Panel
and drag the panel downward to view the following Quick Settings.
• Auto-rotate: Tap to turn on or o the auto-rotate screen feature.
• Battery Saver: Tap to turn on or o Battery Saver.
• Sound: Tap to switch between sound, vibration, and silent mode.
• Airplane mode: Tap to turn on or o airplane mode.
• Flashlight: Tap to turn on or o the ashlight.
• Sync: Tap to turn on or o auto-syncing of accounts data. Press and hold to open the
Accounts menu in Settings.
• Do not disturb: Tap to turn on or o the Do not disturb feature.
• Bluetooth: Tap to turn on or o Bluetooth.
• Wi-Fi: Tap to turn on or o Wi-Fi.
• Data: Tap to enable or disable data access over the mobile network.
• Location: Tap to turn on or o the location access function.
• Brightness: Uncheck AUTO and drag the brightness slider to adjust the
screen brightness.
NOTE: In the Quick Settings screen, tap at the top to access the Settings menu; tap
to view your prole in the Contacts app; tap to change control switch position.
Managing Shortcuts and Widgets
Adding Shortcuts and Widgets
1. Press the Home Key > to add shortcuts.
Or, to add widgets, press and hold an empty area of the home screen and
select Widgets.

Knowing the Basics
24
Knowing the Basics
25
2. Tap a thumbnail to open that app.
NOTE: You can swipe a thumbnail left or right or tap on the thumbnail to remove it
from the list. Tap Clear all to remove all thumbnails.
Entering Text
You can enter text using the on-screen keyboard. Some apps open it automatically. In
others, you open it by tapping where you want to type. You can press the Back Key to
hide the on-screen keyboard. You can also enter text by speaking with the Google Voice™
typing feature.
Enabling or Disabling Input Methods
1. Press the Home Key >
> Settings > Language & input.
2. Tap Current Keyboard > CHOOSE KEYBOARDS.
3. Tap a keyboard in the list to enable/disable it as an option for entering text.
NOTE: Some default input methods may not be disabled.
Changing Input Methods
1. When you use the on-screen keyboard to enter text, the icon appears in the
Status Bar.
NOTE: The
icon appears only when more than one input method is installed and
enabled for use.
2. Open the Notication Panel and tap Change keyboard.
3. Select the input method you need.
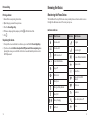
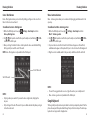
TouchPal Keyboard
The TouchPal keyboard oers three layouts: FULL, PHONEPAD, and T+. You can tap
to
select a layout or an input language.
You can also use Curve® and Wave™ to speed up text input by replacing the key tapping
operation with a tracing gesture where you move your nger from letter to letter without
lifting the nger until you reach the end of the word.
NOTES:
• Tap the folder and then tap the name eld to rename the folder.
• Drag the folder to to delete the folder and replace its shortcuts on the last
home screen.
Uninstalling or Disabling an Application
1. Press the Home Key > to open the application list screen.
2.
Press and hold an application icon and drag the icon to or at the top of the screen.
3. Tap OK to uninstall or disable the app.
NOTE: To nd the disabled applications, press the Home Key > > Settings > Apps.
Tap All apps and select Disabled. You can then tap an application and tap ENABLE to
enable it. Not all applications can be uninstalled or disabled.
Rearranging the Primary Shortcuts
The home screen includes a customizable primary shortcuts area at the bottom of all home
screens. You can keep up to four items in the primary shortcuts area. Drag shortcuts or
folders in or out of the area to rearrange the area.
Opening and Switching Apps
Opening an App
1. Press the Home Key > .
2. Slide up or down on the screen and tap an app to open it.
Switching Between Recently Opened Apps
1. Press the Recent Apps Key. A list of the names and thumbnails of apps you’ve recently
used opens. If you’ve been using more apps recently than can t on the screen, you
can scroll the list up and down.

26 27
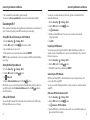
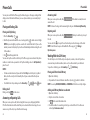
The PHONEPAD Layout
The PHONEPAD layout is similar to a phone pad.
Tap an alphabetic key repeatedly until the desired letter or number appears. Press and
hold the key and slide left or right to choose the text you need.
If word prediction is enabled, just tap the keys once and choose the right word.
The T+ Layout
If word prediction is disabled, tap to enter the left letter on the key. Double tap to enter
the right letter/symbol on the key. Press and hold a key and slide left or right to choose
more letters and symbols.
If word prediction is enabled, just tap the keys and choose the right word.
The FULL Layout
The FULL layout oers an input experience similar to a computer keyboard.
• The alphabetic keys: Tap the keys to enter letters. You can also press and hold a key
and slide to choose more characters.
• The capital key: Tap to use uppercase. Double tap to lock uppercase. This
key also changes to indicate the current case you are using:
for lowercase,
for
uppercase, and
when locked in uppercase.
• Word prediction: Press and hold and tap the Prediction switch to turn o or on
prediction.
• Pre-dened texts: Tap to enter digits and symbols. You can tap the arrow keys to
turn pages, or tap to go back to the alphabetic keys. Slide up on the space key or
tap to enter emoji and emoticons.
• The delete key: Tap to delete text before the cursor. You can also press and hold
the key to quickly delete multiple characters, or slide left on the key to delete a
whole word.
• Voice input: Press and hold the space bar and speak into the microphone.
• More options: Tap to access the quick settings of TouchPal keyboard, use voice
input, edit text, resize the keyboard, change keyboard themes, and more.
Knowing the Basics Knowing the Basics

28 29
Wave - Sentence Gesture
Wave - Sentence gesture allows you to enter words by dragging candidate words to the
space key.
To enable and use Wave - Sentence gesture:
1. On the TouchPal keyboard screen, tap > Settings > Smart input and check
Wave™ - Sentence gesture.
2. Tap >
and tap inside a text eld to open the keyboard, and then tap > FULL
to switch to the FULL layout.
3. Tap or use Curve to enter the rst word. As the rst word appears on the text eld,
candidate words appear on the keyboard for you to choose from as the following word.
4. Drag the correct candidate word to the space key to add the word to the text eld.
NOTES:
• If none of the suggested words are correct, type the word as you normally would.
• Wave - Sentence gesture is only available in the FULL layout.
Google Keyboard
The Google Keyboard provides a layout similar to a desktop computer keyboard. Turn the
phone sideways and the keyboard will change from portrait to landscape. The landscape
keyboard is not supported in all applications.
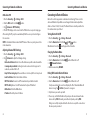
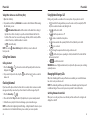
Curve - Word Gesture
Curve - Word gesture allows you to enter text by sliding your nger on the screen from
letter to letter to enter each word.
To enable and use Curve - Word gesture:
1. On the TouchPal keyboard screen, tap > Settings > Smart input and check
Curve
®
- Word gesture.
2. Tap > and tap inside a text eld to open the keyboard, and then tap > FULL
to switch to the FULL layout.
3. Move your nger from letter to letter on the keyboard to trace a word without lifting
the nger until you reach the end of the word.
NOTE: Curve - Word gesture is only available in the FULL layout.
NOTES:
• Tap to type when you want to. If you want to enter a single letter, simply tap the
key once.
• Lift your nger at the end of the word. A space is added automatically when you begin
to trace the next word.
End of the word
Start of the word
Knowing the Basics Knowing the Basics

30 31
3. Move your nger from letter to letter on the keyboard to trace a word without lifting
the nger until you reach the end of the word.
NOTES:
• Tap when you want to. If you want to enter a single letter, go ahead and tap.
• Lift your nger at the end of the word. A space is added automatically when you begin
to input the next word.
Google Voice Typing
Google Voice typing uses the Google Voice recognition service to convert speech to text.
You must have a data connection on a mobile or Wi-Fi network to use it.
1.
Tap to access the voice typing when you are using the Google Keyboard, or ick down
the status bar when entering text and tap Change keyboard > Google voice typing.
2. When you see the microphone image, speak what you want to type.
3. You can continue entering text to keep it or to delete it.
NOTE: Say “comma,” “period,” “question mark,” “exclamation mark,” or “exclamation point”
to enter punctuation.
• Tap the alphabetic keys to enter letters. Press and hold some specic keys to enter
associated accented letters or numbers. For example, to enter È, press and hold and
the available accented letters and number 3 appear. Then slide to choose È.
• Tap to use uppercase. Double-tap to lock uppercase. This key also changes color
to indicate the current case you are using.
• Tap
to delete the text before the cursor.
• Tap to select numbers and symbols. You can then tap to nd more.
• Tap to enter miniature icons.
• Tap
to use Google’s networked voice input.
• Press and hold > to change the input language or set up the Google Keyboard.
Gesture Typing
The Google Keyboard supports the gesture typing feature. You use this feature to input a
word by sliding through the letters.
To enable and use gesture typing:
1. On the Google Keyboard, press and hold > > Google Keyboard Settings.
Or, tap Home Key > > Settings > Language & input > Google Keyboard.
2. Tap Gesture Typing > Enable gesture typing if the feature is turned o.
End of the word
Start of the word
Knowing the Basics Knowing the Basics

32 33
Connecting to Networks and Devices
Input Method Settings
Choose the input method settings by pressing the Home Key > > Settings >
Language & input.
In the Keyboard & input methods section, you can set the current input method and
choose the settings for input methods.
Editing Text
• Move the insertion point: Tap where you want to type. The cursor blinks in the new
position, and a tab appears below it. Drag the tab to move the cursor.
• Select text: Press and hold or double tap within the text. The nearest word highlights,
with a tab at each end of the selection. Drag the tabs to change the selection. Tap >
SELECT ALL to select all the text or SHARE and choose an option.
• Cut or copy: Select the text you want to manipulate. Then tap CUT or COPY to cut or
copy the text to the clipboard.
• Replace text with the clipboard text: Select the text you want to replace.
Then tap PASTE.
Connecting to Mobile Networks
Controlling Mobile Data Use
To enable or disable data access:
1. Press the Home Key > > Settings > Mobile networks > Mobile Data.
2. Slide the Mobile Data switch to enable or disable mobile data use.
To get data services when roaming:
1. Press the Home Key > > Settings > Mobile networks > International
Data Roaming.
2. Slide the International Data switch to enable or disable roaming.
NOTE: Data roaming may incur signicant roaming charges.
Selecting Preferred Network Type
1. Press the Home Key > > Settings > Mobile networks > Preferred network type.
2. Tap the type of network you prefer to connect to.
Setting Access Point Names
You can use the default Access Point Names (APNs) to connect to the Internet. To add a
new APN, you may need to contact your service provider for the required information.
1. Press the Home Key > > Settings > Mobile networks > Access Point Names.
2. Tap .
3. Tap each item to enter the required information.
4. Tap > Save.
NOTE: To set the APN to default settings, tap > Reset to default.
Selecting Network Operator
1. Press the Home Key > > Settings > Mobile networks.
2. Tap Network operators to search for all available networks.
Knowing the Basics

3534
Connecting to Networks and DevicesConnecting to Networks and Devices
To connect to a secured network, you rst need to get the security details from the
network’s administrator.
1. Press the Home Key > > Settings > Wi-Fi.
2. Slide the Wi-Fi switch to the On
position.
3. Tap
> Add network.
4. Enter the network SSID (name). If necessary, enter security or other network
conguration details.
5. Tap SAVE.
Forgetting a Wi-Fi Network
You can make your phone forget the details of a Wi-Fi network that you added—for
example, if you don’t want the phone to connect to it automatically or if it is a network
that you no longer use.
1. Press the Home Key > > Settings > Wi-Fi.
2. Slide the Wi-Fi switch to the On
position.
3. Tap the Wi-Fi network name and then tap FORGET.
Connecting to a WPS Network
Wi-Fi Protected Setup (WPS) is a feature that makes it easy to add your phone to the
access points which supply WPS.
You can use one of the following methods to connect your phone to a wireless network
using WPS.
Method one: WPS button (Recommended)
1. Press the Home Key > > Settings > Wi-Fi.
2. Slide the Wi-Fi switch to the On
position.
3. Tap > Advanced > WPS Push Button.
4. Press the WPS button on the wireless router and the access point will recognize your
phone and add it to the network.
3. Tap a network in the network list to register manually.
You can also tap Choose automatically to select preferred network automatically.
Connecting to Wi-Fi
Wi-Fi is a wireless networking technology that can provide Internet access at distances of
up to 100 meters, depending on the Wi-Fi router and your surroundings.
Turning Wi-Fi On and Connecting to a Wi-Fi Network
1. Press the Home Key > > Settings > Wi-Fi.
2. Slide the Wi-Fi switch to the On
position to turn on Wi-Fi.
3. Tap a network name to connect to it.
4. If the network is secured, enter the password and tap CONNECT.
NOTE: Your phone automatically connects to previously used Wi-Fi networks when they
are in range.
Getting Notied of Open Networks
1. Press the Home Key > > Settings > Wi-Fi.
2. Slide the Wi-Fi switch to the On
position.
3. Tap
> Advanced.
4. Slide the Network notication switch to the On
position.
When Wi-Fi is on, you receive notications in the Status Bar when your phone detects an
open Wi-Fi network. Slide the Network notication switch to the O
position to
turn o notications.
Adding a Wi-Fi Network
You can add a Wi-Fi network if the network does not broadcast its name (SSID) or add a
Wi-Fi network when you are out of range.

36 37
Method two: PIN
1. Press the Home Key > > Settings > Wi-Fi.
2. Slide the Wi-Fi switch to the On
position.
3. Tap
> Advanced > WPS Pin Entry.
4. The WPS PIN displays on the screen. Enter the PIN into the access point’s setup page.
After entering the PIN, your phone automatically
nds the access point and congures
the connection.
NOTE: For detailed information about the WPS feature of the access point, please refer to
its documentation.
Adjusting Advanced Wi-Fi Settings
1. Press the Home Key > > Settings > Wi-Fi.
2. Tap
> Advanced to adjust the following settings.
• Network notication: Enable to be notied whenever a public network is available.
• Scanning always available: Let Google’s location service and other apps scan for
networks, even when Wi-Fi is o.
• Keep Wi-Fi on during sleep: Choose whether or not to keep Wi-Fi on in Sleep mode.
• Install certicates: Check the installed certicates.
• WPS Push Button: Connect to a WPS network via the push button method.
• WPS Pin Entry: Connect to a WPS network via the phone PIN method.
• MAC address: Check the MAC address.
• IP address: Check the phone’s IP address.
Connecting to Networks and DevicesConnecting to Networks and Devices
Connecting to Bluetooth Devices
Bluetooth is a short-range wireless communication technology. Phones or other
devices with Bluetooth capabilities can exchange information wirelessly within a
distance of about 30 feet (10 meters). The Bluetooth devices must be paired before
the communication is performed.
Turning Bluetooth On/O
1. Press the Home Key > > Settings > Bluetooth.
2. Slide the Bluetooth switch to the On
or O
position.
When Bluetooth is on, the
icon will appear in the Status Bar.
Changing the Device Name
1. Press the Home Key > > Settings > Bluetooth.
2. Slide the Bluetooth switch to the On
position if Bluetooth is o.
3. Tap
> Rename this device.
4. Edit the name and tap RENAME.
Pairing With Another Bluetooth Device
1. Press the Home Key > > Settings > Bluetooth.
2. Slide the Bluetooth switch to the On
position if Bluetooth is o.
Your phone automatically scans for and displays the IDs of all available Bluetooth
devices in range. Tap
> Refresh if you want to scan again.
3. Tap the device you want to pair with.
4. If necessary, conrm that the Bluetooth passkeys are the same between the two
devices and tap PAIR. Alternately, enter a Bluetooth passkey and tap PAIR.
Pairing is successfully completed when the other device accepts the connection or
the same passkey is entered.
La pagina sta caricando ...
La pagina sta caricando ...
La pagina sta caricando ...
La pagina sta caricando ...
La pagina sta caricando ...
La pagina sta caricando ...
La pagina sta caricando ...
La pagina sta caricando ...
La pagina sta caricando ...
La pagina sta caricando ...
La pagina sta caricando ...
La pagina sta caricando ...
La pagina sta caricando ...
La pagina sta caricando ...
La pagina sta caricando ...
La pagina sta caricando ...
La pagina sta caricando ...
La pagina sta caricando ...
La pagina sta caricando ...
La pagina sta caricando ...
La pagina sta caricando ...
La pagina sta caricando ...
La pagina sta caricando ...
La pagina sta caricando ...
La pagina sta caricando ...
La pagina sta caricando ...
La pagina sta caricando ...
La pagina sta caricando ...
La pagina sta caricando ...
La pagina sta caricando ...
La pagina sta caricando ...
La pagina sta caricando ...
La pagina sta caricando ...
La pagina sta caricando ...
La pagina sta caricando ...
La pagina sta caricando ...
La pagina sta caricando ...
La pagina sta caricando ...
La pagina sta caricando ...
La pagina sta caricando ...
La pagina sta caricando ...
La pagina sta caricando ...
-
 1
1
-
 2
2
-
 3
3
-
 4
4
-
 5
5
-
 6
6
-
 7
7
-
 8
8
-
 9
9
-
 10
10
-
 11
11
-
 12
12
-
 13
13
-
 14
14
-
 15
15
-
 16
16
-
 17
17
-
 18
18
-
 19
19
-
 20
20
-
 21
21
-
 22
22
-
 23
23
-
 24
24
-
 25
25
-
 26
26
-
 27
27
-
 28
28
-
 29
29
-
 30
30
-
 31
31
-
 32
32
-
 33
33
-
 34
34
-
 35
35
-
 36
36
-
 37
37
-
 38
38
-
 39
39
-
 40
40
-
 41
41
-
 42
42
-
 43
43
-
 44
44
-
 45
45
-
 46
46
-
 47
47
-
 48
48
-
 49
49
-
 50
50
-
 51
51
-
 52
52
-
 53
53
-
 54
54
-
 55
55
-
 56
56
-
 57
57
-
 58
58
-
 59
59
-
 60
60
-
 61
61
-
 62
62


ZTE Z861BL Manuale utente
- Categoria
- Smartphone
- Tipo
- Manuale utente
- Questo manuale è adatto anche per
in altre lingue
- English: ZTE Z861BL User manual
Documenti correlati
-
ZTE Blade X Max Cricket Wireless Guida utente
-
ZTE ZMax Champ LTE Manuale utente
-
-
ZTE Blade Force Manuale utente
-
ZTE Imperial Max US Cellular Manuale utente
-
ZTE Visible R2 Manuale utente
-
ZTE Avid 4 Manuale utente
-
-
-