
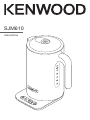
SJM610
instructions

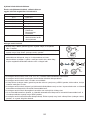
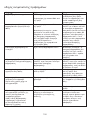
English 2 - 6
Nederlands 7 - 13
Français 14 - 20
Deutsch 21 - 26
Italiano 27 - 33
Português 34 - 40
Español 41 - 47
Dansk 48 - 53
Svenska 54 - 59
Norsk 60 - 65
Suomi 66 - 71
Türkçe 72 - 77
Ïesky 78 - 83
Magyar 84 - 90
Polski 91 - 97
Ekkgmij 98 - 105
Slovenčina 106 - 111
Українська 112 - 119
´¸∂w
021 - 521

햽
햻
햺
햲
햴
햵
햳
햶
햷
햸 햹

Y
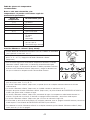
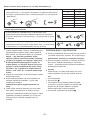
our SJM610 kettle has been designed with a
Variable Temperature and Keep Warm feature to help
select the correct temperature to prepare the best tea
-
whatever your preference.
before using your Kenwood appliance
●
R
ead these instructions carefully and retain for future
reference.
●
Remove all packaging and any labels.
safety
●
Always use the filter and never overfill - boiling water
may splash out.
●
Avoid contact with steam coming out of the spout
area when pouring and out of the lid or spout area
when refilling.
●
Beware: the metal body of the kettle will get hot
during operation.
●
Never let the cord hang down where a child could
grab it.
●
Always unplug your kettle when not in use.
●
Never put the kettle, powerbase, cord or plug in
liquid.
●
Never use a damaged appliance. Get it checked or
repaired: see ‘service and customer care’
●
Caution: Do not operate the kettle on an inclined
surface.
●
Only use the powerbase supplied and keep it clean
and dry.
●
Make sure the lid is secure before switching the kettle
on.
●
Warning: Do not open the lid while the water is
boiling.
●
Take care when opening the lid - droplets of hot
water may be ejected.
●
Make sure the kettle is switched off before lifting or
pouring.
●
Remove the kettle from the base before filling or
pouring.
●
Never put the kettle near or on cooker hot plates or
gas burners.
●
This kettle is for boiling water only.
●
This appliance is not intended for use by persons
(including children) with reduced physical, sensory or
mental capabilities, or lack of experience and
knowledge, unless they have been given supervision
or instruction concerning use of the appliance by a
person responsible for their safety.
●
Children should be supervised to ensure that they do
not play with the appliance.
●
O
nly use the appliance for its intended domestic use.
Kenwood will not accept any liability if the appliance is
subject to improper use, or failure to comply with these
i
nstructions.
b
efore plugging in
●
Make sure your electricity supply is the same as the
one shown on the underside of your kettle.
●
This appliance conforms to EC directive 2004/108/EC
on Electromagnetic Compatibility and EC regulation
no. 1935/2004 of 27/10/2004 on materials intended
for contact with food.
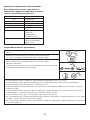
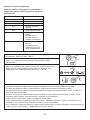
before using for the first time
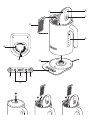
1 Wrap any excess cord around the bracket on the
underside of the powerbase 햻.
2 Fill to ‘MAX’, boil, then pour the water away. Repeat 2
to 3 times.
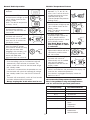
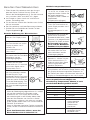
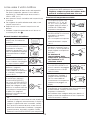
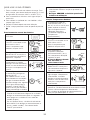
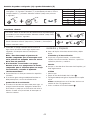
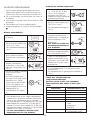
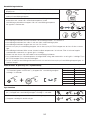
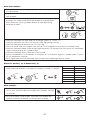
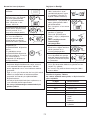
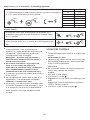
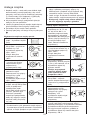
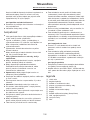
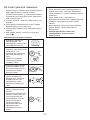
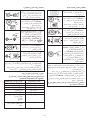
key
햲 flip top lid
햳 finger pad
햴 lid release button
햵 water level window
햶 ON/OFF button
햷 temperature adjust buttons
햸 display screen
햹 Keep Warm button
햺 360° powerbase
햻 cord wrap
햽 filter
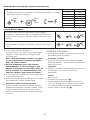
to use your kettle
1 Fill the kettle through either the spout or lid. To open
the lid, press the lid release button 햴. The water level
must be between ‘MAX’ and ‘MIN’ (0.5 L).
●
To be economical: do not boil more water than you
need.
●
To improve the quality of your drinks always use fresh
water.
●
Empty the kettle after each use.
2 Close the lid by pushing down on the finger pad area
.
2

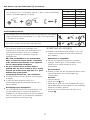
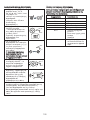
N
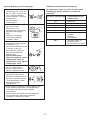
ormal Kettle Operation Variable Temperature Feature
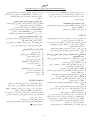
Recommended Temperature Setting Chart
This is for guidance only and temperatures
can be selected for personal preference.
Temp Setting Recommended for
70°C White tea
75°C Green tea
80°C Jasmine tea
85°C Oolong tea
90°C Instant coffee
95°C Herbal teas and infusions
Black
Peppermint
Camomile
100°C Instant drinks where
boiled water
recommended.
1
The temperature can be set
between 70, 75, 80, 85, 90,
9
5 or 100°C so that the most
s
uitable temperature can be
selected (Refer to the
“
Recommended Temperature
Setting Chart”).
2 Press the ON/OFF button once
and the button will light up and
100°C will be shown on the
display screen.
Note: The default temperature
is always 100°C
3 To select the desired
temperature press either the
(-) or (+) button until the
required temperature is shown
on the display screen.
• The Keep Warm feature
will not operate if 100°C
is selected.
4 Press the ON/OFF button
again and the button will flash
continuously and the water
will start to heat.
5 At the end of the heating cycle
the kettle will switch off
automatically with an audible
alert and the selected
temperature will flash on the
display screen.
• If the heating operation is manually stopped or the
kettle is removed from the powerbase the display will
show the last selected temperature.
• If the kettle is unplugged the display screen will
default to 100°C.
1 Plug in and the display will
b
e blank.
2 Press the ON/OFF button once
a
nd the button will light up and
100°C will be shown on the
d
isplay screen.
Note: The default temperature
is always 100°C.
3 Press the ON/OFF button again
and the button will flash
constantly and the water will
start to boil.
4 At the end of the boiling cycle
the kettle will switch off
automatically with an audible
alert and 100°C will flash on
the display screen.
5 To switch off the kettle manually
press the ON/OFF button.
• If the ON/OFF button has only
been pressed once after
plugging in the 2nd press will
start heating the water. The
button will need to be
pressed 3 times to switch off.
NOTE:
• Once the boiling cycle has finished the kettle will
automatically switch off after 30 seconds. The
display screen will switch off and the kettle will go
into standby mode.
• If the kettle is removed from the powerbase at any
time the kettle will switch off automatically and go
into standby mode. Press the ON/OFF button to
reset.
• The kettle will automatically switch off if no function
has been selected within 30seconds.
• Always unplug the kettle when not in use.
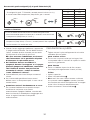
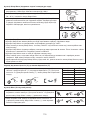
3

K
eep Warm Function
Changing From Centigrade (°C) to Fahrenheit (°F)
Mute Function
• The audible alert at the end of the heating cycle can be turned off by
pressing the Keep Warm button and (-) button at the same time for
2 seconds.
• To switch the audible alert back on press the Keep Warm button and
(-) button together until the audible alert beeps twice.
• The temperature shown on the display screen can be changed from °C °F
°C Centigrade to °F Fahrenheit by holding down the (+) button and the 70 158
Keep Warm button together for 2 seconds. 75 167
80 176
85 185
90 194
95 203
100 212
1
Press the ON/OFF button once and the button will light up and 100°C will
be shown on the display screen.
2 Select the required Keep Warm temperature between 70 – 95°C and then
press the Keep Warm button.
3 Once the water has reached the desired temperature, the Keep Warm
f
unctionwill automatically switch on to maintain the water at the required
temperature. The button will flash whilst in the Keep Warm cycle and then
stop once thecorrect warming temperature is achieved.
• The Keep Warm function can only be selected for settings between 70°C to 95°C.
• The Keep Warm function can be set at any time during the heating cycle.
• The Keep Warm function is inoperable when 100°C is selected.
• After pressing the Keep Warm button do not press the ON/OFF button unless you want to reheat the water.
• The Keep Warm function will keep the water at the selected temperature for 30 minutes. After 30 minutes the
kettle will switch off automatically and go into standby mode.
• The Keep Warm function on it own will not heat water from cold.
• If the kettle is removed from the powerbase at any time the power will switch off automatically and go into
standby mode. Press the ON/OFF button to reset.
• To stop the Keep Warm function at any times just press the Keep Warm button again and the light will go out.
4
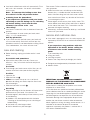
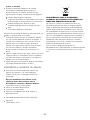
x2

●
Y
our kettle will boil and switch off automatically. To re-
boil, wait a few seconds - the on/off switch needs
t
ime to reset.
N
ote - To interrupt the boiling ensure that
the switch is in the off position before
r
emoving from the powerbase.
●
I
f you experience problems with your kettle
switching on and off during use or switching
off before boiling, check that the flat
element is free from scale - see
“descaling”.
●
Your kettle is fitted with a filter to hold back limescale
particles.
●
If you find drops of water under your kettle, don’t
worry - it is just condensation.
boil-dry protection
●
If you switch on with too little water, your kettle will
cut out automatically. Switch off, remove from the
powerbase and let it cool down before re-filling. When
it has cooled down, the switch will reset itself.
care and cleaning
●
Before cleaning, unplug your kettle and let it cool
down.
the outside and powerbase
●
Wipe with a damp cloth, then dry. Do not use
abrasives - they will scratch the metal and plastic
surfaces.
the inside
●
Even though your kettle comes with a filter, you still
need to clean the inside (and the filter) regularly.
the filter
1 Open the lid.
2 Slide the filter out .
3 either rinse under the tap or use a soft brush.
or when descaling your kettle, drop the filter in too.
Rinse thoroughly.
4 Slide the filter back in to refit .
descaling
●
Regular descaling of the flat element will improve the
performance of your kettle. If the kettle is not
descaled regularly the build up of limescale may result
in the following:
●
problems may be experienced with the kettle
switching on and off during use or switching off
before boiling.
●
the kettle may take longer to boil.
●
the flat element may be damaged.
P
lease note: Failure to descale your kettle may invalidate
your guarantee.
●
W
hen limescale starts to build up on the heating
e
lement, buy a suitable descaler and descale your
kettle. After descaling, boil with fresh water several
t
imes and discard. Clean any descaler off the kettle -
i
t can damage the parts.
●
Some regions of the country have chalky water. This
makes boiled water look cloudy and leaves a deposit
on the side of the kettle. This is normal but can be
removed with regular cleaning.
●
Alternatively, to reduce limescale build up, use filtered
water to fill your kettle.
service and customer care
●
If the cord is damaged it must, for safety reasons, be
replaced by KENWOOD or an authorised KENWOOD
repairer.
If you experience any problems with the
operation of the kettle, before calling for
assistance refer to the troubleshooting
guide.
If you need help with:
●
using your kettle
●
servicing or repairs
●
Contact the shop where you bought your kettle.
●
Designed and engineered by Kenwood in the UK.
●
Made in China.
IMPORTANT INFORMATION FOR CORRECT
DISPOSAL OF THE PRODUCT IN ACCORDANCE
WITH EC DIRECTIVE 2002/96/EC.
At the end of its working life, the product must not be
disposed of as urban waste.
It must be taken to a special local authority differentiated
waste collection centre or to a dealer providing this service.
Disposing of a household appliance separately avoids
possible negative consequences for the environment
and health deriving from inappropriate disposal and
enables the constituent materials to be recovered to
obtain significant savings in energy and resources. As a
reminder of the need to dispose of household
appliances separately, the product is marked with a
crossed-out wheeled dustbin.
5

6
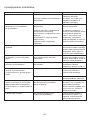
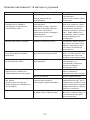
Problem Cause Solution
K
ettle not operating. No Power. Check kettle is plugged in.
Kettle unplugged. Check kettle is correctly located
to the powerbase.
Display screen blank/Selected Kettle unplugged. Press the ON/OFF button to
temperature not shown on display switch the kettle back on.
Normal Operation due:- The display will default to 100°C
To Keep Warm reaching end time when the kettle is switched back
of 30 minutes. on, to select another
No function selected within 30seconds. temperature refer to the
Kettle removed from powerbase. “Variable Temperature feature”
section.
Keep Warm not functioning. 100°C selected. Normal operation - Keep Warm
does not function if 100°C
selected although button will be
lit.
Kettle boiling instead of going into ON/OFF button pressed after Keep Do not press ON/OFF button
Keep Warm function. Warm button. after Keep Warm unless you
want to heat the water.
Selected Temperature not shown Kettle unplugged. The display will default to 100°C
on display. if unplugged.
Kettle not switching off automatically Kettle overfilled. Check water level is not above
after boiling. the Max level.
Long Switch Off Time.
Lid not closed. Check lid is closed correctly.
Long Switch Off Time or Switching Off Limescale/mineral build up on element Check that the element is free
too early. affecting operation. from scale before water boiled.
Incorrect Temperature Reading. Refer to “descaling” section
Kettle switching on and off during use. under care and cleaning.
Water splashing out of spout area. Filter not fitted in spout area. Always use the filter and do not
Kettle overfilled. overfill above the Max level.
Kettle stopped working during Boil dry protection operated due to Switch off and remove from the
operation. insufficient water in the kettle. powerbase.
Allow to cool down before
refilling.
When the kettle has cooled
down the switch will reset itself.
Check the water level is above
the minimum level.
If none of the above solve the problem see “Service & Customer Care”.
troubleshooting guide

Uw SJM610-ketel is ontworpen met een variabele
temperatuurfunctie en warmhoudfunctie waarmee u
d
e juiste temperatuur kunt selecteren voor de beste
thee–wat ook maar uw voorkeur is.
voordat u uw Kenwood-apparaat gebruikt:
●
Lees deze instructies zorgvuldig door en bewaar ze
voor toekomstig gebruik.
●
Verwijder alle verpakking en labels.
veiligheid
●
Maak altijd gebruik van het filter en doe het apparaat
nooit te vol - het kokende water kan eruit spatten.
●
Vermijd contact met de stoom die uit de tuit komt bij
het inschenken of uit het deksel en de tuit komt bij
het vullen.
●
Let op: de metalen behuizing van de waterkoker
wordt heet tijdens het gebruik.
●
Laat het snoer nooit overhangen, zodat een kind erbij
kan.
●
Haal de stekker altijd uit het stopcontact
wanneer u de ketel niet gebruikt.
●
Dompel de ketel, de contactplaat, het snoer of de
stekker nooit onder in een vloeistof.
●
Gebruik nooit een beschadigd apparaat. Laat het
nakijken of repareren: zie ‘onderhoud en
klantenservice’.
●
Voorzichtig: gebruik de waterkoker niet op een
hellend oppervlak.
●
Maak uitsluitend gebruik van de bijgeleverde
contactplaat en zorg dat dit schoon en droog blijft.
●
Controleer of de deksel gesloten is voordat u de ketel
inschakelt.
●
Waarschuwing: open het deksel niet terwijl het
water kookt.
●
Pas op bij het openen van het deksel, omdat daarbij
druppels heet water kunnen vrijkomen.
●
Schakel de waterkoker altijd uit, voordat u deze optilt
om te schenken.
●
Haal altijd de ketel van de contactplaat voordat u hem
vult of water uitschenkt.
●
Zet de ketel nooit op of naast een hete kookplaat of
gasbrander.
●
Deze ketel is uitsluitend voor het koken van water.
●
Dit apparaat is niet bedoeld voor gebruik door
personen (inclusief kinderen) met verminderde
l
ichamelijke, zintuiglijke of geestelijke vermogens of
gebrek aan ervaring en kennis, tenzij ze toezicht of
instructies over het gebruik van het apparaat hebben
gekregen van de persoon die verantwoordelijk is voor
hun veiligheid.
●
Op kinderen moet toezicht gehouden worden om er
zeker van te zijn dat ze niet met het apparaat spelen.
●
Gebruik het apparaat alleen voor het huishoudelijke
gebruik waarvoor het is bedoeld. Kenwood kan niet
aansprakelijk worden gesteld in het geval dat het
apparaat niet correct is gebruikt, of waar deze
instructies niet worden opgevolgd.
voordat u de stekker in het stopcontact
steekt
●
Controleer of de spanning van het stopcontact
overeenkomt met de gegevens op het typeplaatje aan
de onderkant van uw waterkoker.
●
Dit apparaat voldoet aan de EC-richtlijn 2004/108/EC
betreffende de elektromagnetische compatibiliteit en
EC-bepaling 1935/2004 van 27/10/2004 betreffende
materialen die bestemd zijn voor contact met voedsel.
voordat u het apparaat voor de eerste keer
gebruikt
1 Wikkel het teveel aan snoer om het haakje aan de
onderkant van de contactplaat .
2 Vul de waterkoker tot aan de indicatie ‘MAX’, kook
het water en gooi het daarna weg. Dit 2-3 keer
herhalen.
legenda
scharnierdeksel
vingerkussen
dekselontgrendelingsknop
kijkglas voor waterpeil
AAN/UIT-toets
temperatuurregelingstoetsen
weergavescherm
warmhoudtoets
motorblok 360°
snoerwikkelsysteem
filter
7
Nederlands
V
ouw de voorpagina a.u.b. uit voordat u begint te lezen. Op deze manier zijn de afbeeldingen zichtbaar

het gebruik van uw ketel
1 Vul de ketel via de tuit of het deksel. Druk op de
dekselontgrendelingsknop om het deksel te
o
penen. Het waterpeil moet zich tussen MAX en MIN
(0,5 L) bevinden.
●
Voor zuinig gebruik: kook niet meer water dan u nodig
h
ebt.
●
Om de kwaliteit van uw dranken te verbeteren, moet
u altijd vers water gebruiken.
●
Giet overtollig water na gebruik uit de ketel.
2 Sluit het deksel door op het gedeelte met het
vingerkussen te drukken.
Normale werking van de ketel
V
ariabele temperatuurfunctie
1
De temperatuur kan worden
ingesteld op 70, 75, 80, 85, 90,
9
5 of 100 °C, zodat de meest
g
eschikte temperatuur kan
worden geselecteerd (raadpleeg
d
e tabel Aanbevolen
temperatuurinstellingen).
2 Druk één keer op de AAN/UIT-
toets en de toets gaat branden
terwijl op het scherm 100 °C
wordt weergegeven.
N.B. De standaardtemperatuur
is altijd 100 °C.
3 Om de gewenste temperatuur
te selecteren, drukt u op de (-)
of (+) toets tot de vereiste
temperatuur op het scherm
wordt weergegeven.
• De warmhoudfunctie
werkt niet als 100 °C
wordt geselecteerd.
4 Druk opnieuw op de AAN/UIT-
toets waarna de toets
voortdurend knippert en het
water begint te verhitten.
5 Aan het eind van de
verwarmingscyclus schakelt de
ketel automatisch uit met een
hoorbaar alarm; op het scherm
knippert de geselecteerde
temperatuur.
• Als de verwarmingsfunctie handmatig wordt gestopt
of
als de ketel van de contactplaat wordt verwijderd,
geeft het scherm de laatst geselecteerde temperatuur
weer.
• Als de stekker van de ketel uit het stopcontact wordt
getrokken, geeft het scherm de
standaardtemperatuur van 100 °C weer.
1 Steek de stekker in het
stopcontact – het
weergavescherm is leeg.
2
Druk één keer op de AAN/UIT-
toets en de toets gaat branden
terwijl op het scherm 100 °C
wordt weergegeven.
N.B. De standaardtemperatuur
is altijd 100 °C.
3
Druk opnieuw op de AAN/UIT-
toets waarna de toets
voortdurend knippert en het
water begint te koken.
4
Aan het eind van de kookcyclus
schakelt de ketel automatisch
uit met een hoorbaar alarm; op
het scherm knippert 100 °C.
5 Om de ketel uit te schakelen,
drukt u handmatig op de
AAN/UIT-toets.
• Als de AAN/UIT-toets slechts
één keer is ingedrukt nadat de
stekker in het stopcontact is
gestoken, begint het water na
de 2e druk op de toets op te
warmen. Om de ketel uit te
schakelen, moet u 3 keer op
de toets drukken.
NB:
• Aan het eind van de kookcyclus schakelt de ketel
na 30 seconden automatisch uit. Het scherm
schakelt uit en de ketel gaat over op de stand-
bymodus.
• Als de ketel op enig moment van de contactplaat
wordt verwijderd, schakelt de ketel automatisch uit
en gaat over op de stand-bymodus. Druk op de
AAN/UIT-toets om te apparaat terug te stellen.
• De ketel schakelt automatisch uit als binnen 30
seconden geen functie wordt geselecteerd.
• Als de ketel niet gebruikt wordt, dient u de
stekker uit het stopcontact te halen.
8

T
abel met aanbevolen temperatuurinstellingen
Dit dient alleen als richtlijn. Temperaturen
kunnen
naar eigen voorkeur worden
g
eselecteerd.
Temperatuurinstelling Aanbevolen voor
7
0 °C Witte thee
7
5 °C Groene thee
80 °C Jasmijnthee
85 °C Oolongthee
90 °C Oploskoffie
95 °C Kruidenthee en infusies
Zwarte thee
Pepermuntthee
Kamillethee
100 °C Kant-en-klaardranken
waarvoor kokend water
wordt aanbevolen
9
Warmhoudfunctie
1 Druk één keer op de AAN/UIT-toets en de toets gaat branden terwijl op het
scherm 100 °C wordt weergegeven.
2 Selecteer de vereiste warmhoudtemperatuur van 70 – 95 °C en druk
vervolgens op de warmhoudtoets.
3 Wanneer het water de gewenste temperatuur heeft bereikt, wordt de
warmhoudfunctie automatisch ingeschakeld om het water op de vereiste
temperatuur te houden. De toets gaat knipperen terwijl de warmhoudcyclus
is ingeschakeld en stopt wanneer de juiste temperatuur is bereikt.
• De warmhoudfunctie kan alleen worden geselecteerd voor instellingen tussen 70 °C en 95 °C.
• De warmhoudfunctie kan te allen tijde tijdens de verwarmingscyclus worden ingesteld.
• De warmhoudfunctie werkt niet als 100 °C wordt geselecteerd.
• Nadat u op de warmhoudtoets hebt gedrukt, moet u niet op de AAN/UIT-toets drukken tenzij u het water
opnieuw wilt verwarmen.
• De warmhoudfunctie houdt het water gedurende 30 minuten op de geselecteerde temperatuur. Na 30 minuten
schakelt de ketel automatisch uit waarna hij overgaat in de stand-bymodus.
• De warmhoudfunctie kan geen koud water verwarmen.
• Als de ketel op enig moment van de contactplaat wordt verwijderd, schakelt de ketel automatisch uit en gaat
over op de stand-bymodus. Druk op de AAN/UIT-toets om het apparaat terug te stellen.
• Om de warmhoudfunctie op enig moment te stoppen, drukt u opnieuw op de warmhoudtoets, waarna het
lampje uit gaat.

V
an Celsius (°C) naar Fahrenheit (°F) veranderen
Onderdrukkingsfunctie
• Het hoorbare alarm aan het eind van de verwarmingscyclus kan worden
uitgeschakeld door de warmhoudtoets en (-) toets samen gedurende
2 seconden in te drukken.
• Om het hoorbare alarm weer in te schakelen, drukt u de warmhoudtoets
en (-) toets samen in tot het alarm twee keer piept.
• De temperatuur die op het scherm wordt weergegeven, kan worden veranderd °C °F
v
an °C (Celsius) naar °F (Fahrenheit) door de (+) toets en de warmhoudtoets 70 158
s
amen 2 seconden ingedrukt te houden. 75 167
8
0 176
8
5 185
9
0 194
95 203
100 212
10
x2
●
Het water gaat koken en de waterkoker slaat
automatisch af. Wacht een paar seconden om het
water opnieuw te koken; de aan/uit-schakelaar
springt pas na een paar seconden terug in de
uitgangspositie.
NB – Om het kookproces te onderbreken,
dient u ervoor te zorgen dat de schakelaar
in de uitstand staat voordat u het apparaat
van de contactplaat verwijdert.
●
Als het u moeite kost de ketel tijdens
gebruik aan- en uit te zetten of uit te zetten
voordat het water kookt, kijk dan of er geen
kalkaanslag op het platte
verwarmingselement zit – zie ‘ontkalken’.
●
Uw ketel heeft een filter om de losse kalkaanslag op
te vangen.
●
U hoeft zich geen zorgen te maken als u
waterdruppels onder de waterkoker aantreft, dit is
slechts condens.
beveiliging tegen droogkoken
●
Als u het apparaat aanzet met te weinig water, slaat
uw ketel automatisch af. Schakel het apparaat uit,
verwijder het van de contactplaat en laat het afkoelen
voor u er water in doet. Als het apparaat afgekoeld is,
gaat de schakelaar vanzelf weer terug.
onderhoud en reiniging
●
Voordat u de waterkoker gaat reinigen, moet u de
stekker uit het stopcontact halen en het apparaat
laten afkoelen.
buitenkant en motorblok
●
Met een vochtige doek afvegen en vervolgens
afdrogen. Gebruik geen schuurmiddelen – deze
maken krassen op de metalen en plastic
oppervlakken.
de binnenkant
●
Hoewel uw ketel met een filter geleverd wordt, moet u
toch de binnenkant (en het filter) regelmatig
schoonmaken.
het filter
1 Open het deksel.
2 Schuif het filter eruit.
3 Spoel hem af onder de kraan of gebruik een zachte
borstel of ontkalk het filter tegelijk met uw waterkoker.
Spoel het vervolgens goed af.
4 Schuif het filter naar binnen om het weer aan te
brengen .

o
ntkalken
●
Door het verwarmingselement regelmatig te
o
ntkalken, gaat de werking van uw ketel vooruit. Als
d
e ketel niet regelmatig ontkalkt wordt, kan de
opeenhoping van kalk tot de volgende gevolgen
l
eiden:
●
p
roblemen met het in- en uitschakelen van de ketel
tijdens het gebruik of de ketel schakelt zichzelf uit
voordat het water kookt.
●
het kan langer duren voor het water in de ketel aan
de kook komt.
●
het verwarmingselement kan beschadigd worden.
Let op: wanneer u nalaat uw ketel te ontkalken, kan uw
garantie komen te vervallen.
●
Wanneer zich kalkaanslag op het verwarmingselement
afzet, koopt u een geschikt ontkalkingsmiddel voor
uw waterkoker. Kalkaanslag zorgt namelijk voor
langere kooktijden en brengt schade toe aan het
verwarmingselement. Breng na het ontkalken enkele
malen vers water aan de kook en gooi het daarna
weg. Verwijder eventuele resten van het
ontkalkingsmiddel uit de ketel omdat het de
onderdelen kan beschadigen.
●
In sommige delen van het land heeft het water een
relatief hoog kalkgehalte, waardoor het water er
troebel uitziet en er aanslag tegen de binnenzijde van
de waterkoker komt te zitten. Dit is een normaal
verschijnsel en de aanslag kan met een gewoon
schoonmaakmiddel verwijderd worden.
●
Een andere mogelijkheid om kalkaanslag te
voorkomen is het gebruik van gefilterd water.
onderhoud en klantenservice
●
Als het snoer beschadigd is, moet het om
veiligheidsredenen door KENWOOD of een door
KENWOOD geautoriseerd reparatiebedrijf vervangen
worden.
Als u problemen hebt met het gebruik van
de ketel, dient u de probleemoplossingsgids
te raadplegen voordat u om hulp belt.
Als u hulp nodig hebt met:
●
het gebruik van uw apparaat of
●
onderhoud en reparatie
●
kunt u contact opnemen met de winkel waar u het
apparaat gekocht hebt.
●
Ontworpen en ontwikkeld door Kenwood in het VK.
●
Vervaardigd in China.
B
ELANGRIJKE INFORMATIE VOOR DE
C
ORRECTE VERWERKING VAN HET PRODUCT
IN OVEREENSTEMMING MET DE EUROPESE
RICHTLIJN 2002/96/EC
Aan het einde van de levensduur van het product mag
het niet samen met het gewone huishoudelijke afval
worden verwerkt. Het moet naar een speciaal centrum
voor gescheiden afvalinzameling van de gemeente
worden gebracht, of naar een verkooppunt dat deze
service verschaft. Het apart verwerken van een
huishoudelijk apparaat voorkomt mogelijke gevolgen
voor het milieu en de gezondheid die door een
ongeschikte verwerking ontstaan en zorgt ervoor dat de
materialen waaruit het apparaat bestaat, teruggewonnen
kunnen worden om een aanmerkelijke besparing van
energie en grondstoffen te verkrijgen. Om op de
verplichting tot gescheiden verwerking van elektrische
huishoudelijke apparatuur te wijzen, is op het product
het symbool van een doorgekruiste vuilnisbak
aangebracht.
11

Probleem Oorzaak Oplossing
K
etel werkt niet Geen stroom. Controleer of de stekker van
Stekker van ketel uit stopcontact. de ketel in het stopcontact zit.
Controleer of de ketel goed op
d
e contactplaat staat.
Scherm leeg/geselecteerde Stekker van ketel uit stopcontact. Druk op de AAN/UIT-toets
temperatuur niet weergegeven om de ketel opnieuw in te
schakelen.
Normale werking: Het scherm geeft standaard
de warmhoudfunctie heeft het einde 100 °C weer wanneer de
bereikt van de 30 minuten. opnieuw wordt ingeschakeld;
Geen functie geselecteerd binnen om een andere temperatuur
30 seconden. te selecteren, raadpleegt u
Ketel van contactplaat verwijderd. het gedeelte Variabele
temperatuurfunctie.
Warmhoudfunctie werkt niet. 100 °C geselecteerd. Normale werking –
warmhouden werkt niet als 100
°C is geselecteerd. hoewel de
toets is verlicht.
Ketel kookt in plaats van de AAN/UIT-toets ingedrukt na de Druk niet op de AAN/UIT-
warmhoudfunctie. warmhoudtoets. toets na de warmhoudtoets
tenzij u het water wilt
verwarmen.
Geselecteerde temperatuur niet op Stekker van ketel uit stopcontact. Het scherm geeft standaard
scherm weergegeven. 100 °C weer als de stekker van
de ketel uit het stopcontact is
getrokken.
Ketel schakelt niet automatisch uit Ketel te vol. Controleer of het waterniveau
nadat het water kookt. niet boven het maximumniveau
Lange uitschakelingsduur. uitkomt.
Deksel niet dicht. Controleer of het deksel goed
gesloten is.
Lange uitschakelingsduur of schakelt Kalkaanslag / opeenhoping van Controleer of het element
te vroeg uit. mineralen op element beïnvloedt kalkvrij is voordat u water kookt.
Onjuiste temperatuurwaarde. werking. Raadpleeg het gedeelte
Ketel schakelt tijdens het gebruik Ontkalken onder Onderhoud
aan en uit. en reiniging.
Water spettert uit de spuit. Er zit geen filter in de spuit. Gebruik altijd het filter en vul
Ketel te vol. de ketel niet verder dan het
maximumniveau.
probleemoplossingsgids
12

13
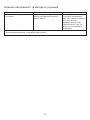
Probleem Oorzaak Oplossing
K
etel werkte niet langer tijdens Droogkookbescherming ingeschakeld Schakel de ketel uit en
het gebruik. vanwege onvoldoende water in de ketel. verwijder hem van de
contactplaat.
L
aat hem afkoelen voordat u
hem opnieuw vult.
Als de ketel afgekoeld is, gaat de
schakelaar vanzelf weer terug.
Controleer of het waterniveau
boven het minimumniveau
uitkomt.
Als geen van bovenstaande oplossingen het probleem verhelpen, raadpleegt u Onderhoud en klantenservice.
probleemoplossingsgids

Votre bouilloire SJM610 comporte une fonction
Température variable et Maintien au chaud pour vous
a
ider à sélectionner la bonne température afin
d’obtenir un excellent thé, et ce quelle que soit votre
préférence.
avant d’utiliser votre appareil Kenwood
●
Lisez et conservez soigneusement ces instructions
pour pouvoir vous y référer ultérieurement.
●
Retirez tous les éléments d’emballage et les
étiquettes.
sécurité
●
Utilisez toujours le filtre et ne remplissez pas trop la
bouilloire - l’eau en ébullition pourrait être projetée
hors de la bouilloire.
●
Évitez tout contact avec la vapeur sortant de la zone
du bec verseur pendant le déversement et celle
sortant de l’ouverture du couvercle ou du bec lors du
remplissage.
●
Attention : le corps métallique de la bouilloire devient
extrêmement chaud durant l’utilisation.
●
Ne laissez jamais pendre le cordon à portée d’un
enfant qui pourrait s’en emparer.
●
Débranchez toujours votre bouilloire en
dehors des périodes d’utilisation.
●
N’immergez jamais la bouilloire, la base
d’alimentation, le cordon ou la prise dans un liquide.
●
N’utilisez jamais un appareil en mauvais état. Faites-le
vérifier ou réparer : reportez-vous à la section
« service après-vente ».
●
Attention : n’utilisez pas la bouilloire sur une surface
inclinée.
●
N’utilisez que la base d’alimentation fournie et
maintenez-la propre et sèche.
●
Vérifiez que le couvercle est fermement en place
avant de mettre la bouilloire sous tension.
●
Attention : n’ouvrez pas le couvercle pendant que
l’eau bout.
●
Faites attention en soulevant le couvercle – des
gouttelettes d’eau bouillante peuvent être projetées.
●
Avant de remplir ou de vider l’eau, vérifiez que la
bouilloire est hors tension.
●
Avant de remplir ou de vider l’eau, enlevez la bouilloire
de son socle.
●
Ne mettez jamais la bouilloire à proximité de ou sur
les plaques chauffantes ou les brûleurs à gaz de votre
cuisinière.
●
Cette bouilloire n’est prévue que pour l’eau.
●
Cet appareil n’est pas destiné à être utilisé par des
personnes (y compris des enfants) dont les capacités
p
hysiques, sensorielles ou mentales sont diminuées,
ou qui ne disposent pas des connaissances ou de
l’expérience nécessaires, à moins qu’elles n’aient été
formées et encadrées pour l’utilisation de cet appareil
par une personne responsable de leur sécurité.
●
Les enfants doivent être surveillés afin qu'ils ne
puissent pas jouer avec cet appareil.
●
N’employez l’appareil qu’à la fin domestique prévue.
Kenwood décline toute responsabilité dans les cas où
l’appareil est utilisé incorrectement ou que les
présentes instructions ne sont pas respectées.
avant de brancher
●
Assurez-vous que le courant électrique que vous
utilisez est le même que celui indiqué sous votre
bouilloire.
●
Cet appareil est conforme à la directive 2004/108/CE
de la CE sur la compatibilité électromagnétique et au
règlement 1935/2004 de la CE du 27/10/2004 sur les
matériaux destinés au contact alimentaire.
avant d’utiliser votre appareil pour la
première fois
1 Enroulez l’excédent de cordon autour du clip sous le
socle d’alimentation .
2 Remplissez jusqu’au repère « MAX », faites bouillir et
jetez l’eau. Répétez l’opération 2 à 3 fois.
légende
couvercle rabattable
bouton poussoir
bouton de déblocage du couvercle
fenêtre de niveau d’eau
bouton MARCHE / ARRÊT
boutons de réglage de la température
écran d’affichage
bouton de Maintien au chaud
socle d’alimentation 360°
enrouleur de cordon
filtre
14
Français
V
euillez déplier les illustrations de la première page

utilisation de votre bouilloire
1 Remplissez la bouilloire par le bec verseur ou par le
couvercle. Pour ouvrir le couvercle, appuyez sur le
b
outon de déblocage . Le niveau d’eau doit se
trouver entre les repères « MAX » et « MIN » (0,5 l).
●
Pour des économies d’énergie : ne faites pas bouillir
p
lus d’eau que nécessaire.
●
Utilisez toujours de l’eau fraîche pour améliorer la
qualité de vos boissons.
●
Videz la bouilloire après chaque utilisation.
2 Fermez le couvercle en appuyant sur la zone du
bouton poussoir .
Fonctionnement normal de la bouilloire
Fonction Température variable
1 La température peut être réglée
s
ur 70, 75, 80, 85, 90, 95 ou
100 °C de manière à pouvoir
obtenir la température la mieux
appropriée (se reporter au
“ Tableau de sélection des
températures recommandées ”).
2 Appuyez une fois sur le bouton
MARCHE / ARRÊT : le bouton
s’éclaire et l’affichage indique
100 °C à l’écran.
Remarque : la température par
défaut est toujours fixée sur
100 °C.
3 Pour sélectionner la température
souhaitée, appuyez sur le
bouton (-) ou (+) jusqu’à ce que
la température recherchée
s’affiche à l’écran.
• La fonction Maintien au
chaud ne peut pas
fonctionner si la
température 100 °C est
sélectionnée.
4 Appuyez une nouvelle fois sur le
bouton MARCHE / ARRÊT : le
bouton clignote en continu et
l’eau commence à chauffer.
5 À la fin du cycle d’ébullition, la
bouilloire s’éteint
automatiquement, émet une
alerte et la température
recherchée clignote à l’écran.
• Si le fonctionnement de la bouilloire est arrêté
manuellement ou si la bouilloire est retirée de son
socle d’alimentation, l’affichage indique alors la
dernière température sélectionnée.
• Si la bouilloire est débranchée, l’affichage indique par
défaut la température 100° C.
• La bouilloire s’éteint automatiquement si aucune
fonction n’est sélectionnée dans un délai de 30
s
econdes.
•
Débranchez toujours votre bouilloire en
dehors des périodes d’utilisation.
1 Branchez votre bouilloire :
l’affichage apparaît vierge.
2 Appuyez une fois sur le bouton
MARCHE / ARRÊT : le bouton
s’éclaire et l’affichage indique
100 °C à l’écran.
Remarque : la température par
défaut est toujours 100 °C.
3 Appuyez une nouvelle fois sur
le bouton MARCHE / ARRÊT :
le bouton clignote en continu
et l’eau commence à bouillir.
4 À la fin du cycle d’ébullition, la
bouilloire s’éteint
automatiquement, émet une
alerte et la température 100 °C
clignote à l’écran.
5 Pour éteindre manuellement la
bouilloire, appuyez sur le
bouton MARCHE / ARRÊT.
• Si vous n’avez appuyé qu’une
fois sur le bouton MARCHE /
ARRÊT après avoir branché la
bouilloire, le fait d’appuyer une
seconde fois sur le bouton
lance l’ébullition de l’eau. Vous
devez dès lors appuyer une
troisième fois sur le bouton
pour éteindre la bouilloire.
REMARQUE :
• Une fois le cycle d’ébullition terminé, la bouilloire
s’éteint automatiquement au bout de 30 secondes.
L’écran d’affichage s’éteint et la bouilloire passe en
mode pause.
• Si à un moment quelconque la bouilloire est retirée
de la base du socle d’alimentation, elle s’éteint
automatiquement et passe en mode pause.
Appuyez sur le bouton MARCHE / MARCHE pour la
relancer.
15

T
ableau de sélection des températures
recommandées
Ce tableau est fourni à titre indicatif
u
niquement et les températures peuvent être
sélectionnées en fonction de vos préférences
personnelles.
Sélection de la Recommandée pour
température
70° C Thé blanc
75° C Thé vert
80° C Thé au jasmin
85° C Thé Oolong
90° C Café instantané
95° C Tisanes et Infusions
Thé noir
Menthe poivrée
Camomille
100° C Boissons instantanées
pour lesquelles il est
recommandé d’utiliser de
l’eau arrivée à ébullition
Fonction Maintien au chaud
1 Appuyez une fois sur le bouton MARCHE / ARRÊT : le bouton s’éclaire et
l’affichage indique 100 °C à l’écran.
2 Sélectionnez la température de Maintien au chaud souhaitée, comprise
entre 70 et 95° C, puis appuyez sur le bouton Maintien au chaud.
3 Une fois l’eau ayant atteint la température souhaitée, la fonction Maintien au
chaud s’enclenche automatiquement pour maintenir l’eau à la température
recherchée. Le bouton clignote tant que le cycle de Maintien au chaud est
enclenché et s’arrête une fois la température devant être maintenue
atteinte.
• La fonction Maintien au chaud ne peut être utilisée que dans le cas de températures sélectionnées comprises
entre 70° C et 95° C.
• La fonction Maintien au chaud peut être sélectionnée à tout moment tandis que l’eau chauffe.
• La fonction Maintien au chaud ne peut pas fonctionner lorsque la température 100° C est sélectionnée.
• Après avoir appuyé sur le bouton de Maintien au chaud, vous ne devez pas appuyer sur le bouton MARCHE /
ARRÊT, hormis si vous souhaitez faire chauffer une nouvelle fois l’eau.
• La fonction Maintien au chaud conservera l’eau à la température sélectionnée pendant 30 minutes. Au bout de
30 minutes la bouilloire s’éteint automatiquement et passe en mode pause.
• La fonction Maintien au chaud ne fait pas chauffer d’elle-même de l’eau froide.
• Si à un moment quelconque la bouilloire est retirée du socle d’alimentation, l’alimentation s’éteint alors
automatiquement et la bouilloire passe en mode pause. Appuyez sur le bouton MARCHE / ARRÊT pour
réenclencher la bouilloire.
• Pour arrêter à un moment quelconque la fonction Maintien au chaud, il vous suffit d’appuyer une nouvelle fois sur
le bouton de Maintien au chaud et le témoin s’éteint.
16

●
Votre bouilloire amènera l’eau à ébullition et se
coupera automatiquement. Pour faire rebouillir l’eau,
attendez quelques secondes. Il faut laisser le temps à
l’interrupteur marche / arrêt (on/off) de se réinitialiser.
Remarque – Pour interrompre l’ébullition,
veillez à ce que le bouton soit en position
arrêt avant de retirer la bouilloire de sa
base d’alimentation.
●
Si le fonctionnement de votre bouilloire
s’interrompt momentanément en cours
d’utilisation ou si elle s’éteint avant
ébullition, assurez-vous que la résistance
plate n'est pas recouverte de tartre (voir «
détartrage »).
●
Votre bouilloire est équipée d’un filtre pour retenir les
particules calcaires.
●
Si vous trouvez des gouttes d’eau en dessous de
votre bouilloire, ne vous inquiétez pas – ce n’est que
de la condensation.
protection contre l’assèchement
●
Si, lors de la mise sous tension, il n’y a pas
suffisamment d’eau, la bouilloire s’éteint
automatiquement. Éteignez, retirez la bouilloire du
socle d’alimentation et laissez-la refroidir avant de la
remplir. Lorsqu’elle a refroidi, le commutateur se
réinitialise.
entretien et nettoyage
●
Avant de procéder au nettoyage, débranchez votre
bouilloire et laissez-la refroidir.
extérieur et base d’alimentation
●
Essuyez avec un chiffon humide, puis séchez.
N’utilisez pas d’abrasifs – ils rayent le métal et les
surfaces en plastique.
intérieur
●
La présence d’un filtre dans la bouilloire ne vous
dispense pas d’en nettoyer régulièrement l’intérieur et
le filtre.
le filtre
1 Ouvrez le couvercle.
2
b
Glissez le filtre vers l’extérieur .
3 Soit rincez à l’eau courante ou utilisez une brosse
douce,
soit, lorsque vous détartrez votre bouilloire, mettez
également le filtre dans la bouilloire. Rincez
abondamment.
4 Glissez le filtre en position dans la bouilloire .
P
asser de degrés Centigrade (° C) à des Fahrenheit (° F)
Fonction Mode Silence
• The audible alert at the end of the heating cycle can be turned off by
pressing the Keep Warm button and (-) button at the same time for
2 seconds.
• To switch the audible alert back on press the Keep Warm button and
(-) button together until the audible alert beeps twice.
• The temperature shown on the display screen can be changed from °C °F
°
C Centigrade to °F Fahrenheit by holding down the (+) button and the 70 158
K
eep Warm button together for 2 seconds. 75 167
8
0 176
8
5 185
9
0 194
95 203
100 212
17
x2

d
étartrage
●
Un détartrage régulier de l’élément plat améliorera le
f
onctionnement de votre bouilloire. Si la bouilloire
n
’est pas régulièrement détartrée, le dépôt de calcaire
peut induire ce qui suit :
●
d
es problèmes peuvent se produire à la mise sous
e
t hors tension pendant l’utilisation ou à la mise
hors tension avant l’ébullition :
●
l’ébullition peut tarder :
●
l’élément plat peut être endommagé.
Remarque : le fait de ne pas détartrer votre bouilloire
peut annuler votre garantie.
●
Si du tartre se forme sur l’élément chauffant, achetez
un produit détartrant approprié et détartrez votre
bouilloire. En cas de présence de tartre, il faudra plus
longtemps à la bouilloire pour faire bouillir l’eau et
l’élément chauffant est susceptible de brûler. Après
avoir détartré l’appareil, faites bouillir de l’eau fraîche
plusieurs fois de suite et jetez cette eau. Veillez à ne
pas laisser de produit détartrant sur votre bouilloire –
les éléments pourraient être endommagés.
●
Certaines régions au sein de votre pays possèdent
une eau calcaire. De ce fait, l’eau bouillie est trouble
et laisse un dépôt sur les bords de la bouilloire. Il
s’agit d’un phénomène normal, auquel il est toutefois
possible de remédier par un nettoyage régulier.
●
Une autre possibilité pour réduire la formation de
tartre est d’utiliser de l’eau filtrée pour remplir votre
bouilloire.
service après-vente
●
Si le cordon est endommagé, il doit être remplacé,
pour des raisons de sécurité, par KENWOOD ou par
un réparateur agréé KENWOOD.
Si vous rencontrez des problèmes lorsque
vous faites fonctionner la bouilloire, nous
vous invitons à consulter notre guide de
dépannage avant de contacter notre service
d’assistance.
Si vous avez besoin d’aide concernant :
●
l’utilisation de votre appareil,
●
l’entretien ou les réparations,
●
contactez le magasin où vous avez acheté votre
appareil.
●
Conçu et développé par Kenwood au Royaume-Uni.
●
Fabriqué en Chine.
A
VERTISSEMENTS POUR L'ÉLIMINATION
C
ORRECTE DU PRODUIT CONFORMÉMENT
AUX TERMES DE LA DIRECTIVE EUROPÉENNE
2002/96/CE.
Au terme de son utilisation, le produit ne doit pas être
éliminé avec les déchets urbains.
Le produit doit être remis à l'un des centres de collecte
sélective prévus par l'administration communale ou
auprès des revendeurs assurant ce service.
Éliminer séparément un appareil électroménager permet
d'éviter les retombées négatives pour l'environnement et
la santé dérivant d'une élimination incorrecte, et permet
de récupérer les matériaux qui le composent dans le but
d'une économie importante en termes d'énergie et de
ressources. Pour rappeler l'obligation d'éliminer
séparément les appareils électroménagers, le produit
porte le symbole d'un caisson à ordures barré.
18
La pagina si sta caricando...
La pagina si sta caricando...
La pagina si sta caricando...
La pagina si sta caricando...
La pagina si sta caricando...
La pagina si sta caricando...
La pagina si sta caricando...
La pagina si sta caricando...
La pagina si sta caricando...
La pagina si sta caricando...
La pagina si sta caricando...
La pagina si sta caricando...
La pagina si sta caricando...
La pagina si sta caricando...
La pagina si sta caricando...
La pagina si sta caricando...
La pagina si sta caricando...
La pagina si sta caricando...
La pagina si sta caricando...
La pagina si sta caricando...
La pagina si sta caricando...
La pagina si sta caricando...
La pagina si sta caricando...
La pagina si sta caricando...
La pagina si sta caricando...
La pagina si sta caricando...
La pagina si sta caricando...
La pagina si sta caricando...
La pagina si sta caricando...
La pagina si sta caricando...
La pagina si sta caricando...
La pagina si sta caricando...
La pagina si sta caricando...
La pagina si sta caricando...
La pagina si sta caricando...
La pagina si sta caricando...
La pagina si sta caricando...
La pagina si sta caricando...
La pagina si sta caricando...
La pagina si sta caricando...
La pagina si sta caricando...
La pagina si sta caricando...
La pagina si sta caricando...
La pagina si sta caricando...
La pagina si sta caricando...
La pagina si sta caricando...
La pagina si sta caricando...
La pagina si sta caricando...
La pagina si sta caricando...
La pagina si sta caricando...
La pagina si sta caricando...
La pagina si sta caricando...
La pagina si sta caricando...
La pagina si sta caricando...
La pagina si sta caricando...
La pagina si sta caricando...
La pagina si sta caricando...
La pagina si sta caricando...
La pagina si sta caricando...
La pagina si sta caricando...
La pagina si sta caricando...
La pagina si sta caricando...
La pagina si sta caricando...
La pagina si sta caricando...
La pagina si sta caricando...
La pagina si sta caricando...
La pagina si sta caricando...
La pagina si sta caricando...
La pagina si sta caricando...
La pagina si sta caricando...
La pagina si sta caricando...
La pagina si sta caricando...
La pagina si sta caricando...
La pagina si sta caricando...
La pagina si sta caricando...
La pagina si sta caricando...
La pagina si sta caricando...
La pagina si sta caricando...
La pagina si sta caricando...
La pagina si sta caricando...
La pagina si sta caricando...
La pagina si sta caricando...
La pagina si sta caricando...
La pagina si sta caricando...
La pagina si sta caricando...
La pagina si sta caricando...
La pagina si sta caricando...
La pagina si sta caricando...
La pagina si sta caricando...
La pagina si sta caricando...
La pagina si sta caricando...
La pagina si sta caricando...
La pagina si sta caricando...
La pagina si sta caricando...
La pagina si sta caricando...
La pagina si sta caricando...
La pagina si sta caricando...
La pagina si sta caricando...
La pagina si sta caricando...
La pagina si sta caricando...
La pagina si sta caricando...
La pagina si sta caricando...
La pagina si sta caricando...
La pagina si sta caricando...
La pagina si sta caricando...
La pagina si sta caricando...
La pagina si sta caricando...
La pagina si sta caricando...
La pagina si sta caricando...
-
 1
1
-
 2
2
-
 3
3
-
 4
4
-
 5
5
-
 6
6
-
 7
7
-
 8
8
-
 9
9
-
 10
10
-
 11
11
-
 12
12
-
 13
13
-
 14
14
-
 15
15
-
 16
16
-
 17
17
-
 18
18
-
 19
19
-
 20
20
-
 21
21
-
 22
22
-
 23
23
-
 24
24
-
 25
25
-
 26
26
-
 27
27
-
 28
28
-
 29
29
-
 30
30
-
 31
31
-
 32
32
-
 33
33
-
 34
34
-
 35
35
-
 36
36
-
 37
37
-
 38
38
-
 39
39
-
 40
40
-
 41
41
-
 42
42
-
 43
43
-
 44
44
-
 45
45
-
 46
46
-
 47
47
-
 48
48
-
 49
49
-
 50
50
-
 51
51
-
 52
52
-
 53
53
-
 54
54
-
 55
55
-
 56
56
-
 57
57
-
 58
58
-
 59
59
-
 60
60
-
 61
61
-
 62
62
-
 63
63
-
 64
64
-
 65
65
-
 66
66
-
 67
67
-
 68
68
-
 69
69
-
 70
70
-
 71
71
-
 72
72
-
 73
73
-
 74
74
-
 75
75
-
 76
76
-
 77
77
-
 78
78
-
 79
79
-
 80
80
-
 81
81
-
 82
82
-
 83
83
-
 84
84
-
 85
85
-
 86
86
-
 87
87
-
 88
88
-
 89
89
-
 90
90
-
 91
91
-
 92
92
-
 93
93
-
 94
94
-
 95
95
-
 96
96
-
 97
97
-
 98
98
-
 99
99
-
 100
100
-
 101
101
-
 102
102
-
 103
103
-
 104
104
-
 105
105
-
 106
106
-
 107
107
-
 108
108
-
 109
109
-
 110
110
-
 111
111
-
 112
112
-
 113
113
-
 114
114
-
 115
115
-
 116
116
-
 117
117
-
 118
118
-
 119
119
-
 120
120
-
 121
121
-
 122
122
-
 123
123
-
 124
124
-
 125
125
-
 126
126
-
 127
127
-
 128
128
-
 129
129


in altre lingue
- français: Kenwood SJM610 Le manuel du propriétaire
- Deutsch: Kenwood SJM610 Bedienungsanleitung
- slovenčina: Kenwood SJM610 Návod na obsluhu
- dansk: Kenwood SJM610 Brugervejledning
- polski: Kenwood SJM610 Instrukcja obsługi
- Türkçe: Kenwood SJM610 El kitabı
Documenti correlati
-
Kenwood SJM610 Manuale del proprietario
-
Kenwood JKP210 Manuale del proprietario
-
-
-
-
-
-
Kenwood JKP130 Manuale utente
-
Kenwood SJM250 Manuale del proprietario
-
Altri documenti
-
King K 8500 Manuale utente
-
ECG RK 1777 Colore Manuale utente
-
Muse MS-320 T Manuale utente
-
Lund TO-68174 Istruzioni per l'uso
-
Sage the Smart Kettle™ BKE825/SKE825 Guida utente
-
-
-
-
LAGRANGE Bouilloire Hemisphere® Manuale utente
-
Cuisinart CPK17E Manuale del proprietario