
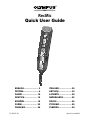
RecMic
Quick User Guide
ENGLISH ......................... 2
ČEŠTINA ......................... 6
DANSK .......................... 10
DEUTSCH ...................... 14
ESPAÑOL ...................... 18
SUOMI ..........................22
FRANÇAIS ..................... 26
ITALIANO ...................... 30
LIETUVIŲ ...................... 34
LATVIEŠU ..................... 38
NEDERLANDS ...............42
POLSKI .........................46
РУССКИЙ ...................... 50
SVENSKA ...................... 54
E1-BS1857-01 date of issue 2016.12.

EN
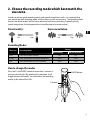
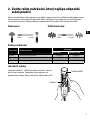
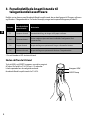
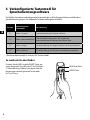
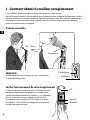
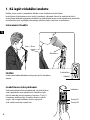
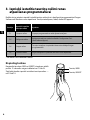
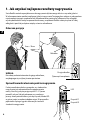
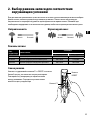
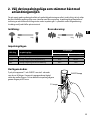
1. How to achieve the best recording result
The RecMic series has been designed to capture dictation in high quality.
While recording, it is recommended to hold the device as you see in the following diagram, to
assure that your voice is recorded in the best possible quality. To achieve high accuracy for speech
recognition, the RecMic should be kept in a consistent distance/angle between your mouth and
the microphone.
Recommended position
NOTE:
Please do not block around the openings for the 2
nd
microphone,
on the back side of the recorder.
5
cm
-
10
cm
Microphone
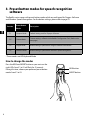
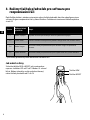
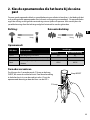
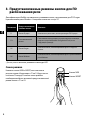
Check your recording environment
The noise analyzer function checks if your recording
environment is good for speech recognition. Press the F1
and F3 button for more than 5 seconds as you see in on the
right. If the noise level is too high, the LED on the top will
flash. It is recommended to change the environment when
you see this sign.
F3 button
LED
F1 button
Back
2
nd
microphone
2

EN
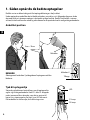
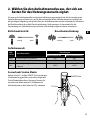
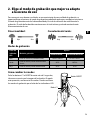
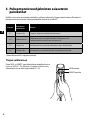
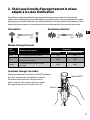
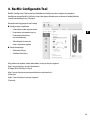
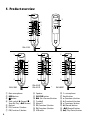
2. Choose the recording mode which best match the
use scene
In order to achieve good recording quality and speech recognition results, it is important that
you select the preset recording mode which matches to your environment. The recording mode
controls the directionality and the noise reduction level during recording. Especially during
speech recognition, the background noise should be kept at a minimum level.
Directionality: Noise cancellation:
Recording Modes
LED Color Recording Mode
Settings
Directionality Noise Cancellation
Blue Quiet Environment (Default) OFF OFF
Green Noisy Environment for Speech Recognition HIGH MID
Red Noisy Environment for Classic Dictation HIGH HIGH
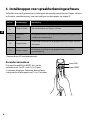
How to change the modes
Press the F1 and INSERT button for more than 5 seconds as
you see in on the right. By repeating this operation, it will
toggle between the modes. You can confirm the recording
modes by the color of the LEDs.
Low HighLow High
F1 button
INSERT button
3

EN
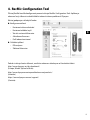
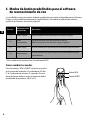
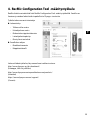
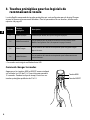
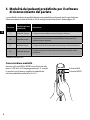
3. Preset button modes for speech recognition
software
The RecMic series comes with preset button modes which are configured for Dragon Software
and Windows Speech Recognition. For the button settings, please refer to page 59.
Position
Preset Button
Modes
Description
F
1 Olympus Mode Default Setting used for Olympus Software.
F
2 * Custom Mode
Custom setting is offered via the RecMic Configuration Tool. (Refer to the
next page)
F
3 * Dragon Mode Button setting is optimized for Dragon Software from Nuance.
F
4 * Windows Mode Button setting is optimized for Windows Speech Recognition.
*
These modes are HID Keyboard Mode.
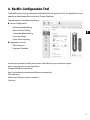
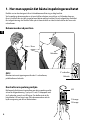
How to change the modes
Press the NEW and INSERT button as you see in on the
right. LEDs from F1 to F4 will flash for 15 seconds.
During this time, choose your preferred preset button
modes from F1 to F4.
INSERT button
NEW button
4

EN
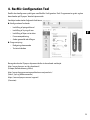
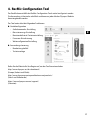
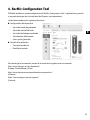
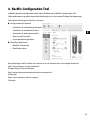
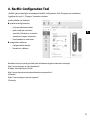
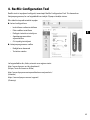
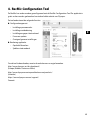
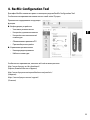
4. RecMic Configuration Tool
The RecMic can be further configured with the RecMic Configuration Tool. The application is free
and can be downloaded from each local Olympus Websites.
The tool supports the following features
s
Device Configuration
• Recording Mode Setting
• Mouse Control Setting
• Custom Keyboard Setting
• Firmware Update
• Other General Setting
s
Application Control
• Edit Command
• Keyboard Template
In order to download the tool, please access the website in your respective region.
http://www.olympus.eu/sds-downloads/
(Europe, Middle east and Africa)
http://www.olympusamericaprodictation.com/products/
(The Americas)
https://www.olympus.com.au/support/
(Oceania)
5

CZ
1. Jak dosáhnout nejlepších výsledků záznamu
Řada RecMic byla navržena k záznamu diktovaného textu ve vysoké kvalitě.
Během záznamu doporučujeme držet zařízení tak, jak ukazuje následující schéma, aby bylo
zaručeno, že váš hlas bude zaznamenán v nejvyšší možné kvalitě. Pokud chcete dosáhnout
vysoké přesnosti rozpoznávání řeči, mikrofon zařízení RecMic by se měl nacházet v konzistentní
vzdálenosti/úhlu vůči vašim ústům.
Doporučená poloha
POZNÁMKA:
Nezakrývejte okolí otvorů pro 2. mikrofon na zadní straně
diktafonu.
5
cm
-
10
cm
Mikrofon
Zkontrolujte prostředí, ve kterém probíhá záznam
Funkce analyzátoru hluku kontroluje, zda je okolí záznamu
vhodné pro rozpoznávání řeči. Stiskněte tlačítka F1 a F3
po dobu více než 5 sekund dle ilustrace napravo. Pokud je
úroveň hluku příliš vysoká, indikátor LED na horní straně
bude blikat. V takovém případě doporučujeme změnit
prostředí.
Tlačítko F3
LED
Tlačítko F1
Zpět
2. mikrofon
6

CZ
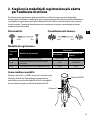
2. Zvolte režim nahrávání, který nejlépe odpovídá
scéně použití
Abyste dosáhli dobré kvality záznamu a výsledků rozpoznávání řeči, je důležité zvolit přednastavený
režim nahrávání, který odpovídá prostředí. Režim nahrávání určuje směrovost a úroveň potlačení
šumu během záznamu. Zejména během rozpoznávání řeči by okolní hluk měl být minimální.
Směrovost: Potlačení šumu:
Režimy nahrávání
Barva LED Režim nahrávání
Nastavení
Směrovost Potlačení šumu
Modrá Tiché prostředí (výchozí) VYPNUTO VYPNUTO
Zelená Hlučné prostředí pro rozpoznávání řeči VYSOKÉ STŘEDNÍ
Červená Hlučné prostředí pro klasické diktování VYSOKÉ VYSOKÉ
Jak měnit režimy
Stiskněte tlačítka F1 a INSERT po dobu více než 5 sekund,
dle ilustrace napravo. Opakováním této operace lze
přepínat mezi režimy. Režim nahrávání indikuje barva LED.
Nízká VysokáNízká Vysoká
Tlačítko F1
Tlačítko INSERT
7

CZ
3. Režimy tlačítek předvoleb pro software pro
rozpoznávání řeči
Řada RecMic přichází s předem nastavenými režimy tlačítek předvoleb, které lze nakonfigurovat pro
software Dragon a rozpoznávání řeči systému Windows. Podrobnosti o nastavení tlačítek najdete na
straně
59.
Pozice
Režimy tlačítek
předvoleb
Popis
F
1 Režim Olympus
Výchozí nastavení používané pro software společnosti Olympus.
F
2 * Vlastní režim
Vlastní nastavení umožňuje nástroj RecMic Configuration Tool (viz další stranu).
F
3 * Režim Dragon
Nastavení tlačítek je optimalizováno pro software Dragon od společnosti
Nuance.
F
4 * Režim Windows
Nastavení tlačítek je optimalizováno pro rozpoznávání řeči systému Windows.
* Tyto režimy představují režim klávesnice standardu HID.
Jak měnit režimy
Stiskněte tlačítka NEW a INSERT, jak je znázorněno
napravo. Indikátor LED od F1 do F4 budou 15 sekund
blikat. Během této doby zvolte upřednostňovaný
režimtlačítek předvoleb od F1 do F4.
Tlačítko INSERT
Tlačítko NEW
8

CZ
4. RecMic Configuration Tool
Přístroj RecMic lze dále konfigurovat pomocí nástroje RecMic Configuration Tool. Aplikace je
zdarma a lze ji stáhnout na každé lokální webové stránce společnosti Olympus.
Nástroj podporuje následující funkce
s
Konfigurace zařízení
• Nastavení režimu nahrávání
• Nastavení ovládání myší
• Vlastní nastavení klávesnice
• Aktualizace firmwaru
• Další obecná nastavení
s
Ovládání aplikací
• Příkaz úprav
• Šablona klávesnice
Pokud si nástroj chcete stáhnout, navštivte webovou stránku pro vaši konkrétní oblast.
http://www.olympus.eu/sds-downloads/
(Evropa, Střední Východ a Afrika)
http://www.olympusamericaprodictation.com/products/
(Amerika)
https://www.olympus.com.au/support/
(Oceánie)
9

DA
1. Sådan opnår du de bedste optagelser
RecMic-serien er blevet designet til at optage dikteringer i høj kvalitet.
Under optagelsen anbefales det at holde enheden, som det er vist i følgende diagram, da du
dermed sikrer, at stemmen optages i den bedst mulige kvalitet. RecMic skal holdes i samme
afstand/vinkel mellem din mund og mikrofonen for at opnå den bedst mulige talegenkendelse.
Anbefalet position
BEMÆRK:
Åbningerne til mikrofon 2 på bagsiden af optageren må ikke
blokeres.
5
cm
-
10
cm
Mikrofon
Tjek dit optagemiljø
Støjanalysefunktionen kontrollerer, om dit optagemiljø
egner sig til talegenkendelse. Hold F1- eller F3-knappen
nede i mere end fem sekunder, som det er angivet til
højre. Hvis støjniveauet er for højt, lyser LED'en øverst.
Detanbefales at skifte miljø, hvis dette tegn vises.
F3-knap
LED
F1-knap
Tilbage
Mikrofon 2
10

DA
2. Vælg den optagetilstand, der passer bedst til
brugssituationen
For at opnå en god optagekvalitet og gode talegenkendelsesresultater er det vigtigt, at du vælger
den forudindstillede optagetilstand, der passer til dit miljø. Optagetilstanden styrer retningen
og støjreduktionsniveauet under optagelsen. Særligt i forbindelse med talegenkendelse er det
vigtigt at holde baggrundsstøjen på et så lavt niveau som muligt.
Retning: Støjannullering:
Optagetilstande
LED-farve Optagetilstand
Indstillinger
Retning Støjannullering
Blå Stille miljø (standard) FRA FRA
Grøn Støjfyldt miljø til talegenkendelse HØJ MELLEM
Rød Støjfyldt miljø til klassisk diktering HØJ HØJ
Sådan skifter du tilstand
Hold F1- og INSERT-knappen nede i mere end fem sekunder,
som det er angivet til højre. Når du gentager dette,
skifter du mellem de enkelte tilstande. Du kan se, hvilken
optagetilstand der er valgt, ud fra farven på LED'erne.
Lav HøjLav Høj
F1-knap
INSERT-knap
11

DA
3. Forudindstillede knaptilstande til
talegenkendelsessoftware
RecMic-serien leveres med forudindstillede knaptilstande, der er konfigureret til Dragon-software
og Windows Talegenkendelse. Du finder flere oplysninger om knapindstillingerne på side 59.
Position
Forudindstillede
knaptilstande
Beskrivelse
F1 Olympus-tilstand Standardindstilling, der bruges til Olympus-software.
F2* Tilpasset tilstand
Du kan vælge en tilpasset tilstand via RecMic Configuration Tool
(senæste side).
F3* Dragon-tilstand Knapindstillingen er optimeret til Dragon-software fra Nuance.
F4* Windows-tilstand Knapindstillingen er optimeret til Windows Talegenkendelse.
*
Disse tilstande er HID-tastaturtilstand.
Sådan skifter du tilstand
Tryk på NEW- og INSERT-knappen, som det er angivet
tilhøjre. LEd'erne fra F1 til F4 lyser i 15 sekunder.
Idenneperiode kan du vælge de ønskede
forudindstillede knaptilstandefra F1 til F4.
INSERT-knap
Knappen NEW
12

DA
4. RecMic Configuration Tool
RecMic kan konfigureres yderligere med RecMic Configuration Tool. Programmet er gratis og kan
downloades på Olympus' danske hjemmeside.
Værktøjet understøtter følgende funktioner
s
Konfiguration af enheder
• Indstilling af optagetilstand
• Indstilling af styring af mus
• Indstilling af tilpasset tastatur
• Firmwareopdatering
• Andre generelle indstillinger
s
Programstyring
• Redigeringskommando
• Tastaturskabelon
Besøg den danske Olympus-hjemmeside for at downloade værktøjet.
http://www.olympus.eu/sds-downloads/
(Europa, Mellemøsten og Afrika)
http://www.olympusamericaprodictation.com/products/
(Nord-, Syd- og Mellemamerika)
https://www.olympus.com.au/support/
(Oceanien)
13

DE
1. So erzielen Sie optimale Aufnahmeergebnisse
Die RecMic-Serie wurde für Diktataufnahmen in höchster Qualität entwickelt.
Während der Aufnahme sollte das Gerät wie in der folgenden Zeichnung dargestellt gehalten werden,
d
amit die Stimme in optimaler Qualität aufgenommen wird. Für eine hohe Erkennungsgenauigkeit
beider Verwendung von Spracherkennungssoftware sollte der RecMic immer so gehalten werden,
dass der Abstand/Winkel zwischen Mund und Mikrofon unverändert bleibt.
Empfohlene Position
HINWEIS:
Die Öffnungen für das 2.Mikrofon auf der Rückseite des
Rekorders sollten nicht abgedeckt werden.
5
cm
-
10
cm
Mikrofon
Aufnahmeumgebung überprüfen
Mithilfe der Funktion zur Rauschanalyse wird überprüft,
ob sich die Aufnahmeumgebung für Spracherkennung
eignet. Halten Sie die F1- und die F3-Taste mindestens
5Sekunden lang gedrückt, wie rechts dargestellt. Wenn
der Rauschpegel zu hoch ist, blinkt die LED oben am Gerät.
Indiesem Fall wird empfohlen, die Umgebung zu wechseln.
F3-Taste
LED
F1-Taste
Rückseite
2. Mikrofon
14

DE
2. Wählen Sie den Aufnahmemodus aus, der sich am
besten für das Nutzungsszenario eignet.
Für eine gute Aufnahmequalität und optimale Erkennungsgenauigkeit bei der Verwendung von
Spracherkennungssoftware müssen Sie den vorkonfigurierten Aufnahmemodus auswählen, der
der jeweiligen Umgebung entspricht. Über den Aufnahmemodus werden während der Aufnahme
die Richtcharakteristik und die Rauschminderungs-Stufe gesteuert. Insbesondere für die
Verwendung von Spracherkennungssoftware sind Hintergrundgeräusche zu minimieren.
Richtcharakteristik: Rauschunterdrückung:
Aufnahmemodi
LED-
Farbe
Aufnahmemodus
Einstellungen
Richtcharakteristik Rauschunterdrückung
Blau Ruhige Umgebung (Standard) AUS AUS
Grün Laute Umgebung für Spracherkennung HOCH MITTEL
Rot
Laute Umgebung für klassisches
Diktieren
HOCH HOCH
So wechseln Sie den Modus
Halten Sie die F1- und die INSERT-Taste mindestens
5Sekunden lang gedrückt, wie rechts dargestellt.
DurchWiederholen dieses Vorgangs können Sie
zwischenden Modi wechseln. Sie können die
Aufnahmemodi an der Farbe der LEDs erkennen.
Niedrig HochNiedrig Hoch
F1-Taste
INSERT-Taste
15

DE
3. Vorkonfigurierte Tastenmodi für
Spracherkennungssoftware
Die RecMic-Serie bietet vorkonfigurierte Tastenmodi, die sich für Dragon-Software und Windows-
Spracherkennung eignen. Sie finden die Tasteneinstellungen auf Seite59.
Position
Vorkonfigurierte
Tastenmodi
Beschreibung
F
1 Modus „Olympus“ Standardeinstellung für Olympus Software
F
2 * Modus „Benutzerdefiniert“
Über das RecMic Configuration Tool angebotene
benutzerdefinierte Einstellung (siehe nächste Seite)
F
3 * Modus „Dragon“ Tasteneinstellung ist für Dragon-Software von Nuance optimiert
F
4 * Modus „Windows“ Tasteneinstellung ist für Windows-Spracherkennung optimiert
*
Bei diesen Modi handelt es sich um HID-Tastatur-Modi.
So wechseln Sie den Modus
Drücken Sie die NEW- und die INSERT-Taste, wie
rechtsdargestellt. Die LEDs von F1 bis F4 blinken
15Sekunden lang. Wählen Sie in dieser Zeit die
bevorzugten vorkonfigurierten Tastenmodi
für F1 bis F4 aus.
INSERT-Taste
NEW-Taste (Neu)
16

DE
4. RecMic Configuration Tool
Der RecMic kann mithilfe des RecMic Configuration Tools weiter konfiguriert werden.
Die Anwendung ist kostenlos erhältlich und kann von jeder lokalen Olympus Website
heruntergeladen werden.
Das Tool unterstützt die folgenden Funktionen:
s
G
erätekonfiguration
• Aufnahmemodus-Einstellung
• Maussteuerungs-Einstellung
• Benutzerdefinierte Tastatureinstellung
• Firmware-Aktualisierung
• Weitere allgemeine Einstellung
s
A
nwendungssteuerung
• Bearbeitungsbefehl
• Tastaturvorlage
Rufen Sie die Website für Ihre Region auf, um das Tool herunterzuladen.
http://www.olympus.eu/sds-downloads/
(Europa, Nahost und Afrika)
http://www.olympusamericaprodictation.com/products/
(Nord- und Südamerika)
https://www.olympus.com.au/support/
(Ozeanien)
17

ES
1. Cómo obtener el mejor resultado de grabación
La serie RecMic se ha diseñado para captar dictados en alta calidad.
Durante la grabación, se recomienda sujetar el dispositivo tal como se muestra en el siguiente
diagrama para garantizar que la voz se grabe con la mejor calidad posible. Para lograr una alta
precisión en el reconocimiento de voz, el RecMic debe mantenerse a una distancia y en un ángulo
constantes entre la boca y el micrófono.
Posición recomendada
NOTA:
No obstruyas las aberturas del 2.º micrófono, situadas en la parte
trasera de la grabadora.
5
cm
-
10
cm
Micrófono
Comprueba el entorno de grabación
La función de analizador de ruidos comprueba si el entorno
de grabación es el adecuado para el reconocimiento de
voz. Pulsa los botones F1 y F3 durante más de 5 segundos,
tal como se muestra en la imagen de la derecha. Si el nivel
de ruido es demasiado alto, el indicador LED de la parte
superior parpadeará. Se recomienda cambiar de entorno
sise observa esta señal.
Botón F3
LED
Botón F1
Parte trasera
2.º micrófono
18

ES
2. Elige el modo de grabación que mejor se adapte
a la escena de uso
Para conseguir unos buenos resultados en reconocimiento de voz y calidad de grabación, es
importante que selecciones el modo de grabación predefinido que mejor se adapte a tu entorno.
El modo de grabación controla la direccionalidad y el nivel de reducción de ruido durante la
grabación. El ruido de fondo debe mantenerse en el nivel mínimo, particularmente durante
elreconocimiento de voz.
Direccionalidad: Cancelación del ruido:
Modos de grabación
Color del
indicador
LED
Modo de grabación
Ajustes
Direccionalidad Cancelación del ruido
Azul Entorno silencioso (Predeterminado) DESACTIVADO DESACTIVADO
Verde
Entorno ruidoso para el reconocimiento
de voz
ALTA MEDIA
Rojo Entorno ruidoso para el dictado clásico ALTA ALTA
Cómo cambiar los modos
Pulsa los botones F1 e INSERT durante más de 5 segundos,
tal como se muestra en la imagen de la derecha. Al repetir
esta operación, se alternarán los modos. Puedes confirmar
los modos de grabación por el color de los indicadores LED.
Baja AltaBaja Alta
Botón F1
Botón INSERT
19

ES
3. Modos de botón predefinidos para el software
de reconocimiento de voz
La serie RecMic cuenta con modos de botón predefinidos que están configurados para el software
Dragon y la función Reconocimiento de voz de Windows. Para obtener información sobre los
ajustes de los botones, consulta la página 59.
Posición
Modos de botón
predefinido
Descripción
F 1 Modo Olympus Ajuste predeterminado utilizado para el software de Olympus.
F 2*
Modo
Personalizado
Se puede acceder al ajuste personalizado a través de
RecMicConfiguration Tool (consulta la página siguiente).
F 3* Modo Dragon El ajuste del botón está optimizado para el software Dragon de Nuance.
F 4* Modo Windows
El ajuste del botón está optimizado para la función Reconocimiento de
voz de Windows.
* Estos modos están basados en la Clase de teclado HID.
Cómo cambiar los modos
Pulsa los botones NEW e INSERT, tal como se muestra
enla imagen de la derecha. Los indicadores LED del
F1 alF4 parpadearán durante 15 segundos. En este
plazo detiempo deberás elegir los modos de botón
predefinidos que prefieras, del F1 al F4.
Botón INSERT
Botón NEW
20
La pagina si sta caricando...
La pagina si sta caricando...
La pagina si sta caricando...
La pagina si sta caricando...
La pagina si sta caricando...
La pagina si sta caricando...
La pagina si sta caricando...
La pagina si sta caricando...
La pagina si sta caricando...
La pagina si sta caricando...
La pagina si sta caricando...
La pagina si sta caricando...
La pagina si sta caricando...
La pagina si sta caricando...
La pagina si sta caricando...
La pagina si sta caricando...
La pagina si sta caricando...
La pagina si sta caricando...
La pagina si sta caricando...
La pagina si sta caricando...
La pagina si sta caricando...
La pagina si sta caricando...
La pagina si sta caricando...
La pagina si sta caricando...
La pagina si sta caricando...
La pagina si sta caricando...
La pagina si sta caricando...
La pagina si sta caricando...
La pagina si sta caricando...
La pagina si sta caricando...
La pagina si sta caricando...
La pagina si sta caricando...
La pagina si sta caricando...
La pagina si sta caricando...
La pagina si sta caricando...
La pagina si sta caricando...
La pagina si sta caricando...
La pagina si sta caricando...
La pagina si sta caricando...
-
 1
1
-
 2
2
-
 3
3
-
 4
4
-
 5
5
-
 6
6
-
 7
7
-
 8
8
-
 9
9
-
 10
10
-
 11
11
-
 12
12
-
 13
13
-
 14
14
-
 15
15
-
 16
16
-
 17
17
-
 18
18
-
 19
19
-
 20
20
-
 21
21
-
 22
22
-
 23
23
-
 24
24
-
 25
25
-
 26
26
-
 27
27
-
 28
28
-
 29
29
-
 30
30
-
 31
31
-
 32
32
-
 33
33
-
 34
34
-
 35
35
-
 36
36
-
 37
37
-
 38
38
-
 39
39
-
 40
40
-
 41
41
-
 42
42
-
 43
43
-
 44
44
-
 45
45
-
 46
46
-
 47
47
-
 48
48
-
 49
49
-
 50
50
-
 51
51
-
 52
52
-
 53
53
-
 54
54
-
 55
55
-
 56
56
-
 57
57
-
 58
58
-
 59
59


in altre lingue
Documenti correlati
-
Olympus VN3100 - VN 128 MB Digital Voice Recorder Istruzioni per l'uso
-
Olympus AS 7000 Manuale del proprietario
-
 Mode d'Emploi pdf DM 770 Manuale utente
-
-
Olympus VN 5500 Manuale utente
-
-
-
-
