Lionelo Braam Baby car seat Manuale utente
- Categoria
- Sedili dell'auto
- Tipo
- Manuale utente

Braam
Baby car seat
Fotelik samochodowy
Kindersitz
Детское автокресло
Seggiolino auto
Siège auto bébé
Silla de coche
Autostoeltje
Automobilinė kėdutė
Dětská autosedačka
Autós gyermekülés
Scaun auto pentru copii
www.lionelo.com
Manual de usuario
Handleiding
Naudojimo instrukcija
Návod k obsluze
Használa utasítás
Manual u lizare
User manual
Instrukcja obsługi
Bedienungsanleitung
Инструкция по эксплуатации
Manuale d’uso
Manuel de l’U lisateur

‑ 2 ‑
2
1
34

‑ 3 ‑
5 6 7
9
8
10
11
23
1

‑ 4 ‑
12
13
15
14

‑ 5 ‑
16 17
18
19

‑ 6 ‑
21
20

‑ 7 ‑
22
24
23
25
26 27

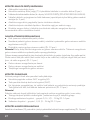
‑ 8 ‑EN
EN
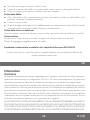
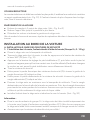
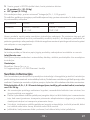
Informaon
NOTE
The child restraint belongs to the categories ‘universal’. Approved in accordance with
UN Regulaon No. 44, series of amendments 04, for general vehicle use and suitable for
mounng on most car seats.
Correct installaon is possible if the vehicle manufacturer has stated in the vehicle’s instrucon
manual that the vehicle is suitable for the installaon of ‘universal’ child restraints for this age
group. This child restraint has been classied as ‘universal’ under more demanding condions
in relaon to condions applying to previous designs that do not have this informaon. In
case of doubt, consult the manufacturer or the retailer of the device.
Suitable for installaon only if type-approved vehicles are equipped with three-point seat
belts ed with a retractor that has been approved in accordance with UN Regulaon No.
16 or other equivalent standards.
Informaon about the ISOFIX system:
1.
NOTE! This is an ISOFIX CHILD RESTRAINT SYSTEM. It is approved in accordance with
UN Regulaon No. 44, 04 series of amendments for general use on vehicles equipped
with ISOFIX anchorages.
2. It ts vehicles with posions approved as ISOFIX posions (according to the vehicle’s
instrucon manual) depending on the child seat category and aachment.
3. ISOFIX weight group and size class for which the device is intended:
• D for group 0+, I (0 - 18 kg)
• B1 for group I (9 - 18 kg)
When used for groups 0+, I, II, III - category “semi-universal”
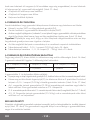
This child restraint system is classied for use in the “semi-universal” category and is suitable
for installaon in the following cars:
Car Front Back
(Model) External/central
NO / NO
External/central
YES / NO
See the user manual for a list of models. This device can also be installed in seang posions
in other car models. If in doubt, consult the device manufacturer or retailer. Rearward-
facing installaon: do not install the device on seats equipped with acve front airbags.

‑ 9 ‑ EN
Dear customer!
Should you have any remarks or quesons concerning the product, please do not hesitate
to contact us: [email protected]
Before you use the child safety seat for the rst me, please read this manual carefully.
Producer:
BrandLine Group Sp. z o. o.
ul. A. Kręglewskiego 1, 61-248 Poznań, Poland
Important
Please read this manual before the use and keep it. The manual can help you properly
assemble the child safety seat. A wrong assembly may pose a threat to the child’s health.
The manufacturer is not held responsible for potenal hazards arising from wrong assembly
of the product.
This child safety seat is intended for weight groups 0+, I, II and III, which means it can
be used by children whose weight ranges from 0 to 36 kg.
•
Rearward-facing installaon: do not install the device on seats equipped with acve
front airbags.
•
Hard elements and plasc parts of the child restraint system must be placed and installed
so that they do not get trapped by sliding seat or vehicle door in normal condions of use.
•
Any belts which aach the product to the vehicle must be ght, while those which
secure the child must be adapted to its body, the belts must not be twisted.
• Make sure the hip belts go low so that the pelvis is properly secured.
• If the product has been subject to sudden loads during an accident, please replace it.
•
Do not alter the child safety seat or install any addional elements, unless relevant
authories agreed on it. A failure to follow the manual supplied by the manufacturer
may pose a threat to the user.
• Protect the child safety seat against sunlight. Otherwise the product may be too hot
to your child’s skin.
• Never leave the child in the product unaended.
• Luggage and other items which may cause bodily injuries in case of accident must be
properly secured.
•
It is not advisable to use the child restraint system without its upholstery. It is forbidden
to replace the upholstery with other than recommended by the manufacturer as it is
an integral part of the device and inuences its funcons.
•
Keep the child safety seat manual when you use the product. Store it in the manual
holder in the child safety seat.
• It is forbidden to use other points of contact than those described in the manual and
marked on the child restraint system.
• Should you have any doubts about posion of the adult safety belt buckle in relaon to

‑ 10 ‑EN
main points of contact, please consult the child safety seat manufacturer.
• For assembly with ISOFIX: please read the vehicle manufacturer’s manual.
•
Assemble the child safety seat in a rear-facing posi on if the child’s weight is lower
than 9 kg or when other size value is not exceeded.
Safety in the car:
To provide top safety to you and your passengers during the travel, make sure:
• Folding elbow rests are folded (ver cal posi on).
•
Any items which may cause damage in the car in case of collision have been properly secured.
• All passengers have fastened their seat belts.
Do not install the child safety seat on seats equipped with two-point safety belts!
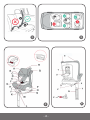
See: g. 1
Installa on in this place is allowed
Installa on in this place is forbidden
A – shoulder belt
B – hip belt
C – ISOFIX grips (required when assembling the child safety seat with belts and ISOFIX
system)
See: g. 2
Installa on is this place is allowed
Installa on in this place is forbidden
Installa on in this place is allowed provided the airbag is inac ve
Installa on in this place is allowed provided the seat is equipped with three-point
safety belts and ISOFIX fasteners.
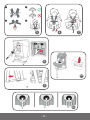
Descrip on ( g. 3 and 4)
A. Shoulder belt guide
B. Child safety seat covering
C. Belt protec ve cushions
D. Shoulder belt
E. Buckle holder
F. Belt unfastening bu on
G. Belt buckle
H. Crotch cover
I. Belt tension adjustment bu on
J. Belt tension adjustment

‑ 11 ‑ EN
K. Seat liner
L. Support leg indicator
M. Base 360 ° rotaon buon
N. Base
O. Seat lng handle
P. Hip belt guide
Q. Headrest
R. Headrest height adjustment lever
S. Shoulder belt guides
T. Top belt connector
U. Manual locker
V. ISOFIX arms
W. Support leg
X. ISOFIX buon
Y. Support leg adjustment buon
Z. ISOFIX sheaths
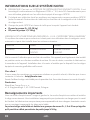
How to use
HOW TO FASTEN BELTS OF THE CHILD SAFETY SEAT
To fasten belts of the child safety seat (g. 5):
1. Join belt buckles.
2. Insert them in the buckle (G), you will hear a disncve „click”.
3. Make sure the belts have been properly ghtened and are not twisted.
To unfasten 5-point belts of the child safety seat, press the red buon (F) on the buckle
and loosen the belts.
HOW TO ADJUST TENSION OF THE CHILD SAFETY SEAT BELTS
1. To ghten the belts, pull the tension adjustment strap (J) (g. 6).
2. To loosen the belts, press adjustment buon (I) and pull the shoulder belts (D) (g. 7).
Note! Make sure the child safety seat belts t ght the child’s body and are not twisted.
Make sure the hip belts go low and protect the child’s pelvis. The belts must t ght the
child’s body but must not be too ght and cause discomfort.
HOW TO DISASSEMBLE CHILD SAFETY SEAT BELTS
• Open the manual locker.
• Pull the metal belt connector (T) out of the plasc fastener, and then remove the belts
(g. 8).
•
Loosen the belts as much as you can (see chapter: HOW TO ADJUST TENSION OF
THE CHILD SAFETY SEAT BELTS).
• The metal belt connector must be placed in a special spot for future use (see: g. 9).
• Unfasten Velcros on belt protecve cushions.
•
Unfasten child safety seat covering Velcros. Pull the buckle through the hole in the
covering.
• Fasten belts and hide them in the glovebox in the child safety seat.
Installaon of belts must be performed in a reversed order.

‑ 12 ‑EN
HOW TO ADJUST THE HEADREST
• Loosen the shoulder belts as much as you can.
•
To change height of the headrest, grab and pull the headrest height adjustment lever (R).
• Choose the headrest height you desire. (See: g. 12).
Note! The height of shoulder belts is integrated with the headrest height. A properly set
headrest provides opmal protecon to your child in the child safety seat:
The headrest must be adjusted so that shoulder belts and child’s arms are at the same
level. The belts must not be too high (at the ears level or higher) or too low (e.g. behind
the child’s back). (See: g. 11)
• Headrest is too low.
• Headrest is too high.
• Headrest is adjusted correctly.
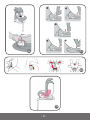
HOW TO ROTATE THE CHILD SAFETY SEAT
To take the child out or place the child in the child safety seat comfortably:
• Pull out the base 360° rotaon buon (M).
• Next rotate the child safety seat in any direcon (360°).
• When you can hear a disncve „click”, it means the child safety seat has been secured
as desired. Then you can be sure the product is safe. (See: g. 13)
Note! Make sure the base rotaon buon is secured in its place aer changing direcon
of the child safety seat.
•
Correct posion of the child safety seat in relaon to driving direcon and applicable groups:
a. Rear-facing posion – group 0+, I (0 – 18 kg) (See: g. 14)
b. Forward-facing posion – group I, II, III, (9 – 36 kg) (See: g. 15)
HOW TO ADJUST INCLINATION ANGLE OF THE CHILD SAFETY SEAT
Grab the lever (O), pull up and change inclinaon angle of the child safety seat. (See: g. 16)
You can choose 5 levels of child safety seat inclinaon, depending on the child’s size:
Group 0+, I (0 - 18kg) Group I (9 - 18kg) Group II, III (15 - 36kg)
Posion 5 Posion 1 - 4 Posion 1
To set the child safety seat in posion 5:
•
Press the base rotaon buon (M), rotate the child safety seat to the rear-facing posion.
• Pull the seat lng grip (O) and lt the product to posion 5. It is a half-lying posion
dedicated to small children from group 0+, I (0-18 kg). See: g. 16 and 17
• Children from group I (9 - 18 kg) can be in a forward- or rear-facing posion. Suitable
posions of the seat inclinaon for these children are posions 1-5 (1-4 in a forward-
facing posion, 5 in a rear-facing posion). See: g. 17

‑ 13 ‑ EN
• Children from group II, III, (15 - 36 kg) can be in a forward-facing posion in posion
1 only.
SEAT LINER
The seat liner is intended for babies, raises their comfort and serves as addional support
(see: g. 19). If the child needs more space in the child safety seat, remove the seat liner.
HOW TO REMOVE COVERING
• Remove 5-point belts of the child safety seat. (See: g. 8 and 9)
• Li the headrest as high as possible.
• Unfasten Velcros and remove the covering from the child safety seat.
To put the cover back on, follow the steps above in a reversed order.
HOW TO INSTALL IN THE CAR
A. ASSEMBLY WITH SAFETY BELTS
1. Installaon in a rear-facing posion, the child secured with safety belts of the child
safety seat (group 0+, 0 - 13 kg).
• Place the child safety seat on the car seat.
• Turn the child safety seat to the rear-facing posion; to do so, press the base rotaon
buon (M) (see: g. 13).
• Press the support leg adjustment buon (Y), then extend the leg and adjust its length
so that it contacts the vehicle oor (the indicator will turn green when the support leg
is suciently extended).
• Pull the car seat belt.
•
Carry the shoulder part of the belt (D) through the shoulder belt guide (A) marked in blue.
• Carry the hip part of the belt through the hip belt guide (P) marked in blue.
•
Press the child safety seat against the car seat as much as you can. Pull the hip belt
towards the buckle in order to ghten it as much as possible. Next pull the shoulder
belt to ghten other parts of the belt. Make sure the belts are not twisted and properly
hold the child safety seat.
•
Put the child in the child safety seat and secure it with product’s safety belts. (See: g. 20)
Informaon:
• For children from group 0+, the child safety seat must be xed in a rear-facing posion
only, and inclinaon angle must be as high as possible (posion no. 5). To make sure
the child safety seat is properly installed, try to move it before use.
• Make sure the car seat belt is not twisted!
• Make sure the belts have been properly fastened. Aer fastening, you should hear a
disncve „click”. (See: g. 20)

‑ 14 ‑EN
• Do not assemble the child safety seat on a front seat if its airbag is acve.
2. Installaon in a forward-facing posion, the child is secured with safety belts of the
child safety seat (group I, 9 - 18 kg).
• Set the child safety seat in a forward-facing posion.
•
Rotate the child safety seat to the forward-facing posion. To do so, press the base
360° rotaon buon (M) (see: g. 13).
• Press the support leg adjustment buon (Y), next extend the leg and adjust its length
so that it contacts the vehicle oor (the indicator will turn green when the support leg
is properly extended).
• Pull the car seat belt.
•
Carry the shoulder part of the belts (D) through the shoulder belt guide (A) marked in red.
• Carry the hip part of the belt through the hip belt guide (P) marked in red.
•
Press the child safety seat against the car seat as much as you can. Pull the hip belt
towards the buckle to ghten it as much as possible. Next pull the shoulder belt to
ghten other parts of the belt; make sure the belts are not twisted and properly secure
the child safety seat.
• Put the child in and secure with safety belts of the child safety seat. (See: g. 2)
3. Installaon in a forward-facing posion, the child secured with car seat belts (group
II, III, 15 - 36 kg).
• Remove 5-point safety belts. (see: g. 8 and 9)
• Place the child safety seat on the car seat.
• Turn the child safety seat to a forward-facing posion. To do so, press the base 360°
rotaon buon (M) (see: g. 13).
• Press the support leg adjustment buon (Y), next slide the leg in and adjust its length
so that it is as short as possible and the indicator turns red.
• Put the child in the child safety seat.
• Pull the car seat belt.
• Carry the shoulder belts (D) through the guide in the headrest (A) marked in red. (See:
g. 23)
• Carry the hip part of the belt through the hip belt guide (P) marked in red.
• Press the child safety seat against the car seat as much as you can.
•
Carry both belts through the hip belt guide (P) marked in red and fasten the belts.
(See: g. 25)
Informaon:
•
Check if the safety belt goes through the shoulder and if it is at a relevant distance
between the neck and shoulder – mark A and B (see: g. 22).

‑ 15 ‑ EN
• Aer you have fastened the belts, you will hear a disncve „click”.
• Try to move the child safety seat to check its stability.
B. ASSEMBLY WITH ISOFIX
4.
Installaon in a rear-facing posion, the child is secured with safety belts of the child
safety seat (group 0+, I, 0 - 18 kg).
• If necessary, put ISOFIX sheaths (Z) on ISOFIX connectors in the car.
• They facilitate scking ISOFIX fasteners of the product when car connectors are hard
to access.
• Rotate the child safety seat to the rear-facing posion. To do so, press the base 360°
rotaon buon (M). (see: g. 13)
• Press ISOFIX buon (X) to extend both ISOFIX arms (V). Next grab the seat with both
hands, slide two ISOFIX arms into the fasteners located in the car seat unl arms (V)
anchor and you can hear a disncve „click”.
• Push the product towards the seat, press it against the car seat as much as you can.
• Green indicator on ISOFIX buon (X) must be visible on both sides; then you can be
sure the seat has been properly secured and xed.
• Press the support leg adjustment buon (Y), next extend the leg and adjust its length
so that it contacts the vehicle oor (the indicator will turn green when the support leg
is suciently extended).
• Put the child in the child safety seat and secure it with safety belts of the child safety
seat. (See: g. 26)
5.
Installaon in a forward-facing posion, the child secured with safety belts of the
child safety seat (group I, 9 - 18 kg).
• If necessary, put ISOFIX sheaths (Z) on ISOFIX connectors in the car.
• They facilitate stocking ISOFIX fasteners of the child safety seat when car connectors
are hard to access.
• Turn the child safety seat to a forward-facing posion. To do so, press the base 360°
rotaon buon (M). (see: g. 13)
• Press ISOFIX buon (X) to extend both ISOFIX arms (V). Next grab the seat with both
hands, slide two ISOFIX arms (V) rmly in fasteners in the car seat unl arms anchor
and you can hear a disncve „click”.
• Push the product towards the car seat, press it against the car seat as much as you can.
• Green indicator on ISOFIX buon (X) must be visible on both sides; then you can be
sure the seat has been properly secured and xed.
• Press the support leg adjustment buon (Y), next extend the leg and adjust its length
so that it contacts the vehicle oor (the indicator will turn green when the support leg
is suciently extended).

‑ 16 ‑EN
•
Put the child in the child safety seat and secure with safety belts of the child safety
seat. (See: g. 27)
6.
Installaon in a forward-facing posion, the child is secured with car seat belts
(group II, III, 15 - 36 kg).
• Remove 5-point safety belts (see: g. 8 and 9)
• Place the child safety seat on the car seat.
• Turn the child safety seat to a forward-facing posion. To do so, press the base 360°
rotaon buon (M). (see: g. 13)
•
If necessary, put ISOFIX sheaths (Z) on ISOFIX connectors in the car. They facilitate
scking ISOFIX fasteners of the child safety seat when car connectors are hard to access.
• Press ISOFIX buon (X) to extend both ISOFIX arms (V). Next grab the seat with both
hands, slide both ISOFIX arms rmly in the fasteners in the car seat unl the arms
anchor and you can hear a disncve „click”.
• Push the product towards the car seat, press it against the car seat as much as you can.
• Green indicator on ISOFIX buon (X) must be visible on both sides, then you can be
sure the seat has been properly secured and xed.
• Press the support leg adjustment buon (Y), then slide the leg in and adjust its length
so that it is as short as possible and the indicator turns red.
• Put the child in the child safety seat.
• Pull the car seat belt.
• Carry shoulder belts (D) through the guide in the headrest (A) marked in red.
• Carry hip part of the belt through the hip belt guide (P) marked in red.
• Carry both belts through the hip belt guide marked in red and fasten them.
• Fasten car seat belts (see: g. 6). Check if the child safety seat has been properly xed.
(See: g. 25)
Informaon:
•
Check if the safety belt goes through the shoulder and if it is at a relevant distance
between the neck and shoulder – marker A and B (see: g. 22).
• When fastening belts, you will hear a disncve „click”.
• Tighten the belts; to do so, follow the direcon of arrows (see: g. 25).
• Try to move the child safety seat to check its stability.
CLEANING AND MAINTENANCE:
• Periodically check the seat for damage and wear.
• If you nd any damaged parts, replace the seat.
• Keep the child safety seat clean to prolong its life.
• Do not expose the seat to sunlight for a long me.

‑ 17 ‑
• Wash the seat fabric with warm water, use soap or so cleaning agents.
• Aer washing, do not let the seat dry o in the sun.
How to clean a buckle:
•
Food, drinks or other pollutants may accumulate inside the buckle and cause it to
malfuncon.
• Wash in warm water.
•
Aer washing, make sure the buckle emits a disncve „click”; this way you can be sure
the buckle works properly.
How to clean a belt and base:
Use a sponge, wash with a soap and warm water – do not use other cleaning agents.
Storage:
Store in a safe and dry place, away from heat and sunlight.
Do not place any heavy items on the seat.
The product has been tested and meets all the requirements of the: ECE R44.04
The pictures are for reference only. The real design of the products may dier from the
pictures presented.
PL
Informacja
UWAGA
Urządzenie przytrzymujące dla dzieci należy do kategorii „uniwersalnej”. Uzyskało homologację
zgodnie z regulaminem ONZ nr 44, seria poprawek 04, do ogólnego zastosowania w pojazdach
i nadaje się do instalacji na większości miejsc siedzących w samochodzie.
Prawidłowa instalacja jest możliwa, jeśli producent pojazdu oświadczył w instrukcji obsługi
pojazdu, że pojazd ten nadaje się do instalacji urządzenia przytrzymującego dla dzieci kategorii
„uniwersalnej” dla tej grupy wiekowej. To urządzenie przytrzymujące dla dzieci zostało
zaklasykowane do kategorii „uniwersalne” w bardziej wymagających warunkach w odniesieniu
do warunków stosujących się do wcześniejszych projektów, które nie są opatrzone tą informacją.
W przypadku wątpliwości należy skonsultować się z producentem lub sprzedawcą detalicznym
urządzenia.
Nadaje się do instalacji jedynie wówczas, gdy homologowane pojazdy wyposażone są w
trzypunktowe pasy bezpieczeństwa wyposażone w zwijacz, które uzyskały homologację zgodnie
z regulaminem ONZ nr 16 lub innymi równoważnymi normami.
EN | PL

‑ 18 ‑PL
Informacja dotycząca systemu ISOFIX:
1.
UWAGA! To jest URZĄDZENIE PRZYTRZYMUJĄCE DLA DZIECI ISOFIX. Uzyskało
ono homologację zgodną z regulaminem ONZ nr 44, seria poprawek 04 do ogólnego
zastosowania w pojazdach wyposażonych w systemy kotwiczenia ISOFIX.
2. Pasuje ono do pojazdów z pozycjami homologowanymi jako pozycje ISOFIX (zgodnie z
instrukcją obsługi pojazdu) w zależności od kategorii fotelika dla dziecka i mocowania.
3. Grupa wagowa i klasa wielkości ISOFIX, dla której przeznaczone jest urządzenie:
• D dla grupy 0+, I (0 – 18 kg)
• B1 dla grupy I (9 – 18 kg)
Przy użytkowaniu dla grup 0+, I, II, III – kategoria ,,półuniwersalne”
To urządzenie przytrzymujące dla dzieci zostało zaklasykowane do użycia w kategorii
„półuniwersalne” i nadaje się do zainstalowania na miejscach w następujących samochodach:
Auto Przód Tył
(Model) Zewnętrzne / Środkowe
NIE / NIE
Zewnętrzne / Środkowe
TAK / NIE
Lista modeli znajduje się w instrukcji obsługi. Urządzenie to może nadawać się do instalacji
także na miejscach siedzących w innych modelach samochodów. W przypadku wątpliwości
należy skonsultować się z producentem lub sprzedawcą detalicznym urządzenia. Montaż
tyłem do kierunku jazdy: nie instaluj urządzenia na siedzeniach wyposażonych w aktywne
przednie poduszki powietrzne.
Drogi Kliencie!
Jeśli masz jakiekolwiek uwagi lub pytania do zakupionego produktu, skontaktuj się z nami:
Przed pierwszym użyciem fotelika prosimy o uważne przeczytanie niniejszej instrukcji użytkowania.
Producent:
BrandLine Group Sp. z o. o.
ul. A. Kręglewskiego 1, 61-248 Poznań, Polska
Ważne informacje
Należy przeczytać tę instrukcję obsługi przed użyciem i zachować. Instrukcja pomoże
prawidłowo zamontować fotelik. Nieprawidłowy montaż może stanowić zagrożenie dla
zdrowia dziecka. Producent nie ponosi odpowiedzialności za ewentualne zagrożenia
spowodowane niewłaściwym montażem fotelika.
Niniejszy fotelik przeznaczony jest dla grup wagowych 0+, I, II i III, co oznacza, że mogą
z niego korzystać dzieci o wadze od 0 do 36 kg.

‑ 19 ‑ PL
• Montaż tyłem do kierunku jazdy: nie instaluj urządzenia na siedzeniach wyposażonych
w aktywne przednie poduszki powietrzne.
• Twarde elementy oraz plaskowe części urządzenia przytrzymującego dla dzieci należy
umieścić i zainstalować w taki sposób, by w normalnych warunkach eksploatacji pojazdu
nie mogły zostać uwięzione przez przesuwane siedzenie lub drzwi pojazdu.
•
Wszelkie taśmy mocujące urządzenie przytrzymujące do pojazdu muszą być napięte,
taśmy przytrzymujące dziecko muszą być dopasowane do budowy jego ciała, taśmy
nie mogą być poskręcane.
•
Upewnij się, że taśmy biodrowe przebiegają nisko, tak aby miednica była mocno przytrzymywana.
• Jeżeli urządzenie zostało poddane gwałtownym obciążeniom podczas wypadku należy
je wymienić.
•
Nie należy dokonywać żadnych przeróbek w foteliku lub instalować żadnych dodatkowych
elementów bez zgody właściwych organów. Nieprzestrzeganie instrukcji dostarczonej
przez producenta może stwarzać niebezpieczeństwo dla użytkownika.
•
Chroń fotelik przed działaniem promieni słonecznych. W przeciwnym przypadku fotelik
może być zbyt gorący dla skóry Twojego dziecka.
• Nigdy nie zostawiaj dziecka bez opieki w urządzeniu przytrzymującym.
• Bagaż i inne przedmioty mogące spowodować obrażenia ciała w przypadku zderzenia
powinny być odpowiednio zabezpieczone.
•
Nie powinno się używać urządzenia przytrzymującego dla dzieci bez tapicerki. Nie wolno
zastępować tapicerki siedzenia innym niż zalecone przez producenta, gdyż stanowi ono
integralną część urządzenia mającą wpływ na jego funkcjonowanie.
•
Zachowaj instrukcję obsługi fotelika podczas użytkowania urządzenia. Trzymaj ją w
schowku na instrukcję w foteliku.
• Nie wolno używać innych nośnych punktów styczności niż punkty opisane w instrukcji
i oznaczone na urządzeniu przytrzymującym dla dzieci.
•
Jeśli masz wątpliwości co do pozycji klamry pasów bezpieczeństwa dla dorosłych
względem głównych nośnych punktów styczności, skontaktuj się z producentem
urządzenia przytrzymującego dla dzieci.
•
W przypadku montażu za pomocą ISOFIX: zapoznaj się z instrukcją obsługi producenta pojazdu.
• Instaluj fotelik tyłem do kierunku jazdy, jeśli waga dziecka jest niższa, niż 9 kg lub jeśli
inne kryterium wymiarów nie jest przekroczone
Bezpieczeństwo w pojeździe:
Aby zapewnić jak największe bezpieczeństwo sobie i pasażerom w trakcie jazdy, upewnij
się, że:
• Składane oparcia pod łokcie są złożone (pozycja pionowa).
• Wszelkie obiekty, które mogłyby spowodować uszkodzenia w samochodzie w sytuacji
kolizji są odpowiednio zabezpieczone.

‑ 20 ‑PL
• Wszyscy pasażerowie mają zapięte pasy bezpieczeństwa.
Nie instaluj fotelika na siedzeniach wyposażonych w dwupunktowe pasy bezpieczeństwa!
Patrz: rys. 1
Instalacja w tym miejscu możliwa
Instalacja w tym miejscu zabroniona
A – pas barkowy
B – pas biodrowy
C – uchwyty ISOFIX (potrzebne w przypadku montażu fotelika za pomocą pasów i systemu
ISOFIX)
Patrz: rys. 2
Instalacja w tym miejscu możliwa
Instalacja w tym miejscu zabroniona
Instalacja w tym miejscu możliwa tylko jeśli poduszka powietrzna jest wyłączona
Instalacja w tym miejscu możliwa tylko jeśli siedzenie wyposażone jest w trzypunktowe pasy
bezpieczeństwa i zaczepy ISOFIX
Opis (rys. 3 i 4)
A. Prowadnica pasów naramiennych
B. Poszycie fotelika
C. Poduszki ochronne pasów
D. Pas naramienny
E. Schowek na klamrę
F. Przycisk rozpięcia pasów
G. Klamra pasów
H. Nakładka krokowa
I. Przycisk regulacji napięcia pasów
J. Regulator napięcia pasów
K. Wkładka redukcyjna
L. Wskaźnik nogi stabilizującej
M. Przycisk rotacji bazy 360 °
N. Baza
O. Uchwyt odchylenia siedziska
P. Prowadnica pasa biodrowego
Q. Zagłówek
R. Dźwignia regulacji wysokości zagłówka
S. Prowadnice pasów naramiennych
T. Górne złącze pasów
U. Schowek na instrukcję obsługi
V. Ramiona ISOFIX
W. Noga stabilizująca
X. Przycisk ISOFIX
Y. Przycisk regulacji nogi stabilizującej
Z. Nakładki ISOFIX
La pagina si sta caricando...
La pagina si sta caricando...
La pagina si sta caricando...
La pagina si sta caricando...
La pagina si sta caricando...
La pagina si sta caricando...
La pagina si sta caricando...
La pagina si sta caricando...
La pagina si sta caricando...
La pagina si sta caricando...
La pagina si sta caricando...
La pagina si sta caricando...
La pagina si sta caricando...
La pagina si sta caricando...
La pagina si sta caricando...
La pagina si sta caricando...
La pagina si sta caricando...
La pagina si sta caricando...
La pagina si sta caricando...
La pagina si sta caricando...
La pagina si sta caricando...
La pagina si sta caricando...
La pagina si sta caricando...
La pagina si sta caricando...
La pagina si sta caricando...
La pagina si sta caricando...
La pagina si sta caricando...
La pagina si sta caricando...
La pagina si sta caricando...
La pagina si sta caricando...
La pagina si sta caricando...
La pagina si sta caricando...
La pagina si sta caricando...
La pagina si sta caricando...
La pagina si sta caricando...
La pagina si sta caricando...
La pagina si sta caricando...
La pagina si sta caricando...
La pagina si sta caricando...
La pagina si sta caricando...
La pagina si sta caricando...
La pagina si sta caricando...
La pagina si sta caricando...
La pagina si sta caricando...
La pagina si sta caricando...
La pagina si sta caricando...
La pagina si sta caricando...
La pagina si sta caricando...
La pagina si sta caricando...
La pagina si sta caricando...
La pagina si sta caricando...
La pagina si sta caricando...
La pagina si sta caricando...
La pagina si sta caricando...
La pagina si sta caricando...
La pagina si sta caricando...
La pagina si sta caricando...
La pagina si sta caricando...
La pagina si sta caricando...
La pagina si sta caricando...
La pagina si sta caricando...
La pagina si sta caricando...
La pagina si sta caricando...
La pagina si sta caricando...
La pagina si sta caricando...
La pagina si sta caricando...
La pagina si sta caricando...
La pagina si sta caricando...
La pagina si sta caricando...
La pagina si sta caricando...
La pagina si sta caricando...
La pagina si sta caricando...
La pagina si sta caricando...
La pagina si sta caricando...
La pagina si sta caricando...
La pagina si sta caricando...
La pagina si sta caricando...
La pagina si sta caricando...
La pagina si sta caricando...
La pagina si sta caricando...
La pagina si sta caricando...
La pagina si sta caricando...
La pagina si sta caricando...
La pagina si sta caricando...
La pagina si sta caricando...
La pagina si sta caricando...
La pagina si sta caricando...
La pagina si sta caricando...
La pagina si sta caricando...
La pagina si sta caricando...
La pagina si sta caricando...
La pagina si sta caricando...
La pagina si sta caricando...
La pagina si sta caricando...
La pagina si sta caricando...
La pagina si sta caricando...
La pagina si sta caricando...
La pagina si sta caricando...
La pagina si sta caricando...
La pagina si sta caricando...
La pagina si sta caricando...
La pagina si sta caricando...
La pagina si sta caricando...
La pagina si sta caricando...
La pagina si sta caricando...
La pagina si sta caricando...
La pagina si sta caricando...
La pagina si sta caricando...
La pagina si sta caricando...
La pagina si sta caricando...
La pagina si sta caricando...
La pagina si sta caricando...
La pagina si sta caricando...
La pagina si sta caricando...
La pagina si sta caricando...
La pagina si sta caricando...
La pagina si sta caricando...
La pagina si sta caricando...
La pagina si sta caricando...
La pagina si sta caricando...
-
 1
1
-
 2
2
-
 3
3
-
 4
4
-
 5
5
-
 6
6
-
 7
7
-
 8
8
-
 9
9
-
 10
10
-
 11
11
-
 12
12
-
 13
13
-
 14
14
-
 15
15
-
 16
16
-
 17
17
-
 18
18
-
 19
19
-
 20
20
-
 21
21
-
 22
22
-
 23
23
-
 24
24
-
 25
25
-
 26
26
-
 27
27
-
 28
28
-
 29
29
-
 30
30
-
 31
31
-
 32
32
-
 33
33
-
 34
34
-
 35
35
-
 36
36
-
 37
37
-
 38
38
-
 39
39
-
 40
40
-
 41
41
-
 42
42
-
 43
43
-
 44
44
-
 45
45
-
 46
46
-
 47
47
-
 48
48
-
 49
49
-
 50
50
-
 51
51
-
 52
52
-
 53
53
-
 54
54
-
 55
55
-
 56
56
-
 57
57
-
 58
58
-
 59
59
-
 60
60
-
 61
61
-
 62
62
-
 63
63
-
 64
64
-
 65
65
-
 66
66
-
 67
67
-
 68
68
-
 69
69
-
 70
70
-
 71
71
-
 72
72
-
 73
73
-
 74
74
-
 75
75
-
 76
76
-
 77
77
-
 78
78
-
 79
79
-
 80
80
-
 81
81
-
 82
82
-
 83
83
-
 84
84
-
 85
85
-
 86
86
-
 87
87
-
 88
88
-
 89
89
-
 90
90
-
 91
91
-
 92
92
-
 93
93
-
 94
94
-
 95
95
-
 96
96
-
 97
97
-
 98
98
-
 99
99
-
 100
100
-
 101
101
-
 102
102
-
 103
103
-
 104
104
-
 105
105
-
 106
106
-
 107
107
-
 108
108
-
 109
109
-
 110
110
-
 111
111
-
 112
112
-
 113
113
-
 114
114
-
 115
115
-
 116
116
-
 117
117
-
 118
118
-
 119
119
-
 120
120
-
 121
121
-
 122
122
-
 123
123
-
 124
124
-
 125
125
-
 126
126
-
 127
127
-
 128
128
-
 129
129
-
 130
130
-
 131
131
-
 132
132
-
 133
133
-
 134
134
-
 135
135
-
 136
136
-
 137
137
-
 138
138
-
 139
139
-
 140
140


Lionelo Braam Baby car seat Manuale utente
- Categoria
- Sedili dell'auto
- Tipo
- Manuale utente
in altre lingue
- français: Lionelo Braam Baby car seat Manuel utilisateur
- español: Lionelo Braam Baby car seat Manual de usuario
- Deutsch: Lionelo Braam Baby car seat Benutzerhandbuch
- Nederlands: Lionelo Braam Baby car seat Handleiding
- slovenčina: Lionelo Braam Baby car seat Používateľská príručka
- română: Lionelo Braam Baby car seat Manual de utilizare
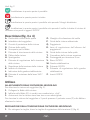
Documenti correlati
Altri documenti
-
Kinderkraft XPEDITION Manuale utente
-
 Babify 10040903 Manuale del proprietario
-
-
CYBEX Platinum Sirona Manuale utente
-
Moni Car seat Serengeti 360° Istruzioni per l'uso
-
 CYBEX gold PALLAS S-FIX Manuale utente
-
CYBEX SIRONA Z i-SIZE Manuale utente
-
Foppapedretti Rolling Fix Assembly Instructions Manual
-
Brevi Alain i-Size Manuale del proprietario

