
1234567
FAQ
i
< 30%
30% - 70%
> 70%
100%
21
OFF
ON
21
Soundcore
Liberty 2 Pro+
Soundcore
Liberty 2 Pro+
12 3
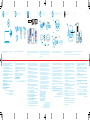
PAIRING
SUPPORT WEARING CHARGING POWERING ON/OFF
For FAQs, detailed user manual and more information, please visit
www.soundcore.com/support
DE: Für FAQs, ein detailliertes Benutzerhandbuch und weitere Informationen
besuchen Sie bitte www.soundcore.com/support
ES: Para acceder a las preguntas frecuentes, el Manual del usuario detallado y más
información, visite www.soundcore.com/support
FR: Pour les FAQ, le manuel d'utilisation détaillé et plus d'informations, veuillez
consulter la page www.soundcore.com/support
IT: Per domande frequenti, manuale utente dettagliato e ulteriori informazioni,
visitare il sito www.soundcore.com/support
PT: Para perguntas frequentes, manual do usuário detalhado e mais informações,
acesse www.soundcore.com/support
TR: Sık sorulan sorular, ayrıntılı kullanıcı kılavuzu ve daha fazla bilgi için lütfen
www.soundcore.com/support adresini ziyaret edin
JP: 詳細な取扱説明書は www.ankerjapan.com でダウンロードできます。
KO:
简中:
繁中:
AR
www.soundcore.com/support
HE
www.soundcore.com/support
Fully dry off the earbuds and the USB-C charging port before charging.
Use a certified USB-C charging cable and charger to prevent any damage.
For wireless charging, position the charging case at the center of your
wireless charger.
DE: Trocknen Sie die Ohrhörer und den USB-Ladeanschluss vor dem Aufladen vollständig ab.
Verwenden Sie ein zertifiziertes USB-C-Ladekabel, um Schäden zu vermeiden.
Zum drahtlosen Aufladen positionieren Sie die Ladehülle in der Mitte Ihres drahtlosen Ladegeräts.
ES: Seque completamente los auriculares y el puerto de carga USB-C antes de la carga.
Utilice un cable de carga USB-C certificado para evitar daños.
Para la carga inalámbrica, coloque el estuche de carga en el centro del cargador inalámbrico.
FR: Séchez entièrement les écouteurs et le port de charge USB-C avant le chargement.
Utilisez un câble de charge USB-C certifié pour éviter tout dommage.
Pour le chargement sans fil, positionnez le boîtier de chargement au centre de votre chargeur sans fil.
IT: Asciugare completamente gli auricolari e la porta USB-C prima della ricarica.
Utilizzare un cavo di ricarica USB-C certificato per evitare eventuali danni.
Per la ricarica wireless, posizionare la custodia di ricarica al centro del caricabatterie wireless.
PT: Seque totalmente os fones de ouvido e a porta de carga USB-C antes de carregar.
Use um cabo de carga USB-C certificado para evitar danos.
Para carga sem fio, posicione o estojo carregador no centro do seu carregador sem fio.
TR: Şarj etmeden önce kulaklıkları ve USB C şarj bağlantı noktasını tamamen kurulayın.
Hasarların önüne geçmek için sertifikalı bir USB C şarj kablosu kullanın.
Kablosuz şarj için şarj kutusunu kablosuz şarj cihazınızın ortasına yerleştirin.
JP: イヤホンと USB ポートに水や汗が付着している場合は、完全に乾かしてから充電してください。
損傷を防ぐため、付属の USB-C ケーブルを使用してください。
ワイヤレス充電を行うには、ワイヤレス充電器の中央に充電ケースを置きます ( ワイヤレス充電器
は別売り )。
CUSB AR
CUSB
USB-C HE
USB-C
Open the charging case, the earbuds will automatically power on.
To power off, place the earbuds in the charging case and close it.
DE: Öffnen Sie die Ladehülle. Die Ohrhörer werden anschließend automatisch eingeschaltet.
Um das Gerät auszuschalten, setzen Sie die Ohrhörer in die Ladehülle und schließen Sie
diese.
ES: Abra el estuche de carga; los auriculares se encenderán automáticamente. Para apagar
los auriculares, colóquelos en el estuche de carga y ciérrelo.
FR: Ouvrez le boîtier de chargement, les écouteurs s’allument automatiquement. Pour
éteindre le boîtier de chargement, placez les écouteurs dans celui-ci, puis fermez-le.
IT: Aprire la custodia di ricarica e gli auricolari si accenderanno automaticamente. Per lo
spegnimento, collocare gli auricolari nella custodia di ricarica e chiuderla.
PT: Abra o estojo carregador e os fones de ouvido serão carregados automaticamente. Para
desligar, coloque os fones de ouvido no estojo carregador e feche-o.
TR: Şarj kutusunu açın, kulaklıklar otomatik olarak açılacaktır. Kulaklıkları kapatmak için şarj
kutusuna yerleştirin ve kutuyu kapatın.
JP: 充電ケースを開くと、両方のイヤホンの電源が自動的にオンになります。充電ケ
ースに両方のイヤホンを戻してケースを閉じると、イヤホンの電源は自動的にオ
フになります。
KO:
AR
HE
Open the charging case, the earbuds will automatically enter the Bluetooth pairing mode. On your device’s Bluetooth device
list, select “Soundcore Liberty 2 Pro+” to connect.
* "Soundcore Liberty 2 Pro+" is the Bluetooth device name of your Soundcore Liberty 2 Pro Upgraded Version.
DE: Öffnen Sie die Ladehülle, die Ohrhörer beginnen automatisch mit dem Bluetooth-
Kopplungsmodus. Wählen Sie „Soundcore Liberty 2 Pro+“ in der Bluetooth-Liste Ihres
Geräts aus, um eine Verbindung herzustellen.
* "Soundcore Liberty 2 Pro+" ist der Bluetooth-Gerätename Ihrer aktualisierten
Soundcore Liberty 2 Pro-Version.
ES: Abra el estuche de carga; los auriculares activarán el modo de emparejamiento
Bluetooth automáticamente. Para establecer conexión, seleccione “Soundcore Liberty 2
Pro+” en la lista de Bluetooth del dispositivo.
* "Soundcore Liberty 2 Pro+" es el nombre de dispositivo Bluetooth de la versión
actualizada de Soundcore Liberty 2 Pro.
FR Ouvrez le boîtier de chargement. Les écouteurs activent automatiquement le mode
Couplage Bluetooth. Sélectionnez « Soundcore Liberty 2 Pro+ » dans la liste Bluetooth
de votre appareil pour vous connecter.
* « Soundcore Liberty 2 Pro+ » est le nom d'appareil Bluetooth de la version améliorée
de votre Soundcore Liberty 2 Pro.
IT: Aprire la custodia di ricarica e gli auricolari entreranno automaticamente nella modalità
di associazione Bluetooth. Selezionare “Soundcore Liberty 2 Pro+” nell’elenco dei
dispositivi Bluetooth per procedere con il collegamento.
*“Soundcore Liberty 2 Pro+” è il nome del dispositivo Bluetooth della versione
aggiornata di Soundcore Liberty 2 Pro.
PT: Abra o estojo carregador e os fones de ouvido entrarão automaticamente no modo de
emparelhamento Bluetooth. Selecione "Soundcore Liberty 2 Pro+" na lista de Bluetooth
do seu dispositivo para se conectar.
* A nova versão do Soundcore Liberty 2 Pro aparecerá como "Soundcore Liberty 2 Pro+"
na lista de dispositivos Bluetooth.
TR: Şarj kutusunu açın, kulaklıklar otomatik olarak Bluetooth eşleştirme moduna girecektir.
Bağlamak için cihazınızın Bluetooth listesinde "Soundcore Liberty 2 Pro+" seçimini
yapın.
* "Soundcore Liberty 2 Pro+" Soundcore Liberty 2 Pro kulaklığınızın Yükseltilmiş
Sürümünün Bluetooth cihaz adıdır.
APP
Download the Soundcore app to customize the user interface (e.g. adjust
volume, control playback, activate Siri), trace HearID, adjust EQ, update
firmware, and explore more.
DE: Laden Sie die Soundcore App herunter, um die Benutzeroberfläche anzupassen (die
Lautstärke einzustelleb, die Wiedergabe zu steuern, den Sprachassistenten zu aktivieren),
die HearID zu verfolgen, den Equalizer einzustellen, die Firmware zu aktualisieren und
weitere Funktionen zu erkunden.
ES: Descargue la aplicación Soundcore para personalizar la interfaz de usuario (ajustar el
volumen, controlar la reproducción, activar el asistente de voz), emplear HearID, ajustar EQ,
actualizar el firmware y explorar otras funciones.
FR: Téléchargez l'application Soundcore pour personnaliser l'interface utilisateur (régler le
volume, contrôler la lecture, activer l'assistant vocal), suivre HearID, régler l'égaliseur audio,
mettre à jour le microprogramme et explorer bien d'autres options.
IT: Scaricare l’app Soundcore per personalizzare l’interfaccia utente (regolare il volume,
controllare la riproduzione, attivare l’assistente vocale), tracciare HearID, regolare l’EQ,
aggiornare il firmware ed esplorare altre funzioni.
PT: Baixar o aplicativo Soundcore para personalizar IU (ajustar o volume, controlar a reprodução,
ativar assistente de voz), acompanhar o HearID, ajustar o equalizador, atualizar o firmware e
explorar mais.
TR: Arayüzü özelleştirmek (ses seviyesini ayarlamak, çalmayı kontrol etmek, sesli asistanı aktive
etmek), HearID takibi yapmak, EQ ayarlamak, donanım yazılımını güncellemek ve daha
fazlasını keşfetmek için Soundcore Uygulamasını indirin.
JP: Soundcore アプリをダウンロードすると、タッチ操作のカスタマイズ(音量の調節、
再生コントロール、音声アシスタントの起動など)、HearID、イコライザー設定、フ
ァームウェアの更新などの機能をご利用いただけます。
Soundcore App
Soundcore AR
HearID
Soundcore HE
HearID
JP: 充電ケースを開くと、両方のイヤホンが自動的に Bluetooth ペアリングモード に
なります。ご使用の機器の Bluetooth 設定画面で「Soundcore Liberty 2 Pro+」
を選択して接続してください。
* 本製品は Bluetooth 設定画面上で「Soundcore Liberty 2 Pro+」と表示されます。
AR
+
.Bluetooth HE
Bluetooth
Bluetooth
.
Choose the EarTips and EarWings that t your ears best.
DE: Wählen Sie die Ohrhörer und Ohrügel, die am besten zu Ihren Ohren passen.
ES: Seleccione los adaptadores para el oído y los soportes que mejor se ajusten a
sus oídos.
FR: Choisissez les embouts et les ailerons correspondant le mieux à vos oreilles.
IT: Scegliere gli auricolari e i copriauricolari che assicurano la tenuta migliore.
PT: Escolha as pontas dos fones de ouvido e modelos para ouvido que melhor se
adaptem à sua orelha.
TR: Kulaklarınıza en uygun kulaklık uçlarını ve kanatlarını seçin.
JP: 耳に最もフィットするイヤーチップとイヤーウィングを選択してください。
AR
HE

8 9 10 11 12
Quick Start Guide
Soundcore Liberty 2 Pro
Upgraded Version
6
Soundcore
Liberty 2 Pro+
Soundcore
Liberty 2 Pro+
3s
21
10% - 30%
0 < 10%
30% - 70%
70% - 100%
ON 1s
PAIRING
1s
For FAQs and more information, please visit :
soundcore.com/support
@soundcoreaudio@soundcoreaudio@SoundcoreAudio
Model: A3930, A3930L, A3930R 51005002592 V03
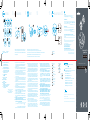
RE-PAIRING LED LIGHT GUIDE
Pairing with another device: Place the earbuds in the charging case, make
sure they are being charged and leave the case open. Press and hold the
button on the case for 3 seconds until the earbud LED indicators flash white
to enter pairing mode.
DE: Kopplung mit einem anderen Gerät: Legen Sie die Ohrhörer in die Ladehülle, stellen Sie
sicher, dass sie aufgeladen werden und lassen Sie die Ladehülle geöffnet. Halten Sie die Taste
an der Ladehülle 3 Sekunden lang gedrückt, bis die LED am Ohrhörer weiß blinkt, um den
Kopplungsmodus aufzurufen.
ES: Emparejamiento con otro dispositivo: Coloque los auriculares en el estuche de carga, asegúrese
de que se estén cargando y deje el estuche de carga abierto. Mantenga pulsado el botón del
estuche durante 3 segundos hasta que los indicadores LED de los auriculares parpadeen en color
blanco, lo que indica que se ha activado el modo de emparejamiento.
FR: Couplage avec un autre appareil: Placez les écouteurs dans le boîtier de charge, assurez-vous
qu'ils sont en charge et gardez le boîtier ouvert. Appuyez et maintenez le bouton enfoncé situé
sur le boîtier pendant 3 secondes jusqu'à ce que les voyants des écouteurs clignotent en blanc
pour activer le mode Couplage.
IT: Associazione con un altro dispositivo: Riporre gli auricolari nella custodia di ricarica assicurandosi
che si ricarichino e lasciare la custodia aperta. Per entrare nella modalità di associazione, tenere
premuto il pulsante sulla custodia per 3 secondi fino a quando gli indicatori LED sugli auricolari
non lampeggiano in bianco.
PT: Emparelhando com outro dispositivo: Coloque os fones de ouvido no estojo carregador, confirme
se estão sendo carregados e deixe o estojo aberto. Mantenha pressionado o botão na capa por
3 segundos até que os indicadores LED no fone de ouvido pisquem na cor branca para entrar no
modo de emparelhamento.
TR: Başka cihazla eşleştirme: Kulaklıkları şarj kutusuna yerleştirin, şarj olduklarından emin olun ve
kutuyu açık bırakın. Eşleştirme moduna girmek için kulaklığın LED göstergeleri beyaz renkte
yanıp sönünceye kadar kutunun üzerindeki düğmeyi 3 saniye basılı tutun.
JP: 他の機器とのペアリング : 左右のイヤホンを充電ケースに戻し、充電ケースを開いた状態
にしてください。ケースのボタンを 3 秒間押し続け、イヤホンの LED インジケーターが
白く点滅し、ペアリングモードになるまで待ちます。
KO:
AR
3
HE
3
Steady white
Flashing white
DE: Leuchtet weiß
Blinkt weiß
ES: Blanco jo
Parpadeo en blanco
FR: Blanc xe
Blanc clignotant
IT: Bianco sso
Bianco lampeggiante
PT: Branco xo
Branco intermitente
TR: Sabit yanan beyaz
Yanıp sönen beyaz
JP: 白色の点灯
白色で点滅
KO:
AR
HE
1
RESET
Reset if the earbuds cannot properly pair with each other or with other devices.
Place the earbuds in the charging case, make sure they are being charged and leave the case open.
Press and hold the button on the case for 10 seconds until the earbud LED indicators flash red 3 times and then turn white.
Wait until the LED indicator on one of the earbuds flashes fast while the other flashes slowly.
This confirms that the reset was successful and your earbuds can be connected normally.
DE: Führen Sie einen Reset aus, wenn die Ohrhörer nicht richtig miteinander oder mit anderen
Geräten gekoppelt werden können. Legen Sie die Ohrhörer in die Ladehülle, stellen Sie
sicher, dass sie aufgeladen werden und lassen Sie die Ladehülle geöffnet. Halten Sie die
Taste an der Ladehülle 10 Sekunden lang gedrückt, bis die LED-Anzeigen an den Ohrhörern
dreimal rot blinken und dann weiß weden. Warten Sie, bis die LED-Anzeige an einem
der Ohrhörer schnell blinkt, während der andere langsam blinkt. Dies bestätigt, dass das
Zurücksetzen erfolgreich war und Ihre Ohrhörer normal angeschlossen werden können.
ES: Reinicie los auriculares si no se emparejan correctamente entre ellos o con otros
dispositivos. Coloque los auriculares en el estuche de carga, asegúrese de que se estén
cargando y deje el estuche de carga abierto. Mantenga pulsado el botón del estuche
durante 10 segundos hasta que los indicadores LED de los auriculares parpadeen en color
rojo 3 veces y luego se iluminen en color blanco. Espere hasta que el indicadorLED de
uno de los auriculares parpadee rápidamente mientras el otro parpadea lentamente. Esto
confirma que el restablecimiento se ha completado correctamente y que los auriculares
están conectados con normalidad.
FR: Réinitialisez les écouteurs si ceux-ci ne parviennent pas à se coupler correctement entre
eux ou avec d'autres appareils. Placez les écouteurs dans le boîtier de charge, assurez-vous
qu'ils sont en charge et gardez le boîtier ouvert. Maintenez le bouton du boîtier enfoncé
pendant 10 secondes jusqu'à ce que les voyants des écouteurs clignotent 3 fois en rouge
puis passe au blanc. Attendez que le voyant de l'un des écouteurs devienne blanc tandis
que les autres clignotent lentement. Cela signifie que la réinitialisation est terminée et que
vos écouteurs peuvent être connectés.
IT:
Procedere con il ripristino se gli auricolari non riescono ad associarsi correttamente tra loro o
con altri dispositivi. Riporre gli auricolari nella custodia di ricarica assicurandosi che si ricarichino
e lasciare la custodia aperta. Tenere premuto il pulsante sulla custodia per 10 secondi fino a
quando gli indicatori LED non lampeggiano in rosso 3 volte, quindi diventano bianchi. Attendere
finché l’indicatore LED su uno degli auricolari non lampeggia velocemente mentre l’altro
lampeggia lentamente. Questa azione conferma che il ripristino è stato eseguito correttamente e
che gli auricolari possono essere collegati normalmente.
PT: Reinicie se os fones de ouvido não emparelharem um com o outro ou com outros
dispositivos. Coloque os fones de ouvido no estojo carregador, confirme se estão sendo
carregados e deixe o estojo aberto. Mantenha pressionado o botão na capa por 10
segundos até que os indicadores LED do fone de ouvido pisquem na cor vermelha 3
vezes e fiquem brancos. Aguarde até o indicador LED em um dos fones de ouvido piscar
rapidamente enquanto o outro pisca lentamente. Isso confirma que a redefinição foi
concluída com sucesso e que seus fones de ouvido podem ser conectados normalmente.
TR: Kulaklıklar birbiriyle veya diğer cihazlarla düzgün eşleştirilemezse kulaklıkları sıfırlayın.
Kulaklıkları şarj kutusuna yerleştirin, şarj olduklarından emin olun ve kutuyu açık bırakın.
Kulaklığın LED göstergeleri 3 defa kırmızı yanıp sönüp beyaz renkte yanıp sönünceye kadar
kutunun üzerindeki düğmeyi 10 saniye basılı tutun. Kulaklıklardan birindeki LED göstergesi hızla
yanıp sönerken diğeri yavaşça yanıp sönene kadar bekleyin. Bu, sıfırlamanın başarılı olduğunu ve
kulaklıklarınızın normal şekilde bağlanabileceğini doğrular.
JP:
片耳からしか音が聴こえない場合やイヤホンと機器を適切に接続できない場合は、リセットを行
ってください。左右のイヤホンを充電ケースに戻し、充電ケースを開いた状態にしてください。
ケースのボタンを 10 秒間押し続け、イヤホンの LED インジケーターが赤く 3 回点滅し、白色に
変わるまで待ちます。一方のイヤホンの LED インジケーターが速く点滅し、もう一方のイヤホ
ンの LED インジケーターがゆっくり点滅していることをご確認の上、再度ご利用の機器とペア
リングしてください。
AR
10
HE
310
Customer Service
Kundenservice | Atención al Cliente | Service Client | Servizio ai Clienti |
|
| 客服支持 | 客戶服務 | Serviço de Apoio ao Cliente | Müşteri Hizmetleri |
תוחוקל תוריש | ءﻼﻣﻌﻟا ﺔﻣدﺧ
םישדוח 18 ךשמל תלבגומ תוירחא | ةدودﺣﻣ ًارﮭﺷ 18 ﺔﻧﺎﻣﺿ
18-month limited warranty
18 Monate beschränkte Herstellergarantie | Garantía limitada de
18 meses | Garantie limitée de 18 mois
| Garanzia limitata 18 mesi |
|| 18个月质保期 | 18個月有限保
固
18 meses de garantia limitada | 18 aylık sınırlı Garanti |
םייחה לכל תינכט הכימת | ةﺎﯾﺣﻟا ىدﻣ ﻲﻧﻔﻟا مﻋدﻟا
Lifetime technical support
Lebenslanger technischer Support | Asistencia técnica de por vida | Support technique à vie |
Supporto tecnico a vita | | | 终身客服支持 | 永久技術支援 | Suporte
técnico ao longo da vida útil do produto | Ömür Boyu Teknik Destek Hizmeti |
Our warranty is additional to the legal rights consumers have buying this product.
Unsere Garantie gilt zusätzlich zu den gesetzlichen Ansprüchen,
die Verbrauchern beim Erwerb dieses
Produkts zustehen.
Nuestra garantía es adicional a los derechos legales de los con
sumidores asociados a la compra este
producto.
Notre garantie s'ajoute aux droits légaux que les consommateurs
disposent à l'achat de ce produit.
La nostra garanzia si aggiunge ai diritti giuridici di cui disp
ongono i consumatori che
scelgono di acquistare questo prodotto.
我们的保修是对购买本产品的消费者所享受合法权利的补充。
我們的保固為消費者購買本產品所獲得的法定權利提供額外權利。
Nossa garantia é adicional aos direitos legais que os consumido
res têm ao adquirir este produto.
Garantimiz, tüketicilerin bu ürünü satın alarak sahip olduklar
ı yasal haklara ek olarak verilmektedir.
.ﺞﺗﻧﻣﻟا اذﮭﻟ ءﻼﻣﻌﻟا ﺎﮭﯾرﺗﺷﯾ ﻲﺗﻟا ﺔﯾﻧوﻧﺎﻘﻟا قوﻘﺣﻟا ﻰﻟإ ًﺔﻓﺎﺿإ ﺎﻧﺑ صﺎﺧﻟا نﺎﻣﺿﻟا دﻌُﯾ
.הז רצומ םינוקה תוחוקלל שיש תויקוחה תויוכזל תפסונ ונלש תוירחאה
Input: 5V 0.5A
Anker Innovations Limited
Room 1318-19, Hollywood Plaza, 610 Nathan Road, Mongkok, Kowloon, Hong Kong
ANKER TECHNOLOGY (UK) LTD
Suite B, Fairgate House, 205 Kings Road, Tyseley, Birmingham, B11 2AA, United Kingdom
Anker Innovations Deutschland GmbH/Georg-Muche-Strasse 3, 80807 Munich, Germany
[email protected] (For Middle East and Africa Only)
+1 (800) 988 7973 (US) Mon-Fri 6:15 - 17:00 (PT)
+44 (0) 1604 936200 (UK) Mon-Fri
Mon-Fri 6:00 - 17:00 Sat-Sun 6:00 - 14:00
+49 (0) 69 9579 7960 (DE) Mon-Fri 6:00 - 11:00
03 4455 7823 (日本) 月 - 金 9:00 - 17:00
+86 400 0550 036 (中国) 周一至周五 9:00 - 17:30
+82 02-1670-7098 (한국) 월~금 10:00 - 17: 00
+971 42463266 (Middle East & Africa) Sun-Thu 9:00 - 17:30 (GMT+4)
+971 8000320817 (UAE) Sun-Thu 9:00 - 17:30 (GMT+4)
+966 8008500030 (KSA) Sun-Thu 8:00 - 16:30 (GMT+3)
+965 22069086 (Kuwait) Sun-Thu 8:00 - 16:30 (GMT+3)
+20 8000000826 (Egypt) Sun-Thu 7:00 - 15:30 (GMT+2)
2 3
10s
x3
R
1s
L
x2
R
x2
L/R
x1
L/R
1s
ON
L/R
x1
L/R
1s
L
Voice Assistant
1s
x1: Press once x2: Press twice
1s: Press and hold for 1 second
Transparency
CONTROLS
DE: x1: Einmal drücken x2: Zweimal drücken
1s: 1 Sekunde lang gedrückt halten
ES: x1: Pulsar una vez x2: Pulsar dos veces
1s: Mantener pulsado durante 1 segundos
FR: x1 : Appuyez une fois x2 : Appuyez deux fois
1s : Appuyez et maintenez pendant 1 seconde
IT: x1: Premere una volta x2: Premere due volte
1s: Tenere premuto per 1 secondo
JP: x1:1 回押す x2:2 回押す
1s: 1 秒間長押し
KO:
简中:
繁中:
PT: x1: Pressione uma vez x2: Pressione duas vezes
1s: Mantenha pressionado por um segundo
TR: x1: Bir defa basın x2: İki defa basın
1s: 1 saniye basılı tutun x1 AR
11s
x1 HE
1s
x1: Press once x2: Press twice
1s: Press and hold for 1 second
-
 1
1
-
 2
2


Soundcore Liberty 2 Pro Upgraded Version Manuale utente
- Tipo
- Manuale utente
- Questo manuale è adatto anche per
in altre lingue
Documenti correlati
-
Soundcore AK-A3909011 Manuale utente
-
Soundcore A3952011 Guida utente
-
Soundcore Liberty Air 2 Wireless Earbuds Manuale utente
-
Soundcore Liberty 4 NC Guida Rapida
-
-
-
-
Soundcore Life A2 NC Manuale utente
-
Soundcore Life P3 Manuale utente
-