
1234567
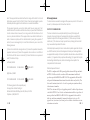
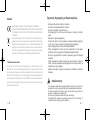
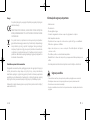
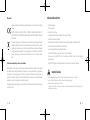
FAQ
i
< 30%
30% - 70%
> 70%
100%
21
OFF
ON
21
Soundcore
Liberty 2 Pro +
Soundcore
Liberty 2 Pro +
12 3
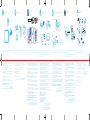
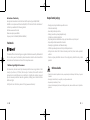
Choose the Liquid Silicone EarWings and EarTips that t your ears
best.
DE: Wählen Sie die Ohrhörer und Ohrügel, die am besten zu Ihren Ohren passen.
ES: Seleccione los adaptadores para el oído y los soportes que mejor se ajusten a sus oídos.
FR: Choisissez les embouts et les ailerons correspondant le mieux à vos oreilles.
IT: Scegliere gli auricolari e i copriauricolari che assicurano la tenuta migliore.
JP: 耳に最もフィットするイヤーチップとイヤーウィングを選択してください。
KO:
CN:
TW:
PT: Escolha as pontas dos fones de ouvido e modelos para ouvido que melhor se adaptem à
sua orelha.
TR: Kulaklarınıza en uygun kulaklık uçlarını ve kanatlarını seçin.
AR
HE
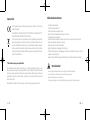
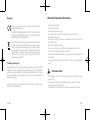
PAIRING
SUPPORT WEARING CHARGING POWERING ON/OFF
For FAQs, detailed user manual and more information, please visit
www.soundcore.com/support
DE: Für FAQs, ein detailliertes Benutzerhandbuch und weitere Informationen besuchen Sie
bitte www.soundcore.com/support
ES: Para acceder a las preguntas frecuentes, el Manual del usuario detallado y más
información, visite www.soundcore.com/support
FR: Pour les FAQ, le manuel d'utilisation détaillé et plus d'informations, veuillez consulter la
page www.soundcore.com/support
IT: Per domande frequenti, manuale utente dettagliato e ulteriori informazioni, visitare il sito
www.soundcore.com/support
PT: Para perguntas frequentes, manual do usuário detalhado e mais informações, acesse
www.soundcore.com/support
TR: Sık sorulan sorular, ayrıntılı kullanıcı kılavuzu ve daha fazla bilgi için lütfen www.soundcore.
com/support adresini ziyaret edin
JP: 詳細な取扱説明書は www.ankerjapan.com でダウンロードできます。
KO:
AR
www.soundcore.com/support
www.soundcore.com/support HE
Fully dry off the earbuds and the USB-C charging port before charging.
Use a certified USB-C charging cable to prevent any damage.
For wireless charging, position the charging case at the center of your
wireless charger.
DE: Trocknen Sie die Ohrhörer und den USB-Ladeanschluss vor dem Aufladen vollständig ab.
Verwenden Sie ein zertifiziertes USB-C-Ladekabel, um Schäden zu vermeiden.
Zum drahtlosen Aufladen positionieren Sie die Ladehülle in der Mitte Ihres drahtlosen Ladegeräts.
ES: Seque completamente los auriculares y el puerto de carga USB-C antes de la carga.
Utilice un cable de carga USB-C certificado para evitar daños.
Para la carga inalámbrica, coloque el estuche de carga en el centro del cargador inalámbrico.
FR: Séchez entièrement les écouteurs et le port de charge USB-C avant le chargement.
Utilisez un câble de charge USB-C certifié pour éviter tout dommage.
Pour le chargement sans fil, positionnez le boîtier de chargement au centre de votre chargeur sans fil.
IT: Asciugare completamente gli auricolari e la porta USB-C prima della ricarica.
Utilizzare un cavo di ricarica USB-C certificato per evitare eventuali danni.
Per la ricarica wireless, posizionare la custodia di ricarica al centro del caricabatterie wireless.
PT: Seque totalmente os fones de ouvido e a porta de carga USB-C antes de carregar.
Use um cabo de carga USB-C certificado para evitar danos.
Para carga sem fio, posicione o estojo carregador no centro do seu carregador sem fio.
TR: Şarj etmeden önce kulaklıkları ve USB C şarj bağlantı noktasını tamamen kurulayın.
Hasarların önüne geçmek için sertifikalı bir USB C şarj kablosu kullanın.
Kablosuz şarj için şarj kutusunu kablosuz şarj cihazınızın ortasına yerleştirin.
JP: イヤホンと USB ポートに水や汗が付着している場合は、完全に乾かしてから充電してください。
損傷を防ぐため、付属の USB-C ケーブルを使用してください。
ワイヤレス充電を行うには、ワイヤレス充電器の中央に充電ケースを置きます ( ワイヤレス充電器
は別売り )。
CUSB AR
CUSB
USB-C HE
USB-C
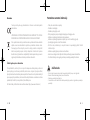
Open the charging case, the earbuds will automatically power on.
To power off, place the earbuds in the charging case and close it.
DE: Öffnen Sie die Ladehülle. Die Ohrhörer werden anschließend automatisch eingeschaltet. Um das
Gerät auszuschalten, setzen Sie die Ohrhörer in die Ladehülle und schließen Sie diese.
ES: Abra el estuche de carga; los auriculares se encenderán automáticamente. Para apagar los
auriculares, colóquelos en el estuche de carga y ciérrelo.
FR: Ouvrez le boîtier de chargement, les écouteurs s’allument automatiquement. Pour éteindre le
boîtier de chargement, placez les écouteurs dans celui-ci, puis fermez-le.
IT: Aprire la custodia di ricarica e gli auricolari si accenderanno automaticamente. Per lo
spegnimento, collocare gli auricolari nella custodia di ricarica e chiuderla.
PT: Abra o estojo carregador e os fones de ouvido serão carregados automaticamente. Para desligar,
coloque os fones de ouvido no estojo carregador e feche-o.
TR: Şarj kutusunu açın, kulaklıklar otomatik olarak açılacaktır. Kulaklıkları kapatmak için şarj
kutusuna yerleştirin ve kutuyu kapatın.
JP: 充電ケースを開くと、両方のイヤホンの電源が自動的にオンになります。充電ケースに両
方のイヤホンを戻してケースを閉じると、イヤホンの電源は自動的にオフになります。
KO:
AR
HE
Open the charging case, the earbuds will automatically enter the
Bluetooth pairing mode.
On your device’s Bluetooth list, select “Soundcore Liberty 2 Pro +” to pair
up with Soundcore Liberty 2 Pro Upgraded Version.
DE: Öffnen Sie die Ladehülle, die Ohrhörer beginnen automatisch mit dem Bluetooth-
Kopplungsmodus. Wählen Sie „Soundcore Liberty Air 2 Pro“ in der Bluetooth-Liste Ihres Geräts
aus, um eine Verbindung herzustellen.
ES: Abra el estuche de carga; los auriculares activarán el modo de emparejamiento Bluetooth
automáticamente. Para establecer conexión, seleccione “Soundcore Liberty Air 2 Pro” en la lista
de Bluetooth del dispositivo.
FR Ouvrez le boîtier de chargement. Les écouteurs activent automatiquement le mode Couplage
Bluetooth. Sélectionnez « Soundcore Liberty Air 2 Pro » dans la liste Bluetooth de votre appareil
pour vous connecter.
IT: Aprire la custodia di ricarica e gli auricolari entreranno automaticamente nella modalità di
associazione Bluetooth. Selezionare “Soundcore Liberty Air 2 Pro” nell’elenco dei dispositivi
Bluetooth per procedere con il collegamento.
PT: Abra o estojo carregador e os fones de ouvido entrarão automaticamente no modo de
emparelhamento Bluetooth. Selecione "Soundcore Liberty Air 2 Pro" na lista de Bluetooth do seu
dispositivo para se conectar.
TR: Şarj kutusunu açın, kulaklıklar otomatik olarak Bluetooth eşleştirme moduna girecektir. Bağlamak
için cihazınızın Bluetooth listesinde "Soundcore Liberty Air 2 Pro" seçimini yapın.
JP: 充電ケースを開くと、両方のイヤホンが自動的に Bluetooth ペアリングモードになります。
ご使用の機器の Bluetooth 接続画面で「Soundcore Liberty Air 2 Pro」を選択して接続し
てください。
AR
.Bluetooth HE
Bluetooth
APP
Download the Soundcore app to customize the user interface (e.g. adjust
volume, control playback, activate Siri), trace HearID, adjust EQ, update
firmware, and explore more.
DE: Laden Sie die Soundcore App herunter, um die Benutzeroberfläche anzupassen (die Lautstärke
einzustelleb, die Wiedergabe zu steuern, den Sprachassistenten zu aktivieren), die HearID zu
verfolgen, den Equalizer einzustellen, die Firmware zu aktualisieren und weitere Funktionen zu
erkunden.
ES: Descargue la aplicación Soundcore para personalizar la interfaz de usuario (ajustar el volumen,
controlar la reproducción, activar el asistente de voz), emplear HearID, ajustar EQ, actualizar el
firmware y explorar otras funciones.
FR: Téléchargez l'application Soundcore pour personnaliser l'interface utilisateur (régler le volume,
contrôler la lecture, activer l'assistant vocal), suivre HearID, régler l'égaliseur audio, mettre à
jour le microprogramme et explorer bien d'autres options.
IT: Scaricare l’app Soundcore per personalizzare l’interfaccia utente (regolare il volume, controllare
la riproduzione, attivare l’assistente vocale), tracciare HearID, regolare l’EQ, aggiornare il
firmware ed esplorare altre funzioni.
PT: Baixar o aplicativo Soundcore para personalizar IU (ajustar o volume, controlar a reprodução,
ativar assistente de voz), acompanhar o HearID, ajustar o equalizador, atualizar o firmware e
explorar mais.
TR: Arayüzü özelleştirmek (ses seviyesini ayarlamak, çalmayı kontrol etmek, sesli asistanı aktive
etmek), HearID takibi yapmak, EQ ayarlamak, donanım yazılımını güncellemek ve daha fazlasını
keşfetmek için Soundcore Uygulamasını indirin.
JP: Soundcore アプリをダウンロードすると、タッチ操作のカスタマイズ(音量の調節、再
生コントロール、音声アシスタントの起動など)、HearID、イコライザー設定、ファーム
ウェアの更新などの機能をご利用いただけます。
Soundcore App
Soundcore AR
HearID
Soundcore HE
HearID
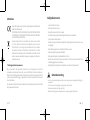
R
1s
L
x2
R
x2
L/R
x1
L/R
1s
ON
L/R
x1
L/R
1s
L
Voice Assistant
1s
x1: Press once x2: Press twice
1s: Press and hold for 1 second
Transparency
CONTROLS
PT: x1: Pressione uma vez x2:
Pressione duas vezes
1s: Mantenha pressionado por um
segundo
TR: x1: Bir defa basın x2: İki defa basın
1s: 1 saniye basılı tutun
x1 AR
11s
x1 HE
1s
DE: x1: Einmal drücken x2: Zweimal drücken
1s: 1 Sekunde lang gedrückt halten
ES: x1: Pulsar una vez x2: Pulsar dos veces
1s: Mantener pulsado durante 1 segundos
FR: x1 : Appuyez une fois x2 : Appuyez deux
fois
1s : Appuyez et maintenez pendant 1
seconde
IT: x1: Premere una volta x2: Premere due
volte
1s: Tenere premuto per 1 secondo
JP: x1:1 回押す x2:2 回押す
1s: 1 秒間長押し
KO:
x1: Press once x2: Press twice
1s: Press and hold for 1 second

8 9 10 11 12
Quick Start Guide
Soundcore Liberty 2 Pro
Upgraded Version
6
Soundcore
Liberty 2 Pro +
Soundcore
Liberty 2 Pro +
3s
21
10% - 30%
0 < 10%
30% - 70%
70% - 100%
ON 1s
PAIRING
1s
For FAQs and more information, please visit :
soundcore.com/support
@soundcoreaudio@soundcoreaudio@SoundcoreAudio
Model: A3930, A3930L, A3930R 51005002xxx V01
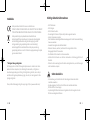
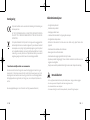
RE-PAIRING LED LIGHT GUIDE
Pairing with another device: Place the earbuds in the charging case, make
sure they are being charged and leave the case open. Press and hold the
button on the case for 3 seconds until the earbud LED indicators flash white
to enter pairing mode.
On your device’s Bluetooth list, select “Soundcore Liberty 2 Pro +” to pair
up with Soundcore Liberty 2 Pro Upgraded Version.
DE: Kopplung mit einem anderen Gerät: Legen Sie die Ohrhörer in die Ladehülle und lassen Sie
diese geöffnet. Halten Sie die Taste an der Ladehülle 3 Sekunden lang gedrückt, bis die LED am
Ohrhörer weiß blinkt, um den Kopplungsmodus aufzurufen.
ES: Emparejamiento con otro dispositivo: Coloque los auriculares en el estuche de carga y
manténgalo abierto. Mantenga pulsado el botón del estuche durante 3 segundos hasta que los
indicadores LED de los auriculares parpadeen en color blanco, lo que indica que se ha activado el
modo de emparejamiento.
FR: Couplage avec un autre appareil: Placez les écouteurs dans le boîtier de chargement et laissez
celui-ci ouvert. Appuyez et maintenez le bouton enfoncé situé sur le boîtier pendant 3 secondes
jusqu'à ce que les voyants des écouteurs clignotent en blanc pour activer le mode Couplage.
IT: Associazione con un altro dispositivo: Collocare gli auricolari nella custodia di ricarica e tenerla
aperta. Per entrare nella modalità di associazione, tenere premuto il pulsante sulla custodia per 3
secondi fino a quando gli indicatori LED sugli auricolari non lampeggiano in bianco.
PT: Emparelhando com outro dispositivo: Coloque os fones de ouvido no estojo carregador
e mantenha-o aberto. Mantenha pressionado o botão na capa por 3 segundos até que
os indicadores LED no fone de ouvido pisquem na cor branca para entrar no modo de
emparelhamento.
TR: Başka cihazla eşleştirme: Kulaklıkları şarj kutusuna yerleştirin ve kutuyu açık tutun. Eşleştirme
moduna girmek için kulaklığın LED göstergeleri beyaz renkte yanıp sönünceye kadar kutunun
üzerindeki düğmeyi 3 saniye basılı tutun.
JP: 他の機器とのペアリング:左右のイヤホンを充電ケースに戻し、充電ケースを開いた状態
にしてください。ケースのボタンを 3 秒間押し続け、イヤホンの LED インジケーターが
白く点滅し、ペアリングモードになるまで待ちます。
KO:
AR
3
HE
3
Steady white
Flashing white
DE: Leuchtet weiß
Blinkt weiß
ES: Blanco jo
Parpadeo en blanco
FR: Blanc xe
Blanc clignotant
IT: Bianco sso
Bianco lampeggiante
PT: Branco xo
Branco intermitente
TR: Sabit yanan beyaz
Yanıp sönen beyaz
JP: 白色の点灯
白色で点滅
KO:
AR
HE
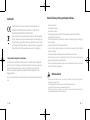
1
RESET
Reset if the earbuds cannot properly pair with each other or with other devices.
Place the earbuds in the charging case, make sure they are being charged and leave the case open.
Press and hold the button on the case for 10 seconds until the earbud LED indicators flash red 3 times and then turn white.
Wait until the LED indicator on one of the earbuds flashes fast while the other flashes slowly.
This confirms that the reset was successful and your earbuds can be connected normally.
DE: Führen Sie einen Reset aus, wenn die Ohrhörer nicht richtig miteinander oder mit anderen
Geräten gekoppelt werden können. Legen Sie die Ohrhörer in die Ladehülle und lassen Sie diese
geöffnet. Halten Sie die Taste an der Ladehülle 10 Sekunden lang gedrückt, bis die LED-Anzeigen
an den Ohrhörern dreimal rot blinken und dann weiß weden. Warten Sie, bis die LED-Anzeige an
einem der Ohrhörer schnell blinkt, während der andere langsam blinkt. Dies bestätigt, dass das
Zurücksetzen erfolgreich war und Ihre Ohrhörer normal angeschlossen werden können.
ES: Reinicie los auriculares si no se emparejan correctamente entre ellos o con otros dispositivos.
Coloque los auriculares en el estuche de carga y manténgalo abierto. Mantenga pulsado el botón
del estuche durante 10 segundos hasta que los indicadores LED de los auriculares parpadeen en
color rojo 3 veces y luego se iluminen en color blanco. Espere hasta que el indicadorLED de uno
de los auriculares parpadee rápidamente mientras el otro parpadea lentamente. Esto confirma
que el restablecimiento se ha completado correctamente y que los auriculares están conectados
con normalidad.
FR: Réinitialisez les écouteurs si ceux-ci ne parviennent pas à se coupler correctement entre eux ou
avec d'autres appareils. Placez les écouteurs dans le boîtier de chargement et laissez celui-ci
ouvert. Maintenez le bouton du boîtier enfoncé pendant 10 secondes jusqu'à ce que les voyants
des écouteurs clignotent 3 fois en rouge puis passe au blanc. Attendez que le voyant de l'un
des écouteurs devienne blanc tandis que les autres clignotent lentement. Cela signifie que la
réinitialisation est terminée et que vos écouteurs peuvent être connectés.
IT:
Procedere con il ripristino se gli auricolari non riescono ad associarsi correttamente tra loro o con
altri dispositivi. Collocare gli auricolari nella custodia di ricarica e tenerla aperta. Tenere premuto il
pulsante sulla custodia per 10 secondi fino a quando gli indicatori LED non lampeggiano in rosso 3
volte, quindi diventano bianchi. Attendere finché l’indicatore LED su uno degli auricolari non lampeggia
velocemente mentre l’altro lampeggia lentamente. Questa azione conferma che il ripristino è stato
eseguito correttamente e che gli auricolari possono essere collegati normalmente.
PT: Reinicie se os fones de ouvido não emparelharem um com o outro ou com outros dispositivos.
Coloque os fones de ouvido no estojo carregador e mantenha-o aberto. Mantenha pressionado
o botão na capa por 10 segundos até que os indicadores LED do fone de ouvido pisquem na cor
vermelha 3 vezes e fiquem brancos. Aguarde até o indicador LED em um dos fones de ouvido
piscar rapidamente enquanto o outro pisca lentamente. Isso confirma que a redefinição foi
concluída com sucesso e que seus fones de ouvido podem ser conectados normalmente.
TR: Kulaklıklar birbiriyle veya diğer cihazlarla düzgün eşleştirilemezse kulaklıkları sıfırlayın. Kulaklıkları
şarj kutusuna yerleştirin ve kutuyu açık tutun. Kulaklığın LED göstergeleri 3 defa kırmızı yanıp sönüp
beyaz renkte yanıp sönünceye kadar kutunun üzerindeki düğmeyi 10 saniye basılı tutun. Kulaklıklardan
birindeki LED göstergesi hızla yanıp sönerken diğeri yavaşça yanıp sönene kadar bekleyin. Bu,
sıfırlamanın başarılı olduğunu ve kulaklıklarınızın normal şekilde bağlanabileceğini doğrular.
JP:
片耳からしか音が聴こえない場合やイヤホンと機器を適切に接続できない場合は、リセットを行って
ください。左右のイヤホンを充電ケースに戻し、充電ケースを開いた状態にしてください。ケースの
ボタンを 10 秒間押し続け、イヤホンの LED インジケーターが赤く 3 回点滅し、白色に変わるまで待
ちます。一方のイヤホンの LED インジケーターが速く点滅し、もう一方のイヤホンの LED インジケー
ターがゆっくり点滅していることをご確認の上、再度ご利用の機器とペアリングしてください。
AR
10
HE
10
3
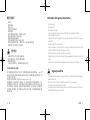
Customer Service
Kundenservice | Atención al Cliente | Service Client | Servizio ai Clienti |
|
| 客服支持 | 客戶服務 | Serviço de Apoio ao Cliente | Müşteri Hizmetleri |
תוחוקל תוריש | ءﻼﻣﻌﻟا ﺔﻣدﺧ
םישדוח 18 ךשמל תלבגומ תוירחא | ةدودﺣﻣ ًارﮭﺷ 18 ﺔﻧﺎﻣﺿ
18-month limited warranty
18 Monate beschränkte Herstellergarantie | Garantía limitada de
18 meses | Garantie limitée de 18 mois
| Garanzia limitata 18 mesi |
|| 18个月质保期 | 18個月有限保
固
18 meses de garantia limitada | 18 aylık sınırlı Garanti |
םייחה לכל תינכט הכימת | ةﺎﯾﺣﻟا ىدﻣ ﻲﻧﻔﻟا مﻋدﻟا
Lifetime technical support
Lebenslanger technischer Support | Asistencia técnica de por v
ida | Support technique à vie |
Supporto tecnico a vita |
| | 终身客服支持 | 永久技術支援 | Suporte
técnico ao longo da vida útil do produto | Ömür Boyu Teknik Des
tek Hizmeti |
Our warranty is additional to the legal rights consumers have buying this product.
Unsere Garantie gilt zusätzlich zu den gesetzlichen Ansprüchen,
die Verbrauchern beim Erwerb dieses
Produkts zustehen.
Nuestra garantía es adicional a los derechos legales de los con
sumidores asociados a la compra este
producto.
Notre garantie s'ajoute aux droits légaux que les consommateurs
disposent à l'achat de ce produit.
La nostra garanzia si aggiunge ai diritti giuridici di cui disp
ongono i consumatori che
scelgono di acquistare questo prodotto.
我们的保修是对购买本产品的消费者所享受合法权利的补充。
我們的保固為消費者購買本產品所獲得的法定權利提供額外權利。
Nossa garantia é adicional aos direitos legais que os consumido
res têm ao adquirir este produto.
Garantimiz, tüketicilerin bu ürünü satın alarak sahip olduklar
ı yasal haklara ek olarak verilmektedir.
.ﺞﺗﻧﻣﻟا اذﮭﻟ ءﻼﻣﻌﻟا ﺎﮭﯾرﺗﺷﯾ ﻲﺗﻟا ﺔﯾﻧوﻧﺎﻘﻟا قوﻘﺣﻟا ﻰﻟإ ًﺔﻓﺎﺿإ ﺎﻧﺑ صﺎﺧﻟا نﺎﻣﺿﻟا دﻌُﯾ
.הז רצומ םינוקה תוחוקלל שיש תויקוחה תויוכזל תפסונ ונלש תוירחאה
Input: 5V 0.5A
Charging time: 2 hours
Playtime (varies by volume level and content): 8 hours (Total 32 hours with the charging case)
Anker Innovations Limited
Room 1318-19, Hollywood Plaza, 610 Nathan Road, Mongkok, Kowloon, Hong Kong
ANKER TECHNOLOGY (UK) LTD
Suite B, Fairgate House, 205 Kings Road, Tyseley, Birmingham, B11 2AA, United Kingdom
Anker Innovations Deutschland GmbH/Georg-Muche-Strasse 3-5, 80807 Munich, Germany
+971 8000320817 (UAE) Sun-Thu 9:00 - 17:30 (GMT+4)
+971 42463266 (Middle East & Africa) Sun-Thu 9:00 - 17:30 (GMT+4)
+966 8008500030 (KSA) Sun-Thu 8:00 - 16:30 (GMT+3)
+965 22069086 (Kuwait) Sun-Thu 8:00 - 16:30 (GMT+3)
+20 8000000826 (Egypt) Sun-Thu 7:00 - 15:30 (GMT+2)
[email protected] (For Middle East and Africa Only)
2 3
10s
x3

Model: A3930&A3930L& A3930R
5100500xxxx V01

01 EN EN 02
Important Safety Information
• Avoid dropping.
• Do not disassemble.
• Do not submerge in water.
• The charging case should not be exposed to dripping or splashing.
• Avoid extreme temperatures.
• The product shall not be exposed to excessive heat such as sunshine, fire or the like.
• Use original or certified cables.
• Clean with a dry, so lint-free cloth. Do not use any corrosive cleaner or oil.
• Do not use the product outdoors during thunderstorms.
• Keep out of reach of children. Small parts included may be a choking hazard.
• Temporarily stop using this product if you feel irritation or discomfort.
Hearing Safety
• To avoid hearing damage, do not listen for extended periods at high volume.
• Do not turn the volume so high that you’re unable to hear your surroundings.
• Do not use earphones while driving.
• You should use caution or temporarily discontinue use in potentially hazardous situations.
Notice
This product complies with the radio interference requirements of the
European Community.
CAUTION: RISK OF EXPLOSION IF BATTERY IS REPLACED BY AN INCORRECT
TYPE. DISPOSE OF USED BATTERIES ACCORDING TO THE INSTRUCTIONS.
CAUTION
Disposal of a battery into fire or a hot oven, or mechanically crushing or
cutting of a battery, that can result in an explosion;
Leaving a battery in an extremely high temperature surrounding
environment that can result in an explosion or the leakage of flammable
liquid or gas;
A battery subjected to extremely low air pressure that may result in an
explosion or the leakage of flammable liquid or gas.
This symbol means the product must not be discarded as household waste,
and should be delivered to an appropriate collection facility for recycling.
Follow local rules and never dispose of the product and rechargeable
batteries with normal household waste. Correct disposal of old products
and rechargeable batteries helps prevent negative consequences for the
environment and human health.
FCC Statement
This device complies with Part 15 of the FCC Rules. Operation is subject to the following
two conditions: (1) This device may not cause harmful interference, and (2) This device
must accept any interference received, including interference that may cause undesired
operation.
Warning: Changes or modifications not expressly approved by the party responsible for
compliance could void the user's authority to operate the equipment.

03 EN EN 04
Note: This equipment has been tested and found to comply with the limits for a Class B
digital device, pursuant to Part 15 of the FCC Rules. These limits are designed to provide
reasonable protection against harmful interference in a residential installation.
This equipment generates, uses and can radiate radio frequency energy and, if not
installed and used in accordance with the instructions, may cause harmful interference
to radio communications. However, there is no guarantee that interference will not
occur in a particular installation. If this equipment does cause harmful interference to
radio or television reception, which can be determined by turning the equipment o
and on, the user is encouraged to try to correct the interference by one or more of the
following measures:
(1) Reorient or relocate the receiving antenna. (2) Increase the separation between the
equipment and receiver. (3) Connect the equipment into an outlet on a circuit dierent
from that to which the receiver is connected. (4) Consult the dealer or an experienced
radio/TV technician for help.
Le Earbud, A3930L
FCC ID: 2AOKB-A3930L IC: 23451-A3930L : 210-144272
Right Earbud, A3930R
FCC ID: 2AOKB-A3930R IC: 23451-A3930R : 210-144281
The following importer is the responsible party
Company Name: Fantasia Trading LLC
Address: 5350 Ontario Mills Pkwy, Suite 100, Ontario, CA 91764
Telephone: +1 (800) 988 7973
RF Warning Statement
The device has been evaluated to meet general RF exposure requirements. The device can
be used in portable exposure conditions without restriction.
IC NOTICE TO CANADIAN USERS
This device contains licence-exempt transmitter(s)/receiver(s) that comply with
Innovation, Science and Economic Development Canada’s licence-exempt RSS(s).
Operation is subject to the following two conditions: (1) This device may not cause
interference. (2) This device must accept any interference, including interference that
may cause undesired operation of the device.
L’émetteur/récepteur exempt de licence contenu dans le présent appareil est conforme
aux CNR d’Innovation, Sciences et Développement économique Canada applicables
aux appareils radio exempts de licence. L’exploitation est autorisée aux deux conditions
suivantes : (1) L' appareil ne doit pas produire de brouillage; (2) L' appareil doit accepter
tout brouillage radioélectrique subi, même si le brouillage est susceptible d' en
compromettre le fonctionnement.
Radiation Exposure Statement
This EUT is compliance with SAR for general population/uncontrolled exposure limits
in IC RSS-102 had been tested in accordance with the measurement methods and
procedures specified in IEEE 1528 and IEC 62209. This equipment should be installed
and operated with minimum distance 0 mm between the radiator and your body. This
device and its antenna(s) must not be co-located or operating in conjunction with any
other antenna or transmitter.
Cet EUT est conforme au DAS pour la population générale / les limites d'exposition non
contrôlées de l'IC RSS-102 ont été testées conformément aux méthodes et procédures de
mesure spécifiées dans IEEE 1528 et CEI 62209. Cet équipement doit être installé et
utilisé avec une distance minimale de 0 mm entre le radiateur et votre corps. Cet
appareil et son (ses) antenne (s) ne doivent pas être colocalisés ou fonctionner avec une
autre antenne ou émetteur.

CS 0605 EN
Declaration of Conformity
Hereby, Anker Innovations Limited declares that the product type A3930/A3930L/
A3930R is in compliance with Directive 2014/53/EU. The full text of the EU declaration of
conformity is available at the following internet
address: www.soundcore.com
Maximum output power: 8dBm
Frequency band: 2.4G band(2.402GHz-2.480GHz)
Trademark
The Bluetooth® word mark and logos are registered trademarks owned by the Bluetooth
SIG, Inc. and any use of such marks by Anker Innovations Limited is under license. Other
trademarks and trade names are those of their respective owners.
* Additional Legal Rights for Consumers
For consumers, who are covered by consumer protection laws or regulations in their
country of purchase or, if dierent, their country of residence, the benefits conferred
by Soundcore's Limited Warranty are in addition to all rights and remedies conveyed
by such consumer protection laws and regulations, including but not limited to these
additional rights.
For FAQs and more information, please visit https://www.soundcore.com/.
Bezpečnostní pokyny
•Dávejte pozor, abyste zařízení neupustili na zem.
•Zařízení nerozebírejte.
•Neumisťujte zařízení pod vodu.
•Nabíjecí pouzdro nevystavujte kapkám vody.
•Vyhýbejte se extrémním teplotám.
•Nevystavujte baterii nadměrnému teplu, např. slunečnímu svitu, ohni apod.
•Nepoužívejte zařízení venku během bouřek.
•Používejte originální nebo certifikované kabely.
•Kčištění nepoužívejte korozivní čisticí prostředky ani benzín.
•Udržujte mimo dosah dětí. Zařízení obsahuje malé části, které mohou způsobit
udušení.
•Pokud se objeví podráždění nebo se cítíte nepříjemně, přestaňte tento výrobek
používat.
Ochrana sluchu
•Pokud chcete zabránit poškození sluchu, nepoužívejte sluchátka po delší dobu při vysoké
hlasitosti.
•Nezvyšujte hlasitost tak, že neuslyšíte, co se děje ve vašem okolí.
•Nepoužívejte sluchátka při řízení.
•Vpotenciálně nebezpečných situacích dbejte opatrnosti, nebo sluchátka na chvíli přestaňte
používat.

DA 0807 CS
Upozornění
Tento výrobek splňuje požadavky Evropské unie týkající se interferencí
rádiových signálů.
UPOZORNĚNÍ: NEBEZPEČÍ EXPLOZE PŘI VÝMĚNĚ ZA NESPRÁVNÝ TYP.
POUŽITÉ BATERIE LIKVIDUJTE PODLE POKYNŮ.
Tento symbol znamená, že svýrobkem nesmí být nakládáno jako sběžným
komunálním odpadem aměl by být odvezen na vhodné sběrné místo pro
recyklaci. Dodržujte místní předpisy anikdy nelikvidujte výrobek anabíjecí
baterie jako běžný komunální odpad. Správnou likvidací starých výrobků
anabíjecích baterií pomáháte předcházet negativním dopadům na životní
prostředí alidské zdraví.
* Další zákonná práva pro spotřebitele
Je-li zákazník chráněn zákony nebo předpisy o ochraně spotřebitele platnými v zemi
zakoupení výrobku nebo v zemi pobytu (pokud se tyto dvě země liší), výhody stanovené
omezenou zárukou společnosti Soundcore jsou doplněním veškerých práv a opravných
prostředků stanovených těmito zákony a předpisy o ochraně spotřebitele, zejména
těchto dalších práv.
Nejčastější otázky a další informace naleznete na adrese https://www.soundcore.com/
Sikkerhedsinstruktioner
• Undgå at tabe produktet.
• Produktet må ikke skilles ad.
• Produktet må ikke nedsænkes i vand.
• Opladeetuiet må ikke udsættes for dryp eller stænk.
• Undgå ekstreme temperaturer.
• Batteriet må ikke udsættes for ekstrem varme som f.eks. solskin, ild eller lignende.
• Brug ikke produktet udendørs i tordenvejr.
• Brug originale eller certificerede kabler.
• Brug aldrig ætsende rengøringsmiddel eller olie.
• Produktet skal opbevares utilgængeligt for børn. Det indeholder små dele, som kan
udgøre en kvælningsrisiko.
• Brug af dette produkt skal stoppes midlertidigt, hvis du føler irritation eller ubehag.
Høresikkerhed
• For at undgå høreskader må du ikke lytte i længere tid med høj lydstyrke.
• Drej ikke lydstyrken så højt, at du ikke kan høre dine omgivelser.
• Brug ikke øretelefoner, mens du kører bil.
• Du bør være forsigtig eller midlertidigt afbryde brugen i potentielt farlige situationer.

DE 1009 DA
Meddelelse
Dette produkt overholder EU's krav om radiointerferens.
FORSIGTIG: RISIKO FOR EKSPLOSION HVIS UDSKIFTET MED EN FORKERT
TYPE. BORTSKAF BRUGTE BATTERIER I HENHOLD TIL INSTRUKTIONERNE.
Dette symbol betyder, at produktet ikke må bortskaes som
husholdningsaald og skal indleveres til et passende indsamlingssted
med henblik på genanvendelse. Følg de lokale regler, og bortskaf
aldrig produktet og de genopladelige batterier med almindeligt
husholdningsaald. Korrekt bortskaelse af udtjente produkter og
genopladelige batterier er med til at forhindre negativ påvirkning af miljøet
og menneskers helbred.
* Yderligere forbrugerrettigheder
For forbrugere, der er omfattet af forbrugerbeskyttelseslove eller -bestemmelser i deres
købsland eller deres bopælsland, hvis dette afviger fra købslandet, er rettighederne i
Soundcores begrænsede garanti et tillæg til de rettigheder og retsmidler, som er udtrykt
ved sådanne forbrugerbeskyttelseslove og regler, herunder, men ikke begrænset til disse
yderligere rettigheder.
Få svar på oe stillede spørgsmål og flere oplysninger på https://www.soundcore.com/
Wichtige Sicherheitsinformationen
• Nicht fallenlassen.
• Nicht zerlegen.
• Nicht in Wasser tauchen.
• Das Ladegerät darf keinen Tropfen oder Spritzern ausgesetzt werden.
• Extreme Temperaturen meiden.
• Das Produkt keiner übermäßigen Wärmeeinwirkung wie z. B. direkter Sonneneinstrahlung,
Feuer usw. aussetzen.
• Verwenden Sie originale oder zertifizierte Kabel.
• Mit einem trockenen, weichen, fusselfreien Tuch reinigen. Weder scharfe
Reinigungsmittel noch Öl verwenden.
• Das Produkt nicht bei Gewitter im Freien verwenden.
• Außerhalb der Reichweite von Kindern aufbewahren. Erstickungsgefahr durch
Kleinteile.
• Stellen Sie die Anwendung dieses Produkts vorübergehend ein, wenn Sie Reizungen
oder Unwohlsein verspüren.
Schutz des Gehörs
• Zur Vermeidung von Gehörschäden nicht über längere Zeiträume bei hoher
Lautstärke verwenden.
• Umgebungsgeräusch nicht durch Hochfahren der Lautstärke übertönen.
• Ohrhörer nicht am Steuer tragen.
• In potenziell gefährlichen Situationen mit gebotener Vorsicht vorgehen oder die
Ohrhörer vorübergehend entfernen.

EL 1211 DE
Hinweis
Dieses Produkt entspricht den EU-Bestimmungen zur Störfestigkeit.
VORSICHT: EXPLOSIONSGEFAHR BEI AUSTAUSCH DURCH EINEN FALSCHEN
TYP. GEBRAUCHTE BATTERIEN ENTSPRECHEND DEN ANWEISUNGEN
ENTSORGEN.
Dieses Symbol bedeutet, dass das Produkt nicht als Hausmüll entsorgt
werden darf, sondern einer angemessenen Sammelstelle für das Recycling
zugeführt werden muss. Beachten Sie die örtlichen Bestimmungen und
entsorgen Sie das Produkt und die Akkus nicht im normalen Hausmüll.
Durch die ordnungsgemäße Entsorgung von Altprodukten und Akkus
tragen Sie zur Vermeidung von Umwelt- und Gesundheitsschäden bei.
* Weitere Verbraucherrechte
Für Kunden, die durch Verbraucherschutzgesetze oder -bestimmungen im Land
des Kaufs bzw. im Land ihres Wohnsitzes geschützt sind, verstehen sich die durch
die eingeschränkte Garantie von Soundcore gewährten Vorteile zusätzlich zu allen
Rechten und Rechtsbehelfen unter den einschlägigen Verbraucherschutzgesetze und
-bestimmungen, einschließlich, jedoch nicht beschränkt auf, diese zusätzlichen Rechte.
Antworten auf häufig gestellte Fragen und weitere Informationen finden Sie unter
https://www.soundcore.com/.
•
•
•
•
•
•
•
•
•
•
•
•
•
•
•

ES 1413 EL
Información de seguridad importante
• Evite las caídas.
• No desmonte el producto.
• No sumerja el producto en agua.
• El estuche de carga no debe quedar expuesto a goteos o salpicaduras.
• Evite temperaturas extremas.
• No exponga el producto a fuentes de calor excesivo como el sol, fuego ni similares.
• Usar cables originales y/o certificados.
• Límpielo con un trapo limpio, suave y sin pelusas. No utilice ningún aceite ni
limpiador corrosivo.
• No utilice el producto en el exterior si hay tormenta.
• Mantenga el producto fuera del alcance de los niños. El producto contiene piezas
pequeñas que podrían suponer un riesgo de asfixia.
• Si siente cualquier irritación o incomodidad, deje de utilizar el producto
temporalmente.
Protección auditiva
• Para evitar daños auditivos, no utilice el producto a un volumen elevado durante largos
períodos de tiempo.
• No suba el volumen hasta el punto de no escuchar el sonido del entorno.
• No utilice los auriculares mientras conducen.
• Tenga precaución o deje de usar el producto temporalmente en situaciones
potencialmente peligrosas.

FI 1615 ES
Turvallisuutta koskevia ohjeita
• Älä pudota.
• Älä pura.
• Älä upota veteen.
• Latauskoteloa ei saa altistaa pisaroille tai roiskeille.
• Vältä äärimmäisiä lämpötiloja.
• Akkua ei saa altistaa liialliselle kuumuudelle, kuten auringonpaisteelle tai tulelle.
• Älä käytä tuotetta ulkona ukkosmyrskyssä.
• Käytä alkuperäisiä tai sertifioituja kaapeleita.
• Älä puhdista syövyttävällä puhdistusaineella tai öljyllä.
• Säilytettävä lasten ulottumattomissa. Sisältää pieniä osia, jotka voivat aiheuttaa
tukehtumisvaaran.
• Lopeta tämän tuotteen käyttö tilapäisesti, jos tunnet ärsytystä tai epämukavuutta.
Kuulon suojaaminen
• Älä kuuntele pitkään suurilla äänenvoimakkuuksilla, ettei kuulosi vaurioidu.
• Älä kuuntele niin suurella äänenvoimakkuudella, ettet kuule ympäristösi ääniä.
• Älä käytä kuulokkeita ajaessasi.
• Käytä varovasti tai keskeytä käyttö väliaikaisesti mahdollisesti vaarallisissa tilanteissa.
Aviso
Este producto cumple los requisitos de interferencias radioeléctricas de la
Comunidad Europea.
PRECAUCIÓN: SI LA BATERÍA SE SUSTITUYE POR OTRA DE UN TIPO
INCORRECTO, PUEDE EXISTIR RIESGO DE EXPLOSIÓN. DESECHE LAS
BATERÍAS USADAS COMO SE INDICA EN LAS INSTRUCCIONES.
Este símbolo indica que el producto no debe desecharse como residuo
doméstico, sino que debe depositarse en un lugar de recogida adecuada
para su reciclaje. Siga las normativas locales y no deseche nunca ni el
producto ni las pilas recargables con residuos domésticos normales. La
correcta eliminación de los productos y pilas recargables ayuda a evitar
posibles consecuencias negativas para el medio ambiente y la salud
humana.
* Derechos legales adicionales para consumidores
Los consumidores están protegidos por las leyes o normativas de protección del
consumidor vigente en el país de compra del producto o, si es diferente, en su país de
residencia. A las ventajas proporcionadas por la garantía limitada de Soundcore se
suman los derechos y recursos que otorgan dichas leyes y normativas de protección del
consumidor, entre los que se incluyen, sin limitación, estos derechos adicionales.
Para consultar las preguntas frecuentes u obtener más información, visite https://www.
soundcore.com/.

FR 1817 FI
Informations importantes de sécurité
• Ne pas faire tomber.
• Ne pas démonter.
• Ne pas immerger dans l'eau.
• L'étui de chargement ne peut être exposé aux gouttes ou aux éclaboussures.
• Éviter les températures extrêmes.
• Tenir le produit à l'abri des rayons du soleil, des incendies et de toute autre source de
chaleur excessive.
• N’utiliser que des câbles originaux ou certifiés.
• Nettoyer à sec avec un chiffon doux non pelucheux. Ne pas utiliser de nettoyant
corrosif ni d'huile.
• En cas d’orage, ne pas utiliser le produit à l'extérieur.
• Tenir hors de portée des enfants. Les petits éléments inclus peuvent entraîner un
danger d'étouement.
• Veuillez arrêter d'utiliser ce produit momentanément en cas d'irritation ou d'inconfort.
Protection de l'audition
• Pour éviter tout dommage de l'audition, ne pas écouter à un volume élevé pendant une
période prolongée.
• Ne pas mettre le volume à un niveau tel qu’il ne soit plus possible d’entendre les
bruits environnants.
• Ne pas porter les écouteurs au volant.
• Utiliser les écouteurs avec précaution ou en interrompre temporairement l'utilisation
dans des situations potentiellement dangereuses.
Huomautus
Tämä tuote täyttää Euroopan yhteisön radiolaitteista aiheutuville häiriöille
asettamat vaatimukset.
VAROITUS: RÄJÄHDYSVAARA, JOS VAIHDETAAN VÄÄRÄÄN TYYPPIIN. HÄVITÄ
KÄYTETYT AKUT OHJEIDEN MUKAISESTI.
Tämä symboli tarkoittaa, ettei tuotetta saa hävittää kotitalousjätteenä ja
että se on toimitettava asianmukaiseen keräyspisteeseen kierrätystä varten.
Noudata paikallisia sääntöjä äläkä hävitä tuotetta ja akkuja tavallisen
kotitalousjätteen seassa. Vanhojen tuotteiden ja akkujen oikeanlainen
hävittäminen auttaa ehkäisemään mahdollisia ympäristölle ja ihmisten
terveydelle aiheutuvia haittavaikutuksia.
* Asiakkaiden lainmukaiset lisäoikeudet
Jos kuluttajilla on tuotteen ostomaan tai asuinmaansa, mikäli ostomaa ei ole asuinmaa,
kuluttajansuojalakien tai -säädösten takaamat oikeudet, Soundcoren rajoitetun takuun
myöntämät edut tarjotaan näiden kuluttajansuojalakien ja -säädösten antamien oikeuksien
ja oikeuskeinojen lisäksi, mukaan lukien nämä lisäoikeudet.
Usein kysyttyjä kysymyksiä ja lisätietoja on osoitteessa https://www.soundcore.com/

HU 2019 FR
Avis
Ce produit est conforme aux exigences en matière d'interférences
radio de la Communauté européenne.
ATTENTION : RISQUE D'EXPLOSION EN CAS DE REMPLACEMENT PAR
UN TYPE INCORRECT. JETER LES PILES USAGÉES CONFORMÉMENT
AUX INSTRUCTIONS.
Ce symbole signifie que le produit ne doit pas être jeté avec les
déchets ménagers, mais doit être transmis à un établissement de
collecte adapté pour permettre son recyclage. Respecter les règles
de votre collectivité et ne jamais jeter le produit et les batteries
rechargeables avec les déchets ménagers. La mise au rebut
appropriée des produits et des batteries rechargeables usagés
contribue à réduire les conséquences négatives pour l'environnement
et la santé humaine.
* Droits supplémentaires du consommateur
Pour les consommateurs qui sont couverts par des lois ou règlements de protection
des consommateurs dans leur pays d'achat ou, s'il s'agit d'un autre pays, dans leur
pays de résidence, les avantages conférés par la garantie limitée de Soundcore
s'ajoutent à tous les droits et recours prévus par lesdits lois et règlements de protection
des consommateurs, y compris mais sans pour autant s’y limiter, les présents droits
supplémentaires.
Pour plus d'informations et afin de consulter la FAQ, veuillez vous rendre à l’adresse :
https://www.soundcore.com/.
Fontos biztonsági előírások
• Ügyeljen rá, hogy ne ejtse le.
• Ne szerelje szét.
• Ne süllyessze víz alá.
• A töltőtokot ne érje csöpögő vagy fröccsenő víz.
• Kerülje a szélsőséges hőmérsékleteket.
• Ügyeljen rá, hogy a terméket ne érje túlzott forróság, pl. napsütés, tűz vagy hasonló hő.
• Használjon eredeti vagy hitelesítéssel ellátott vezetékeket.
• Puha, száraz, szöszmentes ruhával tisztítsa. Ne használjon semmilyen maró anyagot
vagy olajat.
• Viharos időben ne használja a terméket a szabadban.
• Gyermekektől elzárva tartandó. A kisebb alkatrészek fulladásveszélyt okozhatnak.
• Átmenetileg hagyja abba a termék használatát, ha irritációt vagy kellemetlenséget
érez.
Hallásbiztonság
• A halláskárosodás elkerülésére ne hallgassa nagy hangerőn huzamosabb ideig.
• Ne emelje olyan magasra a hangerőt, ahol már a környezeti zajok nem hallhatók.
• Vezetés közben ne használjon fülhallgatót.
• Potenciálisan veszélyes helyzetekben körültekintően használja, vagy átmenetileg ne
használja.

IT 2221 HU
Megjegyzés
A termék eleget tesz az Európai Közösség rádióinterferenciára
vonatkozó követelményeinek.
FIGYELMEZTETÉS: ROBBANÁSVESZÉLYT OKOZHAT, HA AZ ELEMET NEM
MEGFELELŐ TÍPUSÚ ELEMMEL HELYETTESÍTI. A HASZNÁLT ELEMEKET
AZ ELŐÍRÁSOKNAK MEGFELELŐEN KEZELJE.
Ez a szimbólum azt jelenti, hogy a termék nem kerülhet a háztartási
hulladék közé, hanem megfelelő szelektívszemét-gyűjtőbe kell
dobni. A helyi szabályoknak is eleget téve soha ne dobja a terméket
és az újratölthető elemeket a normál háztartási hulladék közé. A
régi termékek és az újratölthető elemek megfelelő kezelése elősegíti
a környezet és az emberek egészségét veszélyeztető negatív
következmények megelőzését.
*További fogyasztói jogok
Azon fogyasztókat, akiket a terméket forgalmazó országban vagy a lakhelyük szerinti
országban (ha ez eltér az előbbitől) fogyasztóvédelmi törvények és rendelkezések
védenek, az adott fogyasztóvédelmi törvényeken és rendelkezéseken felül – ideértve,
de nem korlátozódva a jelen további jogokra – megilleti a Soundcore által nyújtott
korlátozott szavatosság.
A gyakori kérdésekre adott válaszokat és további információkat a https://www.
soundcore.com/ oldalon találhat.
Informazioni importanti sulla sicurezza
• Non fare cadere il prodotto.
• Non smontare il prodotto.
• Non immergere il prodotto in acqua.
• La custodia di ricarica non deve essere esposta a schizzi o gocciolamenti.
• Evitare temperature elevate.
• Non esporre il prodotto a temperature eccessivamente elevate, come vicino a luce
solare, fuoco o simili.
• Utilizzare cavi originali e/o certificati.
• Pulire con un panno asciutto e morbido. Non usare detergenti corrosivi o olio.
• Non usare il prodotto all'aperto durante un temporale.
• Tenere lontano dalla portata dei bambini. I pezzi piccoli possono causare pericolo di
soocamento.
• Interrompere temporaneamente l’uso di questo prodotto se si avverte irritazione o
disagio.
Sicurezza acustica
• Per evitare danni acustici, l'ascolto non deve avvenire a livelli di volume alti per
lunghi periodi.
• Non impostare un volume che non consenta di percepire l'ambiente circostante.
• Non usare gli auricolari durante la guida.
• Prestare attenzione o sospendere l'uso in situazioni potenzialmente pericolose.

NL 2423 IT
Attenzione
Il prodotto rispetta i requisiti relativi alle perturbazioni radioelettriche
della Comunità Europea.
ATTENZIONE: RISCHIO DI ESPLOSIONE SE LA SOSTITUZIONE AVVIENE
UTILIZZANDO UN TIPO ERRATO DI BATTERIE. SMALTIRE LE BATTERIE
USATE SECONDO LE ISTRUZIONI.
Questo simbolo indica che il prodotto non deve essere smaltito
tra i rifiuti domestici e deve essere consegnato presso un centro
di raccolta per il riciclo. Seguire le normative locali e non smaltire
il prodotto e le batterie ricaricabili tra i rifiuti domestici. Il corretto
smaltimento dei prodotti usurati e delle batterie ricaricabili scariche
aiuterà a prevenire potenziali conseguenze negative sull'ambiente e
sulla salute umana.
* Diritti aggiuntivi del consumatore
Per i consumatori che beneficiano delle norme o dei regolamenti a tutela del
consumatore nella nazione di acquisto, ovvero, se dierente, nel Paese di residenza, i
benefici conferiti dalle garanzie limitate di Soundcore si considerano integrativi dei diritti
e dei rimedi previsti da tali leggi e regolamenti a tutela dei consumatori, inclusi senza
alcuna limitazione.
Per consultare le domande frequenti e ottenere ulteriori informazioni, visitare il sito Web
https://www.soundcore.com/.
Veiligheidsinstructies
• Laat het product niet vallen.
• Demonteer het product niet.
• Dompel het product niet onder in water.
• De oplaadcase mag niet worden blootgesteld aan druip- of spatwater.
• Vermijd extreme temperaturen.
• De batterij mag niet worden blootgesteld aan hoge temperaturen zoals zonlicht, vuur
en dergelijke.
• Gebruik het apparaat niet in de buitenlucht tijdens onweer.
• Gebruik originele of gewaarmerkte kabels.
• Gebruik geen bijtende schoonmaakmiddelen of olie.
• Bewaar het product buiten bereik van kinderen. Het bevat kleine onderdelen die
verstikkingsgevaar kunnen opleveren.
• Stop tijdelijk met het gebruik van dit product als u irritatie of ongemak voelt.
Gehoorbescherming
• Luister niet gedurende langere perioden bij een hoog volume om gehoorbeschadiging te
voorkomen.
• Zet het volume niet zo hoog dat u uw omgeving niet kunt horen.
• Gebruik de oordopjes niet tijdens het rijden.
• Wees voorzichtig en gebruik de oordopjes niet in mogelijk gevaarlijke situaties.

NO 2625 NL
Kennisgeving
Dit product voldoet aan de vereisten met betrekking tot radiostoring van
de Europese Unie.
LET OP: EXPLOSIEGEVAAR ALS U DE BATTERIJ VERVANGT DOOR EEN
ONJUIST TYPE. VERWIJDER GEBRUIKTE BATTERIJEN VOLGENS DE
INSTRUCTIES.
Dit symbool betekent dat dit product niet mag worden weggegooid als
huishoudelijk afval en moet worden ingeleverd bij een daarvoor bestemd
inzamelpunt voor recycling. Volg de plaatselijke regels en gooi het product
en de oplaadbare batterijen niet weg bij het huishoudelijk afval. Correcte
inzameling van oude producten en oplaadbare batterijen voorkomt
negatieve gevolgen voor het milieu en de menselijke gezondheid.
* Aanvullende wettelijke rechten voor consumenten
Voor consumenten die de rechten genieten van wetten of regelingen ter bescherming van
consumenten in het land van aankoop of, indien anders, het land waar zij wonen, vormt de
beperkte garantie van Soundcore een aanvulling op alle rechten en verhaalsmogelijkheden
die dergelijke wetten en regels bieden, met inbegrip van, maar niet beperkt tot, deze extra
rechten.
Ga voor veelgestelde vagen en meer informatie naar https://www.soundcore.com/.
Sikkerhetsinstruksjoner
• Unngå å miste produktet.
• Ikke demonter produktet.
• Ikke dypp produktet i vann.
• Ladeetuiet må ikke utsettes for drypping eller vannsprut.
• Unngå ekstreme temperaturer.
• Batteriet må ikke utsettes for sterk varme som direkte sollys, åpen flamme eller
lignende.
• Ikke bruk enheten utendørs under tordenvær.
• Bruk originale eller sertifiserte kabler.
• Ikke bruk etsende rengjøringsmiddel eller olje til å vaske.
• Oppbevar produktet utilgjengelig for barn. Enheten inneholder små deler som kan
utgjøre en kvelningsfare.
• Stopp bruken av dette produktet midlertidig hvis du merker irritasjon eller ubehag.
Hørselssikkerhet
• For å unngå hørselsskade må du ikke lytte med høyt volum i lange perioder om gangen.
• Ikke skru opp volumet så høyt at du ikke hører omgivelsene dine.
• Ikke bruk øretelefoner mens du kjører.
• Du bør være forsiktig eller slutte å bruke produktet i potensielt farlige situasjoner.

PL 2827 NO
Merknader
Dette produktet er i samsvar med kravene for radioforstyrrelser i EU.
FORSIKTIG: FARE FOR EKSPLOSJON HVIS SKIFTES UT MED FEIL TYPE.
AVHEND BRUKTE BATTERIER IHT. INSTRUKSJONENE.
Dette symbolet betyr at produktet ikke skal kastes som husholdningsavfall,
og at det skal leveres til et passende innsamlingssted for resirkulering. Følg
de lokale reglene, og ikke kast produktet og oppladbare batterier i vanlig
husholdningsavfall. Riktig avhending av gamle produkter og oppladbare
batterier bidrar til å forhindre negative konsekvenser for helse og miljø.
* Andre juridiske rettigheter for forbrukere
For forbrukere, som er dekket av forbrukerlover eller -forskrier i landet der kjøpet blir
gjort, eller, hvis de er forskjellige, i bostedslandet, kommer fordelene som er gjeldende
via Soundcores begrensede garanti, i tillegg til alle rettigheter og rettsmidler som
beskrives i nevnte lover og bestemmelser, inkludert, men ikke begrenset til, disse
tilleggsrettighetene.
Hvis du har spørsmål eller vil ha mer informasjon, kan du gå til https://www.soundcore.
com/
Ważne informacje dotyczące bezpieczeństwa
• Unikać upuszczania.
• Nie rozkładać na części.
• Nie zanurzać w wodzie.
• Etui ładującego nie należy narażać na działanie kapiącej wody lub zachlapanie.
• Unikać skrajnych temperatur.
• Produkt nie powinien być narażony na działanie nadmiernego ciepła, takiego jak
słońce, ogień itp.
• Używać oryginalnych lub certyfikowanych kabli.
• Czyścić suchą, miękką, niestrzępiącą się ściereczką. Nie używać żadnych środków
żrących ani olejów.
• Nie używać produktu na świeżym powietrzu podczas burzy z piorunami.
• Przechowywać w miejscu niedostępnym dla dzieci. Małe części dołączone do
produktu mogą stwarzać ryzyko zadławienia.
• W razie wystąpienia podrażnienia albo uczucia dyskomfortu należy tymczasowo
zaprzestać korzystania z produktu.
Ochrona słuchu
• Aby uniknąć uszkodzenia słuchu, nie należy przez dłuższy czas korzystać z głośności
ustawionej na wysoki poziom.
• Nie ustawiać głośności tak wysoko, aby nie słyszeć dźwięków otoczenia.
• Nie używać słuchawek podczas prowadzenia samochodu.
• Podczas potencjalnie niebezpiecznych sytuacji należy zachować ostrożność lub
tymczasowo zaprzestać korzystania z produktu.

PT 3029 PL
Informação de segurança importante
• Evite deixar cair.
• Não desmonte.
• Não mergulhe em água.
• A caixa de carregamento não deve ser exposta a gotejamento ou salpicos.
• Evite temperaturas extremas.
• O produto não deve ser exposto a calor excessivo, seja luz solar, fogo ou semelhantes.
• Utilize cabos originais ou certificados.
• Limpe com um pano seco, suave e sem pelos. Não utilize líquidos de limpeza
corrosivos ou óleo.
• Não utilize o produto no exterior durante tempestades.
• Mantenha fora do alcance das crianças. As peças pequenas incluídas podem provocar
asfixia.
• Deixe temporariamente de utilizar este produto se sentir irritação ou desconforto.
Segurança auditiva
• Para evitar danos auditivos, não ouça durante períodos prolongados a um volume alto.
• Não coloque o volume a um nível que impeça de ouvir o que se passa ao seu redor.
• Não utilize auriculares durante a condução.
• Deve tomar cuidado ou deixar de utilizar temporariamente em situações potencialmente
perigosas.
Uwaga
Ten produkt jest zgodny z wymogami Wspólnoty Europejskiej dotyczącymi
zakłóceń radiowych.
PRZESTROGA: RYZYKO WYBUCHU, JEŚLI BATERIA ZOSTANIE ZASTĄPIONA
BATERIĄ NIEPRAWIDŁOWEGO TYPU. ZUŻYTE BATERIE UTYLIZOWAĆ ZGODNIE
Z INSTRUKCJAMI.
Ten symbol oznacza, że produktu nie można wyrzucać jako odpadów z
gospodarstwa domowego i powinien on być dostarczony do odpowiedniego
miejsca zbiórki, aby móc go poddać recyklingowi. Należy przestrzegać
miejscowych przepisów i nigdy nie wyrzucać produktu ani akumulatorów
z odpadami z gospodarstw domowych. Prawidłowa utylizacja zużytych
produktów i akumulatorów pomaga zapobiegać negatywnym wpływom na
środowisko i zdrowie ludzkie.
*Dodatkowe prawa dla konsumentów
W przypadku konsumentów, którzy podlegają przepisom lub regulacjom dotyczącym
ochrony konsumenta w kraju zakupu lub, jeśli jest inny, w kraju zamieszkania,
świadczenia wynikające z ograniczonej gwarancji Soundcore stanowią uzupełnienie
wszystkich praw i środków zaradczych wynikających z odnośnych przepisów i regulacji
dotyczących ochrony konsumentów, w tym między innymi tych dodatkowych praw.
Odpowiedzi na często zadawane pytania i więcej informacji można znaleźć na https://
www.soundcore.com/.

RU 3231 PT
Informação
Este produto cumpre as normas de interferências rádio da Comunidade
Europeia.
ADVERTÊNCIA: EXISTE O RISCO DE EXPLOSÃO SE A BATERIA FOR
SUBSTITUÍDA POR UM TIPO INCORRETO. ELIMINE AS BATERIAS USADAS DE
ACORDO COM AS INSTRUÇÕES.
Este símbolo indica que o produto não deve ser eliminado com o lixo
doméstico, devendo ser entregue num local de recolha apropriado
para reciclagem. Siga as normas locais e nunca elimine o produto e
as baterias recarregáveis com o lixo doméstico normal. A eliminação
correta de produtos velhos e de baterias recarregáveis ajuda a evitar as
consequências negativas para o ambiente e para a saúde humana.
*Direitos legais adicionais dos consumidores
Para consumidores, os quais estão protegidos por leis ou regulamentos de proteção do
consumidor nos respetivos países de compra ou, caso diferente, países de residência, os
benefícios concedidos pela Garantia Limitada da Soundcore são adicionais a todos os
direitos e resoluções transmitidos pelas leis e regulamentos de proteção ao consumidor
respetivas, incluindo, entre outros, estes direitos adicionais.
Para ver Perguntas Frequentes e mais informações, visite https://www.soundcore.com/.
Важная информация по технике безопасности
• Избегайте падений.
• Не разбирайте изделие.
• Не погружайте его в воду.
• Не допускайте попадания капель или брызг на зарядный футляр.
• Избегайте воздействия экстремальных температур.
• Изделие не должно подвергаться чрезмерному нагреву на солнце, вблизи огня или
раскаленных предметов.
• Используйте исходные или сертифицированные кабели.
• Выполняйте очистку сухой мягкой безворсовой тканью. Не используйте для
очистки масло или чистящие средства, вызывающие коррозию.
• Не используйте изделие на улице во время грозы.
• Храните вдали от детей. Мелкие детали из комплекта поставки могут стать
причиной удушения.
• Прекратите использование устройства на некоторое время, если вы чувствуете
раздражение или дискомфорт.
Безопасность для слуха
• Во избежание повреждения слуха не используйте изделие на высокой громкости
в течение долгого времени.
• Не устанавливайте такую громкость, из-за которой вы не сможете слышать
окружающие звуки.
• Не используйте наушники, находясь за рулем.
• Следует соблюдать осторожность или временно прекратить использование
наушников в потенциально опасных ситуациях.

SK 3433 RU
Примечание
Это изделие соответствует требованиям по радиоинтерференции
Европейского сообщества.
ОСТОРОЖНО: ПРИ ЗАМЕНЕ НА НЕПРАВИЛЬНЫЙ ТИП ИМЕЕТСЯ РИСК
ВЗРЫВА. УТИЛИЗИРУЙТЕ ИСПОЛЬЗОВАННЫЕ АККУМУЛЯТОРЫ В
СООТВЕТСТВИИ С ИНСТРУКЦИЯМИ.
Этот символ означает, что изделие нельзя утилизировать как бытовые
отходы. Его необходимо доставить в соответствующий пункт сбора для
утилизации. Действуйте в соответствии с местным законодательством
и не выбрасывайте изделие и аккумуляторные батареи вместе с
обычными бытовыми отходами. Правильная утилизация устаревших
изделий и аккумуляторных батарей помогает предотвратить негативные
последствия для окружающей среды и здоровья человека.
* Дополнительные юридические права потребителей
Для потребителей, защищенных законом или нормативными актами о правах
потребителей в стране приобретения изделия или в стране их пребывания
(если они различаются), привилегии, предоставленные Ограниченной гарантией
Soundcore, действуют в дополнение ко всем правам и средствам правовой защиты,
предоставляемым подобными законами и нормативными актами о защите прав
потребителей, включая, помимо прочего, эти дополнительные права.
Для просмотра ответов на часто задаваемые вопросы и получения дополнительной
информации посетите веб-сайт https://www.soundcore.com/.
Dôležité bezpečnostné informácie
• Dbajte na to, aby nedošlo k pádu.
• Nedemontujte.
• Neponárajte do vody.
• Nabíjacie púzdro by nemalo byť vystavené pokvapkaniu či ostriekaniu.
• Vyhýbajte sa extrémnym teplotám.
• Produkt nesmie byť vystavený nadmerným teplotám, aké vznikajú pri slnečnom svite,
ohni či niečom podobnom.
• Používajte originálne alebo certifikované káble.
• Čistite pomocou suchej handričky, ktorá nezanecháva vlákna. Nepoužívajte žiadny
korozívny čistič ani olej.
• Počas búrok produkt nepoužívajte vo vonkajšom prostredí.
• Uchovávajte mimo dosah detí. Malé diely môžu predstavovať riziko udusenia.
• Dočasne prestaňte používať tento produkt, ak pociťujete podráždenie alebo
nepohodlie.
Bezpečnostné informácie týkajúce sa sluchu
• Aby sa predišlo poškodeniu sluchu, nepočúvajte dlhšie obdobia pri vysokej hlasitosti.
• Hlasitosť nenastavujte tak vysoko, aby ste nedokázali počuť svoje okolie.
• Slúchadlá nepoužívajte počas šoférovania.
• Pri potenciálne nebezpečných situáciách musíte postupovať obozretne alebo dočasne
prerušiť používanie.
La pagina si sta caricando...
La pagina si sta caricando...
La pagina si sta caricando...
La pagina si sta caricando...
La pagina si sta caricando...
La pagina si sta caricando...
La pagina si sta caricando...
La pagina si sta caricando...
-
 1
1
-
 2
2
-
 3
3
-
 4
4
-
 5
5
-
 6
6
-
 7
7
-
 8
8
-
 9
9
-
 10
10
-
 11
11
-
 12
12
-
 13
13
-
 14
14
-
 15
15
-
 16
16
-
 17
17
-
 18
18
-
 19
19
-
 20
20
-
 21
21
-
 22
22
-
 23
23
-
 24
24
-
 25
25
-
 26
26
-
 27
27
-
 28
28


in altre lingue
Documenti correlati
-
Soundcore Liberty Air 2 Wireless Earbuds Manuale utente
-
Soundcore A3952011 Guida utente
-
Soundcore Liberty 4 NC Guida Rapida
-
-
Soundcore Life A2 NC Manuale utente
-
Soundcore Life P3 Manuale utente
-
-
Soundcore Space Guida utente
-
-
Soundcore A39910F1 Guida utente