Roadstar HRA-590D+/SL Manuale utente
- Categoria
- Radio
- Tipo
- Manuale utente

www.roadstar.com
HRA-590D+
DAB+ / DAB / FM Radio
User manual
Bedienungsanleitung
Manuel d’instructions
Manuale d’istruzioni
Manual de instrucciones
Gebruiksaanwijzing

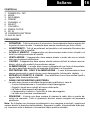
INDEX
English Page 1
Deutsch Seite 6
Français Page 11
Italiano Pagina 16
Español Página 20
Nederlands Page 25
• Your new unit was manufactured and assem-
bled under strict ROADSTAR quality control.
Thank-you for purchasing our product for your
music enjoyment. Before operating the unit,
please read this instruction manual carefully.
Keep it also handy for further future references.
• Votre nouvel appareil a été fabriqué et monté
en étant soumis aux nombreaux tests ROAD-
STAR. Nous espérons que cet appareil vous
donnera entière satisfaction. Avant de vous
adonner à ces activités, veuillez lire attentive-
ment ce manuel d’instructions. Conservez-le à
portée de main à fin de référence ultérieure.
• Vuestro nuevo sistema ha sido construido
según las normas estrictas de control de cali-
dad ROADSTAR. Le felicitamos y le damos las
gracias por su elección de este aparado. Por
favor leer el manual antes de poner en funcio-
namiento el equipo y guardar esta documenta-
ción en case de que se necesite nuevamente.
• Ihr neues Gerät wurde unter Beachtung der
strengen ROADSTAR Qualitätsvorschriften ge-
fertigt. Wir danken Ihnen für den Kauf unseres
Produktes und wünschen Ihnen optimalen Hör-
genuss. Bitte lesen Sie diese Bedienungsanlei-
tung durch, und heben Sie sie auf, um jederzeit
darin nachschlagen zu können.
• Il vostro nuovo apparecchio é stato prodotto ed
assemblato sotto lo stretto controllo di qualità
ROADSTAR. Vi ringraziamo di aver acquistato
un nostro prodotto per il vostro piacere d’ascol-
to. Prima di procedere all'utilizzo dell'apparec-
chio, leggete attentamente il manuale d’istruzio-
ni e tenetelo sempre a portata di mano per futu-
ri riferimenti.
• Seu novo aparelho foi construido e montado
sob o estrito controle de qualidade da ROAD-
STAR. Agradecemos por ter comprado nosso
produto para a sua diversão. Antes de usar
esta unidade é necessário ler com atençâo este
manual de instruções pare que possa ser usa-
da apropriadamente; mantenha o manual ao
seu alcance para outras informações.

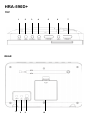
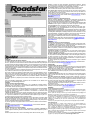
HRA-590D+
TOP
2
1
4 3
5
6
7
REAR
8
11
10
9

1 English
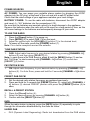
LOCATION OF CONTROLS
1. POWER ON - OFF
2. MODE
3. INFO/MENU
4. PRESET
5. CHANNEL +/-
6. SELECT
7. VOLUME+/-
8. EARPHONE JACK
9. DC IN
10. BATTERY COMPARTMENT
11. AUX IN JACK
PRECAUTION
• INSTRUCTIONS - All the safety and operating instructions should be read before
the radio is operated. The manual should be retained for future reference.
• HEED WARNINGS - All warnings on the appliance and in the operating instruc-
tions should be adhered to.
• WATER AND MOISTURE - The appliance should not be used near liquids or in
rooms with a high level of humidity.
• VENTILATION - The appliance should be situated so that its location or position
does not interfere with its proper ventilation.
• HEAT - The appliance should be situated away from heat sources such as radia-
tors, stoves or other appliances that produce heat.
• POWER SOURCE - The radio should be connected to power supply only of the
type described in the operating instructions or as marked on the appliance.
• POWER CORD PROTECTION - Power supply cords should be routed so that
they are not likely to be walked on or pinched by items placed upon/against
them.
• OBJECT AND LIQUID ENTRY - Care should be taken so that objects do not fall
and liquids are not spilled into the enclosure through openings.
• DAMAGE REQUIRING SERVICE
The appliance should be serviced by qualified service personnel when:
- The power supply cord or plug has been damaged;
- Objects have fallen into or liquids has been spilled into the radio;
- The appliance has been exposed to rain;
- The appliance has been dropped or the enclosure damaged;
- The appliance does not appear to operate normally.
• SERVICING - The user should not attempt to service the appliance beyond that
descrive in the user operating instructions. All the servicing should be referred to
qualified service personnel
Note: If the display does not function properly or no reaction to operation of any con-
trol may due to the electrostatic discharge. Switch off and disconnect the AC cord and
remove all the batteries, then turn the power back on after a few seconds.

2 English
POWER SOURCES
AC POWER: You can power your portable stereo system by plugging the AC/DC
adaptor into the DC plug at the back of the unit and into a wall AC power outlet.
Check that the rated voltage of your appliance matches your local voltage.
BATTERY POWER: To use the radio with batteries, disconnect the AC/DC adaptor
and insert 4 × “AA” batteries into the compartment (10).
Be sure that the batteries are inserted correctly to avoid damage to the appliance.
Remove the batteries when the radio will not be used for a long period of time, as this
will cause leakage to the batteries and subsequently damage to your radio.
TO USE THE RADIO
1. Press the [Power] button (1) to power on;
2. Press [MODE] (2) to select DAB, FM or Aux input;
3. Adjust the volume with the [VOLUME+/-] buttons (7) to the desired level;
4. To power off the radio, press the [POWER] button (1).
Note: For a better reception reorient the antenna.
TUNE DAB STATION
1. DAB: Adjust radio frequency to your desired station by pressing [CHANNEL -/+]
buttons (5) and then press [SELECT] (6);
Note: In case there is No DAB Service, press & hold the [MENU] button (3) and se-
lect “Full Scan” to start scanning with [CHANNEL -/+] buttons (5), confirm con
[SELECT] (6) button.
FM STATION SCAN
1. FM: Adjust radio frequency to your desired station by pressing [CHANNEL -/+]
buttons (5). For Auto Scan, press and hold for 2 seconds [CHANNEL -/+] buttons
(5);
PRESET DAB OR FM
1. Set the desired radio station frequency as explained previously;
2. Press and hold for 2 seconds the [PRESET] button (4), select with [CHANNEL -/
+] buttons (5) desired PRESET position and press the [PRESET] button (4) to
save;
RECALL A PRESET STATION
1. Press the [Preset] button (4);
2. Select the desired preset by pressing [CHANNEL -/+] button (5);
3. Confirm with the [SELECT] button (6).
INFO
When the radio station is playing, press the [INFO] button (3) repeatedly to cycle
through the information broadcasted by the radio as follow:
UNDER DAB
• DLS (Dynamic Label Segmenting): Radio text broadcasted from the DAB station

3 English
such as the news, songs being played…etc.
• PTY (Programme Type): shows which type of programme you are listening to,
“Music”, “Talk”, “News” etc. If there is no information, it will display “Programme
Type”.
• Channel/Frequency: The frequency of DAB is displayed such as “11C
220.352MHz”.
• Audio info: The display shows the digital audio bit rate of the current reception.
• Signal error: The signal strength is displayed graphically.
• Time/Date: The time and date are set automatically.
UNDER FM
• RT (Radio text): Text broadcasted from the FM station
• Program type: shows which type of programme you are listening to.
• Time/Date: The time and date are set automatically.
• Frequency: the FM frequency for the radio station in playing.
• Mono / Stereo: Automatic switching between mono and stereo reception.
Note: Time and date accuracy depends on the info broadcasted from the radio sta-
tion.
SYSTEM SETTINGS
In FM / DAB mode there is an option menu.
1. Press and hold [MENU] (3) to access to the options.
2. Press the [CHANNEL -/+] buttons (5) to navigate into the options. Press
[SELECT] (6) to select the options.
DRC (Dynamic Range Compression): This function reduces the differences
between the loudes and quietest audio being broadcast. It makes quiet sounds com-
paratively louder, and loud sounds comparative quieter (only if offered by the provi-
der).
PRUNE:Removes all invalid stations indicated in the station list with a “?” in front of
the station name.
SYSTEM SETTINGS menu you can choose:
EGG TIMER: select with [CHANNEL -/+] button (5) EGG TIMER, press [SELECT]
(6) to enter, select with [CHANNEL -/+] button (5) from 1 to 99 minutes. Press POW-
ER to stop the buzzer.
SLEEP: select with [CHANNEL -/+] button (5) SLEEP, press [SELECT] (6) to enter,
select with [CHANNEL -/+] button (5) step of 15/30/45/60/90 munutes.
BACKLIGHT: select with [CHANNEL -/+] button (5) BACKLIGHT, press [SELECT]
(6) to enter, select with [CHANNEL -/+] button (5) following info:
• TIMEOUT: you can choose : ON/10/20 etc.
• ON LEVEL: level of intesity, select as desired with [CHANNEL -/+] button (5).
• DIM LEVEL: you can choose dimmer level. select with [CHANNEL -/+] button (5)
desired level.
LANGUAGE: in SYSTEM SETTINGS, select with [CHANNEL -/+] button (5) desired
language

4 English
FACTORY RESET: in SYSTEM SETTINGS, select with [CHANNEL -/+] button (5)
YES to Factory settings.
CLOCK AND DATE SETTING
When the radio is ON:
1. Press and hold [Menu] (3) to access to the menu;
2. Press the [CHANNEL -/+] buttons (5) to select “System SETTINGS”;
3. Confirm with the [SELECT] button (6);
4. Press the [CHANNEL -/+] buttons (5) to select “Set Time/Date”;
5. To SET Time/Date
6. Press the [CHANNEL -/+] buttons (5) to adjust the hour;
7. Confirm with the [SELECT] button (6);
8. Press the [CHANNEL -/+] buttons (5) to adjust the minutes;
9. Confirm with the [SELECT] button (6);
10. Press the [CHANNEL -/+] buttons (5) to set Date;
11. Confirm with the [SELECT] button (6);
Set 12/24 Hour: Press the [CHANNEL -/+] buttons (5) to set 12 or 24hour;
Confirm with the [SELECT] button (6);
Set Date format: Press the [CHANNEL -/+] buttons (5) to set DD-MM-YYYY or MM-
DD-YYYY. Confirm with the [SELECT] button (6);
Auto Update: you can choose radio can update Date/time.
1. Press the [CHANNEL -/+] buttons (5) to select From Any/DAB/FM or no update;
2. Confirm with the [SELECT] button (6);
ALARM SETTING
When the radio is ON:
1. Press and hold [MENU] (3) to access to the menu;
2. Press the [CHANNEL -/+] buttons (5) to select “System SETTINGS”, Alarm;
3. Confirm with the [SELECT] button (6);
1. Select Alarm 1 or 2 pressing [CHANNEL -/+] buttons (5) , Confirm with the
[SELECT] button (6);
2. You navigate in this menu with [CHANNEL -/+] buttons (5) , Confirm with the
[SELECT] button (6);
Select Alarm ON, , Frequency of alarm (daily, once etc), Wake up time, Source
(Buzzer/DAB/FM), Volume setting, Duration (15/30/45 etc).
AUX IN OPERATION
1. Select “AUX” mode by pressing the [MODE] (2)button;
2. Use one male to male 3.5mm jack cable (not included) to connect any external
audio device to the AUX-IN socket (11).
Note: Music control (play, pause, etc) must be done from your external device.

5 English
TECNICAL SPECIFICATIONS
Power
Power Voltage: Power adapter 5V 1A
Power Input: DC 4X1.5V AA size (not included)
Radio Frequency Coverage
DAB+ / DAB: BAND III 174MHz - 239.2MHz.
FM: 87.5 - 108 MHz.
Speaker
Output Power: 1 x 1 Wrms
General
Display 2.8 inches colour TFT display
Earphone Out: 3.5mm jack plug.
Aux in: 3.5mm jack aux in
Specifications and design are subject to possible modifications without notice due to
improvement.
This marking shown on the product or its literature, indicates that it should not be disposed with
other household wastes at the end of its working life. To prevent possible harm to the environ-
ment or human health from uncontrolled waste disposal, please separate this from other types of
wastes and recycle it responsibly to promote the sustainable reuse of material resources. House-
hold users should contact the retailer where they purchased this product, or their local govern-
ment office, for details of where and how they can take this item for environmentally safe recy-
cling. Business users should contact their supplier and check the terms and conditions of the pur-
chase contract. This product should not be mixed with other commercial wastes for disposal.
CORRECT DISPOSAL OF THIS PRODUCT
(Waste Electrical & Electronic Equipment)
WARNINGS
The exclamation point within the triangle is a warning sign alerting the user of important in-
structions accompanying the product.
The lightening flash with arrowhead symbol within the triangle is a warning sign alerting the
user of “dangerous voltage” inside the unit.
To reduce the risk of electric shock, do not remove the cover. No user serviceable parts in-
side the unit. Refer all servicing to qualified personnel.
This unit operates on 230V ~ 50Hz. If the unit is not used for a long period of time, remove
the plug from the AC mains.
Ensure all connections are properly made before operating the unit.
This unit must not be exposed to moisture or rain.
This unit should be positioned so that it is properly ventilated. Avoid placing it, for example,
close to curtains, on the carpet or in a built-in installation such as a bookcase.
Do not expose this unit to direct sunlight or heat radiating sources.

6 Deutsch
ORT DER BEDIENELEMENTE
1. POWER ON - OFF
2. MODE
3. INFO/MENU
4. PRESET
5. CHANNEL +/-
6. SELECT
7. VOLUME+/-
8. EARPHONE JACK
9. DC IN
10. BATTERY COMPARTMENT
11. AUX IN JACK
SICHERHEITSHINWEISE
• ANWEISUNGEN - Alle Sicherheits- und Betriebshinweise sollten sorgfältig
durchgelesen werden, bevor Sie das Radio in Betrieb nehmen.
• WARNHINWEISE BEACHTEN - Alle Warnhinweise am Gerät und in den Be-
triebshinweisen sollten befolgt werden.
• WASSER UND FEUCHTIGKEIT - Das Gerät sollte nicht in der Nähe von
Flüssigkeiten oder in Räumen mit hoher Luftfeuchtigkeit benutzt werden.
• BELÜFTUNG - Das Gerät sollte so aufgestellt werden, dass die Luftzirkulation
nicht beeinträchtigt wird.
• WÄRME - Das Gerät darf nicht in der Nähe von Wärmequellen, wie Heizkör-
pern, Öfen oder anderen Geräten platziert werden, die Wärme erzeugen.
• STROMQUELLE - Das Gerät sollte nur an die Stromversorgung angeschlos-
sen werden, die in der Bedienungsanleitung oder auf dem Gerät angegeben
ist.
• NETZKABELSCHUTZ - Netzkabel sollten so verlegt werden, dass man nicht
auf sie tritt und so, dass sie nicht durch Gegenstände eingeklemmt werden.
• EINTRITT VON FREMDKÖRPERN UND FLÜSSIGKEIT - Es ist darauf zu
achten, dass keine Objekte auf das Gerät fallen und dass keine Flüssigkeiten
durch Öffnungen in das Gehäuse dringen.
• BESCHÄDIGUNGEN, BEI DENEN WARTUNG ERFORDERLICH IST
Das Gerät sollte von qualifiziertem Wartungspersonal gewartet werden, wenn:
- Das Netzkabel oder der Netzstecker beschädigt wurde;
- Gegenstände auf das Radio gefallen oder Flüssigkeiten eingedrungen sind;
- Das Gerät Regen ausgesetzt worden ist;
- Das Gerät heruntergefallen oder das Gehäuse beschädigt ist;
- Das Gerät scheinbar nicht normal funktioniert.
· WARTUNG - Der Benutzer sollte nicht versuchen, das Gerät anders, als in der
Bedienungsanleitung beschrieben, zu benutzen. Alle Wartungsarbeiten müs-
sen von qualifizierten Servicemitarbeitern durchgeführt werden
Hinweis: Wenn das Display funktioniert nicht ordnungsgemäß oder reagiert nicht
auf die Betätigung der Kontrolle, aufgrund einer elektrostatischen Entladung. Zie-
hen Sie das Netzkabel und entfernen Sie die Batterien, dann und schließen Sie die

7 Deutsch
KRAFTQUELLEN
AC POWER: Sie können Ihr tragbares Stereosystem mit Strom versorgen, indem Sie
den AC/DC-Adapter in den DC-Stecker auf der Rückseite des Geräts und in eine AC-
Wandsteckdose stecken.
Prüfen Sie, ob die Nennspannung Ihres Geräts mit der örtlichen Spannung überein-
stimmt.
BATTERIENSTROM: Um das Radio mit Batterien zu betreiben, trennen Sie den AC/
DC-Adapter ab und legen Sie 4 × "LR6"-Batterien in das Fach ein.
Achten Sie darauf, dass die Batterien richtig eingelegt sind, um Schäden am Gerät zu
vermeiden.
Entfernen Sie die Batterien, wenn das Funkgerät über einen längeren Zeitraum nicht
benutzt wird, da dies zum Auslaufen der Batterien und in der Folge zu Schäden an
Ihrem Funkgerät führt.
UM DAS FUNKGERÄT ZU BENUTZEN
Drücken Sie die [Power] Taste (1), um das Gerät einzuschalten;
Drücken Sie [MODE] (2), um den DAB-, FM- oder Aux-Eingang zu wählen;
Stellen Sie die Lautstärke mit den [Volume+/-] Tasten (7) auf den gewünschten Pegel
ein;
Um das Radio auszuschalten, drücken Sie die [Power] Taste (1).
Hinweis: Für einen besseren Empfang richten Sie die Antenne neu aus.
SENDER ABSTIMMEN
DAB: Stellen Sie die Radiofrequenz auf den gewünschten Sender ein, indem Sie die
[CHANNEL -/+] Tasten (5) und dann [SELECT] (6) drücken;
Hinweis: Falls kein DAB-Dienst vorhanden ist, halten Sie die [MENÜ] Taste (3)
gedrückt und wählen Sie "Vollständiger Scan", um den Scanvorgang mit den [KANAL
-/+] Tasten (5) zu starten, und bestätigen Sie mit der [AUSWAHL] Taste (6).
FM SENDER SCANNEN
FM: Stellen Sie die Radiofrequenz durch Drücken der [CHANNEL -/+] Tasten (5) auf
den gewünschten Sender ein. Für den automatischen Suchlauf halten Sie die
[CHANNEL -/+] Tasten (5) 2 Sekunden lang gedrückt;
VOREINSTELLUNG DAB ODER FM
Stellen Sie die gewünschte Frequenz des Radiosenders ein, wie zuvor erklärt;
Halten Sie die [PRESET] Taste (4) 2 Sekunden lang gedrückt, wählen Sie mit den
[CHANNEL -/+] Tasten (5) die gewünschte PRESET-Position und drücken Sie zum
Speichern die [PRESET]Taste (4);
AUFRUFEN EINES VOREINGESTELLTEN SENDERS
Drücken Sie die Taste [PRESET](4);
Wählen Sie die gewünschte Voreinstellung durch Drücken der [CHANNEL -/+] Taste
(5);
Bestätigen Sie die Auswahl mit der [SELECT] Taste (6).

8 Deutsch
INFO
Drücken Sie während der Wiedergabe des Radiosenders wiederholt die [INFO] Taste
(3), um die vom Radio gesendeten Informationen wie folgt zu durchlaufen:
UNTER DAB
DLS (Dynamische Etikettensegmentierung): Radiotext, der vom DAB-Sender ausge-
strahlt wird, wie z.B. die Nachrichten, gespielte Lieder...etc.
PTY (Programmtyp): zeigt an, welche Art von Sendung Sie gerade hören, "Musik",
"Gespräch", "Nachrichten" usw. Wenn es keine Informationen gibt, wird
"Programmtyp" angezeigt.
Kanal/Frequenz: Die Frequenz von DAB wird angezeigt, z.B. "11C 220.352MHz".
Audio-Information: Auf dem Display wird die digitale Audio-Bitrate des aktuellen
Empfangs angezeigt.
Signalfehler: Die Signalstärke wird grafisch angezeigt.
Uhrzeit/Datum: Die Uhrzeit und das Datum werden automatisch eingestellt.
UNTER FM
RT (Radiotext): Vom FM-Sender gesendeter Text
Programmtyp: zeigt an, welche Art von Sendung Sie hören.
Uhrzeit/Datum: Die Uhrzeit und das Datum werden automatisch eingestellt.
Frequenz: die FM-Frequenz für den laufenden Radiosender.
Mono/Stereo: Automatische Umschaltung zwischen Mono- und Stereo-Empfang.
Hinweis: Die Genauigkeit von Zeit und Datum hängt von den vom Radiosender ge-
sendeten Informationen ab.
SYSTEMEINSTELLUNGEN
Im FM / DAB-Betrieb gibt es ein Optionsmenü.
Halten Sie [Menu] (3) gedrückt, um auf die Optionen zuzugreifen.
Drücken Sie die [CHANNEL -/+] Tasten (5), um zu den Optionen zu navigieren. Drüc-
ken Sie die [SELECT] Taste (6), um die Optionen auszuwählen.
DRC (Dynamikbereich-Komprimierung): Diese Funktion reduziert die Unterschiede
zwischen den Lautstärken und dem leisesten Ton, der gesendet wird. Sie macht leise
Töne vergleichsweise lauter und laute Töne vergleichsweise leiser (nur wenn vom An-
bieter angeboten).
PRUNE:Entfernt alle ungültigen Sender, die in der Senderliste mit einem "?" vor dem
Sendernamen angegeben sind.
SYSTEM-EINSTELLUNGEN Menü können Sie wählen
EGG-TIMER: wählen Sie mit der [CHANNEL -/+] Taste (5) EGG-TIMER, drücken Sie
[SELECT] (6) zur Eingabe, wählen Sie mit der [CHANNEL -/+] Taste (5) von 1 bis 99
Minuten. Drücken Sie POWER, um den Summer zu stoppen.
SLEEP: Wählen Sie mit der [CHANNEL -/+] Taste (5) SLEEP, drücken Sie [SELECT]
(6) zur Eingabe, wählen Sie mit der [CHANNEL -/+] Taste (5) einen Schritt von
15/30/45/60/90 Minuten.
ZURÜCKLICHT: Auswahl mit [Kanal -/+]-Taste (5) ZURÜCKLICHT, drücken Sie
[SELECT] (6) zur Eingabe, wählen Sie mit [CHANNEL -/+] Taste (5) folgende Infor-
mationen:
TIMEOUT: Sie können wählen: ON/10/20 usw.

9 Deutsch
ON LEVEL: Stufe der Intensität, wählen Sie wie gewünscht mit der [Channel -/+]
Taste (5).
DIME STUFE: Sie können die Dimmerstufe wählen, wählen Sie mit der Taste
[Channel -/+](5) die gewünschte Stufe.
SPRACHE: Wählen Sie in den SYSTEM-EINSTELLUNGEN mit dem [Channel -/+]
Knopf (5) die gewünschte Sprache aus.
WERKSEINSTELLUNGEN: Wählen Sie unter SYSTEM-EINSTELLUNGEN mit der
Taste [Channel -/+] (5) JA auf Werkseinstellungen.
UHR- UND DATUMSEINSTELLUNG
Wenn das Radio eingeschaltet ist:
Halten Sie [Menu] (3) gedrückt, um auf das Menü zuzugreifen;
Drücken Sie die [CHANNEL -/+] Tasten (5), um "SYSTEM-EINSTELLUNGEN" zu
wählen;
Bestätigen Sie mit der [SELECT] Taste (6);
Drücken Sie die [CHANNEL -/+] Tasten (5), um "Zeit/Datum einstellen" zu wählen;
So stellen Sie Zeit/Datum ein
Drücken Sie die [CHANNEL -/+] Tasten (5), um die Stunde einzustellen;
Bestätigen Sie die Einstellung mit der [SELECT] Taste (6);
Drücken Sie die [CHANNEL -/+] Tasten (5), um die Minuten einzustellen;
Bestätigen Sie mit der [SELECT] Taste (6);
Drücken Sie die [CHANNEL -/+] Tasten (5), um das Datum einzustellen;
Bestätigen Sie die Einstellung mit der [SELECT]-Taste (6);
12/24-Stunden einstellen: Drücken Sie die [CHANNEL -/+] Tasten (5), um 12 oder
24 Stunden einzustellen;
Bestätigen Sie die Einstellung mit der [SELECT] Taste (6);
Datumsformat einstellen: Drücken Sie die [CHANNEL -/+] Tasten (5), um TT-MM-
JJJJ oder MM-TT-JJJJ einzustellen. Bestätigen Sie die Einstellung mit der [SELECT]
Taste (6);
Auto-Aktualisierung: Sie können Radio kann Datum/Uhrzeit aktualisieren wählen.
Drücken Sie die [CHANNEL -/+] Tasten (5), um zwischen Beliebig/DAB/FM oder kei-
ne Aktualisierung zu wählen;
Bestätigen Sie mit der Taste [SELECT] (6);
AUX IN BETRIEB
Wählen Sie den Modus "AUX", indem Sie die Taste [MODUS] (2) drücken;
Verwenden Sie ein 3,5-mm-Klinkenkabel (nicht mitgeliefert) von Stecker zu Stecker,
um ein externes Audiogerät an die AUX-IN-Buchse (11) anzuschließen.
Hinweis: Die Musiksteuerung (Wiedergabe, Pause usw.) muss über Ihr externes
Gerät erfolgen.
ALARMEINSTELLUNG
Wenn das Radio eingeschaltet ist:
Halten Sie [Menu] (3) gedrückt, um auf das Menü zuzugreifen;
Drücken Sie die [CHANNEL -/+] Tasten (5), um "SYSTEM-EINSTELLUNGEN", Alarm

10 Deutsch
zu wählen;
Bestätigen Sie mit der [SELECT] Taste (6);
Wählen Sie Alarm 1 oder 2 durch Drücken der [CHANNEL -/+] Tasten (5), bestätigen
Sie mit der [SELECT] Taste (6);
Sie navigieren in diesem Menü mit den [CHANNEL -/+] Tasten (5) , Bestätigen Sie
mit der [AUSWAHL]-Taste (6);
Wählen Sie Alarm EIN, , Häufigkeit des Alarms (täglich, einmal usw.), Weckzeit, Quel-
le (Summer/DAB/FM), Lautstärkeeinstellung, Dauer (15/30/45 usw.).
TECHNISCHE DATEN
Stromversorgung: AC/DC adapter 5V 1A
Leistungsaufnahme: DC 4X1.5 AA (Batterien nicht enthalten)
Radiofrequenzbereich
DAB+ / DAB: BAND III 174MHz - 239.2 MHz .
FM: 87.5 - 108 MHz.
Lautsprecher
ausgangsleistung: 1 x 1 Wrms.
Allgemeine
Anzeige 2,8-Zoll-TFT-Farbbildschirm
Kopfhörer: 3.5mm jack plug.
Aux in: 3,5-mm-Buchse
Ausführung und Spezifikationen unterliegen unangekündigten Änderungen.
Die Kennzeichnung auf dem Produkt bzw. auf der dazugehörigen Literatur gibt an, dass es nach seiner Leben-
sdauer nicht zusammen mit dem normalen HaushaltsmüIl entsorgt werden darf. Entsorgen Sie dieses Gerat bitte
getrennt von anderen Abfallen, um der Umwelt bzw. der menschl i chen Gesundhei t ni cht durch unkontrol l i erte
Mül l besei ti gung zu schaden. Recycel n Si e das Gerät, um di e nachhaltige Wiederverwertung von stofflichen
Ressourcen zu fördern. Private Nutzer sollten den Händler, bei dem das Produkt gekauft wurde, oder die zustän-
digen Behörden kontaktieren, um in Erfahrung zu bringen, wie sie das Gerät auf umweltfreundliche Weise recy-
celn können. Gewerbliche Nutzer sollten sich an Ihren Lieferanten wenden und die Bedingungen des Ver-
kaufsvertrags konsultieren. Dieses Produkt darf nicht zusammen mit anderem Gewerbemüll entsorgt werden.
KORREKTE ENTSORGUNG DIESES PRODUKTS
(Elektromüll)
SICHERHEITSHINWEISE
Das Ausrufszeichen im Dreieck weist den Benutzer auf wichtige Bedienungs- und Wartungsanweisungen
(Service) in diesem Handbuch hin, die unbedingt zu befolgen sind.
Um die Gefahr elektrischer Schläge auszuschliessen, Gehäuse auf keinen Fall abnehmen.
Im Innem befinden sich keine vom Benutzer selbst instandsetz-baren Teile. Reparaturen dürfen nur von
einer autorisierten Fachwerkstatt durchgeführt werden.
Dieses Gerät ist für 230V ~ 50Hz Netzspannung ausgelegt. Bei längerer Nichtbenutzung des Geräts zie-
hen Sie den Stecker aus der Steckdose.
Setzen Sie das Gerät weder Feuchtigkeit noch Regen aus.
Schalten Sie das System erst dann ein, wenn Sie alle Verbindungen genau geprüft haben.
Stellen Sie das Gerät so auf, dass immer eine ungestörte Frischluftzufuhr sichergestellt ist. Es ist zum bei-
spiel keinesfalls auf Teppiche und in der Nähe von Gardinen zu stellen oder in Bücherregale einzubauen.
Setzen Sie das Gerät weder direkter Sonneneinstrahlung noch Wärmequellen aus.

11 Français
L'EMPLACEMENT DES COMMANDES
1. POWER ON - OFF
2. MODE
3. INFO/MENU
4. PRESET
5. CHANNEL +/-
6. SELECT
7. VOLUME+/-
8. PRISE CASQUE
9. DC IN
10. COMPARTIMENT DES PILES
11. AUX IN
INSTRUCTIONS DE SÉCURITÉ
• INSTRUCTIONS - Toutes les instructions de sécurité et d'utilisation doivent être
lues avant de mettre la radio en marche. Il faudrait conserver le manuel pour
consultation ultérieure.
• AVERTISSEMENTS - Tous les avertissements apposés sur l'appareil et dans le
mode d'emploi doivent être respectés.
• EAU ET HUMIDITÉ - L'appareil ne doit pas être utilisé à proximité de liquides ou
dans des pièces présentant un taux d'humidité élevé.
• VENTILATION - L'appareil doit être disposé de manière à ce que son emplace-
ment ou sa position n'interfère pas avec sa ventilation adéquate.
• CHALEUR - L'appareil doit être placé à l'écart de sources de chaleur telles que
radiateurs, poêles ou autres appareils produisant de la chaleur.
• SOURCE D’ALIMENTATION - Le raccordement de la radio à l'alimentation élec-
trique ne doit se faire que selon le modèle décrit dans le mode d'emploi.
• PROTECTION DU CORDON D'ALIMENTATION - Les cordons d'alimentation
doivent être acheminés de telle sorte qu'ils ne risquent pas d'être écrasés ou pin-
cés par des objets placés dessus ou contre eux.
• PÉNÉTRATION DES OBJETS ET DES LIQUIDES - Veillez à ce que les objets
ne tombent pas et à ce que les liquides ne soient pas déversés dans l'enceinte
par le biais des orifices.
• DÉGÂTS NÉCESSITANT RÉPARATION
L'appareil ne doit être réparé que par un technicien qualifié lorsque :
- L'alimentation électrique ou le cordon est endommagé;
- Des objets sont tombés ou des liquides ont été renversés sur la radio;
- l'appareil a été exposé à la pluie;
- l'appareil est tombé ou le boîtier est endommagé;
- l'appareil ne semble pas fonctionner normalement.
• RÉPARATION - L'utilisateur ne doit pas tenter de réparer l'appareil au-delà de ce
qui est décrit dans le mode d'emploi. Toute réparation doit être confiée à un tech-
nicien qualifié.
Remarque: Si L'affichage ne fonctionne pas correctement ou aucune réaction au
fonctionnement d'une commande quelconque pourrait être due à une décharge

12 Français
électrostatique, éteindre, débrancher le cordon d'alimentation CA et retirer toutes
les piles, puis remettre l'appareil sous tension après quelques secondes.
SOURCES D'ÉNERGIE
ALIMENTATION EN CA : Vous pouvez alimenter votre chaîne stéréo portable en
branchant l'adaptateur CA/CC dans la prise CC à l'arrière de l'appareil et dans une
prise murale d'alimentation en CA.
Vérifiez que la tension nominale de votre appareil correspond à la tension locale.
ALIMENTATION PAR PILES : Pour utiliser la radio avec des piles, débranchez l'a-
daptateur CA/CC et insérez 4 piles "AA" dans le compartiment (10).
Veillez à ce que les piles soient correctement insérées pour éviter d'endommager
l'appareil.
Retirez les piles lorsque la radio ne sera pas utilisée pendant une longue période, car
cela entraînera une fuite des piles et, par la suite, l'endommagement de votre radio.
POUR UTILISER LA RADIO
Appuyez sur le bouton [POWER] (1) pour mettre en marche ;
Appuyez sur la touche [MODE] (2) pour sélectionner l'entrée DAB, FM ou Aux ;
Réglez le volume à l'aide des boutons [VOLUME+/-] (7) au niveau souhaité ;
Pour éteindre la radio, appuyez sur le bouton [POWER] (1).
Note : Pour une meilleure réception, réorientez l'antenne.
TUNE DAB STATION
DAB : Ajustez la fréquence radio à la station souhaitée en appuyant sur les touches
[CHANNEL -/+] (5) puis sur [SELECT] (6) ;
Note : Dans le cas où il n'y a pas de service DAB, appuyez et maintenez le bouton
[MENU] (3) et sélectionnez "Full Scan" pour commencer le balayage avec les bou-
tons [CHANNEL -/+] (5), confirmez avec le bouton [SELECT] (6).
BALAYAGE DES STATIONS FM
FM : Ajustez la fréquence radio à la station souhaitée en appuyant sur les touches
[CHANNEL -/+] (5). Pour le balayage automatique, appuyez sur les touches
[CHANNEL -/+] (5) pendant 2 secondes ;
PRÉRÉGLAGE DAB OU FM
Réglez la fréquence de la station de radio souhaitée comme expliqué précédem-
ment ;
Appuyez et maintenez pendant 2 secondes la touche [PRESET] (4), sélectionnez
avec les touches [CHANNEL -/+] (5) la position PRESET souhaitée et appuyez sur la
touche [PRESET] (4) pour enregistrer ;
RAPPELER UNE STATION PRÉRÉGLÉE
Appuyez sur le bouton [PRESET] (4) ;
Sélectionnez le préréglage souhaité en appuyant sur la touche [CHANNEL -/+] (5) ;
Confirmez avec la touche [SELECT] (6).

13 Français
AUX EN FONCTIONNEMENT
Sélectionnez le mode "AUX" en appuyant sur le bouton [MODE] (2) ;
Utilisez un câble jack 3,5 mm mâle à mâle (non fourni) pour connecter tout appareil
audio externe à la prise AUX-IN (11).
Note : Le contrôle de la musique (lecture, pause, etc.) doit être effectué à partir de
votre appareil externe.
INFO
Lorsque la station de radio joue, appuyez sur le bouton [INFO] (3) à plusieurs repri-
ses pour parcourir les informations diffusées par la radio comme suit :
SOUS DAB
DLS (Dynamic Label Segmenting) : Texte radio diffusé par la station DAB tel que les
nouvelles, les chansons en cours de diffusion...etc.
PTY (Programme Type) : indique le type de programme que vous écoutez, "Musique",
"Talk", "News" etc. S'il n'y a pas d'information, il affichera "Type de programme".
Canal/Fréquence : La fréquence de la DAB est affichée comme "11C 220.352MHz".
Info audio : L'écran affiche le débit binaire audio numérique de la réception actuelle.
Erreur de signal : L'intensité du signal est affichée graphiquement.
Heure/Date : L'heure et la date sont réglées automatiquement.
SOUS FM
RT (Texte radio) : Texte diffusé à partir de la station FM
Type de programme : indique le type de programme que vous écoutez.
Heure/Date : L'heure et la date sont réglées automatiquement.
Fréquence : la fréquence FM de la station de radio en cours de diffusion.
Mono / Stéréo : Commutation automatique entre la réception mono et stéréo.
Remarque : la précision de l'heure et de la date dépend des informations diffusées
par la station de radio.
PARAMÈTRES DU SYSTÈME
En mode FM / DAB, il y a un menu d'options.
Maintenez la touche [MENU] (3) enfoncée pour accéder aux options.
Appuyez sur les touches [CHANNEL -/+] (5) pour naviguer dans les options. Appuyez
sur [SELECT] (6) pour sélectionner les options.
DRC (Compression de la gamme dynamique) : Cette fonction permet de réduire
les différences entre le son le plus fort et le plus faible diffusé. Elle rend les sons fai-
bles comparativement plus forts, et les sons forts comparativement plus faibles
(uniquement s'ils sont proposés par le fournisseur).
PRUNE : supprime toutes les stations non valables indiquées dans la liste des sta-
tions avec un " ?" devant le nom de la station.
Vous pouvez choisir dans le menu SYSTEM SETTINGS :
EGG TIMER : sélectionnez avec la touche [CHANNEL -/+] (5) EGG TIMER, appuyez
sur [SELECT] (6) pour entrer, sélectionnez avec la touche [CHANNEL -/+] (5) de 1 à
99 minutes. Appuyez sur la touche POWER pour arrêter le buzzer.
SLEEP : sélectionnez avec le bouton [CHANNEL -/+] (5) SLEEP, appuyez sur

14 Français
[SELECT] (6) pour entrer, sélectionnez avec le bouton [CHANNEL -/+] (5) par pas de
15/30/45/60/90 munutes.
RETOUR : sélectionnez avec la touche [CHANNEL -/+] (5) RETOUR, appuyez sur
[SELECT] (6) pour entrer, sélectionnez avec la touche [CHANNEL -/+] (5) les infor-
mations suivantes :
TIMEOUT : vous pouvez choisir : ON/10/20 etc.
ON LEVEL : niveau d'intesité, sélectionnez comme vous le souhaitez avec le bouton
[CHANNEL -/+] (5).
DIM LEVEL : vous pouvez choisir le niveau de gradation. Sélectionnez le niveau sou-
haité à l'aide du bouton [CHANNEL -/+] (5).
LANGUE : dans REGLAGES SYSTEMES, sélectionnez la langue souhaitée à l'aide
de la touche [CHANNEL -/+] (5)
FACTORY RESET : dans SYSTEM SETTINGS, sélectionnez avec la touche
[CHANNEL -/+] (5) YES to Factory settings.
RÉGLAGE DE L'HORLOGE ET DE LA DATE
Lorsque la radio est allumée :
Appuyez sur la touche [MENU] (3) et maintenez-la enfoncée pour accéder au menu ;
Appuyez sur les touches [CHANNEL -/+] (5) pour sélectionner "Réglages du systè-
me" ;
Confirmez avec la touche [SELECT] (6) ;
Appuyez sur les touches [CHANNEL -/+] (5) pour sélectionner "Régler l'heure/la da-
te" ;
Pour régler l'heure/la date
Appuyez sur les touches [CHANNEL -/+] (5) pour régler l'heure ;
Confirmez avec la touche [SELECT] (6) ;
Appuyez sur les boutons [CHANNEL -/+] (5) pour régler les minutes ;
Confirmez avec le bouton [SELECT] (6) ;
Appuyez sur les boutons [CHANNEL -/+] (5) pour régler la date ;
Confirmez avec le bouton [SELECT] (6) ;
Régler 12/24 heures : Appuyez sur les boutons [CHANNEL -/+] (5) pour régler 12 ou
24 heures ;
Confirmez avec le bouton [SELECT] (6) ;
Régler le format de la date : Appuyez sur les boutons [CHANNEL -/+] (5) pour régler
JJ-MM-AAAA ou MM-JJ-AAAA. Confirmez avec le bouton [SELECT] (6) ;
Mise à jour automatique : vous pouvez choisir la radio peut mettre à jour la date/
l'heure.
Appuyez sur les boutons [CHANNEL -/+] (5) pour sélectionner From Any/DAB/FM ou
pas de mise à jour ;
Confirmez avec le bouton [SELECT] (6) ;
RÉGLAGE DE L'ALARME
Lorsque la radio est allumée :
Appuyez sur la touche [MENU] (3) et maintenez-la enfoncée pour accéder au menu ;
Appuyez sur les touches [CHANNEL -/+] (5) pour sélectionner "Réglages système",
Alarme ;

15 Français
Confirmez avec la touche [SELECT] (6) ;
Sélectionnez Alarme 1 ou 2 en appuyant sur les touches [CHANNEL -/+] (5) , Confir-
mez avec la touche [SELECT] (6) ;
Vous naviguez dans ce menu à l'aide des boutons [CHANNEL -/+] (5) , Confirmez
avec le bouton [SELECT] (6) ;
Sélectionnez Alarme ON, , Fréquence de l'alarme (quotidienne, une fois, etc.), Heure
de réveil, Source (Buzzer/DAB/FM), Réglage du volume, Durée (15/30/45, etc.).
CARACTERISTIQUES TECHNIQUES
Tension d’alimentation: AC/DC adaptor 5V 1A.
Tension d’entrée: DC 4x1.5 AA (piles non comprises)
Couverture de radiofréquence
DAB+ / DAB: BANDE III 174MHz - 239.2MHz .
FM: 87.5 - 108 MHz.
Haut-parleur
Puissance: 1 x 1 Wrms.
Généralités
Écran TFT couleur de 2,8 pouces
Sortie écouteurs : prise jack 3,5 mm.
Entrée auxiliaire : prise jack 3,5 mm entrée auxiliaire
Les spécifications peuvent êtres modifiées sans avis préalable.
Ce symbole sur le produit ou sa documentation indique qu'il ne doit pas être éliminé en fin de vie avec les autres dé-
chets ménagers. L' élimination incontrôlée des déchetspouvant porter préjudice a l'environnement ou a la santé humai-
ne, veuillez le séparer des autres types de déchets et le recycler defaçon responsable. Vous favoriserez ainsi la réutili-
sation durable desressources matérielles. Les particuliers sont invites a contacter le distributeur leur ayant vendu le
produit ou a se renseigner auprès de leur mairie pour savoir ou et comment ils peuvent se débarrasser de ce produit
afin qu'il soit recycle en respectant l'environnement. Les entreprises sont invitées a contacter leurs fournisseurs et
aconsulter les conditions de leur contrat de vente. Ce produit ne doit pas être éliminé avec les autres déchets commer-
ciaux.
COMMENT ÉLIMINER CE PRODUIT
(déchets d'équipements électriques et électroniques)
ATTENTION
Le symbole “point d’exclamation” à l’intérieur d’un triangle avertit l’utilisateur que d’importantes instructions d’utilisation
et de maintenance sont contenues dans le mode d’emploi.
Le symbole “éclair” à l’intérieur d’un triangle sert à avertir l’utilisateur de la présence du courant à l’intérieur du l’appa-
reil qui pourrait constituer un risque.
Afin de minimiser les risques, ne pas ouvrir le boîtier ni ôter le dos de l’appareil. En case de panne, faites appel aux
techniciens qualifiés pour les réparations. L’appareil ne renferme aucune pièce reparable par l’utilisateur.
Cet appareil a été conçu pour une tension d’alimentation de 230V ~ 50Hz. Débranchez la prise de courant quand on
prévoit de ne pas utiliser l’appareil pendant un certain temps.
Mettez l’appareil sous tension seulement après avoir vérifié que tous les raccordements soient corrects.
L’unité ne doit pas être exposée à l’humidité ou à la pluie.
L’appareil doit être gardé dans un endroit suffisamment ventilé. Ne le gardez jamais par exemple près des rideaux, sur
un tapis ou dans des meubles, tels qu’une bibliothèque.
L’unité ne doit pas être exposée à la lumière directe du soleil ou à des sources de chaleur.

16 Italiano
CONTROLLI
1. POWER ON - OFF
2. MODE
3. INFO/MENU
4. PRESET
5. CHANNEL +/-
6. SELECT
7. VOLUME+/-
8. PRESA CUFFIE
9. DC IN
10. COMPARTO BATTERIE
11. AUX IN JACK
PRECAUZIONI
• ISTRUZIONI - Tutte le istruzioni di sicurezza e funzionamento devono essere let-
te prima di usare la radio. Il manuale deve essere mantenuto per futuri utilizzi.
• AVVERTIMENTI - Tutti gli avvertimenti sul prodotto e nel manuale d’istruzioni de-
vono essere letti e rispettati.
• ACQUA E UMIDITÀ - L’apparecchio non deve essere usato vicino a liquidi o in
locali con alta percentuale di umidità.
• VENTILAZIONE - L’apparecchio deve essere situato in modo che non si interfe-
risca con la propria ventilazione.
• CALORE - L’apparecchio deve essere situato lontano da fonti di calore come ra-
diatori, stufe o altri prodotti che producono calore.
• ALIMENTAZIONE - La radio deve essere collegata ad una fonte di alimentazio-
ne con le specifiche descritte nel manuale d’istruzioni o sul prodotto.
• PROTEZIONE DEL CAVO D’ALIMENTAZIONE - Il cavo d’alimentazione deve
essere posizionato in modo da non venir danneggiato (schiacciato, tagliato, ...).
• ENTRATA DI OGGETTI E LIQUIDI - Fare attenzione a non fare entrare liquidi o
oggetti dalle fessure della radio.
• DANNI CHE RICHIEDONO ASSISTENZA
La radio deve essere controllata da personale qualificato in caso di:
- Il cavo d’alimentazione o il connettre è stato danneggiato;
- Oggetti o liquidi sono entrati all’interno della radio;
- La radio è stata esposta alla pioggia;
- L’apparecchio è caduto o l’involucro è stato danneggiato;
- La radio non funziona correttamente.
• REVISIONE - L’utente non deve cercare di riparare la radio oltre a quanto de-
scritto nel manuale. Tutte le riparazioni devono essere eseguite da personale
qualificato.
Nota: Se il display non funziona correttamente o non reagisce ai controlli, questo può
essere dovuto a scariche elettrostatiche. Spegnere la radio, disconnetterla dalla pre-
sa, rimuovere tutte le batterie e riconnettere dopo qualche secondo.

17 Italiano
FONTI DI ALIMENTAZIONE
CORRENTE ALTERNATA: Puoi alimentare la tua radio portatile connettendo il cavo
di alimentazione nel connettore DC (11) e ad una presa elettrica AC.
Verifica che il voltaggio della radio corrisponda a quello della tua rete di alimentazio-
ne. Assicurarsi che il cavo sia inserito completamente nel connettore.
FUNZIONAMENTO CON BATTERIE: Per utilizzare la radio con le batterie, discon-
nettere il cavo di alimentazione e inserire 4 x “AA” nell’apposito compartimento (10).
Assicurarsi che le batterie siano inserite con la giusta polarità per evitare di dannegg-
giare la radio. Rimuovere le batterie quando non si usa la radio per un lungo periodo,
siccome queste potrebbero avere perdite che danneggerebbero la radio.
PER USARE LA RADIO
Premere il tasto [POWER] (1) per accendere;
Premere il tasto [MODE] (2) per selezionare l'ingresso DAB, FM o Aux;
Regolare il volume con i tasti [VOLUME+/-] (7) al livello desiderato;
Per spegnere la radio, premere il pulsante [POWER] (1).
Nota: Per una migliore ricezione riorientare l'antenna.
SINTONIZZARE LA STAZIONE DAB
DAB: Regolare la frequenza radio sulla stazione desiderata premendo i tasti
[CHANNEL -/+] (5) e poi premere [SELECT] (6);
Nota: Nel caso in cui non sia presente un servizio DAB, tenere premuto il tasto
[MENU] (3) e selezionare "Scansione completa" per avviare la scansione con i tasti
[CHANNEL -/+] (5), confermare con il tasto [SELECT] (6).
SCANSIONE DELLA STAZIONE FM
FM: Regolare la frequenza radio sulla stazione desiderata premendo i tasti
[CHANNEL -/+] (5). Per la scansione automatica, tenere premuti per 2 secondi i tasti
[CHANNEL -/+] (5);
PREIMPOSTARE DAB O FM
Impostare la frequenza della stazione radio desiderata come spiegato in precedenza;
Tenere premuto per 2 secondi il tasto [PRESET] (4), selezionare con i tasti
[CHANNEL -/+] (5) la posizione di PRESET desiderata e premere il tasto [PRESET]
(4) per salvare;
RICHIAMARE UNA STAZIONE PREIMPOSTATA
Premere il tasto [PRESET] (4);
Selezionare la preimpostazione desiderata premendo il tasto [CHANNEL -/+] (5);
Confermare con il tasto [SELECT] (6).
La pagina si sta caricando...
La pagina si sta caricando...
La pagina si sta caricando...
La pagina si sta caricando...
La pagina si sta caricando...
La pagina si sta caricando...
La pagina si sta caricando...
La pagina si sta caricando...
La pagina si sta caricando...
La pagina si sta caricando...
La pagina si sta caricando...
La pagina si sta caricando...
La pagina si sta caricando...
La pagina si sta caricando...
La pagina si sta caricando...
-
 1
1
-
 2
2
-
 3
3
-
 4
4
-
 5
5
-
 6
6
-
 7
7
-
 8
8
-
 9
9
-
 10
10
-
 11
11
-
 12
12
-
 13
13
-
 14
14
-
 15
15
-
 16
16
-
 17
17
-
 18
18
-
 19
19
-
 20
20
-
 21
21
-
 22
22
-
 23
23
-
 24
24
-
 25
25
-
 26
26
-
 27
27
-
 28
28
-
 29
29
-
 30
30
-
 31
31
-
 32
32
-
 33
33
-
 34
34
-
 35
35


Roadstar HRA-590D+/SL Manuale utente
- Categoria
- Radio
- Tipo
- Manuale utente
in altre lingue
- English: Roadstar HRA-590D+/SL User manual
- français: Roadstar HRA-590D+/SL Manuel utilisateur
- español: Roadstar HRA-590D+/SL Manual de usuario
- Deutsch: Roadstar HRA-590D+/SL Benutzerhandbuch
- Nederlands: Roadstar HRA-590D+/SL Handleiding
Documenti correlati
Altri documenti
-
Auna Commuter Internet Radio Manuale utente
-
Soundmaster UR240 Manuale utente
-
MAC Audio MPS 501 Manuale utente
-
-
Schwaiger DAB 400 Operating And Safety Instructions Manual
-
-
Schwaiger DAB 650 Manuale utente
-
Soundmaster DAB150 Manuale utente