Tecnosystemi MINI DISCOVERY 3X wall-mounted backlit programmable thermostat Manuale del proprietario
- Tipo
- Manuale del proprietario

Tecnosystemi S.p.A. Società Benet
Via dell'Industria 2/4 - z.i. San Giacomo di Veglia
31029 Vittorio Veneto Treviso
Tel. 0438 - 500044 / Fax. 0438 - 501516 - NUMERO VERDE 800 904474
[email protected] - www.tecnosystemi.com
REV 04 / 2023
25/07/2023
1.CRONOTERMOSTATO A PARETE CON BATTERIE
IN RADIO FREQUENZA TOUCH “MINI DISCOVERY 3X”
1.1 USO BASE DEL TERMOSTATO PER L’UTENTE
Il MiniDiscovery 3X è un cronotermostato con funzioni “di zona” (Slave, senza possibilità
di diventare Master) alimentato a batterie per sistemi multizona Proair. Il Mini-Discovery
3X ha limitazioni di azione rispetto ad un cronotermostato Discovery3X e Stealth3X. Il
Mini-Discovery 3X permette al cliente di effettuare le seguenti impostazioni:
• ON/OFF del cronotermostato;
• Funzionamento Manuale/Cronotermostato;
• Denizione della temperatura desiderata;
• Denizione della modalità (ON/OFF o Proporzionale) di funzionamento della serranda/
bocchetta controllata.
ATTENZIONE! IL MONTAGGIO DEL CRONOTERMOSTATO DEVE ESSERE ESEGUITO
SOLO A COMPLETAMENTO DELLE OPERE MURARIE
Fig. 1
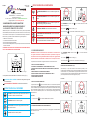
Le icone presenti sul cronotermostato sono suddivise in tre fasce ( Fig.1 ):
ICONE TOUCH DELLO SCHERMO: si riferiscono alla regolazione generale
del cronotermostato.
ICONE VISIONE DELLE INDICAZIONI: si riferiscono alle indicazioni.
ICONE TOUCH DELLO SCHERMO
Tasto INVIO . Conferma del dato, per entrare nel sotto menù e / o
per lo Sblocco / Blocco del cronotermostato.
Tasto MENO. Modica un valore in negativo.
Tasto ON / OFF. Per accensione / spegnimento del cronotermo-
stato e uscita dal menù.
Tasto PIU’. Modica un valore in positivo.
ICONE VISIONE DELLE INDICAZIONI
1.2 CONFIGURAZIONI DI BASE
Icona RADIO FREQUENZA RF. Indica che il livello del segnale radio
è alto.
Icona RADIO FREQUENZA RF. Indica che il livello del segnale radio
è medio.
Icona RADIO FREQUENZA RF. Indica che il livello del segnale radio
è basso (se lampeggia il segnale è assente).
Icona BLOCCO TASTIERA. Indica che la tastiera è bloccata.
Icona SERRANDA O BOCCHETTA CHIUSA. Indica la chiusura della
serranda / bocchetta
Icona POSIZIONE APERTURA DELLE SERRANDE O BOCCHETTE.
Indica l’ apertura delle serrande / bocchette motorizzate.
A
ATTENZIONE: Il sistema di comunicazione tra cronotermostati e centralina avviene
con segnale bidirezionale in Radiofrequenza. Qualsiasi impostazione eseguita sui
cronotermostati viene inviata e gestita dalla centralina in tempo reale. L’aggiornamento
automatico dei dati tra cronotermostati e centralina avviene in un tempo max. di 5 min.
In questa fase sono evidenziate le congurazioni base del cronotermostato di zona:
1. SBLOCCO DEL CRONOTERMOSTATO
2. ACCENSIONE / SPEGNIMENTO DEL CRONOTERMOSTATO DI ZONA
3. SELEZIONE DELLA FUNZIONE TERMOSTATO/CRONOTERMOSTATO (MANUALE/
OROLOGIO)
4. IMPOSTAZIONE DELLA TEMPERATURA DESIDERATA
5. REGOLAZIONE DELL’APERTURA DELLA SERRANDA/BOCCHETTA
6. SOSTITUZIONE DELLE BATTERIE
7. SEGNALAZIONE DEGLI ERRORI
1. SBLOCCO DEL CRONOTERMOSTATO.
La presenza del simbolo indica che la tastiera è bloccata. Il cronotermostato prevede il
blocco automatico dei tasti per evitare pressioni o modiche accidentali degli stessi, evitando il
rischio di modicare le impostazioni (esempio durante la pulizia del cronotermostato o utilizzo
del cronotermostato da parte di bambini, ecc..). Questa funzione si attiva automaticamente
trascorsi 30 secondi dall’ultima pressione di un tasto anticipato dallo spegnimento della
retroilluminazione.
Procedura:
1.1. Premere il tasto per 3 secondi disattivare il Blocco tastiera
2.1. SPEGNIMENTO: Premere il tasto per 3 secondi vericando una delle
indicazioni ON/OFF/Cro.
2.2. Con i tasti o selezionare OFF (g. 2).
2.3. Premere il tasto per confermare e visualizzare Zona 2 OFF (g. 3).
2. ACCENSIONE/SPEGNIMENTO DEL CRONOTERMOSTATO.
Supponiamo di avere un impianto a quattro zone e di voler spegnere il cronotermostato di
Zona 2 attualmente in ON.
Procedura:
2.4. ACCENSIONE (MAN): Premere il tasto per 3 secondi vericando
l’indicazione OFF.
2.5. Con i tasti o selezionare ON (g. 4).
2.6. Premere il tasto per confermare e visualizzare Zona 4 ON (g. 5).
off
OFF
Fig.2 Fig.3
3.MODALITA’ CRONOTERMOSTATO (Cro).
Il Mini-Discovery 3X può essere utilizzato come termostato (in MAN) o come
Cronotermostato. Dal Mini-Discovery 3X è possibile solamente impostare la funzione
cronotermostato, non è possibile effettuare la programmazione delle fasce orarie.
La programmazione dev’essere effettuata direttamente dalla centralina Polaris 3X
(come da procedura indicata nel manuale pagina 65 punto 4).
Procedura:
cr0
Fig.4
Fig.8
Fig.5
On
zona 4 on
Fig.6 Fig.7
Fig.9
CLI00084
ZONA 2 ON

3.1 Impostazione Cronotermostato: Con riferimento alla g. 6, premere il tasto
per 3 secondi vericando la dicitura ON (g. 7).
3.2 Con i tasti o selezionare Cro (g. 8) e premere .
In questa modalità, la serranda aprirà solamente nelle fasce orarie previste dal
programma orario e se la temperatura desiderata risulta in “chiamata” rispetto alla
temperatura ambiente. Al di fuori della fascia oraria, apparirà il simbolo di g. 9 ad
indicare la chiusura della serranda. L’eventuale modica del valore di Setpoint non avrà
alcun effetto.
4. IMPOSTAZIONE DELLA TEMPERATURA DESIDERATA.
Con termostato sbloccato e con riferimento alla g. 4, premere i tasti + o – per modicare
il Set della temperatura desiderata.
Procedura:
4.1 Confermare il dato con il tasto o attendere 3 secondi per consenso tacito.
5. REGOLAZIONE DELLA SERRANDA/BOCCHETTA.
Procedura:
aa a1
a2
5.1 Se sbloccato, premere per 3 secondi il tasto vericando una delle sigle
riportate di seguito:
AA, A1, A2, A3 come da gure 11,12,13,14
5.2 AA. (Auto) Movimento proporzionale della serranda: maggiore il ∆t° tra Set e
TA, maggiore sarà l’apertura. Al ridursi del ∆t° la serranda muoverà portandosi alla
chiusura. La simbologia “alette” sarà accompagnata dalla lettera A. Premere per
confermare e uscire.
6.SOSTITUZIONE DELLE BATTERIE.
Quando il livello delle batterie è molto basso, appare il simbolo “bat” impedendone l’utilizzo: è
necessario sostituirle con N°2 batterie 1,5V tipo AAA (LR03).
La sostituzione delle batterie o lo spegnimento del Mini-Discovery per batterie completamente
scariche, non prevede la perdita dei dati.
Procedura:
6.1 Staccare il cronotermostato dalla dima
di ssaggio a parete facendola slittare verso
l’alto.
6.2 Aprire i due portellini posteriori facendo
leva sui due denti di aggancio rivolti verso il
centro.
6.3 Estrarre le batterie scariche ed inserire
le due nuove rispettando la polarità. I simboli
sono stampati nel vano batterie.
ATTENZIONE: SOSTITUIRE SEMPRE ENTRAMBE LE BATTERIE VECCHIE CON LE
NUOVE. LE BATTERIE SONO CONSIDERATE RIFIUTI SPECIALI E COME TALI VANNO
SMALTITI. RISPETTARE LE NORME VIGENTI PRESSO I PUNTI DI RACCOLTA PRESENTI
NELLA VOSTRA ZONA.
ATTENZIONE: SI SCONSIGLIA DI UTILIZZARE PILE RICARICABILI O A LITIO, IN
QUANTO HANNO UNA DURATA MINORE. TECNOSYSTEMI CONSIGLIA L’UTILIZZO DI
PILE ALCALINE.
7. SEGNALAZIONE DEGLI ERRORI.
Il sistema prevede che in caso di Errori, il cronotermostato avvisi il cliente attraverso quattro
sigle, diverse per tipologia.
Procedura:
e0 e1
e2 e3
E0. Accompagnato al lampeggio del simbolo radio, indica la mancanza di comunicazione
RF (Radio frequenza) con la Centralina di comando del sistema. Vericare che la
centralina “Polaris 3X” sia installata nelle vicinanze (max. 50 mt in capo aperto), che
non ci siano murature consistenti che ostacolano il segnale (maggior numero di muri
sono presenti e meno segnale arriva) e che la centralina sia alimentata. L’allarme può
visualizzarsi anche nel caso in cui il Mini-Discovery si trovi in “comunicazione” con una
centralina di diverso “id” (sostituzione della centralina e mancata assegnazione nuovo
id, oppure Mini-Discovery assegnato a diverso sistema Proair).
E1. Non è assegnato il MASTER ad alcun cronotermostato del sistema. Il master
dev’essere sempre assegnato ad un cronotermostato Discovery 3X o Stealth 3X. Leggere
le istruzioni “Congurazioni avanzate” (punto 4 di pag.14). Contattare l’installatore o
eventualmente l’assistenza tecnica. (Fig.18)
E2. Attuatore (motore) serranda o bocchetta non assegnate al termostato. Ripetere
l’installazione come descritta al punto C) di pag.32 DEL MANUALE D’USO CENTRALINA
POLARIS 3X (contattare l’installatore o eventualmente l’assistenza tecnica). (Fig.19)
E3. L’errore E3 può dipendere da due fattori principali:
1. Avaria Motore: accompagnato dal lampeggio del Led Motore di colore ROSSO, è
riconducibile a mancato movimento del motore o movimento a vuoto per grippaggio
ostruzione del canale.
2. Mancata comunicazione tra centralina e motore. Accompagnato dal led
verde,simboleggia probabile avaria cablaggio, plug o utilizzo di cavi non conformi
(come da indicazione del manuale). Contattare l’installatore o eventualmente
l’assistenza tecnica. (Fig.20)
Questa soluzione (AA) è indicata maggiormente in presenza di Serrande circolari motorizzate.
5.3 A1, A2, A3. Con riferimento alle gure 12,13,14, le tre posizioni indicate si riferiscono a
movimento ON-OFF della serranda. Premere i tasti o per selezionare la posizione/
regolazione desiderata e confermare con .
Fino al raggiungimento della temperatura desiderata, la serranda resterà bloccata nella
posizione denita per poi chiudere (soluzione consigliata in presenza di bocchette motorizzate
per evitare che il lancio dell’aria sia deviato portando fastidio al cliente utilizzatore).
Alla chiusura della serranda, corrisponderà la presenza del simbolo indicato nella g.15.
Fig 10
Fig 15
Fig 16
Fig 17
Fig 19
Fig 18
Fig 20
Fig 11
Fig 13
Fig 12
Fig 14
a3
1.3 FISSAGGIO DEL CRONOTERMOSTATO MINI-DISCOVERY 3X
zona 4 on
DOWNLOAD USER MANUAL
in english language

Tecnosystemi S.p.A. Benefit Corporation
Via dell'Industria 2/4 - z.i. San Giacomo di Veglia
31029 Vittorio Veneto Treviso
Tel. 0438 - 500044 / Fax. 0438 - 501516 - FREE-PHONE NUMBER 800 904474
[email protected] - www.tecnosystemi.com
REV 04 / 2023
25/07/2023
1.WALL CHRONOTHERMOSTAT WITH BATTERIES
IN RADIO FREQUENCY TOUCH "MINI DISCOVERY 3X"
1.1 BASIC USE OF THE THERMOSTAT FOR THE USER
The MiniDiscovery 3X is a chronothermostat with "zone" functions (Slave, with no possibility
of becoming Master) powered by batteries for Proair multi-zone systems. The Mini-Discovery
3X has action limitations compared to a Discovery3X and Stealth3X programmable
thermostat. The Mini-Discovery 3X allows the customer to perform the following settings:
• ON/OFF of the chronothermostat;
• Manual/Chronothermostat operation;
• Denition of the desired temperature;
• Denition of the functioning mode (ON/OFF or Proportional) of the controlled damper/
nozzle.
ATTENTION! THE ASSEMBLY OF THE CHRONOTHERMOSTAT MUST BE PERFORMED
ONLY ON COMPLETION OF THE MASONRY WORKS
Fig. 1
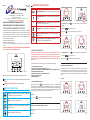
The icons on the chronothermostat are divided into three bands ( Fig.1 ):
SCREEN TOUCH ICONS: they refer to the general setting of the chronother-
mostat.
INDICATION DISPLAY ICONS: they refer to the indications.
SCREEN TOUCH ICONS
ENTER key. Conrmation of the data, to enter the sub-menu and
/ or to Unlock / Lock the chronothermostat.
MINUS key. Changes a value to negative.
ON / OFF key. For turning of the chronothermostat on / off and for
exiting of the menu.
PLUS key. Changes a value to positive.
INDICATION DISPLAY ICONS
1.2 BASIC CONFIGURATIONS
RADIO FREQUENCY RF icon. Indicates that the radio signal level is
high.
RADIO FREQUENCY RF icon. Indicates that the radio signal level is
medium.
RADIO FREQUENCY RF icon. Indicates that the radio signal level is
low (if it ashes, the signal is absent).
KEYPAD LOCK icon. Indicates that the keypad is locked.
DAMPER OR NOZZLE CLOSED icon. Indicates that the damper /
nozzle is closed
OPENING POSITION OF THE DAMPERS OR VENTS icon. Indicates
the opening of the motorised dampers / vents.
A
ATTENTION: The communication system between the chronothermostats and the
control unit takes place with a two-way radiofrequency signal. Any setting made on the
chronothermostats is sent and managed by the control unit in real time. The automatic
updating of the data between the chronothermostats and the control unit takes place in a
max. of 5 min.
In this phase the basic congurations of the zone chronothermostat are highlighted:
1. CHRONOTHERMOSTAT UNLOCK
2. TURNING THE ZONE CHRONOTHERMOSTAT ON / OFF
3. SELECTING THE THERMOSTAT/CHRONOTHERMOSTAT FUNCTION (MANUAL/CLOCK)
4. DESIRED TEMPERATURE SETTING
5. ADJUSTING THE OPENING OF THE DAMPER/NOZZLE
6. REPLACING THE BATTERIES
7. REPORTING ERRORS
1. CHRONOTHERMOSTAT UNLOCK.
The presence of the symbol indicates that the keypad is locked. The chronothermostat
provides for the automatic locking of the keys to avoid accidental pressing or modications of the
same, avoiding the risk of changing the settings (for example when cleaning the chronothermostat
or use of the chronothermostat by children, etc.). This function activates automatically 30 seconds
after the last pressing of a key, anticipated by the backlight switching off.
Procedure:
1.1. Press the key for 3 seconds to deactivate the Keypad lock
2.1. SWITCH OFF: Press the key for 3 seconds checking one of the ON/OFF/Cro
indications.
2.2. With the or keys select OFF (g. 2).
2.3. Press the key to conrm and display Zone 2 OFF (g. 3).
2. SWITCHING THE CHRONOTHERMOSTAT ON/OFF.
Suppose we have a four-zone system and we want to turn off the chronothermostat of Zone 2
currently ON.
Procedure:
2.4. IGNITION (MAN): Press the key for 3 seconds checking the OFF indication.
2.5. With the or keys select ON (g. 4).
2.6. Press the key to conrm and display Zone 4 ON (g. 5).
off
OFF
Fig.2 Fig.3
3.CHRONOTHERMOSTAT MODE (Cro).
The Mini-Discovery 3X can be used as a thermostat (in MAN) or as a chronothermostat.
From the Mini-Discovery 3X it is only possible to set the chronothermostat function but it
is not possible to program the time slots. Programming must be performed directly from
the Polaris 3X control unit (according to the procedure indicated in the manual page 65
point 4).
Procedure:
cr0
Fig.4
Fig.8
Fig.5
On
zone 4 on
Fig.6 Fig.7
Fig.9
CLI00084
ZONE 2 ON

3.1 Chronothermostat Setting: With reference to g. 6, press the key for 3 seconds
checking the wording ON (g. 7).
3.2 Use the or keys to select Cro (g. 8) and press .
In this mode, the damper will only open in the time bands set by the time program and if the
desired temperature results in "call" with respect to the room temperature. Outside the time
slot, the symbol in g. 9 will appear to indicate the closure of the damper. Any modication
of the Setpoint value will have no effect.
4. DESIRED TEMPERATURE SETTING.
With the thermostat unlocked and with reference to g. 4, press the + or – keys to modify
the Set of the desired temperature.
Procedure:
4.1 Conrm the data with the key or wait 3 seconds for tacit consent.
5. ADJUSTMENT OF THE DAMPER/NOZZLE.
Procedure:
aa a1
a2
5.1 If unlocked, press the key for 3 seconds checking one of the abbreviations shown
below:
AA, A1, A2, A3 as in gures 11,12,13,14
5.2 AA. (Auto) Proportional movement of the damper: the greater the ∆t° between Set and
TA, the greater the opening will be. As the ∆t° decreases, the damper will move and close.
The "ns" symbol will be accompanied by the letter A. Press to conrm and exit.
6 REPLACING THE BATTERIES.
When the level of the batteries is very low, the "bat" symbol appears, preventing their use: they
must be replaced with no.2 1.5V batteries type AAA (LR03).
Replacing of the batteries or shutting down Mini-Discovery due to depleted batteries does not
result in loss of data.
Procedure:
6.1 Remove the chrono-thermostat from the
template for wall mounting by sliding it upward.
6.2 Open the two rear hatches by levering the
two attaching teeth facing towards the centre.
6.3 Take out the depleted batteries and insert
the two new ones respecting the polarity. The
symbols are stamped in the battery compartment.
7. REPORTING ERRORS.
The system provides that in the event of errors, the chronothermostat warns the customer through
four messages, different by type.
Procedure:
e0 e1
e2 e3
E0. Accompanied by the ashing of the radio symbol, it indicates the absence of RF (Radio
frequency) communication with the system control unit. Check that the "Polaris 3X" control
unit is installed nearby (max. 50 meters in open area), that there are no solid walls that
hinder the signal (the greater number of walls there are, the less signal arrives) and that
the control unit is powered. The alarm can also be displayed if the Mini-Discovery is in
"communication" with a control unit with a different "id" (replacement of the control unit and
failure to assign a new id, or Mini-Discovery assigned to a different Proair system).
E1. The MASTER is not assigned to any chronothermostat in the system. The master must
always be assigned to a Discovery 3X or Stealth 3X chronothermostat. Read the "Advanced
congurations" instructions (point 4 on page 14). Contact the installer or possibly technical
assistance. (Fig.18)
E2. Actuator (motor) damper or nozzle not assigned to the thermostat. Repeat the installation
as described in point C) on page 32 OF THE POLARIS 3X control unit USER MANUAL
(contact the installer or technical assistance if necessary). (Fig.19)
E3. The E3 error can depend on two main factors:
1. Motor Failure: accompanied by the RED ashing of the Motor LED, it is attributable to
a lack of movement of the motor or idling movement due to seizure and obstruction of
the channel.
2. No communication between control unit and motor. Accompanied by the green LED,
it symbolises probable failure of the wiring, plug or use of non-compliant cables (as
indicated in the manual). Contact the installer or possibly technical assistance. (Fig.20)
This solution (AA) is more suitable in the presence of motorised circular dampers.
5.3 A1, A2, A3. With reference to gures 12,13,14, the three positions indicated refer to the
ON-OFF movement of the damper. Press the or keys to select the desired position/
adjustment and conrm with .
Until the desired temperature is reached, the damper will remain blocked in the dened position
and then close (recommended solution in the presence of motorised vents to prevent the air jet
from being deected, causing annoyance to the user customer).
When the damper is closed, the presence of the symbol indicated in g.15 will correspond.
Fig 10
Fig 15
Fig 16
Fig 17
Fig 19
Fig 18
Fig 20
Fig 11
Fig 13
Fig 12
Fig 14
a3
1.3 FASTENING THE MINI-DISCOVERY 3X CHRONOTHERMOSTAT
zone 4 on
ATTENTION: ALWAYS REPLACE BOTH OLD BATTERIES WITH NEW ONES. BATTERIES
ARE CONSIDERED SPECIAL WASTE AND MUST BE DISPOSED OF AS SUCH. COMPLY
WITH THE RULES IN FORCE AT THE COLLECTION POINTS PRESENT IN YOUR AREA.
ATTENTION: IT IS NOT ADVISABLE TO USE RECHARGEABLE OR LITHIUM BATTERIES AS
THEY HAVE SHORTER LIFESPAN. TECNOSYSTEMI RECOMMENDS THE USE OF ALKALINE
BATTERIES.
-
 1
1
-
 2
2
-
 3
3
-
 4
4


Tecnosystemi MINI DISCOVERY 3X wall-mounted backlit programmable thermostat Manuale del proprietario
- Tipo
- Manuale del proprietario
in altre lingue
Documenti correlati
-
Tecnosystemi DISCOVERY 3X wall-mounted backlit programmable thermostat Manuale del proprietario
-
-
-
-
-